Boats For Sale:


Another BFN Rebuild |
Post Reply 
|
Page <1 2627282930 31> |
| Author | ||
TRBenj 
Grand Poobah 

Joined: June-29-2005 Location: NWCT Status: Offline Points: 21134 |
 Post Options Post Options
") Thanks(0) Thanks(0)
 Quote Reply Quote Reply
 Posted: January-15-2010 at 12:28am Posted: January-15-2010 at 12:28am |
|
Andy, actually its 3M glass bubbles: US Composites Fillers So youre a proponent of the milled fiber vs. cabosil, huh? I wish it wasnt 4 times the price! Of course, thats by volume- maybe it goes farther? The note on the site says, "1 quart of resin will need about 1 quart of Aerosil to make a mayonnaise like viscosity." Does that ratio seem about right for the milled fiber? Or maybe it goes further? |
||
 |
||
|
Waterdog
Grand Poobah

Joined: April-27-2006 Location: United States Status: Offline Points: 2020 |
Post Options
Thanks(0)
Quote Reply
Posted: January-14-2010 at 11:04pm |
|
|
Tim,
I think when you say glass bubbles you mean glass beads. We use glass beads to help control bond line thickness (controls squeeze out) of the bedding material. With large eregularities it the fit(hull mostly)mill fiber / chopped strand will give you the most strenght. Mill fiber will work well to fair-in the bedded stringers too. I do tensile tests on lap shear panels for bonded flight credical aircraft components and milfiber is much stronger than cabosil with a fillet on the end of the bond line it is also stronger, so the fillet does and some strenght. |
||
|
||
|
8122pbrainard
Grand Poobah

Joined: September-14-2006 Location: Three Lakes Wi. Status: Offline Points: 41040 |
Post Options
Thanks(0)
Quote Reply
Posted: January-14-2010 at 10:17pm |
|
|
Tim,
The rule of thumb is the stronger the filler is the harder it is to sand. I wouldn't worry too much about sanding the bilge glass much. Of course I do have a feeling Greg did!! |
||
|
||
|
TRBenj
Grand Poobah
Joined: June-29-2005 Location: NWCT Status: Offline Points: 21134 |
Post Options
Thanks(0)
Quote Reply
Posted: January-14-2010 at 8:49pm |
|
Got it, makes sense. So Ill load up on the cabosil and use it for bedding and all the fillets. That should cover most of it. The only other thing I can think of needing is something that is easy to sand for final fairing of the bilge and floor. Sound right? Maybe grab both glass bubbles (minor filling) and microballoons (large gaps)? Mike, I figured Id let YOU pioneer the 1GSN... Greg paved the way on the BFN so I have a lot of reference info! Ha! This is my first experience doing a rebuild to this degree- so Im sure Ill translate what I learn to the next few in line. The Skier gets done in the spring and the '67 next year. Im sure Ill have a good handle on some of the finer points by then- composite vs. wood, foam vs. no foam, cradle retrofitting, etc. |
||
|
||
|
WakeSlayer
Grand Poobah

Joined: March-15-2006 Location: United States Status: Offline Points: 2138 |
Post Options
Thanks(0)
Quote Reply
Posted: January-14-2010 at 8:48pm |
|
|
I sure wish you were working on your 67SN at the moment.
|
||
|
Mike N
1968 Mustang |
||
|
||
|
8122pbrainard
Grand Poobah
Joined: September-14-2006 Location: Three Lakes Wi. Status: Offline Points: 41040 |
Post Options
Thanks(0)
Quote Reply
Posted: January-14-2010 at 8:39pm |
|
Tim, I go with a strong filler such as the Cabosil. You really want to connect the hull/stringer load together. Yes the glass does but you sure don't want something weak under it. |
||
|
||
|
TRBenj
Grand Poobah
Joined: June-29-2005 Location: NWCT Status: Offline Points: 21134 |
Post Options
Thanks(0)
Quote Reply
Posted: January-14-2010 at 8:09pm |
|
|
I forgot to add that Im going to coat the entire hull with epoxy resin, and add some layers of glass in a few places... Notably the keel and in the area where the original starboard main stringer was. We took out a little too much glass when we removed it!
So maybe we'll use epoxy mat and either mill fiber or cabisil for the bedding. Looks like cabosil is much cheaper! Ill grab some glass bubbles... sanding would imply a finished surface- I assume you used it either in the bilge or on the floor (or both)? Fillets... is it important to have a strong material for this, or not? (I assume not, but please confirm.) I guess that would determine what I use. Any thoughts on the proposed layup schedule? |
||
|
||
|
BuffaloBFN
Grand Poobah

Joined: June-24-2007 Location: Gainesville,GA Status: Offline Points: 6094 |
Post Options
Thanks(0)
Quote Reply
Posted: January-14-2010 at 7:39pm |
|
|
Yep, I went through a 10 gal kit and half of a 2 gal kit.
I did use a strip of mat ~1/8" wider than the stringers with a 'medium' amout of filler/thickener. I also spent a lot of time making the stringer fit the hull. It's all in the prep! As for fillers, I used most of them. Mil fiber is strong as is cabosil. The mil fiber has the most strength potential. Micro ballons are for areas you know will need sanding and a little talc helps peanut butter to spread more evenly. |
||
|
||
|
TRBenj
Grand Poobah
Joined: June-29-2005 Location: NWCT Status: Offline Points: 21134 |
Post Options
Thanks(0)
Quote Reply
Posted: January-14-2010 at 7:07pm |
|
|
Greg, I dont- no time. If I could find a deal like that, I might grab one- that is, if I had a place to put it!
Many thanks again to Joe for letting me pick his brain on his entire approach- from material selection to methods and layup schedules. Many of the ideas below are stolen directly from him- others are a slight deviation. I just laid out all the cross sections, and I was very close to being able to get away with only 4 sheets of Coosa. For those curious, Im using 3/4" Bluewater 26 for the floor in front of the engine box, 1/2" Bluewater 26 for all the stringers, bulkheads and ribs, and 1/2" Bluewater 20 for the rear and front floor areas. Im close enough to needing a 5th sheet that it probably makes sense to order it in case my dimensions are slightly off or we make a cutting mistake (I'll get another sheet of 1/2" 26 since thats what's used the most). Still, with the pricing I'm seeing, we'll be looking at right around $1.5k for the Coosa... right about what I ballparked. Next up, fiberglass supplies. Greg, you used more than 10 gallons of resin, right? I wont have as many layers of glass on the floor as you did, but I've got a whole bunch of ribs... my guess is we'll end up pretty close to the same. The trick will be getting the right thickness(es)... the stringer lamination will be done in the basement (80+ deg), while the boat is in the garage (insulated but not heated- figure 50 or so while working). I believe Ill want US Composites 635 resin and 3:1 (medium) hardener for the basement, and 4:1 (fast) hardener for the garage. Sound right? I wonder if they'll let me mix and match on a 10 gallon kit... Concerning the glass, here are some initial thoughts. Please let me know what you think! Before installation: - Main stringers (3 layers of ½”) will be laminated together with mat - Front bulkheads will get a layer of cloth on both sides (to prevent buckling) - Floor panels will get 2 layers of cloth on the underside (for screw retention) Stringer Installation: - Mains will go in first, followed by secondaries, bulkheads and ribs. - All structure will be bedded with a combination of epoxy mat and some sort of filler (to take up the gaps) - Main stringer layup: 2 layers of 2" cloth, 1 layer of 4" mat, 2 layers of 8" cloth, 1 layer of 12" biaxial. Top will be wrapped with the biax. - Secondaries: : 1 layer of 2" cloth, 1 layer of 4" mat, 1 layers of 8" cloth, 1 layer of 12" biaxial. Not wrapped. - Ribs: Same as the secondary stringer- though Im considering not adding the biax (to be replaced by an extra layer of cloth?). Front bulkheads: Same schedule as the main stringers (but not wrapped). Floor Installation: - Each panel will be bedded with epoxy mat or thickened epoxy. Undecided on the filler. Also undecided on whether or not to use screws as well. - Taped to the wall with 2" cloth, 4" mat and 8" cloth. - Taped to the secondaries with 2” cloth, 4” mat, 8” cloth... not sure if Ill use the mat or replace with another layer of cloth. - The top of the floor will get 2 layers of cloth and one of mat, except up front where its foamed- which will get an extra layer of mat for thickness. Any input on this approach would be appreciated! Fillers... I need some help here as well. I will need fillers for bedding the entire structure (stringers, ribs/bulkheads, and floor), as well as creating fillets before laying glass. Maybe some final fairing as well. I believe I used Phenolic Microballoons and Talc on the Tique. Would it be recommended to use Aerosil-Cabosil, Glass Bubbles, Milled Fiber, or Chopped Strand for any of these? Which one for which purpose? Would a thin layer of epoxy mat be better than fillers for bedding the stringers and gluing down the floor? |
||
|
||
|
BuffaloBFN
Grand Poobah
Joined: June-24-2007 Location: Gainesville,GA Status: Offline Points: 6094 |
Post Options
Thanks(0)
Quote Reply
Posted: January-14-2010 at 2:37pm |
|
|
Tim, do you ever go pawn shop hopping? I have a 70's era 12" craftsman bandsaw that I found that way. $55 after haggling and it only needed a tune up.
|
||
|
||
|
8122pbrainard
Grand Poobah
Joined: September-14-2006 Location: Three Lakes Wi. Status: Offline Points: 41040 |
Post Options
Thanks(0)
Quote Reply
Posted: January-14-2010 at 2:11pm |
|
Well, you could always get one of the new flexible radius cutting saw blades for the table saw! 
|
||
|
||
|
lfskizzer
Senior Member 

Joined: July-26-2007 Location: Wilton, CT Status: Offline Points: 290 |
Post Options
Thanks(0)
Quote Reply
Posted: January-14-2010 at 2:09pm |
|
|
Yeah Brad told me you bought a place on Tyler Lake if I am correct, so the boats can all be in the water now lol. Drive over to your parents place if you want to take a different boat out lol.....
|
||
|
||
|
WakeSlayer
Grand Poobah
Joined: March-15-2006 Location: United States Status: Offline Points: 2138 |
Post Options
Thanks(0)
Quote Reply
Posted: January-14-2010 at 1:25pm |
|
|
Ha. Good one.
|
||
|
Mike N
1968 Mustang |
||
|
||
|
TRBenj
Grand Poobah
Joined: June-29-2005 Location: NWCT Status: Offline Points: 21134 |
Post Options
Thanks(0)
Quote Reply
Posted: January-14-2010 at 1:16pm |
|
|
Alan- good question. Theyre not quite accurate enough to cut to. There are too many variations in the hull to be 100% accurate- without taking a painstaking number of detailed measurements, anyways. The drawing is ballparked to get a hold on my materials list. I'll probably fab a few test pieces out of wood and use them as a guide when I start cutting the coosa. Luckily the hull shape and floor height is essentially the same from front to back. No plotter here, unfortunately- largest I have access to is 11x17. Ill be transfering by hand for the most part.
Luckily Dad has invested some money in saws over the past few years- he's got a new Dewalt jigsaw very similar (if not the same) as the one pictured. 
Mike, I hear you- but how much faster will the bandsaw make the boat? |
||
|
||
|
81nautique
Grand Poobah

Joined: September-03-2005 Location: Big Rock, Il Status: Offline Points: 5774 |
Post Options
Thanks(0)
Quote Reply
Posted: January-14-2010 at 1:11pm |
|
|
"We don't need no stinkin bad saw" That would be too easy. Only stationary tool I have is my table saw.
If you don't have a good jigsaw I can recommend this one, I bought myself this one for xmas and it is an amazing tool. |
||
|
You can’t change the wind but you can adjust your sails
|
||
|
||
|
WakeSlayer
Grand Poobah
Joined: March-15-2006 Location: United States Status: Offline Points: 2138 |
Post Options
Thanks(0)
Quote Reply
Posted: January-14-2010 at 1:11pm |
|
Hmmm. Not sure I am buying that reasoning, Tim. A bandsaw only costs half a Hitek. |
||
|
Mike N
1968 Mustang |
||
|
||
|
81nautique
Grand Poobah
Joined: September-03-2005 Location: Big Rock, Il Status: Offline Points: 5774 |
Post Options
Thanks(0)
Quote Reply
Posted: January-14-2010 at 1:06pm |
|
|
Tim,
Are your drawings accurate enough to actually cut from or are they for a Bill of materials? How do you plan to transfer the dimensions to your stock? Do you have access to a plotter so you could make full size patterns or do you have to transfer everything by hand. |
||
|
You can’t change the wind but you can adjust your sails
|
||
|
||
|
TRBenj
Grand Poobah
Joined: June-29-2005 Location: NWCT Status: Offline Points: 21134 |
Post Options
Thanks(0)
Quote Reply
Posted: January-14-2010 at 1:03pm |
|
|
Pete, as much as I would love one, I think a bandsaw is probably beyond our budget for this project. Ill invest in one eventually! Until then, Ill just keep hacking these things together.

|
||
|
||
|
8122pbrainard
Grand Poobah
Joined: September-14-2006 Location: Three Lakes Wi. Status: Offline Points: 41040 |
Post Options
Thanks(0)
Quote Reply
Posted: January-14-2010 at 12:58pm |
|

|
||
|
||
|
TRBenj
Grand Poobah
Joined: June-29-2005 Location: NWCT Status: Offline Points: 21134 |
Post Options
Thanks(0)
Quote Reply
Posted: January-14-2010 at 12:46pm |
|
|
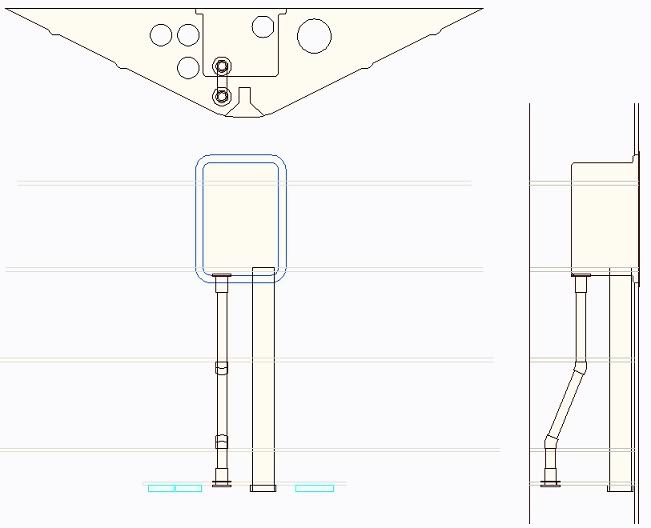
Keegan, in the front bulkheads, the 3 holes on the left are for the vent tubes. They exit the floor all the way at the front and attach to the scoop in the deck with 3" dryer tubes. The small hole in the middle is the battery box drain. The 3" hole in the middle is the tube for the battery cables. The larger hole on the right is the conduit for the steering cable, control cables, wiring harness, etc. The holes in the starboard rear ribs are for the blower line. All will be PVC.
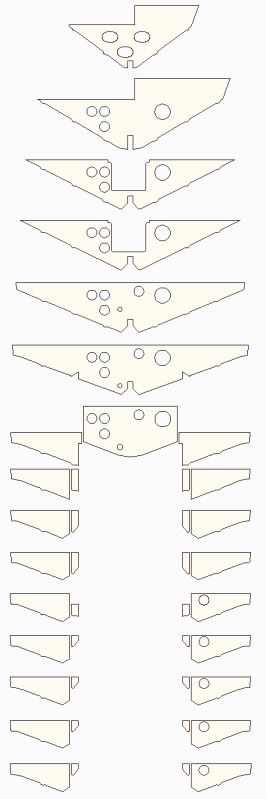
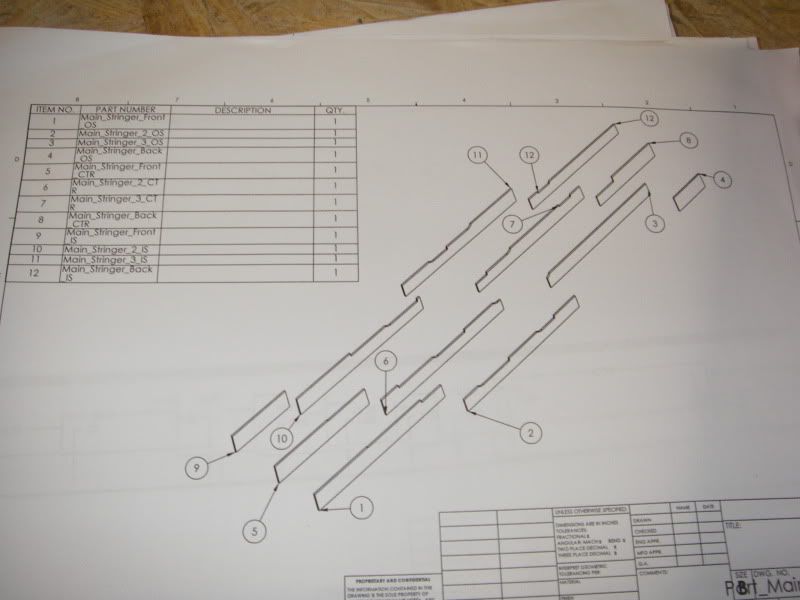
Joe, you did all your cutting with a jigsaw? Geez, that sounds like a lot of work. I was thinking either a tablesaw or circular saw for the long straight runs. A jigsaw on the smaller, more intricate pieces definitely makes sense. Maybe diamond blades for whatever we use is a good idea. Greg, concrete- why didnt I think of that! Phil, probably no real work will be done on the boat this weekend- at least physical work. I need to put together a material list and get coosa and fiberglass on order. Not much going on until I have those in hand. If I have some time, I may do some investigating with the engine- but thats fairly low on the list of priorities for the short term. I just bought a cottage, so Ive got some other projects that need attention! Steve, Ill try to get my act together... sorry! 
|
||
|
||
|
8122pbrainard
Grand Poobah
Joined: September-14-2006 Location: Three Lakes Wi. Status: Offline Points: 41040 |
Post Options
Thanks(0)
Quote Reply
Posted: January-14-2010 at 11:02am |
|
|
Keegan,
Instead of trying to explain Tim's drawings, I feel looking at some pictures would give you a better idea. Start at about page 18 of Gregs weeding the pumpkin patch thread. You'll get a good idea of where the parts fit plus the reason fo the different shapes. EDIT: Start on page 17 as it has some good pictures before Greg started putting in some of the floorboards. Here's a better link directly to the page |
||
|
||
|
SNobsessed
Grand Poobah
Joined: October-21-2007 Location: IA Status: Offline Points: 7102 |
Post Options
Thanks(0)
Quote Reply
Posted: January-14-2010 at 10:19am |
|
|
Tim - It looks like you have all your bases covered.
I have a 3/4 hole cut into the bottom of my battery box & I have used it to pull water out too. There is about 1/2 inch of space between the battery box & the hull - I got about 6 ounces of water out of that area during winterizing. |
||
|
“Beer is proof that God loves us and wants us to be happy.”
Ben Franklin |
||
|
||
|
Morfoot
Grand Poobah

Joined: February-06-2004 Location: South Lanier Status: Offline Points: 5312 |
Post Options
Thanks(0)
Quote Reply
Posted: January-14-2010 at 9:50am |
|
|
Guy's, have you tried a Diamond cut jigsaw blade. I use one all the time here at work to cut layered fiberglass that is a 1/4" thick or more with no problem. We also use it to cut A/C flooring in the cabin that is aluminum honeycomb core sandwiched between fiberglass. It's about 3/8" thick and the blade goes through that too.
|
||
|
"Morfoot; He can ski. He can wakeboard.He can cook chicken.He can create his own self-named beverage, & can also apparently fly. A man of many talents."72 Mustang "Kermit",88 SN Miss Scarlett, 99 SN "Sherman"
|
||
|
||
|
BuffaloBFN
Grand Poobah
Joined: June-24-2007 Location: Gainesville,GA Status: Offline Points: 6094 |
Post Options
Thanks(0)
Quote Reply
Posted: January-14-2010 at 8:50am |
|
|
There won't be any room for water under the floor with that layout! You could build a form around the bilge and pour in concrete; seems quicker.
|
||
|
||
|
lfskizzer
Senior Member
Joined: July-26-2007 Location: Wilton, CT Status: Offline Points: 290 |
Post Options
Thanks(0)
Quote Reply
Posted: January-14-2010 at 2:06am |
|
|
when we cut out our pieces for the stringers we used a table saw to rip the boards, sistered them up 1/2" 3/4" and 1/2" switching back and forth 5' 1" and 8' either or to get 13'1" for the Mains, then we traced them with the original stringers and jig sawed them. Then we used a planner to put the angles to somewhat match up to the hull.
critter a grinder would create alot of dust. with the table saw we attached a vacuum to the shoot out so the dust was to a minimal. Hey Tim you guys working on the boat this weekend? I might be bored saturday lol as im not going to VT this weekend. |
||
|
||
|
critter
Platinum Member 

Joined: January-11-2008 Location: New Hill, NC Status: Offline Points: 1227 |
Post Options
Thanks(0)
Quote Reply
Posted: January-14-2010 at 1:38am |
|
|
Joe, what about a 4 1/2" grinder with a cutoff wheel in it ? Would that cut about as good as a jigsaw ? It should be faster and then use a jigsaw on the inside corners.
|
||
|
1980 Ski Nautique
1966 Barracuda |
||
|
||
|
JoeinNY
Grand Poobah

Joined: October-19-2005 Location: United States Status: Offline Points: 5696 |
Post Options
Thanks(0)
Quote Reply
Posted: January-14-2010 at 1:28am |
|
At prices around 250 for a 4x8 sheet, you don't want to just start cutting that coosa without a plan... 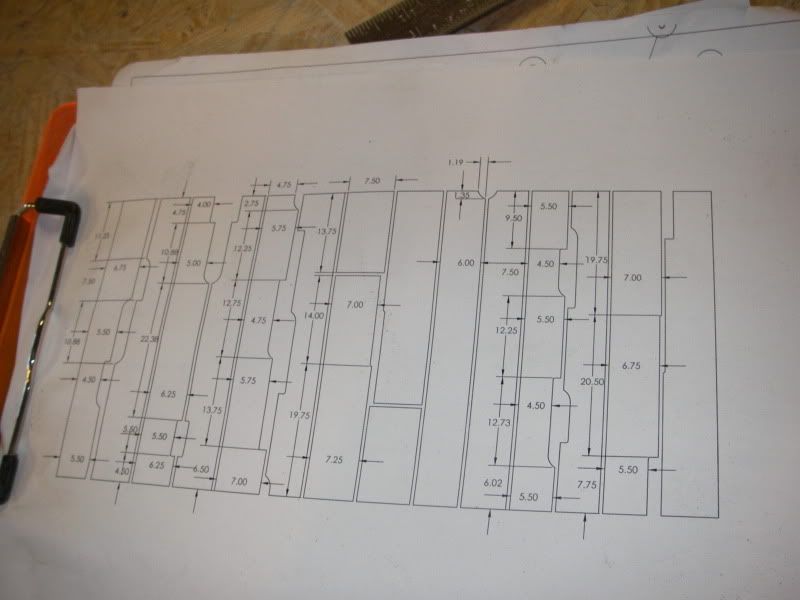
Coosa first claimed they would CNC cut the pieces for me... then backed out.. too bad it would have saved a lot of cutting. Tim I ended up using a Jigsaw for most of the cutting to keep the dust at a minimum. I started off thinking a Zip saw would be the ticket but it was more trouble that it was worth even after acquiring various guides it was not easy to ever get a straight line, and it generated more dust. I went through a good sized pack of assorted dewalt jig saw blades, the coosa was surprisingly hard on them. |
||
|
||
|
RainDog
Platinum Member

Joined: February-21-2007 Location: Mke/Grn Lake WI Status: Offline Points: 1387 |
Post Options
Thanks(0)
Quote Reply
Posted: January-14-2010 at 12:11am |
|
|
Tim, You should really consider planning out your projects instead of hacking into it with out thinking it through...
|
||
|
||
|
Keeganino
Grand Poobah

Joined: October-27-2009 Location: North Carolina Status: Offline Points: 2063 |
Post Options
Thanks(0)
Quote Reply
Posted: January-13-2010 at 11:34pm |
|
These diagrams are great, but since I am new to this could you please explain the holes in the bulkheads? Why it goes from three big ones to down to the end where there are 4 on the left and 2 on the right... I know this is probably common knowledge to all yall salty dawgs but it would help me understand the flow and layout. Thanks Keegan |
||
|
||
|
TRBenj
Grand Poobah
Joined: June-29-2005 Location: NWCT Status: Offline Points: 21134 |
Post Options
Thanks(0)
Quote Reply
Posted: January-13-2010 at 11:08pm |
|
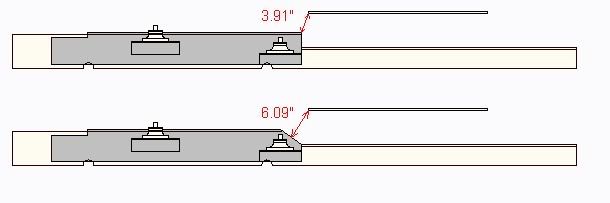
David, thanks for the thought. The idea is to give the water a way out, without giving it an obvious way in. This is why Im keeping everything seperate from the bilge, for the most part. The manual drain points would be here: 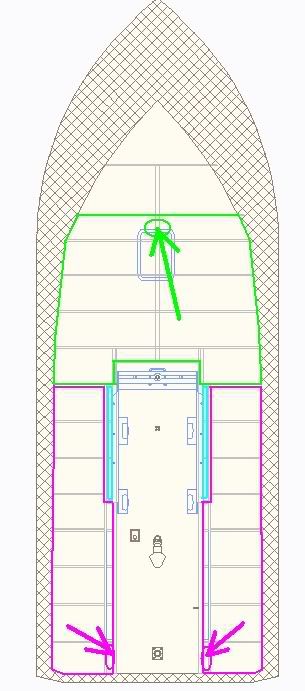
The 2 rear side cavities (purple) drain to the back (but not to the bilge). The front cavity (green) will be collected at the low point in front of the battery box. The light blue areas will drain to the bilge. The front 2 cavities will be foamed (to hold the pipes in place and give me a little time before the boat goes to the bottom of the lake) and will be sealed off. I suppose I could put drain plugs in the bottom or transom in those 3 locations, but I dont think its necessary. Not much water should collect below the floor, so draining these cavities shouldnt be a regular occurance... more like a fail safe. Im thinking once or twice a year. For those times, a hand pump should work just fine. Im not too crazy about having to drill extra holes in the boat either! |
||
|
||
|
Post Reply
|
Page <1 2627282930 31> |
 Tweet
Tweet
|
| Forum Jump | Forum Permissions You cannot post new topics in this forum You cannot reply to topics in this forum You cannot delete your posts in this forum You cannot edit your posts in this forum You cannot create polls in this forum You cannot vote in polls in this forum |


 Topic Options
 Waterdog wrote: