 Boats For Sale:


Added New Dash Ground to 93 with Pics |
Post Reply 
|
Page <1234> |
| Author | |
TimF 
Newbie 
Joined: August-31-2015 Location: E. Lansing, MI Status: Offline Points: 6 |
 Post Options Post Options
") Thanks(0) Thanks(0)
 Quote Reply Quote Reply
 Posted: August-31-2015 at 5:31pm Posted: August-31-2015 at 5:31pm |
|
Sound good. I will try to tackle both sides.
|
|
 |
|
|
TimF
Newbie
Joined: August-31-2015 Location: E. Lansing, MI Status: Offline Points: 6 |
Post Options
Thanks(0)
Quote Reply
Posted: August-31-2015 at 9:00pm |
|
Ah, now I see. This looks easier and better. Of course couldn't make the third trip today to West Marine today because they CLOSED at 6pm. Hopefully I can get this finished before the last trip of the season.
|
|
|
|
|
Bri892001
Grand Poobah 

Joined: September-27-2008 Location: Boston MA Status: Offline Points: 4947 |
Post Options
Thanks(0)
Quote Reply
Posted: August-31-2015 at 11:08pm |
|
Keep in mind, all of my photo posts were separate stages, actually 3, well 4. When I first added my new ground, I just sort of crimped all the grounds together, using piggyback connectors. Then, later replaced that with the ground bus. The bus would have actually been less work to do from the start, I just didn't think of it (or think to think of it before). So, I added that after. I got the bus idea from someone else on CCF.
The third stage was doing a positive feed to the input side of the dash breaker. And, the forth stage was adding a positive bus to connect the output side of the dash breaker, to the input side of all the other switches. Now, the nice thing about starting off with a ground bus, is it's easier logically. You can safely tie all of the grounds together, and not worry that you're messing something up. You just want to make sure everything is in fact a ground. The only gotcha, is the little LED indicator lights have black wires going to both sides, so leave those out of your ground bus. On the positive side, you just have to be aware of the switching logic. You can't just tie all of your positives together like you do with the ground, because you'll have stuff on all of the time. All of the switching is done on the positive side. |
|
|
|
|
TimF
Newbie
Joined: August-31-2015 Location: E. Lansing, MI Status: Offline Points: 6 |
Post Options
Thanks(0)
Quote Reply
Posted: September-01-2015 at 1:24am |
|
OK here's another question. The positive wire going to the ignition switch looks to the same size wire as my new 10 AWG negative wire. Should I run an 8 AWG wire?
|
|
|
|
|
spiralhelix
Senior Member 
Joined: August-06-2014 Location: IL/WI Status: Offline Points: 496 |
Post Options
Thanks(0)
Quote Reply
Posted: September-01-2015 at 2:02am |
|
I thought the reference section had wiring diagram for 93, but I can't see one. In the late 80's, all dash wires were 16, but the main power was 10. It doesn't hurt to have the additional copper going with 8. I stuck with 10 myself, but I don't have anything fancy like perfect pass either.
|
|
|
|
|
desertskier
Platinum Member 

Joined: December-19-2006 Location: Az Status: Offline Points: 1114 |
Post Options
Thanks(0)
Quote Reply
Posted: September-01-2015 at 11:57am |
|
I assume you are leaving the original wiring in place so the wires you add will be in parallel to the existing wires. 10 will work fine.
|
|
|
|
|
8122pbrainard
Grand Poobah

Joined: September-14-2006 Location: Three Lakes Wi. Status: Offline Points: 41040 |
Post Options
Thanks(0)
Quote Reply
Posted: September-01-2015 at 10:19pm |
Remember that all the loads are not switched with the ignition switch. I'd run the 8 to the + buss and then the 10 to the switch. Don't forget the tin plated marine grade wire and the adhesive lined heat shrink "sta-kon" terminals. Going one step farther even though they are expensive are the solder lined head shrink terminals. You use a heat gun, the solder makes the connection to the terminal and the heat shrink seals it. |
|
|
|
|
Bri892001
Grand Poobah
Joined: September-27-2008 Location: Boston MA Status: Offline Points: 4947 |
Post Options
Thanks(0)
Quote Reply
Posted: September-01-2015 at 10:48pm |
|
Hey Pete, are the "sat-kon" terminals a name brand? That's definitely something I'll look for in the future.
On the 93s, basically everything is switched with the dash push button breaker. It's kind of like a crude battery cutoff switch in a way. So, even the blower and auto-bildge pump is supplied by that breaker. The positive feed goes into the breaker, then the output side of the breaker supplies: the bilge pump, blower, light switches, horn etc, and the input side of the key. Then, the output side of the key supplies the ignition, the gauges, and any ignition switched extras you have (in my case the perfect pass and depth gauge). |
|
|
|
|
8122pbrainard
Grand Poobah
Joined: September-14-2006 Location: Three Lakes Wi. Status: Offline Points: 41040 |
Post Options
Thanks(0)
Quote Reply
Posted: September-01-2015 at 11:16pm |
|
Brian,
The term "sta-kon" has become more of a slang term. I believe the first manufacturer (can't remember who) called their terminal product line something like sta-kon's. The ones with the adhesive lined heat shrink as well as the solder type I source from McMaster. However, I was at Napa the other day and noticed they have the solder type too. |
|
|
|
|
8122pbrainard
Grand Poobah
Joined: September-14-2006 Location: Three Lakes Wi. Status: Offline Points: 41040 |
Post Options
Thanks(0)
Quote Reply
Posted: September-01-2015 at 11:38pm |
|
Sta-kon is T&B's (Thomas & Betts) trade name. I did a search!
|
|
|
|
|
Bri892001
Grand Poobah
Joined: September-27-2008 Location: Boston MA Status: Offline Points: 4947 |
Post Options
Thanks(0)
Quote Reply
Posted: September-02-2015 at 1:58am |
|
Thanks Pete
 I think a few, but not all of mine were heat shrink adhesive lined, made by Anchor. I really just bought them because of the size of the ring as I wasn't really aware of the difference. The rest were just the generic Anchor brand sourced from West Marine. I think a few, but not all of mine were heat shrink adhesive lined, made by Anchor. I really just bought them because of the size of the ring as I wasn't really aware of the difference. The rest were just the generic Anchor brand sourced from West Marine. At least it was a big improvement over stock. It's surprising the stock setup lasted as long as it did actually. A lot of instance of wires just twisted together and crimped into the same terminal end. |
|
|
|
|
Trader144
Groupie 
Joined: September-24-2015 Location: North Carolina Status: Offline Points: 55 |
Post Options
Thanks(0)
Quote Reply
Posted: June-17-2016 at 4:50pm |
|
Hi everyone
I am trying to do this on a 1988 Nautique 2001 without perfect pass. Can anyone help me find the dash ground so I can connect the new ground wire from the engine block to the dash ground? I have a bus bank that appears to connect to the breaker l.ights David |
|
|
|
|
Bri892001
Grand Poobah
Joined: September-27-2008 Location: Boston MA Status: Offline Points: 4947 |
Post Options
Thanks(0)
Quote Reply
Posted: June-17-2016 at 4:54pm |
|
Can you post a pic of what you're looking at?
|
|
|
|
|
Trader144
Groupie
Joined: September-24-2015 Location: North Carolina Status: Offline Points: 55 |
Post Options
Thanks(0)
Quote Reply
Posted: June-18-2016 at 10:10am |
|
Thank you, I have already put the boat back; I will try to get some.
Basically it is a black plastic bus that has black wires running into it. The wires are black, and all of my breaker wires are red on both sides. David |
|
|
|
|
Bri892001
Grand Poobah
Joined: September-27-2008 Location: Boston MA Status: Offline Points: 4947 |
Post Options
Thanks(0)
Quote Reply
Posted: June-18-2016 at 10:43am |
|
It sounds like you already have a bus bar from the factory, so you'd add your new ground directly to that, and clean up as many connections as you can reach.
Consider replacing some individual ground wires, and maybe adding a new one to the middle of the daisy chain of grounds connecting all the instruments. Luckily, the wiring diagram for the 88 is available in the reference section under misc files, here: http://www.correctcraftfan.com/downloads/1989_SN_Wiring_Diagram.pdf |
|
|
|
|
Trader144
Groupie
Joined: September-24-2015 Location: North Carolina Status: Offline Points: 55 |
Post Options
Thanks(0)
Quote Reply
Posted: June-18-2016 at 1:45pm |
|
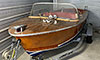
Here is a picture of what I was asking about - is this a ground bus that I could connect my new ground wire to for a better dash ground?

|
|
|
|
|
Bri892001
Grand Poobah
Joined: September-27-2008 Location: Boston MA Status: Offline Points: 4947 |
Post Options
Thanks(0)
Quote Reply
Posted: June-18-2016 at 4:46pm |
|
Definitely looks like it. Just try to confirm that those wires are actually grounds. Makes sense that they are, just want to double check.
|
|
|
|
|
Trader144
Groupie
Joined: September-24-2015 Location: North Carolina Status: Offline Points: 55 |
Post Options
Thanks(0)
Quote Reply
Posted: June-18-2016 at 6:56pm |
|
Great. I will see if the multimeter has a reading by connecting the negative to this and the positive to the battery
|
|
|
|
|
8122pbrainard
Grand Poobah
Joined: September-14-2006 Location: Three Lakes Wi. Status: Offline Points: 41040 |
Post Options
Thanks(0)
Quote Reply
Posted: June-18-2016 at 7:22pm |
|
David,
I think it was mentioned previously but I will again. Besides getting a heavier ground up to the dash, do the same with the positive feed. Both it at the ground are known to be marginally sized. |
|
|
|
|
Bri892001
Grand Poobah
Joined: September-27-2008 Location: Boston MA Status: Offline Points: 4947 |
Post Options
Thanks(0)
Quote Reply
Posted: June-18-2016 at 7:55pm |
|
I agree. I saw an improvement by adding just the ground, but didn't get the full benefit until I added a positive feed as well.
|
|
|
|
|
Airfooter
Groupie

Joined: August-07-2012 Location: Savage, MN Status: Offline Points: 95 |
Post Options
Thanks(0)
Quote Reply
Posted: June-26-2016 at 7:37pm |
|
Hey guys,
Does anyone know the size of the terminal on the load side of the 50 amp breaker off the top of their head ('92 Excel)? Also, are the spade connections on the dash breakers 1/4"? My boat is a few hours away and I wanted to order some connectors for the upcoming weekend. Thanks in advance! |
|
|
1992 Nautique Excel
|
|
|
|
|
8122pbrainard
Grand Poobah
Joined: September-14-2006 Location: Three Lakes Wi. Status: Offline Points: 41040 |
Post Options
Thanks(0)
Quote Reply
Posted: June-26-2016 at 8:04pm |
|
Adam,
Get a box on #12 and 1/4" Stacons to match the wire size you are using. You should be good. I hope you are using marine grade wire and heat shrink adhesive lined Stacons. Yes, the quick connects are .250". |
|
|
|
|
spiralhelix
Senior Member
Joined: August-06-2014 Location: IL/WI Status: Offline Points: 496 |
Post Options
Thanks(0)
Quote Reply
Posted: June-26-2016 at 8:07pm |
|
Pete beat me to the punch. I get anchor brand connectors. I second the adhesive lined heat shrink connectors.
|
|
|
|
|
Airfooter
Groupie
Joined: August-07-2012 Location: Savage, MN Status: Offline Points: 95 |
Post Options
Thanks(0)
Quote Reply
Posted: June-26-2016 at 11:59pm |
|
Yep, I have tinned marine wire in 8, 10, and 14 gauge so that I'm fully prepared. I was going to run an 8 gauge + from the main breaker to the ignition breaker, but finding an actual 8 gauge female quick disconnect is challenging. It looks like the 10-12 gauge female disconnect might work with the 8 gauge wire, but if it don't I'm just going to run the 10 gauge +. I'm purchasing the shrink connectors from McMaster since they have a nice selection. My bus bars have 1/4" main terminals and the rest are #8, s0 I'm going to run with those two sizes. In my mind I was thinking that the terminal on that 50 amp breaker was larger than 1/4", so that's why I posed the question. I also do not recall the thread size of the engine ground bolt. McMaster does have 8 gauge 5/16" and 3/8" heat shrink rings, so maybe since I'm slightly unprepared I better spend an extra $10 for a larger size to be safe. Thanks for your recommendations and for confirming the quick connect size!
|
|
|
1992 Nautique Excel
|
|
|
|
|
8122pbrainard
Grand Poobah
Joined: September-14-2006 Location: Three Lakes Wi. Status: Offline Points: 41040 |
Post Options
Thanks(0)
Quote Reply
Posted: June-27-2016 at 7:36am |
|
Adam,
It's always great to hear of another McMaster shopper! Thinking back, I've used them for over 40 years and have never been disappointed. Before semi retiring and moving up to northern Wisconsin, I was really spoiled in that from work, I was 10 minutes from their main headquarters/warehouse. Getting desperately needed items within one hour was sure convenient. There was only one time when they didn't have nor couldn't find a item. It was a left hand 1/4" pipe plug that's a refrigeration special part It's also great to hear you're doing what I consider a proper job on the wiring. Regarding the feed to the ignition breaker, you don't really need the 8 gauge due to the load on it. 8 gauge to a buss and then smaller gauges from the buss to each individual load will do the job. |
|
|
|
|
Bri892001
Grand Poobah
Joined: September-27-2008 Location: Boston MA Status: Offline Points: 4947 |
Post Options
Thanks(0)
Quote Reply
Posted: June-27-2016 at 3:13pm |
|
I had been buying my terminal ends sort of piece meal.
But, just to have them on hand, I just bought this box set, from McMaster, this item number: 70335K81 Is that what you guys are referencing? It's the fully insulated variety. |
|
|
|
|
Airfooter
Groupie
Joined: August-07-2012 Location: Savage, MN Status: Offline Points: 95 |
Post Options
Thanks(0)
Quote Reply
Posted: June-27-2016 at 9:33pm |
And another McMaster shopper! 70335K81 contains fully insulated connectors, only meaning no bare metal is left exposed. On the same catalog page there are the "heat-shrink quick-disconnect terminals" which have the heat shrink and are available in standard, fully insulated, and sure-connect. I don't see them available as a kit from McMaster, but they're what we're referring to. I personally ordered the sure-connect with solder in it just because I've never tried them and would like to. |
|
|
1992 Nautique Excel
|
|
|
|
|
Bri892001
Grand Poobah
Joined: September-27-2008 Location: Boston MA Status: Offline Points: 4947 |
Post Options
Thanks(0)
Quote Reply
Posted: June-27-2016 at 11:20pm |
|
Maybe I'll pick up some individuals of the sure-connect. I have to do a new bilge pump soon, so that would be the perfect application for those. I wasn't totally sure what gauge I'd be working with on that, but it looks like it's most likely 14 or 16, which would be the blue.
|
|
|
|
|
Trader144
Groupie
Joined: September-24-2015 Location: North Carolina Status: Offline Points: 55 |
Post Options
Thanks(0)
Quote Reply
Posted: June-28-2016 at 12:56am |
|
Comp[eted new ground wire. I retained a circular rope under the floor (like I do in the house) for the next wire run (positive)
Dash voltage up to 13! Thank you for the instructions...I had to be towed back the other week so this was 1 of 10 things I changed. Great weekend afterwards. |
|
|
|
|
gcam4
Groupie
Joined: March-21-2017 Location: Charlotte, NC Status: Offline Points: 51 |
Post Options
Thanks(0)
Quote Reply
Posted: May-09-2020 at 10:42am |
|
I'm resurrecting an old thread. I installed PP last year and now have low voltage at the dash. So, my thinking is new power and ground wire to the engine and then get rid of the daisy chains and install two buss bars at the dash. I will be using marine grade wire sized up 1 or 2 gauges for the mains, 6 or 8 gauge, along with adhesive lined heat shrink connections. I believe that is the best option?
|
|
|
|
|
Post Reply
|
Page <1234> |
 Tweet
Tweet
|
| Forum Jump | Forum Permissions You cannot post new topics in this forum You cannot reply to topics in this forum You cannot delete your posts in this forum You cannot edit your posts in this forum You cannot create polls in this forum You cannot vote in polls in this forum |


 Topic Options
 TimF wrote: