 Boats For Sale:


swim platform maintenance |
Post Reply 
|
Page <1234> |
| Author | |
8122pbrainard 
Grand Poobah 

Joined: September-14-2006 Location: Three Lakes Wi. Status: Offline Points: 41040 |
 Post Options Post Options
") Thanks(0) Thanks(0)
 Quote Reply Quote Reply
 Posted: April-10-2012 at 4:15pm Posted: April-10-2012 at 4:15pm |
|
Tim
The wet sanding with the oil is an old woodworkers trick used when putting on a "Danish oil" finish. On open grain woods such as Walnut (commonly finished with an oil) the technique really smooths it out by leaving some of the sanding dust in the pores. Now, it's not like going all the way with a paste grain wood filler for the "bar top" finish but does fill the grain some. You use it when getting down into the 800 grit and finer paper. |
|
 |
|
|
TRBenj
Grand Poobah

Joined: June-29-2005 Location: NWCT Status: Offline Points: 21108 |
Post Options
Thanks(0)
Quote Reply
Posted: April-10-2012 at 4:32pm |
|
Interesting! Does the oil ball up as you sand? I noticed that would happen if I tried wetsanding before the oil was completely dry.
|
|
|
|
|
8122pbrainard
Grand Poobah
Joined: September-14-2006 Location: Three Lakes Wi. Status: Offline Points: 41040 |
Post Options
Thanks(0)
Quote Reply
Posted: April-10-2012 at 5:01pm |
|
Tim,
No, it doesn't ball up since you are doing the sanding before the oil dries. If a previous coat balls up, just as you said, it wasn't completely dry. But, I feel you would have less of a problem with the oil than water. Give it a try next time. |
|
|
|
|
IAughtNaut
Grand Poobah

Joined: August-22-2010 Location: TN Status: Offline Points: 2568 |
Post Options
Thanks(0)
Quote Reply
Posted: April-10-2012 at 5:03pm |
|
ok, now I'm getting confused, let me see if I get this:
Tim, what you did was 1. Clean 2. Dry (completely) 3. Wet sand (with water) 4. Dry 5. Oil 6. Repeat steps 2-5 And Pete, what you're suggesting is: 1. Clean 2. Dry (completely) 3. Oil 4. Wet sand (with oil) 5. repeat steps 3-4 Is that right? If you're wet sanding using the oil do you still rinse it? Or do you just oil, sand while wet, oil, sand while wet, with no waiting for it to dry? |
|
|
|
|
IAughtNaut
Grand Poobah
Joined: August-22-2010 Location: TN Status: Offline Points: 2568 |
Post Options
Thanks(0)
Quote Reply
Posted: April-10-2012 at 5:04pm |
|
(by the way, I tend to ask a lot of very detailed questions when I have no idea what I'm doing, so all the advice is greatly appreciated)
|
|
|
|
|
TRBenj
Grand Poobah
Joined: June-29-2005 Location: NWCT Status: Offline Points: 21108 |
Post Options
Thanks(0)
Quote Reply
Posted: April-10-2012 at 5:11pm |
|
Youve got my procedure correct. Gotta be 100% dry prior to wetsanding and again prior to oiling.
As Pete describes it, Id say you have his method correct as well. |
|
|
|
|
IAughtNaut
Grand Poobah
Joined: August-22-2010 Location: TN Status: Offline Points: 2568 |
Post Options
Thanks(0)
Quote Reply
Posted: April-10-2012 at 5:16pm |
|
It seems like there would be a tremendous time savings using Pete's wet oil method...I could basically increase the grit on the sandpaper with each oiling but have it done in one afternoon, then only have to wait for a week while it dries once. From that perspective it seems like a slam dunk.
|
|
|
|
|
8122pbrainard
Grand Poobah
Joined: September-14-2006 Location: Three Lakes Wi. Status: Offline Points: 41040 |
Post Options
Thanks(0)
Quote Reply
Posted: April-10-2012 at 5:22pm |
|
You have my procedure correct as well but no "rinsing". Just keep the wet sanding area wet with oil. When done sanding, you can wipe it down with some more Teak oil just to remove any left over sanding dust.
|
|
|
|
|
Foot_Fungus
Gold Member 

Joined: February-27-2012 Location: Chapin, SC Status: Offline Points: 501 |
Post Options
Thanks(0)
Quote Reply
Posted: April-10-2012 at 6:36pm |
|
adding/emphasizing pete's earlier statement I wouldn't wetsand with the oil below 600ish grit. Reason being, or what I experiences anyways was that the amount of wood material you are removing isn't fine enough to settle into the pores and ended up 'clogging' up the sand paper. I oiled, dried, dry sanded till i got to 600+, then I wet sanded after that point as I felt the material was powdery enough to fill in. Again just my observation and I'm by no means an expert.
|
|
|
|
|
IAughtNaut
Grand Poobah
Joined: August-22-2010 Location: TN Status: Offline Points: 2568 |
Post Options
Thanks(0)
Quote Reply
Posted: April-10-2012 at 6:56pm |
|
well then, in the interest of scientific discovery (sort of), and time savings, I think I'll try the wet method. Of course, pictures to follow.
|
|
|
|
|
IAughtNaut
Grand Poobah
Joined: August-22-2010 Location: TN Status: Offline Points: 2568 |
Post Options
Thanks(0)
Quote Reply
Posted: April-10-2012 at 6:58pm |
|
one other thing, probably a dumb question again, but will I have to do this twice? once on the top and once on the bottom? or can I do both in one fell swoop and just get creative with the way I lay it out to dry?
|
|
|
|
|
8122pbrainard
Grand Poobah
Joined: September-14-2006 Location: Three Lakes Wi. Status: Offline Points: 41040 |
Post Options
Thanks(0)
Quote Reply
Posted: April-10-2012 at 8:24pm |
When you get the brackets off, run four long screws into the bottom. Then you do the bottom first and flip it so it's resting on the four screws. |
|
|
|
|
IAughtNaut
Grand Poobah
Joined: August-22-2010 Location: TN Status: Offline Points: 2568 |
Post Options
Thanks(0)
Quote Reply
Posted: April-10-2012 at 8:49pm |
|
see, that's why I ask...I am way too dumb to have thought about that on my own. I would have done it in two steps and taken two extra weeks while it dried.
|
|
|
|
|
fanto3k4
Groupie 
Joined: October-03-2010 Location: SoCal Status: Offline Points: 51 |
Post Options
Thanks(0)
Quote Reply
Posted: April-25-2012 at 8:11pm |
|
QUOTE]When you get the brackets off, run four long screws into the bottom. Then you do the bottom first and flip it so it's resting on the four screws.[/QUOTE]
Brillant! I have been doing the prep work on mine this week. Hope to start oiling this weekend! |
|
|
|
|
desertskier
Platinum Member

Joined: December-19-2006 Location: Az Status: Offline Points: 1114 |
Post Options
Thanks(0)
Quote Reply
Posted: May-04-2012 at 12:44am |
 This thread inspired me to refinish my old and tired looking platform. I used the products shown and the procedures described above (sort of). Power washed then used the cleaner multiple times then dry sanded with 150. Applied oil then let dry and wet sanded with 320 and oil for first coat and did a combination of wet sand with water or oil for the remaining coats. It's very hot and dry in Tucson already so drying time was about 24 hours or less. Thanks for the info. It's the best it has ever looked in the 18 years I've owned it. |
|
|
|
|
DrStevens
Senior Member 

Joined: October-15-2011 Location: Columbus, OH Status: Offline Points: 422 |
Post Options
Thanks(0)
Quote Reply
Posted: May-04-2012 at 8:36am |
|
Looks great, almost like a piece of furniture.
|
|
|
|
|
DrStevens
Senior Member
Joined: October-15-2011 Location: Columbus, OH Status: Offline Points: 422 |
Post Options
Thanks(0)
Quote Reply
Posted: May-22-2012 at 8:59am |
|
What type of caulk/sealer is recommended to place in the screw holes when reattaching a platform after refinishing?
|
|
|
|
|
8122pbrainard
Grand Poobah
Joined: September-14-2006 Location: Three Lakes Wi. Status: Offline Points: 41040 |
Post Options
Thanks(0)
Quote Reply
Posted: May-22-2012 at 9:03am |
|
Brackets to the hull - 5200 or 4200.
Brackets to the wood - nothing. |
|
|
|
|
DrStevens
Senior Member
Joined: October-15-2011 Location: Columbus, OH Status: Offline Points: 422 |
Post Options
Thanks(0)
Quote Reply
Posted: May-22-2012 at 9:22am |
|
Thanks Pete
|
|
|
|
|
newguy1986
Senior Member

Joined: April-08-2011 Location: Houston Status: Offline Points: 226 |
Post Options
Thanks(0)
Quote Reply
Posted: May-22-2012 at 3:21pm |
|
soo.... I am now guessing I have wasted my time this past weekend...
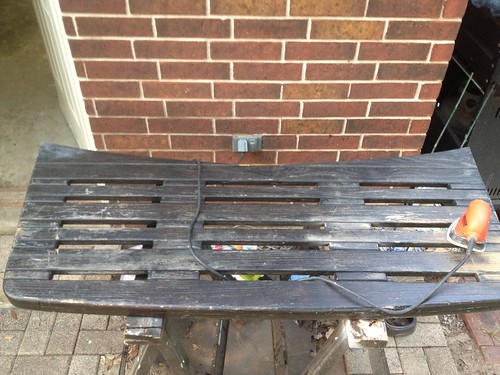
I cleaned my platform with starbrite cleaner scrubbing with brush. then power washed which seemed to work wonders.. then I went to DRY sanding the wood at 80 grit, 120 grit, and 220. I washed the wood to remove all dust. after it was dry i used the brightener. I let is dry and now i have been applying and coat of teak oil every time I see is not "wet" any more. It looks awesome but are yall saying it will not last?? IMG_0925.jpg 
|
|
|
1986sn 2001
|
|
|
|
|
Bri892001
Grand Poobah

Joined: September-27-2008 Location: Boston MA Status: Offline Points: 4945 |
Post Options
Thanks(0)
Quote Reply
Posted: May-22-2012 at 3:35pm |
I have trouble believing that it was a waste of time. It sounds like you are doing the most important parts, cleaning it good, then applying layers of teak oil and letting them sun dry in. Some of the details are a matter of personal preference. |
|
|
|
|
8122pbrainard
Grand Poobah
Joined: September-14-2006 Location: Three Lakes Wi. Status: Offline Points: 41040 |
Post Options
Thanks(0)
Quote Reply
Posted: May-22-2012 at 3:40pm |
Andrew, You haven't wasted your time at all. How long it will last depends on how long it's out in the sun and water. Understand that oiled Teak does need a fair amount of maintenance. When it seems to be drying out, give it another coat of oil. You should at least get several years out of it before having to do the full job on it. |
|
|
|
|
TRBenj
Grand Poobah
Joined: June-29-2005 Location: NWCT Status: Offline Points: 21108 |
Post Options
Thanks(0)
Quote Reply
Posted: May-22-2012 at 3:40pm |
|
Certainly not a waste of time, but I do think that sanding to finer grits has the added bonus of extending the life of the finish. So its not all a matter of personal preference.
|
|
|
|
|
newguy1986
Senior Member
Joined: April-08-2011 Location: Houston Status: Offline Points: 226 |
Post Options
Thanks(0)
Quote Reply
Posted: May-23-2012 at 3:09pm |
|
mine is soaking up oil... alot of oil.... I guess I will just keep applying until it stops taking it in?
|
|
|
1986sn 2001
|
|
|
|
|
Bri892001
Grand Poobah
Joined: September-27-2008 Location: Boston MA Status: Offline Points: 4945 |
Post Options
Thanks(0)
Quote Reply
Posted: May-23-2012 at 3:21pm |
|
|
|
|
|
TRBenj
Grand Poobah
Joined: June-29-2005 Location: NWCT Status: Offline Points: 21108 |
Post Options
Thanks(0)
Quote Reply
Posted: May-23-2012 at 3:22pm |
|
I would let it dry fully between coats. Wet sanding between coats is optional, but should also be allowed to dry fully prior to the next coat.
|
|
|
|
|
notx2001
Newbie 

Joined: February-06-2012 Location: Houston, TX Status: Offline Points: 23 |
Post Options
Thanks(0)
Quote Reply
Posted: May-24-2012 at 10:53pm |
|
Thought id share some pics of my platform transform. The PO had stained it black and coated in poly. YECH.. what fun to get rid of too. I started thinking id just strip it mechanically. But i was going no where fast.
 To make it easier to rid the platform finish and stain I ended up getting some CitrusStrip to remove the old finish. I let the stripper sit on the platform over night and it did a good job of removing the finish, scraped with a plastic scraper and brass brush for the crevices. It was still dark after removing the finish. After this i started using the wood cleaner. Several times. 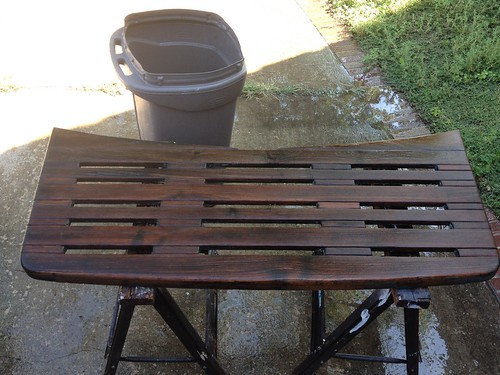 The platform was pretty rough and I wanted a real smooth surface, so I sanded the entire top with 120 and 220. 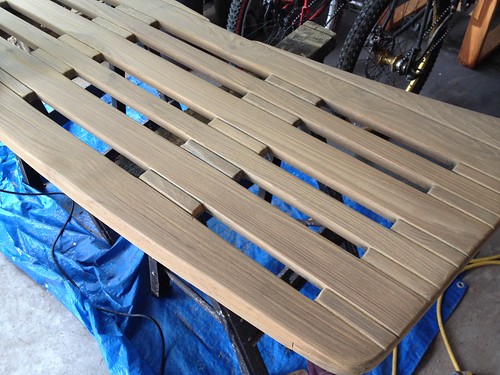 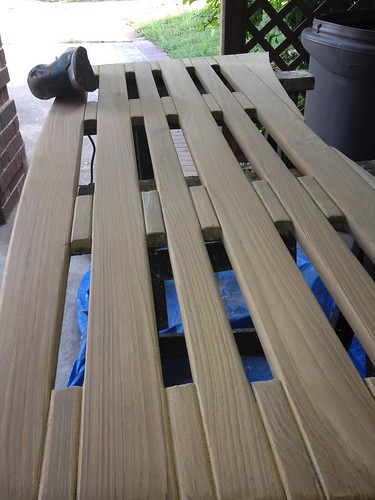 I used the cleaner one more time after sanding figuring it may open up the wood a bit during sanding. Then used oil and wetsand with oil technique I learned from you guys here. And its looking great. Its amazing just how nice the wood feels now. It is incredibly smooth. 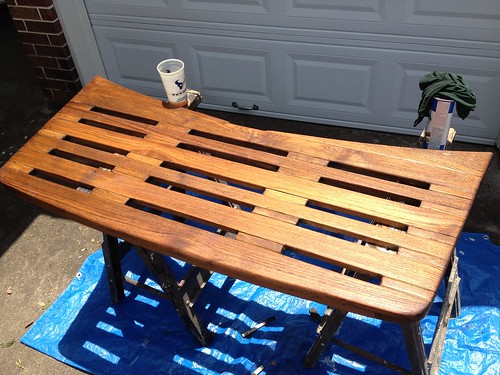 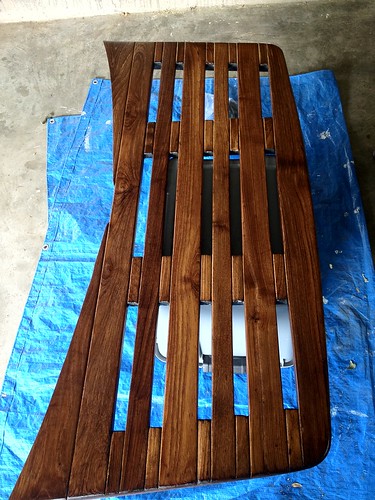 I am happy with how it turned out. Worlds apart from the dark platform prior. |
|
|
82-2001
|
|
|
|
|
8122pbrainard
Grand Poobah
Joined: September-14-2006 Location: Three Lakes Wi. Status: Offline Points: 41040 |
Post Options
Thanks(0)
Quote Reply
Posted: May-24-2012 at 11:14pm |
|
Aaron,
WOW!!! Yup, that's one real big difference. It sure looks great. |
|
|
|
|
DrStevens
Senior Member
Joined: October-15-2011 Location: Columbus, OH Status: Offline Points: 422 |
Post Options
Thanks(0)
Quote Reply
Posted: May-25-2012 at 12:02am |
|
Great job, your hard work really paid off!
|
|
|
|
|
Sampson 182
Groupie

Joined: November-18-2015 Location: North Carolina Status: Offline Points: 82 |
Post Options
Thanks(0)
Quote Reply
Posted: November-27-2015 at 12:48am |
|
Heres a few of my platform pics. Done this weekend! So excited to see the response from the members. all this was done using the knowledge from the site. THANKS everyone.
1987 SN 2001 original ski platform. PO put on polyurethane! Before. (polyurethane, and years of abuse.)  After ( Aircraft stripper, pressure washing , sanding, and first oiling.)  All my knowledge was gained from the correctcraftfan.com forums. THANKS to all the members. |
|
|
1987 Ski Nautique 2001
|
|
|
|
|
Post Reply
|
Page <1234> |
 Tweet
Tweet
|
| Forum Jump | Forum Permissions You cannot post new topics in this forum You cannot reply to topics in this forum You cannot delete your posts in this forum You cannot edit your posts in this forum You cannot create polls in this forum You cannot vote in polls in this forum |


 Topic Options
 IAughtNaut wrote: