proper prop installation |
Post Reply 
|
Page 123 4> |
| Author | |
8122pbrainard 
Grand Poobah 

Joined: September-14-2006 Location: Three Lakes Wi. Status: Offline Points: 41045 |
 Post Options Post Options
 Thanks(0) Thanks(0)
 Quote Quote  Reply Reply
 Topic: proper prop installation Topic: proper prop installationPosted: February-14-2009 at 4:39pm |
|
The topic comes up frequently on the proper method of installing our props. We have even heard of people loosing brand new ones because they weren't installed properly. We are also seeing new CNC machined props come through with recommendations to lap the prop to the shaft. This I feel is due to the machined finish on the tapered bore rather than a reamed finish. Since I had my X55 hanging in the shop, I thought I'd take a few pictures and go through the steps.
Keep in mind that our props are held on by a close fitting taper. According to one of the prop manufacturers, 70% of the torque is said to be transmitted through this fit and the rest is the key/keyway. I personally feel it's 100% because the taper fit shouldn't slip at all. I've seen some pretty sloppy keys with 0 evidence that any force has been applied to them. Prop removed: 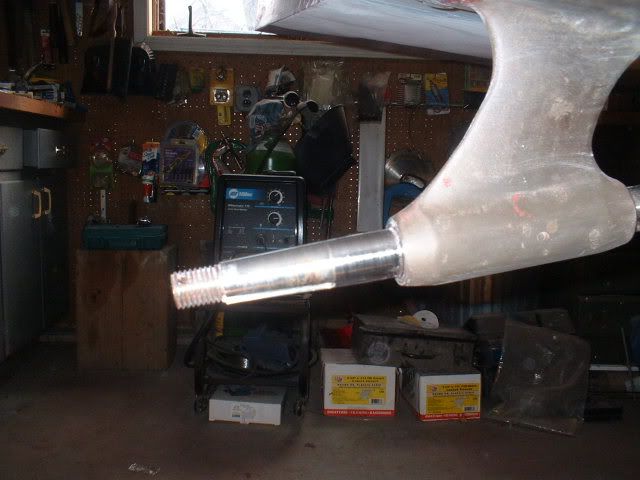
Lightly clean the shaft with some emery paper or a Scotch brite pad: (If you don't have a new prop, clean the bore of it too) 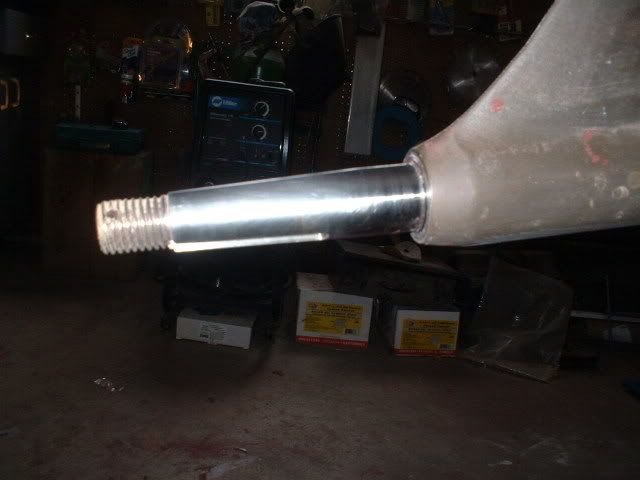
Here's what you'll need. High spot blue (Prussian blue) and valve grinding compound: 
Put a light coating of the blue on the shaft taper area: 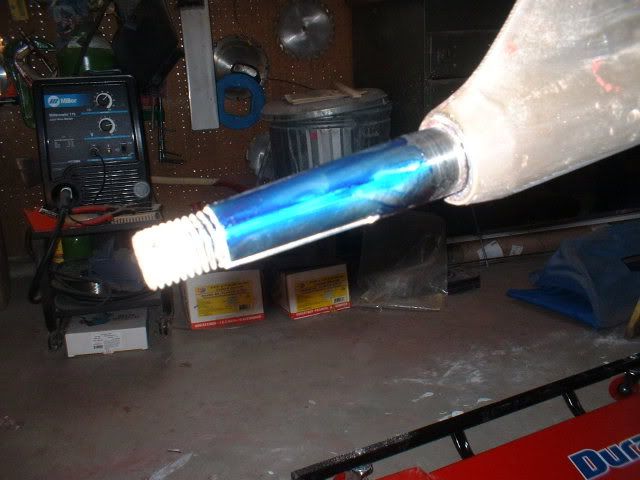
Put the prop on the shaft and rotate back and forth in a small arc. Remove the prop and take a look at the blue: 
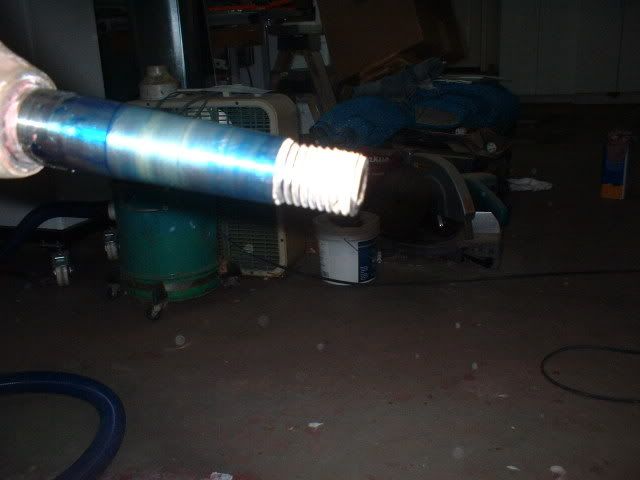
You'll notice any high spots as lighter areas of the blue. This shaft, I made myself in the lathe about 20 years ago when I put a new bottom on the boat. The prop hasn't been off since then. (I know where all the rocks are on my lakes!!!) The prop is the original (64) to the boat. The taper fit isn't that bad considering it wasn't ever lapped in. Spread some valve grinding compound on the shaft: 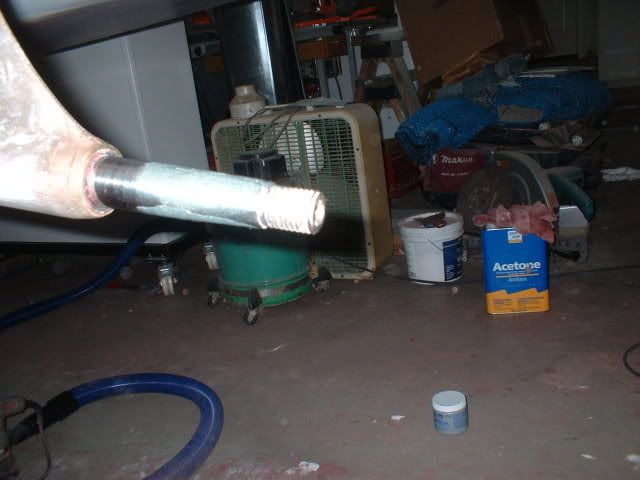
Put the prop on the shaft and with forward pressure on the prop, start turning it back and forth and rotating in 60 degree increments. When the compound seems to smooth out (no grit) pull the prop back and then forward again to get the compound re distributed. Rotate again. Repeat several times until there isn't much "grit" left to the compound. 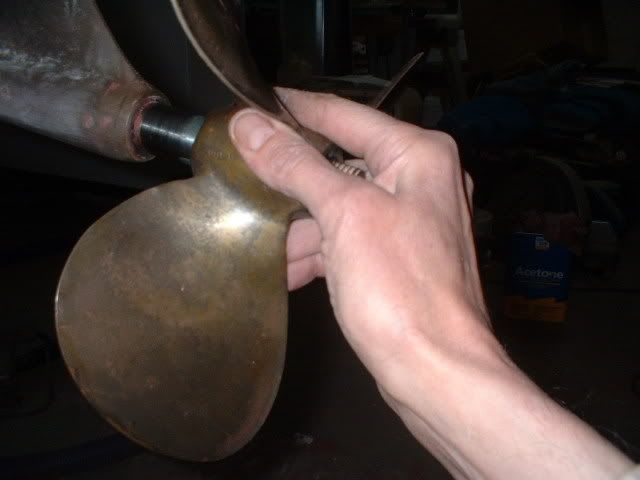
Blue again and put the prop back on to check the lapping. High spots removed: 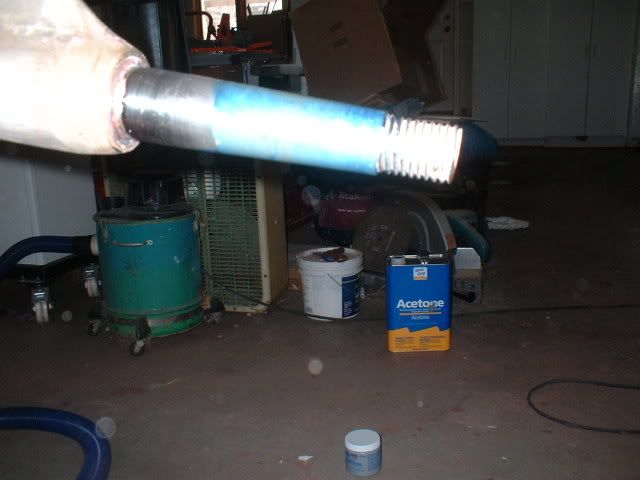
If not, repeat the lapping again. Your shaft and the bore of the prop should have a real nice and even mat finish on it. 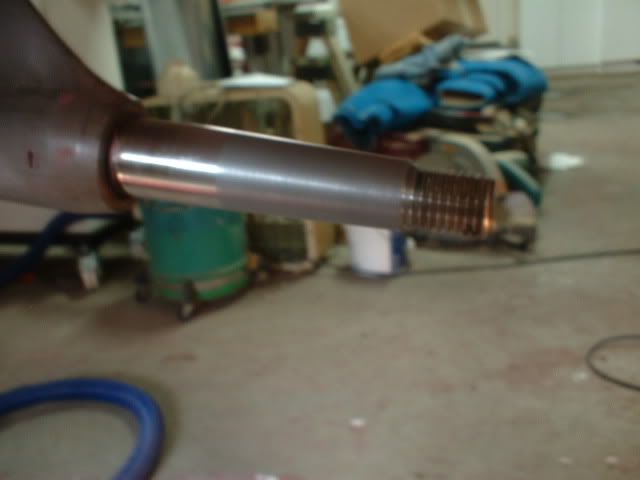
Clean all the compound and blue off with some solvent. Fit the prop to the shaft without the key and mark the forward position of the hub with some tape: 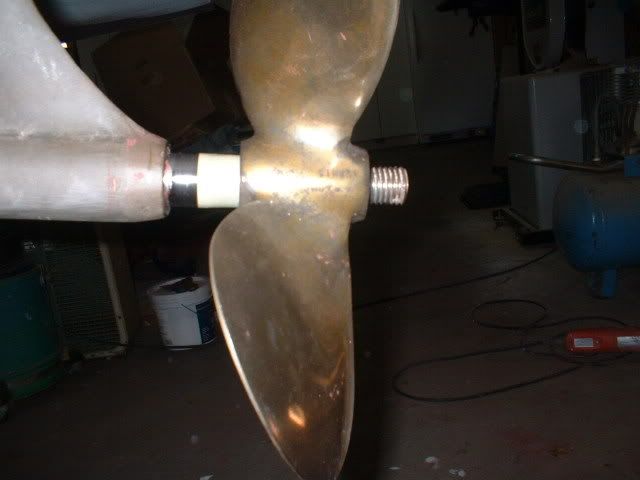
The tape is a indicator that when you put the prop on with the key that it's forward against the shaft's taper. A common problem is that if the key is cocked or not in it's proper place, the prop will bottom out on the key rather than the taper. If you are using a new key, it may need to be fitted. If too wide, drag it across a flat file: 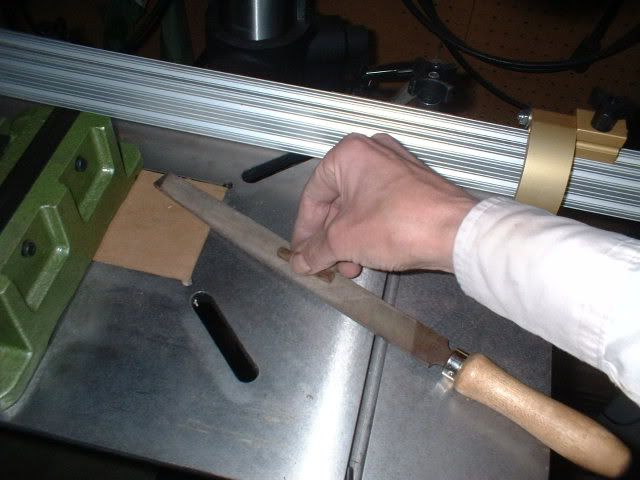
Wrench: 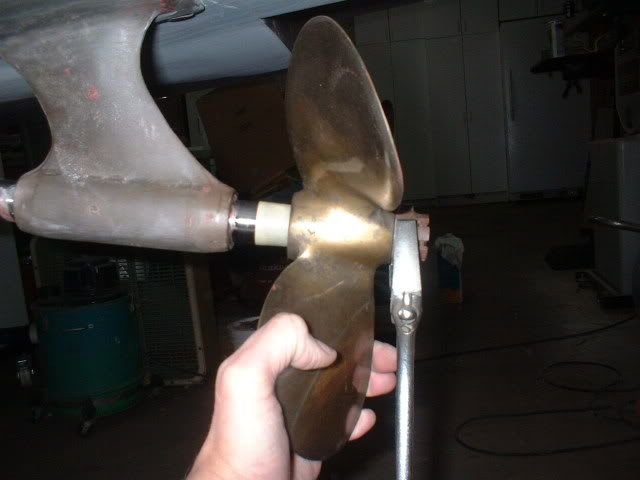
Now, if you can't tighten the castle nut up to the point of getting the cotter pin into the hole, you can actually back off the nut to the hole. Tightening the nut has seated the prop on the taper and remember it's the taper that holds the prop on. It's the reason a puller is needed to break them loose. Anyone who is able to remove a prop with a hammer and a block of wood has a problem!! BTW, every once in awhile, someone asks "why can't I grease or Never-Seize the taper so my prop will come off easier!! Well, you now know why and the correct answer is to tell them to get a decent puller! John, Did you notice only my right cuff shows up in the thread. I was real careful after you've given me such a hard time!!! |
|
 |
|
saffer 
Senior Member 

Joined: March-29-2008 Location: New Zealand Status: Offline Points: 113 |
 Post Options Post Options
 Thanks(0) Thanks(0)
 Quote Quote  Reply Reply
 Posted: February-14-2009 at 10:07pm Posted: February-14-2009 at 10:07pm |
|
awesome awesome awesome

cant wait for the 542 now baby. Explain key installaton a bit more please |
|
 |
|
8122pbrainard 
Grand Poobah 

Joined: September-14-2006 Location: Three Lakes Wi. Status: Offline Points: 41045 |
 Post Options Post Options
 Thanks(0) Thanks(0)
 Quote Quote  Reply Reply
 Posted: February-14-2009 at 10:31pm Posted: February-14-2009 at 10:31pm |
Key fitting: New keys are usually on the large side by a couple thousand (.002") and key ways may be slightly under width. File the sides until the key fits in both the shaft and prop. You shouldn't have to hammer it it but it also shouldn't be falling out. Key position: If the key is placed too far forward on the shaft, it can get into the area of the shaft where the keyway gets shallower caused by the radius of the milling cutter. This makes the key ride high causing the keyway on the prop to bottom out on the key and not the bore taper. This is why you want to keep a eye on the tape on the shaft. |
|
 |
|
Riley 
Grand Poobah 

Joined: January-19-2004 Location: Portland, ME Status: Offline Points: 7965 |
 Post Options Post Options
 Thanks(0) Thanks(0)
 Quote Quote  Reply Reply
 Posted: February-14-2009 at 10:33pm Posted: February-14-2009 at 10:33pm |
|
That's excellent Pete.
We ought to have a tech section for stuff like this. How much distance can be between the strut and the prop? |
|
 |
|
saffer 
Senior Member 

Joined: March-29-2008 Location: New Zealand Status: Offline Points: 113 |
 Post Options Post Options
 Thanks(0) Thanks(0)
 Quote Quote  Reply Reply
 Posted: February-14-2009 at 10:35pm Posted: February-14-2009 at 10:35pm |
|
We ought to have a tech section for stuff like this- agreed
Is the key then suppossed to fit exactly under the prop and not stick out fore and aft? |
|
 |
|
LaurelLakeSkier 
Senior Member 

Joined: February-12-2007 Location: Wisconsin Status: Offline Points: 485 |
 Post Options Post Options
 Thanks(0) Thanks(0)
 Quote Quote  Reply Reply
 Posted: February-14-2009 at 10:42pm Posted: February-14-2009 at 10:42pm |
|
The key can't go to far forward due to the taper at the end of the keyway. It also should not be so long that it will overhang the prop....this will interfere with the nut being tightened.
|
|
 |
|
8122pbrainard 
Grand Poobah 

Joined: September-14-2006 Location: Three Lakes Wi. Status: Offline Points: 41045 |
 Post Options Post Options
 Thanks(0) Thanks(0)
 Quote Quote  Reply Reply
 Posted: February-14-2009 at 10:47pm Posted: February-14-2009 at 10:47pm |
|
Bruce,
The rule of thumb is 1 to 1&1/2 the diameter of the shaft between the strut and prop. It may vary due to the depth of the taper machined into different props. Kimbrian, The key can't stick out aft of the prop because that's where your prop nut goes. Forward it can be longer as it doesn't hurt anything as long as it doesn't ride up in the shallower keyway area. If you want, cut the key length to the same length as the prop hub. |
|
 |
|
saffer 
Senior Member 

Joined: March-29-2008 Location: New Zealand Status: Offline Points: 113 |
 Post Options Post Options
 Thanks(0) Thanks(0)
 Quote Quote  Reply Reply
 Posted: February-14-2009 at 10:53pm Posted: February-14-2009 at 10:53pm |
|
I got it now.
Thanks guys Keit-this site rocks man!!- gonna put many a mechanic out of business with my knowledge one day and work on my own stuff eh. 
|
|
 |
|
saffer 
Senior Member 

Joined: March-29-2008 Location: New Zealand Status: Offline Points: 113 |
 Post Options Post Options
 Thanks(0) Thanks(0)
 Quote Quote  Reply Reply
 Posted: February-14-2009 at 10:55pm Posted: February-14-2009 at 10:55pm |
|
whilst im here, as you can see the pic on my entry is not a 88 SN, i somehow got this guys boat on but I cant edit it off.
HAve asked under general discussion for help but no help as of yet. Any ideas? |
|
 |
|
Tim D 
Grand Poobah 
Joined: August-23-2004 Location: United States Status: Offline Points: 2641 |
 Post Options Post Options
 Thanks(0) Thanks(0)
 Quote Quote  Reply Reply
 Posted: February-15-2009 at 12:32am Posted: February-15-2009 at 12:32am |
|
Pete, I think spinning the prop in the water is going to seat the prop further on the taper, a lot more than tightening the nut against the prop.
|
|
|
Tim D
|
|
 |
|
37N122W 
Groupie 

Joined: December-15-2008 Location: United States Status: Offline Points: 83 |
 Post Options Post Options
 Thanks(0) Thanks(0)
 Quote Quote  Reply Reply
 Posted: February-15-2009 at 3:48am Posted: February-15-2009 at 3:48am |
|
Great info! I'm about to change props on my boat and I had no idea about lapping and what not. Thanks! This site rocks!
JJ |
|
|
"It never gets easier, you just go faster." Greg LeMond
|
|
 |
|
eric lavine 
Grand Poobah 
Joined: August-13-2006 Location: United States Status: Offline Points: 13413 |
 Post Options Post Options
 Thanks(0) Thanks(0)
 Quote Quote  Reply Reply
 Posted: February-15-2009 at 12:12pm Posted: February-15-2009 at 12:12pm |
|
too add on such a great topic on how importanat keyed tapers are, on larger transmissions the "BullGear" which usually are the output gears and weigh about 400 lbs do not use a key, it is simply a keyless taper and you advance the gear on the shaft and the fit relies on the close tolerances of the 2 tapers, the transmission will use an 8" shaft, so you can imagine the torque going through the taper's and they dont spin on the shaft, fortunately these shafts have keys and you still have to advance the prop on the shaft and as Pete states the tapers need to be free of blemishes and the more contact the better of the surfaces
|
|
|
"the things you own will start to own you"
|
|
 |
|
Clew In 
Senior Member 

Joined: March-06-2007 Location: Atlanta, GA Status: Offline Points: 184 |
 Post Options Post Options
 Thanks(0) Thanks(0)
 Quote Quote  Reply Reply
 Posted: February-15-2009 at 12:59pm Posted: February-15-2009 at 12:59pm |
|
Hey 8122pbrainard,
Great write up and thanks for taking the time to put that together. I have a few more questions: One side of my key has rounded edges, what is that for and which way should it go? What kind of solvent should I use? What do you think about the castle nut vs. the nylock nut? I was talking to Skidim and they were recommending the Nylock nut. I am thinking I like the castle nut and cotter pin. Clew In |
|
|
Clew In
|
|
 |
|
8122pbrainard 
Grand Poobah 

Joined: September-14-2006 Location: Three Lakes Wi. Status: Offline Points: 41045 |
 Post Options Post Options
 Thanks(0) Thanks(0)
 Quote Quote  Reply Reply
 Posted: February-15-2009 at 1:19pm Posted: February-15-2009 at 1:19pm |
Check both the keyways cut in the prop and the shaft and see if ether have slight chamfers in the bottom corners. That's where the rounded edges of the key should go. If you are talking about chamfered ENDS, then that side goes in the shaft. Any strong solvent will cut both the blue and the valve grinding compound. I always have a gallon of both acetone and toluene in the shop. The toluene is actually better because it doesn't evaporate as fast. Ether the castle nut or the Nyloc do the job. However, Nyloc's are recommended for only one use. You already have the cross drilled hole for the cotter pin so I'd stick with it. If you do use a Nyloc, NEVER use a stainless on the stainless shaft. The combination is known to gall and lock up the threads. I've had to cut a stainless Nyloc off and then chase all over the northwoods of Wisconsin to find a 3/4-10 die to chase the threads!! Hopefully Skidim wasn't recommending the stainless Nyloc. If so, chalk one up against them!! |
|
 |
|
eric lavine 
Grand Poobah 
Joined: August-13-2006 Location: United States Status: Offline Points: 13413 |
 Post Options Post Options
 Thanks(0) Thanks(0)
 Quote Quote  Reply Reply
 Posted: February-15-2009 at 1:27pm Posted: February-15-2009 at 1:27pm |
|
much to my amazement, i have a 3/4-10, i called and called looking for one, and i had one in my tool box, where it came from i dont know.
|
|
|
"the things you own will start to own you"
|
|
 |
|
eric lavine 
Grand Poobah 
Joined: August-13-2006 Location: United States Status: Offline Points: 13413 |
 Post Options Post Options
 Thanks(0) Thanks(0)
 Quote Quote  Reply Reply
 Posted: February-15-2009 at 1:33pm Posted: February-15-2009 at 1:33pm |
|
Pete, can we use a block of wood between the hull and the prop blades to tighten? or even a pipe wrench on the shaft so it wont spin?
|
|
|
"the things you own will start to own you"
|
|
 |
|
8122pbrainard 
Grand Poobah 

Joined: September-14-2006 Location: Three Lakes Wi. Status: Offline Points: 41045 |
 Post Options Post Options
 Thanks(0) Thanks(0)
 Quote Quote  Reply Reply
 Posted: February-15-2009 at 2:04pm Posted: February-15-2009 at 2:04pm |
Eric, You've brought up one valid point regarding the block of wood. (guys - The other with pipe wrench is a joke) I've seen the block of wood used by many people. I've done it myself just for a little extra leverage but great care must be taken. I know you recommend against it. The Nybral prop is tough. The prop blades must be able to take the torque of the engine which typically is around 300 ft. lbs. or better divided by 3. With reduction trans's, this is multiplied by the ratio. What I'm saying is it would take quite a lot of force on the wrench (probably with a cheater on it) to distort a prop however, I don't recommend the block of wood simply because I don't want someone to have a problem. Everything has a breaking point. A proper fit on the taper doesn't really need that much force to seat it. Give me a break - a pipe wrench!! I shutter when I see one of our maintenance guys with the channel locks!! |
|
 |
|
eric lavine 
Grand Poobah 
Joined: August-13-2006 Location: United States Status: Offline Points: 13413 |
 Post Options Post Options
 Thanks(0) Thanks(0)
 Quote Quote  Reply Reply
 Posted: February-15-2009 at 2:18pm Posted: February-15-2009 at 2:18pm |
|
can i run the nut on with an impact?
|
|
|
"the things you own will start to own you"
|
|
 |
|
8122pbrainard 
Grand Poobah 

Joined: September-14-2006 Location: Three Lakes Wi. Status: Offline Points: 41045 |
 Post Options Post Options
 Thanks(0) Thanks(0)
 Quote Quote  Reply Reply
 Posted: February-15-2009 at 3:24pm Posted: February-15-2009 at 3:24pm |
Sure - you know the factory does. They sure don't lap the props on. The impact is called "form the prop bore to the taper with force". Not enough torque? Get one of these: |
|
 |
|
eric lavine 
Grand Poobah 
Joined: August-13-2006 Location: United States Status: Offline Points: 13413 |
 Post Options Post Options
 Thanks(0) Thanks(0)
 Quote Quote  Reply Reply
 Posted: February-15-2009 at 3:50pm Posted: February-15-2009 at 3:50pm |
|
Pete, i use the block of wood and an impact, sometimes things get taken out of context, if you tell the guy's a block of wood between the hull and blade you know damn sure they will have a big cheater pipe on the end of the cresent wrench jumping on it to get that last turn. One place that i do put put never sieze is between the nut and the prop contact surface, it allows a tighter turn with less force and wont gall the faces
|
|
|
"the things you own will start to own you"
|
|
 |
|
Clew In 
Senior Member 

Joined: March-06-2007 Location: Atlanta, GA Status: Offline Points: 184 |
 Post Options Post Options
 Thanks(0) Thanks(0)
 Quote Quote  Reply Reply
 Posted: March-04-2009 at 8:57pm Posted: March-04-2009 at 8:57pm |
|
Hey 8122pbrainard,
I received my Acme 540 today and I will try to put it on soon. Thanks again for the details they will come in handy and are much appreciated. Thanks, Clew In |
|
|
Clew In
|
|
 |
|
anthonylizardi 
Gold Member 
Joined: July-25-2007 Location: DFW, TX, USA Status: Offline Points: 836 |
 Post Options Post Options
 Thanks(0) Thanks(0)
 Quote Quote  Reply Reply
 Posted: March-04-2009 at 9:45pm Posted: March-04-2009 at 9:45pm |
|
Excellent, I did the lapping compound and got a nice surface but I wish I have know about the Prussian blue. We need to move this thread to the commmon questions asked.
Excellent, Thanks!! |
|
 |
|
Clew In 
Senior Member 

Joined: March-06-2007 Location: Atlanta, GA Status: Offline Points: 184 |
 Post Options Post Options
 Thanks(0) Thanks(0)
 Quote Quote  Reply Reply
 Posted: March-04-2009 at 9:54pm Posted: March-04-2009 at 9:54pm |
|
Hey,
I agree with you and maybe even add an installation procedure heading. When someone puts up an informative procedure it could live there and not get lost in the threads. Any way thanks again to all the experts giving us helpful advice. Clew In |
|
|
Clew In
|
|
 |
|
Waterdog 
Grand Poobah 

Joined: April-27-2006 Location: United States Status: Offline Points: 2020 |
 Post Options Post Options
 Thanks(0) Thanks(0)
 Quote Quote  Reply Reply
 Posted: March-06-2009 at 1:33pm Posted: March-06-2009 at 1:33pm |
|
Pete,
Nicely done! Thanks. |
|
 |
|
Carl 
Newbie 
Joined: February-03-2005 Location: United States Status: Offline Points: 28 |
 Post Options Post Options
 Thanks(0) Thanks(0)
 Quote Quote  Reply Reply
 Posted: March-09-2009 at 10:29pm Posted: March-09-2009 at 10:29pm |
|
When lapping a nibral prop on a stainless shaft, doesn't the prop lose most of the material?
Couldn't that be a problem? I'll be installing a new ACME in a few days. Good write up. |
|
 |
|
8122pbrainard 
Grand Poobah 

Joined: September-14-2006 Location: Three Lakes Wi. Status: Offline Points: 41045 |
 Post Options Post Options
 Thanks(0) Thanks(0)
 Quote Quote  Reply Reply
 Posted: March-09-2009 at 10:54pm Posted: March-09-2009 at 10:54pm |
The Rockwell is close depending on the alloy of the shaft. I think you'd be surprised on how hard the nibral is. I Rockwelled a Acme 540 not too long ago and actually posted it. I see if I can find it because I forgot what the 540 turned out to be!! So, what are you worried about? We are not talking about removing large amounts of metal. Probably no more than .003". The prop shop will ream lots more when they do a prop rebuild. Don't lap it in and you will run the risk of loosing more that a couple thousand on the taper. Edit: I found it! The Nibral is a 78 on the B scale. That's getting up there and damn close to most stainless used on prop shafts. |
|
 |
|
Carl 
Newbie 
Joined: February-03-2005 Location: United States Status: Offline Points: 28 |
 Post Options Post Options
 Thanks(0) Thanks(0)
 Quote Quote  Reply Reply
 Posted: March-09-2009 at 11:10pm Posted: March-09-2009 at 11:10pm |
|
Not really worried about anything. I was just initially surprised to see you using the prop to lap it with.
It makes sense now that I think about it, your trying to make the two pieces the same shape. They're close already so it shouldn't matter much which one loses the material. And a small amount of material also as you point out. |
|
 |
|
jbear 
Grand Poobah 

Joined: January-21-2005 Location: Lake Wales FL. Status: Offline Points: 8193 |
 Post Options Post Options
 Thanks(0) Thanks(0)
 Quote Quote  Reply Reply
 Posted: March-10-2009 at 12:12am Posted: March-10-2009 at 12:12am |
First of all...very good thread...just like we would expect from a guy of your talents Pete. The prop is off the '80 right now as I hit something coming out of the Glen a couple weeks ago. Eddie is checking the alignment for me as I had never tried to check it. Not as easy as you guys make it sound. Glad to have a friend like Eddie. Second...you gotta be the only guy I know that would work on his boat in a white shirt. You know I was looking just as soon as I saw the first picture with your hand in it. You know what I was hoping to see just so I could point it out. But you saved me the troubljohn |
|
|
"Loud pipes save lives"
AdamT sez "I'm Canadian and a beaver lover myself"... |
|
 |
|
Clew In 
Senior Member 

Joined: March-06-2007 Location: Atlanta, GA Status: Offline Points: 184 |
 Post Options Post Options
 Thanks(0) Thanks(0)
 Quote Quote  Reply Reply
 Posted: March-22-2009 at 2:01am Posted: March-22-2009 at 2:01am |
|
Hey 8122pbrainard,
I put my Acme 540 on today and everything went great. I had a little trouble finding the high spot blue. No auto stores have it and only two Napa stores in the Atlanta area had it. When I finished putting the castle nut on and installed the cotter pin the thing looks like a butterfly on the end of the shaft. I just cannot get it to wrap tight around the nut. Do you know any tricks to wrap it tight to the nut or does it even matter? Clew In |
|
|
Clew In
|
|
 |
|
8122pbrainard 
Grand Poobah 

Joined: September-14-2006 Location: Three Lakes Wi. Status: Offline Points: 41045 |
 Post Options Post Options
 Thanks(0) Thanks(0)
 Quote Quote  Reply Reply
 Posted: March-22-2009 at 10:35am Posted: March-22-2009 at 10:35am |
|
Tom,
The cotter legs get bent fore and aft and not radially around the hex of the nut. So, the "head" of the cotter sits all the way into one of the groves in the nut, one leg gets bent over the end of the shaft then the other you can trim shorter so it just gets bent forward over the nut. I guess I stopped short with my install and should have included a picture! Later! Don't worry if the cotter isn't tight. |
|
 |
|
Post Reply 
|
Page 123 4> |
|
Tweet
|
| Forum Jump | Forum Permissions  You cannot post new topics in this forum You cannot reply to topics in this forum You cannot delete your posts in this forum You cannot edit your posts in this forum You cannot create polls in this forum You cannot vote in polls in this forum |