 Boats For Sale:


Another BFN Rebuild |
Post Reply 
|
Page <1 1011121314 31> |
| Author | ||
jbear 
Grand Poobah 

Joined: January-21-2005 Location: Lake Wales FL. Status: Offline Points: 8193 |
 Post Options Post Options
") Thanks(0) Thanks(0)
 Quote Reply Quote Reply
 Posted: June-15-2010 at 3:28am Posted: June-15-2010 at 3:28am |
|
What else can be said? I really enjoy watching you craftsmen redoing these boats. john |
||
|
"Loud pipes save lives"
AdamT sez "I'm Canadian and a beaver lover myself"... |
||
 |
||
|
Morfoot
Grand Poobah

Joined: February-06-2004 Location: South Lanier Status: Offline Points: 5312 |
Post Options
Thanks(0)
Quote Reply
Posted: June-15-2010 at 9:11am |
|
Yep! Tim you and your dad could go into the composite business. Looks fantastic. Kinda like lewy said. Its a shame you gotta cover up all the beautiful work you guy's have done. 
If Delta is ever looking for a new composite guy in the Hartford area I'll put in a good word for ya! 
|
||
|
"Morfoot; He can ski. He can wakeboard.He can cook chicken.He can create his own self-named beverage, & can also apparently fly. A man of many talents."72 Mustang "Kermit",88 SN Miss Scarlett, 99 SN "Sherman"
|
||
|
||
|
TRBenj
Grand Poobah

Joined: June-29-2005 Location: NWCT Status: Offline Points: 21115 |
Post Options
Thanks(0)
Quote Reply
Posted: June-15-2010 at 11:15am |
|
|
Pete, what exactly is melamine? Is it a laminate? I just want to make sure Im looking for the right stuff! I have some FG mold release from McMaster- I planned to use it when I finally start popping out the Skier buckets.
Roger, Ill bring a small piece with me- Ive been saving all of our scrap. Lewy, if Joe remembers correctly, then we ended up buying the exact same amount of coosa. Im not claiming the boat is unsinkable- just trying to do a few obvious things now while its apart that might help the cause. If you cant make it back to GL this year, no worries- this may be my ride of choice for the next few years. Would be great to have you back though. I suppose its ok if youre rooting for Joe- but maybe the fact that we painted our 454 "Ford Blue" would help sway you?
John/Tim- thanks, but we're no craftsmen... just a couple of hobbiests here! I dont think I could go into the composites business- I work too slow to make any money! |
||
|
||
|
TRBenj
Grand Poobah
Joined: June-29-2005 Location: NWCT Status: Offline Points: 21115 |
Post Options
Thanks(0)
Quote Reply
Posted: June-15-2010 at 12:12pm |
|
|
Almost forgot- quick update from last night. We glassed the doubled up floor piece and bedded the large 3/4" front floor section. We also bedded the rear spacers between the primary and secondaries and glassed the lifting ring assembly in.

Tonight I hope to get the floor glassed to the ribs/bulkheads at front and rear, finish filleting the floor to the wall, and finish trimming the floor to the bilge. |
||
|
||
|
Riley
Grand Poobah

Joined: January-19-2004 Location: Portland, ME Status: Offline Points: 7948 |
Post Options
Thanks(0)
Quote Reply
Posted: June-15-2010 at 12:21pm |
|
|
Tim, Hobbiest? I'd say Artist!
|
||
|
||
|
wakeboardin2k4
Platinum Member 

Joined: December-14-2006 Location: Hopatcong, NJ Status: Offline Points: 1117 |
Post Options
Thanks(0)
Quote Reply
Posted: June-15-2010 at 12:24pm |
|
|
I can't wait to see that pretty blue BBC with those nice EMIs sitting in that boat. Should be a beautiful site.
|
||
|
"I'm planning to bring my girl that rides on a trailer with me and leave my girl that complains about camping at home"
|
||
|
||
|
8122pbrainard
Grand Poobah

Joined: September-14-2006 Location: Three Lakes Wi. Status: Offline Points: 41040 |
Post Options
Thanks(0)
Quote Reply
Posted: June-15-2010 at 1:53pm |
|
Tim, It's the real thin sheet (not formica) they put on cheap particle board shelving and furniture. It can be wood grain or a plain solid color. For your forms, I think a couple pieces of the cheap shelving as mentioned would work great. |
||
|
||
|
horkn
Platinum Member

Joined: September-10-2007 Location: Cedarburg, Wi Status: Offline Points: 1511 |
Post Options
Thanks(0)
Quote Reply
Posted: June-15-2010 at 1:57pm |
|
Hobbyists can do a great job, especially when it's their toy that they are working on.
We may take longer but there is a pride in ownership that is beyond compare. You BFN is looking great! I hope to be able see it at GL. I'm thinking I can get the boat out to GL either Saturday or Sunday of that weekend. I'm one of those ford loyalists as well, but I'm happy to hear you painted the motor ford blue. 
|
||
|
78 martinique- refloored, reinforced, stringers re glassed, re engineered interior
GT40P heads Edelbrock Performer intake acme 4 blade http://img.photobucket.com/albums/v64/horkn/fish/nautique.jpg |
||
|
||
|
M3Fan
Grand Poobah

Joined: October-22-2005 Location: United States Status: Offline Points: 3185 |
Post Options
Thanks(0)
Quote Reply
Posted: June-15-2010 at 2:22pm |
|
|
So that rear lifting ring is just held on by the 4 thru-bolts on that one piece of coosa? Is that all it needs because the vertical load would be more of a shear load on those bolts? Seems like a couple thousand pounds could rip that out but perhaps not if the load is vertical?
|
||
|
2000 SN GT40 w/99 Graphics/Gel
2016 SN 200 OB 5.3L DI https://forum.fifteenoff.com |
||
|
||
|
TRBenj
Grand Poobah
Joined: June-29-2005 Location: NWCT Status: Offline Points: 21115 |
Post Options
Thanks(0)
Quote Reply
Posted: June-15-2010 at 3:19pm |
|
|
Joel, the new lifting ring assembly is not all that dissimilar from the original. The backer is actually one large piece of 3/4" coosa, with 2 smaller pieces of 1/2" laminated to it (under the angle). Each of the pieces were preglassed on both sides, then laminated together with another layer of cloth. The angle is 3/8" thick 3"x3" stainless (the original was plain steel) and bedded with thickened resin to the coosa. The 4 bolts are 7/16" ss, which are bedded in at the rear. The edges were filleted on the smaller stack up, and 4-5 layers of glass were added all around before it went in the boat. Another 4 layers of cloth were added to each side once in the boat, then the whole thing was covered in biax. All bedding material was epoxy thickened with milled fiber- the strongest stuff I found.
That being said, I didnt go through the strength calculation for the bolts. The shear strength of the 4 bolts, plus the strength of the adhesion of the angle to the backer may very well be the weak point of the design. It would either be that, or the adhesion of the whole coosa assembly to the transom- or the ability of the 1/8" thick transom to support the load of the entire boat. Instead, I simply replaced old, rusted parts (probably not very high grade originally- I couldnt ID them) with what I deem to be better (SS) material of the same size, and use a healthy glass schedule for the whole thing. Considering that I dont really plan to use the lifting rings- and certainly not on a regular basis- combined with the fact that there are many old CC's still hanging by their original rings (many of which are likely made up of well rusted metal parts and wet or rotten wood), Im not going to lose much sleep over it.
|
||
|
||
|
M3Fan
Grand Poobah
Joined: October-22-2005 Location: United States Status: Offline Points: 3185 |
Post Options
Thanks(0)
Quote Reply
Posted: June-15-2010 at 3:38pm |
|
|
Great explanation on the lift ring. I was totally just curious on the whole thing. I know nothing of fiberglass strength, etc. so this is educational to me. I agree that the factory setup supporting the whole boat is borderline miraculous. I'll have to take a peek at how the 00 rear lift ring is rigged up next time I'm in there.
|
||
|
2000 SN GT40 w/99 Graphics/Gel
2016 SN 200 OB 5.3L DI https://forum.fifteenoff.com |
||
|
||
|
8122pbrainard
Grand Poobah
Joined: September-14-2006 Location: Three Lakes Wi. Status: Offline Points: 41040 |
Post Options
Thanks(0)
Quote Reply
Posted: June-15-2010 at 4:15pm |
|
|
The angle on the transom is actually a "carryover" design from the wood hulls. Worked for years even when the transom frames started to rot at the bottoms!

My X55 has a brass 3/4" downrod to a keel mounted clevis but it's bolted onto the keel with only 2 5/16 bolts!! Yes they are in vertical tensile loading but it never bothered me!! |
||
|
||
|
Okie Boarder
Gold Member
Joined: August-31-2009 Location: OK Status: Offline Points: 779 |
Post Options
Thanks(0)
Quote Reply
Posted: June-15-2010 at 5:09pm |
|
|
Looking really good...you're coming along nicely. The craftsmanship is awesome. Now hurry up and stop attaching new pieces so you can drink those 30 packs of PBR and ML.
|
||
|
||
|
TRBenj
Grand Poobah
Joined: June-29-2005 Location: NWCT Status: Offline Points: 21115 |
Post Options
Thanks(0)
Quote Reply
Posted: June-18-2010 at 4:26pm |
|
|
Quick update. This week we bedded the front section of the floor. Then we spent some time filleting the edges and seams, and sanding them smooth. We also got the battery box finished (capped drain hole, installed inspection port) and bedded. In case no one has picked up on my Dresdon Blue battery box, this originally came installed on Mr. Fennessy's '83 2001.
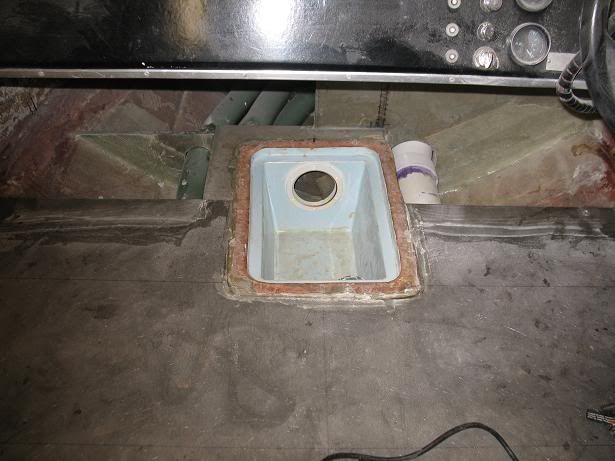
We also got the rear mini ribs glassed in. 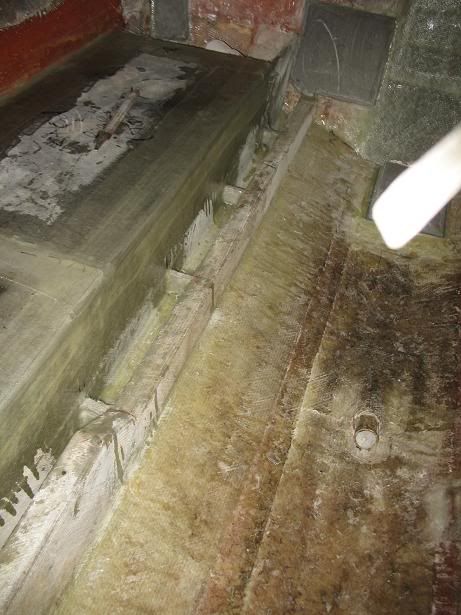
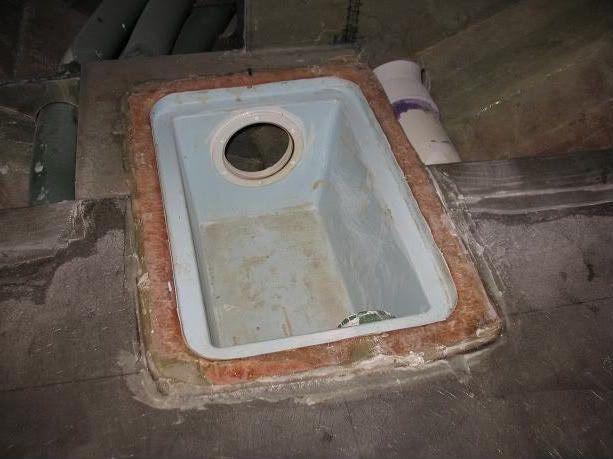
We also got the rudder port backer, pylon cup/bilge pump base and all the transom backers (exhaust tips, platform brackets, airguide ballast tube backers) bedded down as well. 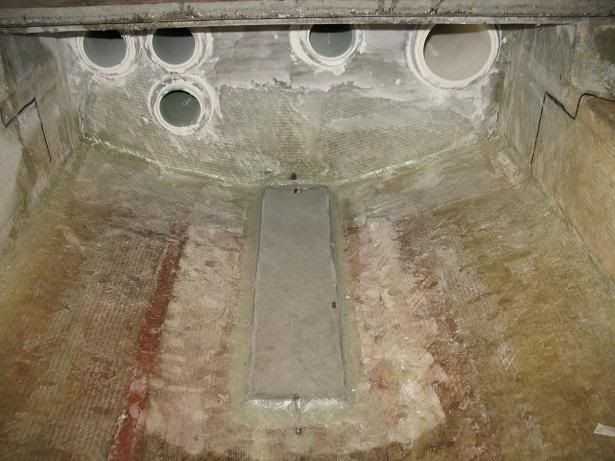
The next step will be to glass down all the backers we have bedded, as well grinding and glassing the battery box area. Then we can proceed to foaming the front compartments. |
||
|
||
|
Nevergrew
Groupie 

Joined: March-22-2010 Location: Australia, NSW Status: Offline Points: 74 |
Post Options
Thanks(0)
Quote Reply
Posted: June-19-2010 at 12:24am |
|
|
Oh my goodness
 That is some serious floor and stringer work there mate !! Bloody brilliant ! That is some serious floor and stringer work there mate !! Bloody brilliant !
It puts our Aussie made under floor work to shame. I'll be following this thread with interest. |
||
|
||
|
Pgaboeing
Senior Member 
Joined: May-16-2007 Location: United States Status: Offline Points: 140 |
Post Options
Thanks(0)
Quote Reply
Posted: June-19-2010 at 1:00am |
|
|
Tim, Its good to see some of my parts going to good use.Looks Great!!
Pgaski |
||
|
||
|
bkhallpass
Grand Poobah

Joined: March-29-2005 Location: United States Status: Offline Points: 4723 |
Post Options
Thanks(0)
Quote Reply
Posted: June-19-2010 at 1:35am |
|
|
Tim, if you've ever bought a white closet organizer (shelving), the white covering over the particle board is melamine. Boat looks great. I wish I was making your progress, but then again, I'd have to work a lot harder at it than I am.
BKH |
||
|
Livin' the Dream
|
||
|
||
|
79nautique
Grand Poobah

Joined: January-27-2004 Location: United States Status: Offline Points: 7872 |
Post Options
Thanks(0)
Quote Reply
Posted: June-19-2010 at 11:31pm |
|
|
Tim I was under the impression that when using the composite type panels like the board your using, that the entire panel needed impregnated with resin. It looks like a section isn't coasted and only where you added the glass over the edges and seems.
|
||
|
||
|
C-Bass
Platinum Member

Joined: November-18-2008 Location: Columbus, IN Status: Offline Points: 1248 |
Post Options
Thanks(0)
Quote Reply
Posted: June-20-2010 at 2:27pm |
|
Chris, I think he's planning on it for the next update.
This is a very neat project, and many thanks for the work of documenting it. I'm sure it would be much easier to not stop and take pictures and write all of this up. |
||
|
||
|
TRBenj
Grand Poobah
Joined: June-29-2005 Location: NWCT Status: Offline Points: 21115 |
Post Options
Thanks(0)
Quote Reply
Posted: June-21-2010 at 11:20am |
|
Chris, Im not sure that the coosa is required to be covered in resin, though we arent leaving any exposed. Just the seams on the floor are taped on top for now (the back side of the floor panels have 2+ layers of glass), but the entire floor is getting a minimum of 3 layers of glass once its all in. I want to get the front compartments foamed before glassing over everything. Yesterday I got the battery box area ground smooth and taped, as well as the rudder port and pylon base glassed down. Tonight will be a quick night- just going to shape and bed the side of the air box so we can foam later this week. Weather is good, so we're going skiing. |
||
|
||
|
TRBenj
Grand Poobah
Joined: June-29-2005 Location: NWCT Status: Offline Points: 21115 |
Post Options
Thanks(0)
Quote Reply
Posted: June-25-2010 at 8:12pm |
|
|
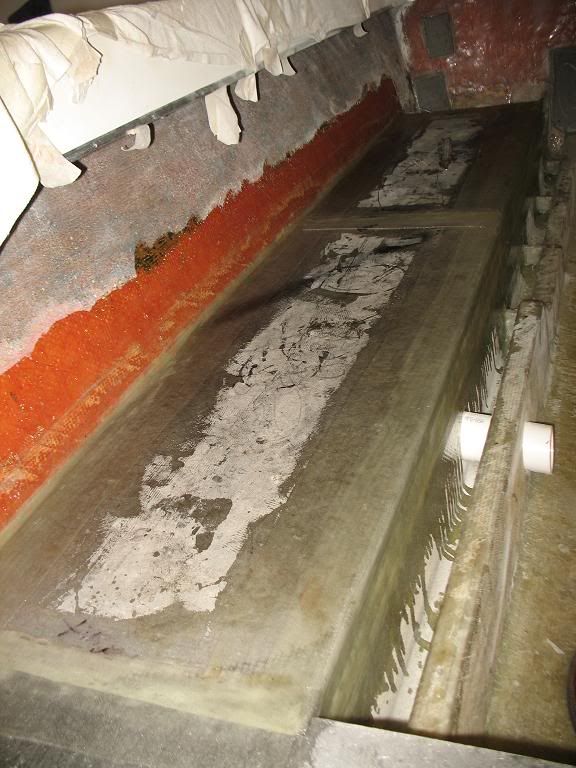
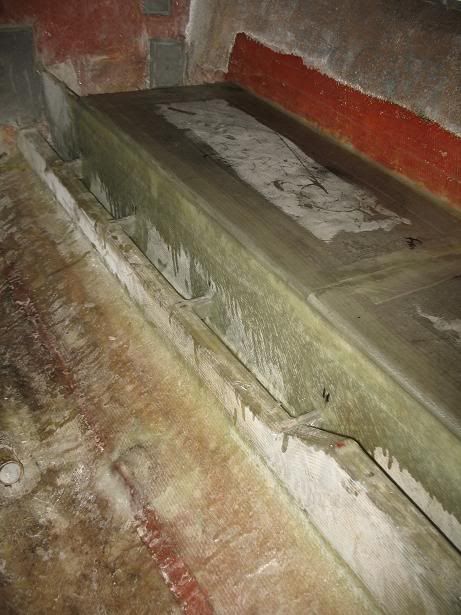
We made some more progress this week.
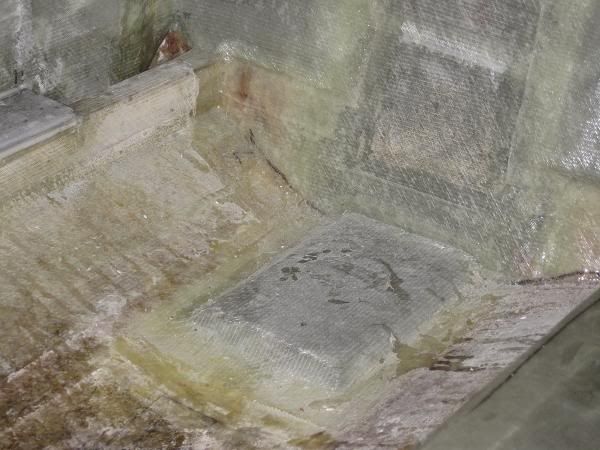
Last Sun I glassed the edges of the battery box and the small piece of floor around it, as well as the pylon and rudder port bases. 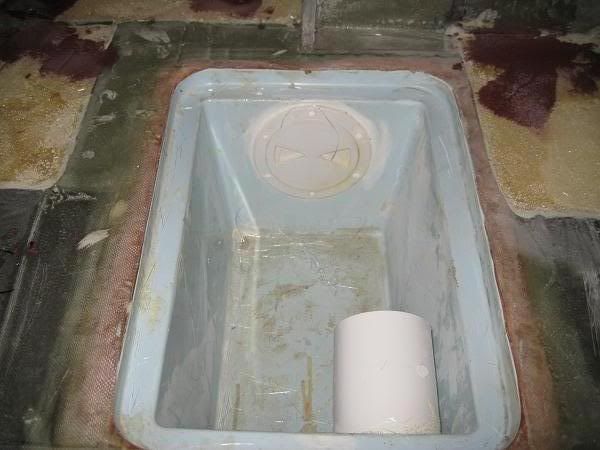

This week we finished assembling the vent hoses in front and poured the foam. I thought I had a bunch left from my Ski Tique restore, but I guess it wasnt as much as I thought. I had just enough to finish the floor, but had to place an order for more so I can finish filling up the airbox. Luckily, it really shouldnt hold us up. The dark spots you see are a little bit of fairing in the low spots before glassing. 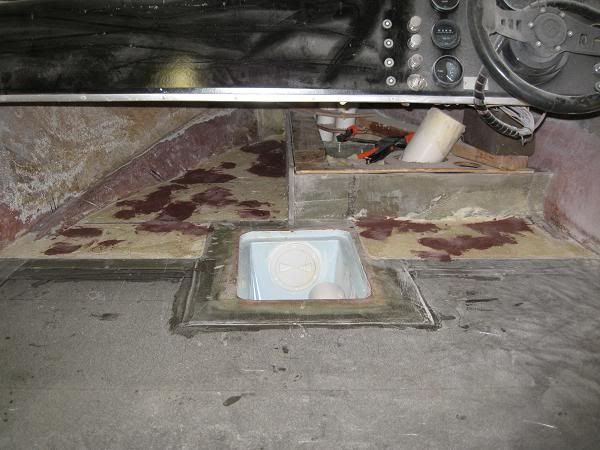
I didnt go and buy any melamine shelving, just traced the top of the air box onto some ply and cut it out, then covered it in resin and mold release. This is holding the vents in place while I pour from the top, we'll see if the foam sticks to it or not. As you can see, even with reusing all of my scrap, I ran a bit short on foam. 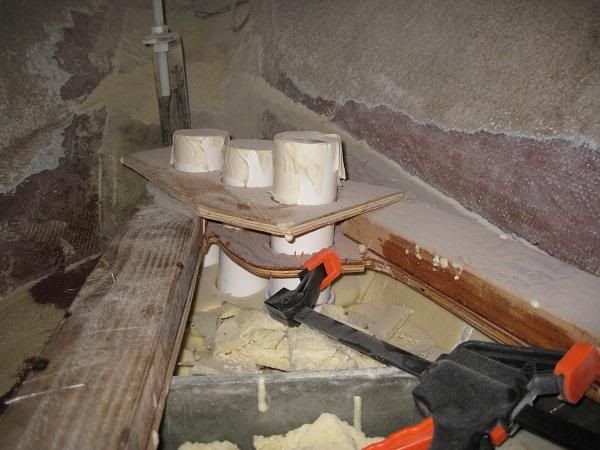
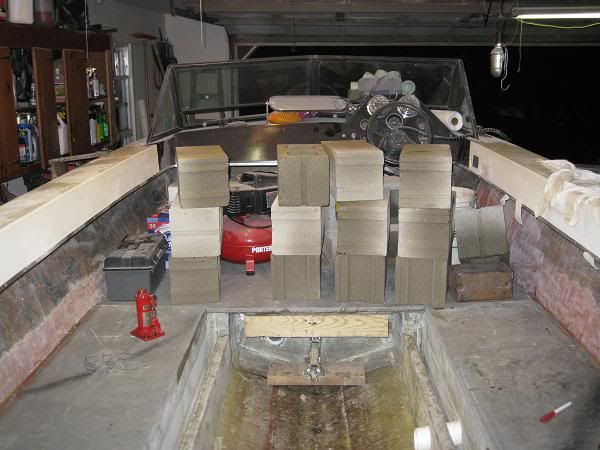
Dad glassed the rear transom backers for the exhaust, platform and other misc hardware. Earlier this week we pre-glassed the bottom of the sub floor pieces. Today Dad bedded them: 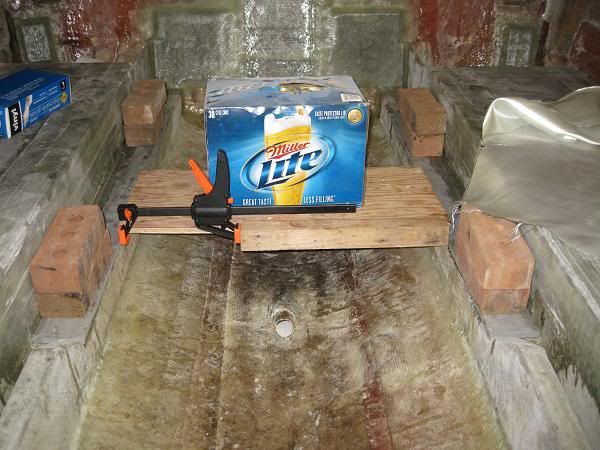
And later, I filleted them: 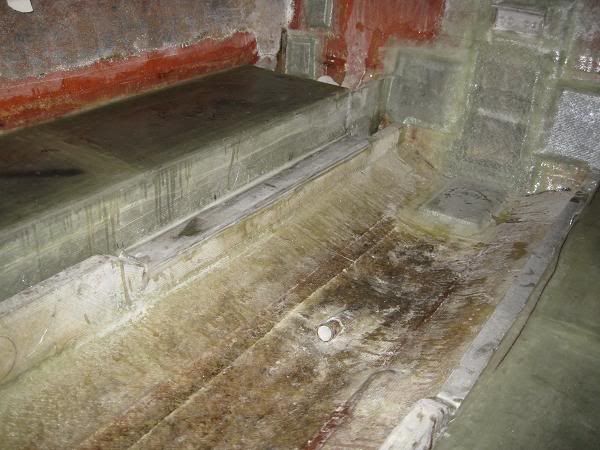
In the meantime, we got 2 layers of glass over the entire floor. The front (foam) section got one layer each of mat and cloth, the coosa got 2 layers of cloth. Still one more layer of mat to go over everything. 
|
||
|
||
|
TRBenj
Grand Poobah
Joined: June-29-2005 Location: NWCT Status: Offline Points: 21115 |
Post Options
Thanks(0)
Quote Reply
Posted: June-28-2010 at 11:35am |
|
|
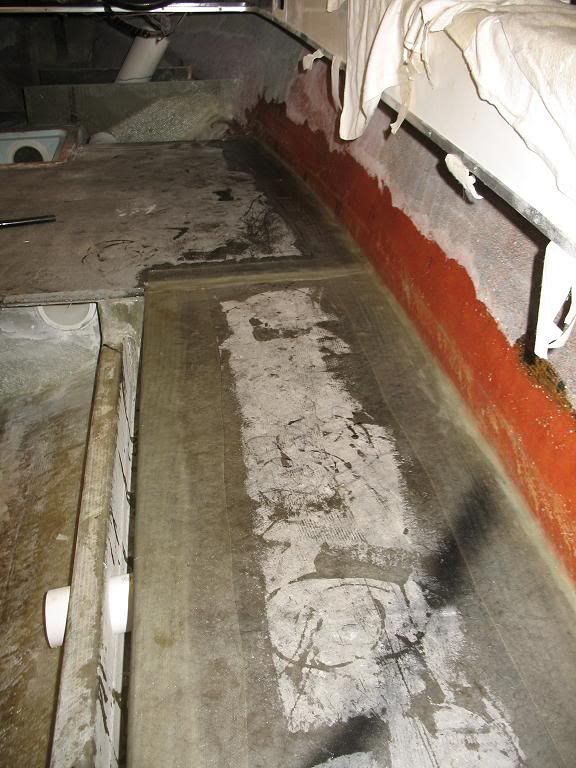
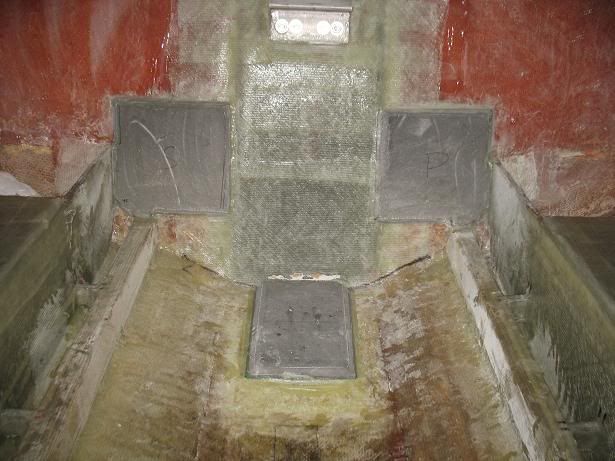
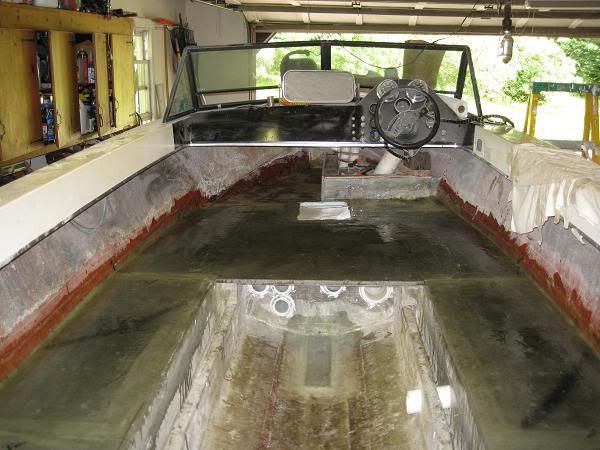
We got the final layers of glass on the floor over the weekend. Also got the bilge cleaned up and a few more strips of biax layed down. This should make for a pretty stout hull. We've started assembly of the removable floor panel as well... pics are on Dad's camera.
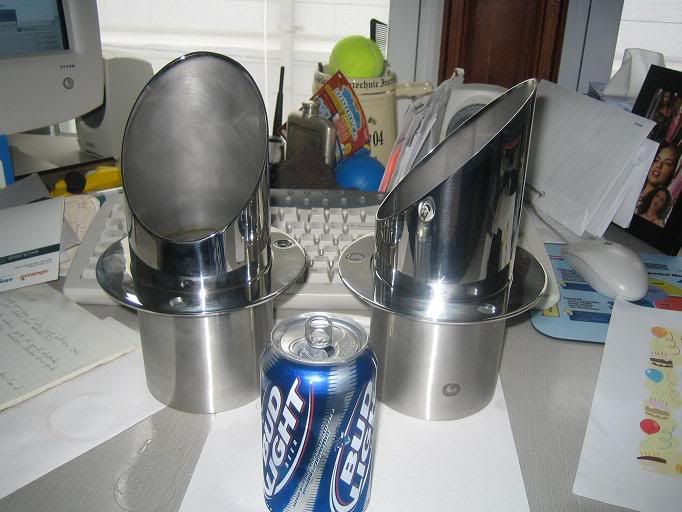
Foam should be here Tues so we can finish up the air box. Just have to glass in the supports for the rear panel, and do a bunch of final sanding- then its on to installing the hull hardware and finishing the assembly of the engine. Here's a shot of the exhaust tips, original 3" on the left, new 4" on the right. The old ones have found a new home on my sister's '69 Mustang (replacing the original 2-1/4" ones). 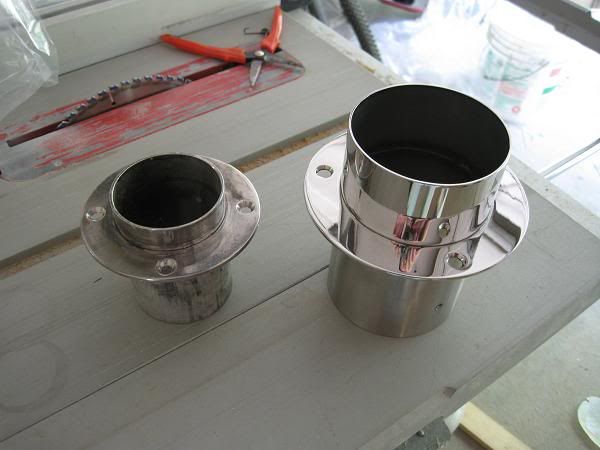
|
||
|
||
|
uk1979
Platinum Member
Joined: June-13-2007 Location: United Kingdom Status: Offline Points: 1411 |
Post Options
Thanks(0)
Quote Reply
Posted: June-29-2010 at 3:33pm |
|
|
Like the new tips Tim, is the small hole which will be on the inside of the hull to fit internal flaps? I'm looking forward to seeing the rebuild at GL.
Roger. |
||
|
Lets have a go
56 Starflite 77 SN 78 SN 80 BFN |
||
|
||
|
TRBenj
Grand Poobah
Joined: June-29-2005 Location: NWCT Status: Offline Points: 21115 |
Post Options
Thanks(0)
Quote Reply
Posted: June-29-2010 at 5:29pm |
|
|
Youve got a good eye, Roger. The new tips were available with and without flaps- I opted to go without. My '90 has the internal flaps but they make a bit of noise... hopefully I dont end up needing them.
|
||
|
||
|
uk1979
Platinum Member
Joined: June-13-2007 Location: United Kingdom Status: Offline Points: 1411 |
Post Options
Thanks(0)
Quote Reply
Posted: June-29-2010 at 6:37pm |
|
|
Thanks Tim but in truth its probably my current desk holders that helped

I didn't know about a noise issue with internal flaps thanks for the heads up. Roger. 
|
||
|
Lets have a go
56 Starflite 77 SN 78 SN 80 BFN |
||
|
||
|
TRBenj
Grand Poobah
Joined: June-29-2005 Location: NWCT Status: Offline Points: 21115 |
Post Options
Thanks(0)
Quote Reply
Posted: June-30-2010 at 3:11pm |
|
|
Roger, those look familiar!
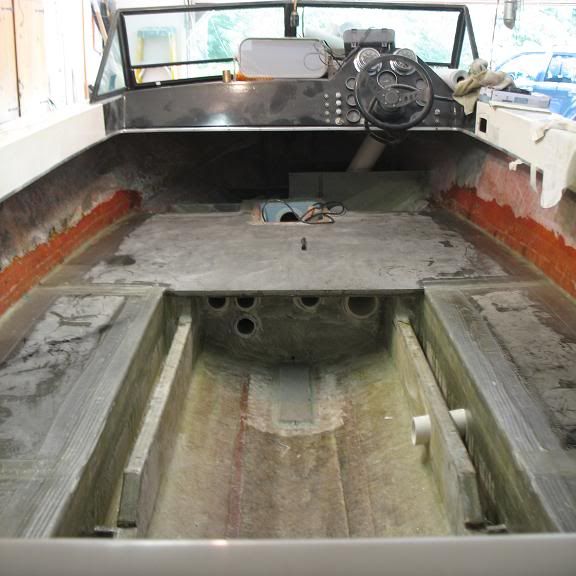
The flappers arent too noisy, but I do notice them sometimes at idle on my '90. So far this week we have ground and sanded the floor and hull, cut, bed and glassed the rear panel supports, put a few more layers of glass on the rear panel, bedded and glassed the gas tank supports and cut/bedded/glassed the final mini-ribs between the stringers. The new foam showed up yesterday so I finished pouring the air box, trimmed it up and bedded the top down as well. Just a bit more foaming at the edge of the wall tonight and then we can glass it in. Dad put some time into building a mold for the side pockets- so those are built too. Tonight we'll get the airbox wrapped up (hopefully), do a bit of trimming/sanding, and cut our holes in the mains for the drains. We're going to need the cradle back pretty quick so we can finalize the rear edge of the front floor section, as well as the final pylon location so I can bed/glass the hull cup and drill a hole in the floor. Otherwise, we're just a round of sanding and fairing away from being ready for bilge paint. Then we're on to engine assembly... I ordered all my tools to check pushrod length this week. I had forgotten that we'll almost certainly need new ones- the new cam has a smaller base circle than the original. Hopefully this wont be a hold up going forward. More pics soon. |
||
|
||
|
M3Fan
Grand Poobah
Joined: October-22-2005 Location: United States Status: Offline Points: 3185 |
Post Options
Thanks(0)
Quote Reply
Posted: June-30-2010 at 3:42pm |
|
|
I've turned my tab to the left at 45* for the past 15 years on my aluminum cans. Did we already discuss this?
|
||
|
2000 SN GT40 w/99 Graphics/Gel
2016 SN 200 OB 5.3L DI https://forum.fifteenoff.com |
||
|
||
|
gun-driver
Grand Poobah
Joined: July-18-2008 Location: Pittsburgh, Pa Status: Offline Points: 4112 |
Post Options
Thanks(0)
Quote Reply
Posted: June-30-2010 at 5:11pm |
|
|
Tim what are you going to use for bilge paint?
|
||
|
||
|
TRBenj
Grand Poobah
Joined: June-29-2005 Location: NWCT Status: Offline Points: 21115 |
Post Options
Thanks(0)
Quote Reply
Posted: June-30-2010 at 5:58pm |
|
|
Ha, I think we did Joel.
Ill be using interlux bilgekote (white) for the bilge paint. |
||
|
||
|
gun-driver
Grand Poobah
Joined: July-18-2008 Location: Pittsburgh, Pa Status: Offline Points: 4112 |
Post Options
Thanks(0)
Quote Reply
Posted: June-30-2010 at 6:55pm |
|
|
Thanks I'm on the '85 project again and getting close to laying the floor and painting the bilge.
|
||
|
||
|
Post Reply
|
Page <1 1011121314 31> |
 Tweet
Tweet
|
| Forum Jump | Forum Permissions You cannot post new topics in this forum You cannot reply to topics in this forum You cannot delete your posts in this forum You cannot edit your posts in this forum You cannot create polls in this forum You cannot vote in polls in this forum |


 Topic Options
 M3Fan wrote: