 Boats For Sale:


Stringer Templates |
Post Reply 
|
Page 123 7> |
| Author | ||
82 Nautique 1 
Senior Member 

Joined: January-06-2007 Location: Rock Island, IL Status: Offline Points: 265 |
 Post Options Post Options
") Thanks(0) Thanks(0)
 Quote Reply Quote Reply
 Topic: Stringer Templates Topic: Stringer TemplatesPosted: December-09-2009 at 7:02pm |
|
|
Does anyone know if someone that has done a stringer replacement project has created any templates for download or use ?
I am considering a stringer replacement project on a 1988 CC 2001 I recently purchased. OR ???? Does anybody do a complete job start to finish ?? COST ???? Thanks... Guy's & Gal's Dennis 
|
||
 |
||
|
TRBenj
Grand Poobah 

Joined: June-29-2005 Location: NWCT Status: Offline Points: 21107 |
Post Options
Thanks(0)
Quote Reply
Posted: December-09-2009 at 7:08pm |
|
|
No one here has posted templates for a 2001. There are some drawings for Ski Tique stringers that would also work for the Skiers and Mustangs that used the same 16' hull, but even those arent perfect and will require some massaging to get perfect before installing.
The general consensus is that a quality stringer job will cost about $1500 or so in materials and about 200 hours of labor. Thats about a $5500 job- if you can find someone who does quality work for $20/hr.  Seriously, its very labor intensive- expect to pay close to $10k for a quality job. Seriously, its very labor intensive- expect to pay close to $10k for a quality job.
Your best bet is to read, read, read. Skibum, JoeinNY, gundriver, and a few others have done very nice writeups on their 2001 stringer replacement projects. |
||
|
||
|
8122pbrainard
Grand Poobah

Joined: September-14-2006 Location: Three Lakes Wi. Status: Offline Points: 41040 |
Post Options
Thanks(0)
Quote Reply
Posted: December-10-2009 at 9:36am |
|
|
Dennis,
Now that the cold is here (2 at O'hare now) and seeing you work involves managing a asphalt plant, you should have plenty of time to do this project. Tim is correvt that there is lots of info and many threads here on CCfan. Read up and ask questions if needed. The actual work isn't that complicated it just takes time. Many have done it without ever doing any glass work before and with just basic tools. Edit: Just went down to 1 at O'hare |
||
|
||
|
ryanowen
Senior Member

Joined: June-05-2008 Location: Detroit Status: Offline Points: 284 |
Post Options
Thanks(0)
Quote Reply
Posted: December-10-2009 at 11:47am |
|
Dennis, I'd recommend just removing your stringers carefully and using them as templates. Having a template in advance of removing your stringers won't save you all that much time in the grand scheme of the project. I think you'll find that the cost will quickly exceed the value of the boat if you hire it done. Just plan on setting aside a lot of time if you do it yourself. Good luck! Ryan |
||
|
||
|
Okie Boarder
Gold Member 
Joined: August-31-2009 Location: OK Status: Offline Points: 779 |
Post Options
Thanks(0)
Quote Reply
Posted: December-10-2009 at 11:48am |
|
|
Dennis,
You might take a look at my thread too. Eventhough it isn't a CC, it might give you some ideas. I'm doing a job like this for my first time and getting a lot of help along the way. Basic mechanical aptitude and tools is getting the job done. I spend a couple hours in the evening working on it and try to squeeze in a full day here and there on weekends. I seem to be making decent progress. Hope that helps. BTW, cutting the stringers carefully to use as templates helps. Also, I've been taking lots of measurements so I can duplicate without the template. Together it has been working well. Scribing helps too. |
||
|
||
|
abolton
Groupie 
Joined: September-07-2005 Location: United States Status: Offline Points: 81 |
Post Options
Thanks(0)
Quote Reply
Posted: December-10-2009 at 3:50pm |
|
|
I have just started a stringer job on my 78sn, I have all the foam dug out and one secondary stringer removed. Yesterday I bought the resin, 60' of 1-1/2oz mat and 30' of 18oz roving. That's enough to do all 4 stringers with a sched. lay up of mat/roving/mat completely encapsolating the stringers with 4" tabs on each side to laminate to the hull. The Stringers will be scribed and placed in a bed of thickened resen with a 3/4" filit radius for the tabbing. Nidacor composit for the secondary stringers, clear doug fir for the main stringers only because of the lagged in motor mounts. So far the fiberglass materials have cost me $200. I had a sheet of Nidacor left over from another project, but I need to buy a few sheets more for the flooring instead of plywood. I Hate Wood! too heavy and it rots anyway. My orig. wood stringers only had one layer of mat 3/4 the way up the sides and the tops where not capped. Pretty weak, stringers and bulk heads should be toataly encapsolated and roving should be used in addition to the mat.
|
||
|
ABE
|
||
|
||
|
TRBenj
Grand Poobah
Joined: June-29-2005 Location: NWCT Status: Offline Points: 21107 |
Post Options
Thanks(0)
Quote Reply
Posted: December-10-2009 at 4:06pm |
|
That does not sound like the factory lay up to me- all the Correct Crafts Ive torn into have had glass all the way up the stringers. The mains have all been fully wrapped anywhere there wasnt a piece of wood floor installed directly over them (which would have been covered in glass again). Perhaps your boat has been restrung once before? Take a close look at the thickness of your layup- you'll want to at least match that of the factory, which ranged from 1/8" on up to 1/4" or 5/16". |
||
|
||
|
abolton
Groupie
Joined: September-07-2005 Location: United States Status: Offline Points: 81 |
Post Options
Thanks(0)
Quote Reply
Posted: December-10-2009 at 4:32pm |
|
|
Yea, the Main Stringers are encapsolated, but the secondary ones where not. It is all orig. she is a virgin for sure...
I have a question - I would like to omitt the box down off the secondary stringer that forms the exhaust hose channel. It doesn't seem like it's a structual member. Your thoughts? |
||
|
ABE
|
||
|
||
|
TRBenj
Grand Poobah
Joined: June-29-2005 Location: NWCT Status: Offline Points: 21107 |
Post Options
Thanks(0)
Quote Reply
Posted: December-10-2009 at 4:55pm |
|
|
Are you talking about this buildup (circled in red)?
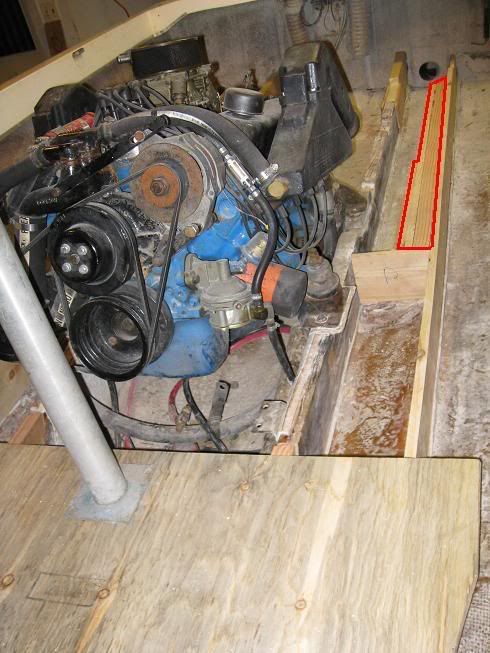
Im not sure I would say that the build up isnt structural. Notice that it happens to line up with one of the shorter/weaker sections of the primary stringer (under the rear mounts). Even if it isnt structural, its still pretty necessary, though. Notice that you need the full width of the pocket at the transom in order to give enough room to attach the exhaust hose to the thru-hulls. Also take a tape measure to your motorbox... notice that if the pockets are left full width, the box is too narrow to cover the channels completely. If you dont mind the front edges of the pockets showing through with the box closed, then you dont need them- otherwise, theyre necessary. |
||
|
||
|
abolton
Groupie
Joined: September-07-2005 Location: United States Status: Offline Points: 81 |
Post Options
Thanks(0)
Quote Reply
Posted: December-10-2009 at 5:07pm |
|
|
Oh you are so right. I didnt think of the motor box since its not there...Da - well Nidacor will be a good choice for that one too. Sorry but I hate wood! I am reducing the hieght of the stringers by 3/4" (except motor mounts) for a full width floor also out of Nidacor.
|
||
|
ABE
|
||
|
||
|
8122pbrainard
Grand Poobah
Joined: September-14-2006 Location: Three Lakes Wi. Status: Offline Points: 41040 |
Post Options
Thanks(0)
Quote Reply
Posted: December-10-2009 at 6:34pm |
|
|
Abe,
I hope you got epoxy resin and not polyester. Also you didn't mention the CPES. Since you hate wood so much, you should be using them. BTW, I don't hate wood! Only one of my boats is glass! |
||
|
||
|
abolton
Groupie
Joined: September-07-2005 Location: United States Status: Offline Points: 81 |
Post Options
Thanks(0)
Quote Reply
Posted: December-10-2009 at 7:52pm |
|
|
I know - everyone is stuck on epoxy resin for a lot of good reasons, but its just needed if the job is done right. Why CPES? A good lay up sched. a fully encapsolated stringer and a dry bildge with bildge paint or colored resin will last a my lifetime. Most well done jobs fail because of a deck or through hull fitting that has let water infiltrate into the core material. Balsa core is especially prone to wicking and I have seen vast areas rot out from a few empty screw holes.
|
||
|
ABE
|
||
|
||
|
Fl Inboards
Grand Poobah

Joined: January-20-2008 Location: United States Status: Offline Points: 2065 |
Post Options
Thanks(0)
Quote Reply
Posted: December-10-2009 at 8:15pm |
|
Why NidaCore? Take a look At Coosa. http://www.coosacomposites.com/nautical.html Also as far a Nautiques center or main stringers being fully encapsulated is not all together true as once the floor in front of the motor is removed you will find the tops of the stringers with no glass over them. |
||
|
Hobby Boats can be expensive when the hobbyist is limited on their own skill and expertise.
1993 Shamrock "fat" 20. 2008 Nautique 196 5.0 |
||
|
||
|
inglesideshawn
Senior Member
Joined: April-03-2009 Location: ingleside, il Status: Offline Points: 203 |
Post Options
Thanks(0)
Quote Reply
Posted: December-10-2009 at 8:25pm |
|
|
ive got all the measurements form my 89 stringer job if that will help..my 2cents are to plan on double what you think ill cost and and another hundred hours to it... dont forget the steering cable, prop,battery,new interior seat bases,bilge pump,fuel gage,hoses,exaust hoses....thats some of the why not stuff.... ohh and post pics....
|
||
|
1989 nautique
|
||
|
||
|
TRBenj
Grand Poobah
Joined: June-29-2005 Location: NWCT Status: Offline Points: 21107 |
Post Options
Thanks(0)
Quote Reply
Posted: December-10-2009 at 8:38pm |
|
Isnt that what I said?
|
||
|
||
|
Fl Inboards
Grand Poobah
Joined: January-20-2008 Location: United States Status: Offline Points: 2065 |
Post Options
Thanks(0)
Quote Reply
Posted: December-10-2009 at 9:00pm |
|
|
Tim, Whats your point? Most of the floors that I have pulled up seem to find a large portion of the rot in front of the motor box. Currently we are doing a stringer job on a 84. At first look one would think their is nothing wrong with this boat as it was kept clean and dry for the most part, but wow how the foam traps water and causes problems. The stringer sustraite is absolute mud. SAY NO TO FOAM!!! |
||
|
Hobby Boats can be expensive when the hobbyist is limited on their own skill and expertise.
1993 Shamrock "fat" 20. 2008 Nautique 196 5.0 |
||
|
||
|
82 Nautique 1
Senior Member
Joined: January-06-2007 Location: Rock Island, IL Status: Offline Points: 265 |
Post Options
Thanks(0)
Quote Reply
Posted: December-10-2009 at 10:36pm |
|
|
Yes, Being it is to cold to make asphalt, might as well start this 88 project. I have been reading lots of the information on several posts from previous projects.
One question I have and have seen it done both ways is. A. Do the secondary stringers 1 at a time B. Then do the Main stringers 1 at a time C. Replace the wood in front of the motor box D. Re glass over all areas. Another question I am unclear on is the importance of covering the replacement wood in front of the motor box with resin or sealer before placing down. I have the time, Just want to do what is best, yet easy as well. Thanks everyone for the information. It really helps. Dennis 
|
||
|
||
|
82 Nautique 1
Senior Member
Joined: January-06-2007 Location: Rock Island, IL Status: Offline Points: 265 |
Post Options
Thanks(0)
Quote Reply
Posted: December-10-2009 at 10:39pm |
|
|
Inglesidehawn.....
Could you send me the measurements you have for your 89 Stringer Job. I will try to remove and save at least the top section, however I would still need the height measurements as well. Thanks |
||
|
||
|
8122pbrainard
Grand Poobah
Joined: September-14-2006 Location: Three Lakes Wi. Status: Offline Points: 41040 |
Post Options
Thanks(0)
Quote Reply
Posted: December-11-2009 at 9:13am |
|
Polyester is hydroscopic and epozy isn't. CPES is such a low viscocity that it will soak into the wood. |
||
|
||
|
8122pbrainard
Grand Poobah
Joined: September-14-2006 Location: Three Lakes Wi. Status: Offline Points: 41040 |
Post Options
Thanks(0)
Quote Reply
Posted: December-11-2009 at 9:18am |
|
|
Dennis,
I suggest CPES glass and resin on all wood. You can go lighter on the glass up front. |
||
|
||
|
82 Nautique 1
Senior Member
Joined: January-06-2007 Location: Rock Island, IL Status: Offline Points: 265 |
Post Options
Thanks(0)
Quote Reply
Posted: December-11-2009 at 10:15am |
|
|
How many layers of glass (and weight or type used)are people placing on the rebuilds ?
1.Over the Plywood floor in front of motor cover 2. From the plywood to the back (over stringers and foam) And guy's thanks for your help.... Your experience & opinions on this subject are a great help. I am also not clear on how you set the new stringers on edge against the hull. (do you brush down resin, place stringer and weight it down ? There has also been mention of colored resin ? How does one do that? Would a colored resin be better in the bilge than bilgecoat ? I know there is a lot of the above questions asked and answered in other forum posts, however it seems there are several people currently in the process of doing this type of work. Let's keep this alive. If it were not my love and pasion for my Correct Craft boat I would not even consider doing this work. Thanks everyone |
||
|
||
|
abolton
Groupie
Joined: September-07-2005 Location: United States Status: Offline Points: 81 |
Post Options
Thanks(0)
Quote Reply
Posted: December-11-2009 at 11:44am |
|
|
1) On just the floor seal with Epoxy Resin, no glass cloth is needed.
2) You might deside not to re-foam... 2 layers of 1-1/2oz mat min. 3) Stringers are set in a bed of thickend resin or equal 4) Add a bit of gel coat (any color) to resin to get tinted resin 5) Epoxy colored resin would be great, most use bilgcoat for cost. |
||
|
ABE
|
||
|
||
|
ryanowen
Senior Member
Joined: June-05-2008 Location: Detroit Status: Offline Points: 284 |
Post Options
Thanks(0)
Quote Reply
Posted: December-11-2009 at 12:14pm |
|
|
First off, keep in mind that I've only done this once. I hardly qualify as an expert, but I did just do it this summer so it's pretty fresh in my mind.
I used a biaxial for everything, so each of my layers were really one layer of mat and one of cloth. I think a lot of guys will use mat, then cloth, then mat and so on to build up thickness. I didn’t get overly hung up on how many layers, I just made sure it was as thick or thicker than the factory. I also made sure to really progressively build up the joints between the floor, stringers and hull. To set the stringers I left a little channel from the old stringers and filled it with a thickened resin compound. You can get it pre-mixed or just make it yourself with the resin you have and some type of thickening material. It had the consistency of drywall mud. Once the stringer was set, I just put some weights on it to hold it down. Gelcoat is the resin typically tinted. I think gelcoat is just a type of polyester resin. I had a batch of gelcoat tinted (for my bilge) to closely match the color of the outside of my boat (gray). Turned out pretty nice and it should stand the test of time. I don’t think you can gelcoat directly over epoxy, so keep that in mind. I used vinylester resin for my project. The main thing I tried to do was build it as good or better than the factory. For example, I capped the secondary stringers, completely covered the plywood floor section in cloth and fiberglassed the driver seat base to the floor rather than screwed it over carpet. The rusted out staples the factory used were replaced with stainless screws. As you pull it apart, it will quickly become apparent where they cut corners. |
||
|
||
|
abolton
Groupie
Joined: September-07-2005 Location: United States Status: Offline Points: 81 |
Post Options
Thanks(0)
Quote Reply
Posted: December-11-2009 at 1:14pm |
|
|
Well said:
I dug out all the foam last week and cut 1" above bottom for the channel like you did. I will pull one stringer at a time too, the secondary poped right out last night in one pc. so I have a nice template. I will post pictures soon. |
||
|
ABE
|
||
|
||
|
BuffaloBFN
Grand Poobah

Joined: June-24-2007 Location: Gainesville,GA Status: Offline Points: 6094 |
Post Options
Thanks(0)
Quote Reply
Posted: December-11-2009 at 1:17pm |
|
|
Here's my .02...and a lot of good info from the gang. It's a BFN, but the proceedures are the same.
Weeding the Pumpkin Patch I used the biaxial as well(#1708? at US Comp) along with mat and cloth. The biaxial is a little tougher to work with but very strong when wetted in properly. I'm also a big advocate of CPES...good stuff! |
||
|
||
|
8122pbrainard
Grand Poobah
Joined: September-14-2006 Location: Three Lakes Wi. Status: Offline Points: 41040 |
Post Options
Thanks(0)
Quote Reply
Posted: December-11-2009 at 1:36pm |
|
|
If you opt for coating the bilge with resin instead of Bilgecoat, tinting agents are available for epoxy. White or gray.
|
||
|
||
|
Okie Boarder
Gold Member
Joined: August-31-2009 Location: OK Status: Offline Points: 779 |
Post Options
Thanks(0)
Quote Reply
Posted: December-11-2009 at 2:06pm |
|
|
I'm new to this as well, but you might be able to glean some information from my thread (eventhough it isn't a CC).
Okie Boarders Stringer Thread I am using CPES on all my wood. I am taking the stringers out one at a time and replacing them as I go. I also plan to have one whole side rebuilt with cross-supports and everything before I do the other side. To set my first stringer I used shims and 1x2 to lift the wood off the hull and also hold it in place. I then mixed up the thickened epoxy and "injected" it in the gap. For thickening the epoxy for bedding I used cabosil. For doing the fillets I used about 60% glass bubbles and 40% cabosil. That seems to be working fairly well. I plan to use biaxial for my stringers and mat on the plywood for the deck (floor) and I'm using all epoxy in mine. |
||
|
||
|
BuffaloBFN
Grand Poobah
Joined: June-24-2007 Location: Gainesville,GA Status: Offline Points: 6094 |
Post Options
Thanks(0)
Quote Reply
Posted: December-12-2009 at 12:05pm |
|
|
For thickeners, mil fiber will add the most strength(cut up glass fibers). I also used talc(cheap) and cabosil, and micro bubbles in different combinations.
Don't use cabosil anywhere you think you want to sand! |
||
|
||
|
82 Nautique 1
Senior Member
Joined: January-06-2007 Location: Rock Island, IL Status: Offline Points: 265 |
Post Options
Thanks(0)
Quote Reply
Posted: December-12-2009 at 11:51pm |
|
|
Started my project today... Wow..
Yes the most damage was in front of the motor box. The Main stringers were not glassed over the tops. ( I wonder why) It appears that the flex hoses for the clean air vents under the floor to the engine compartment failed. Any water entering the vents was captured in the foam. I have a couple questions. Oakie, Did you do the secondary stringer first, then the first main ? Also you stated you placed a wedge under the stringer and injected the filler ? Why did you nat place the stringers on the hull ? To hard to contour ? Will the filler be sufficient ? Someone stated they trimmed 1" above the hull, inserted the new stringer inside of the old fibreglass. Has anyone else did this. I think it would be best to remove all of the old?? Has anybody added additional alluminum supports under the wood seating area for support? I would think something could be made similar to the engine cradle. Thanks everyone for your help. Everyone's experience sure helps us newbees tackle this project. I have been taking pictures and will post as I go. |
||
|
||
|
Wacko
Senior Member

Joined: March-21-2009 Location: BC, Canada Status: Offline Points: 293 |
Post Options
Thanks(0)
Quote Reply
Posted: December-13-2009 at 2:18pm |
|
|
Now answers to your questions but would love to see pics of your progress
|
||
|
||
|
Post Reply
|
Page 123 7> |
 Tweet
Tweet
|
| Forum Jump | Forum Permissions You cannot post new topics in this forum You cannot reply to topics in this forum You cannot delete your posts in this forum You cannot edit your posts in this forum You cannot create polls in this forum You cannot vote in polls in this forum |


 Topic Options
 82 Nautique 1 wrote: