 Boats For Sale:


86 SN rebuild |
Post Reply 
|
Page <12345 11> |
| Author | |
TRBenj 
Grand Poobah 

Joined: June-29-2005 Location: NWCT Status: Offline Points: 21109 |
 Post Options Post Options
") Thanks(0) Thanks(0)
 Quote Reply Quote Reply
 Posted: September-13-2010 at 8:54pm Posted: September-13-2010 at 8:54pm |
Perhaps it was easier because your pieces were shorter? Our pieces were 5-6'. Wrapping the tops of the stringers has always been a PITA for me. Getting the stuff to stick, and then keeping the air bubbles out as it cures is a constant check and recheck process. Doable though, and worth it. I had done a few rebuilds before, but I leaned heavily on Joe and Greg for input when building the BFN. I was really happy with the strength and thickness we were able to achieve with it. |
|
 |
|
|
Ranger
Senior Member 
Joined: August-23-2010 Location: San Diego Status: Offline Points: 151 |
Post Options
Thanks(0)
Quote Reply
Posted: September-13-2010 at 8:55pm |
|
Good enough for me, I'll double up with 2/2 4/4 and 8/8. Then I will wrap the tops with biax.
Did you use the 1708 biax? If I buy the 50 inch material, I can split it up the center for two 25 inch strips, which would leave an adequate tab against the hull. Is that the route you took? Thanks Jeff |
|
|
|
|
uk1979
Platinum Member 
Joined: June-13-2007 Location: United Kingdom Status: Offline Points: 1410 |
Post Options
Thanks(0)
Quote Reply
Posted: September-13-2010 at 9:00pm |
|
Jeff, I found if you roll in the epoxy into biax on a lay up table on both sides as if were wall paper then soak for a while untill you can see through it (put something under the clear plasic sheet to look for ) your have over an hour before it will begin to set so can have a few going at one time, then before you lay in the hull roller a coat of epoxy over first and it will fold round real well then.
|
|
|
Lets have a go
56 Starflite 77 SN 78 SN 80 BFN |
|
|
|
|
BuffaloBFN
Grand Poobah

Joined: June-24-2007 Location: Gainesville,GA Status: Offline Points: 6094 |
Post Options
Thanks(0)
Quote Reply
Posted: September-13-2010 at 9:01pm |
This is a key point I left out. Don't walk away until you're happy with what you have. Keegs, is that an extra run or 2 with the router? 
|
|
|
|
|
Keeganino
Grand Poobah

Joined: October-27-2009 Location: North Carolina Status: Offline Points: 2063 |
Post Options
Thanks(0)
Quote Reply
Posted: September-13-2010 at 10:27pm |
Yes indeed good eye! The funny thing was that I realized it after I did the first one and was determined not to let it happen on the second and sure as the sun will come up tomorrow- zzzzip! Did it on the second one too  ! Filled the gap with filled epoxy. That was when I came up with the ideology that thickened epoxy will cover up most mistakes, gaps, get an air bubble in a layer of glass- cut it out and fill with epoxy, etc. It is the "duct tape", if you will, of the amateur boat builder. ! Filled the gap with filled epoxy. That was when I came up with the ideology that thickened epoxy will cover up most mistakes, gaps, get an air bubble in a layer of glass- cut it out and fill with epoxy, etc. It is the "duct tape", if you will, of the amateur boat builder.
Tim is correct I did short sections of biax at a time and that is probably why it was easier for me. I could not deal with all the transitions and notches using long pieces. I cut three identical pieces and laid them all up at the same time. One for each side and one for the top. The lengths depended on what was going on with the top of the stringer if that makes sense. |
|
|
"working on these old boats may not be cost effective but as it shows its what it brings into your life that matters" -Roger
1973 Skier |
|
|
|
|
charger496
Senior Member
Joined: August-06-2010 Location: atlanta, ga Status: Offline Points: 157 |
Post Options
Thanks(0)
Quote Reply
Posted: September-14-2010 at 1:03am |
|
I finally got to the computer tonight after two days of working on the '77 nautique. My intention was to ask a million questions about layup schedules, cabosil pot-life, how to cut the biax, etc. I can't think of a single question that wasn't answered in this thread! I must've talked to the same guy at U.S. Composites, Ranger. My garage has everything you mentoined. As far as the Fastco two-part glue, it is epoxy based, and strong as hell. It won't chip off the hull where I spilled a big drop. It's not quite thick enough for filleting, though. It runs when it kicks, so I'll use cabosil. I took some "e-mail friendly" lo-res pics yesterday, so when I get a chance to load them to my computer, I'll start that thread. Keegan, are you coming to the Chattahoochee River Run? I swear I'll have my boat in the water by then, probably with no seats, like yours!
|
|
|
|
|
Keeganino
Grand Poobah
Joined: October-27-2009 Location: North Carolina Status: Offline Points: 2063 |
Post Options
Thanks(0)
Quote Reply
Posted: September-14-2010 at 6:42pm |
|
David
I hope I can make it. I coach my son's soccer team and we start this weekend. I am pretty sure we go for 8 weeks but do not have the official game schedule yet. Will know better by the end of the week. Glad my thread was a help to somebody out there! I could not have done the work without this group's support. It has been a long journey, and I still have a punch list but I spent 3 hours on the water today so I am happy! Keegan |
|
|
"working on these old boats may not be cost effective but as it shows its what it brings into your life that matters" -Roger
1973 Skier |
|
|
|
|
Ranger
Senior Member
Joined: August-23-2010 Location: San Diego Status: Offline Points: 151 |
Post Options
Thanks(0)
Quote Reply
Posted: September-15-2010 at 1:08pm |
|
I have been putting together a list of supplies and was hoping that you guys can take a look and let me know what you think. What am I missing? I will also order CPES from Rot Doctor, but this is a list of items from U.S. Composites.

Thanks Jeff |
|
|
|
|
Keeganino
Grand Poobah
Joined: October-27-2009 Location: North Carolina Status: Offline Points: 2063 |
Post Options
Thanks(0)
Quote Reply
Posted: September-15-2010 at 2:28pm |
|
My comments on your order:
Forget the stir stix and tongue depressors. They are only good for mixing small batches(1/2 cup or less). Buy a small paint mixer for your drill. You have to have it when you fill the epoxy. Just make sure you rinse it with acetone after each use and 1 will last the entire project. This will save you lots of time, trees, and you will always get a good mix. I cant remember if they have smaller bags of filler but you are going to have most of the cabosil left over. I am trying to sell the remainder of my cab on here. Probably 7lbs left out of 10. I will deliver it to your door for $55 plus make a donation to CCF.com Did not use the milled fiber but I bet that is way too much of that too. Especially since you are getting both. Get at least 2 sets of pumps for sure. All it takes is to touch the shaft with some resin and its done. Find a harbor freight or go to their website for the gloves and chip brushes. You will pay half that. I used a lot of 2" brushes and did not use the 4" till I got to the 8" tape and the biaxial. I accidentally left the cellophane on a brush one time and found that it worked like a squeegee to spread the resin around the glass, plus it does not absorb the precious resin that way. After that I never took the cellophane off again. Looks like you did your homework and all the bases are covered. Email me if you are interested in the Cab. keeganino76@hotmail.com |
|
|
"working on these old boats may not be cost effective but as it shows its what it brings into your life that matters" -Roger
1973 Skier |
|
|
|
|
Ranger
Senior Member
Joined: August-23-2010 Location: San Diego Status: Offline Points: 151 |
Post Options
Thanks(0)
Quote Reply
Posted: September-15-2010 at 4:10pm |
|
Thanks Keeganino,
I think I have a paint mixer for my drill already, but I probably should pick up another. Good call. I also sent you an email about your left over cabosil. At this point in the project, I spend a lot of time sitting in the boat, thinking, measuring, thinking some more, measuring and the circle continues until I have so many notes, I can't remember what I was doing. Thanks again, Jeff |
|
|
|
|
Ranger
Senior Member
Joined: August-23-2010 Location: San Diego Status: Offline Points: 151 |
Post Options
Thanks(0)
Quote Reply
Posted: September-20-2010 at 12:27pm |
|
I’m going to pull a secondary this coming weekend and will hopefully have something else to post. However, I have another clarifying question. How do you deal with the cut outs in the stringer with regards to your glass and biax. In other words, do you cut the fabric and then use a smaller piece, or do you try to mold the glass to fit the cutout.
Since I am using a 3/4 inch ply deck, my stringers will essentially be flat, but the stringers will be cut for the cradle. Can the cloth mold around this corner easily or should I cut smaller pieces to fit? Thanks for everyone’s help. Jeff |
|
|
|
|
Keeganino
Grand Poobah
Joined: October-27-2009 Location: North Carolina Status: Offline Points: 2063 |
Post Options
Thanks(0)
Quote Reply
Posted: September-20-2010 at 1:42pm |
|
I used 2 layers of 3/4 ply from the pylon forward so I had that step down and notches for crossmembers to deal with. I cut my pieces as long as each section, and laid them that way. In the picture below you can see where I did not wrap the inside faces of the notches. I thought about wrapping those later but since I bedded everything with filled epoxy did not see the need for fabric there. Hope this answers your question.

|
|
|
"working on these old boats may not be cost effective but as it shows its what it brings into your life that matters" -Roger
1973 Skier |
|
|
|
|
gun-driver
Grand Poobah
Joined: July-18-2008 Location: Pittsburgh, Pa Status: Offline Points: 4112 |
Post Options
Thanks(0)
Quote Reply
Posted: September-20-2010 at 2:08pm |
WOW three pages already and you haven't even started yet. 
If you lose the mixing cups and stir sticks you can save about $115.00 I used sauce cans from my local pizza shop to mix in.(like 3lb. coffee cans) I found until you start pouring for the floor it was hard to use more than 18-20 pump mix at one time.(pot life) There will be plenty of wood ripping’s you can use as stir sticks. The glove's you can get at home dumpo (I liked the powered ones, easier to get on). The brushes you can also get at Lowes or Home Depot (chip brushes.99ea.) I used cabosil and milled fiber in everything. I ended up using 2-5qt containers of the fiber and 2-4 gal buckets of cabosil. I still have a little left of each. |
|
|
|
|
Ranger
Senior Member
Joined: August-23-2010 Location: San Diego Status: Offline Points: 151 |
Post Options
Thanks(0)
Quote Reply
Posted: September-20-2010 at 5:50pm |
|
Keegan, yes that answers most of it, but where the cradle sits, the stringer is not notched at a 90 degree angle, it slopes. I'm assuming that I will have to cut smaller pieces to lay in around the sloped area.
On another note, did you figure out your trailer light issue? Gun Driver, Thanks for the suggestions. Not only am I at 3 pages, I also have a groupie status 
Jeff |
|
|
|
|
Keeganino
Grand Poobah
Joined: October-27-2009 Location: North Carolina Status: Offline Points: 2063 |
Post Options
Thanks(0)
Quote Reply
Posted: September-20-2010 at 6:05pm |
|
Jeff you are climbing the ranks quickly. A rebuild will do that to you! No luck on the lights. Marty came over yesterday and we worked on it to no avail. We had a Thomas Edison day- learned a lot but did not get anything to work. Started a thread on it hoping that somebody has been through the same thing. Wrong module is the only thing that makes any sense. The lights all worked when we hooked it up to Marty's truck.
Somebody will probably chime in about glassing around the cradle notches. I am sure there are some tricks out there for getting the glass around those notches. |
|
|
"working on these old boats may not be cost effective but as it shows its what it brings into your life that matters" -Roger
1973 Skier |
|
|
|
|
TRBenj
Grand Poobah
Joined: June-29-2005 Location: NWCT Status: Offline Points: 21109 |
Post Options
Thanks(0)
Quote Reply
Posted: September-20-2010 at 6:09pm |
There are no tricks... glass simply doesnt like to go around 90 degree corners- so avoid making them! Thats why the factory cut outs are rounded... much easier to glass over. I would keep the factory configuration. |
|
|
|
|
JoeinNY
Grand Poobah

Joined: October-19-2005 Location: United States Status: Offline Points: 5693 |
Post Options
Thanks(0)
Quote Reply
Posted: September-20-2010 at 6:27pm |
|
The hard notches and cuts aside from being a pain to glass create stress concentrations which can create failure points. Avoiding stress concentrations is at the fundamental art of very high quality boat building. You can always overbuild and be fine... but if you can avoid stress concentrations you get the most out of what materials you do put in you will be lighter, just as strong, and possibly more durable.. however it takes a lot more thought and usually more effort.
Do use curves to transition from the high to low areas where ever posible.. exceptions are where you are notching to add material back in.. those transitions are strenghtened by the additional materials. It is the same theory as to why you use multiple layers of overlapping tape building up widths.. you dont want an abrupt end to 6 layers of tape where the hull goes from somewhat flexible to rock solid. It is also why I would not run a layer of biax up the side of my hull, and generally stay away from biax it is significant enough that simply ending it creates a stress concentration. In summary.. sharp corners on stringers or abrupt changes in strength in places on the hull = bad. Any stringer attachement to the hull is an opportunity for an abrupt change in strength to the hull.. care should be taken to smooth that transition.. |
|
|
|
|
37N122W
Groupie 

Joined: December-15-2008 Location: United States Status: Offline Points: 83 |
Post Options
Thanks(0)
Quote Reply
Posted: September-20-2010 at 9:04pm |
|
Holy Smokes! Jeff, what have you done to my boat!!

Hi all! I'm the PO of the '86 SN getting overhauled on this thread. I had originally planned to tackle the project but it didn't work out for me - my family wanted a sail boat instead. Now that I'm reading about it from afar, I'm VERY glad it is in someone else's more accomplished hands!! Jeff, I'm glad to see it's working out for you. I'm especially stoked that your son is into it. So cool! Thanks for posting your progress here on CCF. It's great to follow along. I'm happy for you and the boat. She's getting what she deserves! Keep up the good work. Looking forward to the next progress report... Take Care, JJ |
|
|
"It never gets easier, you just go faster." Greg LeMond
|
|
|
|
|
Ranger
Senior Member
Joined: August-23-2010 Location: San Diego Status: Offline Points: 151 |
Post Options
Thanks(0)
Quote Reply
Posted: September-20-2010 at 9:41pm |
|
Hey James, I hope you’re doing well. I just couldn't wait until winter. I tried, but just couldn't do it. I'm planning on having this project finished before next spring so I needed to get going.
All of my supplies for the stringers and deck should be here by Friday, so I am hoping that I make some progress this weekend. Thanks for everyone’s help and suggestions. Jeff |
|
|
|
|
Ranger
Senior Member
Joined: August-23-2010 Location: San Diego Status: Offline Points: 151 |
Post Options
Thanks(0)
Quote Reply
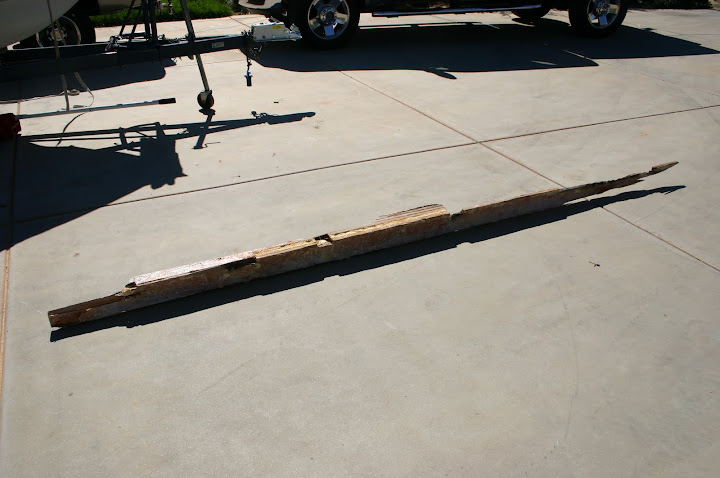
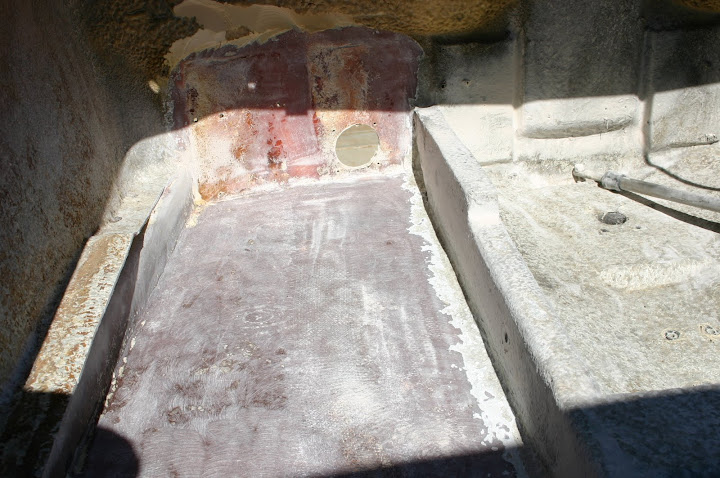
Posted: September-26-2010 at 3:10am |
|
We made good progress today. Started at 7:00 and worked until 2:00. We finished the stands and leveled the boat. Then we cut the starboard secondary stringer out and completely grinded the hull and transom. Tomorrow, I am going to tackle the secondary stringer and get it fit to the hull. I think it's going to take me a while, since I want to build interlocking bulkheads, similar to the V drive rebuild, but I'm happy with what we accomplished today. Hopfully, I'll get something accomplished again tomorrow, but it's been hot. Today it was 104 in the shade. Good thing I wasn't working in the shade?

Jeff 


|
|
|
|
|
BuffaloBFN
Grand Poobah
Joined: June-24-2007 Location: Gainesville,GA Status: Offline Points: 6094 |
Post Options
Thanks(0)
Quote Reply
Posted: September-26-2010 at 10:47am |
|
Cool stands!
Are you going to put that secondary back in before you cut out that main? Makes sense to do it that way if you have room to work. I cut out, prepped, and replaced a side at a time(main & secondary). My V hull may have given more support for that though. Looking good! |
|
|
|
|
BuffaloBFN
Grand Poobah
Joined: June-24-2007 Location: Gainesville,GA Status: Offline Points: 6094 |
Post Options
Thanks(0)
Quote Reply
Posted: September-26-2010 at 10:49am |
|
If I didn't already mention it, a 36 grit flapper disk on a grinder is great for final prep.
|
|
|
|
|
Ranger
Senior Member
Joined: August-23-2010 Location: San Diego Status: Offline Points: 151 |
Post Options
Thanks(0)
Quote Reply
Posted: September-27-2010 at 11:47am |
|
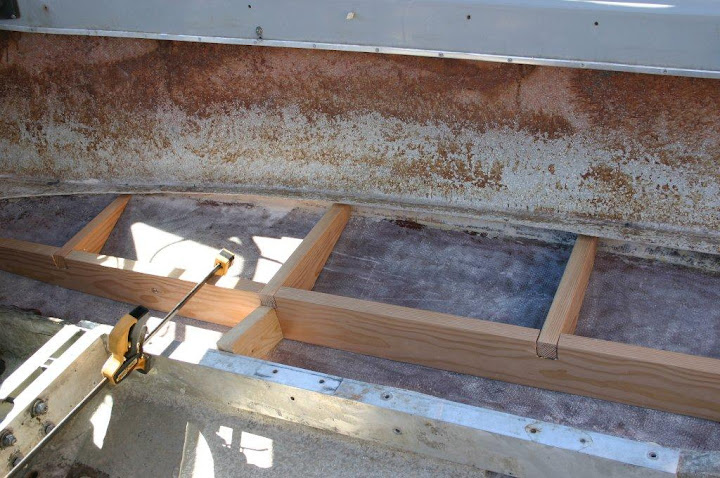
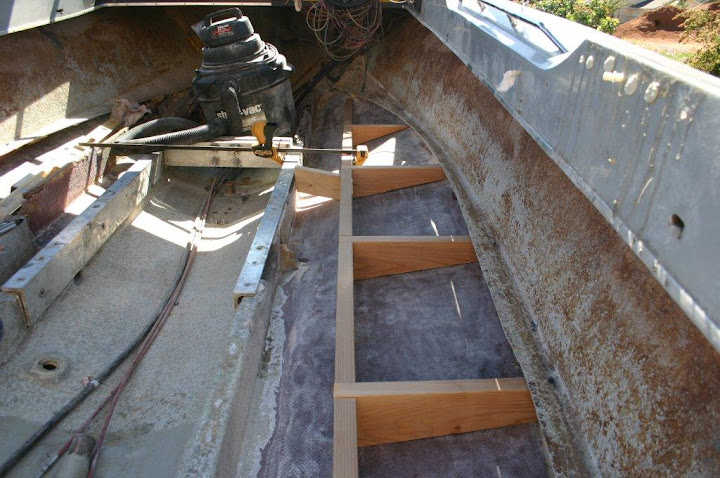
Buffalo, I keep going back and forth regarding pulling the main first. I know that I would like to have it out of the way, before I start glassing in the secondary. But at the same time, I would like to keep it in for reference as long as possible.
What I will probably do is bed the secondary stringer and then cut the main out. Then after I bed the main I can glass everything at the same time. I'm assuming that bedding the secondary will be strong enough to help keep the hull's shape while I work on the main (Thoughts?). As far as yesterday's work, I ended up working through the heat again and got the starboard side secondary dry fit to the hull. I also managed to get all of the bulkhead support cut and fit as well. I still need to do a few minor things like cut water drain holes through all of the pieces. So I am hoping that I can get this side finished by next weekend. I'm also hoping that I can pull the Starboard side main as well. I do have another question. It looks like most people use ply for the backing blocks on the stern. Why would ply be a better choice than something solid? I will most likely install these after the stringers are in, but want to hear from anyone who thinks otherwise. Thanks again for the help! Jeff 
|
|
|
|
|
8122pbrainard
Grand Poobah

Joined: September-14-2006 Location: Three Lakes Wi. Status: Offline Points: 41040 |
Post Options
Thanks(0)
Quote Reply
Posted: September-27-2010 at 12:43pm |
|
Jeff,
I'll through in my .02 cents before Greg does regarding the transom blocking. Ply is used because it spreads the load vertically and horizontally to the glass hull due to the alternating grain direction of the plys. A solid may under certain conditions split down the middle. |
|
|
|
|
Ranger
Senior Member
Joined: August-23-2010 Location: San Diego Status: Offline Points: 151 |
Post Options
Thanks(0)
Quote Reply
Posted: September-27-2010 at 1:43pm |
|
Thanks Pbrain, Makes sense to me. I will probably use 3/4 inch exterior ply. Does CPES work with ply, since it is a laminated product? I could probably read the data sheet, but thought I would ask.
Jeff |
|
|
|
|
Fl Inboards
Grand Poobah

Joined: January-20-2008 Location: United States Status: Offline Points: 2065 |
Post Options
Thanks(0)
Quote Reply
Posted: September-27-2010 at 2:06pm |
|
With all that 2X that hull is going to be hell for stout! Nice job by the way!!
Thanks for the pictures... |
|
|
Hobby Boats can be expensive when the hobbyist is limited on their own skill and expertise.
1993 Shamrock "fat" 20. 2008 Nautique 196 5.0 |
|
|
|
|
BuffaloBFN
Grand Poobah
Joined: June-24-2007 Location: Gainesville,GA Status: Offline Points: 6094 |
Post Options
Thanks(0)
Quote Reply
Posted: September-28-2010 at 10:11am |
I only had 1 penny on me.
|
|
|
|
|
8122pbrainard
Grand Poobah
Joined: September-14-2006 Location: Three Lakes Wi. Status: Offline Points: 41040 |
Post Options
Thanks(0)
Quote Reply
Posted: September-28-2010 at 11:08am |
Jeff, The CPES works as great on ply as it does on solids. It penetrates the wood where the ply adhesive hasn't. |
|
|
|
|
Ranger
Senior Member
Joined: August-23-2010 Location: San Diego Status: Offline Points: 151 |
Post Options
Thanks(0)
Quote Reply
Posted: September-28-2010 at 11:48am |
|
Thanks for the help. But, as usually I have a couple additional questions.
First, I have read where some people do not bed the side bulkhead pieces to the hull. I really don't see why not; as long as you graduate the tape and cloth for a smooth transition, (no hard spots). Does anyone have any experience or suggestions with this? Second, I really do not want to lag the cradle to the stringer. As such, I'm going to use through bolts where possible. Are there any thoughts on drilling a 1 1/2 hole through the stringer and filling it with mill fiber/epoxy. Then redrilling the proper size hole for bolting the cradle to the stringer. I'm not sure if the epoxy will be strong enough. Another option would be to use an 1/8 aluminum plate as a backer, then the load will not be concentrated on the 1 1/2 hole, rather be distributed along the stringer. Are there any other options of bolting through the top of the cradle? If I through bolt the sides, maybe I can get away from them entirely? Any thoughts will be appreciated. Thanks, |
|
|
|
|
8122pbrainard
Grand Poobah
Joined: September-14-2006 Location: Three Lakes Wi. Status: Offline Points: 41040 |
Post Options
Thanks(0)
Quote Reply
Posted: September-28-2010 at 12:26pm |
|
Jeff,
I would bed the bulheads to the hull sides as long as there's prenty of glass to the sides to spread out the loads as you're thinking about. Some don't because of the fear of stress causing gel cracking in the hull sides. The 1&1/2" hole filled with filled epoxy is really the best means of bolting to wood in my opinion. The filled epoxy is stronger than the wood and will spread out the load. You can also do the from the top actually bedding in threaded rod. Overkill? Quite possible! Lags from the top with a CPES treatment and 5200 when running in the lags has been used with very good results - hell of alot better than factory!!
|
|
|
|
|
Post Reply
|
Page <12345 11> |
 Tweet
Tweet
|
| Forum Jump | Forum Permissions You cannot post new topics in this forum You cannot reply to topics in this forum You cannot delete your posts in this forum You cannot edit your posts in this forum You cannot create polls in this forum You cannot vote in polls in this forum |


 Topic Options
 Keeganino wrote:
 They know their stuff!