 Boats For Sale:


1977 Ski Nautique Ressurection |
Post Reply 
|
Page 12> |
| Author | ||
charger496 
Senior Member 
Joined: August-06-2010 Location: atlanta, ga Status: Offline Points: 157 |
 Post Options Post Options
") Thanks(0) Thanks(0)
 Quote Reply Quote Reply
 Topic: 1977 Ski Nautique Ressurection Topic: 1977 Ski Nautique RessurectionPosted: October-17-2010 at 2:20am |
|
|
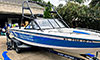
I started rebuilding my boat after making a Windsor-cicle out of my motor last winter. I pulled the motor to find the stringer "repair" that I paid $2000 for in 2007 was, well, about $2000 worth of stringer repair. I really got what I paid for, so I dug in to do it right, and do it myself. Over the past three months I've promised to post pictures of my progress, so here goes my first attempt (actually, second. pics were too big).
    
|
||
 |
||
|
charger496
Senior Member
Joined: August-06-2010 Location: atlanta, ga Status: Offline Points: 157 |
Post Options
Thanks(0)
Quote Reply
Posted: October-17-2010 at 2:26am |
|
|
I'll take better pictures of the current progress, and shrink the 1+mb pics that I have of the muddy mess that were the stringers. I don't have my usual sunday boat day tomorrow, it's my daughters birthday. Is photobucket the best site to shrink pics, or is there a free way?
|
||
|
||
|
jbear
Grand Poobah 

Joined: January-21-2005 Location: Lake Wales FL. Status: Offline Points: 8193 |
Post Options
Thanks(0)
Quote Reply
Posted: October-17-2010 at 2:36am |
|
|
photobucket is so easy even I can do it.
john |
||
|
"Loud pipes save lives"
AdamT sez "I'm Canadian and a beaver lover myself"... |
||
|
||
|
TRBenj
Grand Poobah

Joined: June-29-2005 Location: NWCT Status: Offline Points: 21131 |
Post Options
Thanks(0)
Quote Reply
Posted: October-17-2010 at 11:03am |
|
|
I shrink all my pics using MS Paint.
Bummer that you paid for a stringer repair that wasnt done properly- looks like youre doing it right this time. If you could post up some pics for people to see what a $2k stringer job looks like, that would be helpful. |
||
|
||
|
WakeSlayer
Grand Poobah

Joined: March-15-2006 Location: United States Status: Offline Points: 2138 |
Post Options
Thanks(0)
Quote Reply
Posted: October-17-2010 at 1:01pm |
|
And the find a couple threads with pics of good stringer repairs, take them to the a$$holios who screwed you, and demand some material in trade... |
||
|
Mike N
1968 Mustang |
||
|
||
|
charger496
Senior Member
Joined: August-06-2010 Location: atlanta, ga Status: Offline Points: 157 |
Post Options
Thanks(0)
Quote Reply
Posted: October-18-2010 at 12:30am |
|
|
That is normally exactly what I would do, but I feel like I'm just as at fault. I shopped around for the absolute cheapest solution for my problem, and I got what I paid for. I'll post the pictures of what I pulled out; pressure treated wood with straight cuts not scarfed, fiberglass that didn't really stick to anything, etc. etc.
|
||
|
||
|
Keeganino
Grand Poobah

Joined: October-27-2009 Location: North Carolina Status: Offline Points: 2063 |
Post Options
Thanks(0)
Quote Reply
Posted: October-19-2010 at 1:25am |
|
|
Wow! That just proves you gotta do it yourself. What a nightmare. Everyone always assumes to use pressure treated wood when I bring up my rebuild to friends. Nobody rebuilds these boats for profit because it just aint cost effective. Its a labor of love.
|
||
|
"working on these old boats may not be cost effective but as it shows its what it brings into your life that matters" -Roger
1973 Skier |
||
|
||
|
charger496
Senior Member
Joined: August-06-2010 Location: atlanta, ga Status: Offline Points: 157 |
Post Options
Thanks(0)
Quote Reply
Posted: October-25-2010 at 1:43am |
|
|
So I primed the oil pump, finished off the motor, mated up the trans, hung it from my swing set (as my girls call it), and got the motor in the boat! Huge step, at least mentally, to have the two pieces together at last! I think I've got everything where it needs to be, but of course I have some questions that need to be answered before I go any further. I don't want to rely on any dimensions from the old, ratty stringers (and I didn't take enough before pics), but I think the flanges are aligned close enough to mark the holes, move the motor, drill the holes, treat them with cpes, etc., tighten everything down, and THEN align the motor. My first question is, how long should the exposed portion of the shaft be? From the end of the flange to the beginning of the gland nut is 7 1/4". Too long? The motor came close to aligling without any adjustments. The prop rotates about 5/8" from the hull. Too close? Prop rash waiting to happen, or normal? Well, I can't seem to upload pics right now. It says 'access denied'. I'll post this and try again in a sec.
|
||
|
||
|
charger496
Senior Member
Joined: August-06-2010 Location: atlanta, ga Status: Offline Points: 157 |
Post Options
Thanks(0)
Quote Reply
Posted: October-25-2010 at 1:52am |
|
|
Here's another try at those pics:
     With the motor where it is, the doghouse is right up against the pylon, but it looks like the indentation in the front of the cover is there for that clearance when opening it. With the motor where it is, the doghouse is right up against the pylon, but it looks like the indentation in the front of the cover is there for that clearance when opening it.
|
||
|
||
|
horkn
Platinum Member 

Joined: September-10-2007 Location: Cedarburg, Wi Status: Offline Points: 1511 |
Post Options
Thanks(0)
Quote Reply
Posted: October-25-2010 at 4:15am |
|
|
Yep, the motor's doghouse is cut out so the pylon can be cleared when opening the box.
There is not a lot of room eve from the factory. With my fly high pole on, I have to be careful when I raise the motor box so I don't scratch my vinyl on the box. You are definitely getting there now. |
||
|
78 martinique- refloored, reinforced, stringers re glassed, re engineered interior
GT40P heads Edelbrock Performer intake acme 4 blade http://img.photobucket.com/albums/v64/horkn/fish/nautique.jpg |
||
|
||
|
TRBenj
Grand Poobah
Joined: June-29-2005 Location: NWCT Status: Offline Points: 21131 |
Post Options
Thanks(0)
Quote Reply
Posted: October-25-2010 at 11:11am |
|
Ive found that the best judge of engine position is the length of the shaft protruding from the strut. When the prop is installed, you should ideally have 1/2"-1" of space between it and the strut. 5/8" does seem like marginal prop to hull clearance. I wouldnt necessarily base your engine position on this though... I different prop will improve this clearance. |
||
|
||
|
charger496
Senior Member
Joined: August-06-2010 Location: atlanta, ga Status: Offline Points: 157 |
Post Options
Thanks(0)
Quote Reply
Posted: October-25-2010 at 12:15pm |
|
|
I just went out in the rain to measure the outside shaft again. There is exactly 1 7/8" exposed from the strut to the prop. Considerably more than your reccomendation, TRBenj, but less than it was running with before, based on the shiny area on the shaft. also, exactly 3/4" from prop to hull. By the way, how come it's taking so long for someone to pipe in and say, " my wife says 7 1/2" is plenty of exposed shaft." There. I said it.
|
||
|
||
|
charger496
Senior Member
Joined: August-06-2010 Location: atlanta, ga Status: Offline Points: 157 |
Post Options
Thanks(0)
Quote Reply
Posted: October-25-2010 at 12:22pm |
|
|
I can't remember who had the best one, so can someone direct me to the best thread for alignment?
|
||
|
||
|
8122pbrainard
Grand Poobah

Joined: September-14-2006 Location: Three Lakes Wi. Status: Offline Points: 41040 |
Post Options
Thanks(0)
Quote Reply
Posted: October-25-2010 at 12:22pm |
|
|
David,
What size is the prop that is giving you the 5/8" hull clearance? |
||
|
||
|
TRBenj
Grand Poobah
Joined: June-29-2005 Location: NWCT Status: Offline Points: 21131 |
Post Options
Thanks(0)
Quote Reply
Posted: October-25-2010 at 12:27pm |
|
If youve got a shiny area on the shaft that would clue you in on the engine's original position, I would use that as a guide and replace as-is. Im assuming that the stringers you removed were the factory originals? Almost 2" between the strut and shaft is more than you'd want for smooth running and performance reasons, but it may not be unacceptable. I believe our BFN had ~1.5" from the factory. Regardless, its much easier to buy a new shaft in a different length if you want to fine tune this dimension than it is to move your engine and drill new holes, realign, etc. As far as the prop-hull clearance goes, Id prefer to see 1" or so, but 3/4" *might* be ok. What prop is that with? |
||
|
||
|
charger496
Senior Member
Joined: August-06-2010 Location: atlanta, ga Status: Offline Points: 157 |
Post Options
Thanks(0)
Quote Reply
Posted: October-25-2010 at 12:29pm |
|
|
Sorry Peter, my measurement was off. It's 3/4". Still too tight? The prop is a 3 blade, but I don't know anytthing else about it. It's dinged up, so I need to get a used one soon anyway. What prop is a good all-around one behind a 300hp motor?
|
||
|
||
|
hotboat
Gold Member

Joined: March-28-2009 Location: Conn Lake Pa Status: Offline Points: 814 |
Post Options
Thanks(0)
Quote Reply
Posted: October-25-2010 at 3:24pm |
|
|
My 78 had 2.75 inch between the strut and prop but ran smooth. The 540 worked good as an all around prop on it. I have run the prop anywhere from .25" to 3" from the strut and it changes the handling some but I would say .75 to 1.5" would work great. If Alan reads this I would like to hear if he got to try the new prop he got from acme and let us know how it worked. Thanks Brian
|
||
|
Brian
|
||
|
||
|
TRBenj
Grand Poobah
Joined: June-29-2005 Location: NWCT Status: Offline Points: 21131 |
Post Options
Thanks(0)
Quote Reply
Posted: October-25-2010 at 3:40pm |
|
I would say that 3/4" is marginal- and I bet Pete will agree. The rule of thumb is 10% of the prop's diameter, so 1-1.5" on a 13". The most important thing to realize at this point is that you shouldnt be basing the placement of the engine on the prop clearance... the geometry of those things should fall into place if you maintain the factory set up (engine and strut location). Your goal should be to get the engine back in the same place it came from the factory. Use all the clues you have at your disposal to do that. Later, if you want to optimize your clearances, then do so. Tweaking shaft length is the easiest way to accomplish this. Everything Ive read indicates that minimizing the strut to prop hub clearance (leaving just enough to get a puller in between) will optimize smoothness and performance. If you can identify your current prop, that would be beneficial. It should have some dimensions and a brand stamped on there somewhere. Sometimes its on the face of the hub, other times along the body. The original prop would have been a 13x13 Federal. Prop selection is a bit of a science... knowing how you use the boat and baselining your current performance (getting accurate performance and RPM numbers with a known prop) is a good first step in picking out a wheel that will work best for you. If you can clue us in on those things, there are many here who can point you in the right direction. That being said, many here have been very happy with the performance the new CNC 3-blades offer. The Acme 540 is probably the most common on 351w pwered boats- stock and warmed up ones alike. There are several options though. One advantage to the modern Acmes is the increased aft blade rake- this will increase your hull to prop clearance. |
||
|
||
|
8122pbrainard
Grand Poobah
Joined: September-14-2006 Location: Three Lakes Wi. Status: Offline Points: 41040 |
Post Options
Thanks(0)
Quote Reply
Posted: October-25-2010 at 9:57pm |
|
I agree with Tim and 3/4" is the min. I'd recommend. Yes, check out the Acme 540. Lot's of happy people out there running them on their boats. |
||
|
||
|
charger496
Senior Member
Joined: August-06-2010 Location: atlanta, ga Status: Offline Points: 157 |
Post Options
Thanks(0)
Quote Reply
Posted: October-26-2010 at 12:37am |
|
|
Ok, so the prop is a Dyna-jet 13RH15. I don't know enough to guess what it's strong pionts are, but it's not as dinged up as I thought. I did some very gentle massaging with a small hammer and dolly to get the blade tips in shape. The test-run will determine if I buggered it up. The pros put them in a jig, I know. I'm sure folks are cringing at the thought of taking a hammer to a prop... Anyway, after a couple hours of aligning, the flange still has about .10" of runout, so I'll pick up where I left off later. End of shaft: 1 3/4" or less. Hull clearance still 3/4". I WILL break-in the cam next week! My wife thinks I'm about to move my stuff to the boat and live there. Couldn't imagine doing this without her being so understanding.
|
||
|
||
|
charger496
Senior Member
Joined: August-06-2010 Location: atlanta, ga Status: Offline Points: 157 |
Post Options
Thanks(0)
Quote Reply
Posted: October-26-2010 at 7:08pm |
|
|
I've asked enough questions to be WAY overdue for a donation, and I'll get on that, but here's one more. I noticed my prestolite distributor has no provisions for advance; vacuum, counterweights, or otherwise. It has an aftermarket electronic conversion, and worked fine for years. But with a brand new motor, I don't want to risk detonation. If it's fine like this, where should the timing be set? My guess is 15-20 btdc.
|
||
|
||
|
TRBenj
Grand Poobah
Joined: June-29-2005 Location: NWCT Status: Offline Points: 21131 |
Post Options
Thanks(0)
Quote Reply
Posted: October-26-2010 at 7:14pm |
|
|
Marine distributors dont have a vacuum advance because the engine is always under load (no coasting down hill). If you pop the plate off that holds the EI conversion module, you'll find the weights and springs that determine your advance. You should start with about 10 initial and end up with about 34 final.
Definitely dont spend any money fixing that 13x15 Dynajet, by the way. That is pretty far from the size you need (13x13) so its unlikely you'll be able to use it. Thats probably whats throwing off your hull clearance numbers. I doubt anyone here will have had experience with that particular prop on your hull, so even if you get performance numbers for us, we wont be able to correlate them to something we're familiar with very easily. Id put a new one on your xmas list. |
||
|
||
|
charger496
Senior Member
Joined: August-06-2010 Location: atlanta, ga Status: Offline Points: 157 |
Post Options
Thanks(0)
Quote Reply
Posted: November-08-2010 at 12:14am |
|
|
Progress so far has been to align the motor, assemble the exhaust, and install the gas tank, fuel line, wiring, bilge pump, and blower. After aligning, the engine sits more to the starboard side, so the flexible coupler on the port side is touching the stringer. Does the exhaust get hot enough to damage the fiberglass? I don't think so, but this is the place I can get a definate answer.
    
|
||
|
||
|
charger496
Senior Member
Joined: August-06-2010 Location: atlanta, ga Status: Offline Points: 157 |
Post Options
Thanks(0)
Quote Reply
Posted: November-08-2010 at 12:21am |
|
|
By the way, someone posted a couple weeks ago about hot-glueing these neat little clips to the stringers so you don't need to use screws. works great until they fail. Next time I mix some cabosil, I'll get 'em to stick.
|
||
|
||
|
M3Fan
Grand Poobah

Joined: October-22-2005 Location: United States Status: Offline Points: 3185 |
Post Options
Thanks(0)
Quote Reply
Posted: November-08-2010 at 1:03am |
|
|
Tell us about that Dodge. I'm diggin' those steelies and hubcaps.
|
||
|
2000 SN GT40 w/99 Graphics/Gel
2016 SN 200 OB 5.3L DI https://forum.fifteenoff.com |
||
|
||
|
skfitz
Senior Member
Joined: October-15-2009 Location: Herculaneum Status: Offline Points: 138 |
Post Options
Thanks(0)
Quote Reply
Posted: November-08-2010 at 6:33pm |
|
|
How did you build your front floor? It looks translucent, and there appears to be no foam.
|
||
|
||
|
charger496
Senior Member
Joined: August-06-2010 Location: atlanta, ga Status: Offline Points: 157 |
Post Options
Thanks(0)
Quote Reply
Posted: November-08-2010 at 8:50pm |
|
|
The car is a 1971 Dodge Charger with a 383 stroked to 496 or so. Dyno'd at 530hp/630lbft. The front floor section of the boat is 2 layers of biax and a layer of cloth that I made on a piece of plastic covered plywood, then made a cardboard template of the sections next to the recessed battery box. Cabosil glues it to the stringers and more biax will tie it into the hull.
|
||
|
||
|
skfitz
Senior Member
Joined: October-15-2009 Location: Herculaneum Status: Offline Points: 138 |
Post Options
Thanks(0)
Quote Reply
Posted: November-08-2010 at 11:18pm |
|
Nice idea on the floor. I'll bet it drank resin like a sailor on shore leave. |
||
|
||
|
charger496
Senior Member
Joined: August-06-2010 Location: atlanta, ga Status: Offline Points: 157 |
Post Options
Thanks(0)
Quote Reply
Posted: November-09-2010 at 12:17am |
|
|
Yeah, it took over a pint of resin. Speaking of drinking like a sailor, I had a frustrating day trying to get the motor started. Took the carb off the charger to have a known well-running carb, as specified by the engine builder. Got the timing close to set. Turns out I was 180 off. Re-set the distributor and tried again. Oh, and in the middle of this, I was fighting a dying battery, so I took the battery out of the Charger, which I noticed made the starter sound anemic today. It didn't make it any easier to get the timing close enough to fire. It would turn over for about 5 seconds and then need 10 minutes to recharge on the little trickle charger. It got dark before I could continue. Maybe I can find time tomorrow afternoon to try with a new battery. Oh, and the engine water pump (not the RWP) is leaking like a siev. Guess I should've ordered a new one weeeks ago.
|
||
|
||
|
charger496
Senior Member
Joined: August-06-2010 Location: atlanta, ga Status: Offline Points: 157 |
Post Options
Thanks(0)
Quote Reply
Posted: November-15-2010 at 12:06am |
|
|
It's alive!!! Got the timing close enough to get it to fire, broke-in the cam for 25 minutes or so. The new engine sounds great and I can't wait to get it on the water for an end-of-season test run. Just an hour or so to see what bugs I might need to work out over the winter. The rear of the oil pan has a slight leak that I hope will magically get better. Supposed to rain the next couple days, so maybe before the weekend.
|
||
|
||
|
Post Reply
|
Page 12> |
 Tweet
Tweet
|
| Forum Jump | Forum Permissions You cannot post new topics in this forum You cannot reply to topics in this forum You cannot delete your posts in this forum You cannot edit your posts in this forum You cannot create polls in this forum You cannot vote in polls in this forum |


 Topic Options
 TRBenj wrote: