 Boats For Sale:


Y Block Question |
Post Reply 
|
Page <123> |
| Author | ||
Riley 
Grand Poobah 
Joined: January-19-2004 Location: Portland, ME Status: Offline Points: 7948 |
 Post Options Post Options
") Thanks(0) Thanks(0)
 Quote Reply Quote Reply
 Posted: April-05-2011 at 2:15pm Posted: April-05-2011 at 2:15pm |
|
|
Sure, I figured they made them with holes also, as that's what ours has, one for the pcv valve and one for the oil.
|
||
 |
||
|
boat dr
Grand Poobah
Joined: June-27-2004 Location: United States Status: Offline Points: 4245 |
Post Options
Thanks(0)
Quote Reply
Posted: April-05-2011 at 2:22pm |
|
|
Look closely at the VC on E Bay. No holes.....
Intercepter had their own VC , most were painted, but a very few were chrome... |
||
|
||
|
Riley
Grand Poobah
Joined: January-19-2004 Location: Portland, ME Status: Offline Points: 7948 |
Post Options
Thanks(0)
Quote Reply
Posted: April-05-2011 at 2:39pm |
|
|
I guess I never paid that close attention as we didn't need them. The FE covers on ebay don't have holes either, but I was able to find some nice ones that did. There's a lot of after market stuff out there.
|
||
|
||
|
Inboard Fanatic
Newbie 
Joined: March-27-2011 Location: Texas Status: Offline Points: 29 |
Post Options
Thanks(0)
Quote Reply
Posted: April-06-2011 at 12:44am |
|
|
Billy,
Since you built the 312 that went to England, can you answer my original question in this thread? Should there be an additional spacer between the cam gear and block on a RH rotation 292,(312 in your case)? I checked the video again on YouTube, (sounds great by the way), and it does appear to be a RH engine. Jeff |
||
|
||
|
wingwrench
Senior Member 
Joined: December-11-2010 Location: Lakeland, FL Status: Offline Points: 155 |
Post Options
Thanks(0)
Quote Reply
Posted: April-06-2011 at 2:30pm |
|
On my 256 there is a plate attached to the block with 2 bolts between the cam gear and block. |
||
|
||
|
boat dr
Grand Poobah
Joined: June-27-2004 Location: United States Status: Offline Points: 4245 |
Post Options
Thanks(0)
Quote Reply
Posted: April-06-2011 at 4:23pm |
|
|
wing, give me a call at the shop anytime.........1-318-386-2825
I am no expert by any means on the Y Block, but this is not my first rodeo either........boat dr |
||
|
||
|
Inboard Fanatic
Newbie
Joined: March-27-2011 Location: Texas Status: Offline Points: 29 |
Post Options
Thanks(0)
Quote Reply
Posted: April-14-2011 at 10:22am |
|
|
Just wanted to update everyone on this post, the answer on the additional spacer is that there should only be one spacer between the cam gear and face of the block. In some cases the spacer is integrated into the cam gear and in others it is not. I found out this is the case on RH and standard rotation y blocks. The separate spacer I found during disassembly that was in place between the gear and block was actually supposed to be between the fuel pump eccentric and cam gear and after doing this I now have .002-.003 endplay in the cam as it should be. I will post some pics soon of the progress on this rebuild and I want to thank everyone for their help including Jim over at "The Engine Room" and Billy down in Louisiana for taking the time to speak with me on the phone.
Jeff |
||
|
||
|
8122pbrainard
Grand Poobah

Joined: September-14-2006 Location: Three Lakes Wi. Status: Offline Points: 41040 |
Post Options
Thanks(0)
Quote Reply
Posted: April-14-2011 at 10:34am |
|
|
Jeff,
I'm happy to hear the good news. I knew you'd get the help needed and would find the solution when checking the end play during assembly. The info will sure help when the day comes I need to open mine up!! So, evidently a PO put it together wrong!!! |
||
|
||
|
Inboard Fanatic
Newbie
Joined: March-27-2011 Location: Texas Status: Offline Points: 29 |
Post Options
Thanks(0)
Quote Reply
Posted: April-18-2011 at 10:11am |
|
|
Quick update on my build. Short block almost together, found out the crank oil seal on the timing cover is not the same as an automotive seal for the same engine. Not sure why the Interceptor folks would have done that, naturally it's not a stock item in the parts store either so it is coming in from the store warehouse today. Here are a couple pics, hopefully I got the timing marks right when I indexed the gears, all my manual showed on the RH version is just that, "index the gears", no pictures.
Jeff  
|
||
|
||
|
boat dr
Grand Poobah
Joined: June-27-2004 Location: United States Status: Offline Points: 4245 |
Post Options
Thanks(0)
Quote Reply
Posted: April-18-2011 at 1:10pm |
|
|
Jeff , there was an issue w/high water temp at idle . It is an easy fix fix while the engine is at this stage. Give me a call and I will share what I did on the last three I have built..........Boat dr
|
||
|
||
|
Inboard Fanatic
Newbie
Joined: March-27-2011 Location: Texas Status: Offline Points: 29 |
Post Options
Thanks(0)
Quote Reply
Posted: April-18-2011 at 11:23pm |
|
|
I'll give you a call if I get chance tomorrow Billy. Just for future reference the replacement oil seal is a National seal #472164, it fit like a glove.
Jeff |
||
|
||
|
Inboard Fanatic
Newbie
Joined: March-27-2011 Location: Texas Status: Offline Points: 29 |
Post Options
Thanks(0)
Quote Reply
Posted: May-09-2011 at 10:50am |
|
|
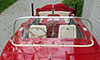
Making some progress on re-assembling the engine but I have hit another snag. Does the screen for the crankcase ventilation in the valley pan under the carbs go aft or forward? I assumed it would go aft for any excess fuel to drain but I am questioning that now after looking at the pics that were taken before I took the assembly apart to blast and paint it. There is an 1/8" vacuum tubing on the one airhorn that is closed off on the bottom and from the pics I have that airhorn is over the screen in the valley, but it is possible this was changed at some time before I got it. I looked at some pics that have been posted here of some original set ups and the air horn with the vacuum tube is aft. Anyone know how it should be?
Jeff |
||
|
||
|
8122pbrainard
Grand Poobah
Joined: September-14-2006 Location: Three Lakes Wi. Status: Offline Points: 41040 |
Post Options
Thanks(0)
Quote Reply
Posted: May-09-2011 at 3:14pm |
|
|
Jeff,
I was hoping Billy would spot your question and respond. He's the one who's recently had a couple Y's apart. I've never dug into mine that far however, I do feel the screen goes aft as well as the carb horn that's open. I'm going to take a look in my manual when I get home. I took a look at the one here in the reference section but it doesn't go into detail on the parts. Mine does. |
||
|
||
|
uk 1979 part2
Groupie 
Joined: April-30-2011 Location: UK Status: Offline Points: 71 |
Post Options
Thanks(0)
Quote Reply
Posted: May-09-2011 at 6:52pm |
|
He has Pete, then rang me to post a picture,have tried to split my post with a new name "Boat,Doc's Yard Boy" as I'm out of down load space. It is set to the back see picture, 
|
||
|
lets have a go 2
|
||
|
||
|
8122pbrainard
Grand Poobah
Joined: September-14-2006 Location: Three Lakes Wi. Status: Offline Points: 41040 |
Post Options
Thanks(0)
Quote Reply
Posted: May-09-2011 at 8:09pm |
|
|
Roger,
I talked with him today as well. Sounds like he may be literally knee deep in whatever comes down that river if the levee doesn't hold!! Jeff, I looked in my manual at the different carb/valley pans/horns/etc. Regrettably, the pictures do not show forward or aft!! However, I still say the pan vent and the carb horn that has the vented bottom, should go aft. It's the aft carb that will puke gas if there are problems! BTW, mine has never done it to my knowledge. |
||
|
||
|
uk 1979 part2
Groupie
Joined: April-30-2011 Location: UK Status: Offline Points: 71 |
Post Options
Thanks(0)
Quote Reply
Posted: May-09-2011 at 9:32pm |
|
Billy and Karen will be in my thoughts and pray it all holds up......but you know Billy he said well if we flood I build a new house....  that's the sprite that built America. that's the sprite that built America.
|
||
|
lets have a go 2
|
||
|
||
|
boat dr
Grand Poobah
Joined: June-27-2004 Location: United States Status: Offline Points: 4245 |
Post Options
Thanks(0)
Quote Reply
Posted: May-09-2011 at 11:01pm |
|
|
The river level as we speak is at 56.98 or 57 feet msl. My house is less than 10 miles from the Mississippi River, it sits at 56 msl. The river is expected to crest at Natchez Mississippi on the 21st at 64 msl.
Not real good in math during school , but I think my shop will get wet if that levee dont hold...........8 to 10 feet over the entire parish is what The Corps predict.... |
||
|
||
|
Inboard Fanatic
Newbie
Joined: March-27-2011 Location: Texas Status: Offline Points: 29 |
Post Options
Thanks(0)
Quote Reply
Posted: June-26-2011 at 3:11am |
|
|
I am getting very close to completeing my rebuild on the 185 Interceptor. I am now trying to figure out what the original set up was on the alternator. I am fairly certain the alternator I have is original, a prestolite in the original Interceptor color, but I am questioning the long bolt spacer set up. The pic below shows how it came to me, there is a long spacer to the rear that does not seem to accomplish anything and I was wondering if maybe there was some sort of bracket that went from the block to the end of that spacer originally as the alternator seems to give too much when I apply tension on the belt and the pulley is not exactly lined up with the others. Also, in the pic is a bracket that was used to hold the voltage regulator and starter relay, questioning whether this was original or not, seems sort of strange to me. After I get these things figured out it will come off the stand and will get the bellhousing and tranny installed. I was holding off on shooting any additional pics until I got the new decals on it, planning on doing that tomorrow.

|
||
|
||
|
wingwrench
Senior Member
Joined: December-11-2010 Location: Lakeland, FL Status: Offline Points: 155 |
Post Options
Thanks(0)
Quote Reply
Posted: June-26-2011 at 9:55am |
|
|
Here is what mine used.

|
||
|
||
|
8122pbrainard
Grand Poobah
Joined: September-14-2006 Location: Three Lakes Wi. Status: Offline Points: 41040 |
Post Options
Thanks(0)
Quote Reply
Posted: June-26-2011 at 10:09am |
|
|
I think you're missing the bracket (arm) that bolts onto the exhaust manifold.
I don't feel the regulator and relay bracket are original. Both would have been on a plate on the aft end of the engine above the bell housing. |
||
|
||
|
Inboard Fanatic
Newbie
Joined: March-27-2011 Location: Texas Status: Offline Points: 29 |
Post Options
Thanks(0)
Quote Reply
Posted: June-26-2011 at 11:02am |
|
|
Thanks for the pic and replys, on the later models with an alternator the adjuster bracket appears to go to the timing cover instead of the exhaust manifold like the earlier generator types, and I have that bracket in place. After looking at the pic from wingwrench there is definitely a bracket to the rear of the long spacer that bolts to the block. I guess during the previous rebuild on this engine they decided it was not needed but I believe it will force the pulley to line up and also make the mount more solid, now all I have to do is find or fabricate one. Off to the shop before it hits 109 again today. Thanks again for the help.
Jeff |
||
|
||
|
8122pbrainard
Grand Poobah
Joined: September-14-2006 Location: Three Lakes Wi. Status: Offline Points: 41040 |
Post Options
Thanks(0)
Quote Reply
Posted: June-26-2011 at 11:57am |
|
Jeff, My 312 with the alternator has the bracket to the exhaust manifold. |
||
|
||
|
Inboard Fanatic
Newbie
Joined: March-27-2011 Location: Texas Status: Offline Points: 29 |
Post Options
Thanks(0)
Quote Reply
Posted: June-26-2011 at 4:51pm |
|
|
Thanks for the info Pete, I guess it's possible they used a different bracket on mine when they did the rest of the work to it. I was going on the pic Skutsch had posted with his all original '63 312 which is also the pic I used to duplicate the air horn arrangement with the vented one to the front and the one with the vacuum line to the rear and also fabricated the lifting strap between the manifold bolts. Here is how everything turned out in the pics below. I will now get it off the lift so I can finsh the rest of the assembly.
Jeff 


|
||
|
||
|
8122pbrainard
Grand Poobah
Joined: September-14-2006 Location: Three Lakes Wi. Status: Offline Points: 41040 |
Post Options
Thanks(0)
Quote Reply
Posted: June-26-2011 at 5:12pm |
|

Is that Alpine Green? |
||
|
||
|
Inboard Fanatic
Newbie
Joined: March-27-2011 Location: Texas Status: Offline Points: 29 |
Post Options
Thanks(0)
Quote Reply
Posted: June-26-2011 at 8:08pm |
|
|
Yes, it is Alpine Green. Here are a few more pics, I went ahead and fabricated a bracket to hold the alternator like it is supposed to be. Maybe by next weekend I can get it off the lift and mount the bellhousing with the starter so I can get it running, getting anxious to hear it run.


|
||
|
||
|
8122pbrainard
Grand Poobah
Joined: September-14-2006 Location: Three Lakes Wi. Status: Offline Points: 41040 |
Post Options
Thanks(0)
Quote Reply
Posted: June-26-2011 at 8:33pm |
|
|
J.
It looks great but I'm disappointed on the color. Reid got it the closest even though it could be a little darker - however, colors don't always come through correctly on the net. 


Did you get the decals from the Steve(s) Hilpisch's? Bruce and Steve, Alpine green is NOT correct!!  
|
||
|
||
|
Gary S
Grand Poobah

Joined: November-30-2006 Location: Illinois Status: Offline Points: 14096 |
Post Options
Thanks(0)
Quote Reply
Posted: June-26-2011 at 9:15pm |
|
|
Looks great Jeff nice job

|
||
|
||
|
wingwrench
Senior Member
Joined: December-11-2010 Location: Lakeland, FL Status: Offline Points: 155 |
Post Options
Thanks(0)
Quote Reply
Posted: June-26-2011 at 9:49pm |
|
|
Looks great Jeff.
Pete, Alpine Green was a perfect match to the original color on my engine. I found 3 layers of greens when I bead blasted the engine, all different. I matched the first layer. If it isn't correct what is the correct color number? Jack |
||
|
||
|
Inboard Fanatic
Newbie
Joined: March-27-2011 Location: Texas Status: Offline Points: 29 |
Post Options
Thanks(0)
Quote Reply
Posted: June-26-2011 at 10:34pm |
|
|
Thanks for the comments. I agree Pete, the Alpine green did not match the original color that I bead blasted off. There does seem to be several variations of the original color out there on engines that supposedly have never been touched. On mine it was lighter with more blue in it, almost like sky blue with a hint of green. Anyway, mine has obviously been redone and the color works for me as far as an "off the shelf" paint goes. The decals did come from Steve Hilpisch, he also confirmed the air horn question for me.
Jeff |
||
|
||
|
8122pbrainard
Grand Poobah
Joined: September-14-2006 Location: Three Lakes Wi. Status: Offline Points: 41040 |
Post Options
Thanks(0)
Quote Reply
Posted: June-26-2011 at 10:53pm |
|
Jack, Then a PO has been in there before you!!!
Jack. You are not keeping it as original as I'd like you to be! You need to do more RESEARCH!!  Did you even use the search feature on the site to see what the color should be?????? No one to date has come up with a "color number". In today's state of technology, it's not even needed!!! It's called "color scanning!! Did you even use the search feature on the site to see what the color should be?????? No one to date has come up with a "color number". In today's state of technology, it's not even needed!!! It's called "color scanning!!
|
||
|
||
|
Post Reply
|
Page <123> |
 Tweet
Tweet
|
| Forum Jump | Forum Permissions You cannot post new topics in this forum You cannot reply to topics in this forum You cannot delete your posts in this forum You cannot edit your posts in this forum You cannot create polls in this forum You cannot vote in polls in this forum |


 Topic Options
 Inboard Fanatic wrote: