 Boats For Sale:


MV-1: Step-by-step teardown, clean and assemble. |
Post Reply 
|
Page <123 |
| Author | |
Morfoot 
Grand Poobah 

Joined: February-06-2004 Location: South Lanier Status: Offline Points: 5312 |
 Post Options Post Options
") Thanks(0) Thanks(0)
 Quote Reply Quote Reply
 Posted: February-08-2012 at 11:46am Posted: February-08-2012 at 11:46am |
I second that motion....All in Favor.. Good write up Chris and thanks for taking the time to snap pics and post them up here. Just another reason why this site is so freaking awesome! 
|
|
|
"Morfoot; He can ski. He can wakeboard.He can cook chicken.He can create his own self-named beverage, & can also apparently fly. A man of many talents."72 Mustang "Kermit",88 SN Miss Scarlett, 99 SN "Sherman"
|
|
 |
|
|
KRoundy
Platinum Member 

Joined: August-23-2010 Location: Lake Stevens Status: Offline Points: 1702 |
Post Options
Thanks(0)
Quote Reply
Posted: February-08-2012 at 3:07am |
|
Awesome post. We need to create a "How To" section on this site! :)
|
|
|
Previous: 1993 Electric Blue/Charcoal Ski Nautique
Current: 2016 Ski Nautique 200 Open Bow |
|
|
|
|
storm34
Grand Poobah

Joined: November-03-2008 Location: Dexter Iowa Status: Offline Points: 4492 |
Post Options
Thanks(0)
Quote Reply
Posted: February-07-2012 at 8:44pm |
|
Thanks Tim, looks like I'll be able to finish this up tonight.
|
|
|
|
|
TRBenj
Grand Poobah

Joined: June-29-2005 Location: NWCT Status: Offline Points: 21125 |
Post Options
Thanks(0)
Quote Reply
Posted: February-07-2012 at 2:03pm |
|
I think Ive used white lithium grease in the last few Ive broken down and reassembled.
|
|
|
|
|
storm34
Grand Poobah
Joined: November-03-2008 Location: Dexter Iowa Status: Offline Points: 4492 |
Post Options
Thanks(0)
Quote Reply
Posted: February-07-2012 at 1:53pm |
|
Great question, I was going to ask the same thing since mine is sitting in the living room waiting to go back in the boat.
|
|
|
|
|
lakedog55
Gold Member
Joined: November-11-2010 Location: Lake Weir Fl Status: Offline Points: 835 |
Post Options
Thanks(0)
Quote Reply
Posted: February-06-2012 at 9:37pm |
|
Nice, Which grease is the correct stuff to use?
|
|
|
Lakedog55
|
|
|
|
|
storm34
Grand Poobah
Joined: November-03-2008 Location: Dexter Iowa Status: Offline Points: 4492 |
Post Options
Thanks(0)
Quote Reply
Posted: February-05-2012 at 7:31pm |
|
Ha! Yes, they run forward on the Tique. I'd guess they are able to run backwards as well. Haven't tried it tho.
|
|
|
|
|
WakeSlayer
Grand Poobah

Joined: March-15-2006 Location: United States Status: Offline Points: 2138 |
Post Options
Thanks(0)
Quote Reply
Posted: February-05-2012 at 1:03pm |
|
But can you reverse it so the cables run forward?

|
|
|
Mike N
1968 Mustang |
|
|
|
|
8122pbrainard
Grand Poobah

Joined: September-14-2006 Location: Three Lakes Wi. Status: Offline Points: 41040 |
Post Options
Thanks(0)
Quote Reply
Posted: January-31-2012 at 8:06am |
|
Good job Chris.
 Kieth should move this thread to the "new" section where he puts all the other info threads. Kieth should move this thread to the "new" section where he puts all the other info threads.
|
|
|
|
|
fanofccfan
Platinum Member

Joined: December-13-2009 Location: North Bend NE Status: Offline Points: 1730 |
Post Options
Thanks(0)
Quote Reply
Posted: January-31-2012 at 12:38am |
|
Well done Chris. Your hands sure stayed clean thru the process!
|
|
|
|
|
Metallman56
Groupie 
Joined: February-23-2005 Location: Indiana Status: Offline Points: 69 |
Post Options
Thanks(0)
Quote Reply
Posted: January-31-2012 at 12:35am |
|
AWESOME POST!!!! this will definatly help me on mine when i get mine redone. in the middle of a stringer project now, 1 stringer out waiting on CPES. to be honest so far getting the throttle off was so far the hardest part.
|
|
|
|
|
storm34
Grand Poobah
Joined: November-03-2008 Location: Dexter Iowa Status: Offline Points: 4492 |
Post Options
Thanks(0)
Quote Reply
Posted: January-31-2012 at 12:24am |
|
Edit- I did my best at describing how to get the control off the boat, but didn't get any pics. When I put it all back together I'll snap some pics and modify the description.
|
|
|
|
|
storm34
Grand Poobah
Joined: November-03-2008 Location: Dexter Iowa Status: Offline Points: 4492 |
Post Options
Thanks(0)
Quote Reply
Posted: January-31-2012 at 12:20am |
|
Hey guys, wanted to share one of my recent winter projects.
I’d been having trouble with my Morse control and wanted to open it up, clean and degrease. Here’s a few pics and a description of my process since I hadn’t seen a step by step instruction to tear one of these down. These pictures are after I’d already torn down the control and did an initial cleaning so expect some more grease. removing the control off the boat: Start with the three Phillips bolts on the outside of the housing. These are backed with washer/nut on the backside. I needed the proper open-end wrench to hold onto the nut since space is limited between the inside of the gunnel and the housing on the backside. (sorry I didn’t get pics of this process.) There are 4 hex head bolts on the backside of the housing that need to be removed next. Might have to open/close the throttle to get at some of them. After these are removed the control cables each have the same hex head bolts holding their respective control arm to the control cables. I had a tough time removing the control arm for my throttle cable, but it finally popped of with some leverage from a screwdriver. Each control cable also has a cotter pin, which needs to be removed. Pull the cables out of their brackets and you should be able to remove the assembly. Tearing down the control itself: First thing I did was to remove the setscrew located under the throttle arm itself. On the backside of the control are two standard bolts in the middle of the brass housing. Be very careful when removing these because they also hold down the somewhat problematic spring and ball assembly people have lost in the past. Keep a thumb over this silver plate just to be safe. In this picture I used a standard screwdriver to slowly pry open the brass housing and remove the silver plate holding the spring and ball. This slowly releases the spring and ball instead of shooting them across the room. 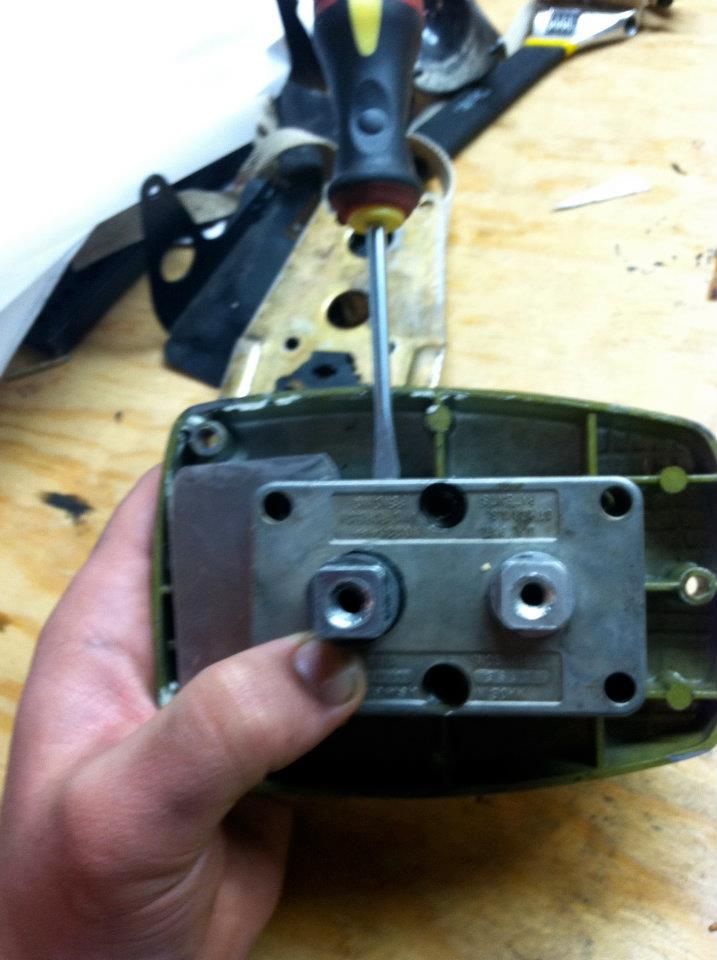 Once the plate is removed you can open the housing the rest of the way. Here you’ll see a few pictures of how the spring and ball sit. Be sure to place them in a cup or safe place so they don’t disappear. 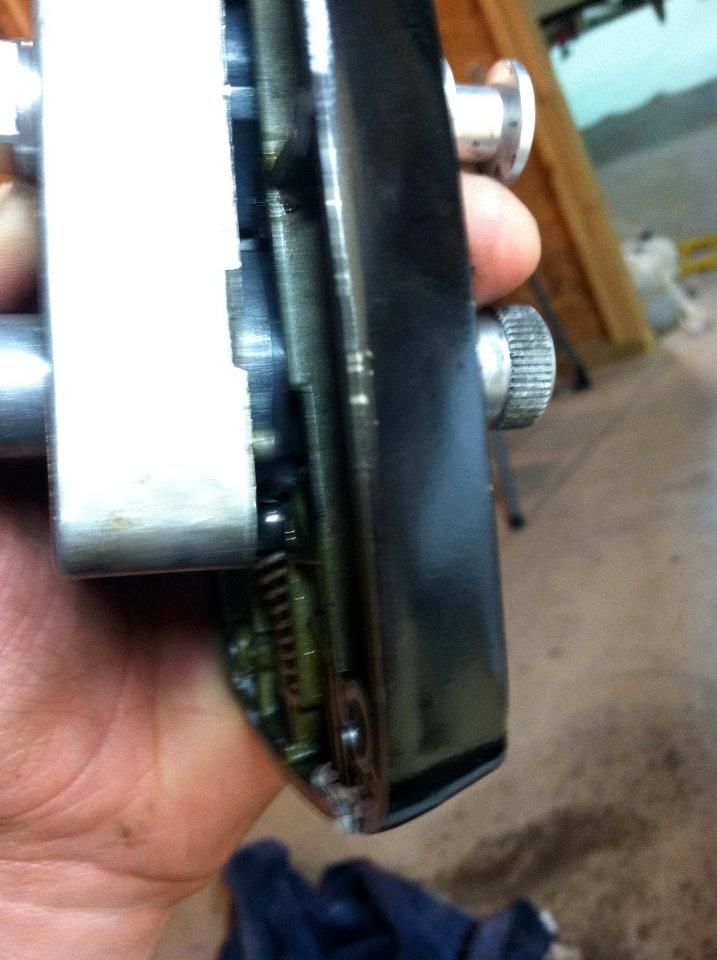 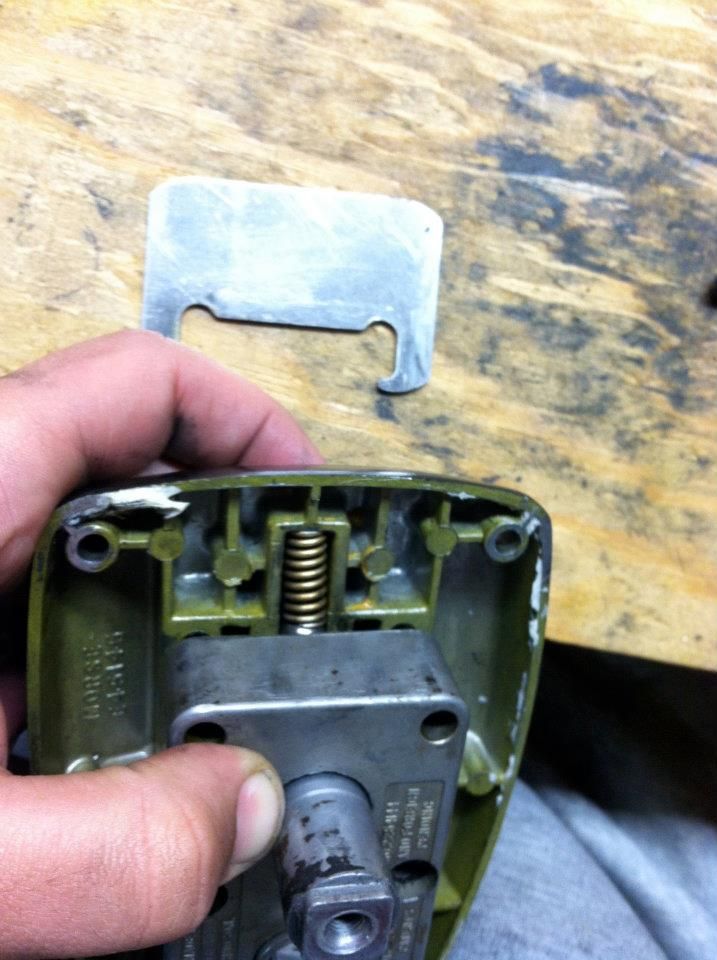 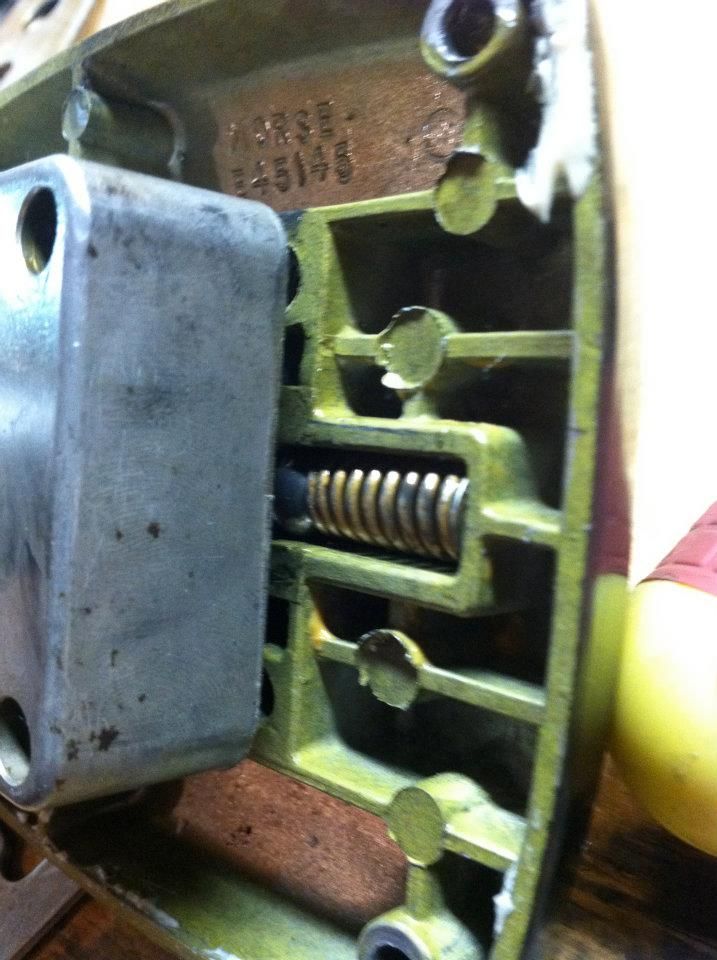 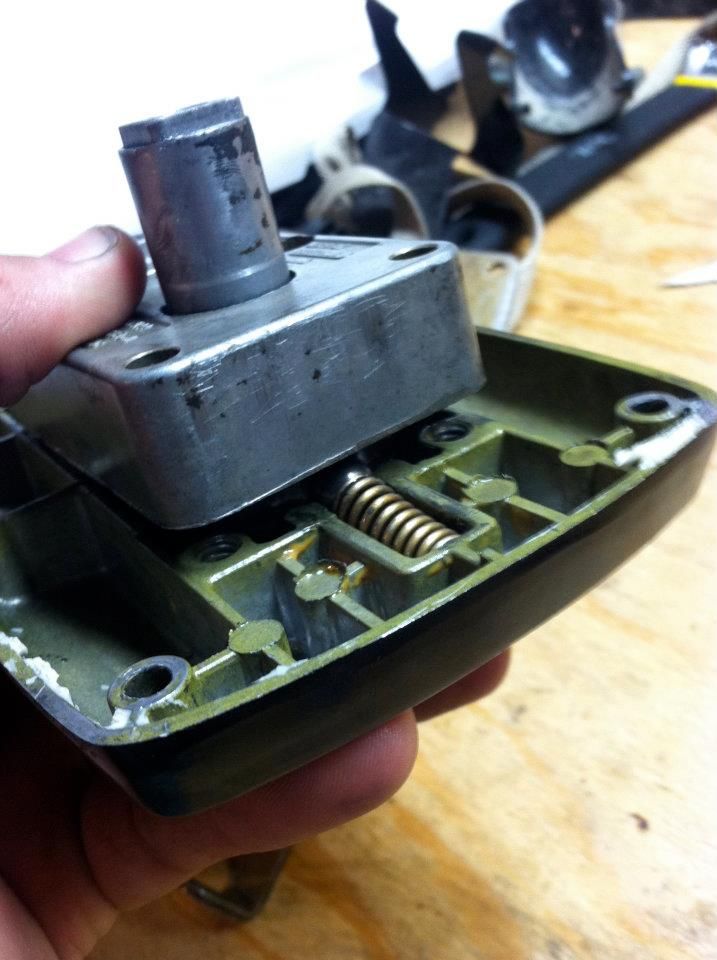 I held a thumb over the spring while I removed the brass housing just to keep everything together. 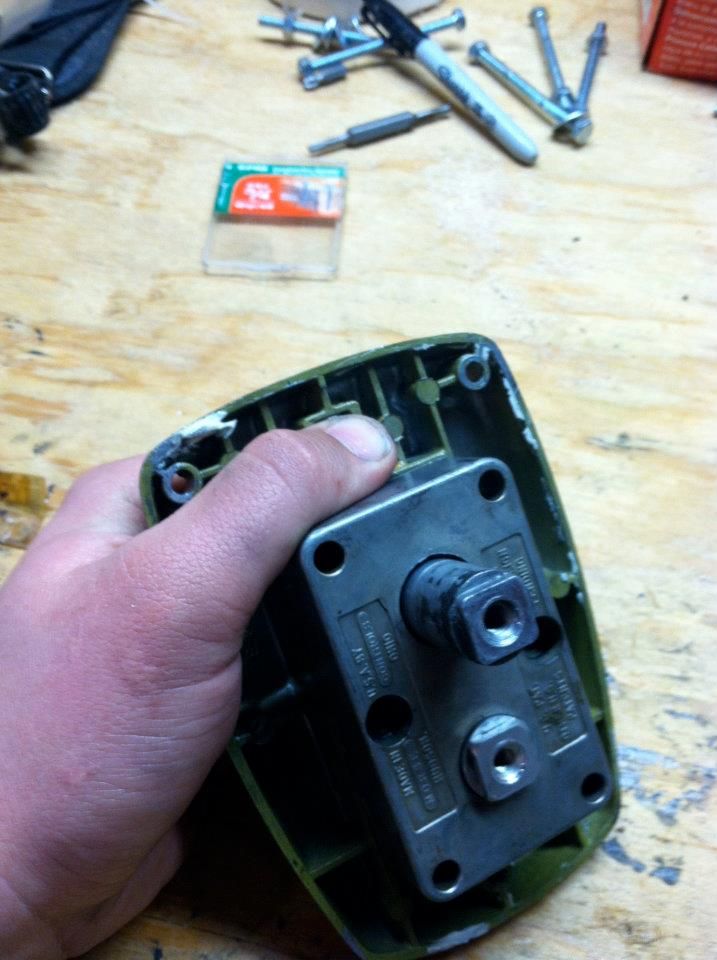 Pretty interesting to see how the internal parts work. Here are a few photos of the throttle in neutral, forward and reverse. 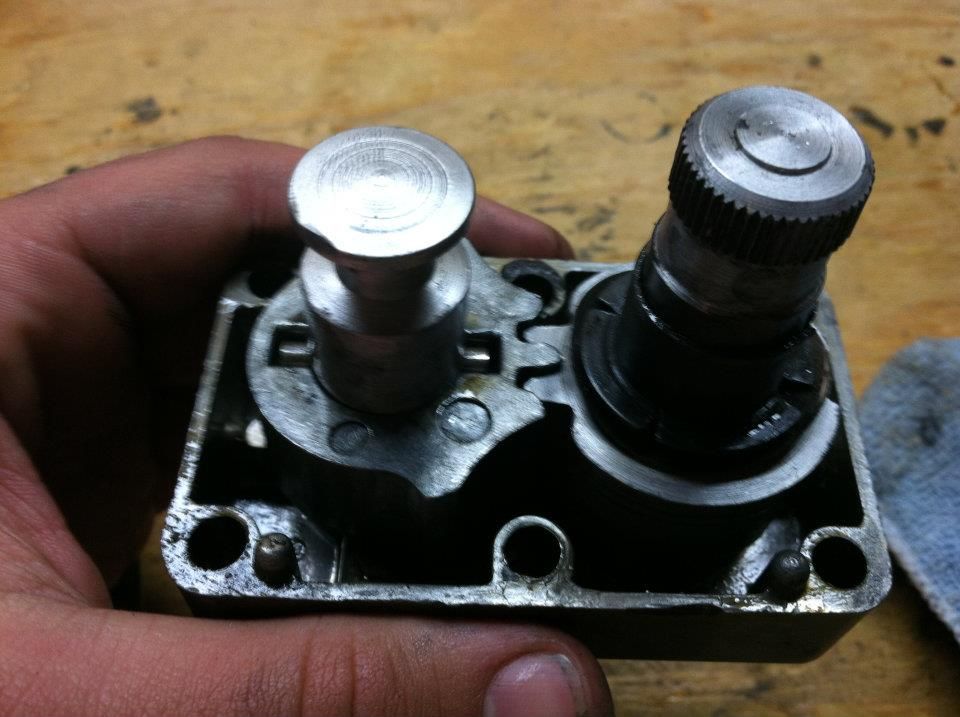 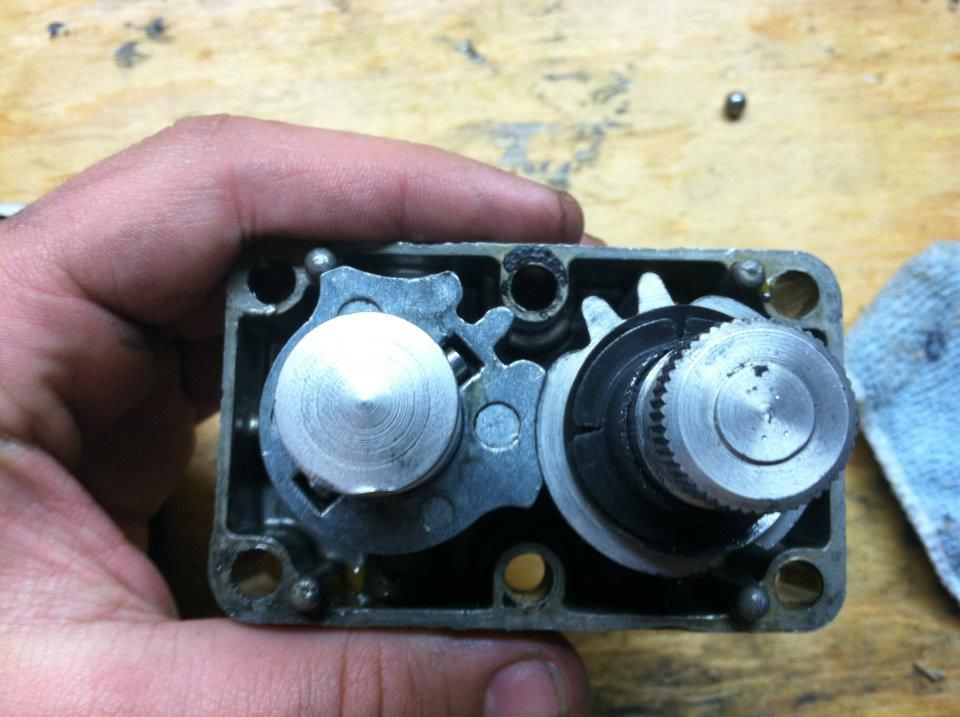 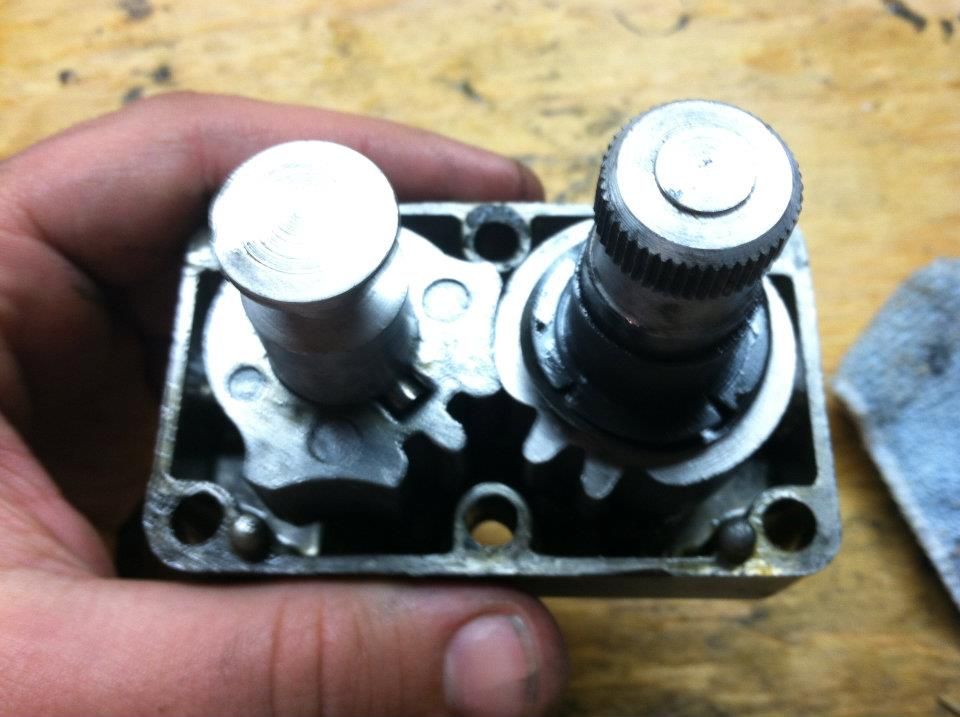 Next step is important… When you remove the throttle pin be careful of another spring/ball assembly you’ll see in the opening of these pics. They should be held in with some grease but I didn’t see them initially and could have easily lost these two. 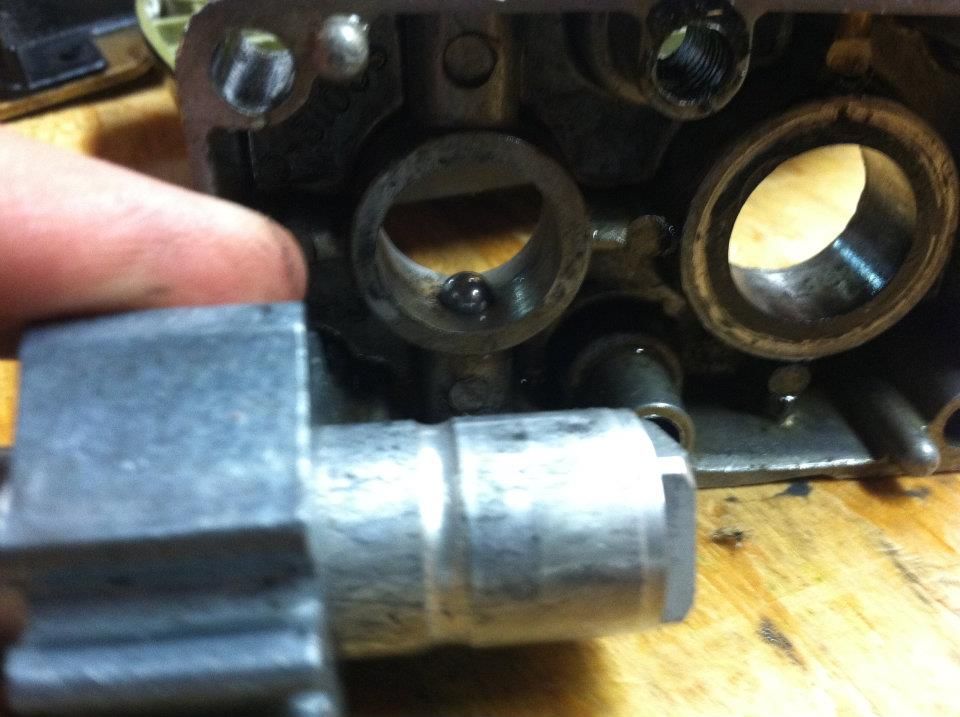 Now you should have everything apart. (sorry I forgot to take a pic when I had all the pieces laid out) Give all the parts a good cleaning and grease them up before putting it all back together. For the sake of this post, I didn’t grease everything so I could show more detail. 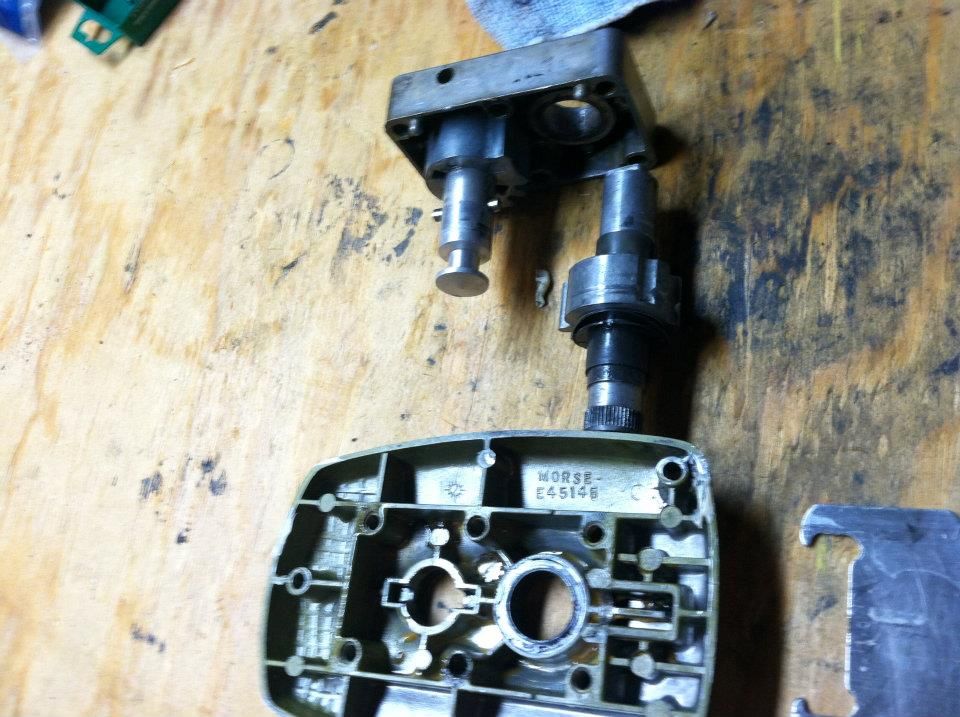 Drop in the throttle and trans pins in the brass housing and put the two housings back together. I found it was easiest to have to have everything lined up in the neutral position for it all to go back together.  I fought with the spring and ball for a while and found an easy way to get everything back together without losing parts. Once you have the two housings and internals back together go ahead and start the two standard screws holding the two together. (Note- this is not the same order everything came apart) 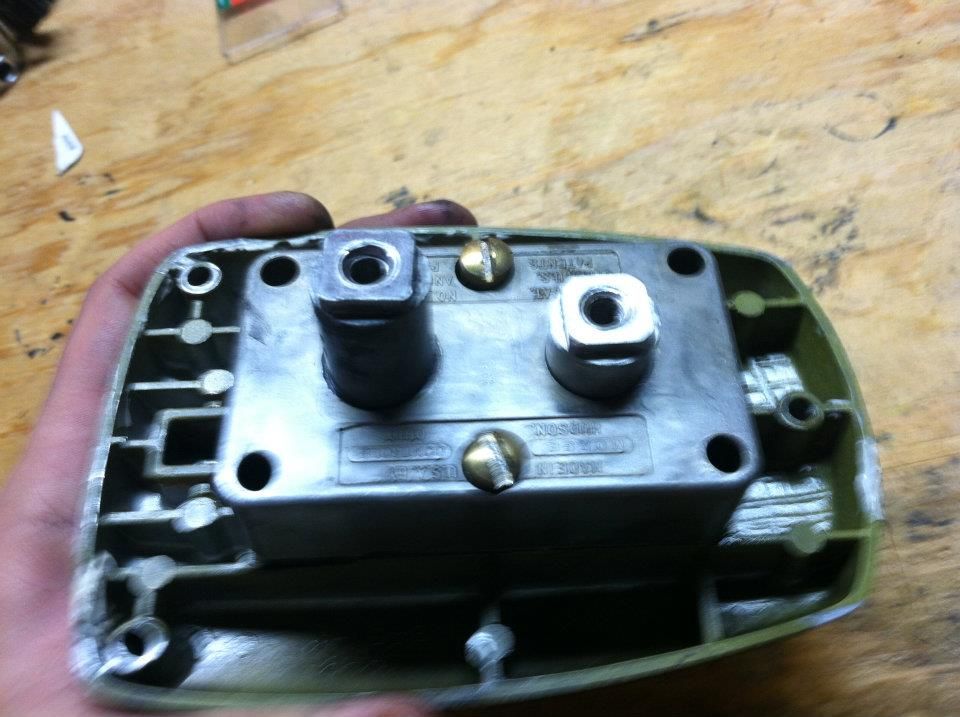 With the two housings held together, drop in the ball as seen in the photo below. 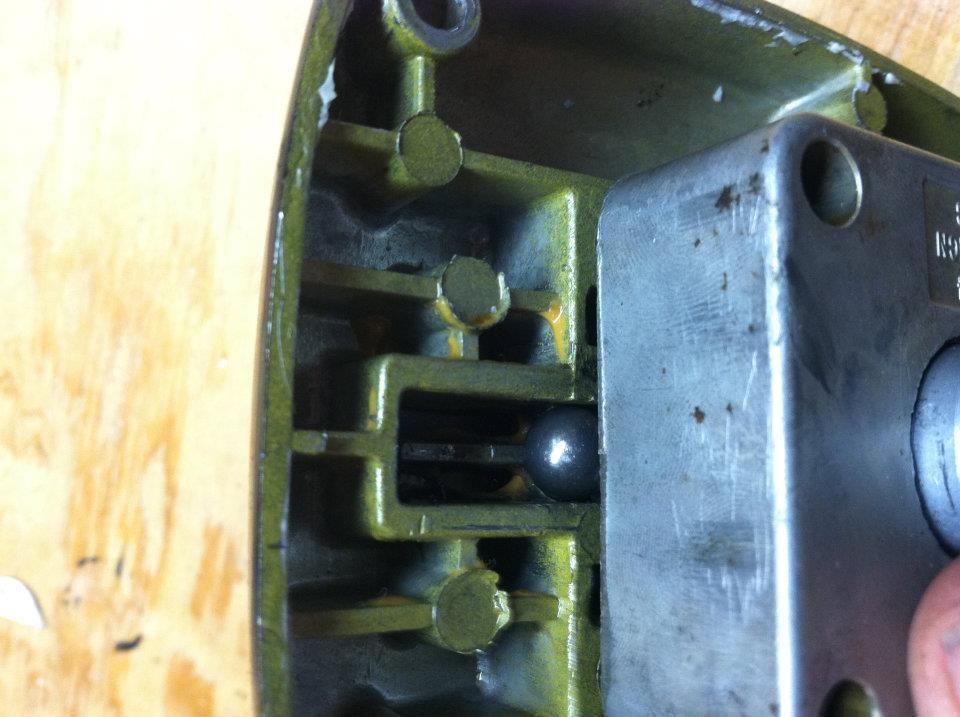 The next photo shows the easiest way to place the spring. After fighting with it for a while, I used a standard screwdriver which fit just inside the spring giving me more control. This should pop the spring right back in the housing. 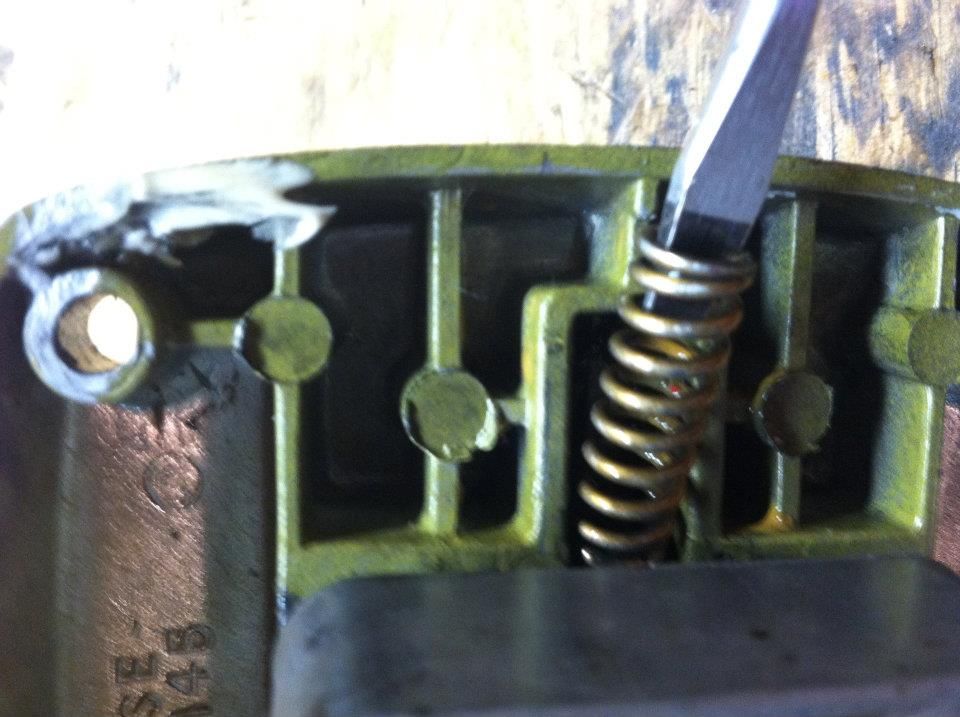 While holding my thumb over the spring to keep in in place, I slowly backed out the two standard bolts so I could replace the silver plate. In the next pic, you'll see it has two "hooks" that hold onto the brass housing and keep the spring down. 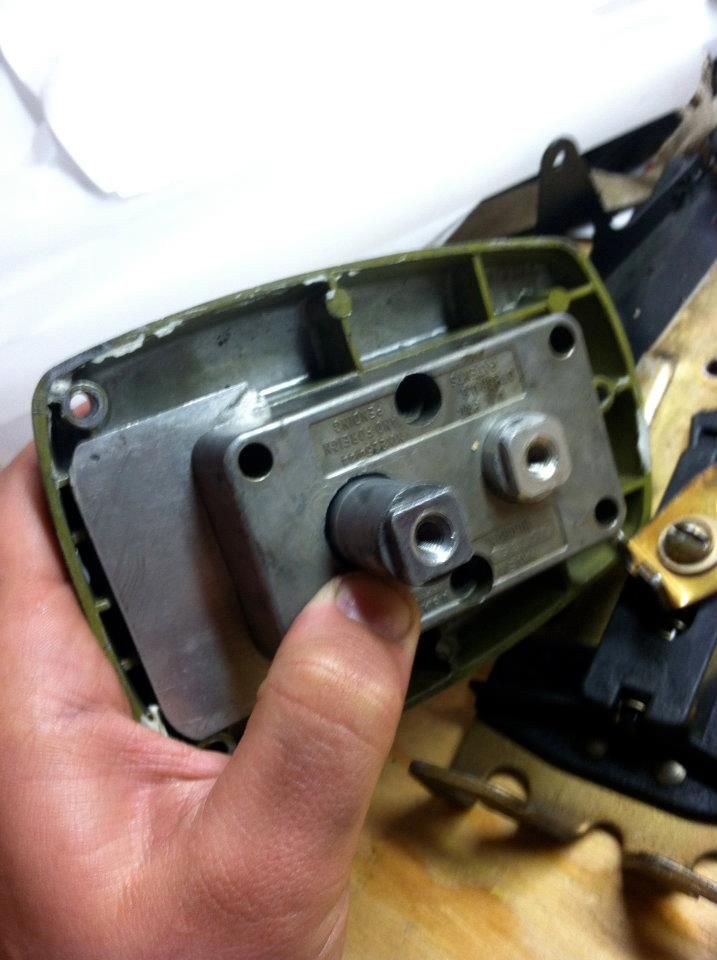 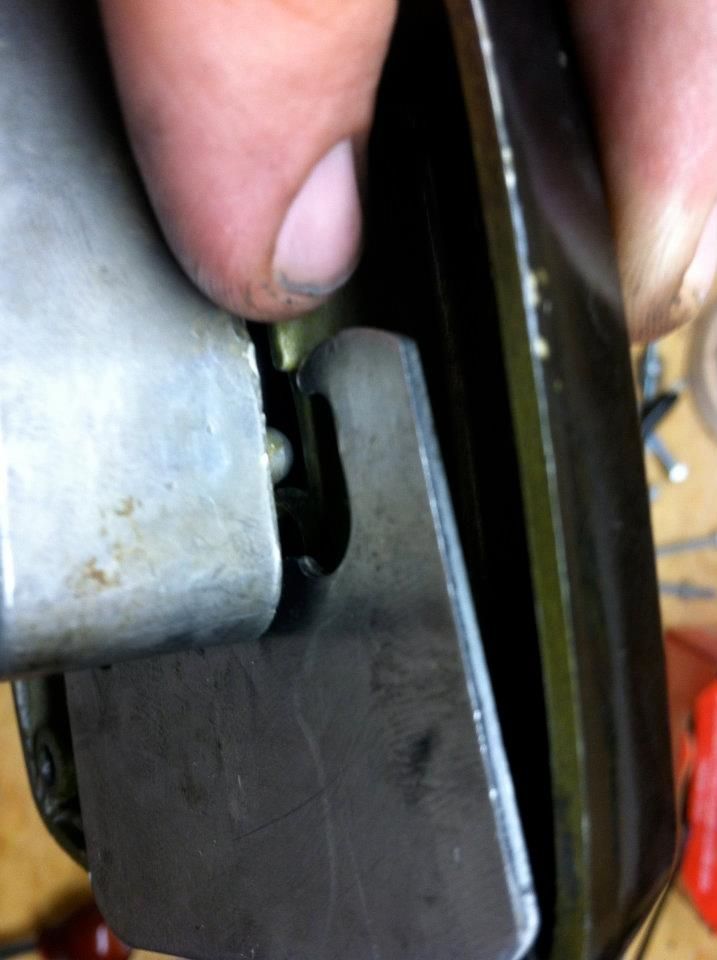 Keep a thumb on the plate till you get the two standard bolts tightened down into the housing. 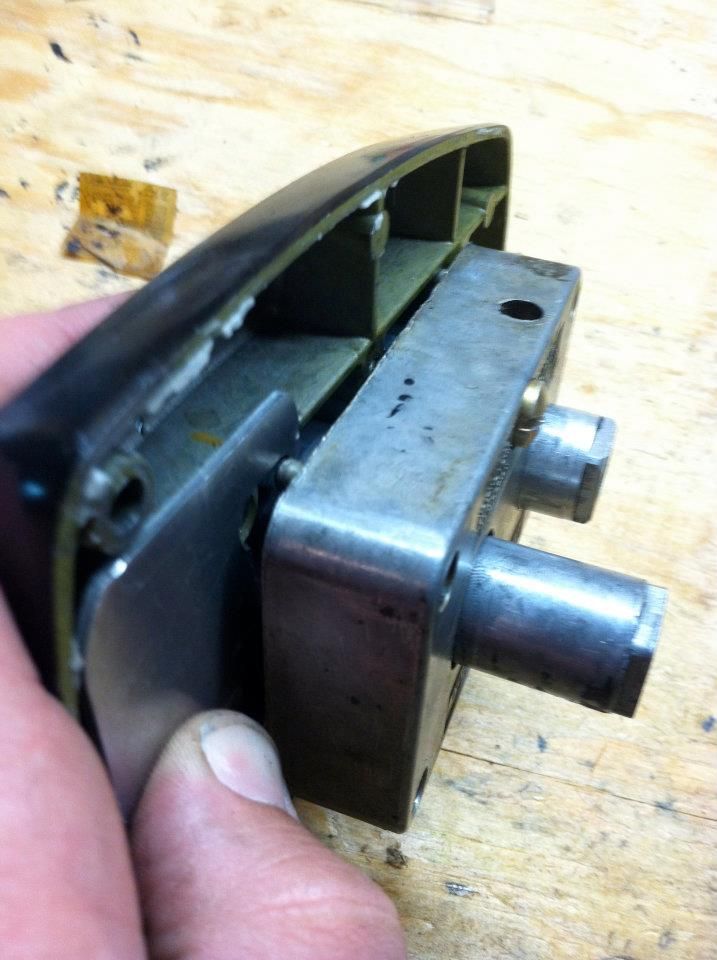 Lock down the two bolts and it completes the internals of the brass housing. (they're removed in this pic) The other side of the Morse control also needs to be disassembled but my phone died so it'll have to wait for another day. Hope this helps someone somewhere down the line. |
|
|
|
|
Post Reply
|
Page <123 |
 Tweet
Tweet
|
| Forum Jump | Forum Permissions You cannot post new topics in this forum You cannot reply to topics in this forum You cannot delete your posts in this forum You cannot edit your posts in this forum You cannot create polls in this forum You cannot vote in polls in this forum |


 Topic Options
 KRoundy wrote: