 Boats For Sale:


‘Project Tique’ photo thread |
Post Reply 
|
Page 12> |
| Author | |
gR@HaM 
Platinum Member 

Joined: May-01-2012 Location: UK Status: Offline Points: 1265 |
 Post Options Post Options
") Thanks(0) Thanks(0)
 Quote Reply Quote Reply
 Topic: ‘Project Tique’ photo thread Topic: ‘Project Tique’ photo threadPosted: August-22-2013 at 5:55pm |
|
I’ve been meaning to write up a thread for Project Tique for a long time now.
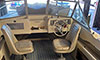
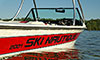
Unfortunately I managed to lose a serious amount of photos taken over the last year so am unable to fully document the work, however this thread will still be rather picture heavy! Also, sorry its fragmented and somewhat lacking in text, I really haven’t got the time (and to be honest can’t be arsed) to write it all up in detail.. Anyone local to the UK looking to source parts for a similar project please feel free to drop me a line. I should be able to assist as have spent a serious amount of time looking for replacement parts, a lot of which are difficult to get hold of this side of the pond. Also any questions related to any of the work I’ve done so far just ask – I can’t guarantee my way was the best way but am quite happy with progress to date. 1982 Ski Tique, this is how it was as I bought it. Someone decided to dress it as a Nautique         It turned out this boat has quite a chequered history, the non-drying paint on the transom was covering up a bodge repair due to it being at some point involved in a collision on trailer. There were numerous large holes that had been stuffed with filler, including one where the starboard platform mount is located and two at the front of the boat where either side meets with the bow stops. Stripping the transom     Impact from this incident subsequently wrecked the prop, shaft, tiller arm, strut, steering cable tube and both transmission mounts!      I’ve since bought an ACME 540  Home-made prop puller, this is not as good as some of the others I’ve seen on the site but was really easy and cheap to make. The prop was well and truly fused to the shaft and still needed a bit of heat to get it off – big tip, always keep the shaft nut on when removing the prop, mine came off with quite a bang!!  Reconditioned strut, thanks to John (Baitkiller)  Stringer glass damage, I’ve since patched this all up and they do sound fairly solid so am hoping to get a couple of seasons under my belt before ripping them out  Battery box before repair  At some point the PO had installed a sh*tty cheapo helm   So I needed to source a replacement ‘Big T’ unit, along with new steering cable and tube  Helm bezel gritted and coated up  Same with the Morse control  After phosphate and re-coat   Back to the hull, after stripping back all the paint I realised that the gel coat was a complete mess so bit the bullet and decided to re-gel. Due to applying outdoors I couldn’t build up the layers wet-on-wet as insects seemed to be magnetised to the wet gel. So I went with 4 coats with wax added and a light sand between coats. This stuff is thick and dries VERY fast, the largest needle size HVLP gun I could get hold of was a 2.5mm so I went at it with this and a 100L air compressor. I found the trick was to mix it up in 0.5L batches and get it out the gun as quickly as possible, orange peel wasn’t a concern as I was rubbing between coats anyway. Oh and watch out for over-spray, I managed to cover my neighbours car 2 houses away which was not good for local relationships or indeed the bank balance!!   After rubbing down the final coat of gel I applied a blue stripe again using 2K isocyanate. For the Liquid Force graphics I created these on my PC and then got a local sign shop to scale them up onto vinyl. The blue stripe was applied over the top of the decals, after which they were were removed resulting in Liquid Force lettering and logo being bare gel coat. Here’s the logo file  And resultant graphics after decals were removed   This should look a lot nicer once I finally get to give the entire boat a wetsand Prepping the dash, the PO had installed a nasty switch panel which needed removing and the hole glassing in.   The dash was spray painted black, again with 2K NCO, I also reconditioned the speedos (gritted and coated the cases, converted dials from KMH to MPH) and fitted all new toggle switches.    New rub-rail, I inserted this using hot water to try to minimise the ripple affect. Also swapped the tatty old rope insert for rubber.    Moving on to tower installation, I spent a serious amount of time looking at different styles in order to decide which one to go for. Understandably there are many who disapprove adding a tower to a classic Tique, but I bought this as a functional wakeboard boat project and from the very beginning this was never going to be a true restoration job. Plus it would have cost me far too much in shipping and import duties to bring it back to original!! The tower I finally decided on (I believe) is re-badged by a few companies and sold in the UK by distributors for Jobe (Jobe Addict 1.3). Although I originally saw this tower on the US Arial website (Arial Airborne). I’m yet to see any other classic Tiques/Nautiques with this tower (probably as it needs modifying to fit) but personally I think it matches the shape of the windscreen pretty well and am happy with the outcome.  It was not a simple fit, due to the short beam width of the Tique I had to get the 'H' top section of tower modified. Lengths were cut from either side before TIG welding it back together in order to reduce its overall length.  The main tip I would give when installing a tower is to ask some friends to help, I did this on my own with a load of blankets to protect the gel – it was very difficult without a spare pair of hands! Here’s where I replaced the rotten air intakes with some beefed up flexible pipe and glassed them together   Installing replacement pitots, I decided to cut them back a bit first. Here’s a before and after  Some corroded chrome bits gritted ready to be re-chromed to make nice and spangley..  Moving on to the engine, here’s before  And after a lot of paint removal and degreasing the block was given a fresh coat  ^ see above where the oil pan gasket was missing where it mates with the timing case, I ended up buying a replacement Felpro kit which included the front crank seal. In order to fit a new full gasket, the engine needs lifting. I also fitted new plugs, belts, oil filter, dizzy rotor, HT leads, re-coated rocker covers and all new rubber hoses, I’m sure along with many other things that don’t come to mind at the moment! If pulling the harmonic balancer, DON’T make the same mistake as I did by using one of these 3-legged pullers, this will wreck the balancer. Needless to say I had to source a new one from the US  Buy the proper tool, one of these did the job perfec:  Exhaust manifolds grit blast and re-coat   RWP before and after   More engine pics, I’ve since tidied up the cables and fitted flexi conduit for all the wiring   New 3” exhaust hose was a bit of a PITA to wrestle with, I used a dremel to get a clean cut through the wire  Replacement transmission mounts and trunnion blocks  The carb needed stripping due to issues with both primary and secondary boosters dripping fuel, I gave it a thorough cleaned using ultrasonic and fitted a Holley ‘trick-kit’    Freshly painted bilge  For the exhaust pipes I used the same paint as on the hull, but brushed it on. The fuel tank base consists of 2 planks of wood, both look original so I gave them a generous 4 coats of CPES homebrew.  Found this in the bottom of the fuel tank!!  Moving on to the swim platform, I made a budget replacement out of marine grade ply (along with replacement seat frames, floor panel, battery lid and fuel tank cover). These were all first treated with 3 coats of home brew CPES and 2 coats of grey bilge paint  With the platform the top side was not painted, here I applied Hydroturf using contact adhesive, this stuff is widely used on Jet skis and I’m hoping will be pretty durable   Removable platform brackets. Here’s the plan which is based on something similar I found on CCF, I’m just waiting on delivery of some flatstrip 316 stainless..  Steering wheel trimmed. The original wheel I first bulked out with Tesa fabric tape before applying PU sealant to smooth it all out and then the leather trim was hand stitched on. Not a fun job.  And finally the upholstery, after making new frames I cut foam using an electric carving knife and set to making patterns out of scrap vinyl.      Here’s the prototype drivers base cushion, it’s a very rough job literally held together using an office stapler.  I’ve since received rolls of 3 colours of vinyl ready for the final skins to be made up, for this I shall use an upholstery machine borrowed off my old folks. I’ve made a start on the welt/piping using rubber cord and the first attempt looks pretty good. The machine  Vinyl choice is off-white, grey and blue, all marine grade but I shall also look at applying a coat of clear PU resin to further protect it from weathering and abrasion  And that’s about it for now!! As I now have most of the general work in one thread I shall continue to update this as the project continues.. |
|
|
'82 Ski Tique
|
|
 |
|
|
skutsch
Grand Poobah 

Joined: June-19-2008 Location: Racine, WI Status: Offline Points: 2874 |
Post Options
Thanks(0)
Quote Reply
Posted: August-22-2013 at 7:44pm |
|
Interesting project, will be fun to see the finished boat!
|
|
|
|
|
ny_nautique
Platinum Member
Joined: June-01-2011 Location: Albany NY Status: Offline Points: 1215 |
Post Options
Thanks(0)
Quote Reply
Posted: August-22-2013 at 8:52pm |
|
You did a great job Graham. Glad to see it all coming together. Nice job of making due with what you could find there.
|
|
|
- Jeff
1999 Ski Nautique |
|
|
|
|
Bri892001
Grand Poobah

Joined: September-27-2008 Location: Boston MA Status: Offline Points: 4945 |
Post Options
Thanks(0)
Quote Reply
Posted: August-22-2013 at 9:04pm |
|
Really great work!
|
|
|
|
|
Gary S
Grand Poobah

Joined: November-30-2006 Location: Illinois Status: Offline Points: 14096 |
Post Options
Thanks(0)
Quote Reply
Posted: August-22-2013 at 9:08pm |
|
+1 Graham,I can't imagine trying to source parts from there. And as I saw pieces here and there of your project now seeing it all at once makes me realize the project you had. Well done.
|
|
|
|
|
8122pbrainard
Grand Poobah

Joined: September-14-2006 Location: Three Lakes Wi. Status: Offline Points: 41040 |
Post Options
Thanks(0)
Quote Reply
Posted: August-23-2013 at 3:53am |
|
Graham,
It sure looks different than when you started. Good job! 
|
|
|
|
|
phatsat67
Grand Poobah
Joined: March-13-2006 Location: Indiana Status: Offline Points: 6147 |
Post Options
Thanks(0)
Quote Reply
Posted: August-23-2013 at 9:30am |
|
Graham is the man.
|
|
|
|
|
juniorwoody
Gold Member
Joined: August-09-2011 Location: Oak Hill, Fl Status: Offline Points: 937 |
Post Options
Thanks(0)
Quote Reply
Posted: August-23-2013 at 9:38am |
|
You have a very diverse skill set Graham. The boat is looking very nice.
|
|
|
The value of money spent on new adventure far exceeds the value of money saved for the future
|
|
|
|
|
jbach
Senior Member 
Joined: September-24-2012 Location: Kentucky Status: Offline Points: 140 |
Post Options
Thanks(0)
Quote Reply
Posted: August-23-2013 at 1:20pm |
|
i think the boat looks great, and perfectly functional for what you will be using it for.
|
|
|
|
|
uk1979
Platinum Member
Joined: June-13-2007 Location: United Kingdom Status: Offline Points: 1410 |
Post Options
Thanks(0)
Quote Reply
Posted: August-23-2013 at 3:33pm |
|
Graham, It’s great to see how the Tique has changed on CCF....and likewise you will have too....great job well done.

|
|
|
Lets have a go
56 Starflite 77 SN 78 SN 80 BFN |
|
|
|
|
ArtCozier
Platinum Member
Joined: April-25-2012 Location: Orlando FL Status: Offline Points: 1023 |
Post Options
Thanks(0)
Quote Reply
Posted: August-23-2013 at 5:01pm |
|
Wow, I'm really impressed by your work. You seem to be very talented, not to mention having access to a lot of great equipment to work with. Do you realize that you've got a sort of a rare boat there? When we came out with the 2001 series in 1981 (as an '82 model) we took the old Ski Nautique hull and cut the chines at the rear as your boat has. We then ceased production of the 16 foot Ski Tique and named this hull the Ski Tique. Not very many of them were built before we dropped it.
Art |
|
|
"Art"
|
|
|
|
|
89Martinique
Senior Member
Joined: September-05-2011 Location: Binghamton Status: Offline Points: 457 |
Post Options
Thanks(0)
Quote Reply
Posted: August-23-2013 at 6:32pm |
|
Very cool work there. Interesting ways of doing things. Do the mufflers still have the baffles intact?
|
|
|
Current Boats:
1992 Supra Comp-TS6M PCM 351w HO Pro Boss Pro-Tec Ignition - Full Composite (no wood stingers!) 1989 (3rd Gen) Correct Craft Martinique B/R PCM 351w Power Plus 1984 E-Scow Keuka Lake, |
|
|
|
|
gR@HaM
Platinum Member
Joined: May-01-2012 Location: UK Status: Offline Points: 1265 |
Post Options
Thanks(0)
Quote Reply
Posted: August-25-2013 at 12:31pm |
|
Thanks for all the positive comments
Its been very slow progress and to be honest I was expecting to be on the water a long time ago but am now finally starting to see light at the end of the tunnel. I'm sure I've mentioned before, but this is my first ever boat purchase so I'm far from skilled with working on these things. CCF, a bit of common sense and a massive amount of spare time is all I needed to get the work done
|
|
|
'82 Ski Tique
|
|
|
|
|
gR@HaM
Platinum Member
Joined: May-01-2012 Location: UK Status: Offline Points: 1265 |
Post Options
Thanks(0)
Quote Reply
Posted: August-25-2013 at 1:10pm |
Hi Art, that's very interesting and good to hear from someone like yourself. Thanks. I'm yet to see another Tique in the UK, have seen a couple of pre 81 nautiques and mustangs but no tiques. I am curious as to why this particular boat was imported maybe being a foot shorter was favourable for transport costs. Regarding equipment for the project its actually been quite limited, all the work has either been done out the back of my house (I have no workshop) or to my wife's displeasure in the dining room! I'm a chemist by trade working for a coatings manufacturer, this helps as my lab has access to various equipment for pre-treating and coating parts etc. Other than that I bought a new compressor for the re-gel and an engine crane but that's all I needed. |
|
|
'82 Ski Tique
|
|
|
|
|
Kristof
Grand Poobah
Joined: October-08-2007 Location: Bree, Belgium Status: Offline Points: 3390 |
Post Options
Thanks(0)
Quote Reply
Posted: August-26-2013 at 6:19am |
|
Very nice work Graham!
Ha, that Jobe tower is very popular over here. I did not like it, as I found it too big and "heavy" for my '89 SN. So I went for the Jobe Addict 1.1, that I modified also to fit the boat better. Looking forward to the pics of the finished interior  |
|
|
- Gun control means: using BOTH hands!
- Money doesn't make one happy, but when it rains cats and dogs, it's still better to cry in a Porsche than on a bicycle... |
|
|
|
|
gR@HaM
Platinum Member
Joined: May-01-2012 Location: UK Status: Offline Points: 1265 |
Post Options
Thanks(0)
Quote Reply
Posted: November-01-2013 at 9:51pm |
|
Progress has been slow since fatherhood, but finally I nearly have a drivers seat.
It’s far from perfect but I’m happy with the result as a first attempt at upholstery and it has worked out a lot cheaper than paying for a professional to do the work! I started out by transferring the patterns to new vinyl  This was all backed with foam to help keep the bolsters tight once all put together  The piping/welt was put together using rubber cord. I found stapling the pieces before stitching worked well as the staples could then be easily removed afterwards   I splashed out (no pun intended) on marine grade polyester thread by dabond   The finished skins ready for installation   Cat loves to get in the way!   And here’s where I’m up to, the top cushion needs pulling a bit tighter but it’s pretty much there now..   For anyone looking to undertake a similar project feel free to drop me a line as they may be able to learn from some of my mistakes!!.. |
|
|
'82 Ski Tique
|
|
|
|
|
storm34
Grand Poobah

Joined: November-03-2008 Location: Dexter Iowa Status: Offline Points: 4492 |
Post Options
Thanks(0)
Quote Reply
Posted: November-01-2013 at 9:57pm |
You can bet that's going to happen sometime in the future! Looks AWESOME!! Some of us have been talking about tackling this for a while now and I'll bet this update will push someone off their a#$ to actually try! |
|
|
|
|
GlassSeeker
Grand Poobah

Joined: November-26-2008 Location: Elk Grove, CA. Status: Offline Points: 2421 |
Post Options
Thanks(0)
Quote Reply
Posted: November-02-2013 at 1:47am |
|
Tenacious G... is your new name. Great job in making your vision a reality. I remember you discovering some of the major damage and thinking to myself I hope he does not give up and you sure didn't. Fantastic follow through...and became a Dad too. Congratulations for all of it.
|
|
|
This is the life
|
|
|
|
|
gR@HaM
Platinum Member
Joined: May-01-2012 Location: UK Status: Offline Points: 1265 |
Post Options
Thanks(0)
Quote Reply
Posted: November-02-2013 at 4:35am |
|
Thanks, theres plenty more to do but starting to see light at the end of the tunnel
|
|
|
'82 Ski Tique
|
|
|
|
|
juniorwoody
Gold Member
Joined: August-09-2011 Location: Oak Hill, Fl Status: Offline Points: 937 |
Post Options
Thanks(0)
Quote Reply
Posted: November-02-2013 at 8:43am |
|
Very nice work Graham from a do it yourself guy to another. You have set the bar to a new level. Having done the seats in my skier last winter and watching your use of the different colors and thicknesses, I am encouraged to continue this winter on more of the same. I think your machine is a wee bit better than mine.
|
|
|
The value of money spent on new adventure far exceeds the value of money saved for the future
|
|
|
|
|
Morfoot
Grand Poobah

Joined: February-06-2004 Location: South Lanier Status: Offline Points: 5311 |
Post Options
Thanks(0)
Quote Reply
Posted: November-02-2013 at 10:21am |
|
Ohhhhh I just love a man who sews!
Good work Grahambo. I can barely sew on a button with any success. You saved bigtime $$ yet learned allot by doing it yourself.
|
|
|
"Morfoot; He can ski. He can wakeboard.He can cook chicken.He can create his own self-named beverage, & can also apparently fly. A man of many talents."72 Mustang "Kermit",88 SN Miss Scarlett, 99 SN "Sherman"
|
|
|
|
|
gR@HaM
Platinum Member
Joined: May-01-2012 Location: UK Status: Offline Points: 1265 |
Post Options
Thanks(0)
Quote Reply
Posted: November-02-2013 at 10:30am |
|
Lol
|
|
|
'82 Ski Tique
|
|
|
|
|
uk1979
Platinum Member
Joined: June-13-2007 Location: United Kingdom Status: Offline Points: 1410 |
Post Options
Thanks(0)
Quote Reply
Posted: November-03-2013 at 7:20am |
|
Great job Graham...note to self your the man for new seat skins in the UK…
|
|
|
Lets have a go
56 Starflite 77 SN 78 SN 80 BFN |
|
|
|
|
gR@HaM
Platinum Member
Joined: May-01-2012 Location: UK Status: Offline Points: 1265 |
Post Options
Thanks(0)
Quote Reply
Posted: November-03-2013 at 10:08am |
|
If you do my stringers Roger its a deal!!!
|
|
|
'82 Ski Tique
|
|
|
|
|
Kristof
Grand Poobah
Joined: October-08-2007 Location: Bree, Belgium Status: Offline Points: 3390 |
Post Options
Thanks(0)
Quote Reply
Posted: November-03-2013 at 2:57pm |
|
Awesome job on the skins Graham!!
Ha, I know what it's like not having a shop and having to do things in either the kitchen or the dining room... And off course the wife b*tching about it I have that problem with my tower speaker enclosure version 2.0 |
|
|
- Gun control means: using BOTH hands!
- Money doesn't make one happy, but when it rains cats and dogs, it's still better to cry in a Porsche than on a bicycle... |
|
|
|
|
gR@HaM
Platinum Member
Joined: May-01-2012 Location: UK Status: Offline Points: 1265 |
Post Options
Thanks(0)
Quote Reply
Posted: November-04-2013 at 3:22pm |
|
Tell me about it, apparently it's not 'normal' to store an air compressor in the dining room!

|
|
|
'82 Ski Tique
|
|
|
|
|
Kristof
Grand Poobah
Joined: October-08-2007 Location: Bree, Belgium Status: Offline Points: 3390 |
Post Options
Thanks(0)
Quote Reply
Posted: November-05-2013 at 11:18am |
|
Say whaaat?? Women!
 |
|
|
- Gun control means: using BOTH hands!
- Money doesn't make one happy, but when it rains cats and dogs, it's still better to cry in a Porsche than on a bicycle... |
|
|
|
|
gmars70970
Senior Member

Joined: November-06-2013 Location: Scotland Status: Offline Points: 235 |
Post Options
Thanks(0)
Quote Reply
Posted: November-15-2013 at 9:41pm |
|
Brilliant thread!!! You've done a cracking job.
Can't wait to go & view this boat tomorrow now! |
|
|
|
|
gR@HaM
Platinum Member
Joined: May-01-2012 Location: UK Status: Offline Points: 1265 |
Post Options
Thanks(0)
Quote Reply
Posted: November-21-2013 at 7:00pm |
|
Well, winter has officially arrived but I've made a bit of progress with the removable platform brackets.
After ordering in 1M lengths of 100x10mm and 20x5mm grade 316 stainless and a bag of M6 countersunk bolts (grade A4) I set at cutting the SS in to 125mm strips.  The 10mm steel was pretty hard to cut, luckily I have access to a band saw at work!  I'm pretty new to working with metal, but on a plus side learnt a few things from making these. When drilling the holes I needed to slow the motor right down and it took a lot of drill re-sharpening to get them all done. A good quality tap was also needed for the threads along with some compound. And here they are, not perfect but should hopefully do the job..   
|
|
|
'82 Ski Tique
|
|
|
|
|
dwouncmd
Gold Member

Joined: July-10-2009 Location: NC Status: Offline Points: 919 |
Post Options
Thanks(0)
Quote Reply
Posted: November-21-2013 at 7:39pm |
I have thought many times how patient your wife is. Nice work. Along with everything else you have done, I like the brackets. |
|
|
89 SN
<a href="http://www.correctcraftfan.com/diaries/details.asp?ID=6567&sort=&pagenum=1" rel="nofollow">7 |
|
|
|
|
Post Reply
|
Page 12> |
 Tweet
Tweet
|
| Forum Jump | Forum Permissions You cannot post new topics in this forum You cannot reply to topics in this forum You cannot delete your posts in this forum You cannot edit your posts in this forum You cannot create polls in this forum You cannot vote in polls in this forum |


 Topic Options
 ArtCozier wrote: