 Boats For Sale:


1992 Sport Floor Replacement |
Post Reply 
|
Page 123 4> |
| Author | |
MechGaT 
Senior Member 

Joined: March-09-2015 Location: Chattanooga Status: Offline Points: 271 |
 Post Options Post Options
") Thanks(0) Thanks(0)
 Quote Reply Quote Reply
 Topic: 1992 Sport Floor Replacement Topic: 1992 Sport Floor ReplacementPosted: January-03-2016 at 12:07am |
|
Unfortunately, it's that time. I bought this boat last spring and got to use it this past summer, but I quickly realized the small spot that felt somewhat spongy, was really a large area that was in need of replacement. Time to replace those stringers. I have done some reading on here and with the size of the job, I originally contacted some local fiberglass shops to do the job. I couldn't find anyone who would contact me back after an initial conversation and none of them wanted to do it to the standards that I wanted it done. All wanted to use polyester resin and plywood. After reading others threads, I think I can get this done myself, the only question is how long it will take and how much help I am going to need from you good folks. I haven't found a thread specifically on replacing a Sport Nautique's stringers, so I figured I would start one. I started a few weeks ago pulling out the interior. The rear seat came out easier than I dreamed it would. Gravity and that one clip is all that was holding it in, just like I had read somewhere on here.
  When I removed the passenger seat, where the spongy feeling started, I noticed that the carpet had been cut and when I pulled it back I saw some poorly laid fiberglass. Looks like someone was trying to strengthen the floor at best and possibly hide something.  This past week I did some more work on it and got the motor out. Then I started cutting the floor up and digging out foam. I am all for the sawzall for this job. We tried one little section with an angle grinder and metal cutting disc. The dust was unbearable. With the sawzall though, no issues. I first cut out the section under the passenger seat and found bits of black stuff that I am sure at one time resembled plywood. 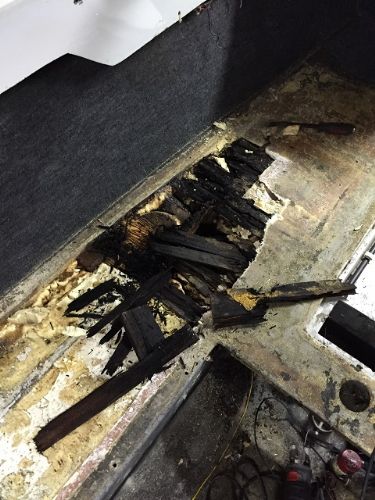 I worked down the passenger side and removed a section on the drivers side. Water, wet foam, and rotted wood throughout. Here is a picture of the standing water at the aft starboard side.   Here's a picture of the floor structure. 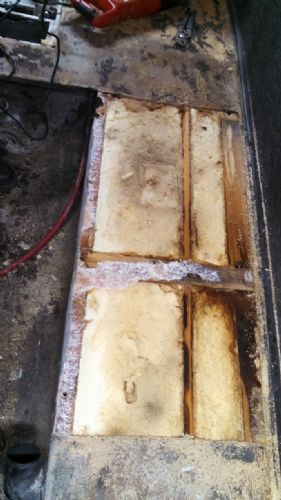 I still have demolition to do, but it is going to be a while as the boat it just over 2 hours away in my Mom's garage since I don't have one that will even fit it with the trailer. I am going to spend the next few weeks buying materials. I figure I need to get some CPES, 3M 5200, resin, fiberglass, and rollers, etc. shipped. Is this thisthe CPES everyone is referring to or is this? I am planning on getting the 635 3:1 epoxy resin from US Composites, sound right? What rollers will I need? Oh, I have so much to learn. 
|
|
|
'92 Sport Nautique
|
|
 |
|
|
SNobsessed
Grand Poobah 
Joined: October-21-2007 Location: IA Status: Offline Points: 7102 |
Post Options
Thanks(1)
Quote Reply
Posted: January-03-2016 at 10:41am |
|
Either CPES will work, you can also mix your own from epoxy resin & Xylol.
The 635 is good stuff, get the medium speed hardener. The hard part of your project will be working around the open bow walk thru. Other guys have removed the entire upper deck (aka cap) see Okie Boarders project thread. Not sure if there is a way to do this without removing the cap. |
|
|
“Beer is proof that God loves us and wants us to be happy.”
Ben Franklin |
|
|
|
|
8122pbrainard
Grand Poobah

Joined: September-14-2006 Location: Three Lakes Wi. Status: Offline Points: 41045 |
Post Options
Thanks(0)
Quote Reply
Posted: January-03-2016 at 11:22am |
|
Brent,
You mentioned polyester resin. I suggest going epoxy after the CPES. Yes, as Chris mentioned, you can mix your own by thinning with a solvent. |
|
|
|
|
MechGaT
Senior Member
Joined: March-09-2015 Location: Chattanooga Status: Offline Points: 271 |
Post Options
Thanks(0)
Quote Reply
Posted: January-05-2016 at 1:37am |
|
The open bow is what worries me the most. I have cut far enough to find the end of the secondary stringer, but I haven't found the end of the primary yet. While I had willing help we started cutting and removing floor and foam. I will have to check out Okie Boarders thread. Thanks for the help.
 |
|
|
'92 Sport Nautique
|
|
|
|
|
MechGaT
Senior Member
Joined: March-09-2015 Location: Chattanooga Status: Offline Points: 271 |
Post Options
Thanks(0)
Quote Reply
Posted: January-07-2016 at 12:59am |
|
I looked for Okie Boarders thread. I looked for all the threads started by Okie Boarders in the Boat Maintenance and General Discussion forums. All I found was a thread someone else started with some pictures of the cap being removed. I was not picturing going to those lengths when I started. Can anyone point me to his thread?
More links for reference later: BuffaloBFN thread Another BFN Rebuild 1985 2001 Ski Nautique rebuild '87 Ski Nautique Floor/Stringer Replacement '83 2001 Ski Nautique Custom 1965 Mustang |
|
|
'92 Sport Nautique
|
|
|
|
|
MechGaT
Senior Member
Joined: March-09-2015 Location: Chattanooga Status: Offline Points: 271 |
Post Options
Thanks(0)
Quote Reply
Posted: January-21-2016 at 8:11pm |
|
Did some more work on the floor this past weekend. I found the end of the primary stringer. I wasn't sure how far I would have to go.
 The foam is dry in front of it, just have to figure out what I am going to do with bilge vents. The hose is coming out as I remove the foam, so I am going to have to remove it until I get back to where it comes through the floor. I also have one small section of rotten floor just before the gel coated section up front. Right now I am planning to cut that out and see exactly what condition the wood is in. It sounds solid once I get past the short section not covered by the front floor. I am still hoping I can get the vents and floor sections replaced without resorting to splitting the boat. It would save so much time and effort. I am hoping I can cut back to good wood, then put CPES on it and join a replacement section to it. Sound like a reasonable plan? How should I join it? |
|
|
'92 Sport Nautique
|
|
|
|
|
SNobsessed
Grand Poobah
Joined: October-21-2007 Location: IA Status: Offline Points: 7102 |
Post Options
Thanks(1)
Quote Reply
Posted: January-23-2016 at 1:52pm |
|
Looks like you can pull it off (not removing cap). I would dig out foam under the good wood ledge that you are trying to tie into. Somehow clamp a slat of plywood under the lip, glue with epoxy. Then your new wood has some good surface area for bonding.
Some guys use PVC pipe for vent ways. Maybe just leave the old hose in the foam & make a new path. |
|
|
“Beer is proof that God loves us and wants us to be happy.”
Ben Franklin |
|
|
|
|
MechGaT
Senior Member
Joined: March-09-2015 Location: Chattanooga Status: Offline Points: 271 |
Post Options
Thanks(0)
Quote Reply
Posted: January-23-2016 at 5:45pm |
|
Thanks for the advice. I will to take a look at fitting the PVC pipe inside the hose. I can see where that would save me a lot of trouble. I still have to cut out the rotten spot in the floor and see what I have left. It is right over the ski locker.
|
|
|
'92 Sport Nautique
|
|
|
|
|
Duane in Indy
Platinum Member 

Joined: October-26-2015 Location: Indiana Status: Offline Points: 1578 |
Post Options
Thanks(1)
Quote Reply
Posted: January-23-2016 at 5:52pm |
 This is what I did on the Mustang. 3" thin wall pvc for airways and 1 1/2 for wireway and for control cables. Looking forward. |
|
|
Keep it as original as YOU want it
1978 Mustang (modified) |
|
|
|
|
8122pbrainard
Grand Poobah
Joined: September-14-2006 Location: Three Lakes Wi. Status: Offline Points: 41045 |
Post Options
Thanks(0)
Quote Reply
Posted: January-23-2016 at 7:13pm |
|
[QUOTE=Duane in Indy]
3" thin wall pvc for airways and 1 1/2 for wireway QUOTE] Duane, What scd. is the "thin wall" you used? |
|
|
|
|
Watauga
Senior Member

Joined: June-12-2009 Location: United States Status: Offline Points: 208 |
Post Options
Thanks(1)
Quote Reply
Posted: January-23-2016 at 8:12pm |
|
Brent, this is how I did mine.
  
|
|
|
|
|
Duane in Indy
Platinum Member
Joined: October-26-2015 Location: Indiana Status: Offline Points: 1578 |
Post Options
Thanks(0)
Quote Reply
Posted: January-23-2016 at 9:10pm |
Pete, I'm not sure. Can look Sunday. Got it at Lowes. The cheap stuff. Only about a 1/16" thick, light weight. |
|
|
Keep it as original as YOU want it
1978 Mustang (modified) |
|
|
|
|
MechGaT
Senior Member
Joined: March-09-2015 Location: Chattanooga Status: Offline Points: 271 |
Post Options
Thanks(0)
Quote Reply
Posted: January-24-2016 at 8:07pm |
|
I was originally planning on running new pipe through the floor similar to what you have done, but because of how close the pipe is to the inside wall of the storage area I am not sure I can cut them out. I am thinking about just cutting the hose where I can get the foam out of the way of the stringer, then putting the pvc pipe inside the hose that is still encased in foam.

|
|
|
'92 Sport Nautique
|
|
|
|
|
Duane in Indy
Platinum Member
Joined: October-26-2015 Location: Indiana Status: Offline Points: 1578 |
Post Options
Thanks(0)
Quote Reply
Posted: February-11-2016 at 6:42am |
 Pete, Sorry for the delay in getting back to your question of "what scd" Sewer and drain Lowes $9.97 for 10 feet of 3" |
|
|
Keep it as original as YOU want it
1978 Mustang (modified) |
|
|
|
|
8122pbrainard
Grand Poobah
Joined: September-14-2006 Location: Three Lakes Wi. Status: Offline Points: 41045 |
Post Options
Thanks(0)
Quote Reply
Posted: February-11-2016 at 7:09am |
|
Duane,
Thanks for getting back. Just so everyone knows, the common scd. 40 PVC pipe used for plumbing drain waste and venting uses different fittings than the very thin walled underground drainage PVC pipe. Tell me how I know!  I got stung years ago piping a gravity return line off a roof cooling tower. Unlike sch. 40 and sch. 80 having common OD's, the underground drainage PVC has a different OD. I got stung years ago piping a gravity return line off a roof cooling tower. Unlike sch. 40 and sch. 80 having common OD's, the underground drainage PVC has a different OD.
|
|
|
|
|
MechGaT
Senior Member
Joined: March-09-2015 Location: Chattanooga Status: Offline Points: 271 |
Post Options
Thanks(0)
Quote Reply
Posted: March-18-2016 at 7:16pm |
|
I am trying to source my stringer material. I have found a mill that has the lumber in the sizes I need and dressed, but they say it is green wood, not dried. I have read on another post that ideally it should be around 8% moisture content. Anybody had experience with green douglas fir and getting the moisture content down to an acceptable level? Is it even feasible in a reasonable amount of time if I lay it out in the garage? Short of buying a meter, is there a way I can tell whether it has the proper moisture content?
|
|
|
'92 Sport Nautique
|
|
|
|
|
8122pbrainard
Grand Poobah
Joined: September-14-2006 Location: Three Lakes Wi. Status: Offline Points: 41045 |
Post Options
Thanks(1)
Quote Reply
Posted: March-18-2016 at 7:50pm |
|
Brent,
If you have better than a year, the Doug can be air dried. Ask the mill if they have anyone who kiln dries for them. 8% I consider to be max. Get a moisture meter. They aren't expensive. Don't forget that LVL is an alternate material for stringers. There's a complete thread on it. I believe there's a link in the FAQ thread. I currently have 500 board feet of Red Pine stickered out in the wood shed. It was cut and sawn about 19 months ago. It's now down to around 5% and ready for my project. |
|
|
|
|
8122pbrainard
Grand Poobah
Joined: September-14-2006 Location: Three Lakes Wi. Status: Offline Points: 41045 |
Post Options
Thanks(0)
Quote Reply
Posted: March-19-2016 at 9:50am |
|
Brett,
Here's Kris's LVL stringer thread Another alternate to the Doug Fir is going composite. It's certainly a good choice but it does take more work and the expense is more.  
|
|
|
|
|
MechGaT
Senior Member
Joined: March-09-2015 Location: Chattanooga Status: Offline Points: 271 |
Post Options
Thanks(0)
Quote Reply
Posted: March-19-2016 at 10:37am |
|
Thanks for the link. The composite is tempting, I have a supplier of Coosa board near me, but the time and expense are too much for me. Based on everything you all have posted, it should last longer than the 23 years it lasted this time if I do it right. I already have the CPES, and am planning on using epoxy, so it should.
I found a moisture meter on Amazon with +/-1% accuracy for $24. I didn't realize they were that cheap. I have a few other things I could use that for, so I bought one. The mill has a kiln, but they didn't offer to dry it. I think I'll call them back on Monday and see if they can't include the four boards they were sourcing for me with some of the heart pine they typically sell. |
|
|
'92 Sport Nautique
|
|
|
|
|
8122pbrainard
Grand Poobah
Joined: September-14-2006 Location: Three Lakes Wi. Status: Offline Points: 41045 |
Post Options
Thanks(0)
Quote Reply
Posted: March-19-2016 at 10:46am |
Brett, Sounds like the mill deals with the higher end lumber! $$$ How much looking around have you done for the Doug Fir? |
|
|
|
|
MechGaT
Senior Member
Joined: March-09-2015 Location: Chattanooga Status: Offline Points: 271 |
Post Options
Thanks(0)
Quote Reply
Posted: March-23-2016 at 1:08am |
|
I searched some more and found a place to supply it.
 They were a wholesaler so I am going to have to buy it through a local hardware store, but I should be able to pick it up Monday. For anyone in North Alabama, Gobble Fite in Decatur can get Douglas fir from Russell Lumber. It is kiln dried. I am planning to get a couple of 1x6x12s & 2x8x14s. Prices quoted were 27.56 for 1x6 & 87.50 for 2x8. They were a wholesaler so I am going to have to buy it through a local hardware store, but I should be able to pick it up Monday. For anyone in North Alabama, Gobble Fite in Decatur can get Douglas fir from Russell Lumber. It is kiln dried. I am planning to get a couple of 1x6x12s & 2x8x14s. Prices quoted were 27.56 for 1x6 & 87.50 for 2x8.
|
|
|
'92 Sport Nautique
|
|
|
|
|
8122pbrainard
Grand Poobah
Joined: September-14-2006 Location: Three Lakes Wi. Status: Offline Points: 41045 |
Post Options
Thanks(0)
Quote Reply
Posted: March-23-2016 at 6:36am |
|
Bret,
Great to hear you found the Doug Fir. |
|
|
|
|
MechGaT
Senior Member
Joined: March-09-2015 Location: Chattanooga Status: Offline Points: 271 |
Post Options
Thanks(0)
Quote Reply
Posted: April-09-2016 at 7:20pm |
|
I am looking at my layup schedule to make my first fiberglass purchase. Here is what I am thinking:
Primary stringers: 2" 8.7oz E cloth, 4" 8.7oz E cloth, with each of these running the length with half on the hull and half on the stringer then 8" 8.7 oz E cloth overlapping 1" on the hull and up the stringer ~5". Over this lay 12" wide 1708 tape that starts at the top of the stringer and runs down onto the hull. That should make it overlap 1" past the 8" cloth. Same on both sides. Secondary stringers: same application of 2", 4", and 8" cloth and 12" biaxial. Then drape 7.5oz cloth over the top of the stringers to give them some protection. For the bulkhead behind the ski locker I plant to use plywood and use the 2", 4", and 8" on the seams to the stringers and hull then drape it in the 7.5oz cloth also. I am using plywood for the floor and plan to wrap it in 1.5oz mat. Thoughts? Am I missing something? |
|
|
'92 Sport Nautique
|
|
|
|
|
TRBenj
Grand Poobah

Joined: June-29-2005 Location: NWCT Status: Offline Points: 21210 |
Post Options
Thanks(0)
Quote Reply
Posted: April-09-2016 at 8:01pm |
|
I would double the 2/4/8 on the mains and wrap the tops with biax instead of cloth.
|
|
|
|
|
PKB1023
Newbie 
Joined: April-17-2016 Location: Magnolia, TX Status: Offline Points: 19 |
Post Options
Thanks(0)
Quote Reply
Posted: June-04-2016 at 12:56pm |
|
Thanks for laying it out on your plans. I was considering paying someone to replace all the wood. After seeing threads on how it should be, I know the price I was qouted would not be to the standards shown on this web site. This weekend, I am plan on getting the floor pulled out on my 1980 sn. Please keep up the post.
|
|
|
|
|
Watauga
Senior Member
Joined: June-12-2009 Location: United States Status: Offline Points: 208 |
Post Options
Thanks(0)
Quote Reply
Posted: June-04-2016 at 6:42pm |
|
I like what TRBeng says about the using Biax to wrap the tops rather than cloth. Just know that there is a learning curve in learning to make the Biax lay flat and not pucker where it transitions from the top and then down the sides of the stringers. Puckering = air pockets which means less adhesion, which means less strength. You can alleviate the tendency of puckering by slightly routing the top edges when you fabricate the stringers, ribs, etc. Biax willI also require more resin, obviously, better technique and more patience. There are plenty of pictures of old stringers on this site that show breaches in the fiberglass mat at the top edges of the stringers resulting in a water entry point and resulting rot of the stringer.
|
|
|
|
|
rolleronariver
Senior Member
Joined: May-24-2016 Location: Rogers, AR Status: Offline Points: 195 |
Post Options
Thanks(0)
Quote Reply
Posted: June-09-2016 at 6:00pm |
|
MechGat, your last post was April 9th. I'm just curious how it all came out. I just picked up a 92 sport nautique a couple months ago. The floor seems very solid except for right in front of the engine. I hope this is just a floor problem and not a stringer problem. It's not bad but I do want to address it this coming winter and I'm curious what all I'm getting into. I'm pretty handy mechanically and I'm not scared to jump in and rebuild something but I don't like surprises. So, I guess my question is, what would you have done differently, and what did you do that would be good advise for someone with the same boat?
|
|
|
92 Sport nautique
|
|
|
|
|
MechGaT
Senior Member
Joined: March-09-2015 Location: Chattanooga Status: Offline Points: 271 |
Post Options
Thanks(0)
Quote Reply
Posted: June-18-2016 at 11:46am |
|
Since April 9 I have only been able to do 1 weekends work. I was able to cut the port secondary stringer out.
  I used an oscillating tool to cut it out. I am pretty sure that was a mistake. I couldn't figure out how to get my grinder in there to the bottom of the stringer without the possibility of cutting into the hull. Afterward I realized that I cut rotate the guard to get in there. I will definitely be doing that next time. The oscillating tool was ridiculously slow and wore out blades fast. I would say that without some exploration it is hard to say how bad the floor or stringers are. I would recommend poking at the wood in the floor and at the stringers where that section of floor meets them. I would say that if everything seems solid elsewhere, you probably have some time before having to replace more. My stringers probably could have made it a few more seasons. They are pretty solid in the area of the engine, but there was not a way to know that without taking it apart. The section you are looking at will require removing the engine cradle and the pylon. Once the cradle is out of the way, you can see the damage much better. Remember also that there is a lip around the edge of the ski locker so don't cut that off. |
|
|
'92 Sport Nautique
|
|
|
|
|
MechGaT
Senior Member
Joined: March-09-2015 Location: Chattanooga Status: Offline Points: 271 |
Post Options
Thanks(0)
Quote Reply
Posted: November-07-2016 at 11:56am |
|
I am working this week on this project. So far I have the secondary stringer shaped and ready for CPES. I also shaped a bulkhead and a piece I needed to replace in front of the ski locker.
 Question for plywood floor: is it better to leave the primary stringers full depth and scab a piece on the inside to support the plywood or once I wrap glass over will it become a strong system that losing that top 1/2" won't matter at all. When I think more about it being 1/2" I think that tells me it probably won't matter. |
|
|
'92 Sport Nautique
|
|
|
|
|
rolleronariver
Senior Member
Joined: May-24-2016 Location: Rogers, AR Status: Offline Points: 195 |
Post Options
Thanks(0)
Quote Reply
Posted: November-07-2016 at 12:14pm |
|
My plan is to use 3/4 in plywood for the floor simply because we're always putting in ballast bags for wake boarding. I'm going to make the primary stringer 7/8 shorter to make up for the plywood and extra fiberglass and actually have the plywood on top of the primary stringer. This will mean less boards and less to rot in 25 years when it starts rotting again. I also think this will make the floor stronger.
I plan on starting all of that this evening. I need to get this done before it gets to cold to lay fiberglass. |
|
|
92 Sport nautique
|
|
|
|
|
Post Reply
|
Page 123 4> |
 Tweet
Tweet
|
| Forum Jump | Forum Permissions You cannot post new topics in this forum You cannot reply to topics in this forum You cannot delete your posts in this forum You cannot edit your posts in this forum You cannot create polls in this forum You cannot vote in polls in this forum |


 Topic Options
 8122pbrainard wrote: