 Boats For Sale:


1992 Sport Floor Replacement |
Post Reply 
|
Page <1234> |
| Author | |
SNobsessed 
Grand Poobah 
Joined: October-21-2007 Location: IA Status: Offline Points: 7102 |
 Post Options Post Options
") Thanks(0) Thanks(0)
 Quote Reply Quote Reply
 Posted: January-20-2017 at 9:38am Posted: January-20-2017 at 9:38am |
|
Maybe take a 2x4 & drill holes for those studs. Then screw it down tight before you remove the cradle. Then it won't flex if you have to persuade it.
|
|
|
“Beer is proof that God loves us and wants us to be happy.”
Ben Franklin |
|
 |
|
|
TRBenj
Grand Poobah

Joined: June-29-2005 Location: NWCT Status: Offline Points: 21109 |
Post Options
Thanks(0)
Quote Reply
Posted: January-20-2017 at 9:50am |
|
Like Pete said, the cradle will flex a little when unbolted but it doesn't matter. It might actually aid you in reinstalling if snug. Get the stringers the right height and in the same spot and it'll align again. Locate stringer location based on pylon cup, PCM mounts are adjustable up/down and left/right.
|
|
|
|
|
MechGaT
Senior Member 

Joined: March-09-2015 Location: Chattanooga Status: Offline Points: 271 |
Post Options
Thanks(0)
Quote Reply
Posted: January-20-2017 at 6:08pm |
|
I will have to take a closer look. At least I know it isn't anything to worry about too much. Thanks guys.
|
|
|
'92 Sport Nautique
|
|
|
|
|
rolleronariver
Senior Member
Joined: May-24-2016 Location: Rogers, AR Status: Offline Points: 195 |
Post Options
Thanks(0)
Quote Reply
Posted: January-22-2017 at 1:02am |
|
Sorry I'm just now getting back to you. The front measurements on the engine should be 22 1/2 between the bolts and the rear should be 22. Btw, my number is 5014542317 if you need any more measurements of I if you get stuck and I can help you out any
|
|
|
92 Sport nautique
|
|
|
|
|
JReisch09
Groupie 

Joined: January-31-2017 Location: Eustis Fl Status: Offline Points: 61 |
Post Options
Thanks(0)
Quote Reply
Posted: February-07-2017 at 10:56pm |
|
I am literally about to start floor in my 1990 Sport, After reading this Im super nervous about the front cap. Have you finished the project? Thank God for this thread, I can really see what Im getting into.
|
|
|
Jon R
1987 Fish Nautique |
|
|
|
|
MechGaT
Senior Member
Joined: March-09-2015 Location: Chattanooga Status: Offline Points: 271 |
Post Options
Thanks(0)
Quote Reply
Posted: February-07-2017 at 11:20pm |
|
I am still working on it. I am working on getting stringers in still. I have estimated that I still have 11 weekends of work until it is ready to hit the water. I can probably do some stuff faster, but I am sure some stuff will be slower than I think. I just don't have the ability to work on it any other time.
|
|
|
'92 Sport Nautique
|
|
|
|
|
rolleronariver
Senior Member
Joined: May-24-2016 Location: Rogers, AR Status: Offline Points: 195 |
Post Options
Thanks(0)
Quote Reply
Posted: February-08-2017 at 5:45pm |
I did my 92 sport this winter. Don't be nervous, just do your research and plan out how you want to do it and then execute the plan. Take your time and do it right though. It's not super hard but it is very time consuming. I had probably 20-30 hours into mine. Maybe more, who knows. Also, plan on spending around $1,500. |
|
|
92 Sport nautique
|
|
|
|
|
JReisch09
Groupie
Joined: January-31-2017 Location: Eustis Fl Status: Offline Points: 61 |
Post Options
Thanks(0)
Quote Reply
Posted: February-08-2017 at 6:22pm |
|
How could you tell if the main stringers needed replacement? Is there a chance mine might still be good? I had soft spots all over, under passenger seat, driver seat, in front of engine, port side by engine rear seat etc. Ive read about drilling and checking but if the engine bolts and tranny mount bolts grip am I home free ? Ive purchases Coosa board already and 5 gallons of poly resin for the floor, what type if resin should I use for sub and main stringers if it comes to it. There is a ton of talk about this on the forums but there is a lot of opinions and info that differ.
|
|
|
Jon R
1987 Fish Nautique |
|
|
|
|
rolleronariver
Senior Member
Joined: May-24-2016 Location: Rogers, AR Status: Offline Points: 195 |
Post Options
Thanks(0)
Quote Reply
Posted: February-08-2017 at 6:27pm |
|
Personally I used epoxy resin as I had several guys on here tell me it was easier to use. I had no issues using it at all. I had a soft spot in front of my engine and behind my drivers seat. My original plan was to simple replace the floor. I had checked my engine mount bolts and they still torqued good for some reason. However, one day I stuck my hand through the ski locker hole and touched the string and my finger when through the stringer. When I tore into it I realized that my stringers were actually getting pretty bad. I might could've made it a couple more seasons but I don't like things not being in good shape so I went a head and replaced them. If you have soft spots I would guess your stringers are bad too.
|
|
|
92 Sport nautique
|
|
|
|
|
JReisch09
Groupie
Joined: January-31-2017 Location: Eustis Fl Status: Offline Points: 61 |
Post Options
Thanks(0)
Quote Reply
Posted: February-08-2017 at 6:29pm |
|
Thanks for the advice, ill start pricing the wood here in Orlando just in case. Rolleronariver what was your procedure with dealing with the stringers under the cap?
|
|
|
Jon R
1987 Fish Nautique |
|
|
|
|
8122pbrainard
Grand Poobah

Joined: September-14-2006 Location: Three Lakes Wi. Status: Offline Points: 41040 |
Post Options
Thanks(0)
Quote Reply
Posted: February-08-2017 at 6:38pm |
|
Jon,
Engine and trans bolts tightening is only one indicator of a problem and in my opinion not a good one. The real indicator is all the soft spots in the sole you mention. I'd say you may be surprised at what you find under the sole. I also recommend epoxy resin and not the poly. Epoxy is stronger, has better bonding plus it's not hygroscopic like the poly is. |
|
|
|
|
rolleronariver
Senior Member
Joined: May-24-2016 Location: Rogers, AR Status: Offline Points: 195 |
Post Options
Thanks(0)
Quote Reply
Posted: February-10-2017 at 12:07am |
I didn't replace the stringers under the cap. It was still solid and dry as far ask could see. |
|
|
92 Sport nautique
|
|
|
|
|
MechGaT
Senior Member
Joined: March-09-2015 Location: Chattanooga Status: Offline Points: 271 |
Post Options
Thanks(0)
Quote Reply
Posted: February-25-2017 at 2:31pm |
|
Made a little more progress the last two weekends. 3 stringers are now glassed in. Decided not to cap the last 2 with 1708 until I get everything set to the right height. I am going to have to grind down the first one due to not fully laying out my plan and getting the correct main stringer material.
 I got the last bit of floor cut out of the way so that I can get at the last stringer. It feels good to be able to say last. Having that section of floor in made working in the boat slightly more comfortable when working on my hands and knees, though. 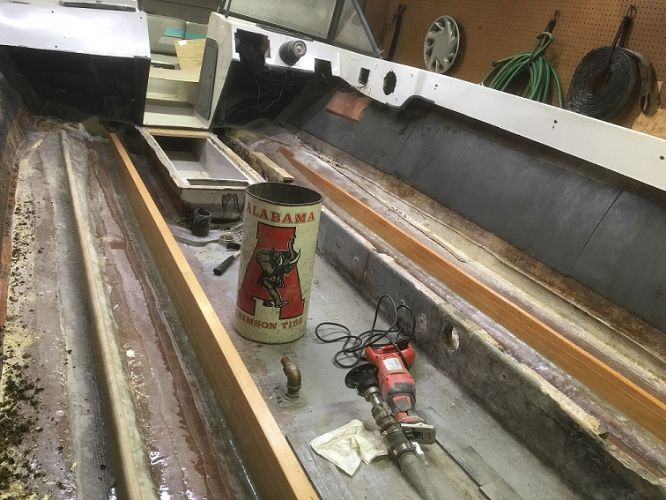 The pipe for pulling the cables and wires through the floor was different than I expected. To turn it up someone cut a fish mouth in the side and then wrapped masking tape around it. Did anyone else find something like this in their floor? As stated before, someone probably replaced the plywood under the driver seat so this may have been replaced at the same time. 
|
|
|
'92 Sport Nautique
|
|
|
|
|
rolleronariver
Senior Member
Joined: May-24-2016 Location: Rogers, AR Status: Offline Points: 195 |
Post Options
Thanks(0)
Quote Reply
Posted: February-26-2017 at 9:47pm |
|
My pipe for my controls had a 45 degree angle on it and then it was cut. I'm pretty sure no one had done any work on my floor before me though. I actually left that pipe in the boat and worked around it but I later regretted that. It's looking good. You're going to be be putting that thing together before you know it!
|
|
|
92 Sport nautique
|
|
|
|
|
MechGaT
Senior Member
Joined: March-09-2015 Location: Chattanooga Status: Offline Points: 271 |
Post Options
Thanks(0)
Quote Reply
Posted: March-27-2017 at 12:49am |
|
Got the last stringer out of a boat that I own. It took all day. Not something I plan to do ever again. I have done most of the grinding to get things cleaned up. Still have more to go. I am ready to be finished with deconstruction and move on to getting it back together. Timeline is much longer than I originally thought.
|
|
|
'92 Sport Nautique
|
|
|
|
|
KRoundy
Platinum Member 

Joined: August-23-2010 Location: Lake Stevens Status: Offline Points: 1702 |
Post Options
Thanks(0)
Quote Reply
Posted: March-27-2017 at 2:16pm |
|
"Timeline is much longer than I originally thought."
Ha ha ha... that about sums up everything I do with my boat. |
|
|
Previous: 1993 Electric Blue/Charcoal Ski Nautique
Current: 2016 Ski Nautique 200 Open Bow |
|
|
|
|
8122pbrainard
Grand Poobah
Joined: September-14-2006 Location: Three Lakes Wi. Status: Offline Points: 41040 |
Post Options
Thanks(0)
Quote Reply
Posted: March-27-2017 at 3:38pm |
That sums up not only my boat projects but any project I undertake!! 
|
|
|
|
|
rolleronariver
Senior Member
Joined: May-24-2016 Location: Rogers, AR Status: Offline Points: 195 |
Post Options
Thanks(0)
Quote Reply
Posted: March-28-2017 at 12:30pm |
That means you're doing it right! LOL It does move quickly one you start getting it back together. Or, at least it feels quicker. |
|
|
92 Sport nautique
|
|
|
|
|
MechGaT
Senior Member
Joined: March-09-2015 Location: Chattanooga Status: Offline Points: 271 |
Post Options
Thanks(0)
Quote Reply
Posted: July-11-2017 at 9:30pm |
|
It has been a while since I have posted. Lots of boring progress. Grind, shape, layer of peanut butter, weigh down, and layer after layer of fiberglass.
 The starboard secondary stringer is just a bit higher than the primary so I chose to cap it with the cloth tape rather than the 1708 I used for the others. This should protect and still have plenty of strength since it only supports the floor. I want it to be perfect, but that flew out the window when I started because I am not perfect.  I learned as I went how to wet out the fiberglass. I was trying to put down resin then lay the 1708 on top then put more resin on top. This was frustrating and not as effective as flipping it over, wetting several feet, then flipping that over into place and wetting the outside. I would then roll a section back, wet the back, put that section in place, and wet the top of it. Walking down the stringers this way seemed much easier. Maybe it was the difference in how tired I was. Next up is putting in the bulkhead behind the ski locker. I have shaped and CPES'ed it. Just got to wrap it in fiberglass and then used my milled glass mix to glue it in and put a couple of layers of tape on the edges. Should be much easier than the long stringers. After that it will be finishing up the pipe for conduit and air duct and I will be ready to foam. Since I couldn't get all of the foam out, I figured it was best to replace it. Hopefully next update will be quicker and with better looking progress. |
|
|
'92 Sport Nautique
|
|
|
|
|
MechGaT
Senior Member
Joined: March-09-2015 Location: Chattanooga Status: Offline Points: 271 |
Post Options
Thanks(0)
Quote Reply
Posted: August-05-2017 at 6:46pm |
|
I made some more progress. I test fit the plywood floor.
I also got the pipe for the air and the conduit for the cables installed in the bulkhead behind the ski locker.  I am in the middle of putting cloth fiberglass on all sides of the plywood pieces. I have gotten them all coated in CPES since the picture was taken. From previous research I have already decided I am going to go with the Interlux Bilgekote. I know the Primekote is required prior to putting on the Bilgekote. How much of each do I need? Is a quart enough or do I need a gallon? I also plan to get the Fiberglass Solvent Wash to make sure I get good adhesion. I plan to roll it on. Unlike some others, I am not trying to make a bilge that is good enough to show, At this point I just want one that is clean and waterproof. |
|
|
'92 Sport Nautique
|
|
|
|
|
gun-driver
Grand Poobah
Joined: July-18-2008 Location: Pittsburgh, Pa Status: Offline Points: 4112 |
Post Options
Thanks(0)
Quote Reply
Posted: August-05-2017 at 8:52pm |
|
The smoother you get the bilge before painting the easier it is to clean and keep it clean later down the road, also looks a little more professional. JMO and experience as I already did a stringer job on my '85.
Nice looking job by the way. 
|
|
|
|
|
MechGaT
Senior Member
Joined: March-09-2015 Location: Chattanooga Status: Offline Points: 271 |
Post Options
Thanks(0)
Quote Reply
Posted: August-06-2017 at 9:44am |
|
I am getting that finish line fever, but I know I still have a lot to do. I have some fairing compound so I might as well use it. I will see how it looks once it is completely assembled.
|
|
|
'92 Sport Nautique
|
|
|
|
|
MechGaT
Senior Member
Joined: March-09-2015 Location: Chattanooga Status: Offline Points: 271 |
Post Options
Thanks(0)
Quote Reply
Posted: January-20-2018 at 6:18pm |
|
Been a while since I have posted any progress. That is mainly because it has been slow progress. I have been putting the foam in and finishing coating the plywood for the floor (sole) with fiberglass. I have learned a lot of lessons. I used 3 kits of foam and still need another to finish it due to wasting because of over pouring it. I realize now I should have poured smaller batches as I got close to being finished. Lesson learned, don't get in a hurry.
Also, I recommend not wearing a suit when mixing and pouring the foam, but shaping the foam creates a mess that is best done with a Tyvek suit on. It is almost as bad grinding fiberglass. |
|
|
'92 Sport Nautique
|
|
|
|
|
MechGaT
Senior Member
Joined: March-09-2015 Location: Chattanooga Status: Offline Points: 271 |
Post Options
Thanks(0)
Quote Reply
Posted: March-04-2018 at 10:52pm |
|
I got the rest of the foam in and just need to do some more shaping. I have been using an oscillating tool to cut it. Seems to work shaving off a little at a time.
I am working on cleaning up the aluminum pylon. Any suggestions on the best way to do it? |
|
|
'92 Sport Nautique
|
|
|
|
|
Timr71
Groupie
Joined: March-28-2016 Location: Alabama Status: Offline Points: 80 |
Post Options
Thanks(0)
Quote Reply
Posted: March-05-2018 at 9:49pm |
|
Looking good. I love that trash can. Roll Tide!
|
|
|
|
|
MechGaT
Senior Member
Joined: March-09-2015 Location: Chattanooga Status: Offline Points: 271 |
Post Options
Thanks(0)
Quote Reply
Posted: March-05-2018 at 10:32pm |
|
Thanks. Roll Tide!
|
|
|
'92 Sport Nautique
|
|
|
|
|
MechGaT
Senior Member
Joined: March-09-2015 Location: Chattanooga Status: Offline Points: 271 |
Post Options
Thanks(0)
Quote Reply
Posted: March-10-2018 at 8:51pm |
|
Shaping foam stinks!
|
|
|
'92 Sport Nautique
|
|
|
|
|
MechGaT
Senior Member
Joined: March-09-2015 Location: Chattanooga Status: Offline Points: 271 |
Post Options
Thanks(0)
Quote Reply
Posted: March-25-2018 at 3:46pm |
|
I did some reading and found a tool called a surform. I got one that is 6" long. It worked really well smoothing out the foam. Wish I had a week earlier. I made good progress and now have the foam to the proper level and the plywood epoxied in. Now I am trying to get the floor level with fairing compound.
  Once it gets level and smoothed out I can start putting the fiberglass over it and getting the fairing on the bilge. |
|
|
'92 Sport Nautique
|
|
|
|
|
gt40KS
Gold Member

Joined: August-05-2017 Location: Wichita Kansas Status: Offline Points: 943 |
Post Options
Thanks(0)
Quote Reply
Posted: March-25-2018 at 3:49pm |
|
Looking good, great progress!
|
|
|
JCCI
1995 Ski Nautique GT40 |
|
|
|
|
samudj01
Gold Member

Joined: March-10-2009 Location: NC Status: Offline Points: 933 |
Post Options
Thanks(0)
Quote Reply
Posted: March-26-2018 at 11:40am |
|
Looking good. Enjoying watching your work
|
|
|
78 Ski Tique, 72 Skier w/302's, 93 SN w/351 & 17 GS22 w/zr409
Previous - 99 Sport Nautique w/GT40 and 87 Martinique w/351 |
|
|
|
|
Post Reply
|
Page <1234> |
 Tweet
Tweet
|
| Forum Jump | Forum Permissions You cannot post new topics in this forum You cannot reply to topics in this forum You cannot delete your posts in this forum You cannot edit your posts in this forum You cannot create polls in this forum You cannot vote in polls in this forum |


 Topic Options
 JReisch09 wrote: