 Boats For Sale:


My 2001 redo - before & after |
Post Reply 
|
| Author | |
erikvaughn 
Newbie 

Joined: July-23-2016 Location: Orlando Status: Offline Points: 4 |
 Post Options Post Options
") Thanks(0) Thanks(0)
 Quote Reply Quote Reply
 Topic: My 2001 redo - before & after Topic: My 2001 redo - before & afterPosted: July-25-2016 at 1:45am |
|
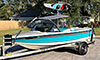
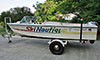
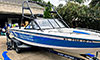
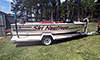
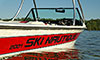
Correct Craft friends, I wanted to share my labor of love: I finished updating and upgrading my 1988 2001. LOVE this boat!! I bought it with my Dad when I was a kid, took it over when I got older, and now that I have my own family I decided it was time for a facelift so my children can grow up with it.
 First, let me say to the naysayers, the folks who are cringing right now sickened by what I've done to a "classic," disgusted that I didn't honor the originality and authenticity of a cultural and historical icon (ok, maybe that's a little much lol) - I get it. I understand and appreciate the value of preserving a "classic" - boats, cars, planes, buildings, etc. In fact, my goal in the beginning was to try and restore this to its original glory. But this boat needed seats, cushioning and backing, paint, decals, minor body work (dings, scratches, mounting hardware holes), carpet, trim items, and some good TLC. The deeper I got into this project and the more I wanted to do, it didn't make sense for me to prioritize originality. To me, the value of tailoring a boat that has long been in my family to the newest, youngest members of my family and building on the things I love about it outweighed keeping it genuine and authentic. I wanted to make this 2001 as great as it could be. I think you'll see what I mean.   I started by tearing out the interior to see what needed to go and what could stay. It also gave me a chance to improve on the design (i.e. rear seat, cupholders, stereo). The stringers and floor are surprisingly solid and the hull is in excellent shape so most of the work was cosmetic. The plastic rear bench always seemed like wasted space to me (so much room was lost due to the buoyancy built into the bench floor between the small compartments) so I created a simple open pressure-treated wood frame that would allow for storage (and even a subwoofer) and designed a wide flat bench to rest on top. I took out the bolstered padding on the sides of the rear bench to make the rear seat wider. It now fits 4 (smaller) people!  I installed 2 speakers in the sides of the padding above the bench seat and cut holes in the fiberglass for 2 more in the front next to the driver and passenger's seat.  I kept the rest of the configuration the same, just replaced the vinyl, padding and wood backing of the seats and cushions.  I always liked the interior pattern of the 196's from the 2000's (my Dad now has one) so I designed a similar swooping-type pattern with bright yellow, black, and white vinyl, working it into the rear bench, engine cover, and front seats. Of course the carpeting is new, too. I replaced the driver's seat base and the new mechanism actually allows the seat to slide forward and backward!  My knees are no longer scrunched up against my chest (the mechanism was frozen on the old seat)!  The plastic face plate on the dashboard was old and cracked so I ordered a carbon fiber replacement. I cut a slot for a Kenwood deck and covered the annoying alarm unit hole with a cigarette lighter socket.  Reinstalling all of the push-button switches was tedious and time-consuming - I had to splice every single breaker! I had my paint guy sand the entire body, remove snaps, fill all holes, and repair all dings.   I designed a bright yellow / white Imron paint scheme with a black stripe just above the water line (again, much like the 196's of the 2000's).  I kept the stickers and lettering simple, just a newer 2000's Nautique decal on the sides and back.  I switched out the white rub-rail rope for a black one to match the new paint scheme. I love how the swim platform turned out - I painted black stripes in the grooves on top to off the yellow!  I upgraded to a 4-blade OJ prop. All gauges function so there was no need to replace any.  I installed a bimini top and had a seamstress back-stitch a hole and a slit for the extended pylon.  I replaced the throttle with a new, safer lock-out unit (so the kids don't accidentally slam it into gear).  I replaced the louvered vents (2 in the front, one in the back).  I removed the teak strips (too much maintenance) and replaced them with soft padding the length of the teak strips and installed 2 foam-grip step strips so the kids (and wife) can board safely. I replaced the steering cable because the old one was stiff and made turning difficult.  I had 2 jumpseats built for the kids just wide enough to be able to wedge between the rail and the engine cover.  My favorite upgrade: 4 in-gunnel cupholders! I used a hole saw to cut through the fiberglass and then ped them in flush-mounted. The tricky one was the back driver's side - the throttle, speedometer and electrical cables run directly underneath that area so I had to slice the cupholder in half, took out the middle section, and installed a shallow-depth cupholder in that spot!  I installed an amplifier under the hull up front to power a Kicker subwoofer under the rear seat.   The engine continues to run strong, reliably, and has been well-cared for so I left it alone. Believe it or not it runs so well that I haven't had to upgrade to electronic ignition - it still has the original distributor and points!  I still run the course with it (at 34 mph) and I do the occasional long-line barefoot run behind it (must be a special occasion lol)! My dad and I replaced the transmission some years ago after water got in and rusted the reverse gear.  Now it sits on a lift, high and dry.  This has been an endearing, nostalgic, labor of love. Nothing beats the 2001!  Let me know what you think! |
|
 |
|
|
DayTony
Gold Member 

Joined: June-30-2013 Location: Salem MA Status: Offline Points: 832 |
Post Options
Thanks(0)
Quote Reply
Posted: July-25-2016 at 2:22am |
|
Nice. Makes it look like a newer boat with the interior done like that. I have never seen a platform that looked like that one on the 2001. Is it custom built or did someone glass around the original one?
Most people will advise not to clip the extended pylon to the lifting ring. The most preffered method is a strap around the bow ring. |
|
|
1988 Barefoot nautique-454
|
|
|
|
|
8122pbrainard
Grand Poobah 

Joined: September-14-2006 Location: Three Lakes Wi. Status: Offline Points: 41040 |
Post Options
Thanks(0)
Quote Reply
Posted: July-25-2016 at 6:42am |
|
Erik,
You do very nice work and it certainly shows. The many hours you put into the boat I'm sure will pay off in many hours of enjoyment on the water. Yes, I too recommend getting a strap around the stem to anchor the extended pylon cable. |
|
|
|
|
Smithfamily
Platinum Member

Joined: December-26-2007 Location: Orlando, Fl Status: Offline Points: 1602 |
Post Options
Thanks(0)
Quote Reply
Posted: July-25-2016 at 7:17am |
|
Wow. I liked the original colors, but the yellow with that new interior really looks great! Which lake you run it on?
|
|
|
Js
|
|
|
|
|
Kristof
Grand Poobah
Joined: October-08-2007 Location: Bree, Belgium Status: Offline Points: 3391 |
Post Options
Thanks(0)
Quote Reply
Posted: July-25-2016 at 10:26am |
|
OK, it's not original... Some here will diasgree with what you did... But even Pete likes it, so you've done a great job.
I really really really like it!!  |
|
|
- Gun control means: using BOTH hands!
- Money doesn't make one happy, but when it rains cats and dogs, it's still better to cry in a Porsche than on a bicycle... |
|
|
|
|
DayTony
Gold Member
Joined: June-30-2013 Location: Salem MA Status: Offline Points: 832 |
Post Options
Thanks(0)
Quote Reply
Posted: July-25-2016 at 10:41am |
It was definitely done in good taste. I'm still curious about the story behind that swim platform though. Oh and want to build me a set of those jump seats? 
|
|
|
1988 Barefoot nautique-454
|
|
|
|
|
relake
Senior Member 

Joined: May-18-2016 Location: IN Status: Offline Points: 126 |
Post Options
Thanks(0)
Quote Reply
Posted: July-25-2016 at 11:56am |
|
Very well done, any tips on building the stern seat?
|
|
|
|
|
erikvaughn
Newbie
Joined: July-23-2016 Location: Orlando Status: Offline Points: 4 |
Post Options
Thanks(0)
Quote Reply
Posted: July-25-2016 at 12:14pm |
|
Thanks guys! I can't take all the credit, I leaned heavily on my paint guy and upholstery guy. And my wife had some good ideas. And orders lol.
Not really sure about the swim platform. It is entirely fiberglass. My dad and I bought it from a family that had 2 boys who liked to tinker with things... I never asked them but I always assumed they switched it out (I was also much younger and didn't know or care it wasn't original). It fit so well that at the time I assumed it was stock. As for the extended pylon, I do have a bow strap (2 actually) that I use when I pull the bigger kids (i.e. me). When I first bought the pylon I read up on the ongoing debate about attaching it to the lifting ring vs around the bow with a strap (lifting ring designed for upward gradually-increasing pressure, fiberglass can crack) so to be safe I pull the adults with the strap. Sometimes when I use it for the kids (I have a 5 and 7 year old) I hook it to the lifting ring. So far haven't had a problem. |
|
|
|
|
erikvaughn
Newbie
Joined: July-23-2016 Location: Orlando Status: Offline Points: 4 |
Post Options
Thanks(0)
Quote Reply
Posted: July-25-2016 at 3:25pm |
It was actually easier than I expected. We built 2 pads (thin, maybe 3 or 4 inches wide) and mounted them to the sides with long screws, washers and bolts through the fiberglass and then did the same with a long pad up against the back. They're roughly the same length and height as the old padding, just not nearly as thick. The base is a rectangle with one cross-member (the picture shows it best). I screwed it to the floor with 2 short wood screws so it doesn't slide. The seat itself is just one long wide pad (instead of 3 separate sections) that rests on top of the base, wedged between the pads. I added a plastic tab underneath the seat so it locks in place and doesn't slide forward (I learned this the hard way with people sitting on it!). Hope that helps. |
|
|
|
|
gun-driver
Grand Poobah
Joined: July-18-2008 Location: Pittsburgh, Pa Status: Offline Points: 4117 |
Post Options
Thanks(0)
Quote Reply
Posted: July-29-2016 at 11:01pm |
|
Looks great!!!
Ya gotta love the Black and Gold
|
|
|
|
|
Joby1969
Senior Member
Joined: July-06-2015 Location: Conway Status: Offline Points: 160 |
Post Options
Thanks(0)
Quote Reply
Posted: July-29-2016 at 11:35pm |
|
Great looking ride. Even tho its not original,you made that boat have its own style. something you can be proud of. Tight work!!
|
|
|
my 1980 SN is mad at my 2009 HD
|
|
|
|
|
DayTony
Gold Member
Joined: June-30-2013 Location: Salem MA Status: Offline Points: 832 |
Post Options
Thanks(0)
Quote Reply
Posted: July-30-2016 at 8:50am |
yeah go Bruins! 
|
|
|
1988 Barefoot nautique-454
|
|
|
|
|
Post Reply
|
|
 Tweet
Tweet
|
| Forum Jump | Forum Permissions You cannot post new topics in this forum You cannot reply to topics in this forum You cannot delete your posts in this forum You cannot edit your posts in this forum You cannot create polls in this forum You cannot vote in polls in this forum |


 Topic Options
 Kristof wrote: