1980 Ski Nautique Total Restoration
Printed From: CorrectCraftFan.com
Category: Repairs and Maintenance
Forum Name: Boat Maintenance
Forum Discription: Discuss maintenance of your Correct Craft
URL: http://www.CorrectCraftFan.com/forum/forum_posts.asp?TID=14223
Printed Date: April-28-2024 at 2:27pm
Topic: 1980 Ski Nautique Total Restoration
Posted By: Watauga
Subject: 1980 Ski Nautique Total Restoration
Date Posted: June-29-2009 at 4:01pm
|
Dear Friends, Just starting a rebuild of the Nautique. Any advice appreciated.  Sitting on my $150 homemade boat lift.         ------------- http://goo.gl/t8gAkI" rel="nofollow - 1980 Rebuild http://goo.gl/TFsgCy" rel="nofollow - Diary Signpainter, Disaster Responder, Longline Barefooter |
Replies:
Posted By: kapla
Date Posted: June-29-2009 at 9:44pm
|
yikes!! these looks familiar to me!!! my 92 its under the same phase...
did you put some support under the hull after removing all the stringer? how was your foam? wet? are you planning on refoaming again? what are you going to use for stringers wood or composites? check here for stringer jobs and you will find lots of info. wellcome and keep the pics comming. good luck on your project... you can find my thread "point of no return" for my 1992 sn stringer repair. ------------- <a href="">1992 ski nautique |
Posted By: Watauga
Date Posted: June-30-2009 at 2:12am
|
Hi Kapla,
Yes the foam was soaked. Especially in the front area. I am pretty sure the stringer failure was instigated by a failure of the battery box drain, but the foam in the area under the air box/foot rest was also soaked. Yes, I am planning on re-foaming. I have looked over lots of posts on this site and I am convinced, for several reasons that re-foaming is the best way to go. This boat is 28 years old. Can I really complain. A new Nautique is how much? I haven't supported the hull yet, but I plan to before I start putting it back together. Currently the boat is outside and will stay there until all of the grinding is finished. As you can see in the pictures I still need another couple of hours to finish, mostly on the inside transom. Then I will get the boat inside and block it up level. I ordered clear Douglas Fir today for all the stringers. Looks like about $175.00 for everything, not including the flooring under the seats or the bulkheads. I have not decided yet if I am going to put plywood down or just fiberglass for the floor. Does anyone have an idea of the cost to order all of the upholstery coverings for an 81?, or is my best way to use someone local? One more question. I want to replace the rubber transition moldings located where the side walls meet the floor, and also the transition molding between the permanent floor and the removable floor section in the rear of the boat. Does anyone know where to get those? Also, I want to replave all of the exterior gaskets and seals on the 351 PleasureCraft while the engine is out. Any recomendation on where to get a kit that includes everything I need? |
Posted By: kapla
Date Posted: June-30-2009 at 4:21pm
|
as for the gasket kits I can give you two stores one is correctcraft parts you will find the email on the links sections or in the ads here..they are site sponsor, another good vendor is skidim.com
good luck on your project ------------- <a href="">1992 ski nautique |
Posted By: nautiless
Date Posted: June-30-2009 at 5:55pm
|
Wat:
Good luck on your resto. I'm sure it will be well worth it. ------------- 1982 SN 2001 RIP (Resto in Progress) http://www.correctcraftfan.com/diaries/details.asp?ID=4400 - Don's Diary |
Posted By: Watauga
Date Posted: July-01-2009 at 12:39pm
|
OK, Everyone,
Took last evening off to welcome some family members back home from the mission field. Gonna finish the grinding this evening. All that is left is about 2 hours, mostly on the inside transom where the primary and secondary strings join the transom. Will post a picture of that later this evening. I would like to order the wood preservative and the resin, mats,foam, and consumable supplies today. Does anyone have a materials list that proved accurate for a SN ? Thanks in advance. |
Posted By: Watauga
Date Posted: July-02-2009 at 3:00am
|
Got to work for a while this evening.
While trying to finish up my grinding where the secondaries meet the transom, I noticed a few sparks, so I decided to remove the swim platform. I was trying to leave it on so that it could give some strength to the rear of the boat during the rebuild. As I removed the screws and the lag bolts, I noticed they were not as tight as I would have hoped. So, I realized I needed to remove the plywood glassed in to the transom that provides backing and strength for the swim platform and the exhaust penetrations. Oh bother. 
This how it looked as I began 
This is one of the backing pieces, closest to the port side. Soft and wet. 
Same condition for the piece that supports and provides mounting for the exhaust flappers. |
Posted By: Watauga
Date Posted: July-02-2009 at 6:09pm
Here is a before the grinding and removal, and after. I am wondering if the factory glassed in the floor stringers before the plywood pieces were glassed to the transom, or after? Also wondering if I could use just one piece of plywood instead of two. If so, it would mean the secondary stringer would meet the plywood rather than the transom. I am also wondering why the piece that is closest to the side of the boat, does not actually meet the side, but rather ends about 1 inch away. Looks like the factory just used scrap.


|
Posted By: Watauga
Date Posted: July-03-2009 at 12:16am
OK, back from finishing the transom grinding. I think I am about 90% finished with the grinding, only some final detail. Here are a few pictures of the transom. I also removed the majority of the foam that was left as well.


I also decided to cut out the block that is directly behind the pylon. It is used to provide a place to mount a bilge pump. Glad I did, since it was soaking wet as well. I think I will definitely try to find some kind of composit for the replacement since it always be wet and have holes drilled in it. 
Thats it until next week. Now to get this fiberglass off me. |
Posted By: 8122pbrainard
Date Posted: July-03-2009 at 12:38am
|
Arklie,
A alternate to using wood to screw the bilge pump down is to epoxy the base directly to the hull. Then there's no worries about water getting into it plus it lets the pump sit lower in the bilge. However, any holes drilled into wood should have CPES injected in them and then when the screw/bolt is installed use 5200 to seal them. The stringers should go all the way to the transom and then any wood on the transom is cut around the stringers and then glassed in. Keep up with the pictures. It never hurts to not have enough info on stringer replacement. ------------- /diaries/details.asp?ID=1622" rel="nofollow - 54 Atom /diaries/details.asp?ID=2179" rel="nofollow - 77 Tique 64 X55 Dunphy Keep it original, Pete < |
Posted By: Watauga
Date Posted: July-11-2009 at 12:03am
|
OK Friends,
Back at it. I picked up my Douglas Fir yesterday. I set up some saw horses this evening and started figurattin'. Couple of questions: On the rear of the stringers where they are pieced together to achieve the correct height for the fuel cell; do you think I can biscuit join the scab rather than the mickey mouse fasteners Correct Craft used from the factory? I am also wondering about the half moon cut-out that allows drainage from between the primary and secondary stringers. Does anyone believe the cut out needs to be that large? 


Thanks for you advice. I may get them cut tomorrow, but will probably cut them on Monday evening. |
Posted By: bkhallpass
Date Posted: July-11-2009 at 12:58am
|
See this site for a materials list. One of our members documented his project on this site, and then created his own website to document everything.
http://www.freewebs.com/billsboatworks/ BKH ------------- Livin' the Dream |
Posted By: storm34
Date Posted: July-11-2009 at 1:06am
|
Just a bit of advice for when you start to carpet...a ways down the road...hang those carpet trim pieces or lay them our nice and straight. I let mine get all twisted up and had to let them bake in the sun for a while before I could put them back in. Just my $.02 ------------- |
Posted By: Watauga
Date Posted: July-12-2009 at 8:01pm
|
Thanks for the advice. Storm, on the rubber termination molding located between the side walls and the floor carpet you mention. Are those available to purchase somewhere? Mine are in pretty good shape, but if they are available, I may want to get those new. Also, of more importance are the rubber transition molding between the side walks, and the removable rear floor. I am missing one of those. I have seen some rebuilds without these, but I want to but mine back as close to original as possible.
How about replacement horns (one too many dips while returning for a downed skier) and replacement floor hinges for the observer bench. Anyone know of a good source? |
Posted By: Watauga
Date Posted: March-12-2011 at 8:26pm
|
Well, after taking a break, I am back on task. The last 2 weekends I have hopefully finished the grinding. Going to try to cut all of the wood this week as time allows. Will also order the epoxy preservative so to have it ready to use as soon as the wood is all cut to fit.
Here are a few pictures after I finished the grinding and flushed the hull out. It does seem that at some time you must just say, "okay, I have ground enough!" I guess you could just grind and grind forever. 


|
Posted By: WOFTAM
Date Posted: March-13-2011 at 12:18pm
|
Hey Watuga-
I am deep in it but just got the stringers tabbed in and I am starting to get hopeful about actually using this boat this season. Here is a link to my progress. https://picasaweb.google.com/mike.macqueen/CORRECTCRAFTFAN# - 1981 Ski Nautique I upload my pics to this album as I make progress. Let me know if I can be of any assistance. ------------- Just because you can does not mean you should. |
Posted By: Watauga
Date Posted: March-13-2011 at 12:57pm
|
Hi Woftam,
I looked at your pictures and you really are in about the same place as me. Couple of questions. 1-Are you using douglas fir? 2-It looks like you have big gaps under the stringers. Are you cool with that or are you going to adjust some how? 3-Is there a reason why you unassembled the engine from the aluminum angle iron mount? 4-Are you planning on removing the fiberglass flooring that is still adhered the the sides of the boat, or just going to glass into it? 5. Going back with foam? |
Posted By: WOFTAM
Date Posted: March-13-2011 at 6:55pm
|
1. Yes on the Douglas Fir
2. I have filled the gaps between the stringer bottom and the floor with thickened epoxy that I loaded in to an empty caulk tube. 3. No real reason why I removed the motor from the grid although it really helped in squaring up the primaries before bedding them. I placed small pieces of angle iron between the stringer tops and the grid to accommodate for the two layers of biax that will go over the top. 4. I will trim the existing glass so it is more uniform, but I will glass into that after I bevel it. 5. Yes on the foam. ------------- Just because you can does not mean you should. |
Posted By: jbear
Date Posted: March-13-2011 at 8:59pm
Well I guess... If I am reading the dates of your posts correctly Arklie you were on break since July of 2009. Glad to see you back at it. Hope you weren't grinding all this time! Keep the pictures coming. john ------------- "Loud pipes save lives" AdamT sez "I'm Canadian and a beaver lover myself"... |
 Watauga wrote:
Posted By: Watauga
Date Posted: March-13-2011 at 10:14pm
|
Thanks Woftam. I am going to be watching your progress closely as you proceed. I am sure I will have many questions.
Hi Jbear, Yes you are right. I had to take a break. I am a disaster responder and many times I am gone for long periods. Las year I was in Haiti a good part of the year and also involved in the Nashville Flood Response and the the two tornadoes that wrecked Yazoo City MS. I normally only serve in the US and Canada. Haiti was a irregular response for me and I am not at this point planning on Japan. Really looking forward to getting the Nautique back in the water this year. |
Posted By: jbear
Date Posted: March-14-2011 at 1:48am
|
Arklie: Disaster relief. Close to my heart. Do you do it fulltime? For an organization like the Red Cross? I work for a charitable org here in Florida called the Care Center. We have a group in Haiti right now. I got involved during 2004 when 3 hurricanes went thru here just weeks after Patti and I moved from Ohio. I went with a group to Mississippi after Katrina. Japan is going to be something. Been watching the news videos and it is kinda hard to believe. Worst problem looks like it is gonna be the nuke plants.
john ------------- "Loud pipes save lives" AdamT sez "I'm Canadian and a beaver lover myself"... |
Posted By: Watauga
Date Posted: March-14-2011 at 1:59am
|
Hi John,
Yes, full time plus. I serve as the director of disaster response for the Presbyterian Church in America PCA / Mission to North America. I have not heard of Care Center. We finally finished our Katrina Mississippi response last year, but we are still going strong in NOLA. Still three worksites operating; Uptown, 8th Ward and 9th Ward. We are planning to continue there for another 5 years. |
Posted By: Watauga
Date Posted: April-04-2011 at 4:23pm
|
Not a great progress report other than the fabrication of my stabilization stands. Almost finished. Next step is to level the boat, place the stands under and in the correct positions, then drill the stands for the carriage bolt that captures the adjustable pad that actually contacts the hull. Will probably adhere some rubber on the surface of the pad to make it more non-slip and to better protect the hull in advance of placing them in position.
Here is a question. How is the best way to determine if the hull is in the right position and has enough pressure at the points of contact? I assume it is at best a judgement call? The boat is sitting on the trailer rather nicely, but when weight is added (read, me and the addition of the strings and fiberglass, tools, etc.) it does collapse the springs to a certain extent. Therefore, it is apparent that the amount of pressure on the stands will increase as the work progresses. Does that matter? I have not seen anyone really support the trailer before. I noticed that one forum poster placed his boat on a cradle totally off the trailer. Seems like a better option than working on a trailer, but I don't have that option. Any advice greatly appreciated. 

|
Posted By: gun-driver
Date Posted: April-06-2011 at 12:06am
|
When I did my '85 I left it on the trailer, blocked the trailer up off the wheels with blocks.
Then supported the boat front and rear and used shims down along the length of the bunks to level and support the hull. I felt that offered more support of the boat instead of just four points. |
Posted By: Watauga
Date Posted: April-06-2011 at 3:07pm
|
Thanks, gun-driver.
I think I will simply block up the trailer frame to prevent the crunching down of the trailer as weight is added, along with using the four jack stands I just built. The idea being to prevent any weight gain from compressing the springs and thus changing the pressure on the four points being supported by the stands. The stands are not really adjustable under load, so I guess the proper way to pre-load them could be accomplished by simply using the trailer nose jack to accomplish the leveling in the same way one would level a camper trailer, i.e, port/starboard and then stern/bow? After I get the four stands set up correctly I guess I should simply crib up under the trailer and insert final shims to apply a good amount pressure between the cribbing and the bottom of the trailer frame. I am traveling this weekend so I hope to have the boat cribbed up before I leave so that I can hit it hard next week. |
Posted By: Watauga
Date Posted: October-07-2013 at 11:10am
|
It's been a while since I have been able to work on the boat. I have almost finished cutting the stringers to shape, just a little more work and I will be ready to bed them in. I have the secondary stringers almost ready to go as well. While doing the trial fit I am not confident that the original stringers were not centered in the hull. They were off to one side about 1/4 inch. Also, the shaft log, the rudder. the ski pole socket, and the center keel were not even close to being "dead on". They are all off to the port or starboard. The shaft log is off center of the hull to one side and the rudder is off to the other side. Here are a few questions for those who have done a complete rebuild that have experienced this. 1- How important is it to center the stringers exactly perfect? This boat has an aluminum cradle that the engine is mounted on. How much forgiveness in the motor mounts can I expect? 2-Is re-glassing the new stringers in the exact position more important than centering them in the hull? 3-I am planning to round off the top edges of the stringers with a router bit. I assume this is worth the trouble? 4-Has anyone used the Jamestown "Thixo" thickened epoxy to bed the stringers in. Has anyone actually used this product or the 3M equivalent? Would you recommend it? What were your experiences?  
|
Posted By: Watauga
Date Posted: October-07-2013 at 11:40am
|
And another question. Before I bed in the stringers I still need to do some final work on them. One of the things I need to do is to to add the forward leg to the starboard stringer that supports the so called air box. I plan on biscuit-joining the leg to the front of the stringer. Obviously the leg was not glassed on the original, but I am planning to do so on the new one. Here is my question: How did CC fabricate the original air box? The original had no internal structure in it except for the stringer leg. Did they pre fabricate the box in a mold then glass it in? Or was it built in place? For those who have rebuilt the air box on this model boat--how did you do it?   
|
Posted By: 29EHV8
Date Posted: October-29-2013 at 4:43pm
|
Great progress your making! How is it coming along now? ------------- -Shiny Low buck, Cool as F*ck Hot Rods |
Posted By: Watauga
Date Posted: October-29-2013 at 5:28pm
|
Hi 29EHV8, Some progress. I pulled the main stringers back out so that I could biscuit join, screw and gorilla glue the foot rest support/extension to the right side main stringer. In the accompanying pictures the stringer extension is too long. I planned it that way so that I would make sure I had enought height. I cut it to the correct length/height after a few trial fits. As you can see in the picture, I have a front and back temporary spacer to hold the stringers at the correct distance apart and vertical. Next Step is to route the top edges of the mains before I bed them in. I still need to cut the large half circle drain hole in each stringer as well. I think I may glass the drain holes before I bed the stringers in to reduce some of the head ache that comes with trying to do them later on. Probably best to glass the bottom of the stringers where they meet the stern as well, i.e., the mitered last few inches of the stringer.   
|
Posted By: 29EHV8
Date Posted: October-29-2013 at 5:54pm
|
Again, nice work! your getting there eh... ------------- -Shiny Low buck, Cool as F*ck Hot Rods |
Posted By: 8122pbrainard
Date Posted: October-29-2013 at 8:21pm
Don't forget the CPES! I agree, the work is looking great.  ------------- /diaries/details.asp?ID=1622" rel="nofollow - 54 Atom /diaries/details.asp?ID=2179" rel="nofollow - 77 Tique 64 X55 Dunphy Keep it original, Pete < |
Posted By: Watauga
Date Posted: October-29-2013 at 9:38pm
| Good reminder, 8122pbrainard. I already purchased the CPES, so I am ready. |
Posted By: gun-driver
Date Posted: October-30-2013 at 9:49am
|
I always wondered why people tear out the floor and air box under the bow. There’s no wood up there and the foam is usually dry up front. I found it was cheaper (no glass/epoxy needed) and easier to stop at the kick board and just hollow the foam out to gain access for the vent hose. When I did my ’85 (I know it’s too late now) I stopped at the kick board then cut the center out of the top of the air box to access the cables and vent hose, hollowed out all the foam and made a removable lid to seal it up but still allow access if I ever need to change a hose or whatever. One other thing I did was after I had all the stringers cut and fit I covered them with a layer of mat and a layer of cloth this way it was easier to work on and I had extra strength on the stringers before starting the stepped layup. Then sanded them with like 60 grit then installed into a thick bed of thickened epoxy mixed with milled fiber strands. That way you ensure that all gaps are filled and what squeezes out the side you mold as a fillet along the edge. Nice work so far keep chipping away at it. |
Posted By: TRBenj
Date Posted: October-30-2013 at 10:34am
|
I have found wet foam all the way up at the nose. I dont like leaving any of the foam- especially the old stuff that absorbs water. It seems much more straightforward to form the air box from scratch rather than trying to leave it in place or reuse the old somehow... but thats just me. On the boat that I did in the original style (glass over foam), it had the air box that spanned the entire width. After the floor and PVC pipes were in place, I poured the foam in several small batches, which allowed it to "grow" above floor level in front. I then trimmed it with a hand saw and angle grinder until it was in the proper shape, then glassed over it. On the boat that I rebuilt with coosa, I formed the side and front of the air box with the boards, then poured from the top until it was full... then trimmed the height and laid a board on top, then glassed over the whole thing. I think the latter approach using ply or similar would be fairly straightforward and would be my recommendation for this build. The ply will give your screws holding the carpeted panels in place something to bite to. |
Posted By: gun-driver
Date Posted: October-30-2013 at 11:14am
|
Tim I guess I didn't make it very clear that I pulled all the foam out from under the bow and out of the air box. I agree I wouldn't leave any of the old foam in. I meant for wet glass or rot theres no reason to tear out the floor and box. Just seems that in my case and most it's a lot easier to leave the floor and box and clean out from underneath. |
Posted By: Watauga
Date Posted: October-30-2013 at 11:28am
|
I agree with TRBenj. If you look back through the pictures you will see discoloration on the hull below the air box and battery box locations. The foam was totally soaked, so much that the rot trail is still obvious after much grinding. The breach was the result of the combination of 3 things. 1-the failure of the dryer-vent style ventilation hose and, 2-The sucky non-sealed black pipe which carried the control-cables, wiring, and steering cable. 3- the failed battery boy drain line connection. When the bow dipped into a wake or wave the resulting wall of water could easily enter the bow mounted air intake, enter the deteriorated vent hoses and find its way to the foam. On this boat the black ABS type of pipe that was used as a conduit for the cables and wiring was cut and snapped over the wires rather than the wires and cabled threaded through it. Not to say anything of the missing elbow where the pipe made the transition down the downward angle towards the stern. The pipe was just cut and lapped together at that point. Instant water entrance point. Seems to me that if CC would have invested $50 of additional time and materials these boats wood structures would have lasted many more years. Gun-runner: your method obviously worked for you-that's cool. I want the satisfaction of going all the way. And to insure the integrity of the bow lifting eve and bow ring. How did you replace the support leg that was attached to the right stringer? Do you have any pictures? Seems like if you only plowed a channel out that you would not be able to get the replacement stringer with attached leg back it there. |
Posted By: gun-driver
Date Posted: October-30-2013 at 12:09pm
|
I built a bulkhead across the front that attached the two stringers together and epoxied the remaining bow floor to the bulkhead. http://s256.photobucket.com/user/gun-driver/media/85%20boat%20rebuild/IMG_0542.jpg.html" rel="nofollow"> 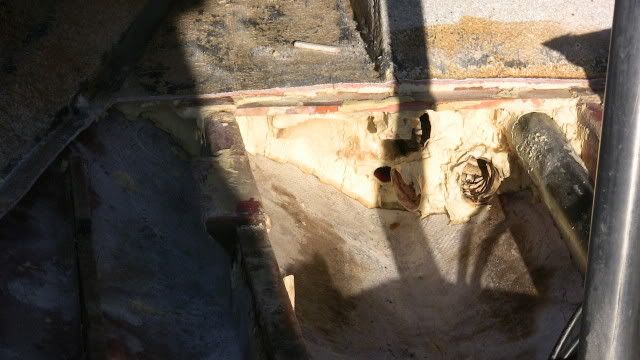 http://s256.photobucket.com/user/gun-driver/media/85%20boat%20rebuild/IMG_0561.jpg.html" rel="nofollow"> 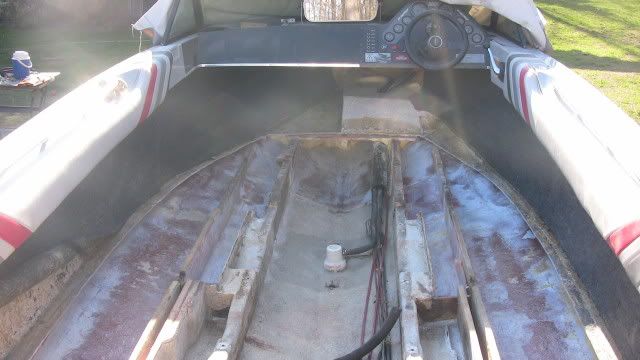 http://s256.photobucket.com/user/gun-driver/media/85%20boat%20rebuild/IMG_0727.jpg.html" rel="nofollow"> 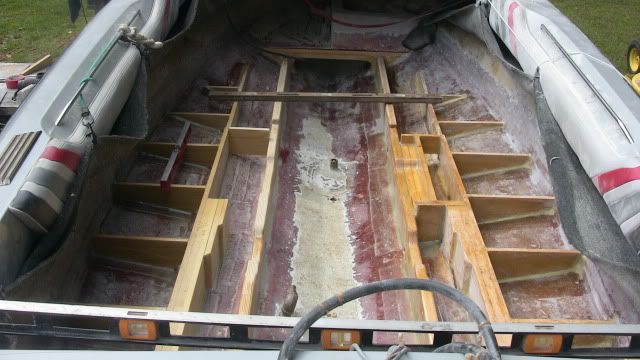
|
Posted By: Watauga
Date Posted: October-30-2013 at 2:40pm
|
Nice work, Gun-Driver. I read a post on this forum that identified the former CC employees as monkeys with chainsaws. I wouldn't go that far, but once you take one of these boats apart piece by piece and reveal how they were built it does make you wonder. I think the design was relatively good, but the production quality was substandard overall. Lots of cut corners, likely driven by production scheduals. I used to work with a carpenter whos building quality was inadequate. When challenged his response would normally be, "carpet will cover it". I think that is what was going on at CC back in those days. The finish was always good, but the underlying work has often inadequate. Having said all of that, I wouldn't consider another brand or type of boat. Still the Harley-Davidson of mid-engine tow boats. |
Posted By: TRBenj
Date Posted: October-30-2013 at 3:31pm
Compared to what, might I ask? How many of the competition's boats have you dissected? I have seen some ugly pictures of x-brand ski boats that have been taken apart and its not pretty. You have to remember that these were boats built on a production line. They were largely hand made- it was a very labor intensive process, and it still is, compared to something like car manufacturing. Unfortunately, the same care that you can put into rebuilding the boat simply could not have been cost effective to do at the factory. The fact that theyre still quite solid 30 or 40 years later, despite the inevitable water intrusion and resulting rot, is pretty impressive. I suspect the factory didnt expect them to last that long, on average. How many cars that age are still on the road? As far as obvious "weak points" in the design or construction go, we now have the luxury of being able to see what worked and what didnt, after being subjected to 30-40 years of use. I agree with your assessment on what caused the water intrusion, but Im not sure saying that CC's were built with "substandard quality" is fair or accurate. |
Posted By: Riley
Date Posted: October-30-2013 at 3:56pm
| I think if anyone of us that's rebuilt old Correct Crafts pulled a new boat apart, they'd be full of ideas how the new boat could be made better. I pulled our 03 Malibu's coaming pads and back seat out when it was 2 years old to get at the gas tank, and wished that I'd ordered the boat incomplete so that I could have finished it. |
Posted By: Gary S
Date Posted: October-30-2013 at 6:15pm
|
I can understand where you are coming from but after a long time CC started to make money after alot of lean years. Money in the 80's was flowing like water and CC got to where they are today by cranking them out as best they could.There are boat companies that were big names and others you never heard of that failed since those times. Does the buyer of a 2014 Nautique care what happened 30 years ago? Doubtful. I believe that if you could afford one and took care of it, a new one would last until you didn't care. My point is at least they resolved those issues,many times it works the other way ------------- http://www.correctcraftfan.com/diaries/details.asp?ID=1711&sort=&pagenum=1&yrstart=1966&yrend=1970" rel="nofollow - 69 Mustang HM SS 95 Nautique Super Sport |
Posted By: Watauga
Date Posted: April-27-2014 at 9:09pm
|
Tending to my Hurricane Sandy worksites, Moore Oklahoma worksite, new responses in Washington Il and now Oso Washington leaves no time to work on this boat. Good thing I am not in a hurry. Got the top edges chamfered, the drain cut-out half circles cut and chamfered and the first coat of CPES brushed on. Hope to get another coat on tomorrow afternoon.  |
Posted By: Watauga
Date Posted: April-27-2014 at 9:17pm
 
|
Posted By: Watauga
Date Posted: June-03-2014 at 12:06am
Starting bedding in the primary stringers this weekend. Do you folks recommend installing all of the bulkheads and supports before beginning laying the mat?  |
Posted By: Gary S
Date Posted: June-03-2014 at 12:33am
|
nice workmanship! ------------- http://www.correctcraftfan.com/diaries/details.asp?ID=1711&sort=&pagenum=1&yrstart=1966&yrend=1970" rel="nofollow - 69 Mustang HM SS 95 Nautique Super Sport |
Posted By: TRBenj
Date Posted: June-03-2014 at 9:23am
No, definitely not. Stringers need to be fully glassed down first for structural reasons. It will also make the job a lot easier not having to work around any ribs yet. |
Posted By: Watauga
Date Posted: June-03-2014 at 12:13pm
|
Thanks, TRBenj. Therefore, I assume that you either fabricate the bulkheads and ribs to match the fillets created by the fiberglass mat, or use a die grinder to remove enough glass to allow the seating of the component all the way to the hull? Another question. While investigating other rebuilds on this site I see that some rebuilders have chosen to use reduced sizes of PVC to replace the dryer-vent type of intake hoses. Has anyone (engineer types) actually completed a scientific analysis of the total CFM capacity of the intake hose vs the CFM capacity of the carburetors of the respective engines? I always tend to think of the intake hoses to supply air to evacuate potentially explosive fumes, but a major portion of the air being drawn in is used for combustion. It would be nice to know if reducing the capacity of the air supply is choking the engine. I think that an adequate exhaust/blower fan and motor enter into the equation as well? |
Posted By: TRBenj
Date Posted: June-03-2014 at 12:58pm
|
Bulkheads and ribs should be shaped to fit against stringers with glass on them. I do not recommend grinding off the structural fiberglass in order to gain an easier fit- that is backwards logic. I've used 2" hard PVC in place of 3" dryer hose on a Ski Tique (3 lines, 302ci) and 2.5" flex PVC in a Barefoot Nautique (3 lines, 454ci). Both boats run well in excess of their factory RPM and speed, and run no faster with the motorbox up (or off). They're not starving for air, so take that for what it's worth. Older boats only had 1-2 vents and I've seen several larger engines installed that run high rpm without starving. It's highly doubtful that CC engineered the Cfm of the vent hoses- just installed what they could fit- and it's overkill. I will say that the flex PVC is a lot easier to route and is worth the extra cost vs the hard stuff. |
Posted By: Morfoot
Date Posted: June-03-2014 at 1:47pm
I second that....Don't give an easier access point for water to reinvade because it will!. Fiberglass would rather bond to itself than something else. ------------- "Morfoot; He can ski. He can wakeboard.He can cook chicken.He can create his own self-named beverage, & can also apparently fly. A man of many talents."72 Mustang "Kermit",88 SN Miss Scarlett, 99 SN "Sherman" |
Posted By: Watauga
Date Posted: June-06-2014 at 11:05am
|
Thanks, TRBenj & Morfoot. I will take your advice. I got the primaries bedded in and they look pretty good. They seem to be solid, therefore I am inclined to bed in the secondaries before I start glassing in the primaries. What do you think? Jamestown back-ordered the 4" glass and will not ship until June 15th. I guess I could do the first 2" layer and wait for the 4", but I think I can go ahead now with bedding the secondaries and rough cut the ribs and bulkheads and begin figuring out the conduit placements. Another thing has become apparent. While I was bedding in the primaries I noticed the steering cable has a cracked outer plastic jacket in several places. I need to investigate replacing it, and probably the control cables as well while I am doing this. Don't want to try to snake the old cables out and snake new ones in later on. Really not complaining since they are 33 years old. |
Posted By: Watauga
Date Posted: June-14-2014 at 6:26pm
|
Got a couple hours in on the rebuild today. I decided to totally glass in the primaries before moving to the secondaries. Today I began that process by laying the 2" ribbon down both sides of each primary stringer. My execution was a little wavy to begin with but progressively got better as I went along. I also was using too much resin to begin with but reduced the amount as I became more proficient. I have a few questions concerning the exhaust support block mounted inside the transom and also the boarding platform support blocks as well. Here is a picture of one of the exhaust support blocks I removed from the transom. It obviously was glassed in before the hole was drilled through the transom and subsequently through the support block. Therefore the hole in the plywood block was not glassed on the inside edge of the hole. When I removed it it did have some silicone sealant wiped around the exposed edge. The hole in the transom and the hole in the support block are both 3". I am wondering if I could drill the new hole in the support blocks at 3 1/4" rather than 3". By doing this in advance of glassing them in would allow me to apply at least one layer of glass over the exposed edge. What do you guys think? And finally, the exhaust flanges were screwed through the hull into the mounting blocks. It this still the preferred method or should I consider thru-bolts. How about the boarding/swim platform - screws or thru-bolts? |
Posted By: Watauga
Date Posted: June-23-2014 at 10:58am
Began bedding in the secondary stringers last evening and got the port side finished. Hope to do the starboard side tonight. 
|
Posted By: Watauga
Date Posted: June-29-2014 at 2:38pm
|
I need some help. Yesterday I was fabricating a few of the structural components and once I made the auxilary stringers that will be sandwiched together and the bunk head they terminate into I realized there must me at least 1, maybe 2, additional bulkheads / ribs / braces, between the primary and secondary strings, forward of the one I just made. Take a look at the area within the red circle. Does anyone have a picture or a diagram of the pieces I need? Mine were so rotten when I removed them, plus my memory is rather weak, that I can't figure it out. I know there were some additional components there. I have patterns made to help me in fabricating ribs from the secondary over to the sidewalls, so I don't need any help on those. Seems like they are supposed to be a wield shape that also supports the floor and capture the foam. 
|
Posted By: uk1979
Date Posted: June-30-2014 at 9:31am
I found no additional bulkheads in that area marked just foam,if you add some may be good to keep them lower so you can add thickness to the underside of flooring panel for better seat fixing. ------------- Lets have a go 56 Starflite 77 SN 78 SN 80 BFN |
Posted By: Watauga
Date Posted: June-30-2014 at 2:23pm
|
Thanks for the help, UK1979. It appears your SN is a few years older than mine. Yours obviously did not have the sculpted primaries that allow access to the motor mounts on the cradle...based on the picture above. The boats that were late in the series (with cradles) before the 2001s were introduced had some components there which provided some support for the floor, which was cantilevered towards the engine enough for the doghouse to rest, but also allow access to the motor mounts horizontal bolts. I would really like to see a picture of a similar boat that underwent new stringer installation. |
Posted By: uk1979
Date Posted: June-30-2014 at 3:15pm
This may help it’s an 81 with cradle it looks like they just shaped the foam to the newer design and glassed over to make the floor just as the older ones... if you’re not using foam time to use your imagination.  ------------- Lets have a go 56 Starflite 77 SN 78 SN 80 BFN |
Posted By: Watauga
Date Posted: June-30-2014 at 5:50pm
|
Thanks again UK1979. The picture you attached may be the only other 1981 on CCF that has been rebuilt that I have seen. It looks like it had been molested even before this picture was taken? Are those pool noodles? Wow. I assume I am going to need to get creative, and build another couple of bulkheads/ribs/braces with a step down mini-stringer to hold the foam but allow access to the engine mounts and support the flooring adequately in this area. See the crude drawing below. The mini-bulkhead at the rear I have already fabricated, I just need to notch it out. The other 2 will need to be fabricated, one in the middle will also need the notch and the one forward will be un-notched. I will need to produce a mini stringer (in 2 pieces for each side) to hold the foam. All of that will need to be glassed over. What do you think? 
|
Posted By: gun-driver
Date Posted: June-30-2014 at 6:05pm
Hope this helps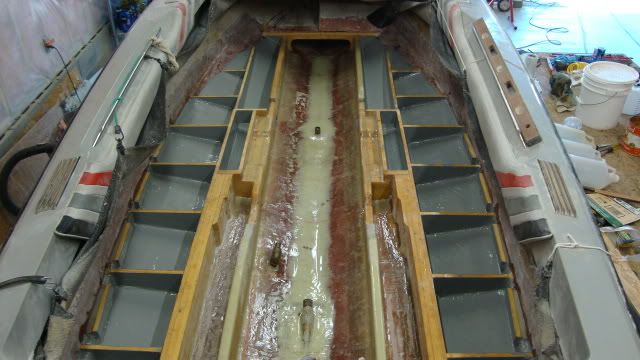 http://s256.photobucket.com/user/gun-driver/media/85%20boat%20rebuild/85rebuild025.jpg.html" rel="nofollow"> 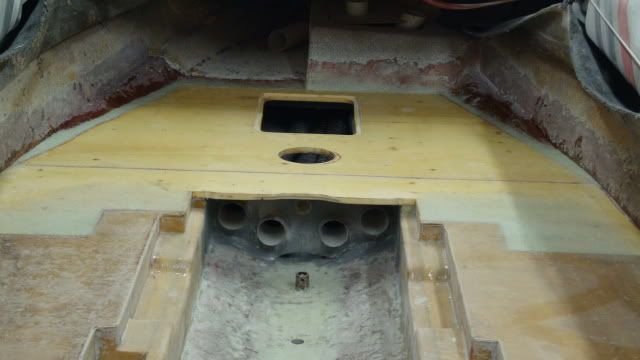
|
Posted By: Watauga
Date Posted: June-30-2014 at 6:46pm
|
Thanks, gun-driver. That is very helpful and I will fabricate something similar on my boat. I wish someone would lead me toward a pre 2001 rebuild with a cradle, though. I ready like the ribs you installed; I am going to do the same. I already have my patterns made. One question, you glassed in blocking along the sidewalls between the ribs. If you had to do over would you add them again? |
Posted By: gun-driver
Date Posted: June-30-2014 at 9:21pm
|
Yes. That gave me more support and contact points for adhesion for the floor in between the ribs and also helped tie the floor to the wall, a weak spot on these boats. |
Posted By: uk1979
Date Posted: July-01-2014 at 7:24am
|
Yes, I see your point on possible weakness around the cradle any extra supports will help...the original would have used the foam as the support cut back to form the shape, and then glassed over with the rest of the floor...some have done the same on their rebuilds and others have added supports it’s up to you...myself I made a simple mould and laid up a pair of stop ended Z section that sat over the top of the stringer and up onto the glass floor, yours will be more of a pain with the dip for engine mount bolts. The big thing you have over the factory is time ,ceps ,epoxy, so it will outlast most of us. Link to the http://www.correctcraftfan.com/forum/forum_posts.asp?TID=28346&title=1981-stringer-and-floor-job-with-ballast" rel="nofollow - CCF 81 ------------- Lets have a go 56 Starflite 77 SN 78 SN 80 BFN |
Posted By: Watauga
Date Posted: July-12-2014 at 9:07pm
Finished tabbing in the primaries and secondaries this week 2/4/8. Waiting on the biaxial to cap them, which will arrive from US Composites on Tuesday. In the meantime I have started cutting all the ribs. Hoping to finish them within a few days and CPES them along with the bulkheads so that I can be in bedding and tabbing them in as well. 
|
Posted By: HatterBee
Date Posted: July-13-2014 at 12:12pm
|
Make sure you leave a little gap to make up for the biax that you will put down on the stringers or you will have to recut and re CPES those support ribs!! ------------- 1977 Ski Nautique Under Re-construction http://www.correctcraftfan.com/forum/forum_posts.asp?TID=25004&title=1977-ski-nautique-rebuild" rel="nofollow - My Rebuild Thread |
Posted By: Watauga
Date Posted: July-14-2014 at 10:32am
|
thanks, HatterBee. Yes, I did do so. Cut most of the Ribs, bulkheads, transom plates, battery box collar ring, and doghouse stringers. I put several coats of CPES on everything I have cut so far. I am traveling this week so I probably will not get much done until the weekend. 
|
Posted By: Watauga
Date Posted: August-22-2014 at 12:49pm
|
Close to wrapping up the rear part of the stringer/rib installation. I still have some touch-up and detail work to do but will try to do that while I concentrate mostly on the bow area. I have also decided to pull the scags off the hull and pull the drive shaft, so I can finish grinding the gel-coat out of the center of the hull, something I was not going to do originally. I was planning on leaving the rudder support plate as well since it appeared to be okay; there were no visible breaches in the gel-coat, but then I decided to probe it to investigate; it was soaking wet!, even though the boat has been out of the water and in the garage for several years! I ground that out and glassed in a new plate. When I removed it the nuts on the mounting bolts were loose and I was able to spin them with only by fingers! I am going to fair the bilge area out nicely since next summer is a long way off. My fairing supplies arrive today from Jamestown. I have also ordered an engine stand from Amazon and intend on breaking the Velvet drive loose and mounting the engine to the stand this weekend so that I can begin taking off all the exterior components to clean and repaint or powder-coat, which has always been my plan. I expect to replace all the exterior seals and gaskets and repaint all. I am thinking about using the Por-15 system. Has anyone used it in the past? Time to start ordering new seals, gaskets, packing, impellers, bilge pumps, blowers, etc. Did I mention that I hate grinding gel-coat: and that using heavy biaxial glass separates the men from the boys?   
|
Posted By: Watauga
Date Posted: August-22-2014 at 1:51pm
|
I am using 3" PVC waste pipe for the bilge ventilation conduits, and 4" PVC waste pipe for the steering cable/control cables/bilge pump pipe/wiring conduit. Here are a couple of pictures of the original water pipe CC used during the original construction for the conduit to carry the steering cable, etc. It was simply a pipe of low cost ABS type water pipe that they slit longways and probably snapped over the cable(s). Where the conduit turned up toward the helm they simply cut it and overlapped it and secured the joint with masking tape! I cant imagine they would have though this was a good method to build a top-quality tow boat. I feel like this construction method led, along with the failure of the battery box drain hose breach and the dryer-vent hose used for ventilation breaches, to the introduction of water into the foamed areas and resulted in the failure of the stringers and floor. Probably back in 1981, a little over $50-$100 worth of additional supplies and labor would have prevented water introduction into the stringers and floor of this particular boat. And for good measure they dumped some Gel-coat into the water pipe from above.   
|
Posted By: Watauga
Date Posted: August-25-2014 at 11:24am
I made some progress this past weekend. Got the conduits cut to length, but not glued yet; a couple of the pieces will need to be heat-formed for a better fit. I also pulled the motor out of my storage place and got it mounted on my engine stand so that I could begin removing all the bolt-on components that I plan on cleaning up and repainting. Next weekend I will drain the engine and pull the oil pan and replace the oil pump and install new seals and gaskets.  I only broke 4 of the 8 bolts that connect the risers to the manifolds. 
|
Posted By: Watauga
Date Posted: September-08-2014 at 12:46pm
|
I was able to do some work on the SN this weekend; wish it would have been more. I got all the PVC glued together and installed. Really happy about that. I also made patterns for the front flooring which I am fabricating out of 3/4 marine plywood. I am doing some additional work on the battery box to strengthen it before I am ready to place it and connect it to the respective drain and battery cable conduits. it was simply stapled into the existing 3/4 floor boards from the factory and the joint was only thickly gel-coated; no fiberglass mat of any flavor that I could tell. A huge water entry point into the foam below with no exit point. I have cut a 3/4 marine plywood donut that I am glassing around the box to strengthen it and to help hold its shape. As I look at other rebuilds on this site I see that CC improved their boxes in subsequent years. One of the problems with my existing box is that the battery box lid/cover is a different shape/size than the actual box. I would like to change it to make it the actual size of the box, but the bright metal (non-stainless) t-trim that is screwed to the existing lid is no longer available so I will need to reuse it, forcing me to make it the original size. I know that some have pointed folks to a supplier that offers a similar trim, but it is not the actual product dimensions and I have decided to try to reuse the existing part. I considered purchasing a new waterproof hatch cover from a supplier,which would be really nice, but when reviewing the pictures I took during the demolition stage on my boat I realized the observer seat support legs actually rest on the lid of the battery box cover when it is folded back into the resting position. I don't think the hatch cover I looked at could support that much concentrated weight.  Here is a picture of the floor section. It still needs the battery box access cut out and the cutout of the area where the pylon/cradle go. I am re-welding the cradle and strengthening it. It had some broken welds and I have also cleaned it up, removing all the crud from the last 33 years.   I am applying biaxial to both sides before installation.  I also got my new cutlass strut bearing and installed it.  And I have been systamatically been cleaning and repainting the bolt on components. I am going with metallic blue for the engine block, bell housing and Velvet Drive, and black on most of the bolt on components. I also removed the fins and drain port, since I already had the strut and rudder off. I am cleaning those items up as well and look forward to sealing them well during reinstallation. 
|
Posted By: Watauga
Date Posted: September-08-2014 at 4:22pm
Here is a picture from before I started taking it apart. You can see the impression in the carpet where the observers seat supports actually crossed over the battery box. You can also see the trim around the lid that captured the lip of the floor and also contained the carpet on the lid. I was hoping for a good alternative such as a nice hatch cover, but most of the ones I have researched are pretty weak compared to the plywood that was original, even when it was deteriorated. 
|
Posted By: Watauga
Date Posted: September-10-2014 at 1:00pm
|
When I pulled my engine out of storage a few weeks back I mounted it on an engine stand, thus freeing up the cradle. At that time I noticed several of the welds were broken on the cradle. I assume they may have been broken before I removed it from the boat and just didn't notice. There have been many times when we would pull up 3 barefooters from the deep-water start position with this Nautique and I wanted to make sure the integrity of the cradle/pylon are strong going forward. I ground out the bad welds and while doing so decided to cut the entire cradle apart and strengthen it with the addition of the 1/2 end plates where the channel was welded to the angle.   When I placed it and the pylon in the boat for a trial it it was a tight fit between the stringers, but no beating or prying was required, and the pylon was really a close tolerance but I finally got it in without any grinding or heavy manipulation. I will clean it up one more time, clear coat it and lay it aside now that I know it is good to go. It is obviously a good feeling when you have spent a lot of time and money on a project like this and the moment of truth happens (placing the cradle back in)and it goes well!! Looking forward to making the final cuts on the flooring so that I can begin foaming the forward areas. 
|
Posted By: gR@HaM
Date Posted: September-18-2014 at 7:19pm
|
Wow wish my welding could be that clean nice work!! ------------- '82 Ski Tique |
Posted By: Watauga
Date Posted: September-21-2014 at 2:55pm
|
Thanks, gR@HaM. I was out of town all of last week and did not get anything accomplished on the SN. I plan on beginning the foaming process this week as time allows. I am using US Composites 2lb for the area under the bow and seating front area and 4lb for the starboard and port sections along the engine toward the rear. Hoping that 6 gallons total will do it. In the meantime I am going to pull out the plywood section shown in the picture so that I can wrap the exterior edges and the battery box penetration edges with fiberglass cloth or mat before I install it permanently with thickened epoxy. Still debating on the need to screw it to the stringers but leaning toward doing so. It already has one layer of bi-axial on each side. I still need to fabricate a piece of flooring to cover the pylon mount; thinking about Starboard for that and the battery box lid so that I will not need to spend the effort protecting the edges. I think it will work since those pieces are removable - not glassed in. I am also going to glass in additional blocking under the areas where the seating mounts attach to the floor for additional strength and mass; I have those areas marked with a Sharpie in the picture below.  |
Posted By: TRBenj
Date Posted: September-21-2014 at 4:56pm
| Wait, so after all the trouble you went through to add the ribs, you're still going with foam? Seems one or the other are both fine approaches (though I am an anti-foam guy myself, generally speaking)... Not sure why you'd use both? |
Posted By: JoeinNY
Date Posted: September-21-2014 at 5:12pm
|
Indeed for the love of god foam, or ribs and a plywood floor, not both! ------------- http://www.correctcraftfan.com/diaries/details.asp?ID=1477 - 1983 Ski Nautique 2001 1967 Mustang 302 "Decoy" http://www.youtube.com/watch?v=cO5MkcBXBBs - Holeshot Video |
Posted By: Watauga
Date Posted: September-21-2014 at 6:19pm
|
Yeah, the foam debate is always going to be with us. So, since you have questioned my intent, I will respond with my thoughts. I am not convinced that the remaining foam under the front and rear top decks is sufficient to meet the USCG floatation requirements alone, although I don't know of anyone actually doing an official test. I admit I don't know for sure. If anyone can point me toward that data, please do so. Without the data, ones opinion is just that. Yes, the effort and cost to install ribs is significant, I was obviously willing to make the investment. I see the ribs mostly as strengthening the hull, but they also will be a great aid when refoaming. I was also not interested in raising the height of the floor, and thus raising the height of the engine cover and the height of the rear seat. Raising the engine cover means the ski rope is closer to the cover unless another adjustment is made in the pylon. The rear seat also sits higher and means another adjustment when reupholstering. Those height adjustments may seem insignificant, but they are real and also require further efforts. I am really happy with my decision, thanks for sharing your opinion. |
Posted By: JoeinNY
Date Posted: September-21-2014 at 6:35pm
|
It' s not really a question of the foam debate so much - I'll claim credit/disgrace for being the original guy to throw ribs into a correct craft - when I designed/engineered it I was specifically trying to not use foam. I had seen (bought) a cc with an epoxy coated floor installed and then refoamed it was terrible to say the least. Foam next to wood is bad, sometimes a necessary evil but it is bad. If you must foam that boat do yourself a favor and don't put a plywood floor anywhere you don't need it to screw a seat into - either you or a future owner will likely regret it, and with 4 lb foam you don't need it. Edit... upon reexamination it sounds like you are not going to use a plywood floor in the back just refoam and glass.. well that's better anyway. For future concerns of documenting best practices.. those ribs in the back will do nothing positive for the structure of a foamed boat. Under normal loading they will not add any strength to the system and under extreme loading (beaching,log, etc) they will be an unwanted stress concentration that will likely result in a hull tear. But that is unlikely, so likely they are no more than waste of time and money. Doing the floor under the seating area in plywood that will have foam under it is about worst case scenario. If I was going to foam and use wood the 1x6 ish douglas fir or something similar will always last longer than plywood where the water tends to wick up the layers. Be very careful to cpes and seal all the screw holes you make. -not trying to bust your balls here, you are doing spectacular quality work and will have a boat many times better than factory. But some things aren't a debate, they are facts. ------------- http://www.correctcraftfan.com/diaries/details.asp?ID=1477 - 1983 Ski Nautique 2001 1967 Mustang 302 "Decoy" http://www.youtube.com/watch?v=cO5MkcBXBBs - Holeshot Video |
Posted By: Watauga
Date Posted: October-04-2014 at 10:56pm
I was traveling all week, so today was the first day I worked on the SN. Got the foam poured in most of the cavities, just some touch up and fairing and I will be able to start glassing. Got the air box shaped up as well. 
|
Posted By: Watauga
Date Posted: October-07-2014 at 7:17pm
Fairing surface imperfections. I really like the Total Fair from Jamestown.
|
Posted By: jbear
Date Posted: October-08-2014 at 12:42am
|
Holy Crap!!!! June 2009 until October 2014. But looks like you are just doing an awesome job. You sure are gonna enjoy this. Semi thread jack...going to Haiti in Novenber for my 1st 'outa the country' mission trip. Scared & excited all at the same time. Been a busy few years for you! john ------------- "Loud pipes save lives" AdamT sez "I'm Canadian and a beaver lover myself"... |
Posted By: Watauga
Date Posted: October-08-2014 at 1:12am
|
Hi John, I have been to Haiti dozens of times; you too will enjoy your time they and come back with a new perspective on just about everything. Immediately after the Haiti quake I moved there for the first 100 days to set up operations. The PAP airport was closed so we flew into The DR and crossed the border into Haiti in the middle of the night, scary for even me. I have responded to 5 major events there, but also go for non-disaster related ministry. Part of the reason that this SN rebuild got off to a slow start is because of Haiti and Sandy, both all consuming. Just remember that your purpose there is people, not projects, and you will do just fine. Every day in Haiti is a hard day, but it's hard for the Haitians too. Sometimes we get sick when we go there, but Haitians get sick too. I got dengue fever during the quake response; that was hard to shake. So hard to believe that PAP is just 1.5 hours from Florida and the country is still about 1 level above Stone Age. Fortunately we have not seen a major hurricane this year, therefore I have been able to spend more time on the boat, although we are still active at 8 locations in 6 states at the moment. I hope to finish the glass work within the next few weeks and move on to the engine. |
Posted By: Watauga
Date Posted: October-19-2014 at 10:54pm
I was out of town most of the week and did not work much on the SN. I did manage to get 3 layers of glass on most all of the floor areas. Still a lot of detail to do, although. A major accomplishment is making good progress on the air box under the bow. It will be a good day when I crawl out from under the front deck for the last time. This boat had removable 3/4" boards, covered in carpet, screwed to the side and front foot-rest of the air box. Although it looked nice, the screws penetrated the fiberglass skin of the air box. I could not say for sure that water entered the interior though the penetrations, but I am thinking about simply applying carpet directly to the air box without the 3/4" boards. Any opinions? I am thinking about using Jamestown TotalBilge epoxy paint to cover the under-bow glass work as well as the bilge and battery box. I ordered a quart to experiment with. I also cut the removable rear floor section this afternoon and applied 1 layer of biaxial on it. I am thinking that it is going to sit a tad low in relation to the rest of the rear floor and I will need to either add more glass to the tops of the primaries or additional glass on the bottom of the removable section. 
|
Posted By: 8122pbrainard
Date Posted: October-19-2014 at 11:09pm
|
Arklie, Nice work. You're almost there. Keep going!! ------------- /diaries/details.asp?ID=1622" rel="nofollow - 54 Atom /diaries/details.asp?ID=2179" rel="nofollow - 77 Tique 64 X55 Dunphy Keep it original, Pete < |
Posted By: Watauga
Date Posted: October-26-2014 at 12:33am
|
Another semi-productive day Got delayed this morning when I offered to replace the battery in my mother's Dodge Stratus. Didn't realize I needed to jack the car up and remove the drivers side front tire and inner-fender to get to the battery. By the time I finished all of that and cleaned my gutters out, raked the leaves and mowed the grass it was already 3:00. I did get the supports cut out and fitted for the ski storage tray. I will pull them out tomorrow afternoon and CPES them and start covering them with glass before reinstalling them with thickened epoxy.  I also subjected myself to the torture of cleaning the inside and outside of the fuel cell with muriatic acid. Wow, don't ever want to do that again. Clean as a whistle now! I replaced the sending unit with a new one and cleaned the elbow and check-valve. Should be ready to reinstall when the time comes.  I also got a piece of composite Trex and ripped it into to narrower pieces to mount the fuel cell on. I think it is going to work well, although a little thick. I may need to slot it out where it fastens to the primary stringers. As it is now it is a little tight on the suspended bilge blower. I am planning on tossing the existing blower anyway and mounting my 2 new blowers under the tank.  I still plan on putting one more layer of biaxial on the removable rear floor section, a total of 3 on top and 1 on the underside. Then it's on to fairing the bilge. |
Posted By: ski-guy
Date Posted: October-30-2014 at 4:59pm
|
[QUOTE=Watauga] I was out of town most of the week and did not work much on the SN. I did manage to get 3 layers of glass on most all of the floor areas. Still a lot of detail to do, although. A major accomplishment is making good progress on the air box under the bow. It will be a good day when I crawl out from under the front deck for the last time. This boat had removable 3/4" boards, covered in carpet, screwed to the side and front foot-rest of the air box. Although it looked nice, the screws penetrated the fiberglass skin of the air box. I could not say for sure that water entered the interior though the penetrations, but I am thinking about simply applying carpet directly to the air box without the 3/4" boards. Any opinions? I epoxied some pieces of fibreglass to the air box to screw the wood pieces too - I didn't want any screws anywhere as that seems to be where water got in......  ------------- 1980 SN - don't worry dear, I may have $10+K into this project boat but I can easily sell it for $5k 2000/2001 Glen-L 'Squirt' 2006 Malibu LSV |
Posted By: Watauga
Date Posted: October-31-2014 at 1:11pm
|
Thanks, Chuck. That picture is very helpful. I see the tabs on top of the air-box, but what did you do to secure the bottom? I like that as an option, but I am still not sure of the benefit over just adhering carpet directly to the air-box. The reduction of the weight, although minimal, would also be a benefit. I had not seen your rebuild thread before, have you made more progress since your last post? The picture of your air-box looks very similar to mine. It is a happy day when one gets out from under to bow! not as significant as the day one finishes the arduous task of grinding, but still a good day. |
Posted By: Watauga
Date Posted: October-31-2014 at 1:20pm
|
I have been making some progress. I dug out my mufflers, just trying to stay ahead on the rebuild. They were wrapped in three strips of the original floor carpet, held on with zip-ties. I have removed all of that and sanded them down so they could be repainted. Does anyone have a recommendation on priming and painting them? I was simply thinking of Rustoleum primer and paint. Will that work okay, or do they need gel-coat? While inspecting them I realized that there was a large hole in the neck of one of them. I drilled it out and will fill it with thickened epoxy and one or two wraps of cloth. Does anyone have better advice?   
|
Posted By: MrMcD
Date Posted: October-31-2014 at 2:32pm
|
When mine rotted out and started leaking I was in a hurry, trying to pack and get away for a long waterski weekend, a muffler shop sold me 3" stainless pipe, it was louder for sure but worked. Very nice work by the way, you are committed. I hope it hits the water again this year. |
Posted By: 8122pbrainard
Date Posted: October-31-2014 at 4:11pm
Many have replaced their mufflers with straight pipe. It's certainly a good option. If you go this route, be aware that muffler shops typically use 400 series stainless. It's not a good choice for material. It will rust with time. ------------- /diaries/details.asp?ID=1622" rel="nofollow - 54 Atom /diaries/details.asp?ID=2179" rel="nofollow - 77 Tique 64 X55 Dunphy Keep it original, Pete < |
Posted By: MrMcD
Date Posted: October-31-2014 at 6:49pm
| I did read that copper was the material I needed but at the time Stainless was available and we had a weekend to salvage. We sold the boat 500 hours and 4 years later, it was still working. I agree the muffler shop version was not ideal or the best fix. |
Posted By: Gary S
Date Posted: October-31-2014 at 7:04pm
If you add cloth or a mat wrap you may just then have trouble getting the hose on. I would just countersink the hole and fill with thickened resin and sand smooth. When the exhaust hose goes back on just make sure it extends back over the hole covering it,the clamp will take care of the rest. Pete likes to modify boats changing them completely from what Correct Craft intended,I personally would keep the exhaust original.  ------------- http://www.correctcraftfan.com/diaries/details.asp?ID=1711&sort=&pagenum=1&yrstart=1966&yrend=1970" rel="nofollow - 69 Mustang HM SS 95 Nautique Super Sport |
Posted By: Watauga
Date Posted: October-31-2014 at 9:31pm
|
Thanks, Mark Pete and Gary. I am planning on fixing the muffler since it is not rotten at all. I am not sure how the puncture occurred; I did not know about it until I removed the hoses last weekend. I will take your advice, Gary. Hopefully that will do it. How about the paint? Any experience in repainting? |
Posted By: gun-driver
Date Posted: October-31-2014 at 9:53pm
|
Rustoleum will work fine. The carpet was wrapped around them from the factory to keep them from vibrating and rubbing against the hull. |
Posted By: Watauga
Date Posted: November-01-2014 at 2:49am
| Thanks, Paul. I will go with the Rustoleum. I would like to find some blue close to the original color. |
Posted By: Hollywood
Date Posted: November-01-2014 at 4:25am
|
Someone probably pried the hose off at some time and punctured a hole with the tip of a flathead screwdriver. ------------- |
Posted By: ski-guy
Date Posted: November-02-2014 at 12:36am
|
Re tabs for the kick plate (or whatever they are called.) I just have the tab at the top and screwed through it - I was going to either screw the front one to the one running along the edge of the air-box or use an angle piece between the two pieces of wood to hold them together at the bottom. But so far it seems solid enough just 'pinned' at the top. I have made more progress since my last post - we fired up the engine today and did a water test. Then I brought it home and winterized it! (it was 6 C (43F) today and that is good for this time of year) - will need to fine tune a bit next season as well as re-do the graphics which are sanded off right now. May try and update my post cause I always liked the ones that go through to the end. ------------- 1980 SN - don't worry dear, I may have $10+K into this project boat but I can easily sell it for $5k 2000/2001 Glen-L 'Squirt' 2006 Malibu LSV |
Posted By: Hollywood
Date Posted: November-02-2014 at 2:13pm
|
I might try big pieces of Velcro to hold those boards to the air box. Simple. ------------- |
Posted By: Watauga
Date Posted: November-08-2014 at 9:17pm
|
More yard work today, but did get a few things done on the rebuild. I went with Rustoleum on the paint for the mufflers; 2 coats of black after using thickened epoxy to fix the hole. After painting I wrapped them with 2 layers of foam insulation and secured the foam with zip ties.  Started working on the manifolds. I have been cleaning them up with wire brush on a grinder. The 3/4 NPT where the plugs and the elbows attach were in rough shape; had to drill one out. I ordered a tap and cleaned up the threads and I think I got them in real good shape. Not a fun job/ I think I mentioned earlier that I broke 4 of the eight bolts that attach the risers to the manifolds. I got 3 of the snapped-off bolts out without too much trouble with easy outs, but 1 was very difficult; I don't have a lot of confidence in threads left. I am going to order a heli-coil and see if It works okay. In the meantime I put together a pressure tester and a plate to seal off the top. I pressure tested them to 10 psi. Is that enough?   I primed and started priming and painting them with Rustoleum high temp primer and paint.  I also started painting bilge coating on the inside transom and under the front floor section that bridges the bilge. This is one coat of TotalBilge epoxy from Jamestown. Planning on 3 coats. I still am not satisified with the way the rear removable floor section sits on the primary stringers. It rocks a little front to back, so I am going to need to make an adjustment somehow. I couldn't figure out the problem for a while until I realized the marine plywood actually has some rocker/warp in it. now that it has been wrapped with multiple layers of glass I don't think it will straighten out, going to need to either add some patches to the stringer or to the underside of the removable piece. |
Posted By: cbr1000dude
Date Posted: November-09-2014 at 9:33pm
|
The mufflers were originally wrapped in carpet to keep them from banging around, the foam looks like it would accomplish the same thing, but will it make noise rubbing against the sides and bottom of the channels they sit in? Looks great, but if it squeaks like a Styrofoam cup it'll drive you nuts! Nice job on the exhaust manifolds, lots of work. There's not much back pressure to speak of, so if they don't leak, you're good to go. The warped rear wood panel sounds like a PITA to deal with. I'd just make a new one if it were mine. Probably the cheapest part of the project. |
Posted By: Watauga
Date Posted: November-09-2014 at 10:31pm
|
cbr1000dude. The foam is soft, its the stuff used to insulate around windows before installing vinyl siding. I don't think it will squeak like a foam cup. They are a snug ft between the primaries and secondaries. Yes, mine had carpet around them and over the years had gotten pretty nasty. When I removed the carpet it basically disintergrated it my hands. I finished the paint on the manifolds this afternoon and I should get my new gaskets from Skidim tomorrow. Relative to the removable floor section. It just rocked front to back a little, and I wasn't satisfied with leaving it that way. I settled on adding 2 small patches to the underside of the section on the very rear where it sits on the primaries and it fixed it perfectly. It definitely wasn't the least expensive part of my rebuild, though. It is 3/4" high quality marine plywood with 3 layers of biaxial on the top and 1 on the bottom. Not saying anything about the resin and time. I got one coat of bilge coat on the entire bilge tonight. Really exposed the imperfections in the bilge. I think 2 coats may do it, but planning on 3. Looking forward to finishing that up and moving on to reinstalling the rudder mount, fins, drain port and exhaust ports. Finally feel like I am getting somewhere. |
Posted By: Watauga
Date Posted: November-10-2014 at 3:57pm
Couple of pictures of the bilge with the first coat of TotalBilge. 
|