86 SN rebuild
Printed From: CorrectCraftFan.com
Category: Repairs and Maintenance
Forum Name: Boat Maintenance
Forum Discription: Discuss maintenance of your Correct Craft
URL: http://www.CorrectCraftFan.com/forum/forum_posts.asp?TID=19405
Printed Date: April-28-2024 at 5:25pm
Topic: 86 SN rebuild
Posted By: Ranger
Subject: 86 SN rebuild
Date Posted: September-10-2010 at 4:45pm
|
Here we go. I was going to wait until winter, but since the fuel filter fell off due to rot, I thought It might be a sign from above that I better start sooner than later. So, the boat is gutted and the floor will be cut out this weekend.
A little background: I'm really a fisherman and a hunter, but have been around boats for most of my life. I have rebuilt a few, but all of them were for chasing something offshore. But I have a 9 year old son and although he is my fishing partner and baseball buddy, he has been watching all of the ski and wakeboard boats go by at the river. I finally started pulling him around in my Ranger, but it's time that I get a real ski boat. So I started looking for a project that we could build together. This is it. It will be something that he ends up with, so we will be building allot more than just a boat. I found this Ski Nautique a little North from where we live and thought that it was perfect for the task at hand. We used it once and it was everything that I thought it should be. So, I started doing my research and although I haven't fully decided on the materials, I should be elbow deep into wet foam within 48 hours. I appreciate this forum and the people who have made it great. Hopefully this will be a build that everyone will enjoy. I'll try to keep you posted with pictures as I go. Jeff |
Replies:
Posted By: BuffaloBFN
Date Posted: September-10-2010 at 4:55pm
|
I'm almost speechless after that intro...very cool! ------------- http://correctcraftfan.com/diaries/details.asp?ID=2331&sort=&pagenum=12&yrstart=1986&yrend=1990" rel="nofollow - 1988 BFN-sold "It's a Livin' Thing...What a Terrible Thing to Lose" ELO |
Posted By: Hollywood
Date Posted: September-10-2010 at 5:30pm
|
It sure was refreshing to read a post as well written as that! This will be a great thread. ------------- |
Posted By: robrich
Date Posted: September-10-2010 at 6:14pm
|
I am looking forward to following the thread. ------------- |
Posted By: charger496
Date Posted: September-10-2010 at 6:23pm
| Showoff. |
Posted By: Ranger
Date Posted: September-10-2010 at 6:35pm
|
Thanks Guys, I appreciate the welcome and humor!
I'll post some pict's later but I pulled the engine last night. What a pain. The hoist I rented was junk and it barely made it over the gunnels. I took one of the tires off, dropped the trailer to the ground, and then cranked the bow down as low as it would go. Since the tranny didn't clear. I had to lift the rear of the engine while my wife pulled on hoist. it was close, but it's out. I'm not renting another piece of junk. I'll either buy one or build one before the motor goes back in. I haven't checked into it, but what is the best way to upload photos? Jeff |
Posted By: BuffaloBFN
Date Posted: September-10-2010 at 6:59pm
|
Photobucket.com works for me. There's a tutorial thread here on the site. ------------- http://correctcraftfan.com/diaries/details.asp?ID=2331&sort=&pagenum=12&yrstart=1986&yrend=1990" rel="nofollow - 1988 BFN-sold "It's a Livin' Thing...What a Terrible Thing to Lose" ELO |
Posted By: Ranger
Date Posted: September-10-2010 at 7:10pm
Ok, I need to give this a shot, so lets see how this come out.


Not really much to see, but I want to make sure that this works out alright. Jeff |
Posted By: TRBenj
Date Posted: September-10-2010 at 7:24pm
|
Probably too late now, but had you removed the carb and flame arrestor, then tightened the chains, you would have cleared at least another 6-8". ------------- |
Posted By: Ranger
Date Posted: September-10-2010 at 7:41pm
|
Yes, I thought of that while I was staring at it in the air. In fact, I was going to drop it back down and do just that, but the bottle jack on the picker wasn't cooperating. I was getting a little nervous with that thing in the air knowing that the pile of junk holding it could go at any moment.
Once I had it over the rail, I finally got the picker to lower enough that I could get the engine on its stand. But it was a crap shoot. I almost went and grabbed my tractor to lift it off of the picker. Jeff |
Posted By: 8122pbrainard
Date Posted: September-10-2010 at 7:53pm
|
Jeff,
It's great to hear that you will be getting your son to help out. I wish I had done more of the same. Get him a flat bar and let him go after some of that old wet foam!! ------------- /diaries/details.asp?ID=1622" rel="nofollow - 54 Atom /diaries/details.asp?ID=2179" rel="nofollow - 77 Tique 64 X55 Dunphy Keep it original, Pete < |
Posted By: TRBenj
Date Posted: September-10-2010 at 8:04pm
Its actually pretty amazing how high you need to lift the engine to get it out of one of these boats while on the trailer. Even the tall swing set we used on my Skier wasnt tall enough for our BFN... we had to go taller.
As far as the father/son project goes, that is pretty cool. Dad and I are doing the BFN together as well. ------------- |
Posted By: Ranger
Date Posted: September-10-2010 at 8:36pm
|
I love doing these kinds of projects, but having your young boy there too makes it all that much better. I just need to persuade the wife that 8:00 is too early of a bedtime for him. We can this done a lot faster if he goes to bed at 9:00.
Jeff |
Posted By: Waterdog
Date Posted: September-10-2010 at 11:40pm
|
Glad you got it out ok, I did'nt want to scare ya about pulling the cherry picker back and "swinging" the motor over the gunnel.It was kinda exciting on mine too. I felt every little pebble under those steel wheels... ------------- - waterdog - http://www.correctcraftfan.com/diaries/details.asp?ID=3896&sort=&pagenum=2&yrstart=1978&yrend=1978" rel="nofollow - 78 Ski Tique |
Posted By: gun-driver
Date Posted: September-11-2010 at 6:12am
These make good engine hoist's

And yes it's great when the little one's get involved. 

It's going to be a long road to the finish, but you will have a deep understanding of all aspects of your boat inside and out when your done. You will really enjoy it when your done. |
Posted By: Ranger
Date Posted: September-11-2010 at 1:57pm
|
I have a 790 deere with a front end loader, but it didn't have the reach. I was slightly short. Now that I think about it, I might want to look at a fork lift extension for the bucket. It would add a few feet to the reach and it would be a ton easier to put the engine back in.
Thanks for the idea. Sometimes I need a little nudge! Jeff |
Posted By: Swatkinz
Date Posted: September-11-2010 at 2:05pm
|
When I was 10 or 11 my dad bought an old glassmaster closed bow "ski" boat and we did a light rehab on it. Was one of the coolest projects ever for dad and son and I'll never forget it. My dad turned us both on to inboards a couple of years later and we did some refurbishing but that "project" boat is one I'll always remember. Lots of good QT with the old man. A few years later he did the same with a pontoon, but this one he did mostly with my sister. Good times!
Sorry for the threadjack! Looks like you are off to a good start. Good luck with the rebuild ------------- Steve 2011 Sport/Air 200 Excalibur 343 2017 Boatmate Tandem Axle Trailer Former CC owner (77, 80, 95, 88, all SNs) Former Malibu owner (07, 09) |
Posted By: Ranger
Date Posted: September-11-2010 at 6:44pm
|
I can sure appreciate your experiences with your father, mine with very similar. I think it's why I spend so my time with my boy as well. I started him fishing when he was three and I think I have only fished a couple of times without him since. We are avid fishermen who were on the water at least 30 weekends a year. He has developed to be a better fisherman than most adults. He only uses bait caster gear and can flip, overhand and sidearm cast with amazing accuracy. He truly is an outdoorsman.
On another note, we are in the house taken a much needed break. The deck is cut out and the majority of the foam is in the dumpster. I'll post some pictures later today. Oh and if you didn’t know, we both hate foam. My boy is tired and my back hurts. Jeff |
Posted By: Keeganino
Date Posted: September-11-2010 at 6:58pm
|
Jeff
Awesome stuff! Nothing like a good family project and spending time together. My 9 year old helped out a little bit with my rebuild and has decided he does not want to wetsand for a living! I felt a huge sense of accomplishment once the foam was out. There are so many aspects to a rebuild I cant count how many times I thought I was on the home stretch of the project. Well worth all the time I put into it. Knowing that it is done right by your own hands is priceless. My biggest hang ups were the couple of things I paid to have done. I was gonna say you have all fall and winter to get er done but being in San Diego you don't get much weather that rules out boating. I love it out there! Good Luck and welcome to the community! Keegan ------------- "working on these old boats may not be cost effective but as it shows its what it brings into your life that matters" -Roger http://www.correctcraftfan.com/diaries/details.asp?ID=4897" rel="nofollow - 1973 Skier |
Posted By: Ranger
Date Posted: September-11-2010 at 11:36pm
|
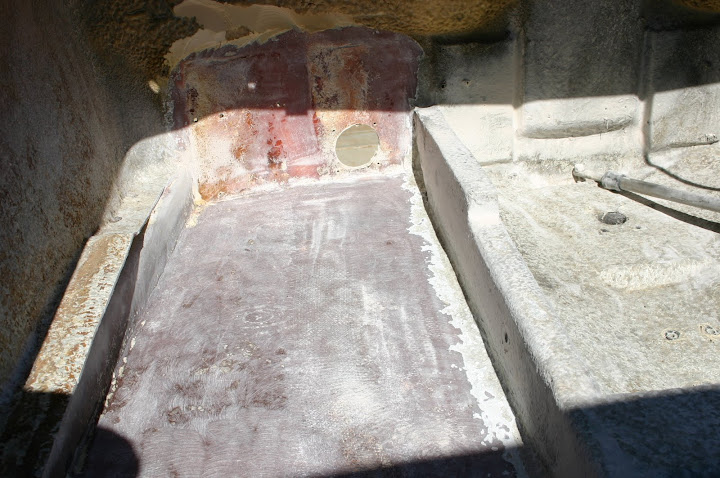
Ok, our first full day is done. I think we moved along pretty well, the hull is virtually foam free. I had a lot of rot on all stringers forward of the cradle. Of course standing water was where it wasn't supposed to be. I'm glad to be past this point. My boy hung in there all day, except when I was cutting the deck. I made him go inside to stay away from the dust.
Afterward, he and I used shovels and claw hammers to get the foam out of the boat and into the dumpster. Once I finished, I flushed the hull clean with a hose. One thing I noticed is that these hulls do not drain water well. Some water just can't get past the pylon cup without raising the bow extremely high. Has anyone tried to glass the forward hull high enough that water finds its way back? I want this hull to drain, so I need to look into options. On other hurtle I had, was the exhaust outlet tubes. I think someone used 5200 on them and they aren't budging. I'm going to gel coat the hull, but still don't want to rip the transom apart trying to get these things out. If anyone have any suggestion, I'm all ears. Here are a couple of photos My boy, hard at work! 


Tomorrow, it looks like we will start to build a few stands. Thanks again the the warm welcome. Jeff |
Posted By: Keeganino
Date Posted: September-11-2010 at 11:51pm
|
Great first day there guys! My exhaust tips had color matched silicone as a sealant but I did not have much trouble removing them after the screws were out. You will want to replace all the wood around the exhaust ports, lift ring mount and rudder mount while you are in there.
Here is my transom with all new wood except the rudder mount.  ------------- "working on these old boats may not be cost effective but as it shows its what it brings into your life that matters" -Roger http://www.correctcraftfan.com/diaries/details.asp?ID=4897" rel="nofollow - 1973 Skier |
Posted By: Ranger
Date Posted: September-12-2010 at 12:00am
|
I need to take a good hard look at all of the wood mounts on the transom. At first glance, they all appear to be extremely solid. But I'm not the type to skimp, so I will probably rip those out too.
Jeff |
Posted By: SNobsessed
Date Posted: September-12-2010 at 12:18am
|
Jeff - Pete Brainerd had a way to rig a 'hot wire' to cut thru the 5200. I think it used a battery & weld wire. Pete will surely comment soon. ------------- “Beer is proof that God loves us and wants us to be happy.” Ben Franklin |
Posted By: gun-driver
Date Posted: September-12-2010 at 12:30am
I did. I filled the bottom like a trough, I even took out the piece of ply they had in to screw the bilge pump to and found water under it after being torn apart for a year. I took the drain plug out and re-glassed the whole bottom then so the drain would be the lowest point. It works well. 


|
 Ranger wrote:
Posted By: Ranger
Date Posted: September-12-2010 at 12:35am
| I like that a lot. Looks really nice. What did you use to fill it with? |
Posted By: 8122pbrainard
Date Posted: September-12-2010 at 9:50am
|
Jeff,
The exhaust through hulls can be stubborn even without 5200. First get a hot air gun on them and warm them up to the point of being uncomfortable to to touch. This temp (about 180 to 200) should not damage the gel/glass and is far from the point of discoloring the chrome on the fittings. Then see if you can tap a sharpened putty knife in and all around the flange to shear the sealant. If this doesn't work, then you can try the hot wire that Chris mentioned. The basic crude hot wire is a piece of stainless .030" welding wire about 18" long strung between two pieces of wood used for handles. Then connected to a 12V battery with jumper cables. The wire is then used in a sawing fashion to cut the sealant. Since this home made hot wire is basic without a variable voltage power supply and the charge level of the battery will vary, some experimenting with the wire length will be needed. If the wire burns up quickly, add 6" of wire length and try it again. ------------- /diaries/details.asp?ID=1622" rel="nofollow - 54 Atom /diaries/details.asp?ID=2179" rel="nofollow - 77 Tique 64 X55 Dunphy Keep it original, Pete < |
Posted By: Ranger
Date Posted: September-12-2010 at 12:59pm
|
Great advice, I'll give it a try.
Jeff |
Posted By: gun-driver
Date Posted: September-12-2010 at 3:03pm
|
I used the epoxy resin mixed with Aerosil-Cabosil and 1/32" Milled Fiber
to very thick paste. I formed it in with a wide putty knife, then I laid cloth and using non-thickened epoxy kneaded the cloth into the paste and across the whole bottom and up 2" on the main stringers essentially tying everything together. This was one of the last steps I did before the final sand and paint. |
Posted By: Ranger
Date Posted: September-12-2010 at 4:12pm
|
Ok, I have another question. I have decided that Epoxy will be my best bet, so I am pretty sure that I will head in that direction. I'm familar with the layup process of vinylester, but not with epoxy.
What would any of you suggest as a layup schedule? I need to get my materials on order fairly soon, so I will need to get a good understanding of the process. Thanks, |
Posted By: 8122pbrainard
Date Posted: September-12-2010 at 7:38pm
Jeff, The layup is the same with any resin. Most will go with a 2" then 4" then 6" tape at the stringer to hull. Then a couple layers of cloth over the top and a extra layer at the engine. The biaxial is popular but I'm more inclined to just use regular cloth. ------------- /diaries/details.asp?ID=1622" rel="nofollow - 54 Atom /diaries/details.asp?ID=2179" rel="nofollow - 77 Tique 64 X55 Dunphy Keep it original, Pete < |
Posted By: BuffaloBFN
Date Posted: September-12-2010 at 7:48pm
|
Pete, the biax adds mega strength compared to cloth or matt. I wouldn't pass on it and used more than 1 layer in some places. Something else I think has been left out of these discussions recently is a green lay-up vs. a cured lay-up. ------------- http://correctcraftfan.com/diaries/details.asp?ID=2331&sort=&pagenum=12&yrstart=1986&yrend=1990" rel="nofollow - 1988 BFN-sold "It's a Livin' Thing...What a Terrible Thing to Lose" ELO |
Posted By: Ranger
Date Posted: September-12-2010 at 8:08pm
|
I thought that if you were using epoxy, you wouldn't necessarily need to use mat. Epoxy supposedly has enough strength without it.
I would like to bed my stringers in at least 1 3oz strip of mat. Maybe 2. Then take the 2, 4 and 6 inch cloth and tab the stringer to the hull, using opposite 45% angles for each. Then, wrap the entire stringer with a 3 oz mat and cloth. Once each stringer is finished, use mat and roven in the bilge, between each stringer and outboard of the secondary stringer up the side of the hull. (Hopefully this makes sense) I'm assuming that I can use biax in place of the mat. What do you think? As far as green versus cured, I would certainly like to complete the entire layup before it cures, but I don't think I can move that fast. I'm going to call a couple of distributor’s tomorrow, but what am I missing? Jeff |
Posted By: BuffaloBFN
Date Posted: September-12-2010 at 8:19pm
|
I'm on an unfamiliar computer or I'd link it. Check US Composites description of #1708 biax. Biax and matt are way different.
As for green, I wanted to bring it up mostly. For my project, I planned to do the lay-ups for 1 main for example before it cured so that each 'element' would be 'one'. ------------- http://correctcraftfan.com/diaries/details.asp?ID=2331&sort=&pagenum=12&yrstart=1986&yrend=1990" rel="nofollow - 1988 BFN-sold "It's a Livin' Thing...What a Terrible Thing to Lose" ELO |
Posted By: 8122pbrainard
Date Posted: September-12-2010 at 8:23pm
|
Jeff,
I don't feel you missed much and your plan sounds good except the 3oz. is on the light side. The biax is worth considering but I've never seen any decent comparison figures on it. I am glad Greg mentioned the green layup. It's preferred for max strength and if you have all the glass precut lay up does go fast. If it does set up on you, all you need to watch out for is the amine blush but it comes off with a light soapy water. Whatever glass you do you use, make sure it's "E" glass. ------------- /diaries/details.asp?ID=1622" rel="nofollow - 54 Atom /diaries/details.asp?ID=2179" rel="nofollow - 77 Tique 64 X55 Dunphy Keep it original, Pete < |
Posted By: Ranger
Date Posted: September-12-2010 at 8:37pm
|
I just read the U.S Composite web site a bit on Mat versus Biax. They do have mat for epoxy, but the majority of them are for vinylester or polyester products. The 1708 biax will eliminate the mat.
So, I could use the 2, 4, and 6 inch strips of e-glas to tab them in. Use the biax and cloth over the entire stringer. What would you use to bed the fir to the hull. West systems says use a mixture of their products, but I think I would feel better with something like mat or maybe biax between the fir and the hull. Then I guess I would use the biax and then roven in the bildge. Thoughts? |
Posted By: 8122pbrainard
Date Posted: September-12-2010 at 8:58pm
If the stringers are scribed well to the hull, not much is needed. Some have used a strip of mat but I feel thickened epoxy (with cabosil) is just as good and sure is easier. Lay a bead down and set the stringers in place. You'll be filleting the bottom edge with it anyway so you can actually fill the minor gaps at the same time. Get some of the empty caulking tubes, make a batch of cabosil/epoxy and force it into the gaps. Then go over it with a squeegee with the radius cut into the corner. ------------- /diaries/details.asp?ID=1622" rel="nofollow - 54 Atom /diaries/details.asp?ID=2179" rel="nofollow - 77 Tique 64 X55 Dunphy Keep it original, Pete < |
Posted By: BuffaloBFN
Date Posted: September-12-2010 at 8:59pm
|
Pete, the proof for biax is holding it in your hand. The 1708 has a matt back and the roving on '2 axes'. I think biax is a modern improvement on roving.
Again, the green thing is picking a part and finishing it...and yes with pre-cut pieces. We have no choice on starting from the dry hull, but planning I think is the key. ------------- http://correctcraftfan.com/diaries/details.asp?ID=2331&sort=&pagenum=12&yrstart=1986&yrend=1990" rel="nofollow - 1988 BFN-sold "It's a Livin' Thing...What a Terrible Thing to Lose" ELO |
Posted By: gun-driver
Date Posted: September-13-2010 at 12:20am
|
I agree with Pete on bedding the stringers instead of using mat. I don’t think you can scribe them perfect enough to not have gaps larger than the mat can fill.
I laid a bed of epoxy thickened with cabosil and milled fiber for extra strength (like your laying brick) Gently set the stringer in place and let the weight of the stringer squeeze out the excess (give it a tap or two if need be) like edge gluing boards you don’t want to squeeze all the adhesive out. I also put a layer of mat on the stringers before installing them. As for lay-up it’s I found it was pretty hard to do the whole layup at one time you only have about 20min. of pot life and that time goes fast while you’re trying to adjust everything as you go. It’s better to take your time and do a little sanding between coats if need be. And don’t forget to coat everything with CPES before you epoxy it. |
Posted By: Ranger
Date Posted: September-13-2010 at 1:12am
|
Thanks guys, I appreciate the info. I'm going to call a few distributors tomorrow and see what they have to say. You are probably right when you say that I can't scribe the stringer in tight enough. If I use thicken epoxy with cabosil, I'll have to be careful about too much weight on the stringer. I don't want to squeeze everything out of the bed.
I'm also going to use all 2X fir, even on the secondaries. I haven't laid it out yet, but I am going to change the cradle bolts to be through the stringer with nuts. No lags, if I can help it. I will double up the secondary in front of the exhaust and run it all the way to the front of the cradle. Since I am using 3/4 ply for the floor, it will also serve as the edge to the doghouse. Thanks again for the help. Jeff |
Posted By: 8122pbrainard
Date Posted: September-13-2010 at 8:40am
Limiting the mixed batch size of resin to what is needed in 20 minuits really helps. Keep in mind it may "kick" in 20 but is still "green" for hours. Make sure you buy the metering pumps along with the resin/hardener. If in doubt about the hardener speed, favor a slow hardener. YES, don't forget the CPES!! ------------- /diaries/details.asp?ID=1622" rel="nofollow - 54 Atom /diaries/details.asp?ID=2179" rel="nofollow - 77 Tique 64 X55 Dunphy Keep it original, Pete < |
Posted By: Ranger
Date Posted: September-13-2010 at 1:10pm
|
Thanks,
Yes, I am going to use the CPES and I will order the mixing pumps as well. |
Posted By: behindpropeller
Date Posted: September-13-2010 at 1:23pm
|
Ranger-
While you are doing the rebuild please consider replacing the shift system with a morse MV-2 which has a safety lockout. The MV-1 which is original on your boat does not have a lockout. Tim ------------- |
Posted By: JoeinNY
Date Posted: September-13-2010 at 1:36pm
|
The Biax saves a lot on labor.. but isnt cheap and sucks down resin which is of course money and weight... But a completely reasonable way to go... but perhaps a little overkill for me if you are using good fir stringers..
I try to work with the tapes as much as possible as they are a relatively efficient way to work both in terms of time and epoxy per strength added. Throwing another layer of tape in a particular area is something that can be done easily and without sinificant overruns in the budget.. each layer of biax is felt in the wallet. In terms of Mat I disagree with Pete's comment on the 3oz being too light... 3oz would be a massively oversized mat for general use. Mat is measured in weight per sq foot not the wieght per square yard used in the cloths. 1.5 oz mat laminates more than twice as thick as 18oz woven roving... and is the highest density mat I would try to work with epoxy. Stitched Epoxy mat still appears to unobtainium for the time being so you would need to use regular mat.. the supply houses are all saying 1.5 oz mat works acceptably with expoy and I have heard reports back from the boys around here that is the case but 3.0 oz would be pushing it. Besides 3oz is going to laminate over a tenth of an inch thick... overkill for many of the uses. Call me old fashioned but with the fir I would be tapes, cloth, and 1.5 oz mat where I was looking to add thickness for durability, like on an impact surface... and I like mill fibers and epoxy for bedding and filleting however there are many acceptable ways to skin that cat as well. ------------- http://www.correctcraftfan.com/diaries/details.asp?ID=1477 - 1983 Ski Nautique 2001 1967 Mustang 302 "Decoy" http://www.youtube.com/watch?v=cO5MkcBXBBs - Holeshot Video |
Posted By: 8122pbrainard
Date Posted: September-13-2010 at 2:15pm
Correction!! Sorry as I missed it was mat! I thought it was cloth!  ------------- /diaries/details.asp?ID=1622" rel="nofollow - 54 Atom /diaries/details.asp?ID=2179" rel="nofollow - 77 Tique 64 X55 Dunphy Keep it original, Pete < |
Posted By: Keeganino
Date Posted: September-13-2010 at 2:30pm
|
I would bed in thickened epoxy. I used aerosil and put a bunch of weight on top while it cures. Then came back and made a nice big fillet.
My advice on laying up the tape is to do each section all at once. I used the 2", 4", and 8" tape layup followed by 12" biaxial. At first I tried to go all the way around the whole stringer with 2" then came back after that set up and layed the 4 and so on. As I got better at it I found that it lays up way better if you do one section at a time and lay up all the tapes at once- wet on wet. I got less air bubbles this way and it moved much faster. You cant lay a strip of tape longer than you can spread your arms so do one arm's length at a time. Pre cut all the tape lay it out on a piece of ply with the cheapest disposable plastic drop cloth you can find on top, wet it all out on the plastic and then lay it down and roll out the bubbles. If I did another rebuild I might skip all the tape and just use biaxial. It makes all the other glass material seem mickey mouse. Once wrapped in biax the stringers became granite solid. ------------- "working on these old boats may not be cost effective but as it shows its what it brings into your life that matters" -Roger http://www.correctcraftfan.com/diaries/details.asp?ID=4897" rel="nofollow - 1973 Skier |
Posted By: Keeganino
Date Posted: September-13-2010 at 2:34pm
|
I cant say enough about how good the biax is. My friend who built offshore race boats for 25 years said that when they were not using kevlar they used biaxial and that was it. ------------- "working on these old boats may not be cost effective but as it shows its what it brings into your life that matters" -Roger http://www.correctcraftfan.com/diaries/details.asp?ID=4897" rel="nofollow - 1973 Skier |
Posted By: Waterdog
Date Posted: September-13-2010 at 5:27pm
|
Ranger,
Take your time fitting the stringers to the hull. Use resin thickened with mil fiber to bed them in. Not fumed silica, cab o sil is nice in gel coat or in a fillet that needs to be astetic(sp) pleasing but isn't as strong as mil fiber. If you put glass cloth on the bottom of the stringer it's just another bond to fail in the future. CPES treated fur + resin,mil fiber + hull AND you can't put to much weight on it to squeeze it all out. Optimum bond line thickness .005mil (in) I can in a 100psi autoclave but not at home. ------------- - waterdog - http://www.correctcraftfan.com/diaries/details.asp?ID=3896&sort=&pagenum=2&yrstart=1978&yrend=1978" rel="nofollow - 78 Ski Tique |
Posted By: Ranger
Date Posted: September-13-2010 at 6:06pm
|
I just spoke to U.S. Composites and here is what he suggested.
First, use Fasco 110 Epoxy Glue to bed the stringers. Then use the 2, 4 and 6 inch E-Glass tape for the stringer to hull joint. Then use 2 layers of 6 oz cloth over the top of each stringer. Tie all of it together with a layer of biax in the bilge and between each stringer. Since I have gel coat cracks that will need to be addressed, he recommended that I run roven up the sides under the gunnels. He also said that I should use the 635 epoxy with medium hardener. What do you think of the Fasco product? |
Posted By: gun-driver
Date Posted: September-13-2010 at 6:43pm
That's exactly how I did mine except with a layer of 1.5oz mat applied first before installation. I also went a little heavier on the cloth I went with the 7-1/2oz. I didn't go all the way to the gunnel's but I did go 10-12" or so up the sides. I feel that's one of the most important areas as it ties the floor to the walls for support. The glue looks very interesting I'll have to try some. Andy, I tried just the milled but found it tended to run and sag no matter how thick I mixed it. Cabosil helped make the paste more manageable and mold-able. |
Posted By: Keeganino
Date Posted: September-13-2010 at 6:44pm
|
I have not heard of anybody using fasco. I would stick to either milled fiber or cab-aer-o-sil. It is not easy to fair at all and is not recommended where fairing is needed. While it is true milled fiber is the strongest, fumed silica is a lot stronger than talc or microballoons which are used where fairing is needed and adequate for this application, and as pointed out makes great fillets.
I agree with the medium cure 635. You can always add less hardener for a slower cure time, but if the temp is below 70 you need that hardener or else you will be waiting forever for it to cure. When I got my 10 gallon kit of 635 it came with 3 and a third gallons of hardener. I never touched the small third bottle because it was getting hot here so I was using less hardener. Digital scales are great for mixing small batches. When I was bedding the stringers and making the fillets I mixed a few 40oz batches which is a PITA using the 1 oz pumps and the scales I had did not read that high. FOr those I used cheap pitchers from the dollar store that were graduated. The biggest favor you can do for yourself when you get into the glass work is buy a small paint mixer for your drill. It is impossible to mix thickener into a 40 oz batch fast enough by hand. Its hard enough in a 9 oz batch! I also used the eglass tape but I used 2, 4, and 8 instead of 6. I would eliminate the 6 oz cloth from the layup they recommended and just use the 12" biaxial. A layer on each side and then one over the top, and I put 2 layers over the top from the pylon back to 6 inches past the tranny mounts. Bulletproof! There are many different ways to skin this cat and most of them are going to be better and stronger than original. Just sharing my experience. ------------- "working on these old boats may not be cost effective but as it shows its what it brings into your life that matters" -Roger http://www.correctcraftfan.com/diaries/details.asp?ID=4897" rel="nofollow - 1973 Skier |
Posted By: Keeganino
Date Posted: September-13-2010 at 6:54pm
I used biaxial on the floor to hull joints. Since it was only 12" wide I bonded equally six on the floor and six up the walls. It made a huge difference in the rigidity of the hull, and if I had had enough resin left I might have gone all the way up the walls. Definitely a good idea to have a thick strong layup there I never used the milled fiber but the cabosil does a nice job getting the resin to a frosting like consistency. One thing I found was that thicker is better. Once it starts to kick it gets runnier than it is when you first incorporate it into the mixture. Especially on the bilge side of the stringer where it want to run downhill and there is nothing there to dam it up. ANother tip is that it kicks a lot faster when it is thickened and all together in the cup. Get it spread out fast and you will have longer to work with it. ------------- "working on these old boats may not be cost effective but as it shows its what it brings into your life that matters" -Roger http://www.correctcraftfan.com/diaries/details.asp?ID=4897" rel="nofollow - 1973 Skier |
Posted By: Ranger
Date Posted: September-13-2010 at 7:25pm
|
I was thinking of using biax over the stringer as well, but U.S. Composites said it’s very difficult to work over the top of a stringer and back down. He said it can be done, but it's not user friendly. Did you have any issues with it going over the top of a stringer?
Jeff |
Posted By: TRBenj
Date Posted: September-13-2010 at 7:55pm
In this case, USC is right. I wrapped the tops of the mains in our BFN with biax. PITA and not user friendly- but it can be done. Im not sure I agree that 3 layers of cloth is a sufficient layup on the stringers though- especially the mains that support the engine. Personally, Id double that (2/2/4/4/8/8) and then add biax or mat up the sides, and wrap the top as well. ------------- |
Posted By: 8122pbrainard
Date Posted: September-13-2010 at 8:19pm
|
Jeff,
Run a router with a round over bit (1/4" to 3/8" R) around the tops of all the wood. It makes it easier to glass over the tops. ------------- /diaries/details.asp?ID=1622" rel="nofollow - 54 Atom /diaries/details.asp?ID=2179" rel="nofollow - 77 Tique 64 X55 Dunphy Keep it original, Pete < |
Posted By: Ranger
Date Posted: September-13-2010 at 8:26pm
|
Thanks TRBenj,
Double it? Wow I wouldn't have thought I needed that much. The tape isn't very thick, so I wouldn't think adding another layer is a problem. Something I should consider, thanks. I would really like the biax over the top, but if it isn't very user friendly, I'm not sure I want to mess with it. USC indicated that if you wait until the epoxy get's "sticky", then it's easier to work around corners. I just don't want it to go off, before I get it down tight. I could do the same with "epoxy" mat and cloth I suppose. But from what I understand, "epoxy" mat is getting hard to come by. Jeff |
Posted By: Ranger
Date Posted: September-13-2010 at 8:27pm
|
I was planning on using a router to round the edges. Does anyone else have any experience using biax over the tops of stringers? Is it worth the hassle?
Jeff |
Posted By: TRBenj
Date Posted: September-13-2010 at 8:32pm
|
You cant get epoxy mat anymore- at least not the good stuff USC used to sell. The good news is that I could barely tell the difference between that and the regular mat they offer. Wrapping mat around the top of the stringer wont be any easier (biax is a combo of cloth and mat)... Ive done both and its a PITA no matter what. It wont stick around the edges until the epoxy starts to tack up a little. By the time youre wrapping the tops of the stringers, you'll have the hang of it.
For the minimal extra amount of resin and time, doubling your schedule of cloth (at least on the primaries) is cheap insurance. Id rather overbuild than underbuild- but thats just me! I followed the 2/2/4/4/8/8/biax schedule on our BFN and plan to use it again in the future. Definitely do whatever you can to round the edges at the top. You'll appreciate them for the same reason fillets work nicely at the bottom. Glass does not like 90 degree corners, and the thicker the cloth (biax is thick!), the more that holds true. ------------- |
Posted By: Ranger
Date Posted: September-13-2010 at 8:40pm
| Great Info, Thanks! |
Posted By: BuffaloBFN
Date Posted: September-13-2010 at 8:43pm
|
I didn't find it to be such a hassle. If you do 1 stringer at a time while it's green, the previous layers hold the next on. Get the aluminum roller and corner roller.
As with most things, it starts with the prep. The better/smoother/flatter layers underneath help in the finished product/subsequent lay-ups. The round over is a must too. I started with a 1/4" bit and went to an 1/8". ------------- http://correctcraftfan.com/diaries/details.asp?ID=2331&sort=&pagenum=12&yrstart=1986&yrend=1990" rel="nofollow - 1988 BFN-sold "It's a Livin' Thing...What a Terrible Thing to Lose" ELO |
Posted By: Keeganino
Date Posted: September-13-2010 at 8:45pm
I routed the tops of my stringers everywhere they were to be wrapped as Pete mentions and I loved the biaxial. In a lot of ways I thought it was easier to deal with than the lighter cloth. As long as it was completely saturated with resin I was surprised at how easily it would make the radius and then stay put after laying it down. Here you can see the CPES finish, the fillet, and the raius on the edges 
Biaxialed over 
This is the schedule I used as well sorry I forgot to mention that there are 2 layers of each cloth tape. I was just impressed by how strong the biaxial is over the cloth. I did my entire rebuild largely from Pete and Tim's suggestions  They know their stuff! They know their stuff!------------- "working on these old boats may not be cost effective but as it shows its what it brings into your life that matters" -Roger http://www.correctcraftfan.com/diaries/details.asp?ID=4897" rel="nofollow - 1973 Skier |
Posted By: TRBenj
Date Posted: September-13-2010 at 8:54pm
Perhaps it was easier because your pieces were shorter? Our pieces were 5-6'. Wrapping the tops of the stringers has always been a PITA for me. Getting the stuff to stick, and then keeping the air bubbles out as it cures is a constant check and recheck process. Doable though, and worth it. I had done a few rebuilds before, but I leaned heavily on Joe and Greg for input when building the BFN. I was really happy with the strength and thickness we were able to achieve with it. ------------- |
Posted By: Ranger
Date Posted: September-13-2010 at 8:55pm
|
Good enough for me, I'll double up with 2/2 4/4 and 8/8. Then I will wrap the tops with biax.
Did you use the 1708 biax? If I buy the 50 inch material, I can split it up the center for two 25 inch strips, which would leave an adequate tab against the hull. Is that the route you took? Thanks Jeff |
Posted By: uk1979
Date Posted: September-13-2010 at 9:00pm
|
Jeff, I found if you roll in the epoxy into biax on a lay up table on both sides as if were wall paper then soak for a while untill you can see through it (put something under the clear plasic sheet to look for ) your have over an hour before it will begin to set so can have a few going at one time, then before you lay in the hull roller a coat of epoxy over first and it will fold round real well then. ------------- Lets have a go 56 Starflite 77 SN 78 SN 80 BFN |
Posted By: BuffaloBFN
Date Posted: September-13-2010 at 9:01pm
This is a key point I left out. Don't walk away until you're happy with what you have. Keegs, is that an extra run or 2 with the router?  ------------- http://correctcraftfan.com/diaries/details.asp?ID=2331&sort=&pagenum=12&yrstart=1986&yrend=1990" rel="nofollow - 1988 BFN-sold "It's a Livin' Thing...What a Terrible Thing to Lose" ELO |
Posted By: Keeganino
Date Posted: September-13-2010 at 10:27pm
Yes indeed good eye! The funny thing was that I realized it after I did the first one and was determined not to let it happen on the second and sure as the sun will come up tomorrow- zzzzip! Did it on the second one too ! Filled the gap with filled epoxy. That was when I came up with the ideology that thickened epoxy will cover up most mistakes, gaps, get an air bubble in a layer of glass- cut it out and fill with epoxy, etc. It is the "duct tape", if you will, of the amateur boat builder.
Tim is correct I did short sections of biax at a time and that is probably why it was easier for me. I could not deal with all the transitions and notches using long pieces. I cut three identical pieces and laid them all up at the same time. One for each side and one for the top. The lengths depended on what was going on with the top of the stringer if that makes sense. ------------- "working on these old boats may not be cost effective but as it shows its what it brings into your life that matters" -Roger http://www.correctcraftfan.com/diaries/details.asp?ID=4897" rel="nofollow - 1973 Skier |
Posted By: charger496
Date Posted: September-14-2010 at 1:03am
| I finally got to the computer tonight after two days of working on the '77 nautique. My intention was to ask a million questions about layup schedules, cabosil pot-life, how to cut the biax, etc. I can't think of a single question that wasn't answered in this thread! I must've talked to the same guy at U.S. Composites, Ranger. My garage has everything you mentoined. As far as the Fastco two-part glue, it is epoxy based, and strong as hell. It won't chip off the hull where I spilled a big drop. It's not quite thick enough for filleting, though. It runs when it kicks, so I'll use cabosil. I took some "e-mail friendly" lo-res pics yesterday, so when I get a chance to load them to my computer, I'll start that thread. Keegan, are you coming to the Chattahoochee River Run? I swear I'll have my boat in the water by then, probably with no seats, like yours! |
Posted By: Keeganino
Date Posted: September-14-2010 at 6:42pm
|
David
I hope I can make it. I coach my son's soccer team and we start this weekend. I am pretty sure we go for 8 weeks but do not have the official game schedule yet. Will know better by the end of the week. Glad my thread was a help to somebody out there! I could not have done the work without this group's support. It has been a long journey, and I still have a punch list but I spent 3 hours on the water today so I am happy! Keegan ------------- "working on these old boats may not be cost effective but as it shows its what it brings into your life that matters" -Roger http://www.correctcraftfan.com/diaries/details.asp?ID=4897" rel="nofollow - 1973 Skier |
Posted By: Ranger
Date Posted: September-15-2010 at 1:08pm
I have been putting together a list of supplies and was hoping that you guys can take a look and let me know what you think. What am I missing? I will also order CPES from Rot Doctor, but this is a list of items from U.S. Composites.

Thanks Jeff |
Posted By: Keeganino
Date Posted: September-15-2010 at 2:28pm
|
My comments on your order:
Forget the stir stix and tongue depressors. They are only good for mixing small batches(1/2 cup or less). Buy a small paint mixer for your drill. You have to have it when you fill the epoxy. Just make sure you rinse it with acetone after each use and 1 will last the entire project. This will save you lots of time, trees, and you will always get a good mix. I cant remember if they have smaller bags of filler but you are going to have most of the cabosil left over. I am trying to sell the remainder of my cab on here. Probably 7lbs left out of 10. I will deliver it to your door for $55 plus make a donation to CCF.com Did not use the milled fiber but I bet that is way too much of that too. Especially since you are getting both. Get at least 2 sets of pumps for sure. All it takes is to touch the shaft with some resin and its done. Find a harbor freight or go to their website for the gloves and chip brushes. You will pay half that. I used a lot of 2" brushes and did not use the 4" till I got to the 8" tape and the biaxial. I accidentally left the cellophane on a brush one time and found that it worked like a squeegee to spread the resin around the glass, plus it does not absorb the precious resin that way. After that I never took the cellophane off again. Looks like you did your homework and all the bases are covered. Email me if you are interested in the Cab. keeganino76@hotmail.com ------------- "working on these old boats may not be cost effective but as it shows its what it brings into your life that matters" -Roger http://www.correctcraftfan.com/diaries/details.asp?ID=4897" rel="nofollow - 1973 Skier |
Posted By: Ranger
Date Posted: September-15-2010 at 4:10pm
|
Thanks Keeganino,
I think I have a paint mixer for my drill already, but I probably should pick up another. Good call. I also sent you an email about your left over cabosil. At this point in the project, I spend a lot of time sitting in the boat, thinking, measuring, thinking some more, measuring and the circle continues until I have so many notes, I can't remember what I was doing. Thanks again, Jeff |
Posted By: Ranger
Date Posted: September-20-2010 at 12:27pm
|
I’m going to pull a secondary this coming weekend and will hopefully have something else to post. However, I have another clarifying question. How do you deal with the cut outs in the stringer with regards to your glass and biax. In other words, do you cut the fabric and then use a smaller piece, or do you try to mold the glass to fit the cutout.
Since I am using a 3/4 inch ply deck, my stringers will essentially be flat, but the stringers will be cut for the cradle. Can the cloth mold around this corner easily or should I cut smaller pieces to fit? Thanks for everyone’s help. Jeff |
Posted By: Keeganino
Date Posted: September-20-2010 at 1:42pm
I used 2 layers of 3/4 ply from the pylon forward so I had that step down and notches for crossmembers to deal with. I cut my pieces as long as each section, and laid them that way. In the picture below you can see where I did not wrap the inside faces of the notches. I thought about wrapping those later but since I bedded everything with filled epoxy did not see the need for fabric there. Hope this answers your question.
 ------------- "working on these old boats may not be cost effective but as it shows its what it brings into your life that matters" -Roger http://www.correctcraftfan.com/diaries/details.asp?ID=4897" rel="nofollow - 1973 Skier |
Posted By: gun-driver
Date Posted: September-20-2010 at 2:08pm
WOW three pages already and you haven't even started yet. 
If you lose the mixing cups and stir sticks you can save about $115.00 I used sauce cans from my local pizza shop to mix in.(like 3lb. coffee cans) I found until you start pouring for the floor it was hard to use more than 18-20 pump mix at one time.(pot life) There will be plenty of wood ripping’s you can use as stir sticks. The glove's you can get at home dumpo (I liked the powered ones, easier to get on). The brushes you can also get at Lowes or Home Depot (chip brushes.99ea.) I used cabosil and milled fiber in everything. I ended up using 2-5qt containers of the fiber and 2-4 gal buckets of cabosil. I still have a little left of each. |
Posted By: Ranger
Date Posted: September-20-2010 at 5:50pm
|
Keegan, yes that answers most of it, but where the cradle sits, the stringer is not notched at a 90 degree angle, it slopes. I'm assuming that I will have to cut smaller pieces to lay in around the sloped area.
On another note, did you figure out your trailer light issue? Gun Driver, Thanks for the suggestions. Not only am I at 3 pages, I also have a groupie status 
Jeff |
Posted By: Keeganino
Date Posted: September-20-2010 at 6:05pm
|
Jeff you are climbing the ranks quickly. A rebuild will do that to you! No luck on the lights. Marty came over yesterday and we worked on it to no avail. We had a Thomas Edison day- learned a lot but did not get anything to work. Started a thread on it hoping that somebody has been through the same thing. Wrong module is the only thing that makes any sense. The lights all worked when we hooked it up to Marty's truck.
Somebody will probably chime in about glassing around the cradle notches. I am sure there are some tricks out there for getting the glass around those notches. ------------- "working on these old boats may not be cost effective but as it shows its what it brings into your life that matters" -Roger http://www.correctcraftfan.com/diaries/details.asp?ID=4897" rel="nofollow - 1973 Skier |
Posted By: TRBenj
Date Posted: September-20-2010 at 6:09pm
There are no tricks... glass simply doesnt like to go around 90 degree corners- so avoid making them! Thats why the factory cut outs are rounded... much easier to glass over. I would keep the factory configuration. ------------- |
Posted By: JoeinNY
Date Posted: September-20-2010 at 6:27pm
|
The hard notches and cuts aside from being a pain to glass create stress concentrations which can create failure points. Avoiding stress concentrations is at the fundamental art of very high quality boat building. You can always overbuild and be fine... but if you can avoid stress concentrations you get the most out of what materials you do put in you will be lighter, just as strong, and possibly more durable.. however it takes a lot more thought and usually more effort.
Do use curves to transition from the high to low areas where ever posible.. exceptions are where you are notching to add material back in.. those transitions are strenghtened by the additional materials. It is the same theory as to why you use multiple layers of overlapping tape building up widths.. you dont want an abrupt end to 6 layers of tape where the hull goes from somewhat flexible to rock solid. It is also why I would not run a layer of biax up the side of my hull, and generally stay away from biax it is significant enough that simply ending it creates a stress concentration. In summary.. sharp corners on stringers or abrupt changes in strength in places on the hull = bad. Any stringer attachement to the hull is an opportunity for an abrupt change in strength to the hull.. care should be taken to smooth that transition.. ------------- http://www.correctcraftfan.com/diaries/details.asp?ID=1477 - 1983 Ski Nautique 2001 1967 Mustang 302 "Decoy" http://www.youtube.com/watch?v=cO5MkcBXBBs - Holeshot Video |
Posted By: 37N122W
Date Posted: September-20-2010 at 9:04pm
Holy Smokes! Jeff, what have you done to my boat!! 
Hi all! I'm the PO of the '86 SN getting overhauled on this thread. I had originally planned to tackle the project but it didn't work out for me - my family wanted a sail boat instead. Now that I'm reading about it from afar, I'm VERY glad it is in someone else's more accomplished hands!! Jeff, I'm glad to see it's working out for you. I'm especially stoked that your son is into it. So cool! Thanks for posting your progress here on CCF. It's great to follow along. I'm happy for you and the boat. She's getting what she deserves! Keep up the good work. Looking forward to the next progress report... Take Care, JJ ------------- "It never gets easier, you just go faster." Greg LeMond |
Posted By: Ranger
Date Posted: September-20-2010 at 9:41pm
|
Hey James, I hope you’re doing well. I just couldn't wait until winter. I tried, but just couldn't do it. I'm planning on having this project finished before next spring so I needed to get going.
All of my supplies for the stringers and deck should be here by Friday, so I am hoping that I make some progress this weekend. Thanks for everyone’s help and suggestions. Jeff |
Posted By: Ranger
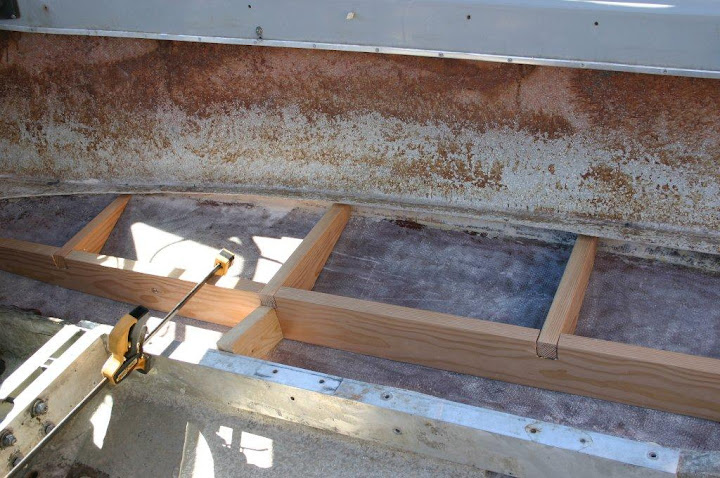
Date Posted: September-26-2010 at 3:10am
We made good progress today. Started at 7:00 and worked until 2:00. We finished the stands and leveled the boat. Then we cut the starboard secondary stringer out and completely grinded the hull and transom. Tomorrow, I am going to tackle the secondary stringer and get it fit to the hull. I think it's going to take me a while, since I want to build interlocking bulkheads, similar to the V drive rebuild, but I'm happy with what we accomplished today. Hopfully, I'll get something accomplished again tomorrow, but it's been hot. Today it was 104 in the shade. Good thing I wasn't working in the shade? 
Jeff 


|
Posted By: BuffaloBFN
Date Posted: September-26-2010 at 10:47am
|
Cool stands!
Are you going to put that secondary back in before you cut out that main? Makes sense to do it that way if you have room to work. I cut out, prepped, and replaced a side at a time(main & secondary). My V hull may have given more support for that though. Looking good! ------------- http://correctcraftfan.com/diaries/details.asp?ID=2331&sort=&pagenum=12&yrstart=1986&yrend=1990" rel="nofollow - 1988 BFN-sold "It's a Livin' Thing...What a Terrible Thing to Lose" ELO |
Posted By: BuffaloBFN
Date Posted: September-26-2010 at 10:49am
|
If I didn't already mention it, a 36 grit flapper disk on a grinder is great for final prep. ------------- http://correctcraftfan.com/diaries/details.asp?ID=2331&sort=&pagenum=12&yrstart=1986&yrend=1990" rel="nofollow - 1988 BFN-sold "It's a Livin' Thing...What a Terrible Thing to Lose" ELO |
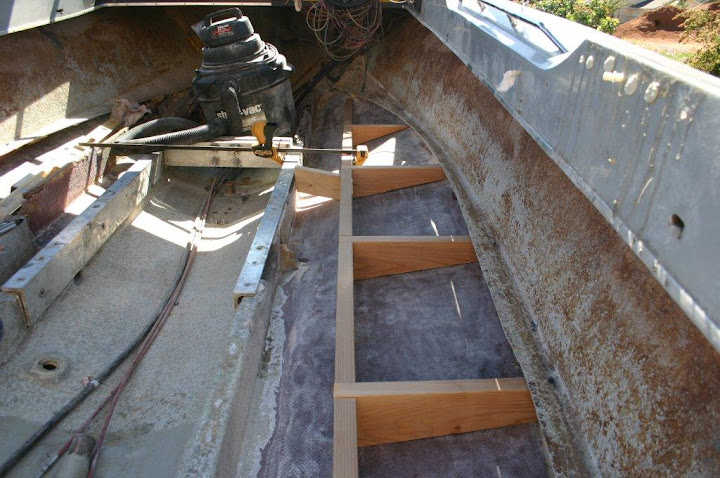
Posted By: Ranger
Date Posted: September-27-2010 at 11:47am
|
Buffalo, I keep going back and forth regarding pulling the main first. I know that I would like to have it out of the way, before I start glassing in the secondary. But at the same time, I would like to keep it in for reference as long as possible.
What I will probably do is bed the secondary stringer and then cut the main out. Then after I bed the main I can glass everything at the same time. I'm assuming that bedding the secondary will be strong enough to help keep the hull's shape while I work on the main (Thoughts?). As far as yesterday's work, I ended up working through the heat again and got the starboard side secondary dry fit to the hull. I also managed to get all of the bulkhead support cut and fit as well. I still need to do a few minor things like cut water drain holes through all of the pieces. So I am hoping that I can get this side finished by next weekend. I'm also hoping that I can pull the Starboard side main as well. I do have another question. It looks like most people use ply for the backing blocks on the stern. Why would ply be a better choice than something solid? I will most likely install these after the stringers are in, but want to hear from anyone who thinks otherwise. Thanks again for the help! Jeff 
|
Posted By: 8122pbrainard
Date Posted: September-27-2010 at 12:43pm
|
Jeff,
I'll through in my .02 cents before Greg does regarding the transom blocking. Ply is used because it spreads the load vertically and horizontally to the glass hull due to the alternating grain direction of the plys. A solid may under certain conditions split down the middle. ------------- /diaries/details.asp?ID=1622" rel="nofollow - 54 Atom /diaries/details.asp?ID=2179" rel="nofollow - 77 Tique 64 X55 Dunphy Keep it original, Pete < |
Posted By: Ranger
Date Posted: September-27-2010 at 1:43pm
|
Thanks Pbrain, Makes sense to me. I will probably use 3/4 inch exterior ply. Does CPES work with ply, since it is a laminated product? I could probably read the data sheet, but thought I would ask.
Jeff |
Posted By: Fl Inboards
Date Posted: September-27-2010 at 2:06pm
|
With all that 2X that hull is going to be hell for stout! Nice job by the way!!
Thanks for the pictures... ------------- Hobby Boats can be expensive when the hobbyist is limited on their own skill and expertise. 1993 Shamrock "fat" 20. 2008 Nautique 196 5.0 |
Posted By: BuffaloBFN
Date Posted: September-28-2010 at 10:11am
I only had 1 penny on me. ------------- http://correctcraftfan.com/diaries/details.asp?ID=2331&sort=&pagenum=12&yrstart=1986&yrend=1990" rel="nofollow - 1988 BFN-sold "It's a Livin' Thing...What a Terrible Thing to Lose" ELO |
Posted By: 8122pbrainard
Date Posted: September-28-2010 at 11:08am
Jeff, The CPES works as great on ply as it does on solids. It penetrates the wood where the ply adhesive hasn't. ------------- /diaries/details.asp?ID=1622" rel="nofollow - 54 Atom /diaries/details.asp?ID=2179" rel="nofollow - 77 Tique 64 X55 Dunphy Keep it original, Pete < |
Posted By: Ranger
Date Posted: September-28-2010 at 11:48am
|
Thanks for the help. But, as usually I have a couple additional questions.
First, I have read where some people do not bed the side bulkhead pieces to the hull. I really don't see why not; as long as you graduate the tape and cloth for a smooth transition, (no hard spots). Does anyone have any experience or suggestions with this? Second, I really do not want to lag the cradle to the stringer. As such, I'm going to use through bolts where possible. Are there any thoughts on drilling a 1 1/2 hole through the stringer and filling it with mill fiber/epoxy. Then redrilling the proper size hole for bolting the cradle to the stringer. I'm not sure if the epoxy will be strong enough. Another option would be to use an 1/8 aluminum plate as a backer, then the load will not be concentrated on the 1 1/2 hole, rather be distributed along the stringer. Are there any other options of bolting through the top of the cradle? If I through bolt the sides, maybe I can get away from them entirely? Any thoughts will be appreciated. Thanks, |
Posted By: 8122pbrainard
Date Posted: September-28-2010 at 12:26pm
|
Jeff,
I would bed the bulheads to the hull sides as long as there's prenty of glass to the sides to spread out the loads as you're thinking about. Some don't because of the fear of stress causing gel cracking in the hull sides. The 1&1/2" hole filled with filled epoxy is really the best means of bolting to wood in my opinion. The filled epoxy is stronger than the wood and will spread out the load. You can also do the from the top actually bedding in threaded rod. Overkill? Quite possible! Lags from the top with a CPES treatment and 5200 when running in the lags has been used with very good results - hell of alot better than factory!! ------------- /diaries/details.asp?ID=1622" rel="nofollow - 54 Atom /diaries/details.asp?ID=2179" rel="nofollow - 77 Tique 64 X55 Dunphy Keep it original, Pete < |
Posted By: Ranger
Date Posted: September-28-2010 at 1:06pm
|
Thanks for the response.
I like the threaded rod idea, but my cradle slides under the forward deck and inch or two, which could pose a problem with regards of getting the cradle down over the rods? Has anyone ever tried drilling a hole to slide in a nut? I could drill an oversize hole, fill it with epoxy, and then redrill it the proper size. Slide a nut in the hole and tighten it up. Good idea or would you run with lags and 5200. I will use the 5200 if I have too, but really want to stay away from it. I have had more than one occasion where I had to remove it and trust me, it sticks! Jeff |
Posted By: TRBenj
Date Posted: September-28-2010 at 1:19pm
|
I was in your shoes not too long ago...
I decided to through bolt the cradle from the sides of the stringer. Remember, unless you want the cradle to be permanant, you need to be able to access the nuts on the back side- so this will affect your stringer/floor configuration around the motor. Cradles DO sometimes break, so I would resist the urge to make yours permanantly mounted! This is the approach we took on our BFN, but the main stringers on the v-hulls dont support the floor- so making a pocket to access the backing nuts was more straightforward. You could do the rod trick, but Im not sold on the idea. I would think it would make installing the cradle a real PITA... gotta be precise to align everything. If one rod isnt perfectly vertical, good luck! As far as the cradle sitting below the floor at the front goes, that is true... but the original '86 floor had a removeable wood panel that went around the pylon. If you built something similar, it would give you full access to the cradle should it need to come out later. I would give some strong consideration to simply lagging down from the top, just like it came from the factory. This is by far the simplest and most straightforward approach. I would think you could keep the 5200 around the top half of the lags (not the threads) which might make it a little easier to get the bolts out next time. ------------- |
Posted By: Ranger
Date Posted: September-28-2010 at 1:45pm
|
Thanks TRBenj,
Yes, I'm going to reconfigure the stringers that allow me to have access to both sides of the main. The original confguration only had foam in that area, so I don't think it's a big deal. Do I really need to bolt it through the top? I completed a restore about 5 years ago, where I installed a 230 hp volvo diesel in an off shore fishing boat. From what I remember, I only bolted it through the sides and not through the top. Thanks again, Jeff |
Posted By: TRBenj
Date Posted: September-28-2010 at 2:07pm
No reason to bolt through the top that I can think of if you sufficiently through bolt it. Keep in mind a few things when you build the pockets for the backing nuts. -Water will make its way into these pockets... how will it get out? -Is your motorbox wide enough to cover the new pockets? ------------- |
Posted By: Keeganino
Date Posted: September-28-2010 at 2:29pm
|
Jeff
You have made a lot of progress since I checked in last! Looks great. Did you use that 24 grit grinder disc yet. Those things eat up glass in a hurry! Peace Keegan ------------- "working on these old boats may not be cost effective but as it shows its what it brings into your life that matters" -Roger http://www.correctcraftfan.com/diaries/details.asp?ID=4897" rel="nofollow - 1973 Skier |
Posted By: Ranger
Date Posted: September-28-2010 at 2:56pm
|
The deck is going to be the same, so the engine cover will remain as it is. The area that needs to be opened up is full of foam, so it's not structural. I am going to run another piece of fir, from the rear cross brace (by rear of engine) forward to another cross brace (forward cradle). It will leave me a 3 inch wide path between the stringer and deck support. I will also cut a 2 X 2 angle in the bottom of the cross braces for water to come and go as it pleases.
Hopefully this makes sense? Also, if I understand you correctly, you don't think I would need to bolt through the top, if I am through bolting on the sides. Correct? Jeff |
Posted By: Ranger
Date Posted: September-28-2010 at 2:57pm
|
Keegan,
Yes, I used mostly 24 grit on the hull. I had the entire length done in about an hour and a half. Thanks again, Jeff |
Posted By: TRBenj
Date Posted: September-28-2010 at 3:07pm
|
Yes, no need for lagging from the top if through bolting through the side, IMHO.
Your extra bracing and draining to form the pockets makes sense as well. From the sounds of it, you are not refoaming at all? I dont see any drains cut in your ribs- will you be adding some to allow all the water to get to the drains? I know many people who rebuild without foam simply allow all compartments to drain together and drain to the bilge. The first part (draining together) is fine by me, but the second part (draining to the bilge) worries me. Any drain point then becomes an intrusion point, which can let water in under your floor very easily. The pockets at the side of your motor would be a very big intrusion point as well- and as soon as the water gets down in there, it will run where it pleases. We built our BFN so that all of the compartments will drain together, but there are no obvious intrusion points, ie, they dont drain to the bilge. Instead, we chose a few low lying spots where water will collect if it somehow makes its way below the floor. We made a few access points ot these spots so we can pump water out if need be. Ive seen an early glass boat (no foam) with a free draining structure with a drain hole that became clogged with leaves, etc from the bilge... which ended up holding a ton of water under the floor. Yikes. ------------- |
Posted By: Ranger
Date Posted: September-28-2010 at 3:26pm
|
Yes, I will have the corners cut on the bulkhead pieces. In fact they are already cut. I also will not be using foam in the rebuild.
In my experience with other boats that I have had, each compartment has drained to the bilge. However, these boats also had scuppers which shed the water off of the deck. That being said, I don't think I want to have smaller compartments for me to drain. I would rather make sure everything drains to the bilge so that I can pump if necessary. Water in, water out. Yes, I would agree if you let your bilge build up with leaves or other debris it could be a problem. But I would also suggest that if I become that negligent, I would have other larger problems at hand. In other words, one should take care of their equipment. However, I'm not closed minded (inspite of what my wife says) and I would certainly like to hear other view points. Thanks, Jeff |
Posted By: storm34
Date Posted: September-28-2010 at 3:28pm
|
Tim, my skier didn't have any foam from the factory and has drains to the bilge at the transom. We also have a drain hole in the transom.
I haven't seen any problems with this set up and find it pretty convenient that everything would go into the bilge should some water get under the floor. As soon as the bow comes up (either on the trailer or in the water) everything flows back and the goes into the bilge. Once it's there, everything stays between the mains and you can either pump it out or pull the plug. Seems like a far better set up than having to check access panels in the floor for water....or worry about intrusion in the middle of the mains. ------------- |