67 SN Resto/Mod rev. 2
Printed From: CorrectCraftFan.com
Category: General Correct Craft Discussion
Forum Name: General Discussion
Forum Discription: Anything Correct Craft
URL: http://www.CorrectCraftFan.com/forum/forum_posts.asp?TID=32011
Printed Date: April-29-2024 at 1:44pm
Topic: 67 SN Resto/Mod rev. 2
Posted By: C-Bass
Subject: 67 SN Resto/Mod rev. 2
Date Posted: November-12-2013 at 4:34pm
Time to start a new thread for the long road ahead. I plan to finish up this 67 SN resto/mod that Mike (Wakeslayer) started a few years ago. I recently picked this up from MN and plan to get started this winter and will do my best to keep up with the documentation in this thread. I know how much I've enjoyed watching other boats come to life on CCFan and am hopeful that with a lot of help that I can accomplish this build as well.  A little history on this boat: Mike picked this boat up in 08, originally thought to be a 68, but through the channels at Correct Craft he found out it is actually a 67. http://www.correctcraftfan.com/forum/forum_posts.asp?TID=12393" rel="nofollow - Original pickup Mike's thread on the great work he did. http://www.correctcraftfan.com/forum/forum_posts.asp?TID=15296&title=the-long-road-ahead-67-nautique-resto-mod" rel="nofollow - Resto/mod Rev. 1 Mike decided to sell the project last year. http://correctcraftfan.com/forum/forum_posts.asp?TID=26784&PN=1&title=67-nautique-project-boat-for-sale" rel="nofollow - For Sale Right now I'm in the planning phase, but obviously the boat still needs a floor, I'm 90% convinced at this point that I want to try to re-gel myself so I'll be reading up on all I can there. Interior all needs redone. Most of the hardware is there, some needs some help (windshield brackets). Spray rails need made, trailer needs a lot of attention, and the 340 which will need built. ------------- Craig 67 SN 73 SN http://www.correctcraftfan.com/diaries/details.asp?ID=6103" rel="nofollow - 99 Sport 85SN |
Replies:
Posted By: Kristof
Date Posted: November-13-2013 at 7:30am
|
Good luck on finishing the job and bringing her back to her former glory! Looking forward to the progress and pictures!! ------------- - Gun control means: using BOTH hands! - Money doesn't make one happy, but when it rains cats and dogs, it's still better to cry in a Porsche than on a bicycle... |
Posted By: DrStevens
Date Posted: November-13-2013 at 7:56am
| Re gel sound like a good idea, will be following to see how that process goes. It's nice that the stringers are done. |
Posted By: gR@HaM
Date Posted: November-13-2013 at 9:22am
|
Gel coating isn't as hard as some think my advice would be use a gravity fed gun with a BIG nozzle size, something like 2.5mm, mix only 750g at a time and get it out the gun as quick as possible! If working outside watch out for overspray (I got the neighbours car) and use wax, sanding between coats as bugs are a nightmare if going down the route of wet-on-wet. ------------- '82 Ski Tique |
Posted By: C-Bass
Date Posted: November-25-2013 at 9:56pm
|
Well the boat is nestled into the garage and ready for some work. Here are some before pics. I've removed all the hardware and windshield, as I'm 100% sure this thing will be getting new gelcoat.  I'm thinking of just strapping the primary/secondary together, but not continuing out to the floor, and instead using ribs from the secondaries out to the hull sides. The floor will be 1/2" or 3/4" ply. Thoughts?   Trailer towed home excellent, but it will be needing some work down the road. It looks like some has beat the hell out of this thing, including ramming into the crash bars a little too hard.   Some shots of the gel. Not sure if I should expect some cracking in the fiberglass below or if this is just superficial. 90% of these cracks are on the starboard side for whatever reason. It's not all isolated to one area on that side either.   I'd like to salvage this original gas tank. Not sure if it's possible. The inside is covered in rust, but from the outside it looks pretty good, aside from the fill.  Spray rails are destroyed from roughly 3-4' back, but there is enough to copy as a pattern.  I'm looking for any insight here. Any clues if any of this interior is original? What about the layout. It has a little jumpseat, but where does this go? Next to the observer's seat I would guess, but not sure. What about the stern seat. I only have the back cushion, not sure if there should be more? There is also a cushion with some straps on it which is pictured on the motorbox, not sure where it goes either.   One more quick thing I noticed. On the fully assembled 318, there are non-matching exhaust manifolds. They are both original Chrysler manifolds, but of different vintage. Mike had this other set of original manifolds off of a donor 318 but they have some serious holes in them. Anyone familiar with welding cast iron have a clue if this is even possible to repair?   I'd like to use at least one of these so I can have a matching set. You can buy aftermarket manifolds, but I'd like to have the original Chrysler's on there. ------------- Craig 67 SN 73 SN http://www.correctcraftfan.com/diaries/details.asp?ID=6103" rel="nofollow - 99 Sport 85SN |
Posted By: TRBenj
Date Posted: November-26-2013 at 10:06am
|
That's the original interior. The back seat bottom cushion would have been vinyl covered foam (no base or frame). I assume it would have been 1-piece and not 3, but someone else can confirm. Not sure if the jump seat would have fit between the buckets, I've only seen it used behind the drivers seat like a modern jump seat... Pauly banana posted a picture of his 68 with the jump seat in use. Get some more pictures and dimensions off it- that would be a cool thing to reproduce! That single cushion with the straps is a throwable pfd and isn't part of the interior, ha. One of the exhaust manifolds on my 273 has pin holes where yours are burned through, I'd like to hear about options to fix it. The good news is that there does not appear to be a water jacket too close to the runners. |
Posted By: Donald80SN
Date Posted: November-26-2013 at 10:31am
We are expecting to see this thing finished this winter.  We need a thread to get us through the winter now that Alan's boat is done. We need a thread to get us through the winter now that Alan's boat is done. No pressure, but we are counting on you. Donald |
Posted By: JoeinNY
Date Posted: November-26-2013 at 11:10am
|
Those are pretty significant holes. Pin holes like Tim is talking about could be brazed, or carefully welded with a high nickel rod, but holes like that…. I doubt they are worth the effort. I would think you would need to cut and chamfer to a reasonable shape, find a similar thickness cast material, machine it to fit, and then weld it in without it cracking. If I had a mill, some durabar, a preheat oven, a good set of high temp blankets, and a lot of patience… and those were the last manifolds left in the world it would probably take me about a case of beer to get one good one out of the two.. I would do what the factory did with those floor supports. Putting in ribs is a lot of time, and done wrong they can create stress concentrations that could possible crack your new gel cote. In that boat I wouldn’t consider them. IF you really want to do them for some reason… we can talk about how to do them to limit the possibility of them causing more harm than good. Awesome project- glad someone could take advantage of the work Mike already put in there! ------------- http://www.correctcraftfan.com/diaries/details.asp?ID=1477 - 1983 Ski Nautique 2001 1967 Mustang 302 "Decoy" http://www.youtube.com/watch?v=cO5MkcBXBBs - Holeshot Video |
Posted By: C-Bass
Date Posted: November-26-2013 at 11:41am
Thanks for the info. Sounds like I'm in pretty good shape for patterns then except for the bottom stern cushion. Even have a good pattern for a new throwable. 
Smart azz...  Seriously though, I need to take another look at it. I swear it had some extra flap w/ snaps or something. ------------- Craig 67 SN 73 SN http://www.correctcraftfan.com/diaries/details.asp?ID=6103" rel="nofollow - 99 Sport 85SN |
 TRBenj wrote:
Posted By: C-Bass
Date Posted: November-26-2013 at 11:47am
|
You think they glassed those supports to the side of the hull from the factory? I'm not planning on foaming that area, do you think it will need a brace under it or just bed it & glass it to the hull sides. ------------- Craig 67 SN 73 SN http://www.correctcraftfan.com/diaries/details.asp?ID=6103" rel="nofollow - 99 Sport 85SN |
Posted By: Riley
Date Posted: November-26-2013 at 11:58am
|
I wouldn't glass them to the sides. If you use decent wood like Douglass fir for your strapping and come within about 1/4 to 1/2 inch from the hull sides, and use good quality 5/8" plywood and come within 1/4 to 1/8 inch from the sides, it will be plenty strong enough. You may feel a little give in the floor if you try to make it give while on the trailer, but never while on the water. |
Posted By: C-Bass
Date Posted: November-26-2013 at 5:04pm
Whether ply or glass over foam, the floors are usually glassed to the sides right? If so, what would be the reasoning for not glassing the straps to the sides as well if whatever is over it is already bonded to the side? ------------- Craig 67 SN 73 SN http://www.correctcraftfan.com/diaries/details.asp?ID=6103" rel="nofollow - 99 Sport 85SN |
Posted By: Hollywood
Date Posted: November-26-2013 at 5:11pm
|
Might just be our education but I wonder the same thing. ------------- |
Posted By: JoeinNY
Date Posted: November-26-2013 at 6:09pm
|
Im no naval architect, but I have broken a lot of boats that were designed by naval architects and I did sleep at a holiday inn last night (wasnt staying there I nodded off at the bar.. but I digress) so Ill take a swing.. The floor wouldn’t be glassed into the sides with that setup necessarily. In this case without the foam I would recommend against it. Quasi removable vinyl wrapped plywood sections screwed down is what I would be expecting and recommending. Whenever someone firmly attaches something dense (ie wood bulkhead or support bedded and glassed to the side and/or floor) to a relatively flexible hull that has some significant height perpendicular to where it attaches it yields a large radius of gyration of the now attached column. Meaning the for a given stress (load) the strain (deformation) is so much higher for the hull that you can basically envision the support as rigid. When you are glass over foam the floor itself can create a pretty good stress concentration at the top of the foam, a nice fillet and a tapered joint can help blend from that locally very rigid section to the relatively flexible hull. I like to think of the boat rubbing down a dock board, (rock, trailer roller, what have you) the rubbing could be along the length of the boat like when you come in a little hot or vertically from the motion of waves or weight shifts. You don’t want to be rubbing down and flexing the side (or bottom) then reach a rigid point as that is when the flex turns to cracks and tears. On a smaller level the same thing happens each time a wave hits… these boats are generally overbuilt so the hull doesn’t flex much and there is a very thick hull to deal with it but I am a little sensitive about it I guess due to the time I have spent on/working on racing canoes and sailboats (both of which I have had break in half on me during races). However even in these tanks it is not at all uncommon to see a set of gel cracks in line with where the floor meets the hull on a glass over foam boat. In fact we see a lot of them where the floor then separates, water gets in, freezes, and causes havoc. Which occurs first, who knows, it is like the chicken and the egg. The other side of the coin is that you have to support the hull to a certain extent to limit the amount that it flexes both for longevity and performance. It is a balancing act. However on a boat like this one here, the factory didn’t need support here and history has shown that the boat will tolerate it pretty well, so there simply isn’t much to be gained by trying to rework the original methodology in this case. Glassing the strap itself rigidly to the hull is the worst case scenario, you basically end up trying to push the hull out in concentrated rectangular shaped zones. If you don’t like the strap floating out there I like the idea of glassing a thin glass covered foam ledge to the hull that the supports can rest on but are not glassed/glued too.. or you can do whatever you want and avoid, docks, rocks, trailers, and rough waters and youll still be fine. ------------- http://www.correctcraftfan.com/diaries/details.asp?ID=1477 - 1983 Ski Nautique 2001 1967 Mustang 302 "Decoy" http://www.youtube.com/watch?v=cO5MkcBXBBs - Holeshot Video |
Posted By: Hollywood
Date Posted: November-26-2013 at 6:59pm
|
Bottom line is resin, wood, etc. isn't free. Sailboats and canoes are built to be lightweight so they are fast. In order to do this designers use materials that meet the required strength and bend before breaking. Overbuilding one of these boats would be counter productive. Overbuilding a ski boat is mostly cost prohibitive, not performance. Ill stick with the "chicken or the egg" notion. I guess I haven't seen enough cracked up overbuilt ski boats to think otherwise. ------------- |
Posted By: Gary S
Date Posted: November-26-2013 at 8:30pm
|
+1 with Joe. Also keep in mind these early glass boats were all built the same. My 69 Mustang has the same stringer structure as my old 64 American Skier, the only difference was the newer one had foam with a layer of 'glass over it rather than the older one's painted plywood floor and no foam. I think some sort of floor,composit or plywood attached only to the structure and then covered would be the way to go ------------- http://www.correctcraftfan.com/diaries/details.asp?ID=1711&sort=&pagenum=1&yrstart=1966&yrend=1970" rel="nofollow - 69 Mustang HM SS 95 Nautique Super Sport |
Posted By: C-Bass
Date Posted: November-26-2013 at 8:37pm
|
Ok, so scratch the rib support idea. With the straps/ply though, I still don't see how attaching the them both to the side of the hull with a progressive overlapping fillet is any more risky than the original CC method (glass over foam attached to hull, although not attached well), or that of which was done with Tim's BFN build with Coosa, or your 83 as well. Tim's BFN  JoeinNY 83   Would you have done your build differently, if so what do you know now that you didn't then. I didn't even come close to a Holiday Inn last night so I'm all ears. ------------- Craig 67 SN 73 SN http://www.correctcraftfan.com/diaries/details.asp?ID=6103" rel="nofollow - 99 Sport 85SN |
Posted By: Gary S
Date Posted: November-26-2013 at 8:57pm
|
But you are comparing an + 80's hull to a early 60's designed hull a lot happened in 20 years. 80's floor was structural 60's floor was something to keep your feet dry. Stringers did not start to rot until floors were foamed and glassed over. I have 1/4 ply under my fiberglass pan and no foam so far so good. The way I cut the glass over the foam to remove it left about a 1" flange around the stringers and sides,there is no more than roughly 6" of span not supporting the floor. ------------- http://www.correctcraftfan.com/diaries/details.asp?ID=1711&sort=&pagenum=1&yrstart=1966&yrend=1970" rel="nofollow - 69 Mustang HM SS 95 Nautique Super Sport |
Posted By: storm34
Date Posted: November-26-2013 at 10:45pm
My $.02 goes along with Joe's theory of flexibility. My 1970 Skier was built from the factory using only Primaries, Secondaries and floor supports which end about 1.5" from the hullsides. There are no signs of a glass over foam floor....or major rot. I've seen pictures of a few other Skiers this vintage and all appear to be built the same. 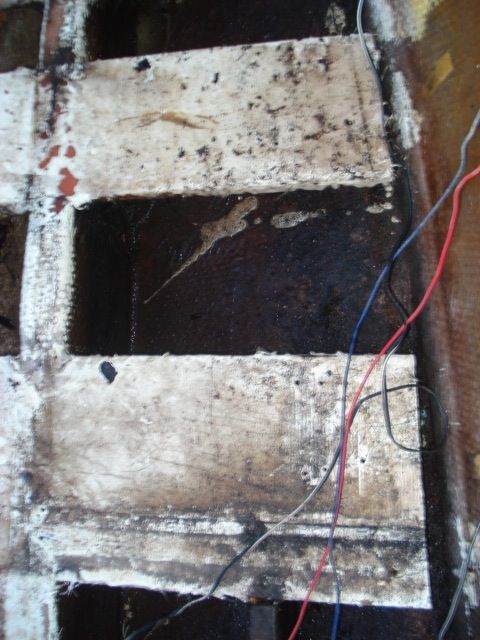 I'm recreating this approach with my 72 Promo and will do so with a number of my older boats in the next 20 years. Luckily, the previous owner of the Promo left me about an inch of the glass floor on the hullsides which I'll use as a lip for the outside of the floor to rest. If I'm following Joe's reference, this will be pretty much the same as his glass over foam ledge. 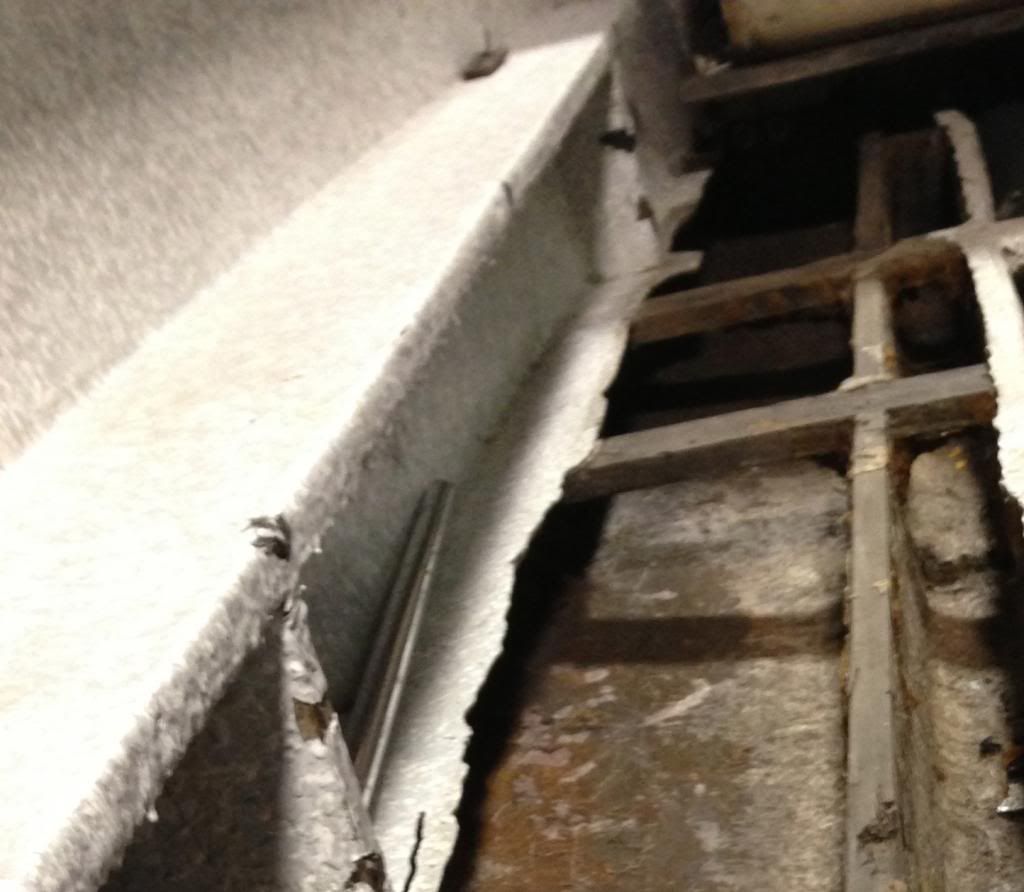 ------------- |
Posted By: Hussler
Date Posted: November-26-2013 at 11:26pm
| I redid the floor in my 65 using bulkheads in similar fashion to Joes, using bulkheads but my floors are individual pieces wrapped with carpet. Main reason is I didnt want to fiberglass in the exhaust |
Posted By: C-Bass
Date Posted: November-27-2013 at 12:07am
Either someone redid this boat before Mike purchased it (unlikely), or it was glass over foam from the factory. And clearly, it had rot.  So I'm concerned if I follow this different method, that it's less support than what it had from the factory. It wouldn't have any hull support basically from the secondary outward, which is actually the state it's already in, and to me the hull sides feel flimsy. I certainly don't have the experience in judging how thick these hulls are in comparison to numerous other hulls, but from feel, this thing feels paper thin compared to our old 85, and our 99 as well. ------------- Craig 67 SN 73 SN http://www.correctcraftfan.com/diaries/details.asp?ID=6103" rel="nofollow - 99 Sport 85SN |
Posted By: Gary S
Date Posted: November-27-2013 at 12:57am
|
Foam was an option up until 68ish when it was required. I am surprised your hull is that thin, Mustangs and Skiers seem thick ------------- http://www.correctcraftfan.com/diaries/details.asp?ID=1711&sort=&pagenum=1&yrstart=1966&yrend=1970" rel="nofollow - 69 Mustang HM SS 95 Nautique Super Sport |
Posted By: Hollywood
Date Posted: November-27-2013 at 3:45am
|
Again, I'm not sure not attaching the straps to the hull sides (freeboard) was intentionally done on a structural level. Considering the whole stringer system was prebuilt, cheap and easy is my take. ------------- |
Posted By: TRBenj
Date Posted: November-27-2013 at 9:44am
|
Like HW said and Joe implied, there was likely not a *lot* of engineering analysis performed on the structures of these boats when they were designed in the early 60's (or possibly earlier). They simply leveraged the existing wood hull structures that they had built previously, made some changes that improved their manufacturability (prebuilt stringer systems, etc) and sent them out the door. That said, we now have 50 years of real world use to see what worked well about the original design, and what didnt. As Gary said, foam was optional in most boats until the late 60's- so there are examples of both foamed and foamless 60's hulls around that have been examined- the 1st gen SN and Mustang included. So, just because this particular boat was built with glass over foam construction doesnt mean it couldnt be rebuilt foamless, in the same style as other foamless 60's SN's... because we know those held up well. The earlier hulls do tend to be a bit thicker and smaller, and thus, dont require the same number of structural members to replace the strength of the hull/foam/floor sandwich found in later boats (like Joe's 2001). Joe shared his points mentioned above with me when I was planning my BFN build, and it helped shape some of my design and layup schedules. For instance, while the boat was rebuilt with 3x the number of ribs and bulkheads as original, 2/3 of them are not bedded to the hull and have reduced layup schedules compared to the others. This should slightly improve the flexibility of the hull and reduce stress concentrations. Still, the boat is largely overbuilt- and I am ok with that. It is worth noting that the v-hull BFN has a very different structure to a small flat bottom boat. I do have some Skier/Mustang/1GSN stringer rebuilds in my future, and my current line of thinking is to install a few strategically placed ribs perpendicular to the stringers to provide floor support. They will likely be glassed in with a very light schedule. I do not care for the straps that CC used, as they are a PITA to work with- they require a lot of extra cuts in the stringers and create a lot of corners that are tedious to glass around... but since the structure on this boat already has the notches cut, youre stuck with the downsides of that system already. So, you might as well take advantage of their upside- they will not cause any stress concentrations if theyre not tied to the hull or walls. As far as tying the floor to the walls goes, I'd probably opt for a few thin layers of glass , just to keep water from draining down a crevice. But, no need to make that a structural joint, as you wont notice the increased strength. Chris's Promo was surprisingly solid and it had no structural floor to speak of. |
Posted By: Riley
Date Posted: November-27-2013 at 9:57am
| The strapping is useful for screwing the flooring to rather than using the stringers. Some ribs were used between the main and secondary stringers, although we didn't replace them on our Mustang. The original plywood floors were only 3/8". I think without the foam, using 3/8" would make for a soft floor without extra support. 5/8" works well with no extra support. If you're going to have side panels, the amount of flooring overhanging the secondary stringers that you can actually step on becomes even shorter. |
Posted By: C-Bass
Date Posted: November-27-2013 at 10:31am
This and Gary's comment about it being an option addresses my main concern that there was a reason CC foamed/glassed this SN hull and thus I needed to put it back that way. Now I'm convinced so I'll put that to bed. Thanks for all the insight guys. ------------- Craig 67 SN 73 SN http://www.correctcraftfan.com/diaries/details.asp?ID=6103" rel="nofollow - 99 Sport 85SN |
Posted By: TRBenj
Date Posted: November-27-2013 at 10:39am
I like this idea, by the way. I have seen small wood blocks used as strap supports as well- cant remember what boat I saw them on or whether they were factory or not... but I cant think of a reason why they wouldnt work just as well. Bruce, I dont believe the 1st gen SN's used any side panels. |
Posted By: Riley
Date Posted: November-27-2013 at 10:51am
|
I've seen that on a few pictures posted over the years as well as fiberglass tape attaching the strapping to the hull. I believe these were on early glass boats that were not foamed. I'm not so sure foam was an option up until '68. It definitely was on the early 60's boats, but other than the Skier like Chris Mars has, has anyone ever seen a late '60s boat without foam? I haven't. I know someone with a Classic that says their original strapping has blocks at the ends that just about touch the floor, but are not adhered to the floor or the sides of the hull. No matter what you do, I would not butt the plywood floor to the hull. Leave a small space. |
Posted By: wwchevy
Date Posted: November-27-2013 at 11:58am
|
Well this has been some timely information. When I did my Mustang stringer job I thought I read everything that I could on stringers, supports and floors. Apparently I did it all wrong, with ribs attached between the secondary stringers and the hull, plywood floor epoxied to the stringers and then taped to the hull. I am about to start a 69 SN stringer rebuild so based on this information I am going to use stringers without the notch cuts, ribs that dont connect to the sides, floor supports with blocks on the ends also not connected. I'm confused about the floor- should it be a fiberglass pan connected to the hull along the sides to keep water out of the hull and capret wrapped plywood sitting on top of it? That was how my Mustang was when I bought it. ------------- wwchevy 1989 Barefoot Nautique |
Posted By: C-Bass
Date Posted: November-27-2013 at 12:37pm
If you went with that route it would have to have either foam or possibly a layer of ply just to support the glass "pan". Correct? I am leaning towards Joe's idea of a semi-removable floor which would be screwed down. There would still be a 1/8"-1/4" gap all around the perimeter of the floor (not glassed to hull). Water would still be able to get in there, but if the hull/stringers were shaped to drain accordingly, and everything is soaked in CPES, then what would the problem be? I'm not saying this boat will be a trailer queen, but it certainly isn't going to be sitting out in rough conditions for any extended period of time. If you ever thought it was soaked under there, you could still pull the floor up and take a look. But just when I start thinking along those lines, I read this from a while back:
------------- Craig 67 SN 73 SN http://www.correctcraftfan.com/diaries/details.asp?ID=6103" rel="nofollow - 99 Sport 85SN |
Posted By: storm34
Date Posted: November-27-2013 at 12:51pm
Craig, that's exactly what I'm shooting for on the promo. Joe was the one who gave me the idea actually. If I remember correctly, we discussed this philosophy over PBR's while riding in the back of the promo at the CT mini. As the boat was loaded with people and pulling multiple trick skiers we discussed how solid the boat was already and how I should go about 'rebuilding' it when the time came. I don't think I'd take this approach with anything older than a 2nd gen SN since they got wider and seem a bit more thin. I'm guessing the foam became structural in the 2001 boats since they figured out it would let them have a thinner hull. Which would merit why Tim agreed with Pete to glass the floor down on your quote above and with Joe on this instance with the earlier boats. ------------- |
Posted By: TRBenj
Date Posted: November-27-2013 at 12:59pm
|
I would be careful not to call anything a "fiberglass pan" as it will only add confusion- the late 60's Mustangs had removable fiberglass floor pans that were primarily cosmetic- they sat on top of a traditional glass over foam floor construction. Most of the other boats from the mid-late 60's through the early 70's that I am familiar with had fiberglass over foam floors, and then vinyl wrapped plywood floors over that (the late 60's Mustangs with the fiberglass floor pans being the exception). The layer of glass over the foam was relatively thin, I dont think it was intended to provide a lot of strength. The wood or fiberglass "cosmetic" floor that laid on top of it provided the necessary impact resistance. So, it would seem that the floors in these boats werent really structural. Which makes sense, since the non-foamed versions of the same boats didnt have their floors tied to the walls. By the mid-late 70's CC made improvements to the floor design... they ditched the vinyl wrapped ply "cosmetic" floor and instead beefed up the glass layup over the foam. They also eliminated the remaining exposed foam under the gas tank. These floors were pretty well tied to the walls, and I havent seen major evidence that doing so creates enough of a stress riser to promote significant gel/glass damage due to impact. CC did keep the wood portion of the floor (between the motorbox and battery box) away from the hull walls though, so Bruce's advice to keep a gap between the ply and the wall is probably not a bad idea. I would still tie the floor to the walls with glass though, as otherwise there will be a pretty big water intrusion point, and it will also be difficult to hide that gap (cosmetic eye sore) on a boat that doesnt have side panels (which SN's did not). |
Posted By: Hollywood
Date Posted: November-27-2013 at 1:14pm
|
The observations have all been made on how these boats were built but we still don't know why. Before the plywood piece several straps were used. They simply needed something for seat screws to bite into. Carefully shaping a piece of plywood to closely match the hull sides is time/profit consuming. A big enough piece to catch all the screws but not too big to have to shave down was probably the goal. A structural gap, I think not. The fiberglass running over the top provides far more strength than any plywood ever could. ------------- |
Posted By: JoeinNY
Date Posted: November-27-2013 at 2:04pm
|
Hollywood is nuts the gap is important, and the joint between the wood and hull can’t be tapered and controlled like that of the fiberglass, and the fiberglass layer will buckle in the event of collision (even minor) where the wood will not, after a very small amount of compression it becomes the rigid structure. If you put an abrupt rigid support in the middle of a flexible section and send it out into waves it will fail, the more abrupt/rigid and the more flexible the worse the failure will be. But he is right on about the cross pieces just being there to hold down the floor and mount the seats that is what they are there for.. , it is always important to know the primary function of the part of the boat you are working on. The hull is there to keep the water out. The stringers are there primarily to transfer the thrust of the engine to the hull. The floor is there to hold you up and to attach things too. Making them do anything they don’t need to do is generally a bad idea. (A floor in a foamed boat is also there to keep water out of the foam). It should be pretty easy to see by now there is more than one way to skin this cat. What I would do and recommend for this boat is certainly not what I would do/have done with a newer boat with a carpeted floor. The early fiberglass boats were very similar in construction to wood boats, it’s somewhat analogous a body on frame construction vs unibody construction on cars. With these boats the transition between earlier and later construction is not clearly defined, between that and the different uses and budget people have for their boats means there is not one right, or even one best way to do these things. I hesitate sometimes to get to far into it on the interwebs because you can never get enough detail out there to cover every situation, and occasionally I have to cringe when I see somebody applying a technique that I have posted to a situation where it is either wrong or simply overkill.. the best advice is if you have any question why or what you might consider doing in a particular situation ask specifically about it. Then read the millions of conflicting answers you get, consider the source and then do it however you want. in general in you repair something exactly as it was originally designed you are safe, any modification from that and you probably should have a pretty good idea of why you are making that modification and what you are trying to achieve with it. Its the difference between being a contractor and an architect, or a mechanic and an engineer. Some things generally always hold true, don’t rigidly bed something to a surface that you expect to move. Other than the stringers I don’t recommend bedding anything securely on one of these boats, whether it is dangerous or not it simply isn’t needed. If these were fast boats with hulls built with weight in mind the stringers wouldn’t get bedded you would want foam between the hull and the stringers. What transitions you do have should be tapered When I run a bulk head or a vertical floor support to replace foam I usually leave an air gap, and tab them to the hull with 3 thin overlapping pieces of fiberglass tape. Filling in the gap between a floor and the vertical portion of the hull I is better done with a few more layers than that, but the smoother the transition the less likely you are to have problems If you are going to let something move then let it move.. if you aren’t then make the whole thing rigid. Rigid bulk heads widely spaced , perpendicular to the direction of travel is the worst case loading. More, lighter weight supports connecting all the structure together is better.. a good bonding structural foam is probably best case structurally … except for the whole water absorbing thing. I have a couple earlier non foamed boats to redo, my plan for them is to put coosa stringers, and then to run cpes coated wood floor supports across the top of them, then put down the vinyl covered cpes infused plywood floor. The wood being preferred to coosa in those cases because it holds screws down better, and as long as it isn’t actually fiberglassed in it will provide more than enough life and if it doesn’t will be easy enough to change out. But again, more than a few ways to skin that cat. ------------- http://www.correctcraftfan.com/diaries/details.asp?ID=1477 - 1983 Ski Nautique 2001 1967 Mustang 302 "Decoy" http://www.youtube.com/watch?v=cO5MkcBXBBs - Holeshot Video |
Posted By: C-Bass
Date Posted: November-27-2013 at 2:15pm
Yeah that part is about the only thing that is perfectly clear to me at this point.  ------------- Craig 67 SN 73 SN http://www.correctcraftfan.com/diaries/details.asp?ID=6103" rel="nofollow - 99 Sport 85SN |
Posted By: turningpoint84
Date Posted: November-27-2013 at 4:21pm
|
C-bass i have 2 almost brand new looking after Market 318 manifolds if you do have to go this route.....they're here in Cincinnati...i could meet you in Batesville to help with drive time....i'd be willing to go $175 for both. I can send pictures(see my email). I'll also give you my gas tank out of a 1968 mustang, it's in a little bit better shape but will still need to be restored, but the neck is still 100%... send me an email if you want pictures....i pretty much have a complete parts 318 engine i'm slowly taking apart, so if you need anything else me know....email me.... petercraft@gmail.com Thanks ------------- Proud 1968 mustang owner and now http://www.correctcraftfan.com/diaries/details.asp?ID=6454&sort=&pagenum1" rel="nofollow - 1970 Mustang |
Posted By: C-Bass
Date Posted: November-27-2013 at 4:26pm
|
Thanks for the offer. I'll keep that in mind as I move forward. The manifolds on the engine appear to be in working condition, they just don't match. One is the older more rounded style with "Chrysler" cast into the sides, and the other is the more squared off style. ------------- Craig 67 SN 73 SN http://www.correctcraftfan.com/diaries/details.asp?ID=6103" rel="nofollow - 99 Sport 85SN |
Posted By: turningpoint84
Date Posted: November-27-2013 at 4:36pm
|
mine are both squared off....also tank is yours if you want to pay shipping check out the fore sale section of the forum. i can mail ya it for a good price with my work's UPS discount. btw if you do happen to toss a manifold, i'd love one of the bolt on end plates for my 273, it's being held together by glue right now. ------------- Proud 1968 mustang owner and now http://www.correctcraftfan.com/diaries/details.asp?ID=6454&sort=&pagenum1" rel="nofollow - 1970 Mustang |
Posted By: C-Bass
Date Posted: January-01-2014 at 8:52pm
|
Well the holiday break didn't provide as much time as I'd hope, but I have been tinkering with the boat. I disassembled all the interior and took measurements. The 3 seats in this boat are all made identical except for the the width. I ended up modifying the angle of the observer seat to match the angle of the dash as I plan on facing this seat backwards. I'm not positive but I think it faced forward originally. I ended up following http://www.correctcraftfan.com/forum/forum_posts.asp?TID=17754&title=rebuilding-seat-bases" rel="nofollow - Alan's method on the seat bases and they are rock solid. They still need CPES and glass on the corners.    I also reconstructed a new motorbox just like the original (ugly) one. I wanted to make sure I got my first mistake out of the way early, so I failed to recognize the height difference of the new Performer intake that will be on the 340. I had to add about 2-1/2" to accommodate that nice piece of aluminum.  When I was tearing into the old motorbox, I found several markings of "SN" on the panels. I'm assuming these were from the woodshop at CC. This marking here looks like "SN xxxx?" Not sure what the 4 numbers are.  I've cut out the bulkheads and the lateral floor supports, and also made a battery box that will move its location from under the drivers seat to the middle of the hull.  I am using 3" PVC for the bilge vent, 1-1/2" for the battery cables, and 4" for all the wiring and control cables. 4" looks huge, but I had the space and it should make it easier to fish things through. You can also see the backer strips for the spray rail just laid in there. I had a wide enough white oak board that I made 3 spray rails and 2 backers. I plan on soaking the backers in CPES and glassing them to the hull to enable fastening the spray rail all from the outside. I could just cut smaller blocks for each hole, but keeping 1 piece should allow me to move the holes if need be, and will more importantly give me something to practice steam bending. Any tips are welcome.  ------------- Craig 67 SN 73 SN http://www.correctcraftfan.com/diaries/details.asp?ID=6103" rel="nofollow - 99 Sport 85SN |
Posted By: TRBenj
Date Posted: January-01-2014 at 10:11pm
|
The driver and observers buckets would have been exactly the same, originally. The observer seat was intended to be reversible (face forwards or backwards) though facing it forwards on a SN was probably not common (and silly IMHO). CC used the same seats on many models. You can see a pic of them in the SN in the 68 brochure. It looks like you made the observer seat wider? I'm not sure you needed to add the difference in the height of the intakes to the motorbox (1.5-2" of extra clearance is the norm) but you just bought yourself some breathing room. Depending on your goals for that 340, you may want to reconsider the Performer. It's not very highly regarded, and since the intake you choose will require mods for the cooling system, I'm assuming you'll want to get that choice nailed the first time. What heads will you be running? |
Posted By: C-Bass
Date Posted: January-01-2014 at 10:44pm
I duplicated the observer seat that was with this boat, whether it was original or not I'm not sure, but it was constructed the exact same as the other seats so I would guess it was. It was 3" wider that the driver seat, and unless they covered up some of the dash instruments this seat faced forwards. I'm modifying it to face backwards, with a small notch out of it similar to this. The intake is actually the Performer RPM, not just the Performer. Not sure if that carriers the same poor reputation. I believe Mike got this intake from Reid originally along with the no longer available Clevite cam which I also now have. The heads that will be going on are J heads, with 2.02/1.60 valves. Not real sure what a realistic goal is for the 340, but for conversation's sake I'd say I'm shooting for a 325-350 target HP. This is my first engine build, so similar to the boat project, I'm all ears! I plan on getting the boat back together and throwing the 318 in it until the 340 project is finished. I don't plan to focus a whole lot on that engine until I have a floating boat. I just fired the 318 up this last weekend. I little gas down the carb and it fired right up. I don't think it'd been cranked since 2009. ------------- Craig 67 SN 73 SN http://www.correctcraftfan.com/diaries/details.asp?ID=6103" rel="nofollow - 99 Sport 85SN |
Posted By: TRBenj
Date Posted: January-02-2014 at 8:35am
|
The Performer RPM is a totally different animal- thats a great choice. So are the J-heads. Whats the story with the short block- will you be rebuilding it from scratch? Piston choice will be key to get your CR where you want it... the J's have pretty big chambers. Like I said, the original observer bucket would have been identical to the driver's seat (no wider). I'm sure a previous owner had widened yours. It shouldnt have blocked the gauges originally I dont think, but it would have done so rather than having a notch. The observer seat shown in the '70-71 above is also non-original, I believe it would have had the same fiberglass bucket as the driver's. Never seen a notch like that on a factory seat. From the '68 brochure: 
|
Posted By: C-Bass
Date Posted: January-02-2014 at 10:21am
|
Yes the shortblock is being built from scratch. The block has been bored .030 over, line honed, and decked. With the new deck height and head chamber CC that was wrote on the shop work order, the shop spec'd Ross 99625 pistons that would put the CR at or slightly north of 9.5/1. I want to CC the heads to verify this though. I think this is still accectable for pump gas? Maybe I'm seeing things, but in that photo the driver seat actually looks to be bigger? Could it be possible that I've just assumed the wider seat is the observer seat when actually it is the drivers? Or are you that sure that they should be the exact same?If they are the same, then I'll be going that route as I don't want to have to work around the instruments. ------------- Craig 67 SN 73 SN http://www.correctcraftfan.com/diaries/details.asp?ID=6103" rel="nofollow - 99 Sport 85SN |
Posted By: TRBenj
Date Posted: January-02-2014 at 10:56am
|
9.5:1 will be fine on pump gas... thats actually a little conservative, if anything. I wouldnt hesitate to shoot for 10 to 10.5:1. I think youre seeing things... its pretty tough to tell the exact width of the driver's seat in that pic as the driver is obscuring the starboard side. The seats are identical in all of the boats that I have encountered with that style of bucket. Here's a pic Pauly Banana posted of his '68 that he purchased new. Im planning to put identical buckets like this in my '67SN. 
|
Posted By: C-Bass
Date Posted: January-09-2014 at 2:09pm
|
I don't have any pictures, but I've setup my steam bending jig and steam box. I'm using a cheap garmet steamer for the steam, 2" PVC wrapped in insulation for the steam box. I drilled holes into the PVC and put wooden dowels in it to keep the wood supported so the steam could surround the board. The little garmet steamer did great. Plenty of steam and last at least 45 minutes on 1 tank. I have only bent one board (inside backer) just to see how much spring back to expect and will adjust my jig accordingly. Any suggestions how to prep and fasten the backer? I had planned on coating them with CPES, situating it in place with a little epoxy bedding, then pre-drill and screwing it from the outside to hold it in place, then glassing over it. Once cured, remove the screws and fill holes with epoxy. Is it recommended to use a layer of cloth or anything when you bed? Or is epoxy with fillers OK? ------------- Craig 67 SN 73 SN http://www.correctcraftfan.com/diaries/details.asp?ID=6103" rel="nofollow - 99 Sport 85SN |
Posted By: 81nautique
Date Posted: January-09-2014 at 3:17pm
|
Craig are you using one piece of lumber for the spray rails? Your garment steamer will work fine, that's what I used on the Hurricane for all my bending. I made my spray rails a little differently though and didn't need to steam them at all. Used 1/4" thick strips laid up on the hull for shape and then epoxied them together. You could do the same using a piece of wax paper between the hull and your spray rail stock so you can remove them for shaping. Then cpes, paint and mount permanently. Obviously I had it easier than you because I could just clamp to the chine but I would think you could use the install fasteners to hold it in place temporarily while laying it up. 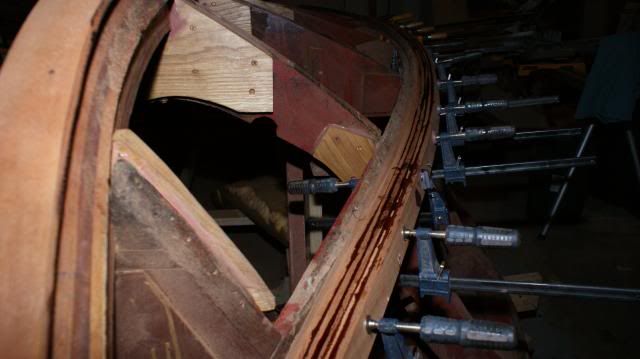 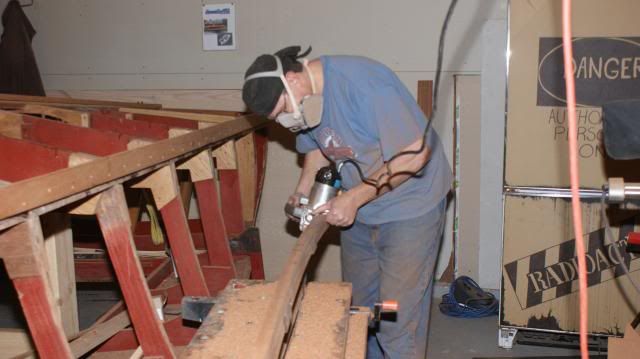 ------------- |
Posted By: phatsat67
Date Posted: January-09-2014 at 4:13pm
|
I am late to the party. You have a very good setup for induction on that bad boy. Should be a runner and I would lean more towards the 350 mark for power. Pending cam selection and exhaust manifold capabilities. Going to run 3" exhaust? Those J's with the larger intake valves make some very respectable power from stock pieces. I agree with Tim in that a higher CR wouldn't be bad. With the cooler engine water temps in a marine engine and cooler underhood temps you can get away with a lot more on pump gas. My car gets pissed off if the outside temps are over about 75. It is in the 10.5 neighborhood. Never actually calculated it. ------------- |
Posted By: TRBenj
Date Posted: January-09-2014 at 4:23pm
|
Zach, the specs on that cam are the same as the stock 340 (auto) grind: Duration @ .50 lift: 209/220 Duration @ .06/Rocker Ratio lift: 279/289 Gross Valve Lift: .429/.444 All Chryslers got 3" exhaust. Im not sure that 350hp is in the cards, but 320-330hp like Marshall's 340 might be- though he was closer to 10.5 or 11:1, IIRC. That boat was a hoot. |
Posted By: C-Bass
Date Posted: January-09-2014 at 10:06pm
|
Alan, Yes I was going to be making the rails out of 1 piece of lumber. I don't know if this is going to be a big mistake or not. I'm sure it's going to be tough to get the bend to match the hull even remotely as close as what your lamination did, but I'm hoping that it will bend slightly and comply to the hull when it comes time to fasten it. I have clamp envy by the way, quickly finding out I don't have enough. Tim/Zach, Haven't CC'd the heads yet still (too damn cold this week), but they're supposed to be 63cc. With everything else and a .032 head gasket, that would put me at 10.16:1 ------------- Craig 67 SN 73 SN http://www.correctcraftfan.com/diaries/details.asp?ID=6103" rel="nofollow - 99 Sport 85SN |
Posted By: TRBenj
Date Posted: January-10-2014 at 9:33am
|
Craig, I havent attempted to attach the spray rails to my 1st gen yet, but the thought of pre-bending them never crossed my mind. The bend is gradual enough that Im sure a straight piece of lumber would install without a problem. Of course, a little bit of steam bending ahead of time probably cant hurt! On the backer, I had tossed around a few different ideas but still havent come up with one Im crazy about yet... though most of that stems from wanting to use composites instead of wood (which generally dont hold screws as well). A full length backer would give you complete flexibility on where to put the screws, but if thats not a concern (like say you know you want to use 8" spacing) then you could always piecemeal the backer(s) instead of trying to bend a single one. I think I would be hesitant to bed the backer in if youre using wood... its certainly not necessary from a structural perspective. CPES for sure, and then a minimal amount of glass to keep it in place is probably what I'd recommend. Just over 10:1... beautiful! |
Posted By: phatsat67
Date Posted: January-10-2014 at 10:24am
|
I agree Tim. The cam is a little weak to achieve that number. Sucks we're all so limited on the RR cam selections these days. Those heads really respond when valve lift reaches the .480-.500 range. Nice job on the calculated compression! What ignition set up are you planning on for that engine? ------------- |
Posted By: C-Bass
Date Posted: January-10-2014 at 10:48am
|
Tim, Maybe the piece of white oak I have is a little dry, but it wasn't going to bend to the hull without steaming. I could get the backer to bend but it was approx. 3/8" thinner and was a lot more flexible. The steam bending process is pretty simple, cheap, and effective, so I'll just bend them as close as possible and get this backer mounted. I just need to get it in there to proceed with the rest of the floor. ------------- Craig 67 SN 73 SN http://www.correctcraftfan.com/diaries/details.asp?ID=6103" rel="nofollow - 99 Sport 85SN |
Posted By: C-Bass
Date Posted: January-10-2014 at 10:53am
Something that makes a spark! Ha, I honestly haven't thought that far ahead Zach. ------------- Craig 67 SN 73 SN http://www.correctcraftfan.com/diaries/details.asp?ID=6103" rel="nofollow - 99 Sport 85SN |
Posted By: phatsat67
Date Posted: January-10-2014 at 11:14am
|
Guess I'm getting a little ahead of you!! haha. ------------- |
Posted By: 81nautique
Date Posted: January-10-2014 at 11:43am
|
Craig, soak that white oak for a couple of weeks before steaming it. Kiln dried white oak is very difficult to bend but the radius your trying to achieve it will probably be fine. I would bet you'll need to leave it in the steam box for an hour+ but it needs to be soaked well or the steam will actually dry it out and it will crack when bending. ------------- |
Posted By: C-Bass
Date Posted: January-10-2014 at 12:16pm
|
You're right on the money Alan. I soaked that first board for 24 hrs and then steamed it for 50 minutes (it was 3/4" thick) and it did pretty good, but did show some signs of minor cracking so I think it needs more time to absorb the moisture. I wasn't too concerned, it's just going to be burried under the floor for nobody to see, but I will definitely let the spray rails soak longer. I always envisioned pulling a board out of the steamer and it being soaking wet, but it's pretty dried out. ------------- Craig 67 SN 73 SN http://www.correctcraftfan.com/diaries/details.asp?ID=6103" rel="nofollow - 99 Sport 85SN |
Posted By: mark c
Date Posted: January-10-2014 at 6:02pm
|
Don't rely on just your static compression ratios when trying to figure out if the engine will run on pump gas or not. You will also need to figure the Dynamic compression ratio as well, especially with the smaller duration cams that these marine engines run. Theres not much valve overlap to bleed off excessive compression in these cams. As I was working thru my big block for the BFN, I started with +30cc domes on the pistons I wanted, which calced out at just about 10.4 to 1 static compression with all the other parts going into the engine. But when I ran the DCR on the parts the compression came in at about 9.25:1. You need to keep the DCR between 7.5 and 8.5:1 if you want to run pump gas without detonation. As a result I was forced to go with 22cc domes with a 9.4:1 static and an 8.3 dynamic, and my cam has 15 degrees more duration than yours does. The most critical spec is where the intake valve closes on the compression stroke, the closer to BDC the higher the DCR will be, so each cam will bring a unique number to the design. Mine is 47deg ABDC as a reference, yours is around 43deg ABC. You can't directly compare a BBc to a SBF but you can calc yours out yourself at the link below. http://members.uia.net/pkelley2/DynamicCR.html I might have been able to keep the +30cc domes with the cooler running engine but it would be right on the edge so for once in my life I'm going a little conservative on the compression ratio in an engine build. It will be at least 2 full points higher than the stock compression on the 454 was, so it should be a lot better without giving me to many hassles with detonation, or idle quality. |
Posted By: phatsat67
Date Posted: January-10-2014 at 6:11pm
|
I left the dished pistons in my Ford back in the day because I wanted to run it like I stole it on the cheapest pump 87 I could find. I never dabbled much in the dynamic side of things outside of knowing advancing cam timing tends to build more cylinder pressure. Good for low revving torque producing engines. I have never installed a cam at anything besides a degree verified straight up. My 67 really detonates on pump gas and higher temps. This phenomenon only happens at or above the 4k rpm mark. Distributor has stock curve and I have only verified timing to 3500 rpms. I assume it is over advancing above 4k rpms. ------------- |
Posted By: mark c
Date Posted: January-10-2014 at 6:46pm
|
Yep, thats either timing or fuel leaning out. My distributor in my 69 Camaro lost the stop bushing on the mechanical advance of the distributor, and under part throttle the engine pings like a can full of stones. Timing was probably advanced at least 56 to 58 degrees BTDC. I had to get a new bushing and massage the advance slot a bit, but all is well now. While SCR will change slightly based on engine RPM, throttle position, etc. DCR does not change once the engine is built, it's purely a function of when different actions occur in the compression stroke. |
Posted By: TRBenj
Date Posted: January-10-2014 at 7:10pm
All good info, Mark, but lets not scare the guy. This is basically the only warmed up RH Chrysler small block cam that has been available for the last few years (its now NLA like the rest) so Reid has some good history with it... and I think some of the builds it was used on were approaching 11:1. Craig wont be breaking any new ground, it doesnt sound like. Not that its here or there, but the stock (static) CR should have been in the low to mid 8's on that 454... Im sure its listed in the manual in the reference section. Did you swap out the heads for larger ovals? Warm up the cam? Buffalo did both with his '88 and had a CR similar to yours in the mid 9's and it runs real strong, ~53 IIRC. |
Posted By: mark c
Date Posted: January-10-2014 at 7:51pm
|
He may be perfectly fine depending on the rest of the hardware, its just worth checking, as SCR is really nothing more than a bragging point for an engine it has very little to do with how it runs, or what it runs on for gas. Doesn't everyone run an 11:1 compression engine with a 3/4 race cam and a 780 Holley Double pumper? Theres nothing worse than an engine that pings running gas that you can buy at the local gas station, or having to back the timing way down and rob some power from the engine. Nope, my engine will be keeping the small ovals, which are actually better on a mildly warmed over engine with a relatively small cam than the large port ovals, or the 074 rectangular port heads, because it keeps the intake port velocity up which is good for torque production. Torque gets you to speed, HP keeps you there, having a billion HP produced at 6000RPM does you no good if your engine doesnt run there, and you don't have the torque to get there. The heads will get port matched to a set of large oval head gaskets, but that match is really nothing more than a filet into the first 1/2" of the intake port as oppossed to a full blown porting job all the way to the bowl. They will get a new set of undercut valves, and new springs but other than that they will remain stock. I will be running the melling 22220 Cam that came in the mercruiser 502 magnum engines which is just slightly longer duration (14 degrees more) and higher lift (.510) than the stock 330HP marine engine cams. An Air Gap RPM will be bolted to the heads, and the Holley 780 thats on the engine now will just get rebuilt, and a couple of turndowns added to the air horns (its not a marine carb now). I think the original BBC were even lower compression than that oout of the box, like 7.8 to 8:1 or there abouts they are horrible. And 53 mph is way down from my Hydrostreams 92. But I'm not going to push one of these barges there without a gas turbine, and probably wings. |
Posted By: TRBenj
Date Posted: January-10-2014 at 8:36pm
|
I agree that static CR doesnt tell the whole story... but since we know that exact cam does just fine on pump gas in a 340 with a static CR approaching 11:1, cant we say with pretty good certainty that he'll be safe with a static CR of 10.1:1? The only additional variable would be if he were to install it off center, right? Otherwise Im missing something. It'll be interesting to see how your boat runs. A few of your assumptions are contrary to what we've found to be true when building a fast ski boat. I think that cam is a bit warmer than you think- did you measure your stocker? 50-51mph may not be out of the question. Clearly these tractors dont have the same speed potential as a purpose built outboard, but the BFN's in particular seem to respond pretty well to power... well, at least they dont behave too badly when pushed well beyond their factory ability. 92 may be out of the question, but I dont think 70 is. |
Posted By: mark c
Date Posted: January-10-2014 at 9:12pm
| Yep, advancing the cam will increase DCR, retarding it would reduce it. You can't advance that cam to far because the exhaust valve starts to open right around 3deg ATDC. There shouldn't be anything contrary about building the engine, how it responds in a ski boat maybe, but it will be at least slightly better than stock. If I get it together correctly it should come in right around 420HP and do it below 4600 RPM, but I'm not letting anyone drag me around behind it above about 42 or 43 anyways, so as long as it will make it to the top of the speedometer that will be good enough for me. Water gets really hard above 50 when you fall. |
Posted By: TRBenj
Date Posted: January-11-2014 at 1:45pm
|
Mark, yes, the part I disagree about is how a ski boat will respond to hp/torque and where those peaks best benefit performance... most people think that low end torque is what gets these tractors moving quickest but I have not seen that to be true. Im not seeing those hp numbers out of the mods youve described, but Ive only built one BBC so Im hardly the authority. If it runs into the mid 50's like the 425hp HO 454's of the mid 80's then that'll prove me wrong! To get it moving that fast at such a low RPM will require a pretty huge prop... such a wheel may not exist for a 1" shaft. It should be faster than stock though, and that should have you in the 50mph range anyways. Thats definitely faster than I care to fall, but I can think of a few uses for extra power- pulling a huge line of footers or barefoot racing come to mind. |
Posted By: oldcuda
Date Posted: January-11-2014 at 3:48pm
|
Think keeping small port ovals would be a big Boo-Boo.I am a major torque junkie but the engine will have to breath a little better to get into rpm range you need for all around performance.I am planning a lot of prop for mine but 565ci,10.4 comp,with a lot more cam think it can handle it. |
Posted By: TRBenj
Date Posted: January-11-2014 at 9:13pm
I dont recall the details of your engine build, but the sheer number of cubic inches you'll have on tap would make me think you might approaching prop limitations if youre staying with a 1" shaft and trying to keep the revs down... or are you going to 1-1/8"? Our BFN will pull some props made for 1.23 boats (15+" pitch) north of 5500... How fast you planning to spin yours? Sorry Craig, Im afraid we've gone off on a tangent here! |
Posted By: mark c
Date Posted: January-11-2014 at 9:36pm
|
The old peanut port heads tend to hit there rpm limits around 4800 rpm in stock form and then power will start to fall off after that, with a bit of pocket porting and port matching you can probably push that up to 5000 RPM without to much work. The engine will be a 30 over 454 with a melling 22220 224/224 duration .500/.500" lift (with 1.6:1 ratio rockers), +22 cc dome full floating pistons(about 9.7:1SCR, 8.4DCR), the stock 119cc 2360 peanut port heads (reworked slightly), heavy H beam 6.125" rods, RPM air Gap intake, Holley 780 carb. Should be good for 420 to 440HP around 4600 to 4800 RPM, 525 ft lbs of torque around 3800-3900 RPM. Would like to keep my max RPMs around 5K, + or - a couple of hundred. The 224/224 cam will start running out of breath at 5200RPM so that's probably where I will want it to run. I have no intentions of changing shaft diameters, props will be open for discussion after the boat finally gets in the water and I see whats up with it. Should look very similar to this dyno chart.  We can move engine build discussions somewhere else. |
Posted By: oldcuda
Date Posted: January-11-2014 at 9:51pm
| No more than 5500 and yes a propshaft upgrade is going to have to be done.Maybe not for this season but definitely been thinking about it.Picked up World tall deck block 4.6 bore and 4.25 crank that makes 565 was thinking 598 but that roller cam I have been saving just won't support that many cubes.I sold the Edelbrock heads now thinking Brodix BB-2's have to find that happy medium between velocity and volume |
Posted By: WakeSlayer
Date Posted: January-14-2014 at 5:21pm
|
Love seeing the progress you are making, Craig!!! ------------- Mike N 1968 Mustang |
Posted By: C-Bass
Date Posted: January-04-2015 at 11:56pm
|
Time to get back to work on the 67. I apologize that I haven't done very well at documenting each step, but I have been making progress. The first step this winter was to finish getting the floor installed. I debated the different options with the floor, but ultimately decided to permanently install the floor and glass the floor to the hull sides. The lateral supports and the floor have a minimum 1/8" gap between the side of the hull. I bedded the lateral supports with thickened epoxy.  The floor (5/8" ply) was test fit with the engine/trans installed, then pre-drilled for countersunk screws. All floor panels were soaked in CPES and have a layer of 4oz cloth on the bottom. I installed the floor using biax on the stringers and lateral supports. I screwed the panels down until the epoxy cured overnight, then removed the screws and back-filled the holes with epoxy.   The floor was then glassed to the hull sides using 2" tape, 4" tape, then a layer of cloth from the primary stringer to 3-4" up the hull sides. Here you can see the gap between the floor and hull under the 2" tape.  Laying out the cloth.  All glassed down. I have been fairing the bilge as well in-between glassing the floor.    I was happy with the result of the floor. It isn't as flat as a pool table but I think it looks good and it's super solid. After the floor was down I moved on to the part of the project I have been dreading. This hull has a ton of cracks in the gel, and I was never going to be happy with just wetsanding/buffing. So I decided to re-gel the whole hull. I have never done anything like this before so I don't know what to expect, but regardless, I have started grinding off all the old gel so I'm on my way. I separated this portion of the garage with plastic and got to work on grinding. I started with a DA and 24 grit and got nowhere. Then I tried an inline with 36 grit and also got nowhere fast. This gel is hard, and it's thick. I used my angle grinder with a 60 grit flap disk but this was too hard to control and be smooth and I ended up gouging a few spots so I quit with that. Ultimately I ended up using a sanding disk adapter for my 4-1/2" angle grinder with 36 grit. I'm pretty happy with this method as it's a good balance of speed/control. To anyone contemplating doing this to a boat, this is a nasty job that is going to take quite a while. I'm wearing a Tyvek suit, respirator and lab goggles but the amount of dust is incredible.   So far I ground the transom, 90% of the top deck, and about 1/3 of the port side. I hope to be finished with the hull sides by this weekend. I will then flip the hull and start on the bottom. Anyone have any tricks on sanding the gel from the tight inside corners around the raised lip on the bow? ------------- Craig 67 SN 73 SN http://www.correctcraftfan.com/diaries/details.asp?ID=6103" rel="nofollow - 99 Sport 85SN |
Posted By: fanofccfan
Date Posted: January-05-2015 at 9:28am
| I admire your work ethic! Looks like a monster project. |
Posted By: peter1234
Date Posted: January-05-2015 at 10:04am
|
I think Pete B knows of a product of tool to remove gel ------------- former skylark owner now a formula but I cant let this place go |
Posted By: JoeinNY
Date Posted: January-05-2015 at 10:58am
Good for you man, lots O progress - I don't envy the tyvek/respirator time you are getting in. I have found the full face respirators to be a pretty decent until it gets too warm out..
I have a black and decker belt dragster belt sander that I use to remove gel on those inside corners. As far as belt sanders go, it is pretty much a piece of crap, I have never used it for anything other than that specific task so it is perhaps not the best use of 60 dollars. However, it has a small front roller of about the right radius and a flip back guard that exposes of that roller... so it gets the job done with a reasonable amount of control. ------------- http://www.correctcraftfan.com/diaries/details.asp?ID=1477 - 1983 Ski Nautique 2001 1967 Mustang 302 "Decoy" http://www.youtube.com/watch?v=cO5MkcBXBBs - Holeshot Video |
Posted By: TRBenj
Date Posted: January-05-2015 at 12:59pm
| Wow, grinding all that gel is an incredible amount of work, good for you. I'd love to see a pic of the tool/attachments you used that resulted in such a nice finish. I've used flap discs on my 4.5" angle grinder and the finish was not pretty. I have the deck of my 67sn to do as well so I'd love to leverage what you've done! Any estimate on how long it's taken you thus far? |
Posted By: C-Bass
Date Posted: January-05-2015 at 3:18pm
|
Thanks for the tip Joe. Looks like I can get that thru Amazon for $50 so that's definitely an option. Tim, I'm basically using the 4-1/2" version of http://www.homedepot.com/p/Diablo-7-in-x-5-8-in-50-Grit-Grinder-Sander-Conversion-Kit-DCP070VGPS01G/202830888" rel="nofollow - this . It's a pretty rigid/flat backing pad that you can fasten sanding discs to. It allows you to hold the pad mostly flat on the surface instead of at an angle like the flap discs. The finish is pretty good but not perfect. If I was more patient I would stop sanding at the first sight of the glass then switch to the DA or inline sander for a smoother finish. It's going to need faired regardless. ------------- Craig 67 SN 73 SN http://www.correctcraftfan.com/diaries/details.asp?ID=6103" rel="nofollow - 99 Sport 85SN |
Posted By: C-Bass
Date Posted: January-05-2015 at 3:30pm
|
I've probably only spent 6 hours doing what I've done so far with the sanding/grinding. I haven't sanded the real hard details like the small radii/corners so that'll take quite a bit of time as well. For just the deck, I'd probably budget 8-10 hours to get the gel removed. ------------- Craig 67 SN 73 SN http://www.correctcraftfan.com/diaries/details.asp?ID=6103" rel="nofollow - 99 Sport 85SN |
Posted By: C-Bass
Date Posted: January-11-2015 at 11:48pm
|
Well I didn't get as much progress on the grinding as I hoped, but I did manage to get the deck gel completely ground off. I guess I could have started fairing it but I decided to go ahead and get the boat flipped and get to work on the rest of the hull sides and bottom. I figure I can practice getting the bottom faired and re-gelled and hopefully be pretty proficient for the sides and top. Here is my sanding adapter for my 4-1/2" Dewalt. I've been using 36 grit fiber disks and it's been going pretty well. This setup can be bought for less than $20 at Home Depot or online for any grinder with a 5/8" spindle.   The deck is all ground. There are spots where the deck is noticeably lighter in texture. I assume these are bad spots in the glass that need ground out and repaired?    Next up is the boat flip. ------------- Craig 67 SN 73 SN http://www.correctcraftfan.com/diaries/details.asp?ID=6103" rel="nofollow - 99 Sport 85SN |
Posted By: C-Bass
Date Posted: January-11-2015 at 11:59pm
|
To flip the hull, I utilized the single beam I have in my garage. I wasn't sure if I could get it done with 1 beam, obviously two parallel beams would be the best solution, but this is all I had. I started by lifting the boat by the lifting rings, then setting it down on "slings" that are attached to the beam. These were 20' straps, and the length worked out just about perfect.  Then I attached the chain hoists to a strap that runs around the boat. This allows me to tighten the hoist and slowly roll the boat inside the slings. The only issue was when the boat was about 90°, the boat was able to sag just enough in the slings to barely touch the floor. I added a 2x4 inside the hull from gunnel to gunnel to help keep the side of the hull from flexing.     Overall this process took about an hour, but I was able to do it all by myself in a what I consider a pretty safe manor. I did attach a strap to the two beam dollies to prevent the front sling from ever wanting to start sliding towards the bow due to the hull taper. ------------- Craig 67 SN 73 SN http://www.correctcraftfan.com/diaries/details.asp?ID=6103" rel="nofollow - 99 Sport 85SN |
Posted By: C-Bass
Date Posted: January-12-2015 at 12:08am
The numerous cracks on the hull sides and chine continue right down the bottom of the hull. There is also what appears to be serious evidence of prop rash.  I had read on here that the 1st gens didn't have a lot of hook in the hull. I don't have a good comparison to know whether this is a lot or not, but I took this picture to try to show what this hull looks like. Since I'm grinding everything down to bare glass and most likely repairing some glass down here anyway, I'm thinking of grinding what hook this does have down to be completely flat to possibly make this thing a little faster and better behaved at higher speeds. Thoughts?  ------------- Craig 67 SN 73 SN http://www.correctcraftfan.com/diaries/details.asp?ID=6103" rel="nofollow - 99 Sport 85SN |
Posted By: 8122pbrainard
Date Posted: January-12-2015 at 8:10am
|
Craig, Good work and thinking using your single beam for flipping the hull. Those light spots look like where there isn't enough resin. I feel they should fill in with a coat of resin. I'd leave the hook but am sure others can add to your question. ------------- /diaries/details.asp?ID=1622" rel="nofollow - 54 Atom /diaries/details.asp?ID=2179" rel="nofollow - 77 Tique 64 X55 Dunphy Keep it original, Pete < |
Posted By: peter1234
Date Posted: January-12-2015 at 9:52am
|
i would measure the amount of hook and get back to someone like tim B for advice on how much is going to give you what you want from the hull ------------- former skylark owner now a formula but I cant let this place go |
Posted By: TRBenj
Date Posted: January-12-2015 at 9:59am
|
ReidP is the one you want to talk to about how much hook you want in a 1gen hull. He's measured and modified the hook in more vintage cc's than anyone, I suspect. It's tough to tell in those pictures, but the light areas look more like air bubbles or delam between layers than simply a lack of resin in the surface coat. If the spots are springy or spongey then I'd grind them out... And I might do so even if they feel mostly solid. Is your theory on the gel cracks due to bad gel, environmental conditions (storage in the water, etc) or have you pinpointed structural hull issues? |
Posted By: C-Bass
Date Posted: January-12-2015 at 10:17am
|
Tim/Pete, Those light spots feel pretty solid. I have found some really small spots/voids that were definitely air bubbles, but these areas are different. The deck had lots of cracks that just appeared completely random. Some propagated from the rubrail holes but there were plenty that were perhaps from bad or too thick of gel application and close to 50 years of age. 90% of the cracks on the hull side and bottom come from the starboard side of the boat and appear to originate around the chine. Again, some appear to start from the spray rail holes but there are plenty that are just random. Since the original construction of this boat didn't have the floor glassed to the wall, and the gel seems to be really thick, I'm wondering if the flex in that area was too much for the gel to last. This is my first archeological dig on one of these, so I might be all wet on my theory. ------------- Craig 67 SN 73 SN http://www.correctcraftfan.com/diaries/details.asp?ID=6103" rel="nofollow - 99 Sport 85SN |
Posted By: JoeinNY
Date Posted: January-12-2015 at 10:30am
|
FWIW I have a CC in my backyard the same color and age that had few hours and decent storage and still has some serious gel coat cracks, the gel is super thick as well. I would tend to agree it was more a gel issue than structural one. ------------- http://www.correctcraftfan.com/diaries/details.asp?ID=1477 - 1983 Ski Nautique 2001 1967 Mustang 302 "Decoy" http://www.youtube.com/watch?v=cO5MkcBXBBs - Holeshot Video |
Posted By: TRBenj
Date Posted: January-12-2015 at 10:48am
|
I would assume it's a gel issue too- but looking for any other obvious hints as you deconstruct is a good idea. My '67 1gen has hull gel that is in reasonable shape- most imperfections look to have been caused by use. The deck is a different story, it is just littered with cracks eminating from nowhere. Just a bad batch (bad mix? Shot in less than optimal conditions? Too thick? Who knows). So it definitely happened- and not uncommonly in the 60's. If the boat was foamed then the floor was probably glassed to the wall, though maybe not so thick as to be considered a structural joint. Certainly some boats (unfoamed) didn't have that glassed joint though and they didn't suffer because of it. Even Chris's early 2gen with the glass floor and foam removed doesn't seem to be adversely affected... The narrow beam and thick construction was beefy enough without it. Those light spots still make me nervous. I wonder if trying to reach the void (small hole drilled) and then filling with (thinned?) resin would be acceptable instead of grinding, filling and fairing. Leaving them be would make me nervous- the amount of work going into this regel is too significant to want to revisit any time soon! |
Posted By: 8122pbrainard
Date Posted: January-12-2015 at 11:55am
Excellent technique. ------------- /diaries/details.asp?ID=1622" rel="nofollow - 54 Atom /diaries/details.asp?ID=2179" rel="nofollow - 77 Tique 64 X55 Dunphy Keep it original, Pete < |
Posted By: C-Bass
Date Posted: January-12-2015 at 12:01pm
|
I assume Xylene is the solvent of choice, but not as thin as CPES? ------------- Craig 67 SN 73 SN http://www.correctcraftfan.com/diaries/details.asp?ID=6103" rel="nofollow - 99 Sport 85SN |
Posted By: skutsch
Date Posted: January-12-2015 at 12:44pm
|
[QUOTE=TRBenj] I would assume it's a gel issue too- but looking for any other obvious hints as you deconstruct is a good idea. My '67 1gen has hull gel that is in reasonable shape- most imperfections look to have been caused by use. The deck is a different story, it is just littered with cracks eminating from nowhere. Just a bad batch (bad mix? Shot in less than optimal conditions? Too thick? Who knows). So it definitely happened- and not uncommonly in the 60's. /QUOTE] The Gel on Dad's 64 is VERY shiny and looks great from 10 feet away, but as you approach there are literally thousands of these spider cracks. They started appearing in the late 80's on the hull and really have increased in number in the last 10 years. This boat has been waxed before it goes into the water for the first time every year and is towel dried every time it is used. So the cracks are not from any sort of neglect. ReidP calls them the "beautiful patina on a great old boat." I will stick with that, because the work going into this 67 is way more then anything I would want to tackle!!! Can't wait to see the end results, that of course may change my opinion. Keep up the GREAT work! ------------- Our http://www.correctcraftfan.com/diaries/details.asp?ID=4669" rel="nofollow - 98 Sport Nautique My Dad's 63 Ski N |
Posted By: 8122pbrainard
Date Posted: January-12-2015 at 12:52pm
|
I suspect but never have confirmed that the spider cracking is caused by the plasticizer leaching out of the gel. Now all we need is the EPA to come down on that emission! ------------- /diaries/details.asp?ID=1622" rel="nofollow - 54 Atom /diaries/details.asp?ID=2179" rel="nofollow - 77 Tique 64 X55 Dunphy Keep it original, Pete < |
Posted By: Gary S
Date Posted: January-12-2015 at 1:45pm
------------- http://www.correctcraftfan.com/diaries/details.asp?ID=1711&sort=&pagenum=1&yrstart=1966&yrend=1970" rel="nofollow - 69 Mustang HM SS 95 Nautique Super Sport |
Posted By: Gary S
Date Posted: January-12-2015 at 1:46pm
Now you see I just lost the whole comment of my post using a pad  ------------- http://www.correctcraftfan.com/diaries/details.asp?ID=1711&sort=&pagenum=1&yrstart=1966&yrend=1970" rel="nofollow - 69 Mustang HM SS 95 Nautique Super Sport |
Posted By: Gary S
Date Posted: January-12-2015 at 10:13pm
I think this is somewhat true.But I feel there is a little more to it. Gel coat is much like paint in that if put on too thick will crack as it dries. When looking for gel coat tips when I was doing my console I did see references to the gel shrinking over time. My 64 was 24 when I had it,cracks were numerous and deep,in places a dime's width.Many Correct Crafts from this era are simmiler. Jump ahead to today- 80's and early 90's boats should be cracking,but off hand I only know of JPass's,obviously there could be more,but we have not seen them here. Plant conditions were the same,variable temp and humidity depending on the weather and time of year. What I'm thinking is that the gel was put on too thick early on,maybe they were thinking a little is good,more would be even better? It is recommended today that gelcoat should be from .010 to .020 thick. Later 60's they seemed to get better, was it thru trial and error? What input did the gel coat suppliers have? Did the company at the time have dedicated gel coaters? Do they today? Any idea Craig what the thickness of your gel coat was? My 69's hull has one small crack,but the deck has a few,all in areas that would be the lowest when in the mold where gel would pool. This is all guess work on my part from my limited experence,any thoughts or comments from others? ------------- http://www.correctcraftfan.com/diaries/details.asp?ID=1711&sort=&pagenum=1&yrstart=1966&yrend=1970" rel="nofollow - 69 Mustang HM SS 95 Nautique Super Sport |
Posted By: C-Bass
Date Posted: January-26-2015 at 11:08am
|
Well the bulk of the grinding is completed. Sorry, forgot to get the pics from the camera, but it's a bare fiberglass boat now. My garage is a complete mess. I bagged up all the dust from the floor and I'm guessing it weighs 30-40 lbs. I didn't keep close tabs on how much time I spent grinding but 25-30 miserable hours is probably close. The setup I used worked pretty well, but still left some minor waviness in the surface. Now I've got to start fixing cracks, gouges, and start fairing. What is the recommended way to fix cracks in the hull? There are numerous visible cracks that you can't even feel with your fingernail, so should I just apply warm/thinned epoxy and hope it soaks into these cracks and move on. I've thought about a layer of 4oz glass centered right over the chine (where most of the cracks are)? That might be a terrible idea, but 4oz is so thin that I doubt I'd have any trouble blending it to the hull, and I'm thinking it would terminate the cracks. I want to make sure after all this work, these stress cracks don't show their face again. The prop rash area I had a picture of before was a lot worse than what it looked. I ground through until I hit good glass, but never got there. That spot was bad all the way through the hull. Is thickened epoxy OK or should I be layering (incrementally larger) pieces of glass on that spot. I've also ordered 5 gallons of neutral gel from USC along with a selection of tints. I plan on using Duratec hi-gloss additive for the last few coats but am open to opinions if anyone has used this or not (I think Gary did on his console). ------------- Craig 67 SN 73 SN http://www.correctcraftfan.com/diaries/details.asp?ID=6103" rel="nofollow - 99 Sport 85SN |
Posted By: TRBenj
Date Posted: January-26-2015 at 11:55am
|
If the bad glass goes all the way through, I would fix with glass rather than thickened resin. A repair from the top would be a lot easier, if you need to fill any low spots from underneath afterwards, I'd use thickened resin for that. I believe joe has recommended mat over old glass to ensure the cracks don't come back. Light cloth would be a heck of a lot easier and take less resin, but might give some print through when the gel is sprayed? I think skibum just did thinned resin on his cracked up 87, I wonder how that held up. Sorry I don't have any answers, I'm urious what those who are smarter say, as I've got this project ahead of me too. What did bill L use on his metalflake gel mustang? That gel came out real nice. Snap some pics when you get a chance! |
Posted By: 8122pbrainard
Date Posted: January-26-2015 at 12:12pm
|
I like the idea of using a light weight cloth over the whole hull especially is there are lots of cracks. A couple coats of resin after fairing and the proper mil. of gel, it should eliminate any print through. ------------- /diaries/details.asp?ID=1622" rel="nofollow - 54 Atom /diaries/details.asp?ID=2179" rel="nofollow - 77 Tique 64 X55 Dunphy Keep it original, Pete < |
Posted By: JoeinNY
Date Posted: January-26-2015 at 12:15pm
|
IMHO, you will definitely want to glass over any thing that looks like a crack. Because you are going to be gelling this boat when you are done so I would be using a good vinylester resin and skip any thoughts of epoxy for repairs on the outside of the hull. If it’s a lot of cracks you may consider sanding deeper in that area so you can get something a little more substancial than 4oz. Deep wide cracks should be enlarged down to the bottom, taper the area of the grinding so that it is wider at the surface by about 10 to 1. Fill the area in with progressively larger glass patches, so you get a good tapered joint. You should be expecting to spend a lot of time with fairing compound, and eventually a good primer before you are ready to gel so don’t take any chances on the base glass. ------------- http://www.correctcraftfan.com/diaries/details.asp?ID=1477 - 1983 Ski Nautique 2001 1967 Mustang 302 "Decoy" http://www.youtube.com/watch?v=cO5MkcBXBBs - Holeshot Video |
Posted By: C-Bass
Date Posted: January-26-2015 at 2:36pm
|
Would laying up the glass with vinyl ester and using vinylester to fair and then gel over that be preferred to laying up the glass with epoxy, fairing with epoxy, then a conversion coat with vinylester, then gel? ------------- Craig 67 SN 73 SN http://www.correctcraftfan.com/diaries/details.asp?ID=6103" rel="nofollow - 99 Sport 85SN |
Posted By: baitkiller
Date Posted: January-26-2015 at 3:01pm
1000% yes. From compatibility to pot life the vinylester is what should be used. As far as glass goes just dishing out the area and going in with a progressive patch of layered 3/4 or 1.5 oz mat will work just fine. Just make sure its not over wet and resin rich. ------------- Jesus was a bare-footer............. |
Posted By: 8122pbrainard
Date Posted: January-26-2015 at 3:08pm
|
Craig, Joe's idea of going with vinylester all the way is sound. It saves time and getting two resins. However, on your prop rash area, I'd like to see the basic repair (build up of glass and resin) using epoxy for strength and bonding. Then fill as Tim mentioned and proceed with the vinylester. ------------- /diaries/details.asp?ID=1622" rel="nofollow - 54 Atom /diaries/details.asp?ID=2179" rel="nofollow - 77 Tique 64 X55 Dunphy Keep it original, Pete < |
Posted By: C-Bass
Date Posted: February-01-2015 at 1:59pm
|
Well I started working with the vinylester for the first time this weekend. Started by grinding out the large cracks and was filling them with VE w/ glass bubbles. After filling the cracks I left it to set up. After about an 1-2 hours I checked and I thought the VE was supposed to cure much quicker than epoxy, but this didn't feel like it was setting up at all. I made sure to mix it exactly at 1% MEKP and the garage was holding 71° so I thought all the variables were under control. I came back this morning and after about 24hrs its still soft to the touch. I'm hoping it will continue to cure, because it's like warm bubblegum right now. I already miss working with the epoxy w/ the pumps. 100% cure every time and no VOC's. I did some digging and found out this was an issue with SkiBum's bilge. Looks like US Composites recommended a lot more MEKP when using fillers (2-3% instead of 1%)
------------- Craig 67 SN 73 SN http://www.correctcraftfan.com/diaries/details.asp?ID=6103" rel="nofollow - 99 Sport 85SN |