Advice for reviving a '87 SN 2001 after 10yrs
Printed From: CorrectCraftFan.com
Category: Repairs and Maintenance
Forum Name: Boat Maintenance
Forum Discription: Discuss maintenance of your Correct Craft
URL: http://www.CorrectCraftFan.com/forum/forum_posts.asp?TID=35646
Printed Date: May-04-2024 at 10:28pm
Topic: Advice for reviving a '87 SN 2001 after 10yrs
Posted By: xarmypilot
Subject: Advice for reviving a '87 SN 2001 after 10yrs
Date Posted: March-28-2015 at 2:33pm
|
Good day everyone, brand new member here from central Indiana needing some advice from the experts. This season I've worked out a deal to use my cousin's '87 SN 2001. In consideration for taking care of the general maintenance, repair and upkeep of the boat, if the boat fits my needs, I'll to buy it from him in the fall. If I don't buy it, I just incur the expense to get it in usable shape for him to sell outright. So I'm pretty excited over this prospect, the SN 2001's have always been a favorite of mine, they are exceptionally flexible watercraft that can easily go from tubing to skiing to wake boarding. So here's what little I do know mechanically about the boat: It has been stored (covered) in his attached garage for 10+yrs The boat was properly winterized by a CC dealer before storage The boat was maliciously maintained before storage It has a PCM 351 It probably needs a new water pump (don't know if that means internal or impeller) It probably need the stuffing box re-adjusted or re-packed It is on the original CC trailer What I'd like to know is, what are the specific very first steps (beyond visual) that I should take to diagnose the condition of the engine and transmission once I get it here to my garage? Another cousin told me he had a 70's Mustang in a similar state once. He knew the condition of this boat before being stored and he believes that, like his Mustang, the 2001 would probably need little more than a new battery, some cleaning up and new fluids before starting. Can that be right? I'm fairly mechanically inclined, but in-boards are new to me and any advise that I can get, no matter how basic, would be extremely appreciated. Thanks! ------------- '87 SN 2001 http://mbbw.com/WIP/DSCN9620.JPG" rel="nofollow - '68 Chris~Craft Grand Prix (Past family boat) '72 Checkmate Mx16 (Past family boat) "Speed is life, altitude is life insurance" |
Replies:
Posted By: 8122pbrainard
Date Posted: March-28-2015 at 3:30pm
|
Rob, Welcome to CCfan and using your cousins 2001. We always ask for pictures and would love to see some. Fluid changes are always a good idea but not needed since oil doesn't go bad with time. However, what may happen is water from condensation. The new battery is needed but don't make the mistake of buying a marine especially a deep cycle. A automotive starting battery is fine. BTW, you will be using a ski boat and NOT a tubing boat!!! Tubing is a no skill activity that just f***'s up the water for everyone else.   Get out on the ski's. Get out on the ski's. ------------- /diaries/details.asp?ID=1622" rel="nofollow - 54 Atom /diaries/details.asp?ID=2179" rel="nofollow - 77 Tique 64 X55 Dunphy Keep it original, Pete < |
Posted By: xarmypilot
Date Posted: March-28-2015 at 4:08pm
|
Hi Peter, Many thanks for the welcome and insight on the oil and battery. I guess my first step, aside from getting the boat here, is going to be fabricating an adapter for my hose to use for cooling in preparation for starting her up. If there is\was a little condensation in the oil, do you suppose it would still be ok to briefly use the old oil just to get the engine and trans warmed up? That would make it a lot easier to vampire out the old and replace it. I'm picking up the boat in a couple of weeks so I'll take plenty of pics of everything I do. I'm a huge fan to putting together pictorial DIY's so that others who want to perform their own maintenance have something to reference - been there\done that with my old BMW E46 coupe. Believe me, it helps. BTW, the Dunphy and Atom are both beautiful boats. The Dunphy almost reminds me of our old '68 Chris~Craft Grand Prix. Ah, the memories... Yup, I agree -tubing just mucks everything up for those who actually want to demonstrate a little coordination and not just suck lake water. |
Posted By: 8122pbrainard
Date Posted: March-28-2015 at 4:27pm
|
Rob, Getting the engine hot for a fluid change is fine with the existing oil. Regarding the hose connection, most here keep it simple and it works fine. We call it the "Tim's flush connection". It simply consists of a T with barbed fittings to cut into the suction hose to the RWP before the trans cooler and then a valve and GHT adapter for the hose. Don't worry about a valve or check valve back to the through hull pick up. The RWP will suck plenty and the excess will come out of the bottom of the boat. It's also a great hook up since you will not get any false idea of the condition of the RWP from the garden hose pressure. Do check the condition of the RWP rubber impeller. It would be best to install a new one. ------------- /diaries/details.asp?ID=1622" rel="nofollow - 54 Atom /diaries/details.asp?ID=2179" rel="nofollow - 77 Tique 64 X55 Dunphy Keep it original, Pete < |
Posted By: Gary S
Date Posted: March-28-2015 at 5:36pm
Hope I don't scare off the new people--- 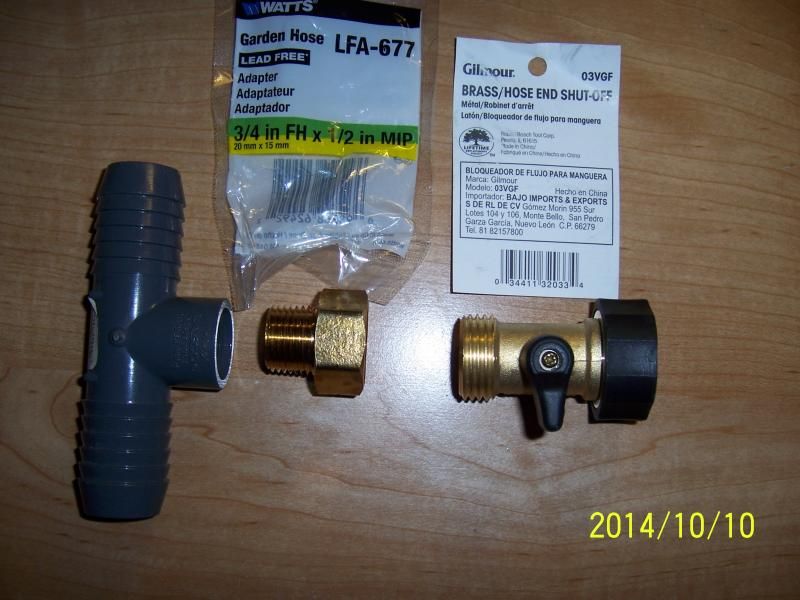 ------------- http://www.correctcraftfan.com/diaries/details.asp?ID=1711&sort=&pagenum=1&yrstart=1966&yrend=1970" rel="nofollow - 69 Mustang HM SS 95 Nautique Super Sport |
 Gary S wrote:
Posted By: Gary S
Date Posted: March-28-2015 at 5:41pm
|
Here is a pic of it mounted in mine,I have a quick connect hose fitting on here too 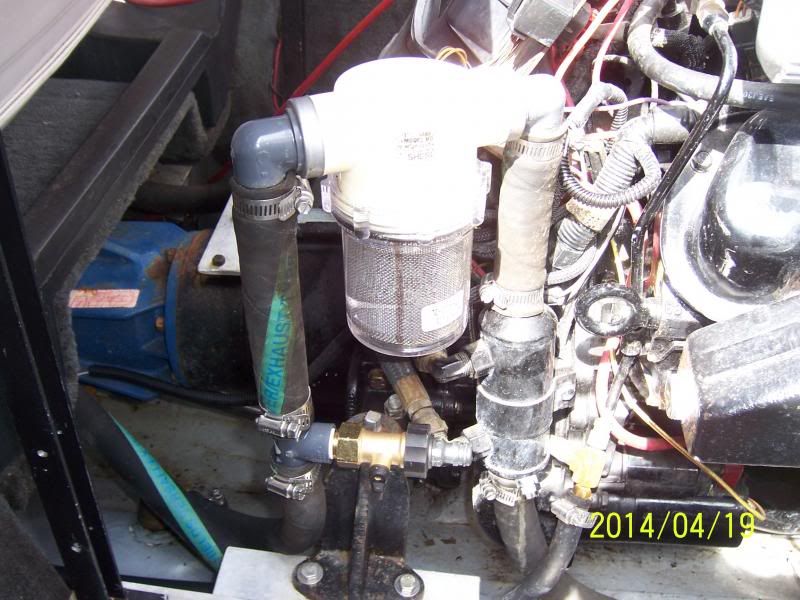 ------------- http://www.correctcraftfan.com/diaries/details.asp?ID=1711&sort=&pagenum=1&yrstart=1966&yrend=1970" rel="nofollow - 69 Mustang HM SS 95 Nautique Super Sport |
Posted By: 8122pbrainard
Date Posted: March-28-2015 at 6:22pm
|
Gary, What's all the white stuff on your engine? Looks like you had to unload a fire extinguisher! ------------- /diaries/details.asp?ID=1622" rel="nofollow - 54 Atom /diaries/details.asp?ID=2179" rel="nofollow - 77 Tique 64 X55 Dunphy Keep it original, Pete < |
Posted By: Gary S
Date Posted: March-28-2015 at 6:42pm
If you remember Pete I bought it in September and drove it once. Put it away for the winter,drove to Florida to clean out Dads house and came back to have my stint put in. I had no time at all to play with my new find. It was just dirty with dust and hard water deposits. The engine mounted breaker panel needs a repaint but on the whole it is cleaner now and should pass inspection at GL  ------------- http://www.correctcraftfan.com/diaries/details.asp?ID=1711&sort=&pagenum=1&yrstart=1966&yrend=1970" rel="nofollow - 69 Mustang HM SS 95 Nautique Super Sport |
Posted By: M3Fan
Date Posted: March-28-2015 at 7:25pm
You guys know that Timmy's boat came to him with the Timmy T on it right? Is it still rightfully the Timmy T? ------------- 2000 SN GT40 w/99 Graphics/Gel 2016 SN 200 OB 5.3L DI https://forum.fifteenoff.com |
Posted By: TRBenj
Date Posted: March-28-2015 at 8:01pm
|
Similar concept but I junked that thing right quick Joel. I didn't invent the concept, just perfected it. ;) |
Posted By: 8122pbrainard
Date Posted: March-28-2015 at 9:16pm
Yup, you did perfect the idea so we can still credit you. That's for reminding Joel!   ------------- /diaries/details.asp?ID=1622" rel="nofollow - 54 Atom /diaries/details.asp?ID=2179" rel="nofollow - 77 Tique 64 X55 Dunphy Keep it original, Pete < |
Posted By: M3Fan
Date Posted: March-28-2015 at 11:31pm
I think it's fair to say that vs. 10 years ago, literally, we all know so much more now than then. I'm comfortable saying I didn't know anything 10 years go vs. what I know now, largely because I read this board every day. It's important to remember your roots and where you came from. Keep the egos in check and don't forget that we are all standing on the shoulders of giants. ------------- 2000 SN GT40 w/99 Graphics/Gel 2016 SN 200 OB 5.3L DI https://forum.fifteenoff.com |
Posted By: SNobsessed
Date Posted: March-29-2015 at 9:11am
|
Back to the boat, I would take the spark plugs out, put some oil in each cyl (just an oz) & roll it over until oil pressure gage starts to wake up. Put the plugs back in, check that that choke is working, & she should fire up with a couple pumps of throttle. ------------- “Beer is proof that God loves us and wants us to be happy.” Ben Franklin |
Posted By: 8122pbrainard
Date Posted: March-29-2015 at 9:16am
Joel, You are absolutely correct.  I always say to myself and others that you can learn something every day of your life and still die stupid! I always say to myself and others that you can learn something every day of your life and still die stupid!  ------------- /diaries/details.asp?ID=1622" rel="nofollow - 54 Atom /diaries/details.asp?ID=2179" rel="nofollow - 77 Tique 64 X55 Dunphy Keep it original, Pete < |
Posted By: OldSchoolBlue84
Date Posted: March-29-2015 at 3:22pm
Had similar situation that my boat sat for 10 years. Did the same as above but manually turned over the engine with a breaker bar and then fired her up. Started right up ------------- Kostas http://www.correctcraftfan.com/diaries/details.asp?ID=6700&sort=&pagenum=1" rel="nofollow - 1984 Ski Nautique 2001 |
Posted By: xarmypilot
Date Posted: March-29-2015 at 5:41pm
|
Pete and Gary, many thanks for pointing me in the right direction so I can put together my own "Timmy T Chris" ("TTC adapter"?). Looks like I now have a reason to visit my favorite home supply store instead of just looking for something to turn a wrench on I'm definitely all about "No since in reinventing the wheel" and "keep it simple". That's why I'm here, there's a pool of knowledgeable folks out there who really want to pass on what they've learned to help the community. Back when I flying OV-1D's, there were less than 70 pilots rated on that aircraft in the entire military. It's funny, but at a recent reunion each of us were able to pick up on certain traits on specific aircraft even though we had never met face to fact. If you can tap into that kind of experience, it will likely save you a whole lot of heartache and $$$$ down the road later. |
Posted By: xarmypilot
Date Posted: March-29-2015 at 5:49pm
Are there any thoughts on Marvel's vs Sea Foam to break up any contaminants\chunky oil pieces? I'd like to get all the old oil changed out and reduce condensation as much as possible before putting in new fluids - I'm just a little concerned that just siphoning the engine\trans oil will leave too much Sea Foam or Marvel in the oil pan and contaminate the new oil. |
Posted By: xarmypilot
Date Posted: March-29-2015 at 6:08pm
Definitely a philosophy everyone could learn from. When I was younger and knew everything, when things went sideways I usually found that at some point I would end up saying to myself "DOH! Why on earth did I do that???" So with age, hopefully comes both experience (knowledge) AND wisdom. At least I'm at the point where I've learned that ignorance may be bliss, but its also painful and expensive
|
Posted By: 8122pbrainard
Date Posted: March-29-2015 at 6:13pm
I'm a firm believer in Marvel. It's basically a detergent similar to the detergent additives in oils and ATF. I've used it the oil as well as in the fuel. After I rebuilt the Hercules for my Atom, it sat for about ten years before the boat was ready. Cranked up the engine and found that I had a couple valves stuck open. Even with fogging for layup, this is common with a flat head since the oil runs down off the valve stem. I squirted Marvel down the cylinders and added it to the gas tank and in the fuel pump sediment bowl. I had a running engine in several minutes. I also use a mix of 50/50 Marvel and motor oil for fogging. That habit came from one of the old time mechanics when I worked at Watercraft sales back in the late 60's and early 70's. BTW, the best penetrating oil is a homemade mix of acetone and ATF or Marvel. ------------- /diaries/details.asp?ID=1622" rel="nofollow - 54 Atom /diaries/details.asp?ID=2179" rel="nofollow - 77 Tique 64 X55 Dunphy Keep it original, Pete < |
Posted By: xarmypilot
Date Posted: April-02-2015 at 1:01am
|
Looks like the boat should be here Saturday evening - Pix should be up by Sunday and hopefully a vid of the 1st start (if I play my cards right). Sure hope the tires on the trailer are good to go for a 120-mile jaunt. If not, I'm bringing a set of newer mounted ones...just in case. Looks like I might actually have something in my sig block next week
|
Posted By: skutsch
Date Posted: April-02-2015 at 1:32am
|
Rough week at work, missed a ton of new posts... Welcome to CCFan, can't wait to see pictures of your "new" boat. What did you fly in the army? There are a few pilots here, and at least one gunship pilot too. Anyway - can't wait to see the pics! ------------- Our http://www.correctcraftfan.com/diaries/details.asp?ID=4669" rel="nofollow - 98 Sport Nautique My Dad's 63 Ski N |
Posted By: xarmypilot
Date Posted: April-02-2015 at 11:22am
Hi Steve, many thanks for the warm welcome! It's great to know that I could probably get a PIREP from some of the other forum members if ever needed . I started out flying eggbeaters, OH-58D's and LOH-6's then I transitioned over to fixed-wing, primarily OV1-D's and finally the RC-12 GCS. 
|
Posted By: skutsch
Date Posted: April-02-2015 at 1:12pm
|
Excellent! That is some very diverse flying! Have a safe trip picking up the boat this weekend. BTW, Joel posted a great link about picking up a new (used) trailer, you can find it here: http://www.correctcraftfan.com/forum/forum_posts.asp?TID=35568&KW=&title=new-boat-trailer-pickup-checklist" rel="nofollow - New Boat/Trailer Pickup Checklist ------------- Our http://www.correctcraftfan.com/diaries/details.asp?ID=4669" rel="nofollow - 98 Sport Nautique My Dad's 63 Ski N |
Posted By: xarmypilot
Date Posted: April-02-2015 at 4:30pm
|
Thanks Steve, Joel's post definitely helped jar some of the cobwebs loose. I had overlooked the cotter pins and spare trailer light modules\bulbs. I think I'm going the "crossed fingers" route with the bearings on this trip. Hopefully a visual inspection will do. I just can't see going down that rabbit hole in my cousin's driveway. If the bearings are showing a lot of wear or play, I'll just flat bed that sucker up to my garage later in the week. |
Posted By: TRBenj
Date Posted: April-02-2015 at 4:39pm
|
Is it an original trailer? If so, here are the bearings you need... Just in case they're toast. I always travel with a spare set, that seems to be a good luck charm (never had a bearing failure). LM67048 25580 10-10 seal (this may be an Etrailer part number), it's the standard 2.25" seal for a 5200lb (6x5.5") hub. |
Posted By: xarmypilot
Date Posted: April-03-2015 at 10:33pm
|
Thanks Tim for the replacement bearing info - that task, I'm afraid, is going to be a given before hitting the water. I'm 99.9% sure the trailer is the '87 OEM CC SN2001 trailer. It's been stored in an attached garage so no real concerns about it seeing a significant amount of moisture. Still, even if the bearing were repacked the day before it was stored I know there's going to be some breakdown of that grease. Any thoughts on it making a 55-60mph, 120-mile highway trek before repacking? Is there anything short of pulling a hub apart that I can do to make an semi-educated guess as to whether it's a good idea to chance it? As Gen George Patton once said "Calculated risks are quite different from being rash." |
Posted By: SNobsessed
Date Posted: April-04-2015 at 12:30am
|
It doesn't take very long to pull a hub off, but you could just pull the dust cap & cotter pin off to get to the outer bearing without removing wheel (use jack stand of course). If the outer bearing & race are in good shape, chances are the inner is too. Not sure if '87 axles are thru-lube; if they are you can easily grease both inner & outer without removing hub. ------------- “Beer is proof that God loves us and wants us to be happy.” Ben Franklin |
Posted By: 8122pbrainard
Date Posted: April-04-2015 at 12:56am
If not thru-lube and as long as the caps are off, put a set of Bearing Buddies on. ------------- /diaries/details.asp?ID=1622" rel="nofollow - 54 Atom /diaries/details.asp?ID=2179" rel="nofollow - 77 Tique 64 X55 Dunphy Keep it original, Pete < |
Posted By: xarmypilot
Date Posted: April-04-2015 at 8:23am
I agree 100%, after thinking on it I just couldn't rationalize dragging that joker 120-miles on a wing and a prayer. 20-30 minutes in the driveway is a cheap and easy investment compared to littering up the highway and making a spectacle for the evening news. |
Posted By: xarmypilot
Date Posted: April-04-2015 at 8:35am
Now that I think about it, I'd actually be pretty surprised if there wasn't a set of bearing buddies on there. My late uncle was absolutely meticulous when it came to stuff like that. He was the epitome of the saying "a stitch in time saves 9". Hopefully I'll get to see a benefit from that philosophy. |
Posted By: TRBenj
Date Posted: April-04-2015 at 8:45am
| 87 will not likely have the greasable spindles (mine doesnt). Id jack each side up and make sure the hub is sufficiently tight, and make sure its not too loud (no grinding) when spun. Take a look at the grease and if reasonable, drag it home. If they look/feel/sound bad, youre going to wish you had spare parts to rebuild them on the spot. |
Posted By: xarmypilot
Date Posted: April-05-2015 at 1:34pm
|
We made it back with everything in one piece. In fact, aside from losing a trailer hub cap somewhere on I-69, the trip up north and back was absolutely uneventful. More good news - the trailer in question was a '90 Shorelander with a lube-thru axle and bearingbuddies. I pulled out my grease gun and hit each side equally with a liberal amount of grease. We hooked everything up, did a quick lights check then went for a 5-mile drive at 30-40 mph to warm up the axle. After we returned, we hit each side again with the grease and viola! The majority of old gummy stuff was pushed out and replaced. On this Easter Sunday, I just wanted give to a big "thank you" to everyone who provided input. With the all knowledge sharing, I was able to ensure that I was adequately prepared to meet the majority of potential showstoppers. Here's a few quick pic's of what I'll be working with over the next few weeks.  Time for a short test drive!  These look awful without the hub caps   The vinyl is a lot more brittle then it looks  I found all the plugs, keys, and even the oil quick drain hose in a plastic bag under the observers seat  The swim platform is going to require some work...  All in all, the engine bay was pretty clean  Aside from wet sanding, buffing and polishing the hull, the port-side graphics are going to eventually need some real work. If I don't keep to the original gray scheme, I'm thinking dark blue...  |
Posted By: SNobsessed
Date Posted: April-05-2015 at 2:14pm
|
Looks great! Glad you had a good trip home. I remember pulling mine home - surge brake coupler was clunking at every little bump the whole hour. ------------- “Beer is proof that God loves us and wants us to be happy.” Ben Franklin |
Posted By: xarmypilot
Date Posted: April-08-2015 at 11:25am
Anyone have any good tips for putting the two halves of the RWP back together after changing the impeller? I've pulled the pump and removed\replaced the old impeller, o-ring and gasket, but I'm having a heck of a time getting enough thread to the screws in order to put pump back together. They're not stripped and initially I thought I might have purchased the wrong kit from Nautiqueparts.com, but everything I can find confirms the correct part number (09959K). Could it be that the new impeller just has that much more thickness to it?   ------------- '87 SN 2001 http://mbbw.com/WIP/DSCN9620.JPG" rel="nofollow - '68 Chris~Craft Grand Prix (Past family boat) '72 Checkmate Mx16 (Past family boat) "Speed is life, altitude is life insurance" |
Posted By: Hollywood
Date Posted: April-08-2015 at 11:43am
|
Kind of confused. I've never had a problem. Put it together the way you had it and post a picture. ------------- |
Posted By: spiralhelix
Date Posted: April-08-2015 at 12:10pm
| have your screws been modified/shortened? mine just barely end up sticking out past the backside of the housing when fully seated. Dawn dish soap on the fins to get it to slide in easier. I then add the "o" ring, plate, gasket, put the shaft into the impeller and spin it until the key meets the slot and it drops in. line up the screws and tighten her down, each screw a bit at a time. Just make sure you orient the impeller in the correct direction. |
Posted By: Hollywood
Date Posted: April-08-2015 at 12:49pm
|
No matter how long the screws are you should be able to close up the housing by hand. A fresh impeller will "right" itself when you start the engine. ------------- |
Posted By: tjca77
Date Posted: April-08-2015 at 1:08pm
| Did this last weekend, a mark on the top of the pump helps make sure you are not installing it backwards. There are some good pictures on the aquaskier.com website of this install. I was surprised at how easy this part was to install. |
Posted By: 8122pbrainard
Date Posted: April-08-2015 at 7:35pm
I agree. Have you measured the old to new thickness thru the bore? ------------- /diaries/details.asp?ID=1622" rel="nofollow - 54 Atom /diaries/details.asp?ID=2179" rel="nofollow - 77 Tique 64 X55 Dunphy Keep it original, Pete < |
Posted By: xarmypilot
Date Posted: April-08-2015 at 9:57pm
I took Kevin's advice and pulled the RWP back apart to get some photos. After zooming in, I noticed that one of the threaded screw holes was pretty smooth and another on it's way. Called my cousin to see if he was aware of this and sure enough, this situation wasn't any news to him   "Good screw hole"  Screw hole in the process of ticking me off  The screw hole that makes me want to throw the RWP across my %$#@! garage In any event, the screws aren't the problem now, it's the RWP back housing. Anyone have any previous experience with using a tap and die set on the housing to re-thread the screw holes? Any idea if going "just a tad" larger is a problem? If not, what's a good size? I'm pretty sure that the screw holes are brass, so I'm a little nervous about just going to town here... |
Posted By: TRBenj
Date Posted: April-08-2015 at 10:04pm
| Go with longer bolts and nuts on the back side if necessary. |
Posted By: xarmypilot
Date Posted: April-08-2015 at 10:12pm
Yes, I agree most definitely! But if you look at pic #3, a longer bolt ain't gonna fix that... |
Posted By: skutsch
Date Posted: April-08-2015 at 10:20pm
I am pretty sure someone is going to have a hey day with this post, I edited up to make it all the easier for you guys... WRT the actual problem at hand, I would do what Tim suggested with a bolt and nut or, re-tap all the next size up, that way you shouldn't have to worry about which bolt fits. Brass is soft, so tapping should not be an issue, just be very careful threading and tightening. ------------- Our http://www.correctcraftfan.com/diaries/details.asp?ID=4669" rel="nofollow - 98 Sport Nautique My Dad's 63 Ski N |
Posted By: xarmypilot
Date Posted: April-08-2015 at 10:37pm
Thanks, Steve. The advise is much appreciated - glad to know that tapping brass shouldn't be problematic. I'm right there with you regarding using care when threading and tightening into soft metals. ------------- '87 SN 2001 http://mbbw.com/WIP/DSCN9620.JPG" rel="nofollow - '68 Chris~Craft Grand Prix (Past family boat) '72 Checkmate Mx16 (Past family boat) "Speed is life, altitude is life insurance" |
Posted By: 8122pbrainard
Date Posted: April-09-2015 at 12:29am
|
I feel the original bolts are 1/4-20. You can tap to 5/16-18 but, there's no reason Tim's method of longer bolts and nut's on the back side won't work ether. Actually, I would prefer to see the longer bolts since there's not much material in the ears of the pump body to go larger. ------------- /diaries/details.asp?ID=1622" rel="nofollow - 54 Atom /diaries/details.asp?ID=2179" rel="nofollow - 77 Tique 64 X55 Dunphy Keep it original, Pete < |
Posted By: xarmypilot
Date Posted: April-09-2015 at 10:53pm
Pete, you're right on the money. The one that looks like it's an adjusting screw is 1" long and the other two appeared to be 3\4" - all were 1/4-20. I checked a number of taps and settled on 1\4-28 - which just happened to coincide with the three 1" fasteners I had laying around. The RWP is now solidly back together and re-installed with a brand new Sherwood impeller and gasket. I didn't go with the nut on the back idea as there really wasn't sufficient room to get a turn on the nut to ensure it was tightly seated to the housing. In any event, there's plenty of "meat" in the new threads and the longer bolts make disasembly\reassembly alot easier. Thanks to all who added some input- I'd rather ask once then have to call for a tow... ------------- '87 SN 2001 http://mbbw.com/WIP/DSCN9620.JPG" rel="nofollow - '68 Chris~Craft Grand Prix (Past family boat) '72 Checkmate Mx16 (Past family boat) "Speed is life, altitude is life insurance" |
Posted By: 8122pbrainard
Date Posted: April-09-2015 at 11:12pm
Rob, I hope you gained thread engagement with the longer 1/4" bolts since you didn't tap for a 5/16". Yes, you are correct that adding nuts on the backside does require spot facing to eliminate the casting radius so a nut will fit. ------------- /diaries/details.asp?ID=1622" rel="nofollow - 54 Atom /diaries/details.asp?ID=2179" rel="nofollow - 77 Tique 64 X55 Dunphy Keep it original, Pete < |
Posted By: xarmypilot
Date Posted: April-15-2015 at 12:43am
Busy day today, just had to show off some wood  The swim platform came out far better than anticipated - the hues in the Teak almost look holographic. Also got the observer's seat bottom, stern seat bottom and boat cover over to the upholsterers. I'm going with a bottom seat color theme in gray. I've asked them to match the gray in the stripe then replace skins & refoam both seats. FWIW, my cousin corrected a misunderstanding today, turns out the boat had been stored in a garage for 19yrs, not 10. Speaking with some of the "old timers" on the lake, they say that's not a problem if climate controlled, not stored in sunlight and properly prepped. Fingers crossed, I'm hoping for a first start this weekend! Oh, that reminds me - check fire extinguisher! The swim platform came out far better than anticipated - the hues in the Teak almost look holographic. Also got the observer's seat bottom, stern seat bottom and boat cover over to the upholsterers. I'm going with a bottom seat color theme in gray. I've asked them to match the gray in the stripe then replace skins & refoam both seats. FWIW, my cousin corrected a misunderstanding today, turns out the boat had been stored in a garage for 19yrs, not 10. Speaking with some of the "old timers" on the lake, they say that's not a problem if climate controlled, not stored in sunlight and properly prepped. Fingers crossed, I'm hoping for a first start this weekend! Oh, that reminds me - check fire extinguisher!Before  After  Detail  ------------- '87 SN 2001 http://mbbw.com/WIP/DSCN9620.JPG" rel="nofollow - '68 Chris~Craft Grand Prix (Past family boat) '72 Checkmate Mx16 (Past family boat) "Speed is life, altitude is life insurance" |
Posted By: 8122pbrainard
Date Posted: April-15-2015 at 7:36am
|
Rob, Good luck on the start up. The platform looks great but I'd like to ask what you used on it. It looks pretty glossy for a oil. Hopefully you didn't use a hard finish. ------------- /diaries/details.asp?ID=1622" rel="nofollow - 54 Atom /diaries/details.asp?ID=2179" rel="nofollow - 77 Tique 64 X55 Dunphy Keep it original, Pete < |
Posted By: xarmypilot
Date Posted: April-15-2015 at 11:29am
Thanks Pete. I used 3-4 coats of Starbrite Teak oil for the base then 3 coats of TotalBoat Marine Wood Finish in gloss to make it "pop". It looks kinda slick, but you actually get pretty good traction on it. I know, I had to test it to make sure I wasn't inviting an accident ------------- '87 SN 2001 http://mbbw.com/WIP/DSCN9620.JPG" rel="nofollow - '68 Chris~Craft Grand Prix (Past family boat) '72 Checkmate Mx16 (Past family boat) "Speed is life, altitude is life insurance" |
Posted By: Hollywood
Date Posted: April-15-2015 at 12:04pm
|
That's gonna be slick in the water. Oil, and oil only. ------------- |
Posted By: phatsat67
Date Posted: April-15-2015 at 12:11pm
|
Agree, Teak is meant for oil and that's the way it is. ------------- |
Posted By: xarmypilot
Date Posted: April-15-2015 at 5:38pm
Nope, it's not slick at all. There's two finish formulations available from this company, one that is strictly "above waterline" - which is more like a lacquer and the other that's made for swim platforms and the like. I would have to say that there's probably more friction being generated now than if the Teak was simply oiled. Zach, I'm sure I'll see you on the water sometime this summer. I'll let you be the judge ------------- '87 SN 2001 http://mbbw.com/WIP/DSCN9620.JPG" rel="nofollow - '68 Chris~Craft Grand Prix (Past family boat) '72 Checkmate Mx16 (Past family boat) "Speed is life, altitude is life insurance" |
Posted By: Hollywood
Date Posted: April-15-2015 at 5:43pm
|
I'm struggling to come up with any finish that makes it pop that wouldn't be slippery. Anyway, good luck. Zach will have to let know how it goes. ------------- |
Posted By: Smithfamily
Date Posted: April-20-2015 at 8:50pm
|
Rob, Looking Great!! How brittle is the vinyl, and did you try treating it with anything? It sure looks nice. ------------- Js |
Posted By: 8122pbrainard
Date Posted: April-20-2015 at 10:16pm
Rob, I asked about the coating worried about it sticking and not how slippery it was. I have never seen anything considered a hard coating stick to Teak. Time will tell. ------------- /diaries/details.asp?ID=1622" rel="nofollow - 54 Atom /diaries/details.asp?ID=2179" rel="nofollow - 77 Tique 64 X55 Dunphy Keep it original, Pete < |
Posted By: xarmypilot
Date Posted: April-20-2015 at 10:51pm
Yep Pete -That's a fact! FYI - I did get a little nervous about it being slippery over the weekend so I pulled it off and watered it down with about an ounce of Dawn mixed in just to check it out. It passed my barefoot "Electric boogie" test no problem My buddy uses this stuff on his ProStar's platform and swears by it (then swears AT his boat..). ------------- '87 SN 2001 http://mbbw.com/WIP/DSCN9620.JPG" rel="nofollow - '68 Chris~Craft Grand Prix (Past family boat) '72 Checkmate Mx16 (Past family boat) "Speed is life, altitude is life insurance" |
Posted By: xarmypilot
Date Posted: April-25-2015 at 1:40am
|
Quick update - It was a very good day today. Took half a day off of work and, with a little help from the fuel, fire and air gods, I was able to get in the 1st start and run up since 1996! I think it only took 2-3 turns of the key before she roared back to life. Nice thing about Ford's 351, they do like to run! Initially she was a bit smokey for the first 5 minutes, probably due to the half ounce or so of Marvel I sprayed down the plug wells after I changed them. Transmission felt and sounded smooth and engine temps stayed around 150-160 after 30 minutes at idle. Before starting I was a bit concerned about having to adjust the carb, but the engine idled steady at about 900 RPM, so I think I'm in the clear - just have to wait until I put it under load. As a side note, as I was reinserting the water plugs, I noticed a red hose attached to the engine listing eye on one end and at the oil pan at the other. Anyone have an idea what that is for or if it need to be attached? I can seem the find it in the PCM manual so I've attached a pic  I'm thinking it's a convenient oil drain hose, but I'd rather not "guess"... There's also an additional plug I can't account for. I believe it to be a spare or maybe a extra drain plug of some type. It's awfully clean to have been used regularly and I can account for the other 5 plugs that I had re-installed. Thoughts? Red host attached to lifting eye  Opposite end, attached to oil pan  Extra plug?  ------------- '87 SN 2001 http://mbbw.com/WIP/DSCN9620.JPG" rel="nofollow - '68 Chris~Craft Grand Prix (Past family boat) '72 Checkmate Mx16 (Past family boat) "Speed is life, altitude is life insurance" |
Posted By: Gary S
Date Posted: April-25-2015 at 2:00am
|
Good deal now if it would only warm up! Your right on the hose,remove the drain in the bottom of the boat shove the hose thru,remove the cap and drain into your favorite container. Word of caution,don't put it in gear without having water run on the strut bearing,they are rubber and water lubricated. ------------- http://www.correctcraftfan.com/diaries/details.asp?ID=1711&sort=&pagenum=1&yrstart=1966&yrend=1970" rel="nofollow - 69 Mustang HM SS 95 Nautique Super Sport |
Posted By: skutsch
Date Posted: April-25-2015 at 8:44am
|
Right on with the oil drain hose, I remember going through my engine on the 98 sport for the first time and finding the same hose. Had no idea what it was, the Ford Interceptor 312 on my Dad's Ski Nautique had no such convenience item. As for that plug, it sure looks like a manifold plug (to drain manifolds - winterization - at the aft end of each manifold), of course it depends on what size it is. If it is small it could also be the plug that goes in the bottom of the J-pipe below the water pump, but those are typically brass and a hex head. ------------- Our http://www.correctcraftfan.com/diaries/details.asp?ID=4669" rel="nofollow - 98 Sport Nautique My Dad's 63 Ski N |
Posted By: SNobsessed
Date Posted: April-25-2015 at 9:03am
|
If there is no water gushing out somewhere, then that is must be a spare plug. Looks new too. ------------- “Beer is proof that God loves us and wants us to be happy.” Ben Franklin |
Posted By: xarmypilot
Date Posted: April-25-2015 at 9:48am
Ahh, that's right!  You stick the hose through the bilge drain so you can empty the oil without fear of contaminating the bilge with spilled waste oil. Now that I think about it, I guess I probably looked a little silly yesterday siphoning the oil through the dipstick... You stick the hose through the bilge drain so you can empty the oil without fear of contaminating the bilge with spilled waste oil. Now that I think about it, I guess I probably looked a little silly yesterday siphoning the oil through the dipstick... The plug's about the size of the two water plugs that insert into the back of the exhaust risers. Maybe just a tad bigger. I'm thinking it may be a spare bilge drain plug, the one thing that's throwing me off is that one end looks keyed for a 1/2" drive ratchet. That's not something you'd typically see in a bilge drain plug as the one I have in now is brass and has the typical "T" handle so you can install\uninstall by hand. Well, there's no gushing water when running or weird temp fluctuations so I'll take that as a positive sign. . ------------- '87 SN 2001 http://mbbw.com/WIP/DSCN9620.JPG" rel="nofollow - '68 Chris~Craft Grand Prix (Past family boat) '72 Checkmate Mx16 (Past family boat) "Speed is life, altitude is life insurance" |
Posted By: 8122pbrainard
Date Posted: April-25-2015 at 10:44am
The sucking the oil out of the dip stick tube is a good way especially if the boat is in the water! I use the method since it's harder to get a drain pan under the boat if their'r hanging in the boathouse or on the lift.------------- /diaries/details.asp?ID=1622" rel="nofollow - 54 Atom /diaries/details.asp?ID=2179" rel="nofollow - 77 Tique 64 X55 Dunphy Keep it original, Pete < |
Posted By: Gary S
Date Posted: April-25-2015 at 11:05am
|
No reason to ever pull oil out of the dipstick tube when you have a drain hose Pete,hook the pump to the hose. Go back and edit your post,you made it real easy for Quinner,HW and me ------------- http://www.correctcraftfan.com/diaries/details.asp?ID=1711&sort=&pagenum=1&yrstart=1966&yrend=1970" rel="nofollow - 69 Mustang HM SS 95 Nautique Super Sport |
Posted By: 8122pbrainard
Date Posted: April-25-2015 at 12:07pm
Gary, I took your advice. The thought did cross my mind but I had to run for an errand. Yup, CQ and HW would have had a field day with the statement! Interesting concept with the drain hose. I had never thought of it. I'll have to do some thinking about the needed parts to adapt the super sucker to the drain hose. and then at least I can use the method on one of my boats. The Tique I'd have to add the drain hose to the pan drain which isn't a problem but with the Atom, I can't With old engines that shared engine oil with the trans, the oil does need to be sucked out of the trans since it's the lowest point. ------------- /diaries/details.asp?ID=1622" rel="nofollow - 54 Atom /diaries/details.asp?ID=2179" rel="nofollow - 77 Tique 64 X55 Dunphy Keep it original, Pete < |
Posted By: Gary S
Date Posted: April-25-2015 at 3:22pm
Pete I just used some things in the junk drawer,a piece of vacuum hose and a 1/4" barbed hose connector. All 3 boats use the same size drain hose so that makes it easy too. ------------- http://www.correctcraftfan.com/diaries/details.asp?ID=1711&sort=&pagenum=1&yrstart=1966&yrend=1970" rel="nofollow - 69 Mustang HM SS 95 Nautique Super Sport |
Posted By: 8122pbrainard
Date Posted: April-25-2015 at 5:00pm
|
Gary, One year on my 312, I did play around attaching the supper sucker directly to the dip stick tube. I didn't have the proper size rubber hose so it kept sucking air at that connection. I'm going to give it another try. ------------- /diaries/details.asp?ID=1622" rel="nofollow - 54 Atom /diaries/details.asp?ID=2179" rel="nofollow - 77 Tique 64 X55 Dunphy Keep it original, Pete < |
Posted By: xarmypilot
Date Posted: April-26-2015 at 12:21pm
|
Got back from church this morning and thought I'd dedicate most of the day to getting to the non-engine items on my checklist. At the top of my list is getting the steering back into order. Right now, the steering is absolutely "stuck" in position - zero movement at the rudder. While I'm not sure if it's a problem with the steering cable or ruder packing, my thought is that since the boat's been sitting for 19 years, I think that steering would be benefited if the rudder was lubed and the box re-packed anyway, if only as a preventative measure. My question is, since I've removed the safety wire, the clamp bolt and the bolt at the top of the shaft, shouldn't the rudder just drop out? It doesn't, but given that the shaft is probably bone-dry, that doesn't surprise me much. What's the best way to free it up? I don't want to just get crazy with a rubber mallet on the rudder to loosen it and take a chance of making the job any harder by warping the shaft or invite any potential leaking. Should I try to pry the control arm (?) off of the shaft first? I've been following this helpful http://www.correctcraftfan.com/forum/forum_posts.asp?TID=25087" rel="nofollow - DIY Pic of rudder box bolts removed  ------------- '87 SN 2001 http://mbbw.com/WIP/DSCN9620.JPG" rel="nofollow - '68 Chris~Craft Grand Prix (Past family boat) '72 Checkmate Mx16 (Past family boat) "Speed is life, altitude is life insurance" |
Posted By: Gary S
Date Posted: April-26-2015 at 12:34pm
|
I'd pull the arm off,loosen the gland nut and get underneath the boat and turn and pull the rudder until it comes out. Should not have to pound and most of the time they want to fall out when everything is loose. Yours might be stuck in the packing though. ------------- http://www.correctcraftfan.com/diaries/details.asp?ID=1711&sort=&pagenum=1&yrstart=1966&yrend=1970" rel="nofollow - 69 Mustang HM SS 95 Nautique Super Sport |
Posted By: xarmypilot
Date Posted: April-26-2015 at 1:42pm
Thanks Gary, that worked quite nicely. The helm is still locked into position and won't budge. I'm going to search to see if there are any threads (with pix ) that cover the steering cable and components to attempt some additional troubleshooting. If anyone has some tips or links to share, it'd be appreciated. ------------- '87 SN 2001 http://mbbw.com/WIP/DSCN9620.JPG" rel="nofollow - '68 Chris~Craft Grand Prix (Past family boat) '72 Checkmate Mx16 (Past family boat) "Speed is life, altitude is life insurance" |
Posted By: Bri892001
Date Posted: April-26-2015 at 2:09pm
|
I just so happen to have a thread like that with pics, you may have a rotary and mine is a rack and pinion style, but some similarities exist. I'd unbolt/disconnect the steering cable from the helm and then see if the wheel turns. If the wheel then turns easily, it's likely your steering cable is frozen. http://www.correctcraftfan.com/forum/forum_posts.asp?TID=31166&title=steering-cable-replacement-with-pictures" rel="nofollow - http://www.correctcraftfan.com/forum/forum_posts.asp?TID=31166&title=steering-cable-replacement-with-pictures |
Posted By: xarmypilot
Date Posted: April-26-2015 at 2:16pm
|
Thanks, Brian - very good advice. Believe it or not, I was actually reading your post before I saw your reply I wonder, if the cable happens to be frozen, is that a "must replace" task or is there some method I can try to attempt to free it up? ------------- '87 SN 2001 http://mbbw.com/WIP/DSCN9620.JPG" rel="nofollow - '68 Chris~Craft Grand Prix (Past family boat) '72 Checkmate Mx16 (Past family boat) "Speed is life, altitude is life insurance" |
Posted By: Bri892001
Date Posted: April-26-2015 at 2:23pm
| To my knowledge it's a must replace. Mine wasn't even fully seized but they can start to drag after a while. It would probably be more work trying to free it up than to replace it. |
Posted By: Gary S
Date Posted: April-26-2015 at 2:24pm
|
Yes you have to replace. Not too big a job on that boat, you tie a rope on the old one and pull it out from the back. Use the rope to pull in the new. Did my Mustang by myself in no time at all. V drive took quite awhile, the whole floor had to come out ------------- http://www.correctcraftfan.com/diaries/details.asp?ID=1711&sort=&pagenum=1&yrstart=1966&yrend=1970" rel="nofollow - 69 Mustang HM SS 95 Nautique Super Sport |
Posted By: xarmypilot
Date Posted: April-26-2015 at 4:56pm
|
Thanks to all for the recommendations. Nautiqueparts.com has the cable listed at $309 and N3 is closed today - any better recommendations where I can find a decent one (the right one) on a budget? Part #'s would be very helpful as well. I've got wiry arms so I'm going to try removing\replacing the cable without pulling the fuel cell - but something tells me that is going to make getting the cable disconnected from the tiller a real PITA... ------------- '87 SN 2001 http://mbbw.com/WIP/DSCN9620.JPG" rel="nofollow - '68 Chris~Craft Grand Prix (Past family boat) '72 Checkmate Mx16 (Past family boat) "Speed is life, altitude is life insurance" |
Posted By: Gary S
Date Posted: April-26-2015 at 6:00pm
|
There are certain years that the cable was a special length only available thru a dealer,someone will know if yours is in that range. Zach, phatsat67 on here, is N3's part manager and since they are a site sponcer does provide us with a discount ------------- http://www.correctcraftfan.com/diaries/details.asp?ID=1711&sort=&pagenum=1&yrstart=1966&yrend=1970" rel="nofollow - 69 Mustang HM SS 95 Nautique Super Sport |
Posted By: xarmypilot
Date Posted: April-26-2015 at 6:58pm
Thanks Gary, +1 to you for reminding me about the sponsors Yeah, N3's always been good to me and quite frankly, you won't have much of a community unless you support one another.I think I remember reading that the steering cable on 82-90 boats are 17.5 ft, a size that's specific to CC only. The old cable is out now...  ...and ready for the new one.  ------------- '87 SN 2001 http://mbbw.com/WIP/DSCN9620.JPG" rel="nofollow - '68 Chris~Craft Grand Prix (Past family boat) '72 Checkmate Mx16 (Past family boat) "Speed is life, altitude is life insurance" |
Posted By: Bri892001
Date Posted: April-26-2015 at 7:18pm
| Wow, you got right after it! |
Posted By: xarmypilot
Date Posted: April-26-2015 at 7:55pm
Yes sir, your thread helped a lot <thanks again> and no since waiting around for a part when I can be quasi-productive today. Frankly it wasn't all that difficult to remove once I got past all the zip ties. Now getting the new one installed and adjusted so the steering is "right" may be a whole different story...guess we'll see soon enough!  ------------- '87 SN 2001 http://mbbw.com/WIP/DSCN9620.JPG" rel="nofollow - '68 Chris~Craft Grand Prix (Past family boat) '72 Checkmate Mx16 (Past family boat) "Speed is life, altitude is life insurance" |
Posted By: skutsch
Date Posted: April-26-2015 at 9:22pm
|
I know you are going in the direction of replacing it and that is GREAT. So my comment is for someone in the future reading this. There are lots of places you can cut corners on boats, patching them for one more year, etc. Steering should NEVER be one of those places. Way to much can happen when a steering cable goes, I have seen way to many people get thrown across the boat resulting in busted ribs or worse, get completely ejected. Ok, getting off the soap box, sorry for the preaching. ------------- Our http://www.correctcraftfan.com/diaries/details.asp?ID=4669" rel="nofollow - 98 Sport Nautique My Dad's 63 Ski N |
Posted By: xarmypilot
Date Posted: April-26-2015 at 10:21pm
Amen! It's that time of year to begin getting your head right. It's not just the owner's safety that's at stake, but everyone who shares the water with you could be at risk. I watched a runaway cruiser almost t-bone a Sunfish full of kids once, all because the owner failed to replace a required safety stop. Imagine having to explain that one to a parent. ------------- '87 SN 2001 http://mbbw.com/WIP/DSCN9620.JPG" rel="nofollow - '68 Chris~Craft Grand Prix (Past family boat) '72 Checkmate Mx16 (Past family boat) "Speed is life, altitude is life insurance" |
Posted By: xarmypilot
Date Posted: May-01-2015 at 12:21am
|
I'll be picking up a new "correct spec" steering cable and packing material from Zach at N3 tomorrow and installing in the afternoon. This got me to thinking - how would you install the cable then when finished, ensure that the wheel is in the "straight position" when the rudder is true? I've poured through the FAQ's and had been using Bret's DIY as a guide, but don't see any adjustment recommendations after install to ensure the wheel reflects the rudder position. The pic below illustrates the wheel position I want when the rudder is totally straight. I'm assuming it would it just be a "simple" tiller adjustment, but as with any safety related device, it's best to ask the experts who've been down this road a couple of times. - Oh yeah, looks like I have to get to that inverted center cap too at some point. Guess too many years playing Army makes me want to set everything "dress right, dress".  ------------- '87 SN 2001 http://mbbw.com/WIP/DSCN9620.JPG" rel="nofollow - '68 Chris~Craft Grand Prix (Past family boat) '72 Checkmate Mx16 (Past family boat) "Speed is life, altitude is life insurance" |
Posted By: 8122pbrainard
Date Posted: May-01-2015 at 7:43am
|
You center the helm wheel, center the rudder and any adjustment is done with the tube block clamp at the aft end of the cable. ------------- /diaries/details.asp?ID=1622" rel="nofollow - 54 Atom /diaries/details.asp?ID=2179" rel="nofollow - 77 Tique 64 X55 Dunphy Keep it original, Pete < |
Posted By: TRBenj
Date Posted: May-01-2015 at 9:44am
| Pete is half right. The clamp block and clamp tube placement determines whether or not you have equal rudder travel in both directions. Whether or not the wheel is straight when the rudder is pointing straight (or boat is moving straight) is not related. That is a function of the wheel angle when you start feeding the cable into the helm. It may take a few tries and a water test to be sure you've got it nailed. |
Posted By: SNobsessed
Date Posted: May-01-2015 at 9:51am
|
To get the steering wheel 'level' you have to engage the cable going into the helm at a given spot in its rotation.. This takes trial & error - best to have a helper look for level as you will be laying on your back spouting 4 letter words about the 4th iteration. ------------- “Beer is proof that God loves us and wants us to be happy.” Ben Franklin |
Posted By: xarmypilot
Date Posted: May-01-2015 at 11:34am
Thanks to everyone for the tips We'll see how it goes this afternoon.
Chris, sounds like at some point you must've heard me when I'm working...  ------------- '87 SN 2001 http://mbbw.com/WIP/DSCN9620.JPG" rel="nofollow - '68 Chris~Craft Grand Prix (Past family boat) '72 Checkmate Mx16 (Past family boat) "Speed is life, altitude is life insurance" |
Posted By: xarmypilot
Date Posted: May-04-2015 at 12:11am
|
What a great day it was on the lake today! After all the preparation, steering cable stress and trailer madness, everything finally came together and I was able to get out and have a relatively flawless 1st run. First impression is that this is a fairly quick "bone stock" boat. It's no BareFooter, but I was constantly able to pull down 47-48 (gps measured) mph and hold it there. Maybe after a good buffing and waxing, I might be able to squeeze 2-3 more mph outta her. One thing I noticed was that, after a 20 minute warm up on the water, she still acted like she wanted to stall out of the hole. So I drove it like I stole it for a good 15-20 minutes then tried again - success! My best guess is that there was probably some crud left in the fuel system or in the carb that was blown out on my romp. Thankfully, I didn't have any such problem the rest of the day... In my eyes, that's not too shabby considering the boat's been stored for 19 years and there was no "real" engine or carb work was done beyond fluids and cleaning. I owe Zach (phatsat67) from N3 a big thanks for saving the weekend and helping me "procure" then correct steering cable. It was good to catch him launching at the boat ramp so he could see the big smile on my face... So as she sits, the only mechanical chits I have are 1) Right speedo doesn't function 2) Stuffing box needs re-done and adjusted (already picked up materials Sat.) 3) Need to determine why the alarm is occasionally sounding very faintly. It stops when the horn is blown so I think that it's most likely this is due to something disconnected or dislodged when I pulled the new steering cable through to the helm. 4) No sound through the speakers. Stereo works and has a signal, just no sound to the speakers. Probably another casualty of the steering cable replacement.  So a big thanks to all who who've helped me get my mechanical bearings on this boat. Hopefully sometime our paths will cross season and we can shred some water together. In any event, here's proof that she floats - .  ------------- '87 SN 2001 http://mbbw.com/WIP/DSCN9620.JPG" rel="nofollow - '68 Chris~Craft Grand Prix (Past family boat) '72 Checkmate Mx16 (Past family boat) "Speed is life, altitude is life insurance" |
Posted By: spiralhelix
Date Posted: May-04-2015 at 11:14am
|
Grats on the first run!!! She looks fantastic. I hope you work out your other issues. Here is a thread I started on the alarm http://www.correctcraftfan.com/forum/forum_posts.asp?TID=35689&title=limits-that-trigger-the-alarm" rel="nofollow - Limits that trigger the alarm For the stereo, make sure all connections are landed/made, then you can use a Volt-Ohm Meter to see if the stereo is actually supplying power and you can check continuity of the speaker. -spiral |
Posted By: skutsch
Date Posted: May-04-2015 at 11:48am
|
Project looks great. Some minor punch list issues, and then time to Enjoy, Enjoy, Enjoy!!! ------------- Our http://www.correctcraftfan.com/diaries/details.asp?ID=4669" rel="nofollow - 98 Sport Nautique My Dad's 63 Ski N |
Posted By: Gary S
Date Posted: May-04-2015 at 12:05pm
|
Looks great,hope your cousin doesn't see all this or the price just might have gone up! Have a great summer! ------------- http://www.correctcraftfan.com/diaries/details.asp?ID=1711&sort=&pagenum=1&yrstart=1966&yrend=1970" rel="nofollow - 69 Mustang HM SS 95 Nautique Super Sport |
Posted By: xarmypilot
Date Posted: May-04-2015 at 10:39pm
Thanks for the link, Spiral - that really helped a lot in understanding the alarm circuitry a bit better. I had a few minutes tonight so I went through the wiring and validated a solid connection on as many of the connectors in the wiring harness as I could find. Viola! I must have found the right one as the stereo is back and, while I had the opportunity, I disconnected that PITA alarm! Ahhh - no sharp shrilling now, just the sweet sound of Fla-Ga Line and Led Zepplin will be coming from my boat now ------------- '87 SN 2001 http://mbbw.com/WIP/DSCN9620.JPG" rel="nofollow - '68 Chris~Craft Grand Prix (Past family boat) '72 Checkmate Mx16 (Past family boat) "Speed is life, altitude is life insurance" |
Posted By: Bri892001
Date Posted: May-05-2015 at 12:09am
|
|