Damage boat project
Printed From: CorrectCraftFan.com
Category: General Correct Craft Discussion
Forum Name: General Discussion
Forum Discription: Anything Correct Craft
URL: http://www.CorrectCraftFan.com/forum/forum_posts.asp?TID=40741
Printed Date: April-27-2024 at 1:18pm
Topic: Damage boat project
Posted By: Mike9812121298
Subject: Damage boat project
Date Posted: March-24-2017 at 5:50pm
|
Looking at getting this damaged 1997. What do u guys this of the damage and what would be a good price to pay? http://s875.photobucket.com/user/mike9812121298/media/F31325A2-A4BF-4FC6-ABED-C0E34CAD6CB3_zpsaj8jn5pn.png.html" rel="nofollow"> 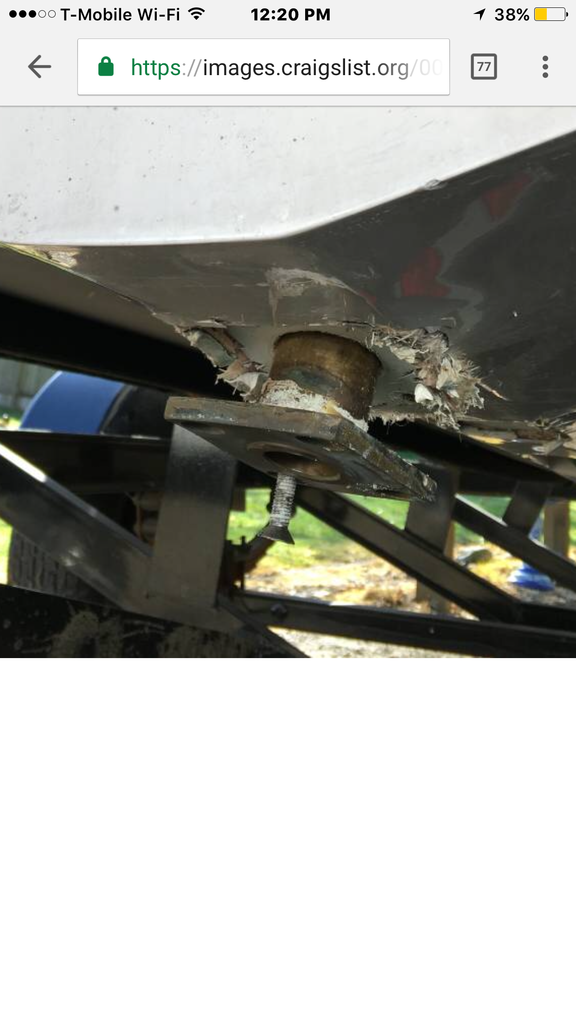 http://s875.photobucket.com/user/mike9812121298/media/42C96D99-19BF-42F6-BC5E-5104EEB18AAE_zpsqsoyzhqo.png.html" rel="nofollow"> 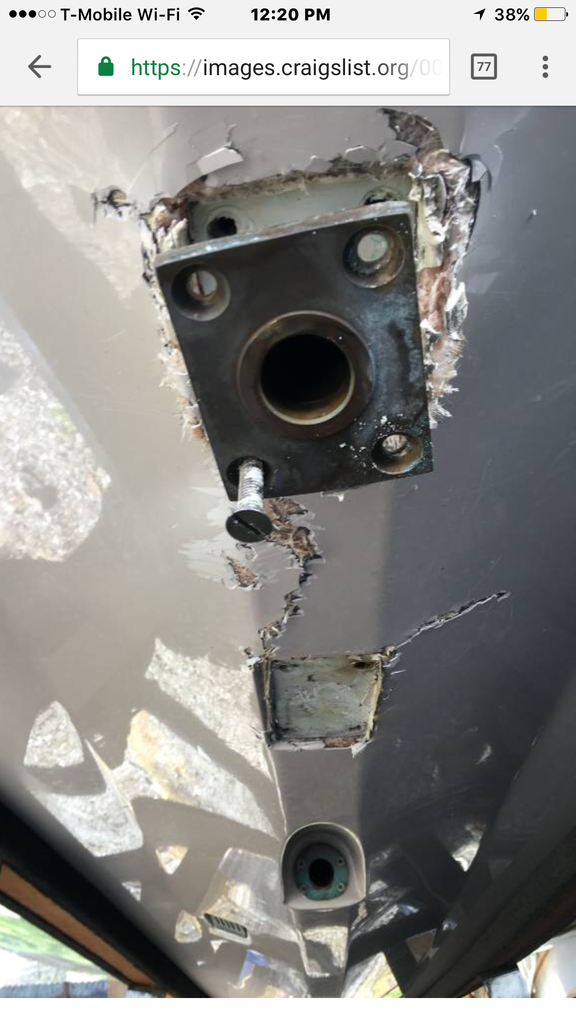
|
Replies:
Posted By: SNobsessed
Date Posted: March-24-2017 at 7:13pm
|
Hard to say without knowing if the rest of the boat is OK. It must have taken on water up to flotation buoyancy with those big holes. If engine/tranny & upholstery is savageable -$1500. There is a reason the seller doesn't want to get it fixed. ------------- “Beer is proof that God loves us and wants us to be happy.” Ben Franklin |
Posted By: desertskier
Date Posted: March-24-2017 at 7:25pm
|
https://seattle.craigslist.org/sno/boa/6057366909.html" rel="nofollow - Link to add The price looks pretty reasonable but if you could get it for less go for it. |
Posted By: tryathlete
Date Posted: March-24-2017 at 8:11pm
| Wow that's quite a bit of damage. Wonder what kind of hours it will take to fix. Is that more work than replacing stringers? Would like to see this boat repaired by someone here just so I could see how it's done and what it takes. |
Posted By: 8122pbrainard
Date Posted: March-25-2017 at 8:05am
|
Mike, Have you seen the 97 in person? If so, were you able to inspect the hull for internal damage? Visible cracks in the hull etc.? As Chris mentioned, there is a reason the seller isn't fixing it. Is it a salvaged boat by the insurer? Welcome to CCfan. Keep us posted as to what you end up doing. ------------- /diaries/details.asp?ID=1622" rel="nofollow - 54 Atom /diaries/details.asp?ID=2179" rel="nofollow - 77 Tique 64 X55 Dunphy Keep it original, Pete < |
Posted By: Nautique2001
Date Posted: March-25-2017 at 12:04pm
|
Ouch, that's a bad day on the lake. That must have made a huge crunch on impact. I'm sure an experienced boat restoration business could fix that up like new. ------------- http://www.correctcraftfan.com/diaries/details.asp?ID=1052&sort=&pagenum=4&yrstart=1986&yrend=1990" rel="nofollow - Nautique 2001 |
Posted By: Mike9812121298
Date Posted: March-25-2017 at 1:58pm
|
Sorry it's a 94, but I'm going to go take a look at it. My guess is the guy didn't have insurance on it and to fix him self it's going to cost 8-10k. I found that things like this gives people a reason to go buy a new boat. Going to try to find the parts used if I end up getting it. Anyone know the part numbers? What year boats could i pull parts from? |
Posted By: tryathlete
Date Posted: March-25-2017 at 2:04pm
| Did you see the 95 being parted out on the other thread? Maybe make one good boat and sell the extra parts. Might be a cheap date. |
Posted By: Mike9812121298
Date Posted: March-25-2017 at 7:34pm
|
Just picked up the boat for 1,840. On the way home now. Falange doesn't look that bad. Here's a link to the video someone made about 7 years ago of the same boat. https://youtu.be/OGVMTBTslS0 http://s875.photobucket.com/user/mike9812121298/media/4203FB72-3003-441C-9BBE-34E7C3112AD7_zpskdztbnmt.jpg.html" rel="nofollow"> 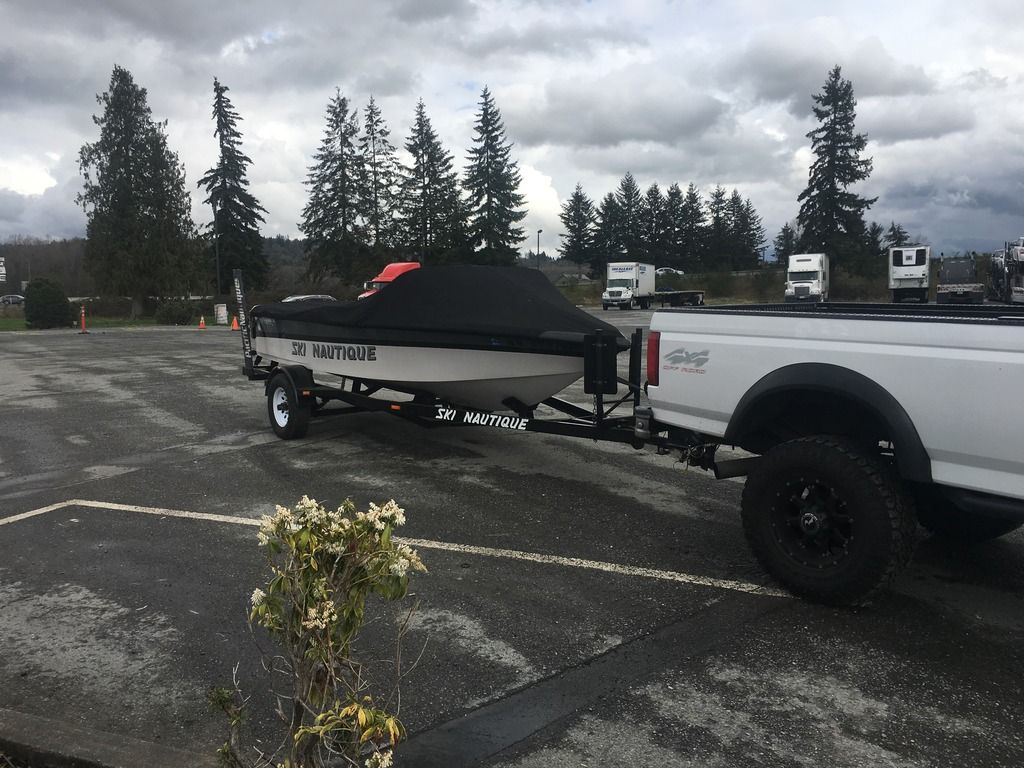 http://s875.photobucket.com/user/mike9812121298/media/1C397AB5-D3D5-4AFA-91A3-79452832333B_zpstqnfjhlc.jpg.html" rel="nofollow"> 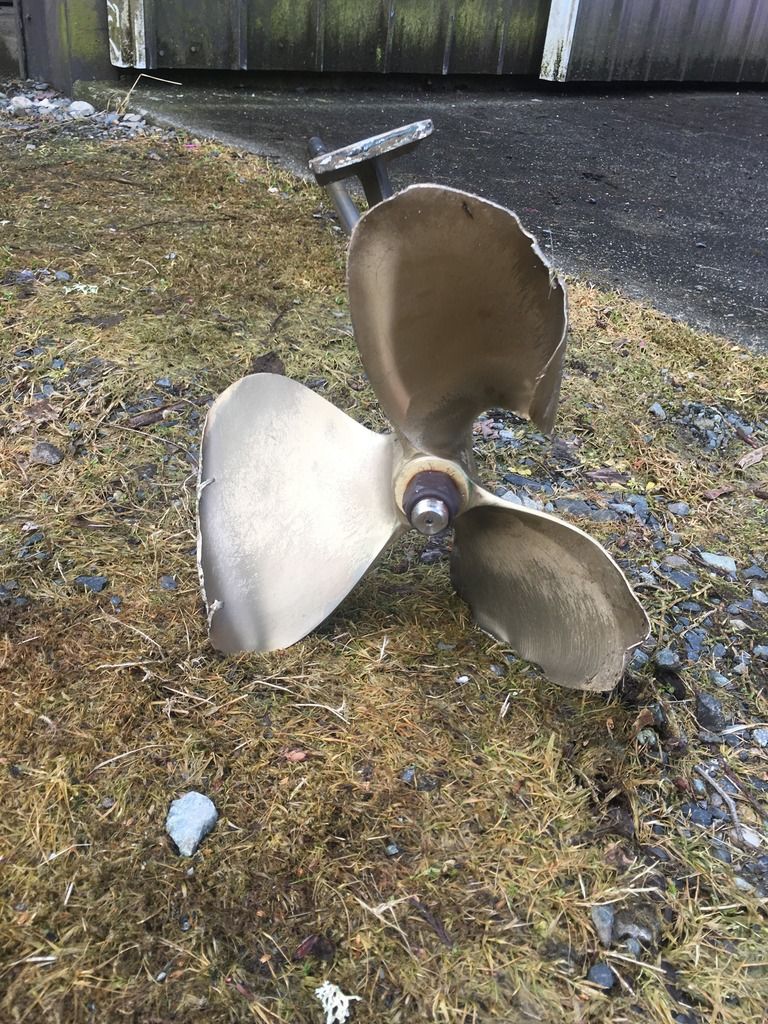 http://s875.photobucket.com/user/mike9812121298/media/95DA8926-CDBE-4BFB-9C5E-EDA34F398A20_zpscpbvnih1.jpg.html" rel="nofollow"> 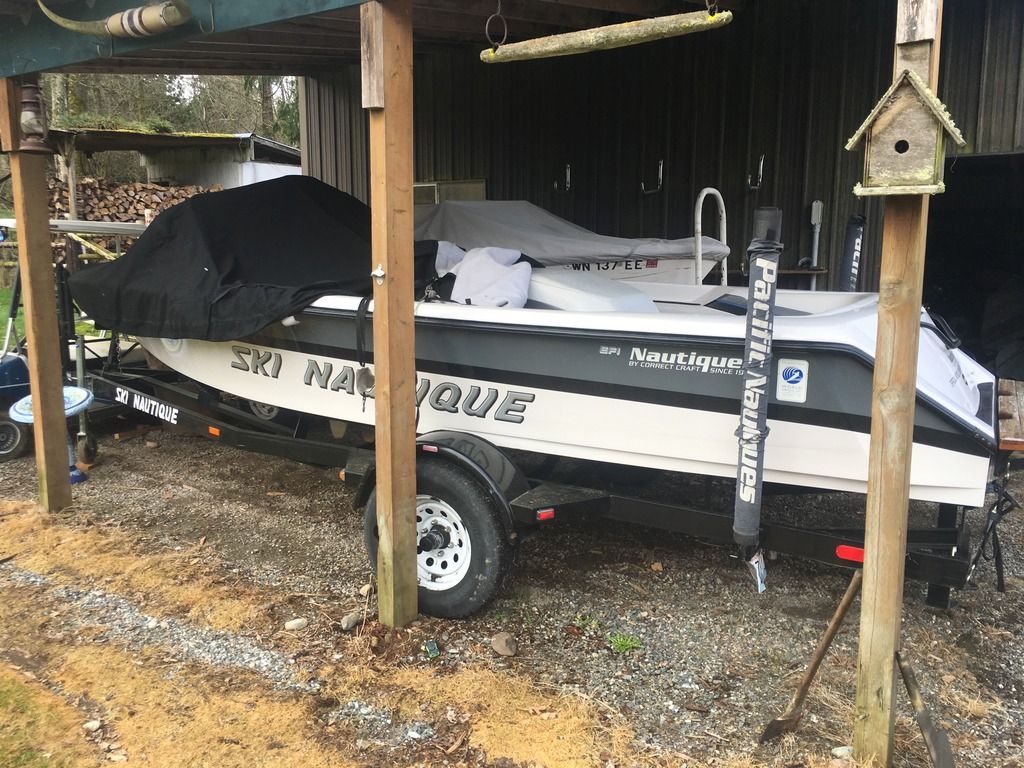 |
Posted By: tryathlete
Date Posted: March-25-2017 at 8:21pm
| Whew that's a beautiful boat! I'm hoping you keep us all informed of your progress with photos and progress reports. You must be excited about the project. |
Posted By: skutsch
Date Posted: March-25-2017 at 8:26pm
|
It would also be interesting to know if the motor was running and in gear when it hit what ever it hit. Did the motor start??? Aside from the bottom damage I lover the color scheme! ------------- Our http://www.correctcraftfan.com/diaries/details.asp?ID=4669" rel="nofollow - 98 Sport Nautique My Dad's 63 Ski N |
Posted By: Blamey
Date Posted: March-25-2017 at 8:54pm
|
Trailer alone is probably worth $800. ------------- 96 Super Sport Previously: 95 Sport Nautique, 1980 Ski Supreme |
Posted By: SNobsessed
Date Posted: March-25-2017 at 10:50pm
|
Are you going to do the glass work yourself? ------------- “Beer is proof that God loves us and wants us to be happy.” Ben Franklin |
Posted By: peter1234
Date Posted: March-26-2017 at 10:18am
|
it would be nice to get the fuel and drivetrain out of that boat and get it upside down for repairs ------------- former skylark owner now a formula but I cant let this place go |
Posted By: 91nautique
Date Posted: March-26-2017 at 10:52am
|
I did a repair on a CC with virtually identical damage myself, it was a little daunting tearing out the entire section around the rudder and skeg leaving a giant hole in the boat and starting again. It's fixable! |
Posted By: tryathlete
Date Posted: March-26-2017 at 10:56am
| What did it actually wind up costing you in $$/hours to do a similar repair? |
Posted By: emccallum
Date Posted: March-26-2017 at 11:00am
| Subscribed. Cool restoration. The rest of the boat seems to be in pretty good shape. If the motor and rest of the boat is good, you can spend 8k and still be in good shape. |
Posted By: 91nautique
Date Posted: March-26-2017 at 11:09am
It was a long time ago,In glass materials it was probably under $ 500, it took about 20 hours, most of the time was prep and making a jig to re -aline everything, I took some pics, will find them and post |
 tryathlete wrote:
Posted By: tryathlete
Date Posted: March-26-2017 at 11:27am
| $500/20 hours seems light but if that's the case $1840 is one hell of a deal. Mike is going to have to show us the job! |
Posted By: Mike9812121298
Date Posted: March-26-2017 at 2:17pm
|
I'm going to tear it down this morning and get a better idea what's going On. I'm rolling the dice on if the engine runs or not. I didn't start it before buying, he did tell me if I wanted to hear it run to bring a battery and gas. He was telling me I need a 51 drive shaft, does that sound right? He also suggested to only buy that new. Does that sound right? If u could find those pics that would be really cool. I've only gone glass a few times so I'm no expert by any means. Got it cleaned up last night, I ways have to clean the project before starting it. http://s875.photobucket.com/user/mike9812121298/media/E98F330A-DA7E-494F-A582-9C10B9369D98_zpssbbhfcex.jpg.html" rel="nofollow"> 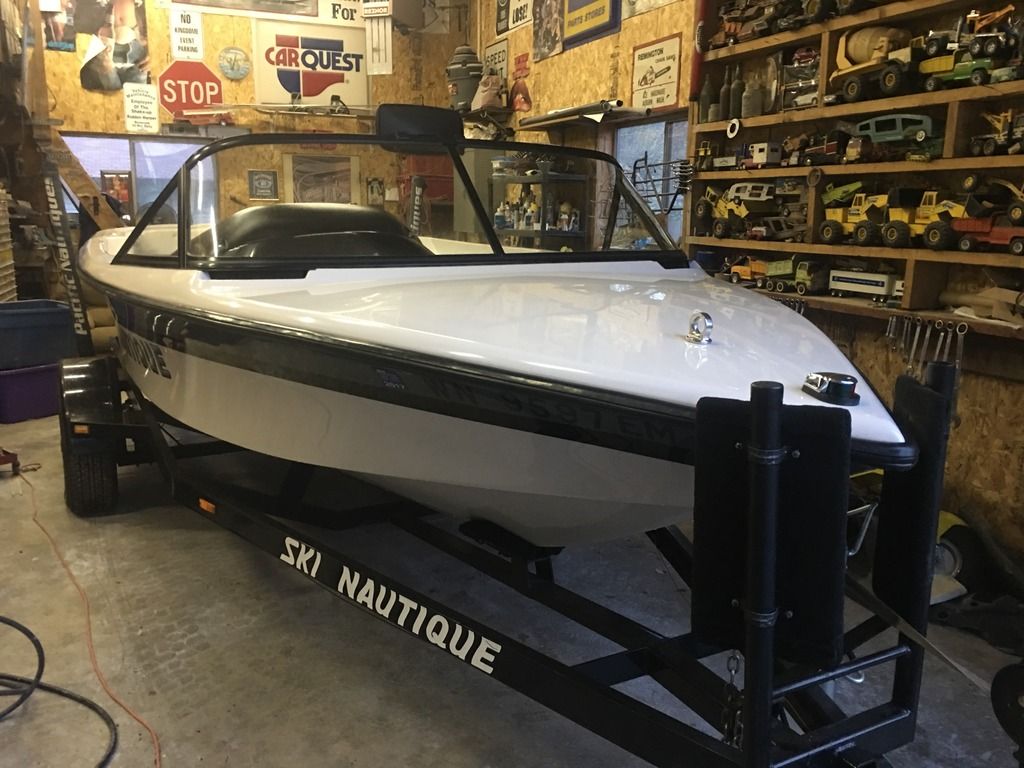 http://s875.photobucket.com/user/mike9812121298/media/D786F56C-E845-4338-99C9-1644E3F75030_zps9qfkipso.jpg.html" rel="nofollow"> 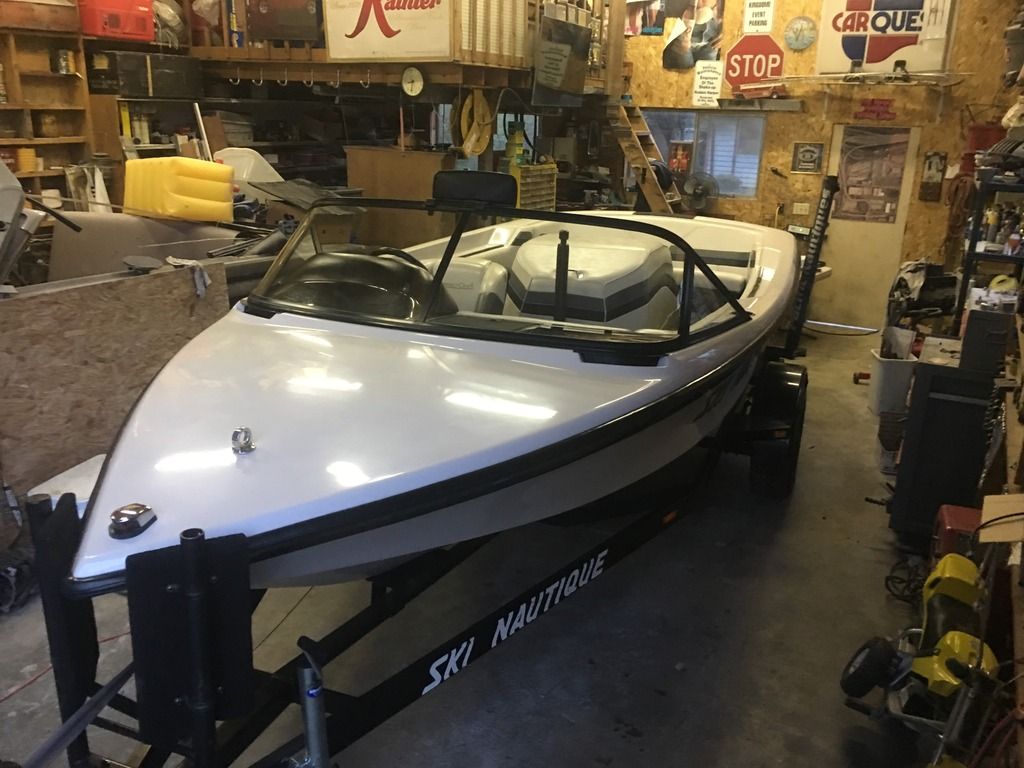
|
Posted By: Jonny Quest
Date Posted: March-26-2017 at 2:29pm
|
Go with the A.R.E. drive shaft (double-taper). About the same cost as a "standard", but a better unit. If I were doing it, I'd pull the motor and transmission and flip the boat over for glass repairs. Don't go "cheap" on things under the water line... JQ ------------- Current 2003 Ski Nautique 206 Limited Previous 2001 Ski Nautique Open Bow 1994 Ski Nautique Open Bow Aqua skiing, ergo sum |
Posted By: fanofccfan
Date Posted: March-26-2017 at 3:23pm
| She shines and looks like a diamond from the waterline up! I agree on the flipping advice as well. Good project to watch for us. |
Posted By: emccallum
Date Posted: March-26-2017 at 3:28pm
|
That looks like an awesome find. Gel looks real shiny, and interior looks original. I agree with JQ on the double taper shaft. Easier install and removal. A bent strut or fins can be straightened, although yours may be beyond repair. I sent my bent strut to Delta propeller. I used a stock style cutlass bearing. I dont recall where I got it, but I can look it up if you need it. Go with a PSS dripless packing and a new CNC prop! With the deal you got, go big! We can help you do that. Pulling the motor isnt very hard. I used my tractor bucket. |
Posted By: flyweed
Date Posted: March-26-2017 at 4:04pm
|
agree with the last few posts...pull the engine and drive and flip it over....so much easier to do a good quality glass repair on the "top" side then underneath. :) ------------- '93 Ski Nautique NWZ, Air Boom Tower Drink Tonight..for tomorrow We Ride! |
Posted By: MrMcD
Date Posted: March-26-2017 at 4:27pm
|
Great looking boat, it will be a keeper once fixed. ------------- |
Posted By: Mike9812121298
Date Posted: March-26-2017 at 6:37pm
|
quick questions, The boat is org a efi engine, the guy gave me a box with the org efi setup. He was telling me that they had a bunch of issues with the efi back in the day, so the factory would swap out and carb them. Theres a holly carb on it now, I would like to put it back to efi, Does anyone know why they would have removed it? |
Posted By: flyweed
Date Posted: March-26-2017 at 6:49pm
|
If they swapped out the old Pro Tech Ign. for the carb setup, you are MUCH better off already! Just do a search here on the forums, and you'll see the original setup was known to have problems, so people did the swap out all the time. My boat also has the swap out, and it's a much better running engine with the Holly Carb. If they have already swapped it out on yours, it was for good reason. ------------- '93 Ski Nautique NWZ, Air Boom Tower Drink Tonight..for tomorrow We Ride! |
Posted By: SNobsessed
Date Posted: March-26-2017 at 6:59pm
|
The carb is much easier to troubleshoot, It's a tradeoff, gas economy vs. diagnostic time. Many on this site use US Composite materials.. If you call them, they will help you decide what to buy. I would put on extra layup layers into your patch, so there is no doubt as to the strength. You may want to make some sort of alignment jig to make sure the strut & rudder mounting surface lay up square. Another option could be to strip the engine & interior, then take it to a fiberglass shop for the glass work. They have slings to roll it upside down. Might be worth the money. Ask for epoxy resin. ------------- “Beer is proof that God loves us and wants us to be happy.” Ben Franklin |
Posted By: emccallum
Date Posted: March-26-2017 at 10:34pm
|
I had the Protec EFI on my 95. There was a reason they only used it for one year! Some of the replacement parts are NLA. I had trouble with my EFI not starting and scrapped the system and went with the carb and electronic ignition. Pretty pricey to swap over, but it has been bullet proof for many years. I think I sold my whole EFI set up to another CCFAN for a few bucks. He was trying to keep his running. I vote for leaving the carb and the hull EFI decal!. Also, if your low oil light on the dash is not working it is b/c the retro kit did not allow for it. There is a way to make it work, and I can check mine to tell you how to wire it. It lights up when the key is turned to on. Goes off after starting. http://www.skidim.com/CARB-RETRO-KIT-TBI-PRO-TEC/productinfo/RF052019-03/" rel="nofollow - carb retrofit http://www.skidim.com/PROTEC-RETRO-KIT-PCM-FORD/productinfo/RK107025A/" rel="nofollow - ignition |
Posted By: 91nautique
Date Posted: March-27-2017 at 10:40am
|
The glass materials number is about right, when I say 20 hours,it was about that number but over a two week period. I had access to all the right tools/equipment/advice and materials,and have done a lot of glass work on other boats. Unfortunately I did not document the repair very well,the damage was virtually identical to Mike's boat. The repair started with grinding out the rudder port area but I ended up grinding all the way to the shaft log chasing down the fractures and cracks and up the sides of the stringers and up the transom past the exhaust outlet. I did not turn the boat over. It started with a new rudder port,shaft,strut and coupler, the area the strut bolted to was severely compromised but had not shifted,so I left that area as it was (temporarily) and used it to align the rudder port area using the new shaft and temp bolting the strut to the damaged area. I cut out the rudder port area and feathered it back to the stringers,this is the only pic I have prior to actually cutting out the area around the rudder port,if you look closely at the area where the strut mounts you can see the fractures and delamitation in that area but it had not shifted,so I left it temporarily to set up the rudder port area.  I then cut out the area around the rudder port and feathered it back,mounting the new rudder port onto steel plates that where tek screwed into the hull from underneath    Originally the rudder port was not flush with the hull (underneath)I opted to flush mount it by recessing into the hull,this is what it looked like from underneath with the formwork fixed to the hull.  Leaving the rudder port in place I thin layered matt directly to the rudder port,you can see the actual area I ended up cutting by the sunlight showing through the thin area, I then drilled the holes for the four mounting bolts and refilled them with resin/talc mixture to mark there location (not shown)  Underneath after the formwork was removed  I then repeated the process around the strut area (no pics) Once that area was set up (thin) I then ground back and feathered the entire area up to the shaft log,up the sides of the stringers and up past the exhaust outlet.Underneath I feathered back the same area. (no pics) I cut up and numbered multiple pieces of heavy mat, and kevlar offcuts and gradually thinner matt material (no pics)and prepped the area with acetone and heat to ensure it was moister free.and using two people we layered up the entire repair in in one hit starting from up the transom,and backed out and finished at the shaft log, as it cured we worked back over the strut,rudder port areas with multiple layers and built it up to over 3/4 of an inch thick,no wood was used. Underneath we layered up (thin) and faired back as the strength of the repair was taken care of inside.I then wet sanded the entire repair smooth These are the only pics I have of the result, I hope this helps.    
|
Posted By: tryathlete
Date Posted: March-27-2017 at 12:03pm
| What a great forum. What an awesome set of data to encourage Mike in his quest. Mike, you've clearly come to the right place! |
Posted By: Dreaming
Date Posted: March-27-2017 at 3:32pm
|
Mike, nice to have another Seattle CCF. there are a couple of us on this side of the mountains, so if you need to look at another similar model for reference, let me know. Sounds like a nice deal if you can get the motor running. I too swapped out the EFI (TBI) for carb and electronic ignition last year, I think you should keep the carb set up the way you purchased it. Where do you plan on boating? Based on your user name, I am guessing you live in Belltown? |
Posted By: Donald80SN
Date Posted: March-27-2017 at 4:03pm
|
Very fixable, but check out the transmission for possible damage too. Sometimes they can get hurt when a prop and drive shaft get hurt. ARE double taper shaft is indeed the way to go. It can be a great boat once again. Get your new prop from Delta Propellers, they are a site sponsor and you can save by using discount code DP5CCFO8. There is a banner or Ad in the left hand corner of this site. Also, you may find one used on Ski it again .com. Gel Coat likely was made by Spectrum Color and it can be found at www.iboats.com. Look up your gel by MFG or Correct Craft. ------------- 1980 Ski Nautique SOLD Back to Cypress Gardens 2002 Sport Nautique, GT-40, FCT2, Cover Sports, Tower Bimini, Inc., Wet Sounds Audio System, Star Gazer Wake Edition S. 1968 Ski Nautique, Project. |
Posted By: Mike9812121298
Date Posted: March-27-2017 at 11:24pm
|
I live in Bonney lake, so I'm about 1 min away from lake tapps. What city r u in? I found a local brand new oj 14x18 right hand ( https://seattle.craigslist.org/see/bpo/6045085011.html ) I wanna use the boat for wake boarding and wake sufing. Will this prop work or better to get a different one? Any chance someone could post a link to the correct driveshaft, sounds like double taper will be the way to go. I'll also need one of these? http://shaftseal.com/en/categories/300000116 I ordered a blue top battery last night, trying to get some parts order so I'm not waiting on them. Is there anything else I'm missing? |
Posted By: Gary S
Date Posted: March-27-2017 at 11:49pm
|
http://elberts.com/system.htm" rel="nofollow - A.R.E. link give them a call and have them tell you how to measure what you need. Then check here http://www.skidim.com/Drive-Shafts/products/1160/" rel="nofollow - skidim see if it's cheaper to go direct or with Skidim ------------- http://www.correctcraftfan.com/diaries/details.asp?ID=1711&sort=&pagenum=1&yrstart=1966&yrend=1970" rel="nofollow - 69 Mustang HM SS 95 Nautique Super Sport |
Posted By: SNobsessed
Date Posted: March-28-2017 at 10:02am
|
Guessing the shaft will be used to position strut? ------------- “Beer is proof that God loves us and wants us to be happy.” Ben Franklin |
Posted By: quinner
Date Posted: March-28-2017 at 10:02am
|
Considering you can get a brand new 422 for $350 not sure I see that CL prop being worth $300?? Maybe 1/2 that. A 422 or a 224 would be a much better prop on that boat. ------------- http://www.correctcraftfan.com/diaries/details.asp?ID=1143" rel="nofollow - Mi Bowt |
Posted By: 8122pbrainard
Date Posted: March-28-2017 at 10:43am
Chris, Guessing aside, using the shaft is a good method. It's the reverse of when alignment is done, the strut is already in place and you find that "happy spot" where the shaft turns freely and is centered in the log. For strut position, the shaft is bolted up to the trans, centered in the log and then the strut can be located. Final engine alignment is still required. ------------- /diaries/details.asp?ID=1622" rel="nofollow - 54 Atom /diaries/details.asp?ID=2179" rel="nofollow - 77 Tique 64 X55 Dunphy Keep it original, Pete < |
Posted By: 91nautique
Date Posted: March-28-2017 at 10:47am
|
Mike, Can I suggest before you purchase a prop,rudder,shaft,strut and rudder port confirm the motor runs,it may be a deciding factor on whether you proceed with the repairs or how you go about the repairs to the hull. If its ok I would change the fluids and winterise ,it may be some time before you can run it again. Same with the gearbox,if the engine runs you could access it to some point if its ok. Ask yourself this -if the motor needs a rebuild and the gearbox is suspect would you still go ahead with the repairs to the hull? Either way it would be better to know now. |
Posted By: tryathlete
Date Posted: March-28-2017 at 11:31am
| I think Mike is "all in" and not too concerned if there's an engine or transmission issue. If he needed, I have the feeling Mike will procure driveline in a similar fashion to the boat. It wouldn't surprise me if Mike found a GT40 and velvet drive for $500! |
Posted By: Blamey
Date Posted: March-28-2017 at 11:52am
|
I have a 422 that I'd like to sell. I got it in June last year and used it for the rest of the summer. Last I checked it was in perfect condition. It has never been repaired. I got it for my Sport Nautique but since the engine is a little tired I need something that spins a little faster as my max rpm is a little low. I'd let it go for $280 shipped, which is basically $100 less then what I cost me with shipping. ------------- 96 Super Sport Previously: 95 Sport Nautique, 1980 Ski Supreme |
Posted By: emccallum
Date Posted: March-28-2017 at 1:01pm
|
https://columbia.craigslist.org/bpo/6011096056.html" rel="nofollow - boat parts Saw this today. Not positive it will work on yours but others should know for sure. |
Posted By: Dreaming
Date Posted: March-28-2017 at 2:06pm
Hi Mike, I am in NE Tacoma/Federal way, but we consider Lake Tapps to be our lake of choice for now. I'll look for you this summer. |
Posted By: Mike9812121298
Date Posted: March-28-2017 at 2:25pm
|
Your right I should try starting up the engine, but it's a hell of a lot cheaper to believe that it runs perfect then to find out there's a issues with it. Lol Using Amec website there saying the 480 prop for wakeboarding? Has anyone used this prop before? I think I'm going to pass on the craigs one. My problem is I have to remind my self not to be to cheap. I can usually do pretty good on finding a good deal, last summer I picked up a 90 bayliner for 1800, used it all summer then sold it in September for 4,300 without doing anything but putting gas into it. I'm going to make some calls this morning and see if I can get some parts ordered. I'm trying to have this boat done in a month. |
Posted By: Blamey
Date Posted: March-28-2017 at 3:10pm
Turn the key, I bet she Purrs.  ------------- 96 Super Sport Previously: 95 Sport Nautique, 1980 Ski Supreme |
Posted By: Mike9812121298
Date Posted: March-30-2017 at 2:47am
|
been trying to get the work done on the boat. Just need to take it down a little bit more. As i was sanding it down the underside didnt look to bad, everything still seems to be in line. The plan is to just lay the fiberglass down on the top. http://s875.photobucket.com/user/mike9812121298/media/A9F56510-7A2A-4053-89AD-DC9E3B40CC96_zpsucdys79f.jpg.html" rel="nofollow">  http://s875.photobucket.com/user/mike9812121298/media/F7A967A5-CCBD-4AE8-B279-93EDB730315E_zpsopz2cwai.jpg.html" rel="nofollow"> 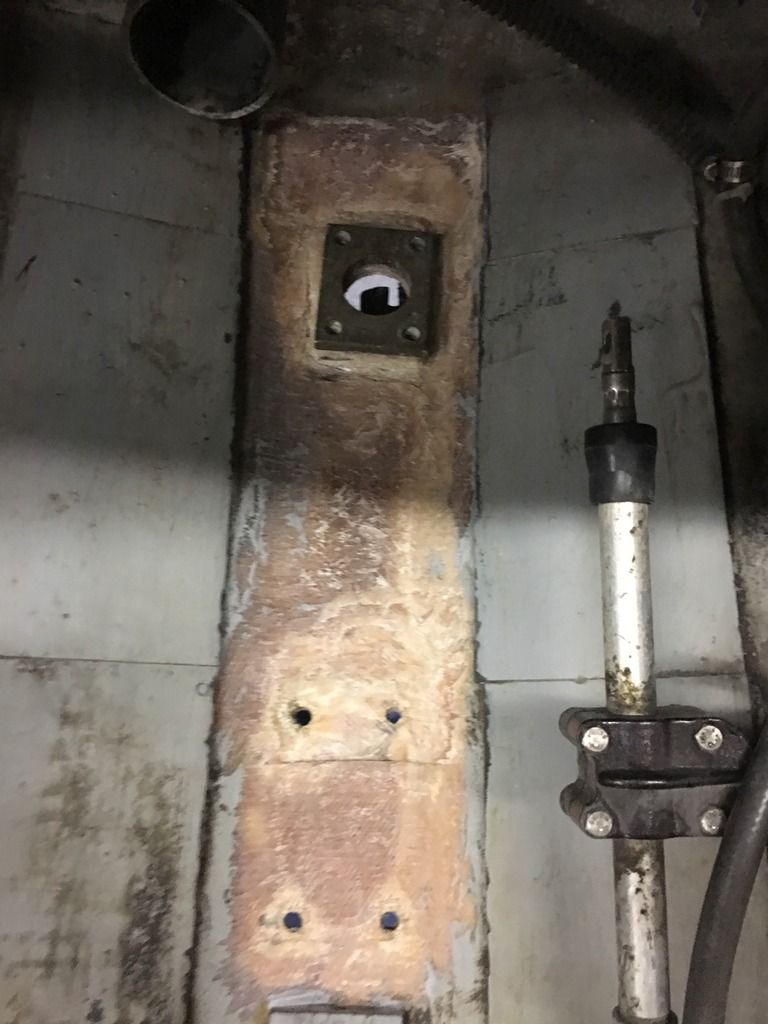
|
Posted By: 8122pbrainard
Date Posted: March-30-2017 at 7:48am
Mike, I suggest going deeper into the cracks that are evident on both the inside and outside of the hull. By routing them out farther, you may be able to make sure there isn't any disbonding between the layers of glass. ------------- /diaries/details.asp?ID=1622" rel="nofollow - 54 Atom /diaries/details.asp?ID=2179" rel="nofollow - 77 Tique 64 X55 Dunphy Keep it original, Pete < |
Posted By: Mike9812121298
Date Posted: March-30-2017 at 8:11pm
|
Got some time this morning to get it fired up. Checks that off the list of things to do. Engine sounds good, it didn't seem to be sucking up much water. Do I have it hooked up right? I only Let it run for 5-10 seconds at a time. http://s875.photobucket.com/user/mike9812121298/media/9FE015A4-88A0-482C-86E4-FA168B985468_zpsvgqfnt5f.jpg.html" rel="nofollow"> 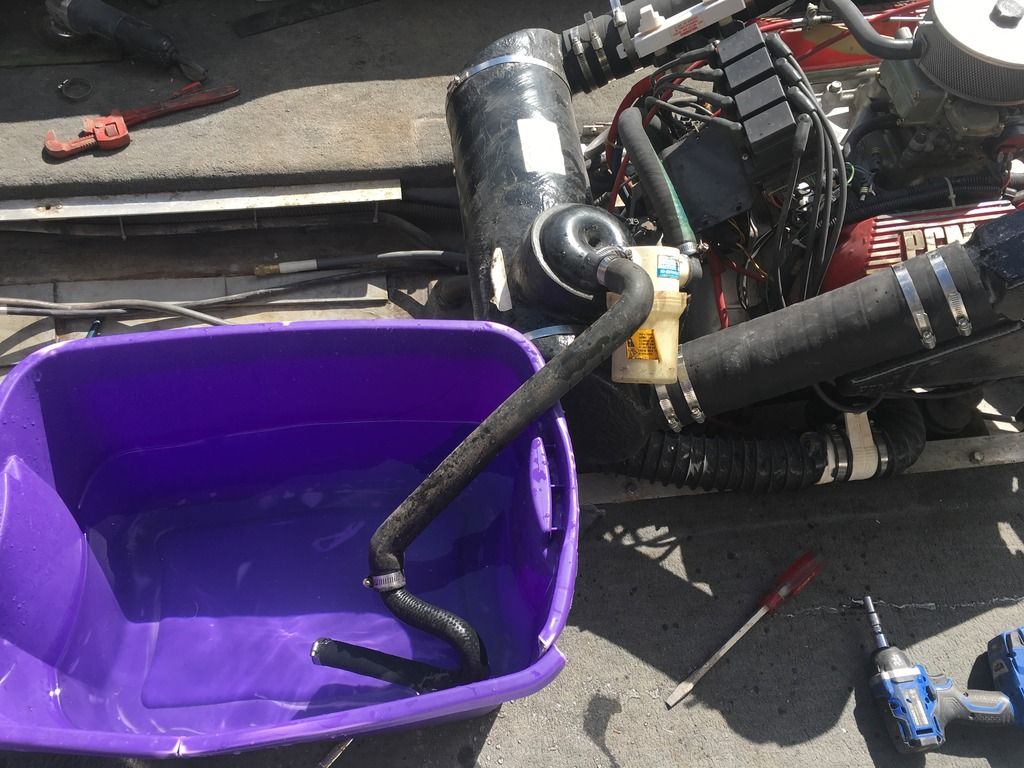 http://s875.photobucket.com/user/mike9812121298/media/58D18E02-5151-41A7-A728-4D6DF98D57DB_zpsecwznxcq.jpg.html" rel="nofollow">  Here's the YouTube video of it running https://youtu.be/k0oxPX0LuzA |
Posted By: desertskier
Date Posted: March-30-2017 at 8:35pm
| I would check raw water pump impeller. If the boat lost contact with the water during the accident it may have been damaged. |
Posted By: flyweed
Date Posted: March-30-2017 at 8:35pm
|
Sounds good to me from your video. You didn't really run it long enough to suck up much water. I suggest installing the "Timmy T" mod, so you can hook it up to a hose, and run it longer. Check your engine oil, and transmission fluid and look for water intrusion, and also any foreign contaminants like metal filings, etc. Just good peace of mind. ------------- '93 Ski Nautique NWZ, Air Boom Tower Drink Tonight..for tomorrow We Ride! |
Posted By: desertskier
Date Posted: March-30-2017 at 8:37pm
| After looking at your picture you have it hooked up wrong. You need to supply water before it connects to the raw water pump. Water flows from the inlet on the boat hull then through the trans cooler then to the RWP. It looks like you disconnected it at the RWP so it was sucking air. |
Posted By: skutsch
Date Posted: March-30-2017 at 8:48pm
|
------------- Our http://www.correctcraftfan.com/diaries/details.asp?ID=4669" rel="nofollow - 98 Sport Nautique My Dad's 63 Ski N |
Posted By: 8122pbrainard
Date Posted: March-30-2017 at 8:50pm
To me, it looks like the water supply is on the suction side of the RWP. ------------- /diaries/details.asp?ID=1622" rel="nofollow - 54 Atom /diaries/details.asp?ID=2179" rel="nofollow - 77 Tique 64 X55 Dunphy Keep it original, Pete < |
Posted By: flyweed
Date Posted: March-30-2017 at 8:53pm
|
isn't the end IN the rubbermaid bucket, the end that hooks onto the intake in the boat bottom? That's what it looks like to me. ------------- '93 Ski Nautique NWZ, Air Boom Tower Drink Tonight..for tomorrow We Ride! |
Posted By: desertskier
Date Posted: March-30-2017 at 8:55pm
| OK. I guess it just looked strange to me. |
Posted By: tryathlete
Date Posted: March-30-2017 at 9:08pm
| It runs! Check that off the list. Back to work on the hull! |
Posted By: peter1234
Date Posted: March-30-2017 at 9:13pm
|
I don't care how you cut it that boat was a great deal . for me it would be good sweat equity and a learning project. I hope everything goes good for you. The one thing I would do though is follow Pete's advice about exposing everything down as deep as you can to make sure you get anything that is hidden damage in the layers ------------- former skylark owner now a formula but I cant let this place go |
Posted By: emccallum
Date Posted: March-30-2017 at 9:44pm
|
Make sure the filter has an o ring and is not loose and sucking air. Several different ways to run boat out of water. I unplug the hose at the top of the trans cooler and use an old u shape washer machine rubber waste line. One end over the trans cooler and a hose stuffed up the other. Fits perfect. Crank motor and turn hose on. It takes a few minutes before water starts coming out of exhaust. Some say the cooler is fragile, but I have not had any issues. It is just an easy place for me to get too. I leave the rubber washer machine u hose in the boat. Has worked for me for about 20 years. Same hose! |
Posted By: MechGaT
Date Posted: March-30-2017 at 10:08pm
|
Looks like you have a good helper there with you. ------------- '92 Sport Nautique |
Posted By: Mike9812121298
Date Posted: March-31-2017 at 4:44pm
|
I took the end coming from the bottom of the boat and put that in the bucket. That one goes into filter. Tried to show on the pics. I was working on the boat last night and noticed the heads had gt stamped on them. This would make them gt heads correct? I did some research this morning and learned that it would also have the 3 lines on the end of the head. I was reading they didn't put out the gt40 engine until 95? What kind of hp difference is between gt and the lower heads? I got some work done on the hull, I did some more cuting and sanding last night. The strut mount looks pretty solid, the rudder mount I added some glue before I fiberglass to make that connection from when it ripped out of there. Next I'm going to sand down the glue to make it level and flat. Then I will be packing on the fiberglass. http://s875.photobucket.com/user/mike9812121298/media/F9A9F697-AC84-41B3-9361-FAC1AC53FA03_zpsum5by3kj.jpg.html" rel="nofollow"> 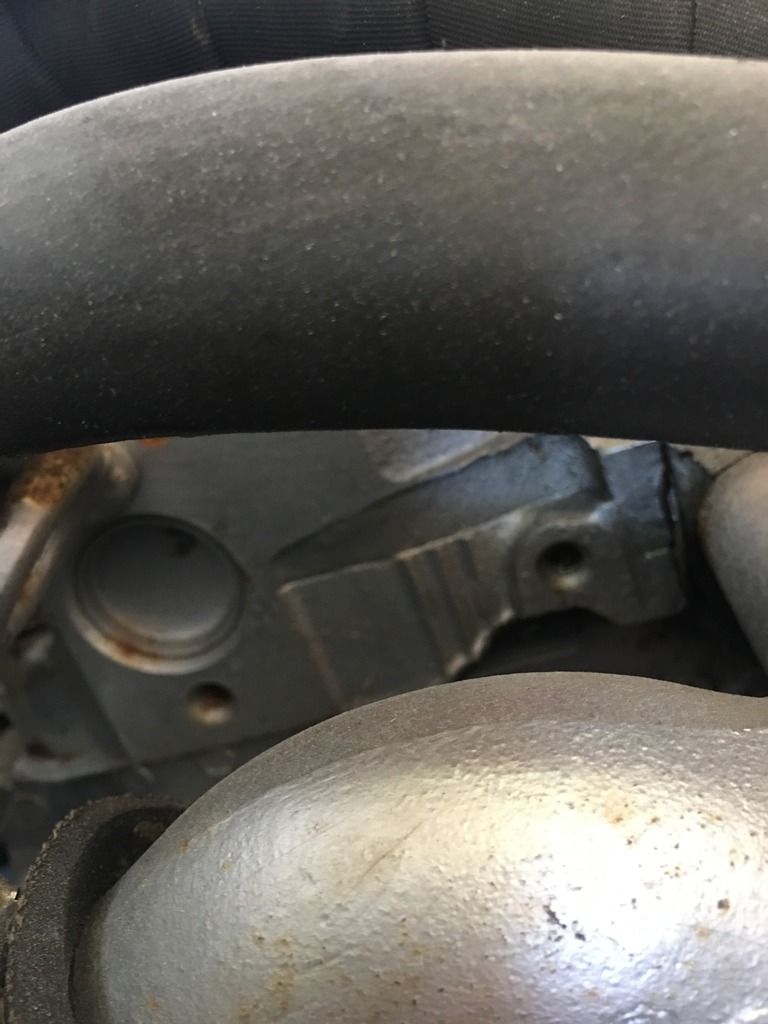 http://s875.photobucket.com/user/mike9812121298/media/55ABDE0E-397B-4FAC-B8C8-8FAA0AC00257_zpsmenizrux.jpg.html" rel="nofollow"> 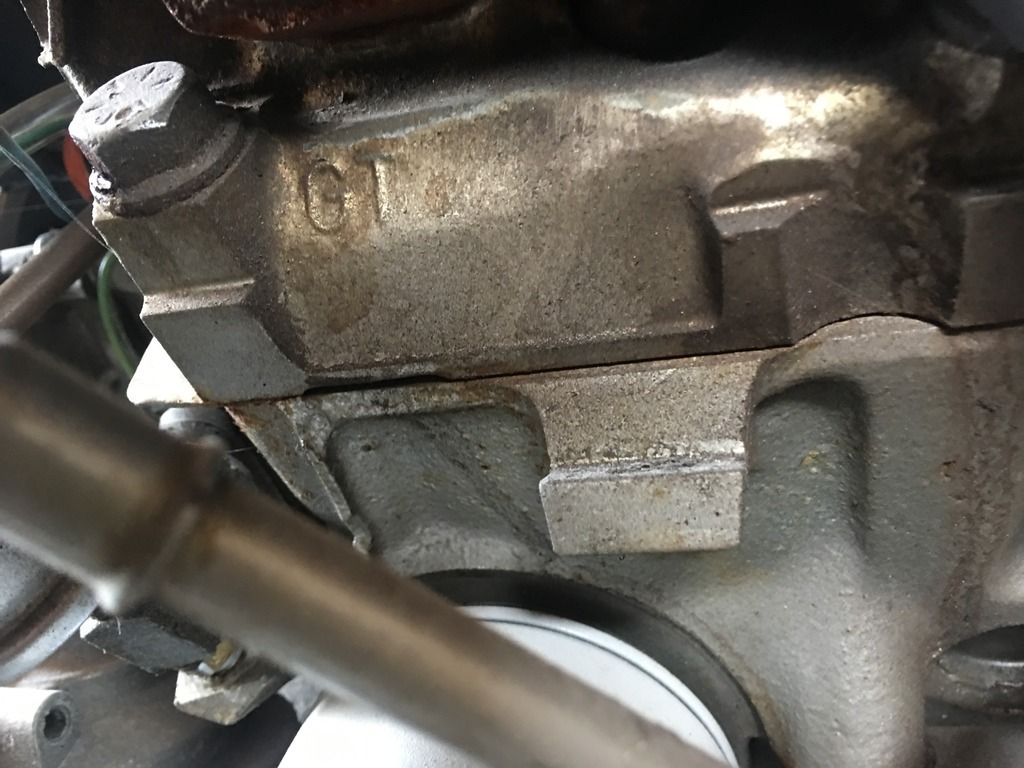 http://s875.photobucket.com/user/mike9812121298/media/9E628F2C-7BEB-4C2E-A812-736B60BA67DC_zpsvznbl8qr.jpg.html" rel="nofollow"> 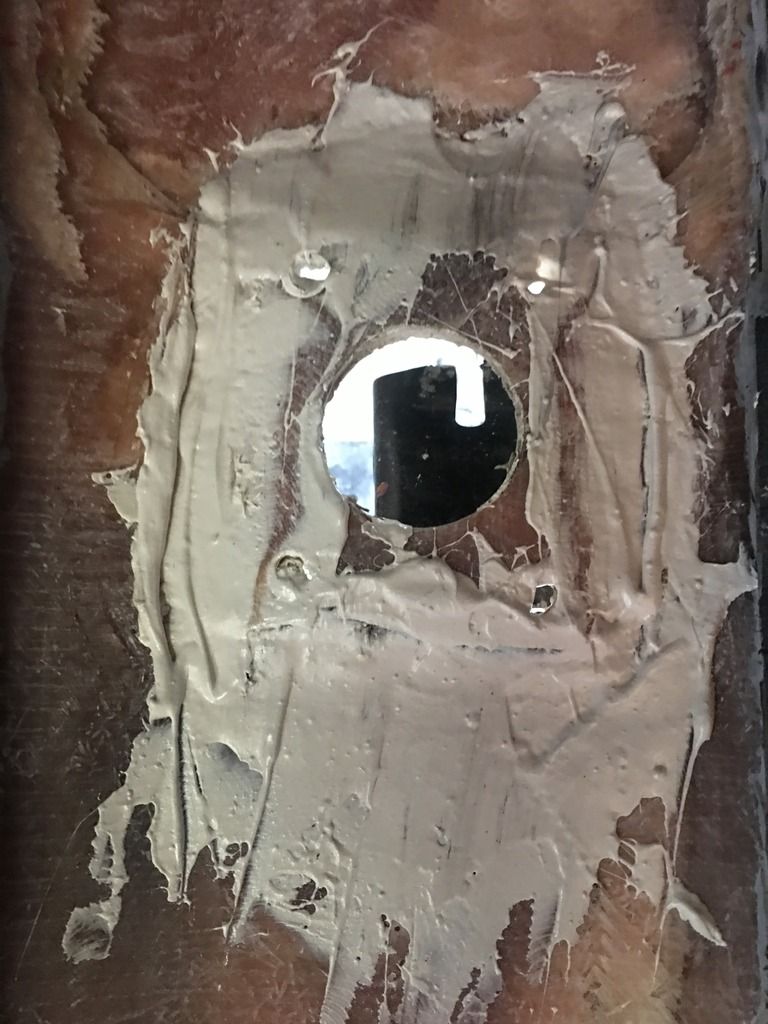 http://s875.photobucket.com/user/mike9812121298/media/C392C5B3-154F-40C7-964D-8FEDA7F14FE0_zpsd30czqmw.jpg.html" rel="nofollow"> 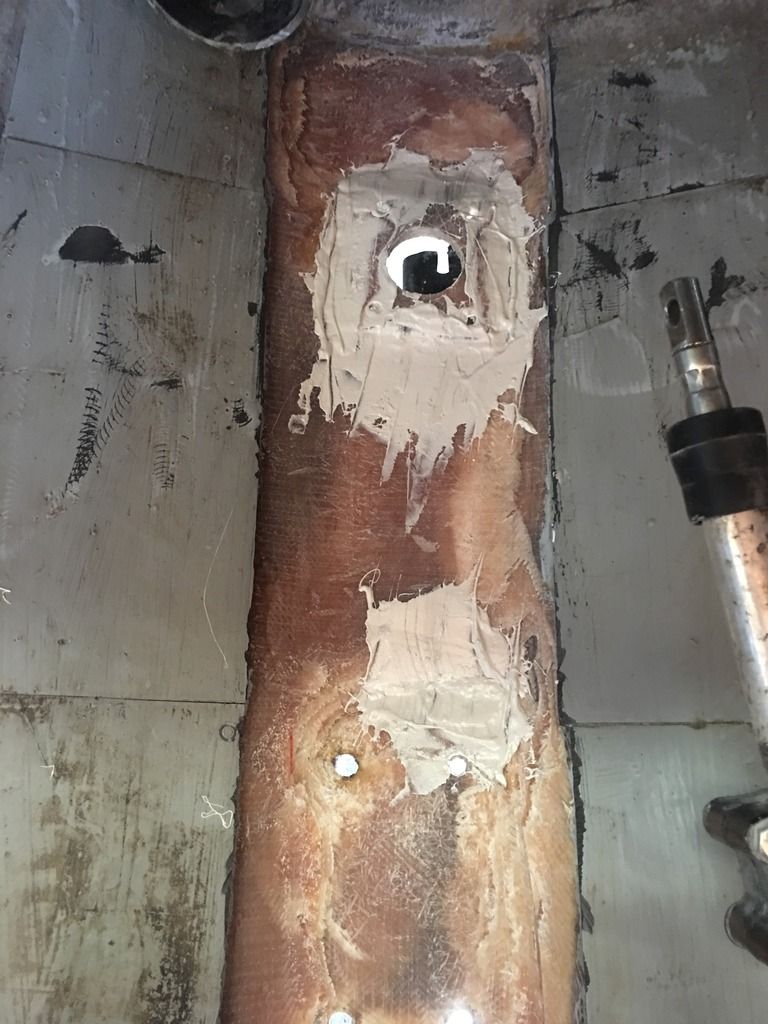 |
Posted By: Donald80SN
Date Posted: March-31-2017 at 5:11pm
|
I believe those three lines or bars on the heads is very significant. If my memory is correct, that means GT Heads. ------------- 1980 Ski Nautique SOLD Back to Cypress Gardens 2002 Sport Nautique, GT-40, FCT2, Cover Sports, Tower Bimini, Inc., Wet Sounds Audio System, Star Gazer Wake Edition S. 1968 Ski Nautique, Project. |
Posted By: Blamey
Date Posted: March-31-2017 at 5:36pm
|
I think if you have the GT40 heads then you have the carbed version of the Pro Boss. I believe this was rated at 280HP. I have also read that the HP difference between the Pro BOss Carb'd(280HP), Pro Boss TBI(300HP) and GT40 (310 HP) is likely just marketing and that the engines will all perform around the same when turned correctly. Not sure how accurate that is but the difference is small and really the condition of the engine will make a bigger difference. ------------- 96 Super Sport Previously: 95 Sport Nautique, 1980 Ski Supreme |
Posted By: Duane in Indy
Date Posted: March-31-2017 at 5:45pm
|
Thinking that you better grind the bilge gel coat down to raw glass also. I would take it out towards each side at least 6 inches more. Your patches need to be narrow and building up to wide patches on top. The more width you get the better for strength JMO Duane. ------------- Keep it as original as YOU want it 1978 Mustang (modified) |
Posted By: Mike9812121298
Date Posted: March-31-2017 at 5:53pm
| It was also a efi engine but was taken off. So that would make it 310hp? Any idea what those rectangle blocks are for? I can just remove them? |
Posted By: tryathlete
Date Posted: March-31-2017 at 6:10pm
| Mike, that's not a GT40 EFI. That engine was not available until 95. You've got the one many have converted to carb because of lack of availability of replacement parts. It was a Throttle Body injected engine. The GT40 is port injection. |
Posted By: Blamey
Date Posted: March-31-2017 at 6:54pm
Yup, and the TBI I believe was 300HP. ------------- 96 Super Sport Previously: 95 Sport Nautique, 1980 Ski Supreme |
Posted By: SNobsessed
Date Posted: March-31-2017 at 7:59pm
|
Now that you have the rudder port material glued back into place, I recommend grinding a V groove, almost thru the entire thickness of the cracks. Do one side at a time, so you don't lose position. Pack the groove with glass, then grind flush after cure. Then proceed with the overlays. If you leave the crack it will be a stress riser (weak spot). ------------- “Beer is proof that God loves us and wants us to be happy.” Ben Franklin |
Posted By: 8122pbrainard
Date Posted: April-01-2017 at 12:52am
Mike, I don't feel you are following recommended procedure with the repair to the hull. As mentioned, you need to grind out the cracks more. What is the "glue" you refer to? The gray colored stuff you applied? What is it? ------------- /diaries/details.asp?ID=1622" rel="nofollow - 54 Atom /diaries/details.asp?ID=2179" rel="nofollow - 77 Tique 64 X55 Dunphy Keep it original, Pete < |
Posted By: tryathlete
Date Posted: April-01-2017 at 5:00am
|
Mike, just a bit of advice from an observer. The need to grind into those cracks isn't really optional. This repair isn't something for inexperienced hobbyists. For the strength of this area to survive the stresses that a tournament ski boat will undergo, the rudder has to be bulletproof in terms of strength or the repair will wind up being a failure and the consequences might even be hazardous to family members and friends. Filling of the v-ground cracks with a mixture of resin and chopped glass before overlaying of several layers of properly oriented and saturated Fiberglas should do the trick if properly laid in on both sides of the hull. Just putting lots of resin without glass is not going to return the strength to proper levels. Trust all of us--follow the advice and take the time to do this properly. We want you to be successful! |
Posted By: Gary S
Date Posted: April-01-2017 at 10:59am
|
I believe the iso-damp material on either side of the damage should be removed also. You then can overlay resin and fiberglass tapering out past the damage. When done it could be replaced making it easier replicating the original look. ------------- http://www.correctcraftfan.com/diaries/details.asp?ID=1711&sort=&pagenum=1&yrstart=1966&yrend=1970" rel="nofollow - 69 Mustang HM SS 95 Nautique Super Sport |
Posted By: SNobsessed
Date Posted: April-01-2017 at 11:04am
|
Mike - Sorry for the kibitzing, but just want to help you achieve optimum outcome. You might want to assemble the rudder port & rudder & check for center before you start glassing (assuming the glue is strong enough to support the weight.) The reason I suggest this is that the length of the rudder will magnify even a small amount of error in the surface of the mount. Easy to fix now, much harder to fix after the glass has cured. Just a thought. ------------- “Beer is proof that God loves us and wants us to be happy.” Ben Franklin |
Posted By: tryathlete
Date Posted: April-01-2017 at 12:33pm
|
http://www.westsystem.com/ss/assets/HowTo-Publications/Fiberglass-Boat-Repair-and-Maintenance.pdf I'm not a boat builder and am excited about your project enough to keep reading every post on your thread. I've built Fiberglas kayaks and have repaired holes and done a little gel spraying --enough to know I didn't know much. Maybe this link will give you a little direction. http://www.westsystem.com/ss/assets/HowTo-Publications/Fiberglass-Boat-Repair-and-Maintenance.pdf |
Posted By: flyweed
Date Posted: April-01-2017 at 6:45pm
|
like my grandpa always said....."If it's worth doing, it's worth doing right." ------------- '93 Ski Nautique NWZ, Air Boom Tower Drink Tonight..for tomorrow We Ride! |
Posted By: 8122pbrainard
Date Posted: April-01-2017 at 8:43pm
|
Mike, Now that you've had a chance to read our comments and suggestions, we'd love to get some feedback from yourself. That would help us better help you with the project. Are you getting any guidance from a friend? Also, I'd sure like to know what the grey stuff is you used. Hopefully it's not Marinetex! ------------- /diaries/details.asp?ID=1622" rel="nofollow - 54 Atom /diaries/details.asp?ID=2179" rel="nofollow - 77 Tique 64 X55 Dunphy Keep it original, Pete < |
Posted By: fgroce
Date Posted: April-01-2017 at 10:09pm
|
Hi awesome project boat. I do also hope you follow the advice of the guys on the forum. Everyone just wants you to be successful. The cost and labor will not be much more. But if you skimp on the repair and it fails people your boat could sink or worse people could get hurt. Be safe have fun fixing the boat. ------------- FGroce 88 Ski Nautique For 28 years Now 2002 Ski Nautique |
Posted By: Mike9812121298
Date Posted: April-01-2017 at 10:45pm
|
No I completely understand I don't want to want have to do it a second time. The adhesive was 3m 3532, its pretty strong stuff. I spent a long day out at Westport,wa on a fishing charter, so I'm gonna see what I can get done tonight. I'm gonna grind it down some more tonight. Basically I need to take it down to 1/4 inch thickness of the hull? Then just glass over 2 -4 inches? |
Posted By: KRoundy
Date Posted: April-01-2017 at 11:50pm
|
I'll wait for others to chime in on the hull repair, but welcome. I live up in Lake Stevens, but get together with Dreaming now and then to share Nautique stories. I love the way those engines sound! I can't wait for summer. ------------- Previous: 1993 Electric Blue/Charcoal Ski Nautique Current: 2016 Ski Nautique 200 Open Bow |
Posted By: john b
Date Posted: April-02-2017 at 2:16am
|
Mike, 3M 3532 is marketed as a semi flexible urethane construction adhesive for bonding materials such as concrete, rubber, wood, glass, and some plastics.. I am no expert, but I believe the semi-flexible property is something you would want to avoid at all cost when reinforcing a high stress area. I question whether the structure will be compromised with a semi-flexible layer, or any layer with unlike properties, between layers of fiberglass. I have restored several boats prior to my current project. Although they turned out nice cosmetically, I now know that none of them was done to highest standards with the proper materials due to inexperience and lack of knowledge. The most important thing I have learned here is to listen to the experts. There is an unmatched wealth of experience here and they are passionate about their craftsmanship. I have asked more questions than I care to revisit and the experts here have been patient and helpful (with a few head SMHs at my ideas) and have led me to the proper techniques and materials. If you take their advice you will reap the rewards. ------------- 1970 Mustang "Theseus' paradox" If everyone else is doing it, you're too late! |
Posted By: Mike9812121298
Date Posted: April-02-2017 at 4:00am
|
Alright scratching the adhesive idea and going back to sanding. Had about 45 min to get some work done. Got the pads pealed up. Tomorrow the plan is to take it down some more. http://s875.photobucket.com/user/mike9812121298/media/E01B5DF0-F3D7-4061-A8A4-2AE1FEFFCE6D_zpsd6nop97y.jpg.html" rel="nofollow"> 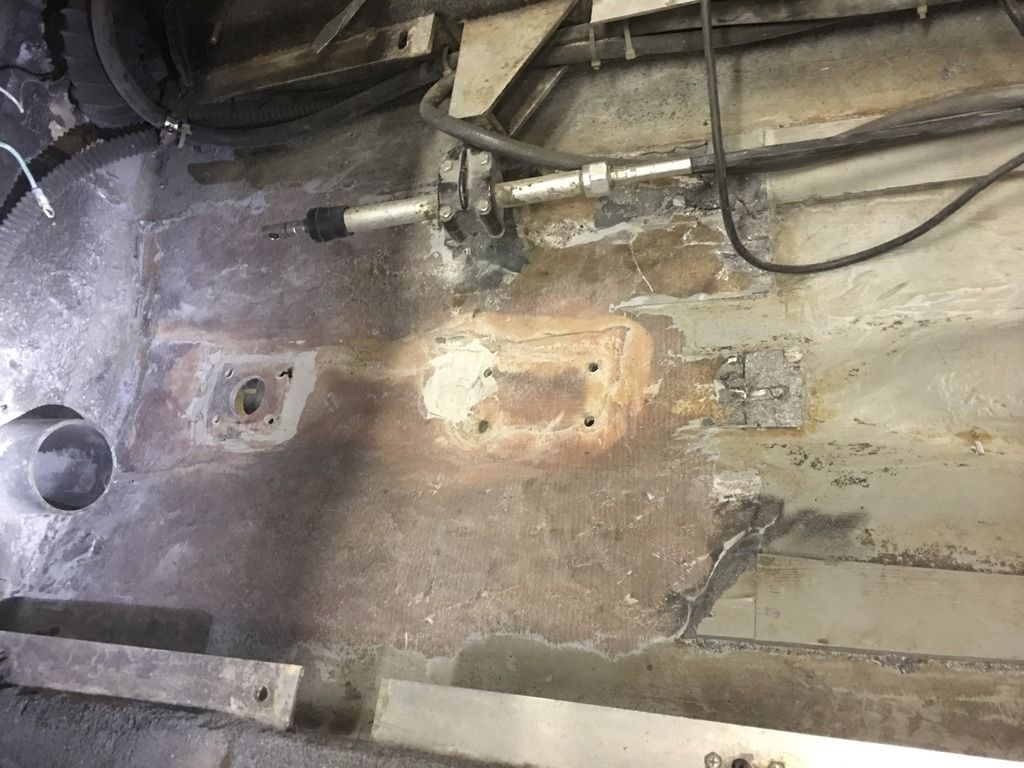 |
Posted By: 8122pbrainard
Date Posted: April-02-2017 at 7:06am
|
Mike, I just looked up 3M's 3532 and agree with what John states. This statement on McMaster's site is the concern "The thickest and most flexible structural adhesives, urethanes bond materials that expand and contract at different rates." Urethanes are fantastic adhesives but wrong for your hull repair. I'm very familiar with them since I was involved with an automation project using the Lord urethane equivalent for bonding metal components. For production, we were purchasing it in 55 gal. drums. Now, I feel you are heading in the proper direction with taking the hull down more. You want to remove the gel in the bilge until you start to see some glass. You want the new glass to bond to the old glass and not the old bilge gel coat. I also feel strongly that you should grind out the cracks as previously mentioned. I'm still concerned about some lamination disbonding in the damaged area. Also, it's great you removed the iso-damp so you can get the repair over a larger area. Stay with traditional epoxy resins, fillers and glass. I'm curious as to why you used the 3532. Is it a material you use at work? Did a friend recommend it? ------------- /diaries/details.asp?ID=1622" rel="nofollow - 54 Atom /diaries/details.asp?ID=2179" rel="nofollow - 77 Tique 64 X55 Dunphy Keep it original, Pete < |
Posted By: Mike9812121298
Date Posted: April-02-2017 at 7:53pm
http://s875.photobucket.com/user/mike9812121298/media/DD56EEEF-332F-47FD-AE99-70D045F70AC2_zpsr8kzy9bz.jpg.html" rel="nofollow">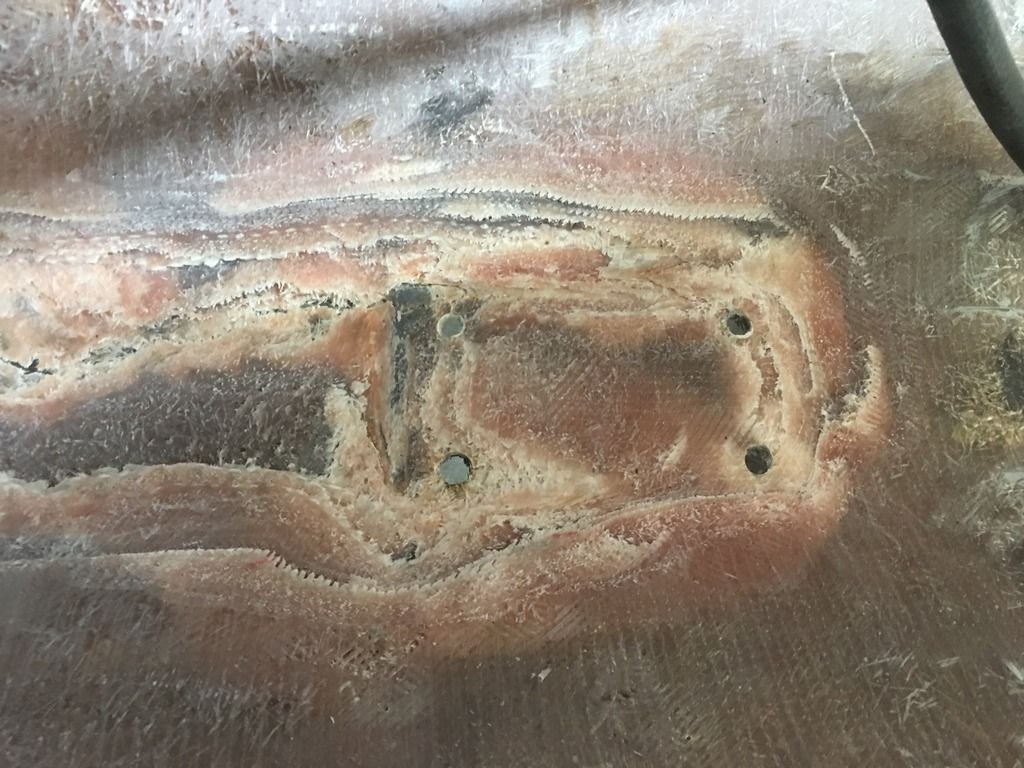 http://s875.photobucket.com/user/mike9812121298/media/FB218762-6BDD-4DC4-B240-5FC02E98FCC9_zpspmddwjwk.jpg.html" rel="nofollow"> 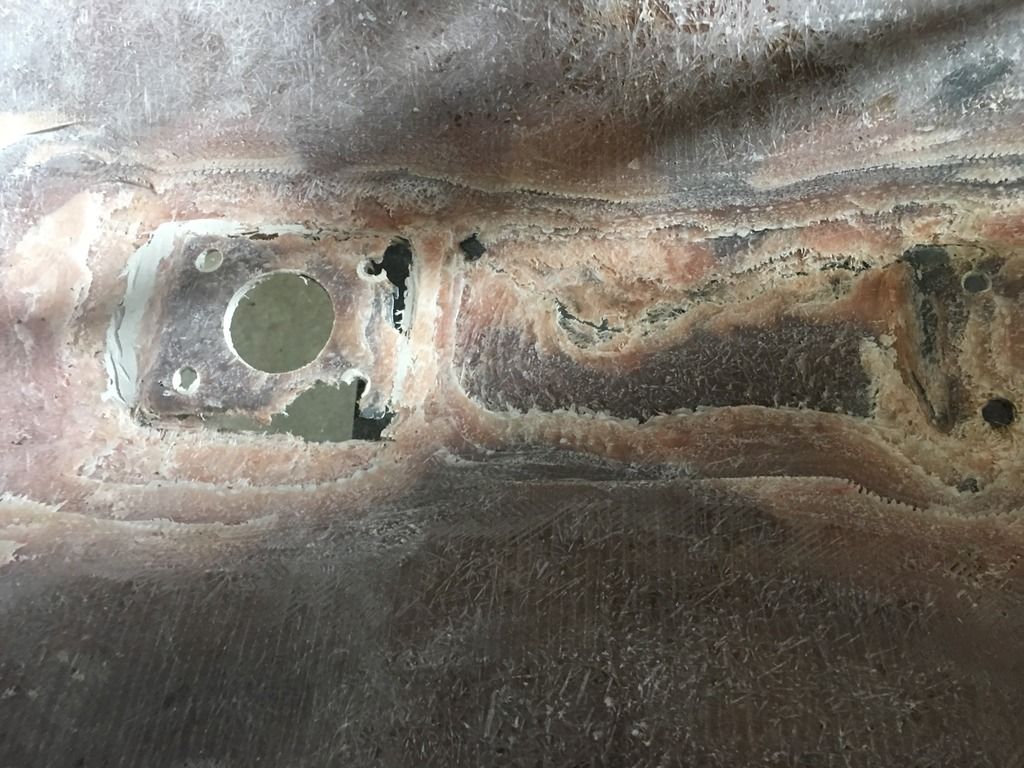 http://s875.photobucket.com/user/mike9812121298/media/F93E89AE-59EF-453E-990A-0E5F4EA6C12B_zpsj4ddxvbw.jpg.html" rel="nofollow"> 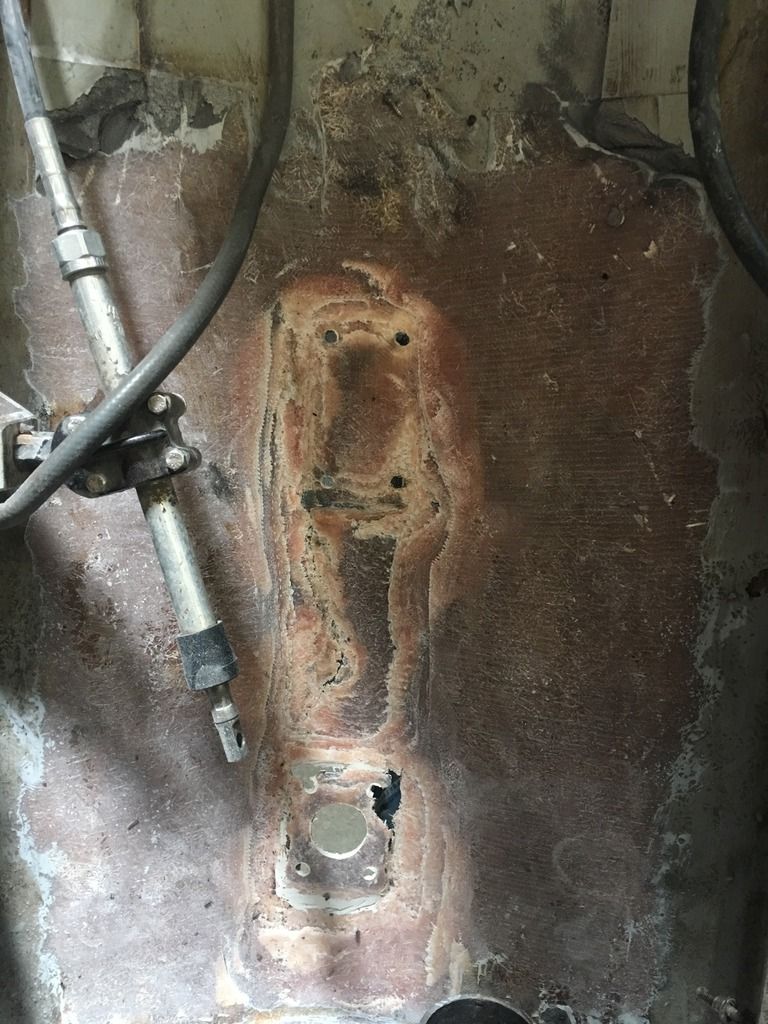 |
Posted By: SNobsessed
Date Posted: April-02-2017 at 8:10pm
|
I see you broke thru. Still in kibitzing mode here. Here's an idea - somehow clamp some plywood up to the bottom side of that hole pattern. Maybe use some of that glue temporarily. Transfer the hole pattern to the plywood with 1/8 in. holes. Then take out the remnant of the damage entirely. Then start the layers from scratch & you can redrill after it is all cured. If you put some plastic sheet over the plywood, the resin won't stick to it. I think a totally virgin patch will be stronger because there are less interfaces. ------------- “Beer is proof that God loves us and wants us to be happy.” Ben Franklin |
Posted By: Gary S
Date Posted: April-02-2017 at 8:21pm
|
That might be a good idea Chris. He'd have to make plates out of other plastic maybe to recreate the indentations for the underwater gear http://s875.photobucket.com/user/mike9812121298/media/42C96D99-19BF-42F6-BC5E-5104EEB18AAE_zpsqsoyzhqo.png.html" rel="nofollow"> ------------- http://www.correctcraftfan.com/diaries/details.asp?ID=1711&sort=&pagenum=1&yrstart=1966&yrend=1970" rel="nofollow - 69 Mustang HM SS 95 Nautique Super Sport |
Posted By: 8122pbrainard
Date Posted: April-02-2017 at 8:21pm
|
Mike, Thanks for the pictures since they do show the disbonding concern. Chris's idea is a good one. with bolting a board and plastic on the bottom of the hull to act as a form. Fairing the bottom can be done latter. Prime the area with straight epoxy resin especially where you see the disbonding. Then mix in some filler such as Cabosil or milled glass. Putty knife that into the disbonded layers and any low areas such as where you went through the bottom. From there, you are ready to start laying in glass. Have you looked for glass yet? BTW, I suggest not using any more of the urethane adhesive. ------------- /diaries/details.asp?ID=1622" rel="nofollow - 54 Atom /diaries/details.asp?ID=2179" rel="nofollow - 77 Tique 64 X55 Dunphy Keep it original, Pete < |
Posted By: Gary S
Date Posted: April-02-2017 at 8:33pm
|
But if he would start laying thin layers of thin new mat,each one being larger than the last, it would end up much like plywood in it's strength. Pete ,Tim or Tim Bob should have some good ideas. Mike check into http://www.uscomposites.com" rel="nofollow - US Composites for your glass supplies, medium cure epoxy might be best ------------- http://www.correctcraftfan.com/diaries/details.asp?ID=1711&sort=&pagenum=1&yrstart=1966&yrend=1970" rel="nofollow - 69 Mustang HM SS 95 Nautique Super Sport |
Posted By: 8122pbrainard
Date Posted: April-02-2017 at 9:03pm
Correct. That's the suggested plan after the low spots and disbonding are addressed with the prime of straight resin and then the filled resin. I'm not talking about filling the complete area with filled epoxy!! As far as glass goes, biaxial is my recommendation. Yes on US Composites. ------------- /diaries/details.asp?ID=1622" rel="nofollow - 54 Atom /diaries/details.asp?ID=2179" rel="nofollow - 77 Tique 64 X55 Dunphy Keep it original, Pete < |
Posted By: Gary S
Date Posted: April-02-2017 at 9:17pm
I was too slow typing Pete I was referencing Chris,I didn't mean to direct that to you  ------------- http://www.correctcraftfan.com/diaries/details.asp?ID=1711&sort=&pagenum=1&yrstart=1966&yrend=1970" rel="nofollow - 69 Mustang HM SS 95 Nautique Super Sport |
Posted By: rolleronariver
Date Posted: April-02-2017 at 9:38pm
|
I'm just here to watch and learn. Projects like this is why I love this forum! I"m learning a ton on here! ------------- 92 Sport nautique |
Posted By: Mike9812121298
Date Posted: April-02-2017 at 11:06pm
http://s875.photobucket.com/user/mike9812121298/media/411D8566-10D6-4EA3-B9FE-6DC9B2F56DA3_zpsquigzo4r.jpg.html" rel="nofollow">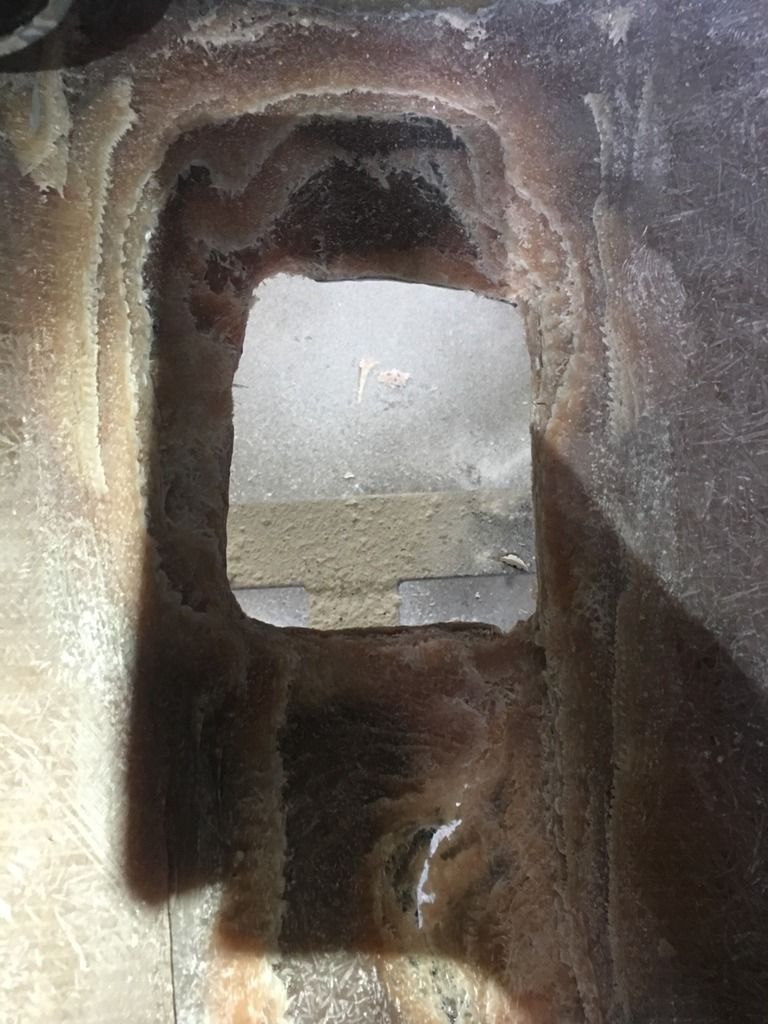 http://s875.photobucket.com/user/mike9812121298/media/580C795A-3D8A-47A0-BA32-69868ED338CC_zpsndtj16pw.jpg.html" rel="nofollow"> 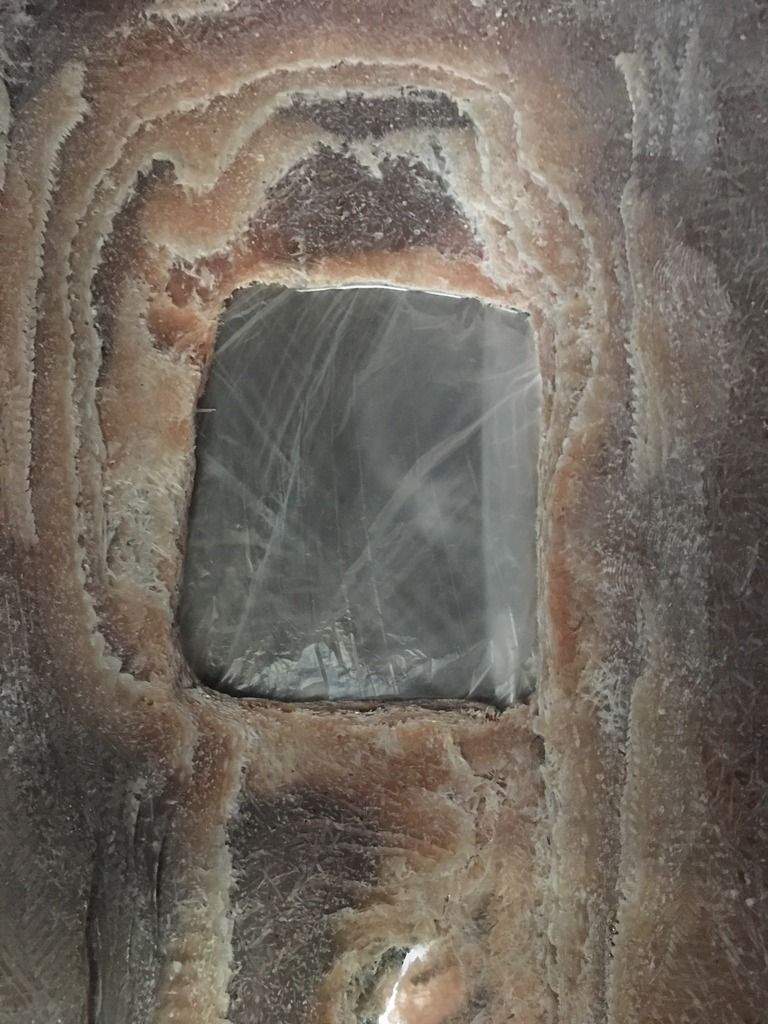 http://s875.photobucket.com/user/mike9812121298/media/5EBCBA20-6E74-4039-A309-E6F1EB89EC4B_zpsqezkhibw.jpg.html" rel="nofollow"> 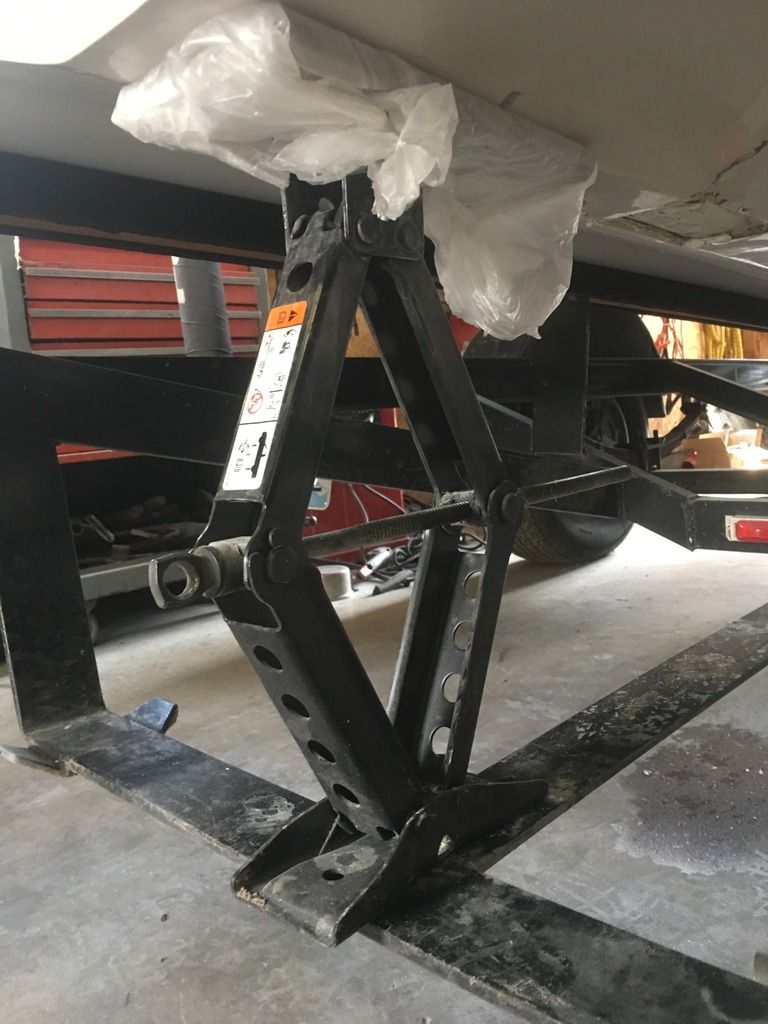
|
Posted By: tryathlete
Date Posted: April-03-2017 at 12:20am
| Nice going Mike! |
Posted By: Mike9812121298
Date Posted: April-03-2017 at 12:31am
|
I would have started glass but I only have the bondo resin that is not expoxy. How much glass should I order? Think this will work to start glass? |
Posted By: KRoundy
Date Posted: April-03-2017 at 2:01am
|
I think you are on the right track! You see no more delamination or cracks, right? Hard to tell from a couple of small pictures. Once you get to that time to glass it back up with the right glass and epoxy resin. Lots of places to source it here in the Seattle area. TAP plastics has a good selection of glass but make sure you get the right resin. There are some very good marinas (NOT WEST MARINE!) that carry what you need too. Up near me I've always been amazed at the selection and knowledge of the team at Harbor Marine in Everett. ------------- Previous: 1993 Electric Blue/Charcoal Ski Nautique Current: 2016 Ski Nautique 200 Open Bow |
Posted By: 8122pbrainard
Date Posted: April-03-2017 at 7:46am
|
Mike, Don't forget poly covered blocks to mimic the strut and rudder base indentations in the hull bottom. Make them slightly oversize to allow for bedding (caulking) compound. Lookin' Good!  One trick I've used for disbonded areas where they are too deep to get resin into is to drill small (about 3/32") holes through the top layer. Then when you prime the area with plain resin, the resin will flow into the disbonded layers. Injection with a syringe also woks in real tight spots. ------------- /diaries/details.asp?ID=1622" rel="nofollow - 54 Atom /diaries/details.asp?ID=2179" rel="nofollow - 77 Tique 64 X55 Dunphy Keep it original, Pete < |
Posted By: Mike9812121298
Date Posted: April-04-2017 at 12:22am
|
Looking at fiberglass. What one would I want for this project and how much http://s875.photobucket.com/user/mike9812121298/media/33900CB0-FF57-40AC-9602-643FF94ECDD1_zpsydubk9dw.png.html" rel="nofollow"> 
|
Posted By: Mike9812121298
Date Posted: April-04-2017 at 12:26am
http://s875.photobucket.com/user/mike9812121298/media/85808B8A-BDB1-48FB-B6A6-422675D449AC_zps24xotmzh.png.html" rel="nofollow">
|
Posted By: Gary S
Date Posted: April-04-2017 at 12:47am
|
I would not use something like that,chopped fibers do not have the strength that cloth or matt has. Nautiques are not originally constructed with chopped glass they use a cloth/mat layup. Many cheaper boats use chopped glass applied with a Chopper gun which mixes the resin and chops fiberglass thread and sprays it into a mold. I would lean towards something like the fifth one down http://www.uscomposites.com/cloth.html" rel="nofollow - here . Maybe Morfoot will see this and advise, he repairs fiberglass parts in the aviation world. A small roller like http://www.uscomposites.com/fgrollers.html" rel="nofollow - these would be nice too to work out the excess resin and bubbles as you layup the layers too ------------- http://www.correctcraftfan.com/diaries/details.asp?ID=1711&sort=&pagenum=1&yrstart=1966&yrend=1970" rel="nofollow - 69 Mustang HM SS 95 Nautique Super Sport |
Posted By: Morfoot
Date Posted: April-04-2017 at 1:37pm
Late to the game on this one guys but a tarnished Starr texted me to have a looksee at this thread and add my $.03 worth. Glad to see you grind it all the way down and get rid of the adhesive fill that you added. Smart Move!  You're on the right track Mike but I would NOT use chop glass on any of that repair. For strength I would definately use woven cloth. You're on the right track Mike but I would NOT use chop glass on any of that repair. For strength I would definately use woven cloth. Now that you've got it reinforced from the bottom I would brush epoxy straight onto what you have and use the brush bristles to force epoxy in between the delaminating plies. once you have done that, put some wax paper down then weigh it down with a half empty bag of sand or a gallon ziplock bag not quite full to compress the delaminated/damaged plies together. Using a sandbag will conform to the shape of the bottom of the hull. Once it cures then do a light sand with a 120 grit or coarse scotchbrite pad to rough up the epoxy. Wipe it down with acetone. Use a big piece of transparent plastic and lay it down on the repair. Use a fine line sharpie and trace each individual layer of cloth starting with the smallest first and continue with each larger ply until you have no more layers to trace. Now you have patterns to go by when you cut your cloth to epoxy in place. I would add 3 final plys on top of however many initial plies you have with each one 1/2 inch larger than the next. Several plies adhereing to the hull is better than just one big one. Stronger longer lasting repair if it's done this way. Once all the plies are down then weigh it down with those sandbags as compression is KEY to a STRONG repair! If any of this confuses you then don't hesitate to give me a call at 77Zer0 31six 6nine6three and I'll be happy to explain better than the above. Nice find and keep the pictures coming on the progress. ------------- "Morfoot; He can ski. He can wakeboard.He can cook chicken.He can create his own self-named beverage, & can also apparently fly. A man of many talents."72 Mustang "Kermit",88 SN Miss Scarlett, 99 SN "Sherman" |
Posted By: Mike9812121298
Date Posted: April-04-2017 at 3:13pm
| quick question, theres a local store that sells the fiberglass and resin. the lady on the phone was telling me that i would want to use vinyl ester resin over epoxy. what do you guys recommend |
Posted By: TRBenj
Date Posted: April-04-2017 at 3:32pm
| Epoxy |
Posted By: 8122pbrainard
Date Posted: April-04-2017 at 3:53pm
|
Epoxy. Don't go to THAT store!!! ------------- /diaries/details.asp?ID=1622" rel="nofollow - 54 Atom /diaries/details.asp?ID=2179" rel="nofollow - 77 Tique 64 X55 Dunphy Keep it original, Pete < |