85 2001 LVL Stringer Project
Printed From: CorrectCraftFan.com
Category: Repairs and Maintenance
Forum Name: Boat Maintenance
Forum Discription: Discuss maintenance of your Correct Craft
URL: http://www.CorrectCraftFan.com/forum/forum_posts.asp?TID=9503
Printed Date: April-29-2024 at 3:03am
Topic: 85 2001 LVL Stringer Project
Posted By: Big Pappa
Subject: 85 2001 LVL Stringer Project
Date Posted: January-28-2008 at 5:34pm
|
Hey everyone. I have been lurking around here for a while and posted a couple of times, but this is my first project post. I have an 85 2001 that is in great shape it just had a soft spot in front of the pylon and behind the drivers seat as so many of these boats do.
Well this is the year to fix that. I pulled up the carpet yesterday and low and behold most of the drivers side floor has delaminated from the side of the boat and a little over half of the passenger is the same way. The area in front of the pylon is shot and will have to be replaced. I drilled a 1" hole every 2' down both sides and once I got behind the front of the motor the foam looks dry and clean. I am probably going to go ahead and rip it all up so I can see the condition of the stringers and supports and make sure there is not any water under the foam. This is creating more work but it is better to fix it right the first time than having to do it all over again in a couple of years. This is view of my boat. 
This is the Drivers side the floor has pulled away between the red lines. 
Here you can see how far it pulled away 
Here are the holes on the driver side. The red circles are where the foam was wet and nasty looking. Green is where it was clean and dry. 
Here is the Passenger side crack. 
And the Passenger side Holes 
So what do you all think? I am pretty sure I want to pull up the floor to check the stringers and make sure it is all dry under there before I glass it all back together. Who has used something besides carpet after completing their repairs, To keep from having carpet that will hold moisture? I am still thinking 40oz carpet is going to be what I use but I am thinking maybe there is another option. Gator grip would be cool but expensive. Anyone done snap out carpet? How did it work out? Anyway, thanks guys and gals!!! Kris ------------- http://bit.ly/Mghpvx" rel="nofollow - Big Pappa http://bit.ly/L4zRW0" rel="nofollow - My Project |
Replies:
Posted By: TRBenj
Date Posted: January-28-2008 at 5:42pm
Welcome to the site. Sounds like you should pull the wood out of the floor and see whats underneath. It runs from the front of the motorbox to the back of the battery box. Here is a pic of my '90 with the wood portion removed:
Once you get that up, you'll be able to judge the condition of the foam and stringers. If theyre wet and rotten, keep digging backwards until you find solid, dry stuff. ------------- |
Posted By: Big Pappa
Date Posted: January-28-2008 at 7:25pm
Thanks, glad to be here. Yea, I will definitely have to pull up that portion it is completely shot. I can see the edge by the pylon and it look like just the fiberglass then the soaked wood is hanging below. 
Has anyone redid the area where the vents come down? Like making rigid vents that run down each side and give more room in the middle, or is that an area that can not be modified? |
 TRBenj wrote:
Posted By: TRBenj
Date Posted: January-28-2008 at 8:05pm
|
For more information than you could ever hope to digest in one sitting, check out Skibum's stringer/floor thread http://correctcraftfan.com/forum/forum_posts.asp?TID=5409 - here. He completely rebuilt his '87 and documented everything. ------------- |
Posted By: Big Pappa
Date Posted: January-29-2008 at 12:54am
I sat up last weekend and read all 11 pages in one sitting last week. Boy was that a read. Like drinking from a fire hose. 
|
Posted By: SkiBum
Date Posted: January-29-2008 at 7:35pm
|
Big Pappa,
If your floor is separating from the side of the hull then I strongly suspect the secondary stringers are separated from the hull as well. I have no doubt the secondaries are rotted foreward of the pylon. When I cut away the floor of the '87 it looked like much of the foam was dry. It was not. I suggest you cut away the entire floor, remove the foam, and inspect (then replace) the secondary stringers and foam. A partial repair of that area under the front seats is okay. But you are going to have to remove the floor where it is separated from the hull then splice in a repair. Pretty fun project. Just don't start doing the gelcote. That sucks. ------------- Bill http://www.freewebs.com/billsboatworks - http://www.freewebs.com/billsboatworks www.freewebs.com/billsboatworks 1987 SN Rebuild Project |
Posted By: jbear
Date Posted: January-30-2008 at 2:15am
|
Glad to see ya on Bill...not deployed yet huh?
I think I remember a post a little while back saying you might be changing "jobs". Hope you stay safe. Are you searching for a new boat or gonna wait awhile? You sure wrote the thread that explains it all about stringer replacement. john ------------- "Loud pipes save lives" AdamT sez "I'm Canadian and a beaver lover myself"... |
Posted By: Big Pappa
Date Posted: January-30-2008 at 12:37pm
Gelcote is is good shape so no worries there, thank goodness!!! Thanks for the info though. I am going through your post again making notes and figuring out a materials list and just doing my research. Looking back is there anything you would do different or have any tipos for me? That is anyone not just SkiBum. I will be cutting out the floor this weekend and will have a better picture of what I have and what the scope of work will be. Hopefully the main stringers are all fine. The bolts are all tight. I can overpower a few of them so hopefully I can get away with some rotdr or something like that. I will just have to see what I have once I get the floor out. I need to do the tap with hammer test and see what happens. |
Posted By: 8122pbrainard
Date Posted: January-30-2008 at 3:01pm
Kris, I feel the bolt tightening is just a preliminary check as the lag bolts don't go down to the bottom of the stringers. I find that a lot of the rot is on the bottoms. Just like you drilled the exploritory holes in the floor, I would drill some in the stringers close to the bottoms and see what comes out. I'm not really a big fan of Git-rot or the Rot-Doctor. It is a tempory fix. The surounding wood next to the repair done with these penetrating epoxies will start to rot quicker. The moisture is already in the wood. Tapping with a hammer is used as a preliminary as well. I've never had any luck with really "reading" the sound unless the wood is real mush! After you get the floor out, report back with what you find. ------------- /diaries/details.asp?ID=1622" rel="nofollow - 54 Atom /diaries/details.asp?ID=2179" rel="nofollow - 77 Tique 64 X55 Dunphy Keep it original, Pete < |
Posted By: SkiBum
Date Posted: February-04-2008 at 3:14pm
|
One thing I wish I would have done: After I cut the floor and removed the foam all that remained was the rotting stringers partially attached to the hull. What I did not realize was that despite the fact the boat was on the trailer, it was not shaped correctly. I found out (quite by accident) that I had to raise the sides of the hull foreward of the engine compartment in order to bring the boat back into the proper shape. At the factory it would be in a mold. I ended up placing blocks of 2x4 and small wedges to raise the bottom of the hull until it matched the bottom of the stringers.
It is important to level the boat as much as possible. Try to get it level left to right and back to front. I suppose the best thing would be to brace the boat before you cut out the floor and remove the foam. ------------- Bill http://www.freewebs.com/billsboatworks - http://www.freewebs.com/billsboatworks www.freewebs.com/billsboatworks 1987 SN Rebuild Project |
Posted By: Big Pappa
Date Posted: February-04-2008 at 3:46pm
So I should level up everything then brace everything so that the hull pulls back up to be in contact with the floor? Or is that just a matter of pulling the sides together? |
Posted By: BuffaloBFN
Date Posted: February-04-2008 at 6:37pm
Thanks Bill, I'm about to dive into this on another thread...and I really appreciate the documentation you did on your boat. ------------- http://correctcraftfan.com/diaries/details.asp?ID=2331&sort=&pagenum=12&yrstart=1986&yrend=1990" rel="nofollow - 1988 BFN-sold "It's a Livin' Thing...What a Terrible Thing to Lose" ELO |
Posted By: 8122pbrainard
Date Posted: February-04-2008 at 8:14pm
|
Kris, Here's a thread from just a couple weeks ago. It's what I think Bill (skibum) is referring to.
http://www.correctcraftfan.com/forum/forum_posts.asp?TID=9420&KW=pancake - hull pancakes ------------- /diaries/details.asp?ID=1622" rel="nofollow - 54 Atom /diaries/details.asp?ID=2179" rel="nofollow - 77 Tique 64 X55 Dunphy Keep it original, Pete < |
Posted By: SkiBum
Date Posted: February-05-2008 at 12:20pm
I did (pretty much everything) the hard way. I didn't realize the boat was changing shape until I removed the floor and the foam. I left the stringers in place and replaced only one at a time. To remedy the problem of the boat changing shape I first lifted, then blocked under four points (stern at both ends and under the dash on each side). To level the boat just use a long carpenter's level from side to side and front to back. Shim or adjust as needed. This will keep everything that comes after your work in proper level. ------------- Bill http://www.freewebs.com/billsboatworks - http://www.freewebs.com/billsboatworks www.freewebs.com/billsboatworks 1987 SN Rebuild Project |
Posted By: timsdayoff
Date Posted: February-12-2008 at 10:19pm
|
Hi guys, Sorry to slow you down a bit but my question is this: What is the best way to go about ripping the delaminated floor up. I have a 87 2001 and I have the carpet ripped up. I have two soft spots that I want to fix. I've cut into one spot and the foam is wet. Do I need to rip the entire floor and how do I do it? How do I separate it from the side of the hull? Sorry I'm not at the advanced level. Not afraid to do the work, just need some help on technique.
Tim ------------- Tim, born skiing in MN, now skis Vegas |
Posted By: Big Pappa
Date Posted: February-13-2008 at 12:32am
| I am planning on cutting mine out with a sawsall. On the hull side use a long blade and let it conform to the side of the boat so it does not dig in. On the stringer side I have not decided if I am going to use the sawsall or use a Skill saw. Either one Just make the cut and try not to get into the stringer. Then just grind down the rest with a DA sander to grinder with a flap disk. Hope this helps. |
Posted By: eric lavine
Date Posted: February-13-2008 at 10:24am
|
Big Pappa, stick with the sawzall, the skillsaw blows sh*t all over the place plus you get a jagged cut, just passing info, I try keeping the dust down as first priority. I put on winter coats from last year and i instantly start itching from doing glass work ------------- "the things you own will start to own you" |
Posted By: Big Pappa
Date Posted: February-13-2008 at 12:22pm
Awesome, thanks for the tip!!!! |
Posted By: SkiBum
Date Posted: February-13-2008 at 2:02pm
|
My weapon of choice was a small air powered saw. Like a very small version of a sawzall. The blade was similar to that of a jig saw. The saw quickly cut through the floor while bending with the curves of the hull to avoid cutting through. Had to replace the blades every fifteen minutes but had the entire floor cut out in an hour - no messy glass flying about - no damage to the hull.
Then it is best to just pull all that foam out. It is in the way of replacing the stringers. It is probably wet too. ------------- Bill http://www.freewebs.com/billsboatworks - http://www.freewebs.com/billsboatworks www.freewebs.com/billsboatworks 1987 SN Rebuild Project |
Posted By: Big Pappa
Date Posted: February-18-2008 at 12:53am
|
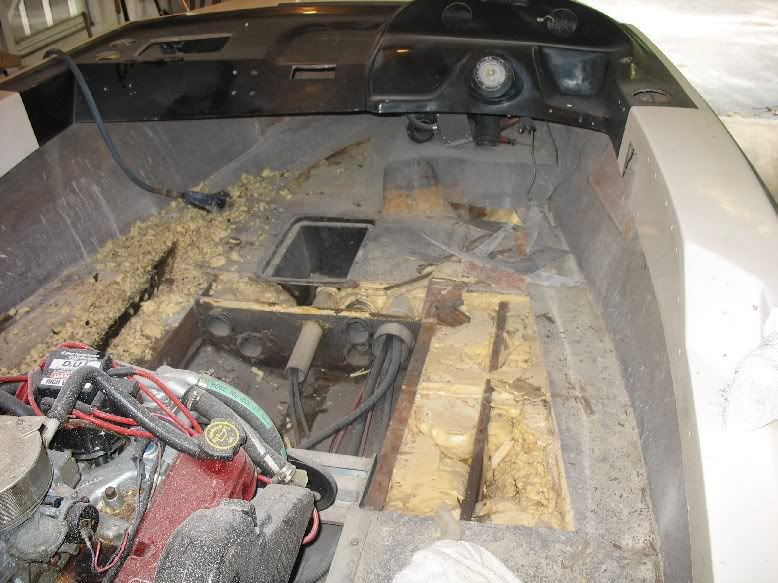
Hey everybody,
Well the boat is all braced up and the floor is out. Like you all said there was water in there. The foam was not drenched but the bottom was wet a little. All the braces but the back 2 on the port side were completely soaked with water. Here is the Boat on the stands 
This is the Starboard side with the foam still in. The 3 braces on this side were completely drenched with water. 
This is the port side with the foam still in. The first brace actually was just mush at the stringer. The back two were solid but you could see where they had been wet once or twice. 
Here is the worst part. The foam up front is completely soaked. Under the pass seat there was about 2" water puddled up. 
The foam came out real easy. I slid a pitch fork under the foam pried up and it came out in big chunks. 
Here is the side of a piece of the foam. There is some water in there bit it does not seam to be much. 
Here is the port side main stringer. I have got to do some more looking but i know for sure some is going to have to be replaced, I am not sure how much yet. 
Here is the port side secondary stringer after I the foam was out. 
And the back on the port side. If you look close you can see about a 1/2" of water running down the secondary stringer. 
This is the starboard side after the foam is out. 
And this is the back on the starboard. 
Here is the front with the foam outside of the secondary stringers out. If you look close between the secondary stringer and the main stringer you can see water standing in the foam. 
And the last one for today. This is the floor once it was out. What you see stuck to the floor up front is all that was left of the wood that was in front of the pylon. The rest was just mush. 
Now a question for you all. I have heard that you can just replace only the rotten part of the stringer. It looks like part of my secondary stringers are still OK. Are there any down sides strength wise? Or is it better to just go ahead and replace it all? I think it is better to do things right the first time and that way you do not have to go back and do things over again. I would think it would be best to replace the whole thing with one solid piece of wood but I would like to hear what you all have to say about it. What do you think? Kris ------------- http://bit.ly/Mghpvx" rel="nofollow - Big Pappa http://bit.ly/L4zRW0" rel="nofollow - My Project |
Posted By: 8122pbrainard
Date Posted: February-18-2008 at 7:44am
|
Kris, I strongly recommend doing the complete stringers and never just part. Scabbing old to new is a problem but you need to think about the water moisture. Sections of the stringers may seem good now but the wood is already wet and the rot spores are just waiting to go to work. Doing the complete job now really isn't that much more work considering having to open up the bilge a second time to finish the job. Don't forget that the stringers now can be done with epoxy resin and not polyester. Big difference with the water getting to the stringers. ------------- /diaries/details.asp?ID=1622" rel="nofollow - 54 Atom /diaries/details.asp?ID=2179" rel="nofollow - 77 Tique 64 X55 Dunphy Keep it original, Pete < |
Posted By: SkiBum
Date Posted: February-19-2008 at 12:07am
|
I think you are going to find that those secondaries will just crumble when you pull them apart. Best to just replace the entire stringer.
Good to see that you have your boat braced. I suggest that before you get started with your repairs that you pull the engine/transmission, fuel cell, and running gear. You'll have more room to work in the boat and less chance of getting fiberglass mess on the engine and components. Also, be careful about prying that foam out of the boat. If you are using leverage from the bottom of the boat to force the foam out, you could actually damage the hull if you apply too much pressure. ------------- Bill http://www.freewebs.com/billsboatworks - http://www.freewebs.com/billsboatworks www.freewebs.com/billsboatworks 1987 SN Rebuild Project |
Posted By: Big Pappa
Date Posted: February-19-2008 at 2:52am
|
I was hoping to not have to pull the engine (I was hoping that the main stringers were OK). I was planning on pulling the Fuel cell and exhaust the whole time, now I just have to add the Engine/trans and running gear. :-(
I will be doing this this weekend. I will have to go and get another engine stand to put it on now. (I have a 73 bronco I am restoring and the fresh 351W is on the stand I currently have.) At least now I will have the engine out and can run over it with a fine tooth comb. I can also clean it up some and repaint some of the parts that need it. Just to give you guys a little idea on the direction I am going with my project. I am replacing the floor to pretty much stock. One exception is I am going to add a cooler in front of the pylon like the option from the factory. I am going to carpet the sides of the boat like the factory did except using some 40 oz carpet. For the main floor I am going to change a little bit. I am going to gel coat the floor, then I am going to cut and install snap out carpet. The exact layout I am not sure of yet but every thing will be functional. The center in the back will come out just like stock. One other thing I am going to do is I am going to add a removable seat from behind the drivers seat to the rear seat. Something like this. 
Yea I know these two may be somewhat controversial, but they both serve a functional purpose. 1. The Gel coat and snap out carpet will help keep water from getting back to the stringers. Epoxy coated fiberglassed stringers sprayed with gel coat on the floor and outside of the hull should keep water out pretty well. Then the snap out carpet will allow me to pull the carpet out and let it dry completely. Plus replacement will be a breeze and I will see cracks in the floor as soon as they happen. 2. The seating is mainly for storage. That is all that happens in that part of my boat anyway. Cooler, boards, rope, towels, bags, food, etc... this way I will have some more hideable storage. I am going to design it so that it will be completely removable to return the floor plan back to stock. Other small changes are a carpet covered panel to cover the fuel cell area. Glove compartment with a top, Radio, hose attachment for running the boat at the house easier, Transom mounted ski ring, a good wet sand and buff, clean and oil the swim deck, and maybe some sort of clear protection for the transom for good measure. That is the plan as it is today. Any comments, yeaaas, neaaaas, or flames? :-) Kris |
Posted By: JoeinNY
Date Posted: February-19-2008 at 2:59pm
|
http://www.corinthianmarine.com/ - Corinthian Marine
These guys will make your snap in carpet for you, they send you samples and instructions to basically make a paper template to roll up and send back. They do all the edgeing and can do custom embrodiary work, pretty sure they can install the snaps as well. Its high end stuff however, not for the faint of wallet. I might go the snap in route if I felt I could get a good nonskid gelcoat down inside the boat I would be happy with but I dont have those skills. ------------- http://www.correctcraftfan.com/diaries/details.asp?ID=1477 - 1983 Ski Nautique 2001 1967 Mustang 302 "Decoy" http://www.youtube.com/watch?v=cO5MkcBXBBs - Holeshot Video |
Posted By: timsdayoff
Date Posted: February-21-2008 at 12:38am
|
Big Poppa,
I'm in the middle of replacing the foam and glass on my 87. How are you going about placing a floor cooler in front of the pylon? I think I know where it will fit but what are you using for the thermal compartment and where do you get that? How does it mount? Are you worried it may block some of the cooling airflow to the engine? I love the idea. Help me out with some info. Tim ------------- Tim, born skiing in MN, now skis Vegas |
Posted By: Big Pappa
Date Posted: February-21-2008 at 2:34am
|
I have not decided the exact implementation just yet. From the factory it was just another compartment like the battery compartment. I will probably look around and see if I can find something that I can modify and make work. If I can not find something that will look factory I will get some foam and mold it like the battery box. Then make my own out of fiberglass.
One thing I have been contemplating is extending the battery compartment like in http://www.the2001.com/index.php?name=PNphpBB2&file=viewtopic&t=74&highlight=cooler - This Thread then using a hinged lid so I could get to the tasty beverages without lifting the seat but still having the larger cooler. Then move the battery up in the bow. As far as the airflow. That is not for cooling, the lake water is an endless supply of cooling. The vent is to keep gas vapors down to a min so you do not go boom!!! I am just going extend the vents down and there should not be a problem. Hope this helps. Kris |
Posted By: timsdayoff
Date Posted: February-24-2008 at 10:22pm
|
Thanks for the info. ------------- Tim, born skiing in MN, now skis Vegas |
Posted By: jon4pres
Date Posted: February-28-2008 at 3:22pm
|
I am pretty late to the party here but I had a pretty similar project last summer when I went to fix a small soft spot and ended up tearing everything out.
I say if you are doing it do it all at once. It is not going to be that much more difficult or expensive to do it all. I did something very similar to what Luke did in that post. I did not do a cooler but made a large compartment that has both batteries and room for some storage. I like you idea of gel-coating the floors and stringers. I wanted to do the same thing but did not have the ability to spray gel so I went with a 2 part epoxy (garage floor) paint over my epoxied stringers and marine plywood floor panels. Only time will tell but I am very confident that my boat will last a long time. ------------- http://correctcraftfan.com/diaries/details.asp?ID=1801&yrstart=1976&yrend=1980 - 82 2001 jon4pres@gmail.com Fort Scott Kansas |
Posted By: 8122pbrainard
Date Posted: February-28-2008 at 3:45pm
Jon, I must have missed that thread on 2001. I admire you guys enlarging the under floors but hope you didn't use a carbon steel box like Luke did. From the stand point of corrosion with the potential (I know he's got the optima's) for battery acid/fumes plus down in the bilge, it would be my very last choice for a material. ------------- /diaries/details.asp?ID=1622" rel="nofollow - 54 Atom /diaries/details.asp?ID=2179" rel="nofollow - 77 Tique 64 X55 Dunphy Keep it original, Pete < |
Posted By: jon4pres
Date Posted: February-28-2008 at 5:36pm
|
I didn't ever take any pictures so there was no thread. I used wood painted with epoxy for mine. Mine is not solid. I hated the stock battery box because it was not deep enough and would trap water in it. The new one is much more open.
In my rebuild I gave up on the idea of keeping everything watertight. Instead I tried to make a way for all the water that gets into the boat to make it into the bilge. ------------- http://correctcraftfan.com/diaries/details.asp?ID=1801&yrstart=1976&yrend=1980 - 82 2001 jon4pres@gmail.com Fort Scott Kansas |
Posted By: Big Pappa
Date Posted: March-12-2008 at 4:47pm
|
I have had the crud and had a trip for work so I have not worked on the boat all that much. Over the past few weeks I have made some progress though.
I have the engine out and on a stand I built. 
I have the floor out to behind the battery box. The boards both in front and behind the battery box had rot in them. The one in front was just mush. 
The foam under the box was completely soaked. Upon further inspection the hose coming from the drain on the box was broke so any water in the bilge was able to seep under the battery box and it did. 
Once all the foam was out I could see the front of all the stringers and all 4 have rot from the engine forward. So they all have to go and new put in. 
Here is the front of the boat once I cleaned out all the foam and vacuumed. Yes I am another one with OCD.  Also notice that the fiberglass has dried out since the last pictures. All the foam was wet on the bottom 1/4" or so. Also notice that the fiberglass has dried out since the last pictures. All the foam was wet on the bottom 1/4" or so.

Here is the back after clean up. 
Next on the agenda is pulling the rest of the floor under the bow. All the water I found under the Battery box has me spooked and I am going to pull it while I am here just for piece of mind. It will not be that much more work but will ease my mind knowing it was done right. Plus I wanted to change the vent hoses and maybe reconfigure things up there a little bit. Other than that it is just cleaning up where the floor connected to the hull in the very front and in the very back. The boat was nice enough to separate the floor along the sides for me. 
After that it is time to cut and replace the stringers. I am hoping they are in good enough shape I will be able to create some templates, we will see how that works out though. |
Posted By: JoeinNY
Date Posted: March-12-2008 at 5:08pm
|
Your only about a day behind me, I found the foam wet right up to the lifting eye in the front when I went the rest of the way. I am measuring and 3d modeling up the boat now so I can order parts and know where to put them once I start taking out stringers, if I come up with anything useful I will pass it along. ------------- http://www.correctcraftfan.com/diaries/details.asp?ID=1477 - 1983 Ski Nautique 2001 1967 Mustang 302 "Decoy" http://www.youtube.com/watch?v=cO5MkcBXBBs - Holeshot Video |
Posted By: BuffaloBFN
Date Posted: March-12-2008 at 7:42pm
|
Kris, I think OCD rox! I think many of us may be paddling that canoe...to go to such lengths to end up with what we want?!!?
I too found a broken fitting at my battery box. We may have found a weak link. It seemed like a brittle fitting and the foam around it was solid. If the boat moves as fiber does, maybe the smaller fittings need to be a little flexible? Yall set me straight if I'm off, but I'm thinking back to a mariah that flexed enough in rough water for the center window to fall through. This hull is much more soild than that, but it will still move some I think. Joe, I'd be interested in your measuring strategy...especially since you've been here before! ------------- http://correctcraftfan.com/diaries/details.asp?ID=2331&sort=&pagenum=12&yrstart=1986&yrend=1990" rel="nofollow - 1988 BFN-sold "It's a Livin' Thing...What a Terrible Thing to Lose" ELO |
Posted By: Hollywood
Date Posted: March-12-2008 at 7:50pm
|
Seeing the original floor design, it kind of makes me want to dig into the '88 to redo some of the things. Not that I want to have to do this, but ready for the day it needs it. ------------- |
Posted By: JoeinNY
Date Posted: March-12-2008 at 7:56pm
|
4 foot adjustable drywall t square, 16 inch adjustable framing square, digital calipers, tape measure, 4 and 6 foot levels, clamps, etc its a PIA. But with the changes I want to make up front, and my desire to order material mostly precut it seems the thing to do. It would go quicker if I recruit a secretary... ------------- http://www.correctcraftfan.com/diaries/details.asp?ID=1477 - 1983 Ski Nautique 2001 1967 Mustang 302 "Decoy" http://www.youtube.com/watch?v=cO5MkcBXBBs - Holeshot Video |
Posted By: BuffaloBFN
Date Posted: March-12-2008 at 8:21pm
|
You're more high tech than I am. I've made a few 'adjustable' squares out of scrap wood from the shop...drives me nutz that this is not an exact science?!!? LOL ------------- http://correctcraftfan.com/diaries/details.asp?ID=2331&sort=&pagenum=12&yrstart=1986&yrend=1990" rel="nofollow - 1988 BFN-sold "It's a Livin' Thing...What a Terrible Thing to Lose" ELO |
Posted By: 8122pbrainard
Date Posted: March-12-2008 at 8:57pm
|
Greg, Do you have a power hand planer? Goes real quick to scribe the new wood to the hull! ------------- /diaries/details.asp?ID=1622" rel="nofollow - 54 Atom /diaries/details.asp?ID=2179" rel="nofollow - 77 Tique 64 X55 Dunphy Keep it original, Pete < |
Posted By: Big Pappa
Date Posted: March-12-2008 at 11:46pm
|
Joe, That is cool what are you modeling it in?
BFN, The hose and fitting was hard and brittle but I think it may have been pliable at some point. I will just have to figure out a better system/ Components when I put it back in. For those of you that do not know what we are talking about I will try and get a pic tomorrow. |
Posted By: BuffaloBFN
Date Posted: March-13-2008 at 2:18am
I'm thinking flexible pvc...we may get some other ideas from the pros. ------------- http://correctcraftfan.com/diaries/details.asp?ID=2331&sort=&pagenum=12&yrstart=1986&yrend=1990" rel="nofollow - 1988 BFN-sold "It's a Livin' Thing...What a Terrible Thing to Lose" ELO |
Posted By: JoeinNY
Date Posted: March-13-2008 at 12:42pm
|
I am modeling in Solidworks for the most part, although I have ProE at the shop and I like ProE better but I don't use it enough to justify the maintanence fees so its getting to be a pretty old version. This measuring is far from hitech and is probably overkill but I can't ever remember being pissed off that I took too many measurements before I pulled it apart. The digital caliper does save my back a little as I dont have to get down to eye level with the stringers as much. I did notice last night that although the boat was leveled to the floor it is not level to the stringers in the front, so I am going to have to adjust again.
My boat had both a cooler and a battery box, these were critical weak spots in two ways, one is the drains which both were in blocks of frozen soaked foam, the other and more critical in my situation is the joint between the boxes and the floor. First the gelcoated boxes were put in place, then the floor was put over the top, but getting fiberglass to stick onto of the gelcoat in a spot where the box cover is going to transfer your wieght to every time get in and out of the driver seat is just a bad idea. Thats where mine delaminated from the box and allowed water into the floorboards and rotted the front of the stringers from the top, the dozens of staples holding the floorboards into the stringers didnt help slow the rot any. My better system for the drain is to not put any foam back under there. ------------- http://www.correctcraftfan.com/diaries/details.asp?ID=1477 - 1983 Ski Nautique 2001 1967 Mustang 302 "Decoy" http://www.youtube.com/watch?v=cO5MkcBXBBs - Holeshot Video |
Posted By: lancef
Date Posted: April-04-2008 at 12:52am
As i posted in another topic, I am doing the same thing as you guys. I got to here tonight. What a blast this has been getting to here (:

A couple of questions... 1. What kind of wood are you going to use for stringers? 2. I know, I know, I have read all the old posts, but epoxy or poly resin? 3. Marine plywood glassed/resined on both sides for the floor? 4. Also do you know if there was a reason the outer little stringers have that 1" gap in them? (where its filled with foam) |
Posted By: BuffaloBFN
Date Posted: April-04-2008 at 9:27am
LOL It's a rite of passage! Be careful with so many tools in the boat...I have 2 left feet and would look like a 3 stooges episode?!!?
Have you had a chance to scroll through the http://correctcraftfan.com/forum/forum_posts.asp?TID=9543&PN=1 - pumpkin patch thread? Tons of good info! 1. Douglas Fir, and I used fir ply as well instead of marine grade(much cheaper). I'll give it a CPES bath before installation. 2. epoxy ------------- http://correctcraftfan.com/diaries/details.asp?ID=2331&sort=&pagenum=12&yrstart=1986&yrend=1990" rel="nofollow - 1988 BFN-sold "It's a Livin' Thing...What a Terrible Thing to Lose" ELO |
Posted By: BuffaloBFN
Date Posted: April-04-2008 at 9:37am
|
Joe, Kris...what are you using for the air vent hose under the floor? ------------- http://correctcraftfan.com/diaries/details.asp?ID=2331&sort=&pagenum=12&yrstart=1986&yrend=1990" rel="nofollow - 1988 BFN-sold "It's a Livin' Thing...What a Terrible Thing to Lose" ELO |
Posted By: 8122pbrainard
Date Posted: April-04-2008 at 9:57am
Greg answered your questions the way I would have but missed the reason for the epoxy. Strenght but primarilly because it isn't hygroscopic like polyester is. As far as the 1" gap, you'll need to ask Billy Bob out in the carpenter shop at the CC factory! Really, I can't see the gaps you are reffering too. Probably no structural reason to be any closer. Keep going and keep us informed. ------------- /diaries/details.asp?ID=1622" rel="nofollow - 54 Atom /diaries/details.asp?ID=2179" rel="nofollow - 77 Tique 64 X55 Dunphy Keep it original, Pete < |
Posted By: Big Pappa
Date Posted: April-04-2008 at 12:44pm
|
I am going to be using epoxy resin and glass coated Douglas Fir. I am going to be very meticulous on waterproofing the wood because I do not want to do this again.
I am thinking of laying up some glass to use in front of the pylon so I am not putting wood back there. If you notice in my pictures this is where the rot in my boat was the worst and probably where it started. I have not made the decision on the air tubing yet. I know I am going to be using something more rigid than what was there from the factory. I am also thinking of re routing them so I have more storage area under the bow of the boat for storage. I have not had any updates here recently because we are about to put our house up for sale so I have been working on all the honey dos that come with that. I hope to get back to work on in in the next week or two. It is starting to warm up here as well so the fever is coming on so I have got to get back at it so I can get to the lake. :-) |
Posted By: 79nautique
Date Posted: April-04-2008 at 12:59pm
|
Kris I think the issue around the pylon is caused by the hole not being sealed with CPES, resin/glass, or anything other than carpet. So if you where to use wodd and maybe made the clearance hole a little oversized so that you could come back with some resin and glass and completely seal that area, then it would be good to go. Maybe a little over kill but in the area instead of using ply/resin layup to span the stringers use a small section of starboard glassed over then it cann't rot, wick or deteriorate. Just some food for thought. ------------- http://www.correctcraftfan.com/diaries/details.asp?ID=756&sort=&pagenum=1&yrstart=1979&yrend=1979 - 79 nautique |
Posted By: Big Pappa
Date Posted: April-04-2008 at 1:12pm
|
I also picked up another project to work on after I finish with the Nautique. It is a Hobie Cat 16 that was given to me. The hulls need a little work and it is missing the mast and Jib but other than that it is all there. It is a bargain when it is free.
This is my first sail boat, Anybody else sail on here? Anyway here it is. 
|
Posted By: JoeinNY
Date Posted: April-04-2008 at 1:37pm
|
[QUOTE=Big Pappa] It is a bargain when it is free.
QUOTE] Not always true, sail boat parts add up to much more than the price of the whole. Retail on a new mast 1395, retail new jib white 260, color a hundred more. Single pulleys and cleats can be hundreds of dollars. I routinely see good complete H16's for sale at 1200 dollars, occasionally 800 although most of those boats are neglected. Don't want to naysay because you may find a deal on some used parts learn a little as you rebuild and get a lot of fun out of that Hobie just know what your getting into. I have a nacra 
boat dr has a fleet of hobies I am sure there are a couple other closet sailers around. ------------- http://www.correctcraftfan.com/diaries/details.asp?ID=1477 - 1983 Ski Nautique 2001 1967 Mustang 302 "Decoy" http://www.youtube.com/watch?v=cO5MkcBXBBs - Holeshot Video |
Posted By: boat dr
Date Posted: April-04-2008 at 1:39pm
|
Kris, yes there are a couple that do the BLOW BOATS.
We have our first regatta on the Gulf coast April 19.......H-18M I have several; 2] Hobie 18 1] Hobie 17 1] Hobie 16 1] Hobie 14 Turbo 1] Wharram 26 Pahi And enough parts to build several more,too many boats and not enough time to sail. Kris where are you located ? ------------- boat dr /diaries/details.asp?ID=4631 - 1949 Dart /diaries/details.asp?ID=1533 - 1964 American Skier |
Posted By: Big Pappa
Date Posted: April-04-2008 at 1:56pm
|
Joe, Yea the cost new is quite hight but I figure I would get some used stuff and get it all cleaned up and get out on the water. Then if it is something that I really enjoy I will sell it and get something newer. It is an 83 model and from what I can tell (remember I am very green) I have most all of the cables, cleats, pullys etc. It even has 3 trapeze wires with it, granted one of the handles are broken. The tramp is a little old but still holds me standing (230#) without any problems.
Boat Dr. I am in Birmingham, Al. Here is a link to more pictures. I have not loaded any since I cleaned it up though. It is in rough shape but it still floats. http://www.fulfordfamily.com/images/hobie%2016/album/hobie16.html - Click Here for Pictures
|
Posted By: 79nautique
Date Posted: April-04-2008 at 1:58pm
|
sounds like a road trip to the Doc is in order. ------------- http://www.correctcraftfan.com/diaries/details.asp?ID=756&sort=&pagenum=1&yrstart=1979&yrend=1979 - 79 nautique |
Posted By: Hollywood
Date Posted: April-04-2008 at 2:02pm
|
If you could take some pictures of the hull socket/pylon base with the pole in and out of the boat that would help many. ------------- |
Posted By: boat dr
Date Posted: April-04-2008 at 2:05pm
|
Kris give me a call , I love to talk Hobies...
Shrouds and forstay are called "standing rigging" Sheets and other lines are called "running rigging" At #230 that boat is a little small, but will be a good "starter boat" I have a jib"forsail" and a lot of misc. parts...............1-318-386-2825...Billy ------------- boat dr /diaries/details.asp?ID=4631 - 1949 Dart /diaries/details.asp?ID=1533 - 1964 American Skier |
Posted By: Big Pappa
Date Posted: April-04-2008 at 2:06pm
Here is another shot of it cleaned up. I was looking at the hulls yesterday and a good coat of wax and you can see your self in the gel. I am going to give it a good wet sand and buff to smooth things out once I finish the repairs. 
|
Posted By: Big Pappa
Date Posted: April-04-2008 at 2:07pm
| Where are you located Boat Dr? |
Posted By: boat dr
Date Posted: April-04-2008 at 2:29pm
|
Location ; Monterey Louisiana 71354 ------------- boat dr /diaries/details.asp?ID=4631 - 1949 Dart /diaries/details.asp?ID=1533 - 1964 American Skier |
Posted By: Big Pappa
Date Posted: April-07-2008 at 2:25pm
Once I get the Pylon out I will snap a few pics and post them up. |
Posted By: BuffaloBFN
Date Posted: April-08-2008 at 10:07am
|
Kris, I found some good hose at a local http://www.grgco.net/ - store . I've lived here for years and didn't know about this place. They also have wet exhaust hose but call it something different...looks the same anyway. For the air vents, I got what they call RFH (reinforced flexible hose?). It's stength/toughness is about halfway between dryer hose and the wet exhaust hose. It was a little expensive, but I'm sure I won't have to buy it again! ------------- http://correctcraftfan.com/diaries/details.asp?ID=2331&sort=&pagenum=12&yrstart=1986&yrend=1990" rel="nofollow - 1988 BFN-sold "It's a Livin' Thing...What a Terrible Thing to Lose" ELO |
Posted By: Big Pappa
Date Posted: April-08-2008 at 12:54pm
Awesome I will have to check into that. Thanks for the info!!! |
Posted By: BuffaloBFN
Date Posted: April-08-2008 at 1:31pm
|
Kris, I should add that I'm hoping to use PVC for the connections and so forth. The trouble may be that they are both ID measurements. I'm going to try rounding the ends of the pvc and see if it will work. ------------- http://correctcraftfan.com/diaries/details.asp?ID=2331&sort=&pagenum=12&yrstart=1986&yrend=1990" rel="nofollow - 1988 BFN-sold "It's a Livin' Thing...What a Terrible Thing to Lose" ELO |
Posted By: Big Pappa
Date Posted: June-29-2008 at 3:49am
|
Well it has been a while but I am still around. With work and us getting our house ready to sell I have not had time to work on the boat. I tell you, the wife has put me to work around here so we could sell and move. Not able to work on the boat and then moving closer to work and farther from the lake. Some people's Priorities!!!
Anyway Got to get out and take the rest of the floor out. Next on the list is to pull the wires cables out or out of the way. Then the engine cradle pylon. After that it is time to replace the secondaries then the primaries. Here is under the bow with the floor removed. There is a lot or room under there with all of that out!! 
Now I just have to pull all this out. Replace/ Clean it and put it all back in. That is it!!

One other question for you guys. I am about to order my supplies. Is it cheaper to buy fiberglass supplies from US Composites and have it shipped or is there somewhere in the south (Ga, Tn, Al, Ms) that has the materials and the prices? I only ask because of the weight of 10 - 12 gallons of resin and then the foam kits as well. Seams like shipping would kill your wallet!!!
|
Posted By: TRBenj
Date Posted: June-29-2008 at 11:24am
Ive still found US Composites to be the cheapest- and thats including shipping to the northeast. Theyre located in FL, so shipping to the south would be even cheaper. ------------- |
Posted By: horkn
Date Posted: June-29-2008 at 4:22pm
|
QUOTE...
"The foam under the box was completely soaked. Upon further inspection the hose coming from the drain on the box was broke so any water in the bilge was able to seep under the battery box and it did." yeah, either CC glassed the drain holes closed (like on my 78 martinique) or they simply were not made right and cracked. I like other have had to do an entire floor/ stringer replacement. I think that is one reason used CC's keep their value. Meticulous owners ;) btw, I used the very short pile marine carpeting, and since the restore/ mod work I did to the interior in 02, it has held up VERY well, but I am one of those boat owners that will ot allow shoes in my boat. Only sandals that have been properly risnsed of any sand are allowed in the nautique. Floor/ stringer replacement is a right of passage as an owner of an older nautique. ------------- 78 martinique- refloored, reinforced, stringers re glassed, re engineered interior GT40P heads Edelbrock Performer intake acme 4 blade http://img.photobucket.com/albums/v64/horkn/fish/nautique.jpg |
Posted By: Poster112
Date Posted: June-30-2008 at 10:44pm
|
Kris, wherebouts in B'ham are you? I'm on Shades Mtn. in Hoover near Bluff Park and my 85 will be going under the knife this winter. My floor is separated front to back along both sides and I have a few horizontal gel gracks on the lower exterior of both sides, which tells me it needs to be this winter, not next.
I'd love to see yours in person to see what I'm getting into and see how it's braced up underneath. Also, depending on when you order your lumber, glass, resin, and foam, we may be able to split shipping costs by ordering together. Shoot me an email if you are interested or if you'll at least let me take a gander at your nekkid boat
my email is poster112@charter.net Chris ------------- I'd rather have a bottle-in-front-of-me than a frontal-lobotomy. http://correctcraftfan.com/diaries/details.asp?ID=3182&sort=&pagenum=1&yrstart=1925&yrend=2009" rel="nofollow - 1985 Ski 1984 SW |
Posted By: Big Pappa
Date Posted: July-01-2008 at 2:23pm
I live in Hayden currently but we are looking to move around the Gardendale/ Mount Olive area. I work in Vestevia and know your area pretty well. I would agree that you need to do it this winter. The gel cracks are a good indicator that the stringers ore just about gone. My floor was separated from front to back as well. I have the bracing under the boat but it is not sitting on them right now. I took the boat off the stands to get the motor out, having to air down the tires as well. I had to air them back up to pull the boat back around to it's resting place. Now I have got to get the boat leveled back out and put it on the stands. I will be making my order in the next couple of days. Will you be ready to order then? You can come and take a look at the boat if you would like. I sent you an email. Kris |
Posted By: Poster112
Date Posted: July-01-2008 at 7:47pm
|
Kris, got your email, but I'm working in South GA this week and cannot send email for some reason.
We go through Hayden on the way to my in-law's house in Guntersville. We may be heading there this weekend. I'll let you know. I am NOT ready to order my supplies yet. I've got too much money tied up with other projects now. Sorry. I'll email you when I get back in town. Thanks. Chris ------------- I'd rather have a bottle-in-front-of-me than a frontal-lobotomy. http://correctcraftfan.com/diaries/details.asp?ID=3182&sort=&pagenum=1&yrstart=1925&yrend=2009" rel="nofollow - 1985 Ski 1984 SW |
Posted By: Big Pappa
Date Posted: July-09-2008 at 3:20am
|
Well the boat is ready for the stringers to come out!!! Woo Hoo let the fun and itching begin.
Here are a pic as it sits now. 
Question I have is the pylon mount and where the prop shaft goes through the hull looks like it has been worked on. What do you guys think? I do not have a good picture of the back but it looks a lot like the front. What ever is down there is also chipping up in places. What do you guys think? 

|
Posted By: Big Pappa
Date Posted: July-09-2008 at 3:33am
Ask and you shall receive!!! I feel rather blessed, after reading the trouble some have had getting their pylon out. I pulled the bottom bolt out and loosened the bolts on the cradle ind it easily slid out. 


|
Posted By: BuffaloBFN
Date Posted: July-09-2008 at 9:49am
Looks like you're 'gettin ready for the dance'! 
The shaft log area is a common place to find a patch; I haven't seen so many with a patch around the pylon. I would explore those patches to see how well they were done. Unless they were done really well, I'd cut out as much as I could without cutting the hardware out. I used my pylon and cradle as a reference for the stringers. It gets heavy in and out of the boat, but it worked for me. When I put the boat on stands, I leveled the cradle front to back and left to right. That gave me a known place to work back to; first 1 stringer, then the next. I also had to cut out my pylon base. Again, I used the cradle to put it back where it belongs, and the pylon base was the first part to go back before I cut anything else out. If you bolt the pylon back to the cradle before you cut anything else out, it will be a good reference for stringer height and cradle position. There are probably better ways to ensure that it all goes back as it should...I think I liked seeing the real deal in place rather than wonder if I took my measurements right. ------------- http://correctcraftfan.com/diaries/details.asp?ID=2331&sort=&pagenum=12&yrstart=1986&yrend=1990" rel="nofollow - 1988 BFN-sold "It's a Livin' Thing...What a Terrible Thing to Lose" ELO |
Posted By: Big Pappa
Date Posted: July-09-2008 at 2:00pm
I was planning on using the cradle to locate the stringers when replacing them but I had not though about using the pylon as well. Good I dea, the more things to keep constant the better likely hood it will go back together correctly!!! Thanks for the tip!!! Kris |
Posted By: MADTOWN78
Date Posted: July-09-2008 at 3:28pm
|
The pylon mount and shaft thru hulls on my 78 and my buddies 81 SN have the identical greyish "patch" job. Same goes for the raw water intake thru hull. I mean identical!! Same approximate shape and size.
It makes me think that it is a factory job. ------------- livin', lovin', lovin' livin' |
Posted By: horkn
Date Posted: July-09-2008 at 9:19pm
I agree. My 78 martinique had the identical greyish material there. I know it is factory. ------------- 78 martinique- refloored, reinforced, stringers re glassed, re engineered interior GT40P heads Edelbrock Performer intake acme 4 blade http://img.photobucket.com/albums/v64/horkn/fish/nautique.jpg |
Posted By: Big Pappa
Date Posted: July-10-2008 at 1:13pm
| That is good to know. I was worried that there has been work done in both areas of my boat. It is working fine it is just reassuring to know that it was done by the factory. |
Posted By: Big Pappa
Date Posted: July-13-2008 at 3:16am
|
The first stringer is out!!! I leveled, and braced the boat back up. Taking BFN's advice I put the cradle and pylon back in to level the boat and for future stringer locating. After all that I pulled the Drivers Side Secondary. It was in good shape for the most part but there is rot there. Once I got it out and looked at the there was hardly any glass past half way up the stringer on the starboard side.
Here is the floor with the stringer out. 
Here is a shot of the stringer out of the boat. I broke it in the process of getting it out. I used the foot hammer a little too hard. :-) 
Here is the measurements of the stringer pieces. I am going to clean it up and create one on the computer for future people to have as a reference. 
|
Posted By: BuffaloBFN
Date Posted: July-13-2008 at 12:03pm
|
Kris, be careful with that foot hammer. The hull glass will flex some under the stringer, and too much force could cause cracking in glass you want to keep.
I used a combo of a sawzall, a metal cutting grinding wheel, and a 4.5" diamond blade to cut the stringers out at their base. There were places that I wished I had a 7" grinder because of the steeper hull angle, but I was still able to get them out without too much frustration. ------------- http://correctcraftfan.com/diaries/details.asp?ID=2331&sort=&pagenum=12&yrstart=1986&yrend=1990" rel="nofollow - 1988 BFN-sold "It's a Livin' Thing...What a Terrible Thing to Lose" ELO |
Posted By: Big Pappa
Date Posted: July-14-2008 at 1:09am
Yea I was watching it pretty close. I already had the long piece out and was just trying to get the rest out. I had cut most of it and was just trying to break the parts I could not get to easily. I am using a sawsall and 4.5" grinder as well. The grinder cuts through like butta!!! |
Posted By: Big Pappa
Date Posted: April-29-2009 at 6:53pm
Hey all I have not fell off of the planet, I am in our new house and have the boat sitting patiently in the garage. I finally have all of my honey do's completed for now and it is time to get back to work on the boat. Since it has just been sitting for over a year now I guess it is about time. :-) Anyway I just made my order from US Composites, I ordered everything I think I am going to need except the Foam. I figured I would order that once I got a little closer so it would not be taking up a bunch of space in my garage. The materials should be her early next week. I will have to adjust my hull supports to work with a level Floor. They were built to hold my floor level with a gravel drive below, now they dont work with concrete.  I guess that is not to bad of a problem to have. I should be able to get to work on glassing the first stringer in once taht is done. Then it is off to the races, I figure it will probably take about 2 months or so get get it all done. (Reading between the lines... Probably more like 3 months) I guess that is not to bad of a problem to have. I should be able to get to work on glassing the first stringer in once taht is done. Then it is off to the races, I figure it will probably take about 2 months or so get get it all done. (Reading between the lines... Probably more like 3 months)
|
Posted By: 85jws
Date Posted: April-29-2009 at 8:22pm
|
Kris,
I will be following your thread as I too have an 85 and will be doing some floor work next winter. I have a soft spot under the observers seat and am a little scared at what I may get into. I am in Moody, AL. Did you move to Gardendale area? Which lake do you go to? jay ------------- Jay Current 2000 Air Nautique Old 1985 Ski Nautique |
Posted By: Big Pappa
Date Posted: April-30-2009 at 5:45pm
Yea we are in Gardendale now. We usually go up to Smith Lake. We like it up there, it is somewhat close and the water is always clean. |
Posted By: BuffaloBFN
Date Posted: May-01-2009 at 10:55am
|
Howdy Kris!
Don't you hate it when life gets in the way? I was most fortunate with an understanding wife and not having major changes going on...now she's got me busy! LOL ------------- http://correctcraftfan.com/diaries/details.asp?ID=2331&sort=&pagenum=12&yrstart=1986&yrend=1990" rel="nofollow - 1988 BFN-sold "It's a Livin' Thing...What a Terrible Thing to Lose" ELO |
Posted By: Big Pappa
Date Posted: May-27-2009 at 2:12pm
|
Well I have finally gotten back to work on the boat. Yeaaa!! This past weekend I got the boat back on the newly reworked braces so she is good and level and stable. I then got the stringers out and finished cutting the bracing cutouts on them. I then sanded them down good so everything was smooth and nice and clean. Then laminated both sides of all the pieces with mat and epoxy. Finally yesterday I pulled the pieces out and gave them a good soap and water scrubbing to knock the dust off from where I cut the edges off and sanded them smooth and make sure they were ready to be laminated together. I plan on putting them together tonight with a layer of mat and epoxy between each piece.
I do have a question on that though, Do I put down a layer of epoxy, lay on the mat, wet it out, then put some more on the other piece for good measure, then sandwich it all together and weight it down to hold it together good? Is that all there is to it? Here are all the pieces to the Drivers side Secondary laid out after getting a good scrub down. 
Here I stacked them up like they will be laminated. 
Here is a shot of my materials. I had a truck toolbox sitting in my garage and that turned out to be the perfect place to put all my glass materials.  ------------- http://bit.ly/Mghpvx" rel="nofollow - Big Pappa http://bit.ly/L4zRW0" rel="nofollow - My Project |
Posted By: critter
Date Posted: May-27-2009 at 2:17pm
|
Kris,
Looks like you are ready to go. "Do I put down a layer of epoxy, lay on the mat, wet it out, then put some more on the other piece for good measure, then sandwich it all together and weight it down to hold it together good? Is that all there is to it?" Sounds like you have a plan. This will mate the materials together nicely. ------------- 1980 Ski Nautique 1966 Barracuda |
Posted By: Big Pappa
Date Posted: June-02-2009 at 1:51am
|
The stringer is in. I was real busy running around this weekend so I did not get a chance to work on the boat. I came home today though and vacuumed out the fiberglass dust from the grinding I did on it last week. Then I laid in the 2 layers of mat and sat in the secondary. I finally feel like I am making progress. This one stringer has been over a year in the making. The next 3 should hopefully go pretty quick. I still have to do the filling and strips up the side but I have it bedded!! :-)
Here is the stringer being laminated together. 
Here it is in the boat. Finally!!! Woo Hoo!!  ------------- http://bit.ly/Mghpvx" rel="nofollow - Big Pappa http://bit.ly/L4zRW0" rel="nofollow - My Project |
Posted By: Big Pappa
Date Posted: May-18-2010 at 5:38pm
What's up guys!! It has been looks like almost a year since my last post on this project. It feels like it has been going on for years.... Oh, wait.. 
Anyway I have both the secondaries in now and the drivers side Primary is out. It was a bit of a pain to get out but it is done!! I was shocked to see how many places there were from the factory, that water could potentially get to the wood. Even though I should not be by now, I still was. Needless to say this will not be a problem with the stringers I am putting in!! I am heading out to pick up the LVL for my main stringers. I am going to give it a go it is a little thicker than what was in there 1.75" vs 1.5". Everything should fit back in without too much fuss. I figure as long as I keep my cradle as the baseline and work off of it everything else should fall into place. Now all that is left to do is do it!! I will post some updated pictures soon. Kris ------------- http://bit.ly/Mghpvx" rel="nofollow - Big Pappa http://bit.ly/L4zRW0" rel="nofollow - My Project |
Posted By: Big Pappa
Date Posted: May-18-2010 at 5:55pm
|
I forgot to tell you why I have not been working on the boat. I decided to take time and get myself back in shape and hopefully prevent some health problems that run in my family. So I got to work starting at 238# with about 27% bodyfat and am currently am around 190 and about 10% BodyFat. It has been a lot of work and I still have a little bit more that I want to loose it has been so worth it just by the way I feel and the energy that I now have!!
So working out and I also got my Personal Trainer Certification so I can help others do the same as I have, is what has kept me from getting done with the boat. I guess this has been kind of an A.D.D.project for me. I get started working on it and Oooo something shiny, then I am off for a while then back on it for a bit then get distracted again!! LOL Hopefully this time I am on it until I finish!! ------------- http://bit.ly/Mghpvx" rel="nofollow - Big Pappa http://bit.ly/L4zRW0" rel="nofollow - My Project |
Posted By: Hollywood
Date Posted: May-18-2010 at 6:49pm
|
Good for you! ------------- |
Posted By: storm34
Date Posted: May-18-2010 at 7:04pm
|
welcome back! Keep us updated! ------------- |
Posted By: bkhallpass
Date Posted: May-18-2010 at 7:12pm
|
Since you have already set your secondary stringer, and since you are using a thicker board for the primaries, be sure there is enough room for the muffler before you bed that stringer down. BKH ------------- Livin' the Dream |
Posted By: 8122pbrainard
Date Posted: May-18-2010 at 9:42pm
|
Kris,
It's great you're getting back on the boat project. Keep us informed on how the LVL goes. To my knowledge you're the first to use it here. I really feel it's a great alternate to finding Doug Fir and I know it will be a excellent material. ------------- /diaries/details.asp?ID=1622" rel="nofollow - 54 Atom /diaries/details.asp?ID=2179" rel="nofollow - 77 Tique 64 X55 Dunphy Keep it original, Pete < |
Posted By: Big Pappa
Date Posted: May-19-2010 at 2:45pm
|
Updated Pictures for you all.
This is the Passenger side Secondary all fiberglassed in. Bedded with 2 layers of mat and glassed in with 2", then 4" woven glass on opposite 45 deg angles then 8" woven glass all the way up the side and at least 4" on the hull. 
Same side just the rear of the secondary 
This is the Drivers side hull after the Main was cut out. 
Here is the Fiberglass off of the Main. It took about 5 minutes to pop this off as it was hardly holding on to the wood. 
Here is the Main Stringer laying next to the lvl. If you look close you can see I have traced it out already. 
Old Stringer on top of the LVL 
Old stringer on top of LVL Thickness comparison. Main on top 1.5" LVL on bottom 1.75". I did measure and I have 5.5" between the main and the secondary stringer now and the muffler with carpet is 5" so I should have room. I will just have to make sure and maintain that 5.25" when I install the main. 
A couple of notes about the lvl. There are lap joints that will have to be filled on the outside to keep air bubbles out when you fiberglass it in. I plan to fillet the joint then lay a layer of mat over the whole thing before installing so I have a good even surface to bond to when I install it in the boat. 
One other thing is the laps on the interior of the boards. I plan to take a needle and injecting some resin in these holes to fill the void and make sure it is solid all the way through. Any ideas on good ways to do this effectively? Thinning the epoxy resin maybe? 
All in all I think this is going to be a good option I am going to take extra precaution as I go with this and make sure these are installed the best I can. I have some CPES that should be here later in the week so I will be able to coat this baby good then putting a layer of glass on then glassing it in the boat. Hopefully It should never be touched by water. It is very strong even laterally, these are 13' sticks and they do not bend and bounce with you pick up and carry them like other 2X material I have dealt with does. As far as weight It may be a little heavier than stock I am not sure yet once I get it cut out and pretty close to install shape I plan to put it on the scale and see what it weighs for comparison. There is a varnish like coating (Glue?) that is on the sides that I am going to sand off before I cover it with cpes so I can be sure I get good penetration. That is about it for now, more to come soon. Kris ------------- http://bit.ly/Mghpvx" rel="nofollow - Big Pappa http://bit.ly/L4zRW0" rel="nofollow - My Project |
Posted By: 8122pbrainard
Date Posted: May-19-2010 at 3:26pm
|
Kris,
Looking good!! The coating on the LVL is a water repellent just there for when they're out in the weather on the contruction site. Just take the belt sander to them. I wouldn't worry too much about the voids in the plys. I'd CPES first and then inject some regular epoxy with a glue syringe. You don't need to fill them up completely. ------------- /diaries/details.asp?ID=1622" rel="nofollow - 54 Atom /diaries/details.asp?ID=2179" rel="nofollow - 77 Tique 64 X55 Dunphy Keep it original, Pete < |
Posted By: Big Pappa
Date Posted: May-20-2010 at 2:16pm
Awesome, thanks for the input!! ------------- http://bit.ly/Mghpvx" rel="nofollow - Big Pappa http://bit.ly/L4zRW0" rel="nofollow - My Project |
Posted By: Big Pappa
Date Posted: June-15-2010 at 4:40pm
OK guys, the first LVL main stringer is in. Woo Hoo I will describe as I post the pictures.

Here is the stringer shaped laying next to the original. 
Here is the shaped raw wood stringer on the scale, coming in at 27 pounds. Does anyone know what the stringer in Douglas Fir weighs? 
OK, here I decided to move the drain a little to try and add some strength, so it was located where there would be more wood and not make a thin spot. I found out later that this was a mistake because it is now in front of where the stringer is exposed.

Here is the stringer CEPSed, filled and covered with 1 layer of mat ready to go in the boat. 
As others have done I decided to drill out a large (Either 1" or 1.5" I do not remember off the top of my head) hole in the stringer and fill it with a thickened resin (Milled fibers) where the Steering cable mounts. This way there will hopefully be no way water will be able to get to the wood. ------------- http://bit.ly/Mghpvx" rel="nofollow - Big Pappa http://bit.ly/L4zRW0" rel="nofollow - My Project |
Posted By: JoeinNY
Date Posted: June-15-2010 at 4:52pm
|
why the layer of mat before putting it in? ------------- http://www.correctcraftfan.com/diaries/details.asp?ID=1477 - 1983 Ski Nautique 2001 1967 Mustang 302 "Decoy" http://www.youtube.com/watch?v=cO5MkcBXBBs - Holeshot Video |
Posted By: Big Pappa
Date Posted: June-15-2010 at 4:53pm

Here is the drain in completely (In the wrong Place though) I cut a half circle like the original but I then placed a Piece of 1" PVC in there and filled the rest with thickened resin. Again working to make sure the stringer will hopefully not see water. I covered it when I was covering the stringer with mat, so What I will do is drill a small hole in there then fill the PVC with resin. Hopefully that will take care of it.
The stringer is in the boat now (I did not notice the problem until after I had it installed). So I think I am going to take a hole saw and drill a new hole in the correct place then fill it in the same way I did this one. It will take some time, but it is what I am going to have to do to pay for my mistake. LOL 
Here is where I filled one of the laps in the LVL. It is now nice and smooth. 
The stringer ready to go in. 

And here it is bedded into the boat and weighed down. I got it filleted yesterday and hopefully will get the 2" strips on today. ------------- http://bit.ly/Mghpvx" rel="nofollow - Big Pappa http://bit.ly/L4zRW0" rel="nofollow - My Project |
Posted By: 8122pbrainard
Date Posted: June-15-2010 at 4:55pm
|
Kris,
I like it. Very nice!!! The LVL will be great for those not wanting to go composite and have a hard time finding Doug Fir in their area. I'm glad we now have someone who's using it. Even if the Fir is available, I really think it's a great product for the application. ------------- /diaries/details.asp?ID=1622" rel="nofollow - 54 Atom /diaries/details.asp?ID=2179" rel="nofollow - 77 Tique 64 X55 Dunphy Keep it original, Pete < |
Posted By: Big Pappa
Date Posted: June-15-2010 at 4:56pm
I mainly wanted to make sure everything was going to be flat where I filled the lap Joints and to give a layer over where I filled for the drain and steering mount hole. It is probably overkill but Oh well, Better over engineered then under. ------------- http://bit.ly/Mghpvx" rel="nofollow - Big Pappa http://bit.ly/L4zRW0" rel="nofollow - My Project |
Posted By: Big Pappa
Date Posted: February-21-2011 at 8:48pm
|
Hey everyone it had been a while since I last gave an update. Things are still moving forward enven though rather slowly!! After loosing 50 pounds in 2009 I decided that I wanted to help others do the same so I studied and got my personal trainer certification. I now am an online personal trainer with the site I used to loose the weight. So that combined with my normal job has kept me very busy. I also competed in a 10K mud run, an 8k run and an adventure race last year so training for those has kept me away.
The final thing is my Dad had a heart attack last year and passed away so that was a big hit on me as well. This has made me even more health conscious than ever, seeing as I made the weight change to improve my health in the first place. I have started back to work now, the second main stringer is out and I have cleaned up the hull of all the old fiberglass from the old stringer. The new LVL stringer is cut out, shaped, coated with CPES, then a layer of mat and the drain installed. All that is left is to install it, then lay up some mat on it. After that all the stringers will be in. Woo Hoo, it only took like 3 years. LOL I am shooting to really get at it and have the boat ready for water in June or July. It will be nice to finally have a boat to take out on the water again!! Kris ------------- http://bit.ly/Mghpvx" rel="nofollow - Big Pappa http://bit.ly/L4zRW0" rel="nofollow - My Project |
Posted By: uk1979
Date Posted: February-22-2011 at 11:09am
|
Its not just you that's loosing weight,the is boat too
Stringer with glass on  ------------- Lets have a go 56 Starflite 77 SN 78 SN 80 BFN |
Posted By: 2001Stinger
Date Posted: February-27-2011 at 2:35am
Hey big papa, Wondering if you were ever able to convert all the measurements to the computer. I also need to start a stringer job on my 2001 and would like to have some good numbers to work off cause I think my stringers are going to be worhless for getting good measurements from. If I can get those measurements I would like to get them into one of my computer programs where I can run full-size patterns from. If that works out good I was thinking of starting a post so if other people would like a full-size pattern to do their stringers from I could run the pattern and mail it out to them. My way of giving back to fellow nautique owners. Thanks |