Resealing platform brackets and pitots - tips? |
Post Reply 
|
| Author | |
cadunkle 
Groupie 
Joined: August-17-2012 Location: NJ Status: Offline Points: 66 |
 Post Options Post Options
 Thanks(0) Thanks(0)
 Quote Quote  Reply Reply
 Topic: Resealing platform brackets and pitots - tips? Topic: Resealing platform brackets and pitots - tips?Posted: July-27-2015 at 10:43pm |
|
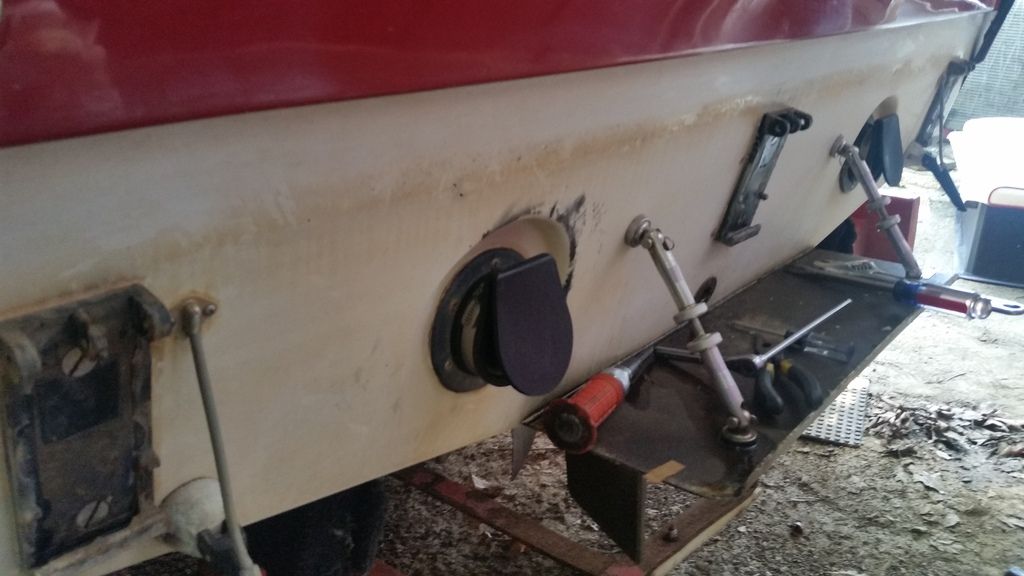
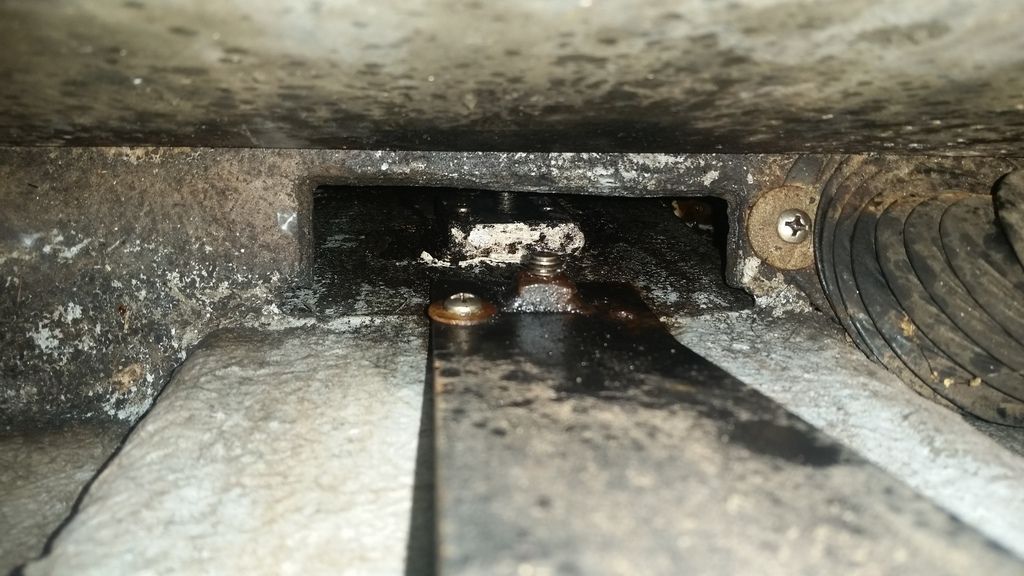
Not a CC (though I almost bought one before I found this boat) but asking here since you guys seem to be the most active forum for restoration and other mechanical work. One of my platform brackets was leaking so I pulled all three as well as each pitot. When i pulled the center bracket the lower backing piece, a square of stainless threaded in center (lower somewhat shiny piece in pic) tore off the transom. It has some sort of sealant between it and the transom wood and two screws barely biting into it. How should I reattach this piece? Not sure I can screw it back down unless I pull the tank and cut the floor a bit as access is very tight in the bilge and through that small hole. I can smear some 4200 on it and hold it with a wrench while tightening though. Is this sufficient?
Excuse teh dirty transom, it has since been compounded and polished while it's all clear and accessible.   How should I seal these up when reinstalling? 4200 on backside of bracket and how do I ensure the through bolts are sealed? Put 4200 in the hole or a bead around each hole? Installing a flow through style pitot in place of the original which plugs constantly on the murky river. Just 4200 on the threads of the screws? There was no sealant used on these when I took them off. One side was dry, the other a bit wet but the screws still bite and tighten up. I'll reseal where each hose went though too. Thanks for any advice. I don't want to do this again, at least not until whenever it comes down to a full restoration. For now I'd be happy with a dry bilge. |
|
 |
|
74Wind 
Grand Poobah 

Joined: August-02-2011 Location: Georgia Status: Offline Points: 2101 |
 Post Options Post Options
 Thanks(0) Thanks(0)
 Quote Quote  Reply Reply
 Posted: July-27-2015 at 11:17pm Posted: July-27-2015 at 11:17pm |
|
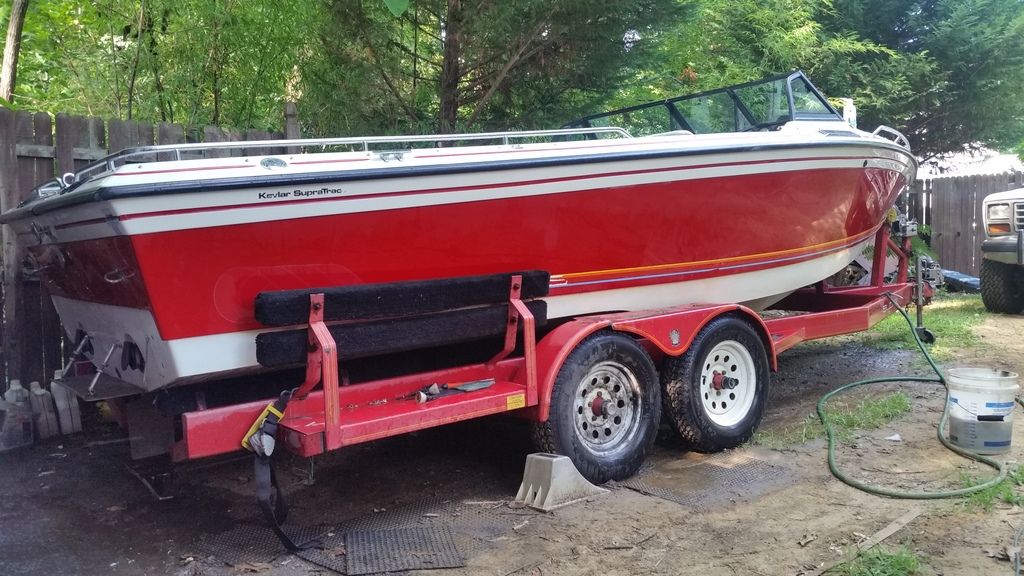
Ok, the insets around the exhausts have got to be a clue. Someone else might recognize it but I give up...so, what is it?
|
|
|
1974 Southwind 18
1975 Century Mark II |
|
 |
|
cadunkle 
Groupie 
Joined: August-17-2012 Location: NJ Status: Offline Points: 66 |
 Post Options Post Options
 Thanks(0) Thanks(0)
 Quote Quote  Reply Reply
 Posted: July-27-2015 at 11:32pm Posted: July-27-2015 at 11:32pm |
Bonus points if anyone can guess the model? 
|
|
 |
|
Morfoot 
Grand Poobah 

Joined: February-06-2004 Location: South Lanier Status: Offline Points: 5320 |
 Post Options Post Options
 Thanks(0) Thanks(0)
 Quote Quote  Reply Reply
 Posted: July-27-2015 at 11:50pm Posted: July-27-2015 at 11:50pm |
|
Ideally you'd want to remove the tank and seal it with 4200 and bolt the platform brackets in place. I'm gonna guess the plate itself was threaded???? If so and that's what stripped out then Stainless thru bolts with stainless lock washer and nut is the way to go or a stainless lock nut.
If removing the tank is not an option then a trick we use in the aviation industry is dab a little superglue to the flatwasher and glue it to the nut then repeat the same from the washer/nut to the backing plate. Use the bolt to line it up so when you install it you can actually start the threading it without trying to turn it and hold the washer and the nut in such tight quarters. Just be careful NOT to use too much superglue when doing it and don't ask me how I know! 
|
|
|
"Morfoot; He can ski. He can wakeboard.He can cook chicken.He can create his own self-named beverage, & can also apparently fly. A man of many talents."72 Mustang "Kermit",88 SN Miss Scarlett, 99 SN "Sherman"
|
|
 |
|
cadunkle 
Groupie 
Joined: August-17-2012 Location: NJ Status: Offline Points: 66 |
 Post Options Post Options
 Thanks(0) Thanks(0)
 Quote Quote  Reply Reply
 Posted: July-28-2015 at 12:05am Posted: July-28-2015 at 12:05am |
|
Yes the plate is threaded. It's a 2"x2"x1/2" stainless square. Had a small hole drilled to either side of the main 3/8" threaded hole which had small screws threaded into the transom wood. There are 6 bracket bolts and 5 of these squares. The 6th bolt threads into the bracket pictures which comes off the lift ring. Seems to me it would have been better to have one plate large enough to cover both platform bracket bolts on the outer brackets and for the center have the lift ring brace long enough that both bolts thread into it. Penny pinchers I guess.
|
|
 |
|
Hollywood 
Moderator Group 

Joined: February-04-2004 Location: Twin Lakes, WI Status: Offline Points: 13514 |
 Post Options Post Options
 Thanks(0) Thanks(0)
 Quote Quote  Reply Reply
 Posted: July-28-2015 at 11:17am Posted: July-28-2015 at 11:17am |
|
Pirata
I don't think you need to screw that plate back to the transom, if you can get the bolt threaded you're good to go. Plenty of 4200. Not much else you can do w/o pulling everything out from the inside. Your plan is good. |
|
 |
|
TRBenj 
Grand Poobah 

Joined: June-29-2005 Location: NWCT Status: Offline Points: 21184 |
 Post Options Post Options
 Thanks(0) Thanks(0)
 Quote Quote  Reply Reply
 Posted: July-28-2015 at 11:33am Posted: July-28-2015 at 11:33am |
|
Don't know my supras very well... Pirata a real model? Bravura is the one I remember being larger than the comp ts6m.
These guys will point you straight on the 4200/5200. |
|
 |
|
Hollywood 
Moderator Group 

Joined: February-04-2004 Location: Twin Lakes, WI Status: Offline Points: 13514 |
 Post Options Post Options
 Thanks(0) Thanks(0)
 Quote Quote  Reply Reply
 Posted: July-28-2015 at 12:40pm Posted: July-28-2015 at 12:40pm |
|
The Bravura is bigger than the Comp, and is a "cuddy" closed bow but the Pirata is even bigger than that. On second thought it's probably a Saltare. The windshield was not walk through on the Pirata.
Saltare. Pirata  I don't know a ton about Supras, but there are a lot of them running around here. Local dealer must have done well in the 90s. |
|
 |
|
cadunkle 
Groupie 
Joined: August-17-2012 Location: NJ Status: Offline Points: 66 |
 Post Options Post Options
 Thanks(0) Thanks(0)
 Quote Quote  Reply Reply
 Posted: July-29-2015 at 1:04am Posted: July-29-2015 at 1:04am |
|
Got it all sealed up and back together. Used plenty of 4200 on everything, particularly around through bolts and on threads of screws directly into transom wood for the speedometer parts.
Should be sealed up well, hopefully no more leaks. Unfortunately part of the transom is wet so it'll eventually need to be redone. Maybe a winter project to rip that apart and redo it with composite backing since it seems reasonably accessible if I pull the tank. Been wanting to replace the rudder and port anyhow. In that case glad I used 4200 and not 5200. I used 5200 to seal the PP paddlewheel a few years ago, don't expect I'd ever need to remove that. Boat is a Saltare. Pirata was a good guess, identical aside from windshield and open/closed bow. I expected to hear SunSport, the seemingly more common open bow large Supra. |
|
 |
|
Post Reply 
|
|
|
Tweet
|
| Forum Jump | Forum Permissions  You cannot post new topics in this forum You cannot reply to topics in this forum You cannot delete your posts in this forum You cannot edit your posts in this forum You cannot create polls in this forum You cannot vote in polls in this forum |