 Boats For Sale:


Stringer rebuild 1987 Ski Nautique 2001 |
Post Reply 
|
Page 12> |
| Author | |
angryginger 
Newbie 
Joined: June-12-2019 Location: Orlando, FL Status: Offline Points: 1 |
 Post Options Post Options
") Thanks(0) Thanks(0)
 Quote Reply Quote Reply
 Topic: Stringer rebuild 1987 Ski Nautique 2001 Topic: Stringer rebuild 1987 Ski Nautique 2001Posted: October-09-2019 at 6:19pm |
|
Old thread but quick question if your still around.. did you leave it on the trailer for your stringer rebuild or take it off? If day what did you put it on how did you support it ?
|
|
|
sam nielsen
|
|
 |
|
|
Timr71
Groupie 
Joined: March-28-2016 Location: Alabama Status: Offline Points: 82 |
Post Options
Thanks(0)
Quote Reply
Posted: May-24-2017 at 4:41pm |
|
I had to make similar adjustment when I rebuilt my Morse 2 control connected with new throttle and shift cables.
The boat looks great! You should really enjoy it. |
|
|
|
|
lharley
Newbie
Joined: April-20-2017 Location: Lexington, SC Status: Offline Points: 33 |
Post Options
Thanks(0)
Quote Reply
Posted: May-24-2017 at 12:47pm |
|
We ran her all weekend this past weekend and besides a little tuning on the carb and setting the tranny adjustment it ran great. She was shifting into gear a little soon causing a jerking. So I adjusted the throttle and tranny cables to allow it to shift into gear at 750 RPM and then there is just a tiny amount of slack before you give it throttle. It took maybe 30 min to get it right. Everything else seems solid.
|
|
|
|
|
lharley
Newbie
Joined: April-20-2017 Location: Lexington, SC Status: Offline Points: 33 |
Post Options
Thanks(0)
Quote Reply
Posted: May-24-2017 at 12:27pm |
|
Great way to end a weekend !

|
|
|
|
|
DCIndustries
Groupie
Joined: July-13-2012 Location: Orlando, Fl Status: Offline Points: 78 |
Post Options
Thanks(0)
Quote Reply
Posted: May-12-2017 at 3:43pm |
|
It's the current G Series seat. I managed to scrape together parts here and there, cut and stitched vinyl to match the rest of the boat. Haven't been able finish the custom driver's throttle panel or rear subcoamings so I haven't updated my post yet.
 
|
|
|
|
|
quinner
Grand Poobah 

Joined: October-12-2005 Location: Unknown Status: Offline Points: 5828 |
Post Options
Thanks(0)
Quote Reply
Posted: May-12-2017 at 2:11pm |
|
That drivers seat looks to be a factory seat being used in the current model year CC's
|
|
|
|
|
Blamey
Gold Member 

Joined: August-18-2015 Location: White Plains,NY Status: Offline Points: 631 |
Post Options
Thanks(0)
Quote Reply
Posted: May-12-2017 at 1:59pm |
Is that Drivers seat a complete rebuild or is that a transplant from somewhere else? I'd like to see more pics of your boat. I really like the look of the updated vinyl. EDIT: Never mind I found your boat project post. Nice work. Still interested in how you did that drivers seat. |
|
|
96 Super Sport
Previously: 95 Sport Nautique, 1980 Ski Supreme |
|
|
|
|
n7narcosis
Groupie

Joined: October-12-2016 Location: Delta,BC Canada Status: Offline Points: 41 |
Post Options
Thanks(0)
Quote Reply
Posted: May-12-2017 at 1:06pm |
|
@DCIndustries

|
|
|
1989 Correct Craft Martinique CB --- 351W
|
|
|
|
|
JOE. R
Newbie
Joined: April-23-2017 Location: Florida Status: Offline Points: 1 |
Post Options
Thanks(0)
Quote Reply
Posted: May-12-2017 at 9:29am |
|
Nice job. I recently bought a 87 Ski also. Thanks for sharing.
|
|
|
|
|
DCIndustries
Groupie
Joined: July-13-2012 Location: Orlando, Fl Status: Offline Points: 78 |
Post Options
Thanks(0)
Quote Reply
Posted: May-10-2017 at 6:38pm |
|
Nice Work! I've been fixing up my 87 for about 3 years now.
Working in a machine shop have you ever considered cutting the dash panels out of .090 aluminum? I had it cut on a cnc router to fit my stereo and converted rocker switches. Painted to match. Came out great. I can get you cad files to get ya started if your interested.  
|
|
|
|
|
KENO
Grand Poobah
Joined: June-06-2004 Location: United States Status: Offline Points: 11191 |
Post Options
Thanks(0)
Quote Reply
Posted: May-09-2017 at 8:08am |
Got it, For some reason I was thinking you had an Ignitor 3 setup that I'm not familiar with.. I'm familiar with what you have and like them a lot. Many trouble free years on those modules and that same distributor despite what some people on here think. Notice that I didn't even mention your name Pete, I just said "some people" 
|
|
|
|
|
fanofccfan
Platinum Member

Joined: December-13-2009 Location: North Bend NE Status: Offline Points: 1797 |
Post Options
Thanks(0)
Quote Reply
Posted: May-09-2017 at 12:31am |
|
Good looking boat and clean work. Looks great.
|
|
|
|
|
lharley
Newbie
Joined: April-20-2017 Location: Lexington, SC Status: Offline Points: 33 |
Post Options
Thanks(0)
Quote Reply
Posted: May-08-2017 at 10:47pm |
|
Keno,
Here is the distributor I used. PerTronix Flame-Thrower Plug and Play Marine Distributors with Ignitor II® Module D231800 I just had to swap out the gears to the RR gear. |
|
|
|
|
KENO
Grand Poobah
Joined: June-06-2004 Location: United States Status: Offline Points: 11191 |
Post Options
Thanks(0)
Quote Reply
Posted: May-08-2017 at 6:19pm |
|
Lee
Nothing urgent but do you think sometime you could take a picture looking straight down at your distributor with the cap and rotor removed so the weights and springs are clearly visible? If you could add it to this thread or PM me, either would be fine Thanks |
|
|
|
|
KENO
Grand Poobah
Joined: June-06-2004 Location: United States Status: Offline Points: 11191 |
Post Options
Thanks(0)
Quote Reply
Posted: May-08-2017 at 4:36pm |
|
Well since I was the one who originally brought it up I guess I can be the first one to say "Good job, I like it"
It keeps the fuel tank vent line configured the way it's supposed to be too. Glad you did some research about it. |
|
|
|
|
lharley
Newbie
Joined: April-20-2017 Location: Lexington, SC Status: Offline Points: 33 |
Post Options
Thanks(0)
Quote Reply
Posted: May-08-2017 at 1:20pm |
|
Got her back on the lake this weekend. She ran smooth only one tiny oil leak on one of the valve cover gaskets. The rubber gaskets I got from Summit Racing for $39 were leaking. I went to Auto Zone got 2 cork gaskest for $16 and it sealed it right up. Ran it all day Saturday and Sunday no Issues. Re-set the speedometers with my GPS they were only about 2 MPH off. It felt tight and ran great.
       |
|
|
|
|
lharley
Newbie
Joined: April-20-2017 Location: Lexington, SC Status: Offline Points: 33 |
Post Options
Thanks(0)
Quote Reply
Posted: May-08-2017 at 1:12pm |
|
Ok after lots of thinking and research I decided to take the advise of a few people and run my gas return line back into my carb insted of the vent line on the gase takn. I plugged the tee that I put on the vent line. I didnt want the line exposed and I didnt want to have to modify my K&N flame arrester fliter. So I got a 1/4" bulk head and drilled a 3/8" hole under the housing and ran it up that way. Still gives it that clean look and serves the purpose of running the gas line in to the carb. Lets hear what you think.
       |
|
|
|
|
lharley
Newbie
Joined: April-20-2017 Location: Lexington, SC Status: Offline Points: 33 |
Post Options
Thanks(0)
Quote Reply
Posted: April-30-2017 at 12:01am |
|
The wake tower is a Big Air $550 off their web site. The top I made myself. I had some 1" steal tubing I bent it with my bender welded some bracing in it and made the front supports out of 1/2" tube. I put a 15 degree down slope in it. Painted it black ordered the Sunbrella fabric off Amazon along with the grommet kit. Had the wife sew it up and tied it into the frame with 550 cord. The whole thing cost me $200. It has saved many hours of not getting sun burned on the lake. It is the best thing I could have done to the boat if I am going to be pulling teenage kids all day. Love it best $200 I have eves spent.
|
|
|
|
|
lharley
Newbie
Joined: April-20-2017 Location: Lexington, SC Status: Offline Points: 33 |
Post Options
Thanks(0)
Quote Reply
Posted: April-29-2017 at 11:50pm |
|
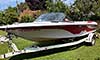
Just got the boat from the shop and have it at the house now. Got it running like a top and it is looking good. All I need to do is put the drivers chair in. We are taking it to the lake house next weekend for the summer. Can't wait to get pulled !!
                  |
|
|
|
|
lharley
Newbie
Joined: April-20-2017 Location: Lexington, SC Status: Offline Points: 33 |
Post Options
Thanks(0)
Quote Reply
Posted: April-24-2017 at 11:24pm |
|
Watauga,
Here we go I will go through all your questions and hope I answer the best I can. I am sure that the "experts" on this site will find fault in or a better way to do it. I am not a boat mechaninc but I am very good at what I do. I am a carpenter a machinist and a decent mechanic. "It looks like you partially removed the primary stringers, and did not disturb the airbox. If that is true, how did you join the remaining existing stringers with the new?" I removed all the primary stringers up to the first bulkhead where they were solid after that. I joind them with biscuits, epoxy and fiberglassed the *************** out of them. "It also appears that when you removed the primaries and secondairies that you left some of the existing stringer fiberglass lamination intact. Did you install the new primaries and secondaries against the remaining vertical fiberglass or did you actually remove it before bedding the new stringers to the hull?" We used the existing stringer fiberglass to set the new stringers to get the right width, hight and just for stability when setting the new ones. We then used epoxy to set them in place and we cut the old material out and fiberglass out and replaced it with new fiberglass. We did not use any of the old fiberglass to bond to we just used it as a templet and a base set to work off of. As stated I am sure there are other ways to do it and I am sure you will hear about it. This was my way hope this works and please ask if you have any more questions. |
|
|
|
|
lharley
Newbie
Joined: April-20-2017 Location: Lexington, SC Status: Offline Points: 33 |
Post Options
Thanks(0)
Quote Reply
Posted: April-24-2017 at 9:02pm |
|
Watauga, i am going to answer all your questions. Just haveing a busy week.
|
|
|
|
|
Watauga
Senior Member 

Joined: June-12-2009 Location: United States Status: Offline Points: 208 |
Post Options
Thanks(0)
Quote Reply
Posted: April-21-2017 at 5:38pm |
|
Lee,
I appreciate your hard work and long hours you invested in the old gal, you should be able to enjoy her many more days. Congratulations! A couple of questions. It looks like you partially removed the primary stringers, and did not disturb the airbox. If that is true, how did you join the remaining existing stringers with the new? It also appears that when you removed the primaries and secondairies that you left some of the existing stringer fiberglass lamination intact. Did you install the new primaries and secondaries against the remaining vertical fiberglass or did you actually remove it before bedding the new stringers to the hull? What was you process? If you left some of the old fiberglass how did you achieve adhesion? |
|
|
|
|
JoeinNY
Grand Poobah

Joined: October-19-2005 Location: United States Status: Offline Points: 5698 |
Post Options
Thanks(0)
Quote Reply
Posted: April-21-2017 at 5:20pm |
|
I dunno - if it starts to fail and is both running lean (hot) and with thinned out oil from the fuel in the oil one mistimed barefoot run could be your last on that motor. Particularly if the guy familiar with the boat is behind it and not driving it. Not super likely of course but a bummer for sure.
|
|
|
|
|
8122pbrainard
Grand Poobah

Joined: September-14-2006 Location: Three Lakes Wi. Status: Offline Points: 41045 |
Post Options
Thanks(0)
Quote Reply
Posted: April-21-2017 at 5:18pm |
Ken Correct, those USCG rules are just made up by idiots who really just want to make things difficult and aren't even thinking about safety!  Lee, you are forgetting an important aspect of a mechanical fuel pump. That it's capable of pumping way more fuel than is needed by the engine so, even with a seal or diaphragm problem, the carb is getting plenty of gas. |
|
|
|
|
lharley
Newbie
Joined: April-20-2017 Location: Lexington, SC Status: Offline Points: 33 |
Post Options
Thanks(0)
Quote Reply
Posted: April-21-2017 at 5:10pm |
|
Joe, you are correct if the pump fails or starts to fail you notice a drop in performance or it stops all together. At that point you trouble shoot. When you narrow it down to the fuel pump you replace check and change the oil and hit the lake the next weekend.
Quinner, As for pumping I have never had a diaphragm break just bruised a few. |
|
|
|
|
KENO
Grand Poobah
Joined: June-06-2004 Location: United States Status: Offline Points: 11191 |
Post Options
Thanks(0)
Quote Reply
Posted: April-21-2017 at 5:08pm |
|
Lee
In your mind there's no problem here and I really don't see any sense in discussing this with someone who figures he's smarter than the people who make the regulations and the people who manufacture the stuff to meet those regs.. |
|
|
|
|
JoeinNY
Grand Poobah
Joined: October-19-2005 Location: United States Status: Offline Points: 5698 |
Post Options
Thanks(0)
Quote Reply
Posted: April-21-2017 at 4:59pm |
|
The assertion is that because your fuel pump now has gas on the upside of the diaphragm that that gasoline will flood the top part of the fuel pump and there will be nothing to prevent it from following the arm that enters through the timing cover and follows the eccentric. The theory seems to hold water with me giving it a quick thought.
You would eventually notice it is failing from being lean (although that's a much worse failure mode than being rich) but I am not sure that only a small leak will show a loss in fuel pressure. I actually have a similar setup as yours on my boat, because my fuel pump is electric and located below the gas tank and I didn't want run it all the way up to the carb... but I am a rebel - and my fuel pump is not bolted to the timing cover. Now that I am thinking about it I wonder if I ran it to the carb I would get more warning when my electric pumps are about to die and leave me stranded ( they never last more than 2 years)... |
|
|
|
|
quinner
Grand Poobah
Joined: October-12-2005 Location: Unknown Status: Offline Points: 5828 |
Post Options
Thanks(0)
Quote Reply
Posted: April-21-2017 at 4:56pm |
|
Yeah what he said ya goons!!
I have found that pumping too hard can break the diaphragm however Reverse Gel and Blue, that is a rockin cool boat, nice work!! |
|
|
|
|
lharley
Newbie
Joined: April-20-2017 Location: Lexington, SC Status: Offline Points: 33 |
Post Options
Thanks(0)
Quote Reply
Posted: April-21-2017 at 4:09pm |
|
So the outlet pressure on the mechanical fuel pump should be between 4 and 10 PSI. A leak in the diaphragm in a mechanical fuel pump will cause a loss of fuel pressure and starve the carburetor of fuel. This may cause the engine to run lean, misfire, hesitate or stall. If the pump fails entirely, no fuel will be delivered to the carburetor and the engine will not start or run. Any of these will cause you to check under the dog house. So the point of the returne line is when the fuel pump fails it keeps the fuel from spilling into the bottom of the boat. So if the the fuel pump fails your boat will start to act up or shut off.
As stated I am not a boat mechanic but I have been around engines and motors my whole life. So please explane to me how a failed fuel pump can keep pumping fuel into the carb or any other part of the engine "filling the crankcase full of gas as it pushes past the top seal in the pump....." If gas pushes past the top seal in the fuel pump it will just be returned to the fuel tank. If you are getting gas in your crank case it is too much pressure or a bad float in the carb it would not be a failed fuel pump. Failed fuel pump = zero or very little pressure. 
|
|
|
|
|
KENO
Grand Poobah
Joined: June-06-2004 Location: United States Status: Offline Points: 11191 |
Post Options
Thanks(0)
Quote Reply
Posted: April-21-2017 at 1:27pm |
Your line running through the bilge then tapping into your hopefully USCG approved vent line isn't USCG approved if it's a piece of clear tubing. The short little piece is OK with them since it is short, can't hold much fuel and it dumps into the carb so like Gary said it makes the engine run lousy or quit before you have bigger issues. What's the Burger King slogan "Have it your way" Let's hope you're not char broiled one day because of it.
|
|
|
|
|
Post Reply
|
Page 12> |
 Tweet
Tweet
|
| Forum Jump | Forum Permissions You cannot post new topics in this forum You cannot reply to topics in this forum You cannot delete your posts in this forum You cannot edit your posts in this forum You cannot create polls in this forum You cannot vote in polls in this forum |


 Topic Options
 DCIndustries wrote: