 Boats For Sale:


79BFN |
Post Reply 
|
Page <1 34567> |
| Author | |
WakeSlayer 
Grand Poobah 

Joined: March-15-2006 Location: United States Status: Offline Points: 2138 |
 Post Options Post Options
") Thanks(0) Thanks(0)
 Quote Reply Quote Reply
 Posted: April-28-2009 at 1:37pm Posted: April-28-2009 at 1:37pm |
|
Looks great !!
I loomed all my wiring going through the bilge. Keeps any crap off the wiring, but i can still open it up. |
|
|
Mike N
1968 Mustang |
|
 |
|
|
Donald80SN
Grand Poobah
Joined: January-12-2009 Location: Denver, NC Status: Offline Points: 3896 |
Post Options
Thanks(0)
Quote Reply
Posted: April-28-2009 at 6:18pm |
|
Grinch,
Looks Great !!!!!!!!!! Nice work. Donald |
|
|
1980 Ski Nautique SOLD Back to Cypress Gardens
2002 Sport Nautique, GT-40, FCT2, Cover Sports, Tower Bimini, Inc., Wet Sounds Audio System, Star Gazer Wake Edition S. 1968 Ski Nautique, Project. |
|
|
|
|
the grinch
Senior Member 

Joined: November-25-2008 Location: Lexington, NC Status: Offline Points: 150 |
Post Options
Thanks(0)
Quote Reply
Posted: May-13-2009 at 2:32am |
|
I've been pecking away at it and trying to get her water tested. It's all together, but had to spend some time cleaning parts like the fuel tank, seat brackets, and etc. I had to get a new fuel filter and mount. The original ff housing was full of rust when I went to replace the filter so I just replaced. I had to make a mount for this that took a little figuring. I also decided to mount a battery disconnect switch which also required a making a mounting bracket. I'll take some pics of these when I get a chance. Probably the greatest dilema I've had the last two weeks was with the throttle linkage. The little ends that screw onto the morse cables were extremly worn.


I have had them ordered for two weeks and looks like they will show up tommorrow. I also had the plastic clip on the throttle cable at the carb to break on me. Anyone have an idea on where to get them? |
|
|
It takes a big hole to bury an elephant.
Kirk Miller [URL=http://www.correctcraftfan.com/forum/register.asp?FID=7]KIRKS79/URL] |
|
|
|
|
the grinch
Senior Member
Joined: November-25-2008 Location: Lexington, NC Status: Offline Points: 150 |
Post Options
Thanks(0)
Quote Reply
Posted: May-13-2009 at 2:39am |
|
I'm also looking for these decals on the trailer.


|
|
|
It takes a big hole to bury an elephant.
Kirk Miller [URL=http://www.correctcraftfan.com/forum/register.asp?FID=7]KIRKS79/URL] |
|
|
|
|
TRBenj
Grand Poobah

Joined: June-29-2005 Location: NWCT Status: Offline Points: 21190 |
Post Options
Thanks(0)
Quote Reply
Posted: May-13-2009 at 12:07pm |
|
Grinch, sounds like youve already found them but the Morse/Teleflex pivots can be found at Go2Marine. Im not following what youre talking about on the throttle end- post a picture.
Im afraid that no one on here has gone to the trouble of making any of those trailer decals yet... but Im hoping that someone will! Perhaps you're willing to volunteer? 
|
|
|
|
|
MartyMabe
Grand Poobah

Joined: February-21-2006 Location: High Point,NC Status: Offline Points: 3991 |
Post Options
Thanks(0)
Quote Reply
Posted: May-15-2009 at 12:30am |
|
Kirk,this is Marty.I got a guy in Indianapolis that says he can reproduce those decals for us. Get me some more pics as close as you can get & dimensions & he says he'll figure it up & give us a price. My e-mail is mtmabe@northstate.net
|
|
|
|
|
the grinch
Senior Member
Joined: November-25-2008 Location: Lexington, NC Status: Offline Points: 150 |
Post Options
Thanks(0)
Quote Reply
Posted: May-15-2009 at 3:51am |
|
I'll get some better pics of them this wknd. and send em to ya.
|
|
|
It takes a big hole to bury an elephant.
Kirk Miller [URL=http://www.correctcraftfan.com/forum/register.asp?FID=7]KIRKS79/URL] |
|
|
|
|
the grinch
Senior Member
Joined: November-25-2008 Location: Lexington, NC Status: Offline Points: 150 |
Post Options
Thanks(0)
Quote Reply
Posted: May-15-2009 at 4:01am |
|
Checked all electrical tonight and found two problems. The first is the horn doesn't work. I didn't spend any time on it other than checking the fuse and making sure the wires were connected good. I was a little more concerned with the other problem which is the ignition switch. As soon as I turn the key to the on position, it blows the fuse in the holder beside it. I've checked all of the obvious stuff like the connections and made sure I didn't have something grounding out on a gauge bracket. Unless anyone knows of some obvious problem that occurs on these things, I'll be checking resistance on all the wires this wknd.
|
|
|
It takes a big hole to bury an elephant.
Kirk Miller [URL=http://www.correctcraftfan.com/forum/register.asp?FID=7]KIRKS79/URL] |
|
|
|
|
8122pbrainard
Grand Poobah

Joined: September-14-2006 Location: Three Lakes Wi. Status: Offline Points: 41045 |
Post Options
Thanks(0)
Quote Reply
Posted: May-15-2009 at 10:01am |
|
Kirk,
Your blowing the fuse as soon as you go to the on position has got to be a problem with the load on that fuse or a short to ground on the load side. It will not be a ignition switch problem - there isn't a ground in the switch to short to. Trace what's on that fuse. Is the lable gone? |
|
|
|
|
the grinch
Senior Member
Joined: November-25-2008 Location: Lexington, NC Status: Offline Points: 150 |
Post Options
Thanks(0)
Quote Reply
Posted: May-15-2009 at 6:38pm |
|
Pete. Label is gone, but 12v is comming off the volt gauge going to the fuse and the other wire on the fuse goes, of course to the ign. switch. I know there is no ground on the ign. switch, but until I put a flashlight on the volt gauge, it looked as though the 12v wire was awfull close to the bracket that holds that gauge in place, and thus grounding it out. I eliminated that as a cause for the problem, but have not traced the other wires on the switch. I know that one goes to NSS and the other probably goes to the starter solenoid or relay (it does have both and maybe that's an OMC thing). I would say it would be almost imposible for one of those wires to be grounding against something, thus shorting. (I have of course checked all of the obvious locations this may occur at connection ends.) My guess would rather be, that there is something in the solenoid or relay that's sending 12v to the wrong place (or a short inside of either). I'll dig into it this wknd with the meter and see what I come accross. I'll be glad to check any suggestions out.
|
|
|
It takes a big hole to bury an elephant.
Kirk Miller [URL=http://www.correctcraftfan.com/forum/register.asp?FID=7]KIRKS79/URL] |
|
|
|
|
8122pbrainard
Grand Poobah
Joined: September-14-2006 Location: Three Lakes Wi. Status: Offline Points: 41045 |
Post Options
Thanks(0)
Quote Reply
Posted: May-15-2009 at 11:25pm |
|
Kirk,
Sounds like you'll need to ohm out all the switched loads off the ignition switch until you find what's close to 0 blowing the fuse. Do you have a wiring diagram? All engines of that era are pretty similar. Here's the old PCM if it helps any: 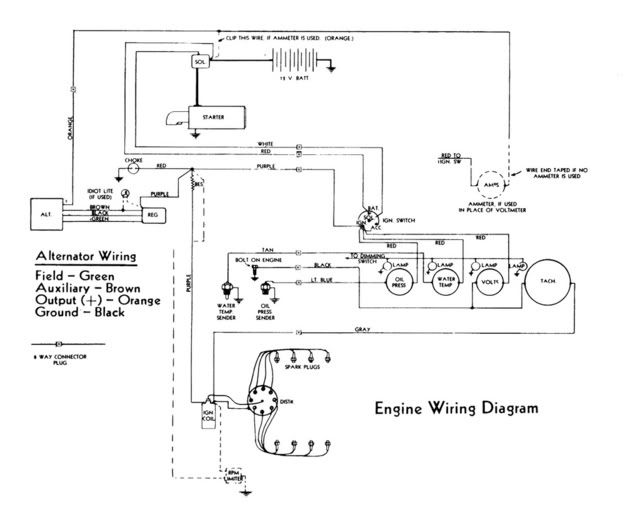
|
|
|
|
|
the grinch
Senior Member
Joined: November-25-2008 Location: Lexington, NC Status: Offline Points: 150 |
Post Options
Thanks(0)
Quote Reply
Posted: May-18-2009 at 12:19am |
|
Problem found. Without an insulator on this gauge bracket, the wire going to the hour meter gauge from the ign. switch was grounding and causing my short.

|
|
|
It takes a big hole to bury an elephant.
Kirk Miller [URL=http://www.correctcraftfan.com/forum/register.asp?FID=7]KIRKS79/URL] |
|
|
|
|
the grinch
Senior Member
Joined: November-25-2008 Location: Lexington, NC Status: Offline Points: 150 |
Post Options
Thanks(0)
Quote Reply
Posted: May-18-2009 at 12:29am |
|
Here are the pics of my battery disconnect and my fuel filter/water seperator. The batt. disconnect ought to be a real help in case of an emergency. On my 81SN, I had a starter relay to hang open while cranking and almost melted the cables before I got the battery disconnected.


|
|
|
It takes a big hole to bury an elephant.
Kirk Miller [URL=http://www.correctcraftfan.com/forum/register.asp?FID=7]KIRKS79/URL] |
|
|
|
|
the grinch
Senior Member
Joined: November-25-2008 Location: Lexington, NC Status: Offline Points: 150 |
Post Options
Thanks(0)
Quote Reply
Posted: May-19-2009 at 1:23am |
|
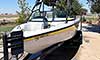
Water tested finally. Here is my new punch list........... Not cooling, not charging, tach not working, rudder packing leaking, and water intake leaking. I didn't take it off the trailer, but I'm going to work on this list and try again by the wknd.
My water intake fitting has a 1/4turn shut-off valve on it. It is leaking from this valve and I can't think of any reason there needs to be a shut-off valve here anyway. Can I just eliminate the valve and solve my leaking, or does it need to be there?? Is the impeller the same for the PCM and OMC engines? I think I have a new one laying around for a PCM, but I haven't pulled the OMC apart yet. |
|
|
It takes a big hole to bury an elephant.
Kirk Miller [URL=http://www.correctcraftfan.com/forum/register.asp?FID=7]KIRKS79/URL] |
|
|
|
|
8122pbrainard
Grand Poobah
Joined: September-14-2006 Location: Three Lakes Wi. Status: Offline Points: 41045 |
Post Options
Thanks(0)
Quote Reply
Posted: May-19-2009 at 10:22am |
|
Kirk,
Looks like you have quite a list there!! The 1/4 turn on the valve may just be the stem packing. Under the handle there should be a packing nut. Tighten it up and see what happens. Lots easier that pulling the valve! I doubt the RWP impeller will be the same. Opening it up will tell. |
|
|
|
|
the grinch
Senior Member
Joined: November-25-2008 Location: Lexington, NC Status: Offline Points: 150 |
Post Options
Thanks(0)
Quote Reply
Posted: May-20-2009 at 2:45am |
|
I found an impeller (not the same one used on a Sherwood or PCM) at NAPA and installed along with a new t-stat. And yes, Pete, you are correct on that nut..... I probably got a full turn on it. I found the missing wire for the tach and hooked it up. I dropped my alternator off at the local rebuild shop and he said it was definitely not charging. I am going to go with a (1)wire marine alternator so I can get rid of a few wires. I tightened the packing in the rudder, and looks like I might be ready for water test number 2.
Paint comming for graphics tommorrow so I can complete the graphics on the sides. The graphics on the transom turned out good, but I used some left overs I had at the shop and I'm getting enough mixed so I can do the trailer when everything else is finished. |
|
|
It takes a big hole to bury an elephant.
Kirk Miller [URL=http://www.correctcraftfan.com/forum/register.asp?FID=7]KIRKS79/URL] |
|
|
|
|
kapla
Grand Poobah

Joined: March-27-2008 Location: BA, Argentina Status: Offline Points: 6148 |
Post Options
Thanks(0)
Quote Reply
Posted: May-20-2009 at 4:13pm |
|
Grinch nice work.. Those final details are pita but the prize is almost there!!!
Send us a picture of your face on your next successfull attemp (cheeck to cheeck smile is my bet) Btw what carpet did you put and were did you buy it?
|
|
|
<a href="">1992 ski nautique
|
|
|
|
|
the grinch
Senior Member
Joined: November-25-2008 Location: Lexington, NC Status: Offline Points: 150 |
Post Options
Thanks(0)
Quote Reply
Posted: May-20-2009 at 4:36pm |
|
The carpet is from Lowes. The local one had 3 different grades on I/O carpet. I bought the mid grade and did the whole thing for less than $150. I wanted the original type I/O astro turf type in red/black pattern, but I searched for it without results. If you want that stuff, all I found was green, blue, and brown.
|
|
|
It takes a big hole to bury an elephant.
Kirk Miller [URL=http://www.correctcraftfan.com/forum/register.asp?FID=7]KIRKS79/URL] |
|
|
|
|
WakeSlayer
Grand Poobah
Joined: March-15-2006 Location: United States Status: Offline Points: 2138 |
Post Options
Thanks(0)
Quote Reply
Posted: May-21-2009 at 2:26pm |
|
Nice job Kirk, Almost there !!
|
|
|
Mike N
1968 Mustang |
|
|
|
|
8122pbrainard
Grand Poobah
Joined: September-14-2006 Location: Three Lakes Wi. Status: Offline Points: 41045 |
Post Options
Thanks(0)
Quote Reply
Posted: May-21-2009 at 3:30pm |
I ran into this the other day - it's red but no black flake: turf type carpet |
|
|
|
|
Donald80SN
Grand Poobah
Joined: January-12-2009 Location: Denver, NC Status: Offline Points: 3896 |
Post Options
Thanks(0)
Quote Reply
Posted: May-21-2009 at 4:19pm |
|
Grinch,
I remember reading that some people installed a seacock valve at the raw water inlet in-order to turn off the water coming into the boat in case one of the cooling hosed blew out in a big way. It sounds like you fixed it with the packing adjustment and I would keep it in the boat. I am just trying to answer your questions as to what use it may have. I love your Battery Kill Switch idea. Good luck with the next lake test. Donald |
|
|
1980 Ski Nautique SOLD Back to Cypress Gardens
2002 Sport Nautique, GT-40, FCT2, Cover Sports, Tower Bimini, Inc., Wet Sounds Audio System, Star Gazer Wake Edition S. 1968 Ski Nautique, Project. |
|
|
|
|
the grinch
Senior Member
Joined: November-25-2008 Location: Lexington, NC Status: Offline Points: 150 |
Post Options
Thanks(0)
Quote Reply
Posted: May-22-2009 at 12:34am |
|
Water tested tonight real quick before dark. No leaks and cooling just fine. I still have some wires to figure out, as tach and new alt. not working. The reason it is all such a mess is because PO had put an HEI distributor out of a car in this thing. Pete, the PCM wiring diagram is of course simialar, but the wire colors are incorrect. I've kind of been comparing it with the newer(86)SN wiring diagram. I've figured out worse wiring problems, and I'll get it when I've got some daylight and have it in the water.
I took her off the trailer and up the cove for a little spin. It seems as though the rpms are there, but the boat is not moving in comparison. It feels like maybe a slipping transmission in a car would feel. Any suggestions? |
|
|
It takes a big hole to bury an elephant.
Kirk Miller [URL=http://www.correctcraftfan.com/forum/register.asp?FID=7]KIRKS79/URL] |
|
|
|
|
WakeSlayer
Grand Poobah
Joined: March-15-2006 Location: United States Status: Offline Points: 2138 |
Post Options
Thanks(0)
Quote Reply
Posted: May-22-2009 at 3:05pm |
|
I put the same Blue Sea switch in the Mustang last year cause I had a phantom drain on the battery while on the lift. I knew I had my electrical fixed after repairing the boat this winter, but am really happy to have that in there.
|
|
|
Mike N
1968 Mustang |
|
|
|
|
8122pbrainard
Grand Poobah
Joined: September-14-2006 Location: Three Lakes Wi. Status: Offline Points: 41045 |
Post Options
Thanks(0)
Quote Reply
Posted: May-22-2009 at 4:04pm |
Probably not a bad idea to get a shop tach hooked up to check out the boats tach and get a WOT RPM. Then check out what prop is on the boat before digging into the trans. |
|
|
|
|
the grinch
Senior Member
Joined: November-25-2008 Location: Lexington, NC Status: Offline Points: 150 |
Post Options
Thanks(0)
Quote Reply
Posted: May-25-2009 at 12:50pm |
|
Transmission was full of milky fluid. Can the cooler leak and contaminate the fluid, or would it come in through the vent fitting or dipstick?
Could this be the reason the trans just doesn't feel right? Well, I know it don't help things, but would it make it feel like it was in a bind? The prop on the boat is a 13/15 and PO gave me a spare so I have 2. Both appear to be OK. Is there any way to check them? Would it show me anything if I put the boat in the water with no prop on the shaft and placed in gear and ran the rpms up? I would think this may give me an indication of what problems may exist with the prop. |
|
|
It takes a big hole to bury an elephant.
Kirk Miller [URL=http://www.correctcraftfan.com/forum/register.asp?FID=7]KIRKS79/URL] |
|
|
|
|
the grinch
Senior Member
Joined: November-25-2008 Location: Lexington, NC Status: Offline Points: 150 |
Post Options
Thanks(0)
Quote Reply
Posted: June-02-2009 at 12:33am |
|
I've solved more issues on the punch list but some new ones have popped up now that I can really giver a run.
I pumped the trans. fluid out and refilled. I took the shaft back out and the coupler off. I cleaned both couplers real well with emory and rechecked all for burrs. One problem was definetely the fit of the coupler on the shaft. It was loose and I replaced the keyshaft and tightened to set bolts when I reinstalled. I finished it off by putting on the spare prop. All of this made a huge difference and I will be putting on my other prop when I get it back from straightening. My new problem is a leaking valve cover. Of course it's leaking at the rear lower corner and you can't get to the bolt with the exhaust hose and/or manifold installed. I'm going to remove the exhaust hose and see if I can get to it, but if not, the x manifold will have to come off. |
|
|
It takes a big hole to bury an elephant.
Kirk Miller [URL=http://www.correctcraftfan.com/forum/register.asp?FID=7]KIRKS79/URL] |
|
|
|
|
the grinch
Senior Member
Joined: November-25-2008 Location: Lexington, NC Status: Offline Points: 150 |
Post Options
Thanks(0)
Quote Reply
Posted: June-05-2009 at 2:30pm |
|
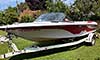
Graphics are now complete. I used PPG Concept over a 400 grit scratch. Sprayed all of the yellow, air brushed the red. (The highlighting color was originally brown and I changed to red.) Sanded out with 600, 800, 1000, 3000 3M DA paper.......That's right, DA paper on a DA. No hand sanding. OH......buff out a 3000 grit scratch one time as opposed to a 1200, or even 1500 grit and you'll cut your buff time in half. I can give details along with 3M part numbers if anyone needs them.
Here are my pics...... 


|
|
|
It takes a big hole to bury an elephant.
Kirk Miller [URL=http://www.correctcraftfan.com/forum/register.asp?FID=7]KIRKS79/URL] |
|
|
|
|
the grinch
Senior Member
Joined: November-25-2008 Location: Lexington, NC Status: Offline Points: 150 |
Post Options
Thanks(0)
Quote Reply
Posted: June-05-2009 at 2:33pm |
|
Anyone have any of these factory hubcabs for a CC trailer they would like to get rid of?

|
|
|
It takes a big hole to bury an elephant.
Kirk Miller [URL=http://www.correctcraftfan.com/forum/register.asp?FID=7]KIRKS79/URL] |
|
|
|
|
kapla
Grand Poobah
Joined: March-27-2008 Location: BA, Argentina Status: Offline Points: 6148 |
Post Options
Thanks(0)
Quote Reply
Posted: June-05-2009 at 6:26pm |
|
those new graffics rock!!! keep up the good work... you are almost there...
S |
|
|
<a href="">1992 ski nautique
|
|
|
|
|
the grinch
Senior Member
Joined: November-25-2008 Location: Lexington, NC Status: Offline Points: 150 |
Post Options
Thanks(0)
Quote Reply
Posted: June-16-2009 at 3:10am |
|
Solved my leaking valve cover problem by replacing all of the bolts with allen heads so I can get to them to tighten without removing exhaust manifolds and hoses. I picked up the rest of my interior and have it all in.
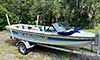
I am not crazy about the way the boat loads on the trailer. I'm going to add some short centering bunks up towards the front. I'll post some pics once they are in place. 

|
|
|
It takes a big hole to bury an elephant.
Kirk Miller [URL=http://www.correctcraftfan.com/forum/register.asp?FID=7]KIRKS79/URL] |
|
|
|
|
Post Reply
|
Page <1 34567> |
 Tweet
Tweet
|
| Forum Jump | Forum Permissions You cannot post new topics in this forum You cannot reply to topics in this forum You cannot delete your posts in this forum You cannot edit your posts in this forum You cannot create polls in this forum You cannot vote in polls in this forum |


 Topic Options
 the grinch wrote: