floor to hull |
Post Reply 
|
| Author | |
lakedog55 
Gold Member 
Joined: November-11-2010 Location: Lake Weir Fl Status: Offline Points: 835 |
 Post Options Post Options
 Thanks(0) Thanks(0)
 Quote Quote  Reply Reply
 Topic: floor to hull Topic: floor to hullPosted: April-20-2011 at 1:25pm |
|
Hi,
I found alot of info on the stringers and have almost finished that mojo. What would be considered the correct attachment for floor to hull, A little worried about the sides in the front where the bottom hull gets tight to the floor, It seems like that is where they like to crack open. Also any tips for battery box seems like another pita to get sealed up, Yes and one more does anyone have a pattern for the wood in the seats for a 86 sn with the wrap around seating? I took mine apart well the fell apart and not much is left. |
|
|
Lakedog55
|
|
 |
|
gun-driver 
Grand Poobah 
Joined: July-18-2008 Location: Pittsburgh, Pa Status: Offline Points: 4127 |
 Post Options Post Options
 Thanks(0) Thanks(0)
 Quote Quote  Reply Reply
 Posted: April-21-2011 at 3:17am Posted: April-21-2011 at 3:17am |
|
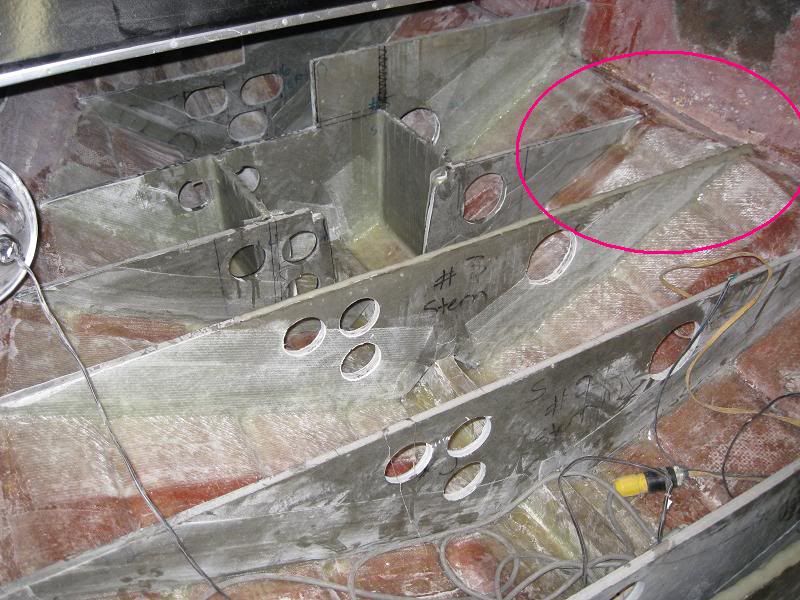
I used thickened epoxy with milled fiber mixed in, I put it on all the stringers/bracing that the floor was going to sit on(like bedding brick in mortor) then set the floor on it with some light weights.
Floor to wall I went with 4", 6" then 12" cloth. |
|
 |
|
WOFTAM 
Groupie 
Joined: July-14-2010 Location: SW Michigan Status: Offline Points: 97 |
 Post Options Post Options
 Thanks(0) Thanks(0)
 Quote Quote  Reply Reply
 Posted: April-21-2011 at 2:47pm Posted: April-21-2011 at 2:47pm |
|
I would like to see this as well. Is there a need to tab the underside of the ply?
Pics of this would be nice. What is the preferred method for reinforcing the area where the seat brackets will attach? I would like to investigate the use of the threaded inserts. Anyone tried it? |
|
|
Just because you can does not mean you should.
|
|
 |
|
TRBenj 
Grand Poobah 

Joined: June-29-2005 Location: NWCT Status: Offline Points: 21186 |
 Post Options Post Options
 Thanks(0) Thanks(0)
 Quote Quote  Reply Reply
 Posted: April-21-2011 at 3:10pm Posted: April-21-2011 at 3:10pm |
|
I did the same as Gun Driver. Anywhere the floor sat- stringer, rib, etc- got a good amount of thickened resin as bedding. This included the area at the front where the hull narrows and chine comes up, where the floor sits directly on the hull.

On our v-hull, the underside of the floor had to be trimmed slightly to sit all the way down in this area. The 2001 may be slightly different. All floor panels were taped to the hull sides with at least 3 layers of glass- 2 cloth, 1 mat. Again, a little different because of our material, but we added glass to the underside of the floor to improve screw retention. Where we knew the front seats would be mounting, we added a layer of biax. 
I like the idea of threaded inserts. Something with a large shoulder, like a round base weld nut, so that it can be sealed properly, would be pretty cool. 
The only problem is that they'd need to be secured prior to carpet- so it would require a lot of forethought on where to locate them. I think that predrilling and then sealing any screws is also acceptable. |
|
 |
|
lakedog55 
Gold Member 
Joined: November-11-2010 Location: Lake Weir Fl Status: Offline Points: 835 |
 Post Options Post Options
 Thanks(0) Thanks(0)
 Quote Quote  Reply Reply
 Posted: April-21-2011 at 8:10pm Posted: April-21-2011 at 8:10pm |
|
Thanks,
Yes, the v-hull looks different but amazingly the same on the sides, Did you shorten the main stringers to put the bulk heads in or did they stop more towards the rear of the boat? |
|
|
Lakedog55
|
|
 |
|
gun-driver 
Grand Poobah 
Joined: July-18-2008 Location: Pittsburgh, Pa Status: Offline Points: 4127 |
 Post Options Post Options
 Thanks(0) Thanks(0)
 Quote Quote  Reply Reply
 Posted: April-22-2011 at 1:50am Posted: April-22-2011 at 1:50am |
|
Here's a pic of my floor before I matted the floor to the sides.

|
|
 |
|
TRBenj 
Grand Poobah 

Joined: June-29-2005 Location: NWCT Status: Offline Points: 21186 |
 Post Options Post Options
 Thanks(0) Thanks(0)
 Quote Quote  Reply Reply
 Posted: April-22-2011 at 11:35am Posted: April-22-2011 at 11:35am |
Like you said, the v-hull is different, but similar in that area of the floor/hull connection. We extended the stringers a bit further forward from the original configuration, and added a bunch of extra bulkheads and ribs (since we did not re-foam) but the original still used a similar configuration. |
|
 |
|
lakedog55 
Gold Member 
Joined: November-11-2010 Location: Lake Weir Fl Status: Offline Points: 835 |
 Post Options Post Options
 Thanks(0) Thanks(0)
 Quote Quote  Reply Reply
 Posted: April-26-2011 at 10:38am Posted: April-26-2011 at 10:38am |
|
Hi,
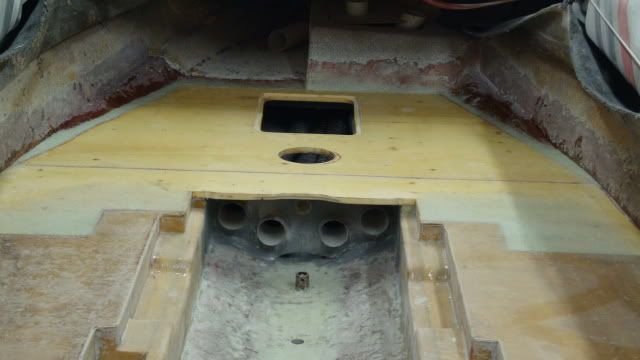
On your picture above . I know there is a piece of wood that sits on to of the motor cradle at the ski pylon. Mine did not come with that piece and I am not sure how big to make it. My floor clears the raised portion of the sled by less than an 1/8 and I can easily make it touch. Also I noticed my dog box angles off on the sides and I almost trimmed to much wood getting it roughed in. If anyone has a top view of this area it would be way cool |
|
|
Lakedog55
|
|
 |
|
Keeganino 
Grand Poobah 

Joined: October-27-2009 Location: North Carolina Status: Offline Points: 2063 |
 Post Options Post Options
 Thanks(0) Thanks(0)
 Quote Quote  Reply Reply
 Posted: April-26-2011 at 12:31pm Posted: April-26-2011 at 12:31pm |
|
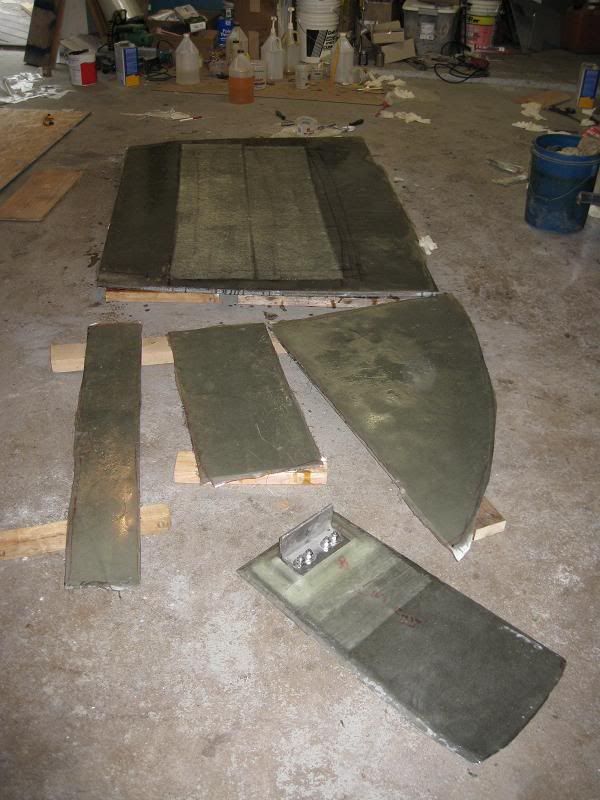
Here are some pics of the battery box I built


|
|
|
"working on these old boats may not be cost effective but as it shows its what it brings into your life that matters" -Roger
1973 Skier |
|
 |
|
WOFTAM 
Groupie 
Joined: July-14-2010 Location: SW Michigan Status: Offline Points: 97 |
 Post Options Post Options
 Thanks(0) Thanks(0)
 Quote Quote  Reply Reply
 Posted: April-27-2011 at 12:38am Posted: April-27-2011 at 12:38am |
|
Nice work.
Thanks for posting the images! Is your battery box 3/4"? Did you place anything between the bottom of the box and the top of the floor? |
|
|
Just because you can does not mean you should.
|
|
 |
|
WOFTAM 
Groupie 
Joined: July-14-2010 Location: SW Michigan Status: Offline Points: 97 |
 Post Options Post Options
 Thanks(0) Thanks(0)
 Quote Quote  Reply Reply
 Posted: April-27-2011 at 12:41am Posted: April-27-2011 at 12:41am |
|
What is that stuff? Too dark to be G-10. You are too smart to be using carbon...
Do tell.
|
|
|
Just because you can does not mean you should.
|
|
 |
|
TRBenj 
Grand Poobah 

Joined: June-29-2005 Location: NWCT Status: Offline Points: 21186 |
 Post Options Post Options
 Thanks(0) Thanks(0)
 Quote Quote  Reply Reply
 Posted: April-27-2011 at 1:19am Posted: April-27-2011 at 1:19am |
coosa |
|
 |
|
Keeganino 
Grand Poobah 

Joined: October-27-2009 Location: North Carolina Status: Offline Points: 2063 |
 Post Options Post Options
 Thanks(0) Thanks(0)
 Quote Quote  Reply Reply
 Posted: April-27-2011 at 4:01am Posted: April-27-2011 at 4:01am |
The box is made of 1/2", but the floor is 2 layers of 3/4". Then I used 1/2" to make my pressure fitted lid since the 3/4" would have been sticking up once wrapped in carpet. The bottom of the box is bedded to a piece of wood that I glassed to the hull. I have been accused of overbuilding the floor in the front by using 2 layers of 3/4" ply from the pylon forward but oh well... Tim's coosa build is pretty amazing stuff. Can't wait to see it one day. |
|
|
"working on these old boats may not be cost effective but as it shows its what it brings into your life that matters" -Roger
1973 Skier |
|
 |
|
Post Reply 
|
|
|
Tweet
|
| Forum Jump | Forum Permissions  You cannot post new topics in this forum You cannot reply to topics in this forum You cannot delete your posts in this forum You cannot edit your posts in this forum You cannot create polls in this forum You cannot vote in polls in this forum |