 Boats For Sale:


UK’s 78 SN |
Post Reply 
|
Page <1234 8> |
| Author | |||
uk 1979 part2 
Groupie 
Joined: April-30-2011 Location: UK Status: Offline Points: 71 |
 Post Options Post Options
") Thanks(0) Thanks(0)
 Quote Reply Quote Reply
 Posted: November-28-2011 at 5:36pm Posted: November-28-2011 at 5:36pm |
||
|
Shall see if this works, got some cheapo burst pipe detectors off the nett they are battery operated with a buzzer if water hits the senders, put some extra epoxy around the wire at the sender heads to seal more,(the original seal looked like clear silicon)then epoxy to the low points in the hull that will be sealed up, I have 5 set in and shall wire them up to a 6 way rotary switch and one buzzer marked up as to where they are.
It will be interesting to see if all stays dry after all the CCF mods 


|
|||
|
lets have a go 2
|
|||
 |
|||
|
uk 1979 part2
Groupie
Joined: April-30-2011 Location: UK Status: Offline Points: 71 |
Post Options
Thanks(0)
Quote Reply
Posted: September-14-2011 at 8:18pm |
||
This where we are at with chrome... left to right Ali,Chrome,Steel(look for the magnet) and below all Mdf unit in Steel then acid rusting agent on it there is a magnet holding the picture up. 


|
|||
|
lets have a go 2
|
|||
|
|||
|
eric lavine
Grand Poobah 
Joined: August-13-2006 Location: United States Status: Offline Points: 13413 |
Post Options
Thanks(0)
Quote Reply
Posted: September-14-2011 at 9:54am |
||
|
puertorican chrome?
|
|||
|
"the things you own will start to own you"
|
|||
|
|||
|
uk1979
Platinum Member 
Joined: June-13-2007 Location: United Kingdom Status: Offline Points: 1426 |
Post Options
Thanks(0)
Quote Reply
Posted: September-14-2011 at 8:18am |
||
Yes I have a few sticks of real wood around the shop and tones of Mdf, I was just not sure what you guys call it over there  I'm still learning American. I'm still learning American.
I do feel that wrapped Polystyrene could be a cheaper alternative to foam by using old packing blocks and gluing together then shape and wrap with PVC just not sure if there are many grades of Polystyrene? It would be good to see what the collective mind here thinks. We need to drive cost down so more old boats are saved a long term thing I'm looking into is a glued in stringers only, like some new boats now do and some jet ski are. Kris, yes it not cheap here £3 to £12 a roll depending on size and yes much the same a your duck tape. Thanks Joe, so I was not to way off with the name.
|
|||
|
Lets have a go
56 Starflite 77 SN 78 SN 80 BFN |
|||
|
|||
|
JoeinNY
Grand Poobah

Joined: October-19-2005 Location: United States Status: Offline Points: 5698 |
Post Options
Thanks(0)
Quote Reply
Posted: September-13-2011 at 11:06pm |
||
|
Also known as gaffers tape on this side of the pond...
|
|||
|
|||
|
Dreaming
Platinum Member

Joined: May-21-2010 Location: Tacoma, WA Status: Offline Points: 1870 |
Post Options
Thanks(0)
Quote Reply
Posted: September-13-2011 at 10:51pm |
||
Pete - Gaffers tape is much like duct tape, but is easier to remove. it is commonly used in stage productions for securing things like light cords, and microphone cables... it's nice stuff, but pricey on our side of the pond! last I checked it was about 30 bucks a roll |
|||
|
|||
|
8122pbrainard
Grand Poobah

Joined: September-14-2006 Location: Three Lakes Wi. Status: Offline Points: 41045 |
Post Options
Thanks(0)
Quote Reply
Posted: September-13-2011 at 9:46pm |
||
|
Hey Roger,
Is that some real wood I see in your shop?
What is "gaffer" tape. We need an English to English translation! |
|||
|
|||
|
BuffaloBFN
Grand Poobah

Joined: June-24-2007 Location: Gainesville,GA Status: Offline Points: 6094 |
Post Options
Thanks(0)
Quote Reply
Posted: September-13-2011 at 8:32pm |
||
|
I think Ken & Barbie will like their new dock!
|
|||
|
|||
|
uk 1979 part2
Groupie
Joined: April-30-2011 Location: UK Status: Offline Points: 71 |
Post Options
Thanks(0)
Quote Reply
Posted: September-13-2011 at 8:15pm |
||
|
I had a go at my wrapped foam, just wasn't happy with it so played with shrinking it first tried a map gas gun which worked but did not spread the heat enough so then went with a electric heat gun 1500w worked great and shrank the PVC DPC all over, it got me thinking so tried it over polystyrene with good results,
 I used gaffer tape to hold it together before heat shrinking,then just added new when all shrunk round. I used gaffer tape to hold it together before heat shrinking,then just added new when all shrunk round.
Before heat gun 
After heat gun 

Polystyrene wrapped in PVC 


|
|||
|
lets have a go 2
|
|||
|
|||
|
uk1979
Platinum Member
Joined: June-13-2007 Location: United Kingdom Status: Offline Points: 1426 |
Post Options
Thanks(0)
Quote Reply
Posted: September-02-2011 at 7:45am |
||
Thanks Tim,I just thought what would bond in well to the hull so it had to be a composite of some kind so why not try carbon its not that expensive over here,as to how it works the twill weave I use on the cradle can be a pain to hold down you need it to be nice and sticky epoxy to go onto. The carbon bi axial is a treat to use it will lay out well and go round shapes well its like wet cloth when pre wetted on a bench, I also think it uses less epoxy to wet out than glass.
Thanks Keegan glad to here you enjoy my playing around with stuff
|
|||
|
Lets have a go
56 Starflite 77 SN 78 SN 80 BFN |
|||
|
|||
|
Keeganino
Grand Poobah

Joined: October-27-2009 Location: North Carolina Status: Offline Points: 2063 |
Post Options
Thanks(0)
Quote Reply
Posted: September-01-2011 at 8:40pm |
||
|
Well said Tim. Roger I love the stuff you come up with. Very cool to see what one can do with a bit of ingenuity!
|
|||
|
"working on these old boats may not be cost effective but as it shows its what it brings into your life that matters" -Roger
1973 Skier |
|||
|
|||
|
BuffaloBFN
Grand Poobah
Joined: June-24-2007 Location: Gainesville,GA Status: Offline Points: 6094 |
Post Options
Thanks(0)
Quote Reply
Posted: September-01-2011 at 8:38pm |
||
|
Tim, the strength is a good bit higher and the weight is similar.
|
|||
|
|||
|
TRBenj
Grand Poobah

Joined: June-29-2005 Location: NWCT Status: Offline Points: 21210 |
Post Options
Thanks(0)
Quote Reply
Posted: September-01-2011 at 8:32pm |
||
|
Roger, really creative, cool stuff going on here- nice work!
Im curious- what drove you towards fiber on a few of these parts? How does working with it compare to epoxy/glass? Is the strength/weight significantly higher? Ive considered the pin vs. socket thing before, glad to see someone actually implement it! |
|||
|
|||
|
BuffaloBFN
Grand Poobah
Joined: June-24-2007 Location: Gainesville,GA Status: Offline Points: 6094 |
Post Options
Thanks(0)
Quote Reply
Posted: September-01-2011 at 8:13pm |
||
|
You lost 6.5 grams of strength...it'll never work.
|
|||
|
|||
|
uk 1979 part2
Groupie
Joined: April-30-2011 Location: UK Status: Offline Points: 71 |
Post Options
Thanks(0)
Quote Reply
Posted: September-01-2011 at 8:03pm |
||
|
Then set in the hull with the cradle and pylon once set removed pylon and cradle and build up with carbon sleeving and bi axial carbon have 9 layers now at different angles.
Used some carbon thread to hold it all together 

|
|||
|
lets have a go 2
|
|||
|
|||
|
uk 1979 part2
Groupie
Joined: April-30-2011 Location: UK Status: Offline Points: 71 |
Post Options
Thanks(0)
Quote Reply
Posted: September-01-2011 at 7:09pm |
||
|
This how the rest turned out,
Made the plug by mixing in fibers of carbon in the epoxy then put the mix into some tubes I had (these are what our router bits come in)making sure no air was trapped,to stop the heat build up and melting the tubes,just put them in water filled pots and left to dry. 
Then spun down to fit dilled and glue in a stud to hold the pin in 

Then glued the plug into the base 
Spun up a glass base glued on with a lead up for the glassing in. checked the weight of the old and new 499g for new old was 505.5g so as good as the same. 
Fitted an O ring to pin as I will need to unscrew to slide the cradle out 
|
|||
|
lets have a go 2
|
|||
|
|||
|
uk1979
Platinum Member
Joined: June-13-2007 Location: United Kingdom Status: Offline Points: 1426 |
Post Options
Thanks(0)
Quote Reply
Posted: August-20-2011 at 12:32pm |
||
Greg I am going to use the engine mount bolts to hold the cradle in along with hook under tabs at the front of the cradle which are glassed onto the stringers, so if you remove all the bolts from mount to stringers lift the engine/drive out the cradle should slide back 5/8 and lift out,bonded bushes into the stringers will take the bolts. That's the plan we will see if it works, and yes I will need to remove the pylon first too, look a page back I took a picture of a mock up. I think this what your asking, Cheers Roger. |
|||
|
Lets have a go
56 Starflite 77 SN 78 SN 80 BFN |
|||
|
|||
|
uk1979
Platinum Member
Joined: June-13-2007 Location: United Kingdom Status: Offline Points: 1426 |
Post Options
Thanks(0)
Quote Reply
Posted: August-20-2011 at 12:17pm |
||
It takes one to know one
|
|||
|
Lets have a go
56 Starflite 77 SN 78 SN 80 BFN |
|||
|
|||
|
BuffaloBFN
Grand Poobah
Joined: June-24-2007 Location: Gainesville,GA Status: Offline Points: 6094 |
Post Options
Thanks(0)
Quote Reply
Posted: August-19-2011 at 11:56pm |
||
|
Re-inventing the wheel is a much better pass-time than looting.
Roger, that cradle turned out well. I'd say it's worthy of being called art. I hope it wears as well as it looks down the road. Did you, or has anyone, thought about a mod that would speed up the bolting process on the mount to cradle? |
|||
|
|||
|
8122pbrainard
Grand Poobah
Joined: September-14-2006 Location: Three Lakes Wi. Status: Offline Points: 41045 |
Post Options
Thanks(0)
Quote Reply
Posted: August-19-2011 at 10:17pm |
||
|
Roger, It's been definitely confirmed that your are as anal as I am!! Probably worse!!
I wake up in the middle of the night and think about projects and assume you do the same. Ether that or, as mentioned before, you just have too much extra time on your hands!!
Yes, the "engineers" where sure sleeping on that socket connection of the pylon to the keel. It really does not take a "rocket scientist" to figure out you do not mount a cup (female) on the keel that will hold water!!!! They, down at CC in those years, plane and simple are just stupid idiots!! I have the female socket on my 77. I filled it with epoxy!! Stuff like this really amazes me that Ralph actually made it though that time period!! He had nothing but "stupids" working for him!!
|
|||
|
|||
|
uk 1979 part2
Groupie
Joined: April-30-2011 Location: UK Status: Offline Points: 71 |
Post Options
Thanks(0)
Quote Reply
Posted: August-19-2011 at 8:42pm |
||
|
This is what I have come up with for a pylon pin holder to glass onto the hull.
Wrapped the pin with 1 layer if cling film 0.03mm thick then first wrapped a layer of Kevlar followed by 1.2m run of biax carbon fiber round tight held in place with more cling film. Once dry spun off round on a lathe and more carbon biax 2.6m added spun off again giving me the tube, then just tapped the pin out and removed the cling film, shall make a carbon plug to bond into base with a thread set in it to screw the pylon pin onto. Not sure yet if I will add an O ring or just some sealer around the top of the housing and pin. The wall thickness of the housing has come out at 12.7mm Shall use the carbon sleeving to bond down to the hull, in the picture I have turned the sleeve in on itself giving me 2 layers, the bands are there just to show how it wraps round, will use cling film when I bond in place. Will add more layers after that and finish off with the carbon biax. 


|
|||
|
lets have a go 2
|
|||
|
|||
|
eric lavine
Grand Poobah
Joined: August-13-2006 Location: United States Status: Offline Points: 13413 |
Post Options
Thanks(0)
Quote Reply
Posted: July-17-2011 at 12:04pm |
||
|
have yet to crack into the back ends of one of those PCM's, the only 2 I have seen is yours and Joey's, looks like they went to cast iron,
when you see a drastic change like that, that means there was problems, well anyways that where the "whine" noise is created, and it looks like a ball bearing may have been added to the top gear. I think of the problems on the older PCMs was under heavy power the 2 gears would cause a spread load and snap the aluminum housing |
|||
|
"the things you own will start to own you"
|
|||
|
|||
|
eric lavine
Grand Poobah
Joined: August-13-2006 Location: United States Status: Offline Points: 13413 |
Post Options
Thanks(0)
Quote Reply
Posted: July-17-2011 at 12:01pm |
||
|
you're right up there on the OCD list
|
|||
|
"the things you own will start to own you"
|
|||
|
|||
|
uk 1979 part2
Groupie
Joined: April-30-2011 Location: UK Status: Offline Points: 71 |
Post Options
Thanks(0)
Quote Reply
Posted: July-17-2011 at 11:02am |
||
|
Think its time to change meds again
I have skinned the cradle in carbon fiber then coated with epoxy wet sand and buff up. 


|
|||
|
lets have a go 2
|
|||
|
|||
|
uk 1979 part2
Groupie
Joined: April-30-2011 Location: UK Status: Offline Points: 71 |
Post Options
Thanks(0)
Quote Reply
Posted: June-28-2011 at 7:19am |
||
|
Here is a picture of the Polaris duckbill may fit existing set ups.

|
|||
|
lets have a go 2
|
|||
|
|||
|
uk 1979 part2
Groupie
Joined: April-30-2011 Location: UK Status: Offline Points: 71 |
Post Options
Thanks(0)
Quote Reply
Posted: June-27-2011 at 8:49pm |
||
|
I have had a go at the battery box after making a new one I then add a ducting around 1 side and across the back with a smaller outlet engine side both my cables will run up it and also act as a vent,I have gone for a drain but have kept it up off the hull by 1'1/4 I made a glass pipe up and glass it to the box,once I fitted it into the hull I then glass around the bulkhead,I put a small grove around the end so I can fit a Riva Duckbill drain RY8100A replacement valve (sorry Pete its off a jet ski)its the only type I could find over here, you guys have many the Polaris has a good one,the one I used will fit on a tube 1'OD or if you grove the pipe 11/8 for a snug fit.


On a side note this may work for the talked about no foam self drain stringer set up just make some tubes up and fit through the stringers in a few places with duckbills on,they are not 100% water tight but close once wet. 

|
|||
|
lets have a go 2
|
|||
|
|||
|
uk 1979 part2
Groupie
Joined: April-30-2011 Location: UK Status: Offline Points: 71 |
Post Options
Thanks(0)
Quote Reply
Posted: June-08-2011 at 7:33pm |
||
|
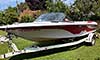
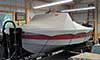
Here are some pictures of the mock engine and drive to see how it works out, looks like I need to put a 1/2in glass packer under the front mounts to leave good adjustment, I used the idea off the site (think its Pete's) and made a collar that is a snug fit on the log with an inch hole for the shaft,left a shoulder on it to stop it working down the log then tape on a stick to hold the shaft out to the size I was shooting for and set my mounts to fit.
If you make the collar quite long I found the log sets the shaft out. Shall now spot the fixing holes so I can drill out to take some bronze threaded bushes I'm going to bond in with the 3M Epoxy so I end up just bolting down through the cradle locking it up,at the front will bond on mounts(see mdf mock up) that the cradle slides under and locked by the engine mounts, this way if I take the engine out I can pull the pylon and the cradle should slide out from under the floor. Switching to a PCM drive has lowered the front of the engine by 3'3/4in, as for stringer height off the hull I would now shoot for 7in(mine are at 6'1/2) to underside of mounts at the front( note PCM have 3 sizes of engine block mounts for Chevy I'm using the short) and 6in to the underside of the rear mounts. If your going to use a cradle you need to take the thickness off along with the drain tray from the above sizes and all sizes are from engine side of stringers. The prop shaft will need to be shortened by 4in all sizes are working off a distance from end of the log to the coupling of 6'3/4 which leave room to fit a PSS seal and places the engine where its always been but lower. 


|
|||
|
lets have a go 2
|
|||
|
|||
|
uk 1979 part2
Groupie
Joined: April-30-2011 Location: UK Status: Offline Points: 71 |
Post Options
Thanks(0)
Quote Reply
Posted: June-03-2011 at 8:44pm |
||
|
While I have been working on this I came across this,which may be of interest,ready made sleeves from glass to carbon and others in between,so making a tall pylon or a custom fit boom along with ducting under floor a lot easier,could even make exhaust pipes back from the manifolds

Got to try there way on the site by using heat shrink over it and working out from the middle with a heat gun
As you can see it will expand and contract to a shape and comes in many sizes and grades. 

Glass Sleeves |
|||
|
lets have a go 2
|
|||
|
|||
|
uk 1979 part2
Groupie
Joined: April-30-2011 Location: UK Status: Offline Points: 71 |
Post Options
Thanks(0)
Quote Reply
Posted: June-03-2011 at 6:54pm |
||
|
Once the top and bottom braces had been glassed on I then wrapped the socket around the outside onto the main frame with 3 layers of quad.

Will add a flat to one side at the bottom so I can make a twist lock on the bottom of the pylon. On a side note I tried the 3M epoxy on plastic pipe after a light sanding it works real well and as its a modified epoxy has some flex too,down side its not cheep but it is sold in small tubes. 
|
|||
|
lets have a go 2
|
|||
|
|||
|
uk 1979 part2
Groupie
Joined: April-30-2011 Location: UK Status: Offline Points: 71 |
Post Options
Thanks(0)
Quote Reply
Posted: June-03-2011 at 6:13pm |
||
|
I used the other part of the tube to make a socket to fit a tall pylon in and set it at the same angle as the main pylon 2 inches off leaving room to still get a rope over the finger.
I bonded 2 strips of brass inside the box using 3M epoxy to tap into and will hold the main pylon in, also added some quad inside around the tube. 


|
|||
|
lets have a go 2
|
|||
|
|||
|
Post Reply
|
Page <1234 8> |
 Tweet
Tweet
|
| Forum Jump | Forum Permissions You cannot post new topics in this forum You cannot reply to topics in this forum You cannot delete your posts in this forum You cannot edit your posts in this forum You cannot create polls in this forum You cannot vote in polls in this forum |


 Topic Options
 eric lavine wrote: