 Boats For Sale:


Stringer Repair 1985 2001 Ski Nautique |
Post Reply 
|
Page <1 23456 10> |
| Author | |
TRBenj 
Grand Poobah 

Joined: June-29-2005 Location: NWCT Status: Offline Points: 21169 |
 Post Options Post Options
") Thanks(0) Thanks(0)
 Quote Reply Quote Reply
 Posted: May-06-2013 at 11:01am Posted: May-06-2013 at 11:01am |
|
Looks awefully light on glass... were you planning to do everything with 10oz cloth? That will take a long time (many layers) to build up. I would recommend adding tapes to the list so youre not cutting that 38" roll into 2", 4" and 8" strips. Glass does not cut nicely, even with proper tools. I would add a bunch of mat and biax to the list as well. 12gal of epoxy *might* be enough.
I dont see it covered where you discuss your plans for the layup... might want to post that for us to pick apart before you attempt to make a material list. Remind us of your structural plans as well- stringer material, foam, floor, etc. |
|
 |
|
|
iplan
Senior Member 

Joined: April-19-2010 Location: Lake Murry SC Status: Offline Points: 201 |
Post Options
Thanks(0)
Quote Reply
Posted: May-06-2013 at 11:51am |
I've never really been much of a detail planner ~~~~ lol In broad brush strokes here is my rebuild concept: * No foam in the rebuild * Stingers are Fir for the Primary, and Pine for the secondary. * Since I was not using foam on the rebuild, I was going to run lateral supports from the Secondary Stringer to the hull. Someone posted a picture of their boat on this thread where they had done this also. * The floor is to be a wood with gelcoat top (as opposed to carpet). I'm trying to follow BillsBoatworks with regard to specifics as to how he treated his stringers (lamination, bonding, etc.). I didn't see any fiberglass tape on US Composites Website, but I see it now in the Mat section. That said, I only see it in 4", 8" and 12 inch widths (No 2" widths). Is that okay for building up? Also, should I add to my 10oz cloth? |
|
|
85 Ski Nautique 2001.
Stringer replacement job completed July 3 2014. Exterior painted June 2015. The Trailer is next. |
|
|
|
|
TRBenj
Grand Poobah
Joined: June-29-2005 Location: NWCT Status: Offline Points: 21169 |
Post Options
Thanks(0)
Quote Reply
Posted: May-06-2013 at 12:12pm |
|
Youre looking at mat tape, not cloth tape. Check the bottom of the cloth section.
In addition to the ribs between the secondaries and hull, you'll probably want a few between the mains and secondaries (forward of the exhaust pockets and a bulkhead or 2 in front of the bilge... so factor those in. I would be glassing both sides of all plywood panels (floor, bulkheads, ribs, etc) in addition to the CPES and taping them into place. On the floor, I'd add some mat to the top side as well for impact resistance. Dont forget that you'll be taping the floor boards at the seams, as well as to the stringers and to the hull walls. As far as the layup goes on the stringers, there are several different ways that Ive seen it done. Personally, I like to get a bunch of layers of increasingly wider cloth on them, then follow up with either biax or mat up the sides, as well as over the tops of the mains. Ive done alternating layers of mat and cloth in the past, but going subsequent layers of glass over the thicker materials (mat or biax) is sort of a pain, as air bubbles are easily trapped at the (thicker) transitions. |
|
|
|
|
iplan
Senior Member
Joined: April-19-2010 Location: Lake Murry SC Status: Offline Points: 201 |
Post Options
Thanks(0)
Quote Reply
Posted: May-06-2013 at 2:07pm |
Alright ~~~ I like what I'm learning here. Thanks! Taking your advice I'll add to my glass order (I do see the tape also). Relative to the epoxy, the fiberglass is not all that expensive) so I guess it is better to error on the side of "more." I'll get my final first order posted soon.... Best, J |
|
|
85 Ski Nautique 2001.
Stringer replacement job completed July 3 2014. Exterior painted June 2015. The Trailer is next. |
|
|
|
|
TX Foilhead
Grand Poobah

Joined: February-01-2009 Location: Kingsland TX Status: Offline Points: 2076 |
Post Options
Thanks(0)
Quote Reply
Posted: May-06-2013 at 2:44pm |
|
I'm not sure where I heard this, but a liquid ounce of epoxy wets out an ounce of fiberglass when you're doing it by hand. A small cheap kitchen scale is a great tool, I weight all the cloth once it's cut and then measure out the epoxy. At first you probably want to up the epoxy a little, but once you get the process you can get very close to that number.
The other thing you're missing is most everything that gets epoxy on it goes in the trash. Lots of plastic scrapers, cheap paint brushes, latex gloves and mixing sticks and cups. The only thing I've found worth cleaning is the fiberglass roller. I don't think many people realize it, but there's a lot more than just some epoxy and some cloth. Get all the disposable stuff local and as cheap as you can. |
|
|
|
|
iplan
Senior Member
Joined: April-19-2010 Location: Lake Murry SC Status: Offline Points: 201 |
Post Options
Thanks(0)
Quote Reply
Posted: May-06-2013 at 3:12pm |
|
Okay ~~~ here's my beefed up order
Fiberglass & Filler Aerosil-Cabosil FL-AER400 4 Gal ~~~~~~~~~~~~~~~~22.50 1/32 Milled Fiber SM-MF050 (15 qt)~~~~~~~~~~~~~~82.80 (to set stringers in place) 10 Oz E Glass FG3C1038 38" by 25 yds 5.40/ yd~~135.00 50 yds of tape in 2", 4" and 8" inch rolls ~~~~107.15 (3 rolls ~ 50 yds each) DBM 1208 Bixal (I'm assuming DBM 1208)~~~~~~~~~ 77.50 (50" 10 yds) Epoxy (I conceed I'll need more at some point) 10 Gal Thin Epox in 3-1 ratio EPOX 633317 ~~~~~548.00 2 Gal Thin Epox in 3-1 ratio EPOX 635315 ~~~~~~128.00 3-1 Ratio Pumps~~~~~~~~~~~~~~~~~~~~~~~~~~~~~~~~~~6.75 10" Fiberglass Cutting Scissors WISS - 101 ~~~~~31.25 Misc: 12" Stir Sticks (50 per pack)GLV-PS050~~~~~~~~~~~3.95 4" Plastic Squeeges SQ-04 5 count ~~~~~~~~~~~~~2.50 Red Glasskoter Roller RF-101F3B (3" Box of 36)~~51.00 Total:~~~~~~~~~~~~~~~~~~~~~~~~~~~~~~~~~~~~~~~1,192.15 |
|
|
85 Ski Nautique 2001.
Stringer replacement job completed July 3 2014. Exterior painted June 2015. The Trailer is next. |
|
|
|
|
ny_nautique
Platinum Member 
Joined: June-01-2011 Location: Albany NY Status: Offline Points: 1215 |
Post Options
Thanks(0)
Quote Reply
Posted: May-06-2013 at 3:19pm |
|
Tim (or anyone),
Is there a thread with pictures or a drawing that shows the layup you are discussing. |
|
|
- Jeff
1999 Ski Nautique |
|
|
|
|
iplan
Senior Member
Joined: April-19-2010 Location: Lake Murry SC Status: Offline Points: 201 |
Post Options
Thanks(0)
Quote Reply
Posted: May-06-2013 at 3:48pm |
|
It was Gun-Driver's layup ~~~ page 2 of this thread (at the bottom) there is a picture of Gun Driver's boat with the starboard side stringers completed).
I wish I could simply follow Gun-Driver's thread step by step it's here: (http://correctcraftfan.com/forum/forum_posts.asp?TID=13341&KW=&title=and-so-it-begins), but none of his pictures are active anymore, so you can't really see what he did. |
|
|
85 Ski Nautique 2001.
Stringer replacement job completed July 3 2014. Exterior painted June 2015. The Trailer is next. |
|
|
|
|
TRBenj
Grand Poobah
Joined: June-29-2005 Location: NWCT Status: Offline Points: 21169 |
Post Options
Thanks(0)
Quote Reply
Posted: May-06-2013 at 4:09pm |
|
There are plenty of stringer threads that show the stringers fully glassed in... but not any that I can think of that fully illustrate the layup very well. It doesnt really lend itself well to pictures.
Re: disposable items- solo cups work great for small layups where youre using the pumps. For larger layups (pouring resin), the cups with marked graduations are nice. About the same price from Home Depot as USComposites. Disposable gloves and cheap brushes are available from Harbor Freight. You will use a LOT of them. |
|
|
|
|
ny_nautique
Platinum Member
Joined: June-01-2011 Location: Albany NY Status: Offline Points: 1215 |
Post Options
Thanks(0)
Quote Reply
Posted: May-06-2013 at 4:38pm |
|
Is it something like this?

|
|
|
- Jeff
1999 Ski Nautique |
|
|
|
|
TRBenj
Grand Poobah
Joined: June-29-2005 Location: NWCT Status: Offline Points: 21169 |
Post Options
Thanks(0)
Quote Reply
Posted: May-06-2013 at 4:51pm |
|
No, the tape goes longitudinal (same direction as the stringer). Complete layer 1 before starting layer 2. Single piecing each layer is ideal, but if thats not practical, then overlap the joints and stagger them from one layer to the next.

|
|
|
|
|
iplan
Senior Member
Joined: April-19-2010 Location: Lake Murry SC Status: Offline Points: 201 |
Post Options
Thanks(0)
Quote Reply
Posted: May-06-2013 at 4:58pm |
|
Wait ~ I'm confused....
Does that layer #1 in the picture above imply multiple cuts of tape overlapped vertically? I would have thought you'd just run it horizontally down the stringer with half the tape on the hull and the other half on the stringer. |
|
|
85 Ski Nautique 2001.
Stringer replacement job completed July 3 2014. Exterior painted June 2015. The Trailer is next. |
|
|
|
|
ny_nautique
Platinum Member
Joined: June-01-2011 Location: Albany NY Status: Offline Points: 1215 |
Post Options
Thanks(0)
Quote Reply
Posted: May-06-2013 at 5:00pm |
|
Ahh. Interesting that on my phone my pic is rotated 90 degrees but on the computer it is fine...
Anyway, In #2 and 3 those were pieces of mat. I thought you started with mat and put tape down after that. So when does mat come into play? |
|
|
- Jeff
1999 Ski Nautique |
|
|
|
|
TRBenj
Grand Poobah
Joined: June-29-2005 Location: NWCT Status: Offline Points: 21169 |
Post Options
Thanks(0)
Quote Reply
Posted: May-06-2013 at 5:01pm |
|
No, no cuts. I drew hatching on the 2 different layers so you could differentiate between the 2 in my drawing. Each tape piece runs longitudinally down the length of the stringer, approximately centered on the stringer-hull joint.
|
|
|
|
|
TRBenj
Grand Poobah
Joined: June-29-2005 Location: NWCT Status: Offline Points: 21169 |
Post Options
Thanks(0)
Quote Reply
Posted: May-06-2013 at 5:06pm |
|
Like I said previously, there are several layups that I have seen work. The one I like most is cloth tape (2/2/4/4/8/8 on the mains and 2/4/8 on the secondaries) followed by 12" wide biax up the side. Mains are topped with 12" biax as well.
I have also done alternating mat and cloth (starting and finishing with mat, total number of layers usually around 5-7). Plenty strong, but the mat is very thick- so not only do you cruise through resin, but since each layer is wider than the previous one, the cloth layer following the mat tends to trap air bubbles at the transition. This is less of a problem with layer after layer of cloth, as it is much thinner. Cloth also has a much higher strength to weight ratio. Mixing in some mat or biax towards the end of the layup is a good idea though, as it builds thickness and you get strength in all directions with the mat layer. Cloth is strong primarily in 2 directions... though they are the 2 directions you are most concerned about. |
|
|
|
|
ny_nautique
Platinum Member
Joined: June-01-2011 Location: Albany NY Status: Offline Points: 1215 |
Post Options
Thanks(0)
Quote Reply
Posted: May-06-2013 at 5:09pm |
|
Thanks Tim. And what goes over the top of the stringer? Are you capping it with that 12" wide biax?
|
|
|
- Jeff
1999 Ski Nautique |
|
|
|
|
iplan
Senior Member
Joined: April-19-2010 Location: Lake Murry SC Status: Offline Points: 201 |
Post Options
Thanks(0)
Quote Reply
Posted: May-06-2013 at 7:04pm |
Thak you Sir! This is my "official" plan! |
|
|
85 Ski Nautique 2001.
Stringer replacement job completed July 3 2014. Exterior painted June 2015. The Trailer is next. |
|
|
|
|
iplan
Senior Member
Joined: April-19-2010 Location: Lake Murry SC Status: Offline Points: 201 |
Post Options
Thanks(0)
Quote Reply
Posted: May-06-2013 at 7:04pm |
Thank you Sir! This is my "official" plan! |
|
|
85 Ski Nautique 2001.
Stringer replacement job completed July 3 2014. Exterior painted June 2015. The Trailer is next. |
|
|
|
|
iplan
Senior Member
Joined: April-19-2010 Location: Lake Murry SC Status: Offline Points: 201 |
Post Options
Thanks(0)
Quote Reply
Posted: May-09-2013 at 12:26pm |
|
Alright ~~~ Got my order paid for yesterday ~~~~~ $1,350 was the total....
I have the Starboard Secondary stringer cut, treated w/ CPES, and fitting nicely in the old stringer's slot ~~~~ surprisingly nicely. Anyway, while I am waiting on my materials from US Composites, I was thinking of pulling the same side Main Stringer..... I saw on a few threads that people had done this, but just wanted to make sure (this was a recommended procedure) before I committed. |
|
|
85 Ski Nautique 2001.
Stringer replacement job completed July 3 2014. Exterior painted June 2015. The Trailer is next. |
|
|
|
|
gun-driver
Grand Poobah
Joined: July-18-2008 Location: Pittsburgh, Pa Status: Offline Points: 4127 |
Post Options
Thanks(0)
Quote Reply
Posted: May-10-2013 at 11:51am |
|
That's what I did. I found it easier to mirror the original which helped with fitment later in the process.

|
|
|
|
|
VTreker08
Newbie 
Joined: April-14-2013 Location: Vacaville, CA Status: Offline Points: 16 |
Post Options
Thanks(0)
Quote Reply
Posted: May-10-2013 at 6:05pm |
|
In case you want to see a video on someone doing a stringer job...video series is pretty comprehensive. The work was done on a 1995 Searay, but it has some great points on the whole process.
1995 Sea Ray Stringer/Floor/Transom Rebuild |
|
|
86 Ski Nautique 2001
|
|
|
|
|
ny_nautique
Platinum Member
Joined: June-01-2011 Location: Albany NY Status: Offline Points: 1215 |
Post Options
Thanks(0)
Quote Reply
Posted: May-13-2013 at 5:31pm |
|
I'm having a much harder time cutting my secondary stringers than the primaries. I ended up cutting it too short. My secondaries were so rotted that I don't have a very good template. Any suggestions?
|
|
|
- Jeff
1999 Ski Nautique |
|
|
|
|
iplan
Senior Member
Joined: April-19-2010 Location: Lake Murry SC Status: Offline Points: 201 |
Post Options
Thanks(0)
Quote Reply
Posted: May-13-2013 at 6:38pm |
|
My materials arrived today, so I've got no more excuses.
I also spent some time grinding on my Starboard Primary stringer. There is 10x more fiberglass to cut through than the secondary stringer ~ especially on the tops. After only 45 minutes, I removed about 2 feet of material on the surface of the main stringer, and burned through my 2 grinder disk supply. I had to stop, and take a shower for a resupply trip to Home Depot. I'll be happy if I can get my primary out before dark. As I'm working on getting the primary stringer out, I guess I should also be laying up the Secondary stringer ~ but which is the best way to start? I saw on BillsBoatWorks that he glassed each piece of the secondary stringer separately, and then glued them together with epoxy. Is this the preferred procedure?
Well ~ I'm not an "expert" but my thought would be to use the grooves on the floor as a guide ~ but make it a little longer, and higher. Did you leave the opposite side Secondary Stringer in place? If so, maybe you could use that one to check for level... but don't take my word for anything. lol |
|
|
85 Ski Nautique 2001.
Stringer replacement job completed July 3 2014. Exterior painted June 2015. The Trailer is next. |
|
|
|
|
lakedog55
Gold Member
Joined: November-11-2010 Location: Lake Weir Fl Status: Offline Points: 835 |
Post Options
Thanks(0)
Quote Reply
Posted: May-13-2013 at 7:03pm |
|
Might want to take the combing pads out. Looks like they are in good shape
|
|
|
Lakedog55
|
|
|
|
|
iplan
Senior Member
Joined: April-19-2010 Location: Lake Murry SC Status: Offline Points: 201 |
Post Options
Thanks(0)
Quote Reply
Posted: May-13-2013 at 7:40pm |
Can I get a translation? |
|
|
85 Ski Nautique 2001.
Stringer replacement job completed July 3 2014. Exterior painted June 2015. The Trailer is next. |
|
|
|
|
8122pbrainard
Grand Poobah

Joined: September-14-2006 Location: Three Lakes Wi. Status: Offline Points: 41045 |
Post Options
Thanks(0)
Quote Reply
Posted: May-13-2013 at 8:11pm |
|
|
|
ny_nautique
Platinum Member
Joined: June-01-2011 Location: Albany NY Status: Offline Points: 1215 |
Post Options
Thanks(0)
Quote Reply
Posted: May-13-2013 at 9:11pm |
|
It's a "coaming pad", not "combing pad".
When I said I cut my secondaries too short, I meant height, not length. I'm going to try again this weekend... |
|
|
- Jeff
1999 Ski Nautique |
|
|
|
|
iplan
Senior Member
Joined: April-19-2010 Location: Lake Murry SC Status: Offline Points: 201 |
Post Options
Thanks(0)
Quote Reply
Posted: May-13-2013 at 9:53pm |
|
"coaming: a raised edge around ship's hatches to keep water out."
This still does nothing for me. I'm not even sure you're referring to my boat. |
|
|
85 Ski Nautique 2001.
Stringer replacement job completed July 3 2014. Exterior painted June 2015. The Trailer is next. |
|
|
|
|
ny_nautique
Platinum Member
Joined: June-01-2011 Location: Albany NY Status: Offline Points: 1215 |
Post Options
Thanks(0)
Quote Reply
Posted: May-13-2013 at 11:10pm |
|
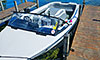
Coaming pads (also called Coaming Bolsters) are just the pads that are at waist height around the boat. I think they are more prevalent in fishing boats, where you'd be leaning against them while fishing.
If you have the deluxe seating arrangement, you have coaming pads on the side behind the driver and observer seats. The suggestion to remove them was so that you don't damage them working on the floor. Here's an example. |
|
|
- Jeff
1999 Ski Nautique |
|
|
|
|
iplan
Senior Member
Joined: April-19-2010 Location: Lake Murry SC Status: Offline Points: 201 |
Post Options
Thanks(0)
Quote Reply
Posted: May-15-2013 at 8:47am |
|
~~~ That "coaming pad comment was made about Gun-Driver's boat.
|
|
|
85 Ski Nautique 2001.
Stringer replacement job completed July 3 2014. Exterior painted June 2015. The Trailer is next. |
|
|
|
|
Post Reply
|
Page <1 23456 10> |
 Tweet
Tweet
|
| Forum Jump | Forum Permissions You cannot post new topics in this forum You cannot reply to topics in this forum You cannot delete your posts in this forum You cannot edit your posts in this forum You cannot create polls in this forum You cannot vote in polls in this forum |


 Topic Options
 TRBenj wrote: