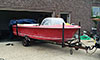
 Boats For Sale:


ProTec Ignition replacement question |
Post Reply 
|
Page <1234> |
| Author | ||
JPASS 
Grand Poobah 

Joined: June-17-2013 Location: Orlando Status: Offline Points: 2283 |
 Post Options Post Options
") Thanks(0) Thanks(0)
 Quote Reply Quote Reply
 Posted: July-31-2014 at 12:08am Posted: July-31-2014 at 12:08am |
|
Those are the ends that came with the dizzy. There is another piece they go into that clamps them to the dizzy cap. I believe my spark plug wire crimper tool has the dies for this type of terminal end. If these are the correct dies, do I strip the wire like my previous pic or do I place the supplied terminal ends unstripped and allow the crimpers to roll then ends over piercing the wire inside?    |
||
|
'92 Correctcraft Ski Nautique
|
||
 |
||
|
Bri892001
Grand Poobah

Joined: September-27-2008 Location: Boston MA Status: Offline Points: 4947 |
Post Options
Thanks(0)
Quote Reply
Posted: July-31-2014 at 1:41am |
|
|
I believe you want to "strip the wire like my previous pic." If you put them over the insulation, it's unlikely it would pierce through with enough bite to get you a good contact.
If you happen to have heat shrink tubing laying around, it wouldn't hurt to put that over the terminal end. Actually, they have a type of insulation that can actually be painted on after as well. |
||
|
||
|
JPASS
Grand Poobah
Joined: June-17-2013 Location: Orlando Status: Offline Points: 2283 |
Post Options
Thanks(0)
Quote Reply
Posted: July-31-2014 at 8:01am |
|
I have plenty of heat shrink tubing. Do I use the black die in the pic or the one with the colored dots? My guess would be the black die as the die seems to be more rounded and would close those posts tighter around the wire. |
||
|
'92 Correctcraft Ski Nautique
|
||
|
||
|
SNobsessed
Grand Poobah
Joined: October-21-2007 Location: IA Status: Offline Points: 7102 |
Post Options
Thanks(0)
Quote Reply
Posted: July-31-2014 at 9:45am |
|
|
I would strip the wire to less length & have those end tangs crimp down on insulation. I think that is why they are wider.
|
||
|
“Beer is proof that God loves us and wants us to be happy.”
Ben Franklin |
||
|
||
|
JPASS
Grand Poobah
Joined: June-17-2013 Location: Orlando Status: Offline Points: 2283 |
Post Options
Thanks(0)
Quote Reply
Posted: July-31-2014 at 10:07am |
|
|
There's a gap below the spade head. I could always flatten the stripped wire and shove it under the spade head and wrap the prongs around the insulated part of the wire.
|
||
|
'92 Correctcraft Ski Nautique
|
||
|
||
|
Orlando76
Grand Poobah

Joined: May-21-2013 Location: Mount Dora, FL Status: Offline Points: 3108 |
Post Options
Thanks(0)
Quote Reply
Posted: July-31-2014 at 10:08am |
|
Yeah try the black dies. Changing the terminals out is not an option? Are you familiar with Skycraft on Fairbanks? This is about the point I'd go there. I never fully understood those terminals but from my experience I think they're a poor design |
||
|
||
|
Bri892001
Grand Poobah
Joined: September-27-2008 Location: Boston MA Status: Offline Points: 4947 |
Post Options
Thanks(0)
Quote Reply
Posted: July-31-2014 at 10:14am |
|
Good point and sharp eye Chris. I didn't notice the wider set of arms. |
||
|
||
|
JPASS
Grand Poobah
Joined: June-17-2013 Location: Orlando Status: Offline Points: 2283 |
Post Options
Thanks(0)
Quote Reply
Posted: July-31-2014 at 10:21am |
|
I think we have some terminal ends here at work I can practice on. And yes, I am familiar with Skycraft. Love that place. I could also solder the wire to the terminals for some added strength. |
||
|
'92 Correctcraft Ski Nautique
|
||
|
||
|
backfoot100
Platinum Member 
Joined: January-03-2007 Location: United States Status: Offline Points: 1897 |
Post Options
Thanks(0)
Quote Reply
Posted: July-31-2014 at 10:24am |
|
I disagree guys. Those are the only tangs for making contact with the bare wire. You crimp them on the insulation and the only contact you'll have is a few ragged strands of the wire on the spade lug itself. A marginal connection at best. You might be able to solder it after crimping in that fashion (if you know what you're doing) but then you'll heat up the insulation making the crimp marginal at best then. I would just crimp on the bare wire myself. |
||
|
When people run down to the lake to see what's making that noise, you've succeeded.
Eddie |
||
|
||
|
JoeinNY
Grand Poobah

Joined: October-19-2005 Location: United States Status: Offline Points: 5697 |
Post Options
Thanks(0)
Quote Reply
Posted: July-31-2014 at 10:33am |
|
|
The crimp is definitely designed so that the pair of tangs closest to the blade crimp down on the stripped wire, preferably after being tinned, and that the second set crimp down upon the insulation providing a strain relief for the first set. Its actually a pretty tough connector to do a good job crimping with anything other than a connector specific tool set but every ignition company still seems to send them out.
|
||
|
||
|
JPASS
Grand Poobah
Joined: June-17-2013 Location: Orlando Status: Offline Points: 2283 |
Post Options
Thanks(0)
Quote Reply
Posted: July-31-2014 at 10:45am |
|
|
I have regular waterproof spade connectors at the house. The only thing I would lose would be the brown clips that the terminal end goes into. I would just run each spade to the each post on the coil. It's always an option if the supplied connectors cause me issues.
|
||
|
'92 Correctcraft Ski Nautique
|
||
|
||
|
JPASS
Grand Poobah
Joined: June-17-2013 Location: Orlando Status: Offline Points: 2283 |
Post Options
Thanks(0)
Quote Reply
Posted: July-31-2014 at 9:50pm |
|
|
Do I need to put assembly lube or motor oil on the dizzy cam gear or does it go in dry? Directions don't mention anything about it needed lube.
|
||
|
'92 Correctcraft Ski Nautique
|
||
|
||
|
KRoundy
Platinum Member
Joined: August-23-2010 Location: Lake Stevens Status: Offline Points: 1702 |
Post Options
Thanks(0)
Quote Reply
Posted: August-01-2014 at 2:21pm |
|
|
In your first photo there, what is that small device packed on the red and white cardboard?
|
||
|
Previous: 1993 Electric Blue/Charcoal Ski Nautique
Current: 2016 Ski Nautique 200 Open Bow |
||
|
||
|
Dreaming
Platinum Member

Joined: May-21-2010 Location: Tacoma, WA Status: Offline Points: 1870 |
Post Options
Thanks(0)
Quote Reply
Posted: August-01-2014 at 2:32pm |
|
It's an inline spark tester. You can use the spark plug instead if you prefer, but the tester helps lessen the risk of getting shocked  JP - Definitely watching your progress - I'll probably be doing this in the future too |
||
|
||
|
JPASS
Grand Poobah
Joined: June-17-2013 Location: Orlando Status: Offline Points: 2283 |
Post Options
Thanks(0)
Quote Reply
Posted: August-01-2014 at 2:46pm |
|
Yeah. It was only $10 and I figured it wouldn't hurt to add one to my toolbox. Called the manufacturer today and they said I can install the dizzy dry, but if I was concerned, a little cam lube on the gear would certainly not hurt. |
||
|
'92 Correctcraft Ski Nautique
|
||
|
||
|
JPASS
Grand Poobah
Joined: June-17-2013 Location: Orlando Status: Offline Points: 2283 |
Post Options
Thanks(0)
Quote Reply
Posted: August-03-2014 at 6:43pm |
|
|
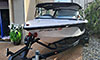
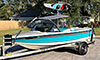
Got the swap done today. Beat the serious rain by about 2 minutes. She was a little tough to start, but once we set the idle timing at 12 she purred like a kitten. I did notice my plugs were very white. I need to adjust the carb to fatten it up. Its a 4010. Not sure which way to turn the mixture screws on the side (in or out).
Still need to clean up a few things (the coil insulation on the bell housing and some wire separators). I think it came out great. Looks like I have enough room to put the plastic cover back on, but not sure I well. I ruined the supplied tach and 12V terminal ends, so I used weatherproof ones. Oh well. I will do the write up shortly. Here are some pics:    |
||
|
'92 Correctcraft Ski Nautique
|
||
|
||
|
Bri892001
Grand Poobah
Joined: September-27-2008 Location: Boston MA Status: Offline Points: 4947 |
Post Options
Thanks(0)
Quote Reply
Posted: August-03-2014 at 8:06pm |
|
|
Congrats on getting it up and running. Looks great

|
||
|
||
|
KRoundy
Platinum Member
Joined: August-23-2010 Location: Lake Stevens Status: Offline Points: 1702 |
Post Options
Thanks(0)
Quote Reply
Posted: August-04-2014 at 2:25am |
|
|
Sweet! Looking forward to seeing the write up. Congrats on completing the job. Have you done an on-the-water test yet?
|
||
|
Previous: 1993 Electric Blue/Charcoal Ski Nautique
Current: 2016 Ski Nautique 200 Open Bow |
||
|
||
|
AAM196
Gold Member

Joined: October-23-2012 Location: Pittsburgh, PA Status: Offline Points: 846 |
Post Options
Thanks(0)
Quote Reply
Posted: August-04-2014 at 2:56am |
|
|
nice upgrade!
|
||
|
||
|
JPASS
Grand Poobah
Joined: June-17-2013 Location: Orlando Status: Offline Points: 2283 |
Post Options
Thanks(0)
Quote Reply
Posted: August-04-2014 at 9:45am |
|
No water test yet. It started to rain as we finished up. I'll definitely be taking it out next Saturday for a full day of running it. Once timed properly she fired right up. Going from 3000 rpm straight to closed throttle resulted in no rpm dips or stumbles like she used to. She ran nice and smooth. Gonna fire her up today again and double check everything. In my pic it appears my idle might be at 14 degrees. I need to double check that. I also want to take some more pics of how I ran the plug wires and to clean up a few things while I'm in there. |
||
|
'92 Correctcraft Ski Nautique
|
||
|
||
|
JPASS
Grand Poobah
Joined: June-17-2013 Location: Orlando Status: Offline Points: 2283 |
Post Options
Thanks(0)
Quote Reply
Posted: August-04-2014 at 1:12pm |
|
|
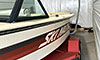
A couple more pics. The spark arrestor hose barely makes contact with one of the wires. Not sure if I will swap it out or what. Going to get another set of wire organizers to tidy everything up a bit nicer.
Wifey misses the plastic cover, so I am going to modify it to fit over the dizzy. I have clearance on the top, just need to notch the front to clear the wires.    |
||
|
'92 Correctcraft Ski Nautique
|
||
|
||
|
Bri892001
Grand Poobah
Joined: September-27-2008 Location: Boston MA Status: Offline Points: 4947 |
Post Options
Thanks(0)
Quote Reply
Posted: August-04-2014 at 1:40pm |
|
|
Looks great. It's funny that your wife is poking around under the doghouse. I thought the doghouse was the one place where a man is safe from interior design suggestions, LOL.
I wouldn't lose sleep over the spark arrester hose touching a wire. |
||
|
||
|
halfnelly
Senior Member 

Joined: January-14-2013 Location: Maitland, FL Status: Offline Points: 253 |
Post Options
Thanks(0)
Quote Reply
Posted: August-04-2014 at 2:20pm |
|
|
Nice work!
|
||
|
||
|
Orlando76
Grand Poobah
Joined: May-21-2013 Location: Mount Dora, FL Status: Offline Points: 3108 |
Post Options
Thanks(0)
Quote Reply
Posted: August-04-2014 at 2:30pm |
|
|
Nice to see attention to detail.
Can you flip the mesh part of flame arrestor over to make it clear? Hose will probably be short. Even if it touches doubt it would be a problem. |
||
|
||
|
Air206
Grand Poobah
Joined: September-28-2008 Location: Roanoke, VA Status: Offline Points: 3000 |
Post Options
Thanks(0)
Quote Reply
Posted: August-04-2014 at 2:39pm |
|
Those hose adaptors usually screw (or are riveted in) ....you can move it if you want........ Nice job - The Barefoot will be needing this in the future - we had the DUI on the Tique - loved it! |
||
|
||
|
kapla
Grand Poobah

Joined: March-27-2008 Location: BA, Argentina Status: Offline Points: 6148 |
Post Options
Thanks(0)
Quote Reply
Posted: August-04-2014 at 11:12pm |
|
|
Nice work!
I see a riser gasket replacement in your near future!  You have some leaks there...and you do not want any water leaking to the engine... |
||
|
<a href="">1992 ski nautique
|
||
|
||
|
JPASS
Grand Poobah
Joined: June-17-2013 Location: Orlando Status: Offline Points: 2283 |
Post Options
Thanks(0)
Quote Reply
Posted: August-04-2014 at 11:19pm |
|
|
I think those leaks were from before when the PO had the boat. I've never seen water leaking from either riser. the rust stains drive me nuts.
|
||
|
'92 Correctcraft Ski Nautique
|
||
|
||
|
TX Foilhead
Grand Poobah

Joined: February-01-2009 Location: Kingsland TX Status: Offline Points: 2076 |
Post Options
Thanks(0)
Quote Reply
Posted: August-04-2014 at 11:28pm |
|
|
If it's it leaking you won't see it wet, you'll see the stains. Clean it up and give it squirt of paint, if it comes back it's still leaking.
|
||
|
||
|
JPASS
Grand Poobah
Joined: June-17-2013 Location: Orlando Status: Offline Points: 2283 |
Post Options
Thanks(0)
Quote Reply
Posted: August-05-2014 at 8:39am |
|
Good to know. I'll just replace the gaskets. They're only $10 each from what I can find on SkiDim. Pretty straight forward to change right? Just remove the 4 bolts on top of the riser, clean the mating surfaces and reinstall the riser???Looks like the tab on the gasket faces forward on my set-up. |
||
|
'92 Correctcraft Ski Nautique
|
||
|
||
|
gun-driver
Grand Poobah
Joined: July-18-2008 Location: Pittsburgh, Pa Status: Offline Points: 4117 |
Post Options
Thanks(0)
Quote Reply
Posted: August-05-2014 at 9:13am |
|
More like remove the two short bolts... break the two long bolts... get the torch out heat the riser... vice grips on the remaining part of the bolt... hope for the bolt to spin free.  Not to hard really. |
||
|
||
|
Post Reply
|
Page <1234> |
 Tweet
Tweet
|
| Forum Jump | Forum Permissions You cannot post new topics in this forum You cannot reply to topics in this forum You cannot delete your posts in this forum You cannot edit your posts in this forum You cannot create polls in this forum You cannot vote in polls in this forum |


 Topic Options
 Bri892001 wrote: