 Boats For Sale:


Advice for reviving a '87 SN 2001 after 10yrs |
Post Reply 
|
Page <1234> |
| Author | ||
TRBenj 
Grand Poobah 

Joined: June-29-2005 Location: NWCT Status: Offline Points: 21141 |
 Post Options Post Options
") Thanks(0) Thanks(0)
 Quote Reply Quote Reply
 Posted: April-04-2015 at 8:45am Posted: April-04-2015 at 8:45am |
|
|
87 will not likely have the greasable spindles (mine doesnt). Id jack each side up and make sure the hub is sufficiently tight, and make sure its not too loud (no grinding) when spun. Take a look at the grease and if reasonable, drag it home. If they look/feel/sound bad, youre going to wish you had spare parts to rebuild them on the spot.
|
||
 |
||
|
xarmypilot
Groupie 

Joined: March-25-2015 Location: Westfield, IN Status: Offline Points: 97 |
Post Options
Thanks(0)
Quote Reply
Posted: April-05-2015 at 1:34pm |
|
|
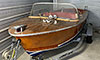
We made it back with everything in one piece. In fact, aside from losing a trailer hub cap somewhere on I-69, the trip up north and back was absolutely uneventful.
More good news - the trailer in question was a '90 Shorelander with a lube-thru axle and bearingbuddies. I pulled out my grease gun and hit each side equally with a liberal amount of grease. We hooked everything up, did a quick lights check then went for a 5-mile drive at 30-40 mph to warm up the axle. After we returned, we hit each side again with the grease and viola! The majority of old gummy stuff was pushed out and replaced. On this Easter Sunday, I just wanted give to a big "thank you" to everyone who provided input. With the all knowledge sharing, I was able to ensure that I was adequately prepared to meet the majority of potential showstoppers. Here's a few quick pic's of what I'll be working with over the next few weeks.  Time for a short test drive!  These look awful without the hub caps   The vinyl is a lot more brittle then it looks  I found all the plugs, keys, and even the oil quick drain hose in a plastic bag under the observers seat  The swim platform is going to require some work...  All in all, the engine bay was pretty clean  Aside from wet sanding, buffing and polishing the hull, the port-side graphics are going to eventually need some real work. If I don't keep to the original gray scheme, I'm thinking dark blue...  |
||
|
||
|
SNobsessed
Grand Poobah
Joined: October-21-2007 Location: IA Status: Offline Points: 7102 |
Post Options
Thanks(0)
Quote Reply
Posted: April-05-2015 at 2:14pm |
|
|
Looks great! Glad you had a good trip home. I remember pulling mine home - surge brake coupler was clunking at every little bump the whole hour.
|
||
|
“Beer is proof that God loves us and wants us to be happy.”
Ben Franklin |
||
|
||
|
xarmypilot
Groupie
Joined: March-25-2015 Location: Westfield, IN Status: Offline Points: 97 |
Post Options
Thanks(0)
Quote Reply
Posted: April-08-2015 at 11:25am |
|
|
Anyone have any good tips for putting the two halves of the RWP back together after changing the impeller? I've pulled the pump and removed\replaced the old impeller, o-ring and gasket, but I'm having a heck of a time getting enough thread to the screws in order to put pump back together. They're not stripped and initially I thought I might have purchased the wrong kit from Nautiqueparts.com, but everything I can find confirms the correct part number (09959K). Could it be that the new impeller just has that much more thickness to it?
 
|
||
|
'87 SN 2001
'68 Chris~Craft Grand Prix (Past family boat) '72 Checkmate Mx16 (Past family boat) "Speed is life, altitude is life insurance" |
||
|
||
|
Hollywood
Moderator Group 

Joined: February-04-2004 Location: Twin Lakes, WI Status: Offline Points: 13512 |
Post Options
Thanks(0)
Quote Reply
Posted: April-08-2015 at 11:43am |
|
|
Kind of confused. I've never had a problem. Put it together the way you had it and post a picture.
|
||
|
||
|
spiralhelix
Senior Member 
Joined: August-06-2014 Location: IL/WI Status: Offline Points: 496 |
Post Options
Thanks(0)
Quote Reply
Posted: April-08-2015 at 12:10pm |
|
|
have your screws been modified/shortened? mine just barely end up sticking out past the backside of the housing when fully seated. Dawn dish soap on the fins to get it to slide in easier. I then add the "o" ring, plate, gasket, put the shaft into the impeller and spin it until the key meets the slot and it drops in. line up the screws and tighten her down, each screw a bit at a time. Just make sure you orient the impeller in the correct direction.
|
||
|
||
|
Hollywood
Moderator Group
Joined: February-04-2004 Location: Twin Lakes, WI Status: Offline Points: 13512 |
Post Options
Thanks(0)
Quote Reply
Posted: April-08-2015 at 12:49pm |
|
|
No matter how long the screws are you should be able to close up the housing by hand. A fresh impeller will "right" itself when you start the engine.
|
||
|
||
|
tjca77
Groupie
Joined: April-29-2014 Location: Dunwoody Status: Offline Points: 54 |
Post Options
Thanks(0)
Quote Reply
Posted: April-08-2015 at 1:08pm |
|
|
Did this last weekend, a mark on the top of the pump helps make sure you are not installing it backwards. There are some good pictures on the aquaskier.com website of this install. I was surprised at how easy this part was to install.
|
||
|
||
|
8122pbrainard
Grand Poobah

Joined: September-14-2006 Location: Three Lakes Wi. Status: Offline Points: 41045 |
Post Options
Thanks(0)
Quote Reply
Posted: April-08-2015 at 7:35pm |
|
I agree. Have you measured the old to new thickness thru the bore? |
||
|
||
|
xarmypilot
Groupie
Joined: March-25-2015 Location: Westfield, IN Status: Offline Points: 97 |
Post Options
Thanks(0)
Quote Reply
Posted: April-08-2015 at 9:57pm |
|
|
I took Kevin's advice and pulled the RWP back apart to get some photos. After zooming in, I noticed that one of the threaded screw holes was pretty smooth and another on it's way. Called my cousin to see if he was aware of this and sure enough, this situation wasn't any news to him
  "Good screw hole"  Screw hole in the process of ticking me off  The screw hole that makes me want to throw the RWP across my %$#@! garage  In any event, the screws aren't the problem now, it's the RWP back housing. Anyone have any previous experience with using a tap and die set on the housing to re-thread the screw holes? Any idea if going "just a tad" larger is a problem? If not, what's a good size? I'm pretty sure that the screw holes are brass, so I'm a little nervous about just going to town here... |
||
|
||
|
TRBenj
Grand Poobah
Joined: June-29-2005 Location: NWCT Status: Offline Points: 21141 |
Post Options
Thanks(0)
Quote Reply
Posted: April-08-2015 at 10:04pm |
|
|
Go with longer bolts and nuts on the back side if necessary.
|
||
|
||
|
xarmypilot
Groupie
Joined: March-25-2015 Location: Westfield, IN Status: Offline Points: 97 |
Post Options
Thanks(0)
Quote Reply
Posted: April-08-2015 at 10:12pm |
|
Yes, I agree most definitely! But if you look at pic #3, a longer bolt ain't gonna fix that... |
||
|
||
|
skutsch
Grand Poobah

Joined: June-19-2008 Location: Racine, WI Status: Offline Points: 2874 |
Post Options
Thanks(0)
Quote Reply
Posted: April-08-2015 at 10:20pm |
|
I am pretty sure someone is going to have a hey day with this post, I edited up to make it all the easier for you guys... WRT the actual problem at hand, I would do what Tim suggested with a bolt and nut or, re-tap all the next size up, that way you shouldn't have to worry about which bolt fits. Brass is soft, so tapping should not be an issue, just be very careful threading and tightening. |
||
|
||
|
xarmypilot
Groupie
Joined: March-25-2015 Location: Westfield, IN Status: Offline Points: 97 |
Post Options
Thanks(0)
Quote Reply
Posted: April-08-2015 at 10:37pm |
|
Thanks, Steve. The advise is much appreciated - glad to know that tapping brass shouldn't be problematic. I'm right there with you regarding using care when threading and tightening into soft metals.  |
||
|
'87 SN 2001
'68 Chris~Craft Grand Prix (Past family boat) '72 Checkmate Mx16 (Past family boat) "Speed is life, altitude is life insurance" |
||
|
||
|
8122pbrainard
Grand Poobah
Joined: September-14-2006 Location: Three Lakes Wi. Status: Offline Points: 41045 |
Post Options
Thanks(0)
Quote Reply
Posted: April-09-2015 at 12:29am |
|
|
I feel the original bolts are 1/4-20. You can tap to 5/16-18 but, there's no reason Tim's method of longer bolts and nut's on the back side won't work ether. Actually, I would prefer to see the longer bolts since there's not much material in the ears of the pump body to go larger.
|
||
|
||
|
xarmypilot
Groupie
Joined: March-25-2015 Location: Westfield, IN Status: Offline Points: 97 |
Post Options
Thanks(0)
Quote Reply
Posted: April-09-2015 at 10:53pm |
|
Pete, you're right on the money. The one that looks like it's an adjusting screw is 1" long and the other two appeared to be 3\4" - all were 1/4-20. I checked a number of taps and settled on 1\4-28 - which just happened to coincide with the three 1" fasteners I had laying around. The RWP is now solidly back together and re-installed with a brand new Sherwood impeller and gasket. I didn't go with the nut on the back idea as there really wasn't sufficient room to get a turn on the nut to ensure it was tightly seated to the housing. In any event, there's plenty of "meat" in the new threads and the longer bolts make disasembly\reassembly alot easier. Thanks to all who added some input- I'd rather ask once then have to call for a tow...
|
||
|
'87 SN 2001
'68 Chris~Craft Grand Prix (Past family boat) '72 Checkmate Mx16 (Past family boat) "Speed is life, altitude is life insurance" |
||
|
||
|
8122pbrainard
Grand Poobah
Joined: September-14-2006 Location: Three Lakes Wi. Status: Offline Points: 41045 |
Post Options
Thanks(0)
Quote Reply
Posted: April-09-2015 at 11:12pm |
|
Rob, I hope you gained thread engagement with the longer 1/4" bolts since you didn't tap for a 5/16". Yes, you are correct that adding nuts on the backside does require spot facing to eliminate the casting radius so a nut will fit. |
||
|
||
|
xarmypilot
Groupie
Joined: March-25-2015 Location: Westfield, IN Status: Offline Points: 97 |
Post Options
Thanks(0)
Quote Reply
Posted: April-15-2015 at 12:43am |
|
|
Busy day today, just had to show off some wood
 The swim platform came out far better than anticipated - the hues in the Teak almost look holographic. Also got the observer's seat bottom, stern seat bottom and boat cover over to the upholsterers. I'm going with a bottom seat color theme in gray. I've asked them to match the gray in the stripe then replace skins & refoam both seats. FWIW, my cousin corrected a misunderstanding today, turns out the boat had been stored in a garage for 19yrs, not 10. Speaking with some of the "old timers" on the lake, they say that's not a problem if climate controlled, not stored in sunlight and properly prepped. Fingers crossed, I'm hoping for a first start this weekend! Oh, that reminds me - check fire extinguisher! The swim platform came out far better than anticipated - the hues in the Teak almost look holographic. Also got the observer's seat bottom, stern seat bottom and boat cover over to the upholsterers. I'm going with a bottom seat color theme in gray. I've asked them to match the gray in the stripe then replace skins & refoam both seats. FWIW, my cousin corrected a misunderstanding today, turns out the boat had been stored in a garage for 19yrs, not 10. Speaking with some of the "old timers" on the lake, they say that's not a problem if climate controlled, not stored in sunlight and properly prepped. Fingers crossed, I'm hoping for a first start this weekend! Oh, that reminds me - check fire extinguisher!Before  After  Detail 
|
||
|
'87 SN 2001
'68 Chris~Craft Grand Prix (Past family boat) '72 Checkmate Mx16 (Past family boat) "Speed is life, altitude is life insurance" |
||
|
||
|
8122pbrainard
Grand Poobah
Joined: September-14-2006 Location: Three Lakes Wi. Status: Offline Points: 41045 |
Post Options
Thanks(0)
Quote Reply
Posted: April-15-2015 at 7:36am |
|
|
Rob,
Good luck on the start up. The platform looks great but I'd like to ask what you used on it. It looks pretty glossy for a oil. Hopefully you didn't use a hard finish. |
||
|
||
|
xarmypilot
Groupie
Joined: March-25-2015 Location: Westfield, IN Status: Offline Points: 97 |
Post Options
Thanks(0)
Quote Reply
Posted: April-15-2015 at 11:29am |
|
Thanks Pete. I used 3-4 coats of Starbrite Teak oil for the base then 3 coats of TotalBoat Marine Wood Finish in gloss to make it "pop". It looks kinda slick, but you actually get pretty good traction on it. I know, I had to test it to make sure I wasn't inviting an accident
|
||
|
'87 SN 2001
'68 Chris~Craft Grand Prix (Past family boat) '72 Checkmate Mx16 (Past family boat) "Speed is life, altitude is life insurance" |
||
|
||
|
Hollywood
Moderator Group
Joined: February-04-2004 Location: Twin Lakes, WI Status: Offline Points: 13512 |
Post Options
Thanks(0)
Quote Reply
Posted: April-15-2015 at 12:04pm |
|
|
That's gonna be slick in the water. Oil, and oil only.
|
||
|
||
|
phatsat67
Grand Poobah
Joined: March-13-2006 Location: Indiana Status: Offline Points: 6149 |
Post Options
Thanks(0)
Quote Reply
Posted: April-15-2015 at 12:11pm |
|
|
Agree, Teak is meant for oil and that's the way it is.
|
||
|
||
|
xarmypilot
Groupie
Joined: March-25-2015 Location: Westfield, IN Status: Offline Points: 97 |
Post Options
Thanks(0)
Quote Reply
Posted: April-15-2015 at 5:38pm |
|
Nope, it's not slick at all. There's two finish formulations available from this company, one that is strictly "above waterline" - which is more like a lacquer and the other that's made for swim platforms and the like. I would have to say that there's probably more friction being generated now than if the Teak was simply oiled. Zach, I'm sure I'll see you on the water sometime this summer. I'll let you be the judge
|
||
|
'87 SN 2001
'68 Chris~Craft Grand Prix (Past family boat) '72 Checkmate Mx16 (Past family boat) "Speed is life, altitude is life insurance" |
||
|
||
|
Hollywood
Moderator Group
Joined: February-04-2004 Location: Twin Lakes, WI Status: Offline Points: 13512 |
Post Options
Thanks(0)
Quote Reply
Posted: April-15-2015 at 5:43pm |
|
|
I'm struggling to come up with any finish that makes it pop that wouldn't be slippery. Anyway, good luck. Zach will have to let know how it goes.
|
||
|
||
|
Smithfamily
Platinum Member

Joined: December-26-2007 Location: Orlando, Fl Status: Offline Points: 1602 |
Post Options
Thanks(0)
Quote Reply
Posted: April-20-2015 at 8:50pm |
|
|
Rob, Looking Great!!
How brittle is the vinyl, and did you try treating it with anything? It sure looks nice. |
||
|
Js
|
||
|
||
|
8122pbrainard
Grand Poobah
Joined: September-14-2006 Location: Three Lakes Wi. Status: Offline Points: 41045 |
Post Options
Thanks(0)
Quote Reply
Posted: April-20-2015 at 10:16pm |
|
Rob, I asked about the coating worried about it sticking and not how slippery it was. I have never seen anything considered a hard coating stick to Teak. Time will tell. |
||
|
||
|
xarmypilot
Groupie
Joined: March-25-2015 Location: Westfield, IN Status: Offline Points: 97 |
Post Options
Thanks(0)
Quote Reply
Posted: April-20-2015 at 10:51pm |
|
Yep Pete -That's a fact! FYI - I did get a little nervous about it being slippery over the weekend so I pulled it off and watered it down with about an ounce of Dawn mixed in just to check it out. It passed my barefoot "Electric boogie" test no problem My buddy uses this stuff on his ProStar's platform and swears by it (then swears AT his boat..).
|
||
|
'87 SN 2001
'68 Chris~Craft Grand Prix (Past family boat) '72 Checkmate Mx16 (Past family boat) "Speed is life, altitude is life insurance" |
||
|
||
|
xarmypilot
Groupie
Joined: March-25-2015 Location: Westfield, IN Status: Offline Points: 97 |
Post Options
Thanks(0)
Quote Reply
Posted: April-25-2015 at 1:40am |
|
|
Quick update -
It was a very good day today. Took half a day off of work and, with a little help from the fuel, fire and air gods, I was able to get in the 1st start and run up since 1996! I think it only took 2-3 turns of the key before she roared back to life. Nice thing about Ford's 351, they do like to run! Initially she was a bit smokey for the first 5 minutes, probably due to the half ounce or so of Marvel I sprayed down the plug wells after I changed them. Transmission felt and sounded smooth and engine temps stayed around 150-160 after 30 minutes at idle. Before starting I was a bit concerned about having to adjust the carb, but the engine idled steady at about 900 RPM, so I think I'm in the clear - just have to wait until I put it under load. As a side note, as I was reinserting the water plugs, I noticed a red hose attached to the engine listing eye on one end and at the oil pan at the other. Anyone have an idea what that is for or if it need to be attached? I can seem the find it in the PCM manual so I've attached a pic  I'm thinking it's a convenient oil drain hose, but I'd rather not "guess"... There's also an additional plug I can't account for. I believe it to be a spare or maybe a extra drain plug of some type. It's awfully clean to have been used regularly and I can account for the other 5 plugs that I had re-installed. Thoughts? Red host attached to lifting eye  Opposite end, attached to oil pan  Extra plug? 
|
||
|
'87 SN 2001
'68 Chris~Craft Grand Prix (Past family boat) '72 Checkmate Mx16 (Past family boat) "Speed is life, altitude is life insurance" |
||
|
||
|
Gary S
Grand Poobah

Joined: November-30-2006 Location: Illinois Status: Offline Points: 14096 |
Post Options
Thanks(0)
Quote Reply
Posted: April-25-2015 at 2:00am |
|
|
Good deal now if it would only warm up! Your right on the hose,remove the drain in the bottom of the boat shove the hose thru,remove the cap and drain into your favorite container. Word of caution,don't put it in gear without having water run on the strut bearing,they are rubber and water lubricated.
|
||
|
||
|
skutsch
Grand Poobah
Joined: June-19-2008 Location: Racine, WI Status: Offline Points: 2874 |
Post Options
Thanks(0)
Quote Reply
Posted: April-25-2015 at 8:44am |
|
|
Right on with the oil drain hose, I remember going through my engine on the 98 sport for the first time and finding the same hose. Had no idea what it was, the Ford Interceptor 312 on my Dad's Ski Nautique had no such convenience item.
As for that plug, it sure looks like a manifold plug (to drain manifolds - winterization - at the aft end of each manifold), of course it depends on what size it is. If it is small it could also be the plug that goes in the bottom of the J-pipe below the water pump, but those are typically brass and a hex head. |
||
|
||
|
Post Reply
|
Page <1234> |
 Tweet
Tweet
|
| Forum Jump | Forum Permissions You cannot post new topics in this forum You cannot reply to topics in this forum You cannot delete your posts in this forum You cannot edit your posts in this forum You cannot create polls in this forum You cannot vote in polls in this forum |


 Topic Options
 Hollywood wrote: