 Boats For Sale:


Stringers using Coosa |
Post Reply 
|
Page <123> |
| Author | ||
shierh 
Gold Member 
Joined: April-29-2015 Location: Florida Status: Offline Points: 605 |
 Post Options Post Options
") Thanks(0) Thanks(0)
 Quote Reply Quote Reply
 Posted: July-20-2015 at 12:15pm Posted: July-20-2015 at 12:15pm |
|
|
ive seen that before. thought of trying to do the same. I am also using pneumatic cut off wheel. and chisel.
|
||
 |
||
|
shierh
Gold Member
Joined: April-29-2015 Location: Florida Status: Offline Points: 605 |
Post Options
Thanks(0)
Quote Reply
Posted: July-29-2015 at 11:43am |
|
|
have the 2 port side stringers bedded in , will glass tomorrow.
I decided to use 4 layers of bi-ax where the engine sits and 2 for the remainder. , outside will get one layer then 2 where the x brace from engine are placed. Had to grind out all the glass mat where the rudder mount is. it was all wet down to the hull layup. Will build it back up flat then use coosa backer. Also found that Correct Craft Dealer,SE Correct Craft, had reinforced the shaft tube area and pylon area with what appears to be bi ax and epoxy. Going to grind them smooth and lay one more layer and will have to use epoxy so no bond issues. (rest is vinyl ester) |
||
|
||
|
8122pbrainard
Grand Poobah 

Joined: September-14-2006 Location: Three Lakes Wi. Status: Offline Points: 41045 |
Post Options
Thanks(0)
Quote Reply
Posted: July-29-2015 at 8:54pm |
|
Careful with the composite. It won't like to be compressed by the rudder port mounting. |
||
|
||
|
CrazyCanuck
Senior Member 

Joined: July-21-2013 Location: Vancouver B.C. Status: Offline Points: 254 |
Post Options
Thanks(0)
Quote Reply
Posted: July-29-2015 at 10:39pm |
|
|
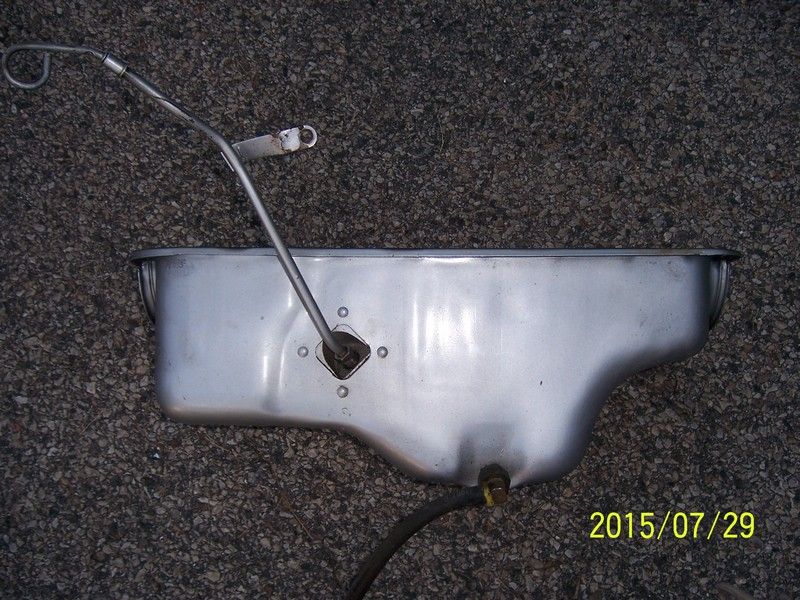
Your oil pan looks just like mine. I noticed the dipstick tube patched into the side of the pan like mine also. Is that factory? I am interested to know how much oil it takes to the full mark.
On my 78 SN I put in 5 litres.....which is just under 5.3 quarts.....and I get to half way between ADD and the end of the dipstick. I put it down to the patch job being off and have never seen the oil pressure dip during cruise......however if I am supposed to run more oil I would like to know. Thanks. Corey. |
||
|
https://encrypted-tbn1.gstatic.com/images?q=tbn:ANd9GcRtW3vJrMHLdqBzndt9VX3oOpBuRopGlzKq9Ea7pAO7wnTuoD8E8g
|
||
|
||
|
Gary S
Grand Poobah

Joined: November-30-2006 Location: Illinois Status: Offline Points: 14096 |
Post Options
Thanks(0)
Quote Reply
Posted: July-29-2015 at 10:55pm |
|
|
That is an oem Pleasure Craft Marine oil pan,and has not been modified.
|
||
|
||
|
Gary S
Grand Poobah
Joined: November-30-2006 Location: Illinois Status: Offline Points: 14096 |
Post Options
Thanks(0)
Quote Reply
Posted: July-29-2015 at 11:24pm |
|
|
Here is one off an early '90's -
|
||
|
||
|
CrazyCanuck
Senior Member
Joined: July-21-2013 Location: Vancouver B.C. Status: Offline Points: 254 |
Post Options
Thanks(0)
Quote Reply
Posted: July-30-2015 at 3:48am |
|
|
Yup....that is what mine looks like, except I have 4 bolts not rivets holding the dipstick in....which is why I thought it was a home modified one.
What is the oil capacity of that type of pan? Thanks, |
||
|
https://encrypted-tbn1.gstatic.com/images?q=tbn:ANd9GcRtW3vJrMHLdqBzndt9VX3oOpBuRopGlzKq9Ea7pAO7wnTuoD8E8g
|
||
|
||
|
JoeinNY
Grand Poobah

Joined: October-19-2005 Location: United States Status: Offline Points: 5698 |
Post Options
Thanks(0)
Quote Reply
Posted: July-30-2015 at 1:19pm |
|
I'm not thinking there is going to be a problem compressing coosa with any kind of skin over it. It is not exactly Styrofoam, compression strengths are similar to that of wood perpendicular to the grain. The penalty in compressive strength is more than made up for buy it's resistance to water absorbtion and rot in this application. Even someone using wood for stringers should seriously consider coosa for hull backing applications such as this one- |
||
|
||
|
Glassdog
Groupie 
Joined: October-31-2014 Location: Pennsylvania Status: Offline Points: 62 |
Post Options
Thanks(0)
Quote Reply
Posted: August-03-2015 at 11:48pm |
|
|
Steve I have a question for you and it may have already been answered somewhere in this string, so if I'm being repetitive please accept my apologies.
I have another string in general questions I have been posting to and I'm looking for a little confirmation. I am in the process of restoring a 1963 17' American Skier. I am currently working in the hull and have unwrapped the stringers. Mine are a little different than yours however your main stringers look identical to mine from your pic. My motor stringers are 2x Fir and the outer are 1x Fir. My plans are to fillet and rewrap with 1708 biaxial glass (main stringers). I purchased easily enough to do 2 layers and did so very early. As I unwrapped my stringers I was surprised. to find they were tabbed with CSM and the overwrapped with a single layer of (im guessing) 16 oz. or so roving. I have done glasswork before, but have not used 1708 and was quite alarmed at the weight of the roll that arrived. So the meat of the question is this. Do you have any idea what they had down when you were removing your stringers? You have quite a bit more motor in your boat, mine (hopefully) will see the return of it's little 6 banger. I'm trying to balance strength and weight and since I have a quite narrow space between my main stringers and the outer stringers I'm concerned that at two layers of 1708 in stepped overlap on the bottom of the hull is going to create quite a bit more thickness and rigidity on the bottom of the hull and result in an area that will be prone to stress by virtue of the amount of resin this stuff will sop up and deposit. There's quite a bit of material there now and since I have never tinkered with one of these beasts some of it is tuff to identify as original layup or what may have been a previous addition. From all appearences, my stringers appear to be original and the way they were assembled had all the appearences of employees that once were building in wood. Any insights you have would be appreciated. BTW your motor looks great! |
||
|
||
|
shierh
Gold Member
Joined: April-29-2015 Location: Florida Status: Offline Points: 605 |
Post Options
Thanks(0)
Quote Reply
Posted: August-04-2015 at 11:11am |
|
|
my outside stringers were also 1x fir, they had a wide area for floor support but basically the same. Didnt have much glass on them, one thin layer of chop stran.
Yes the stitched bi ax is very heavy stuff. I went over Kill. I believe 2 layers will be enough but i used 4 under engine cradle. Sort of matched the prior layup under engine. I had a little trouble bending over the top of stringers, didnt round over enough i guess. Have a bulge to grind off so cradle will fit. I dont know your hull but am guessing it was likely over built as most fiberglass boats in the 60's were. For instance, on my 1967 hatteras i was told by a factory guy that if the hull flexed when they pulled it from the mold, they dropped it back in and put in more glass. Bottom of that boat was 1" thick, solid and sides were half inch thick. it was a beast. Anyhow point being is that you may not need as much glass as you think but on same token i would use 2 layers on the main and one on the secondary. As far as a hard spot, all i can say is remove all the glass layers that they used to install the stringers. grind down to the original hull. |
||
|
||
|
dangerwil
Senior Member

Joined: June-20-2013 Location: Orange Park, FL Status: Offline Points: 319 |
Post Options
Thanks(0)
Quote Reply
Posted: August-04-2015 at 11:52am |
|
|
That 1708 is just what you need. When I removed the stringers in my Mustang I had much the same situation. Primary stringers were tabbed in with heavy woven roving. Entire stringer was not covered. Just around engine area and at the ends. I chopped out all the original foam and found bare fir! The secondaries were the same but just tabbed in with a single layer of CSM.
When I replaced the stringers with cypress, I did a layer of CSM followed by a layer 1708 then another layer of CSM and 1708. Overlapping 4 inches on first layup, 8 inches on second. The secret to get the 1708 to lay over the corners is to round the tops of the stringers a bit. When laying up, use a small roller and wet out the bottom side of the 1708 then flip it over and will be very supple and go right in to place. Friscoboater on youtube did a great series of videos on layup in his cvx-18 restoration. 
|
||
|
||
|
uk1979
Platinum Member
Joined: June-13-2007 Location: United Kingdom Status: Offline Points: 1422 |
Post Options
Thanks(0)
Quote Reply
Posted: August-05-2015 at 4:11pm |
|
|
This Thread has many tips from the guys here using Epoxy ... that may cross over to poly/vinyl work.
Thanks for posting your project. 
|
||
|
Lets have a go
56 Starflite 77 SN 78 SN 80 BFN |
||
|
||
|
Glassdog
Groupie
Joined: October-31-2014 Location: Pennsylvania Status: Offline Points: 62 |
Post Options
Thanks(0)
Quote Reply
Posted: August-09-2015 at 2:44pm |
|
|
Sorry for the delay in getting back guys. Thanks so much for your input. Sorry I don't have any pics with me to post, I will however soon. Yesterday my son and I applied filletes and did a little spot grinding.
Your information was quite helpful. Their had been some repair work done to the hull in the transom area. Bad patch a single layer of boat cloth and it wasn't even wetted out. came off like a bad band aid (my sons description). Anyhow at some point they knew they had a leak and they packed tar caulking around the rudder plate. Did not appear to be the leak. So. During hardware removal, I could not get the lifting eye / cleat out. It was rusted to the angle attachment to the transom inlay. So I removed the inlay and ground everything down and discovered some stress cracking and almost what I would call crushing or delamination of what appears to have been just multiple layers of original CSM. I then remembered the previous owner said they used the cleat frequently instead of the pylon (why???). I get the impression this was a result of probably tubing. Lift eye / cleat was probably great for lifting (straight line) and obviously docking probably not so much the way the load would transfer for pulling. the lift eye base was slightly above the deck instead of flush so.... Hey I have seen the "Friscoboater" series on you tube - great information. I was just trying to make sure I build in enough strength in the assemblies. His boats I believe were both outdrives with quite dissimilar motor mounts. I going to use the original or re-made engine beds as constructed. Don't want my stringers to fold up  Many thanks again!! Many thanks again!!
|
||
|
||
|
shierh
Gold Member
Joined: April-29-2015 Location: Florida Status: Offline Points: 605 |
Post Options
Thanks(0)
Quote Reply
Posted: August-09-2015 at 9:26pm |
|
|
well i thought by taking out stringers one at a time and replacing while on trailer that there would be no hull sag issue. Well removed starboard outboard one and then re fitted it and found the front was up about an inch. jacked up hull under windshield and it fit again. I installed it with boat jacked up and then removed engine stringer. My problem is that i installed the port side while on trailer and its glassed in.
will jack it up next week and take a strait edge to it and see how it looks.... |
||
|
||
|
8122pbrainard
Grand Poobah
Joined: September-14-2006 Location: Three Lakes Wi. Status: Offline Points: 41045 |
Post Options
Thanks(0)
Quote Reply
Posted: August-09-2015 at 9:41pm |
|
 Good guess on the tubing issue, Good guess on the tubing issue,It's been mentioned many times that the lifting eyes are designed for a vertical load. There are even decals on some models warning about using them for pulling. |
||
|
||
|
shierh
Gold Member
Joined: April-29-2015 Location: Florida Status: Offline Points: 605 |
Post Options
Thanks(0)
Quote Reply
Posted: August-10-2015 at 3:32pm |
|
|
Mine had issue where the rear ring tore out and boat sank in boathouse. Correct Craft fixed it. What a joke on their repair. They covered up the ripped out area with teak and didnt even fix the torn up glass or backer board. they installed new mount and used some hacked up used parts. It was done at SE Correct Craft who most will know was Walter Malones dealership. Now I know why he isnt a dealer any longer nor part of the factory.
I have the rear area ground down underneath and getting it ready for coosa backer with bi ax layer on both sides. also wood backer on transom was full of water when i cut open the glass. All Correct Craft did was dig out some rot and fill with epoxy and skin it over with Biax. |
||
|
||
|
shierh
Gold Member
Joined: April-29-2015 Location: Florida Status: Offline Points: 605 |
Post Options
Thanks(0)
Quote Reply
Posted: August-17-2015 at 11:29am |
|
|
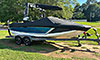
All 4 stringers are now in. Will finish leveling them off this weekend and make and install x members and start on floor.
Working on body work at same time. all hardware has been removed including windshield. Entire top and sides of hull have been sanded to good gelcoat. Its a plain white wrapper at this time. grinding out blisters and will fill as i go. Bottom is heavily blistered and lots of stress spiderweb from removal of stringers. |
||
|
||
|
shierh
Gold Member
Joined: April-29-2015 Location: Florida Status: Offline Points: 605 |
Post Options
Thanks(0)
Quote Reply
Posted: August-26-2015 at 5:55pm |
|
|
im a little behind with photos. cant load from i phone and having trouble with pc loading
Im done with structure. notching the stringers for the engine mount bolts this week and making battery box and the 2 bulkheads forward of engine. will also work on vent tubes. Im starting on body work, have hull sanded from waterline up and blisters fixed. Going to shoot gelcoat this weekend on hull and possibly top side. I was able to set up my gun to get it pretty smooth on practice board. Still plan on engine install next friday. so far ive used 15 gallons of resin on stringers and other repairs and will use 2 to 5 more. Used 50 feet of heavy stitched biax and 15 feet of light stitched biax. about 30 feet of chop strand that is in a 12 inch roll. 2.5 sheets of blue water 26 coosa. Remaining supplies are 2 full sheets of coosa and one sheet of nydacore. Nydacore will be used for removable deck panel and in front of engine. Coosa on sides. Will have one sheet left over. Using the Gelcoat i got from Correct Craft factory, have a friend working there. Its thinned waxed and sprays pretty good from hvlp 2.0 gun. Mystic White is the color. |
||
|
||
|
shierh
Gold Member
Joined: April-29-2015 Location: Florida Status: Offline Points: 605 |
Post Options
Thanks(0)
Quote Reply
Posted: September-08-2015 at 11:40am |
|
|
Stringers are done. the side floor panels are glassed in and installed backer plate for rudder and for rear lifting ring mount. I decided to flip boat over on the trailer to do blister repair. There are hundreds of them. I took boat to the coast and had the Cape Marina flip it over using travel lift. only cost 80.00. its sitting on 4x4 with styrofoam pads.
I was able to do in an hour with it upside down that would take me a whole day lying on my back under the thing. All blisters are opened up and first coat of fill is in. Going to take 2 coats to make it smooth and flush. also with it upside down i can now say that the hull is very even, no bulges from stringer removal error. Will finish fairing friday evening and saturday and hope to shoot gell coat sunday then take it back next weekend and flip it over again and install engine. |
||
|
||
|
SNobsessed
Grand Poobah
Joined: October-21-2007 Location: IA Status: Offline Points: 7102 |
Post Options
Thanks(0)
Quote Reply
Posted: September-08-2015 at 7:29pm |
|
|
After shooting the gel, are you going to wet sand & buff, or just leave the orange peel?
If WS-buff, your schedule seems aggressive. |
||
|
“Beer is proof that God loves us and wants us to be happy.”
Ben Franklin |
||
|
||
|
shierh
Gold Member
Joined: April-29-2015 Location: Florida Status: Offline Points: 605 |
Post Options
Thanks(0)
Quote Reply
Posted: September-08-2015 at 11:19pm |
|
|
will wet
sand and buff yes it will likely take one weekend |
||
|
||
|
SNobsessed
Grand Poobah
Joined: October-21-2007 Location: IA Status: Offline Points: 7102 |
Post Options
Thanks(0)
Quote Reply
Posted: September-08-2015 at 11:28pm |
|
|
You must have strong arms or really helpful friends. I wore my arm & shoulder out sanding cars years ago.
Please take some pix for us when it's done. |
||
|
“Beer is proof that God loves us and wants us to be happy.”
Ben Franklin |
||
|
||
|
TRBenj
Grand Poobah

Joined: June-29-2005 Location: NWCT Status: Offline Points: 21169 |
Post Options
Thanks(0)
Quote Reply
Posted: September-08-2015 at 11:30pm |
|
|
You either have better tools than me or a small army helping you, ha. I had about 40 hrs into the deck of my Ski Nautique, and that was just bringing the color and shine back (400 grit +). Orange peel is a bit more serious.
|
||
|
||
|
shierh
Gold Member
Joined: April-29-2015 Location: Florida Status: Offline Points: 605 |
Post Options
Thanks(0)
Quote Reply
Posted: September-08-2015 at 11:37pm |
|
|
i can wet sand bottom then flip it and finish the rest as a space filler im painting top side so it wont be that bad
|
||
|
||
|
shierh
Gold Member
Joined: April-29-2015 Location: Florida Status: Offline Points: 605 |
Post Options
Thanks(0)
Quote Reply
Posted: October-26-2015 at 3:03pm |
|

|
||
|
||
|
shierh
Gold Member
Joined: April-29-2015 Location: Florida Status: Offline Points: 605 |
Post Options
Thanks(0)
Quote Reply
Posted: October-26-2015 at 9:55pm |
|

|
||
|
||
|
shierh
Gold Member
Joined: April-29-2015 Location: Florida Status: Offline Points: 605 |
Post Options
Thanks(0)
Quote Reply
Posted: October-27-2015 at 5:07pm |
|
|
http://www.correctcraftfan.com/forum/uploads/15695/IMG_2206.JPG
|
||
|
||
|
lewy2001
Grand Poobah

Joined: March-19-2008 Location: NSW Australia Status: Offline Points: 2234 |
Post Options
Thanks(0)
Quote Reply
Posted: October-27-2015 at 8:28pm |
|
|
There you go Steve
 ..... Use the quote option to look at the difference between the posts. Requires the {IMG} tags (tree without arrow) to display pictures once uploaded to site. ..... Use the quote option to look at the difference between the posts. Requires the {IMG} tags (tree without arrow) to display pictures once uploaded to site.
|
||
|
If you're going through hell, keep going
89 Ski <a href="http://www.correctcraftfan.com/diaries/details.asp?ID=5685" ta |
||
|
||
|
BlakelyMarine
Newbie 
Joined: March-02-2014 Location: Edmond, Ok Status: Offline Points: 14 |
Post Options
Thanks(0)
Quote Reply
Posted: January-04-2016 at 7:14pm |
|
|
I have a 63 skier hull, that has been thrashed by weather over the years. Not much left. I have what I believe to be some good parts. I really hate to haul to the dump but are you by chance looking for any hard parts or motor accessories? Strut, prop, motor hatch, gauges, shift linkage, complete 144 motor, etc.
In Oklahoma, please PM me and I'll be happy to let you know what I have. |
||
|
||
|
8122pbrainard
Grand Poobah
Joined: September-14-2006 Location: Three Lakes Wi. Status: Offline Points: 41045 |
Post Options
Thanks(0)
Quote Reply
Posted: January-04-2016 at 7:23pm |
|
|
Blake,
I suggest you post the items you have for sale in the "boat parts for sale" section. Also, pictures would be great. |
||
|
||
|
Post Reply
|
Page <123> |
 Tweet
Tweet
|
| Forum Jump | Forum Permissions You cannot post new topics in this forum You cannot reply to topics in this forum You cannot delete your posts in this forum You cannot edit your posts in this forum You cannot create polls in this forum You cannot vote in polls in this forum |


 Topic Options
 shierh wrote: