 Boats For Sale:


Gel Spraying Techniques |
Post Reply 
|
Page <1 23456 7> |
| Author | |
David F 
Platinum Member 
Joined: June-11-2004 Location: United States Status: Offline Points: 1770 |
 Post Options Post Options
") Thanks(0) Thanks(0)
 Quote Reply Quote Reply
 Posted: March-07-2007 at 1:48pm Posted: March-07-2007 at 1:48pm |
|
If it were me, I would just do the following:
1. brush on thinned epoxy resin and apply heat to help if flow into any cracks. 2. Clean off blush and sand with 80 or heavier grit. 3. Apply Bondo as fairing compound. Sand ending in 120 grit. 4. Clean and apply gelcoat. |
|
 |
|
|
SkiBum
Gold Member

Joined: November-17-2006 Location: United States Status: Offline Points: 587 |
Post Options
Thanks(0)
Quote Reply
Posted: March-07-2007 at 8:38pm |
|
Sounds like a plan. Thank you.
|
|
|
|
|
87BFN owner
Grand Poobah 
Joined: August-25-2006 Location: Saline, MI Status: Offline Points: 2194 |
Post Options
Thanks(0)
Quote Reply
Posted: March-07-2007 at 10:01pm |
|
you know what they say those that fail to plan, plan to fail. I don't see you failing on your project Skibum, looks like you have had it well planned the whole way. Except wasn't this supposed to take a week. Just kidding, from all the pics and talking to Eric about my boat. I know it is a lot of work and time consuming. I hope to be brave enough to try one of these days.
|
|
|
|
|
SkiBum
Gold Member
Joined: November-17-2006 Location: United States Status: Offline Points: 587 |
Post Options
Thanks(0)
Quote Reply
Posted: March-09-2007 at 9:21pm |

Sanded the Bondo on the rs of the hull. Then I realized that I still have to apply Bondo to the lip just below the rub rail location. I grinded that already but skipped the Bondo. That will take a minute to do. I filled the other side of the boat with Bondo. Start sanding that tomorrow. |
|
|
|
|
79nautique
Grand Poobah

Joined: January-27-2004 Location: United States Status: Offline Points: 7872 |
Post Options
Thanks(0)
Quote Reply
Posted: March-09-2007 at 10:08pm |
|
Bill won't the rub rail cover up any waveyness in that area any way? the underside that is. I was looking at them the other day and alot of the vynal (sp)/rubber ones have a lip on them that would extend and cover it up. Just a thought. Your making progress and the end is in sight.
|
|
|
|
|
SkiBum
Gold Member
Joined: November-17-2006 Location: United States Status: Offline Points: 587 |
Post Options
Thanks(0)
Quote Reply
Posted: March-11-2007 at 7:08pm |
|
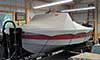
I was actually talking about the lip on the side of the hull where it actually curves upward and out as much as two inches. One side of the boat is finished. The other is sanded with 40 and 80 grit and halfway down with 120 grit. The stern is sanded down to 120 grit as well, including the lip. Not much left until I can start spraying gel.
|
|
|
|
|
David F
Platinum Member
Joined: June-11-2004 Location: United States Status: Offline Points: 1770 |
Post Options
Thanks(0)
Quote Reply
Posted: March-12-2007 at 8:47am |
|
Bill:
That lip is a royal pain to sand. What is your plan to terminate the fairing compound and gel coat at the joint sealant? Personally, I avoided covering the sealant with boat. This required that I dig out most of the sealant and spent considerable time trying to clean the area of the silicon...not easy and I am sure not very effective ultimately. Still, I ended up without gelcoat covering sealant that I was afraid would cause it to peel away. Keep up the excellent work. |
|
|
|
|
SkiBum
Gold Member
Joined: November-17-2006 Location: United States Status: Offline Points: 587 |
Post Options
Thanks(0)
Quote Reply
Posted: March-12-2007 at 9:31am |
|
I have encountered some silicone strings along that joint. I never really thought much about it until you brought up the problem. Perhaps I could mask just the very point at the joint or once the gel is applied sand it all the way down at the joint. Still have a bunch of grinding, filling, and sanding ahead of me. Thanks for the support.
|
|
|
|
|
SkiBum
Gold Member
Joined: November-17-2006 Location: United States Status: Offline Points: 587 |
Post Options
Thanks(0)
Quote Reply
Posted: March-12-2007 at 6:41pm |

Finished grinding away all of the gelcote on the topside. Brushed, cleaned, rinsed, and used 202 for prep. Applied resin and it is cooking right now. Finished putting bondo under the lip all the way around the boat. Just need to sand that off. Plenty of grinding left under the boat. Really wish I could have flipped it over. Would have made things much easier. |
|
|
|
|
jon4pres
Senior Member 

Joined: September-19-2005 Location: United States Status: Offline Points: 275 |
Post Options
Thanks(0)
Quote Reply
Posted: March-14-2007 at 9:56am |
|
SkiBum, You are my hero. I can not wait to see your finished boat.
|
|
|
|
|
SkiBum
Gold Member
Joined: November-17-2006 Location: United States Status: Offline Points: 587 |
Post Options
Thanks(0)
Quote Reply
Posted: March-14-2007 at 7:29pm |

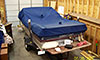
Grinded halfway on the left side. Working under the boat is not much fun at all. I wear a nomex hood, goggles, respirator, and full face shield. Use a creeper with adjustable head rest. Arms get tired quick. Even more fun is applying the resin from under the boat. Really wish I could have flipped the damn thing. The remainder of the topside is all faired with Bondo. Just waiting for it to cure. Been working on the dash and new observer bench. Don't want to give it away yet because of the sensitivity to modifications on these boats. Racing against time. Been tasked to fly out to Ft. Lewis for several weeks. That is several weeks of no progress. |
|
|
|
|
87BFN owner
Grand Poobah
Joined: August-25-2006 Location: Saline, MI Status: Offline Points: 2194 |
Post Options
Thanks(0)
Quote Reply
Posted: March-14-2007 at 7:55pm |
|
Tell them you can't go you have a injured boat at home that needs medical attention. They will understand really, or they will come and help one of the two.
Just kidding sorry to hear that you have to possibly put her on hold, if your not done. Hope things go well. |
|
|
|
|
SkiBum
Gold Member
Joined: November-17-2006 Location: United States Status: Offline Points: 587 |
Post Options
Thanks(0)
Quote Reply
Posted: March-15-2007 at 6:25pm |


While I was grinding the bottom of the hull today I thought my eyes were playing tricks on me. Appeared as though the glass was actually bubbled outward and moved inward when I applied pressure. I took off my dust covered protective gear and found out there was a problem. A big problem. I was able to grind off this entire layer of glass from the hull. Thought I had seen everything with this boat. She still has some suprises for me. 
Once I pulled the bad glass off the boat I grinded through until there were no more loose strands of glass. I washed the area with clean water and an abrasive pad. Mixed up some epoxy and cut multiple pieces of 10oz E-glass. I applied the layers from smallest to a full 8" wide. I'll just have to sand this area down a bit once it cures then fill as with the rest of the boat. Hope this is the only bad spot. |
|
|
|
|
87BFN owner
Grand Poobah
Joined: August-25-2006 Location: Saline, MI Status: Offline Points: 2194 |
Post Options
Thanks(0)
Quote Reply
Posted: March-15-2007 at 7:09pm |
|
That's not cool, I hope you don't find anymore spots like that. Worse yet I hope there are not more spots like that, that you don't find.
|
|
|
|
|
8122pbrainard
Grand Poobah

Joined: September-14-2006 Location: Three Lakes Wi. Status: Offline Points: 41045 |
Post Options
Thanks(0)
Quote Reply
Posted: March-16-2007 at 4:29am |
|
Bill, wow!! sorry to see you run into the problem. At least you found it now and not after you had gel on it. Does it look like the area was starved from resin or do you see fracturing of the glass say from impact? It's hard to see in the picture. Maybe that spot wasn't rolled out before they put in the next layer. I'm sure you checked the same spot on the other side!!
|
|
|
|
|
SkiBum
Gold Member
Joined: November-17-2006 Location: United States Status: Offline Points: 587 |
Post Options
Thanks(0)
Quote Reply
Posted: March-16-2007 at 7:03am |
|
The other side is just fine. No sign of impact. Not sure what the cause. It was kind of like a large blister. No big deal. It is repaired now. Has several layers of E-glass and epoxy resin. I'll wash and scratch it, cover wtih vinyl ester resin, and fill.
|
|
|
|
|
8122pbrainard
Grand Poobah
Joined: September-14-2006 Location: Three Lakes Wi. Status: Offline Points: 41045 |
Post Options
Thanks(0)
Quote Reply
Posted: March-16-2007 at 7:10am |
|
Sounds like someone in the CC molding dept. went on break then forgot where they were when they came back and continued rolling out the glass!
|
|
|
|
|
David F
Platinum Member
Joined: June-11-2004 Location: United States Status: Offline Points: 1770 |
Post Options
Thanks(0)
Quote Reply
Posted: March-16-2007 at 10:52am |
|
You did good sir. Spots like that are not uncommon on boats. Less so for CC, but not uncommon. You repair technique was spot on.
|
|
|
|
|
SkiBum
Gold Member
Joined: November-17-2006 Location: United States Status: Offline Points: 587 |
Post Options
Thanks(0)
Quote Reply
Posted: March-16-2007 at 8:06pm |

I always suspected previous damage to the boat in this area. I found unusual glasswork in the bilge. This confirms that extensive work was done along the keel. Usually that means a significant impact with an underwater structure at some speed. It is a solid repair. Should not be an issue at all. One half of the bottom of the boat is grinded to the glass. I'll finish the other side tomorrow. That's my last day to work on her for a few weeks. Thank you to David F. |
|
|
|
|
bkhallpass
Grand Poobah

Joined: March-29-2005 Location: United States Status: Offline Points: 4723 |
Post Options
Thanks(0)
Quote Reply
Posted: March-16-2007 at 8:35pm |
|
Bill,
Another question. I see you've removed the rudder guide. Did that come out easily? Mine seen to be glassed. Tried to get it out with no luck. BKH |
|
|
Livin' the Dream
|
|
|
|
|
SkiBum
Gold Member
Joined: November-17-2006 Location: United States Status: Offline Points: 587 |
Post Options
Thanks(0)
Quote Reply
Posted: March-17-2007 at 8:47am |
|
Mine was bonded with 5200 or similar material. I had to wedge a 4" putty knife under the guide and eventually worked it away. Some people on the site recommend using epoxy to bond the under water gear to the hull. If that is the case it will be more difficult for you.
|
|
|
|
|
bkhallpass
Grand Poobah
Joined: March-29-2005 Location: United States Status: Offline Points: 4723 |
Post Options
Thanks(0)
Quote Reply
Posted: March-17-2007 at 9:42am |
|
Thanks. Mine definitely has the calk on the plate at bottom, but it appears to be glassed in around the sleave on the inside of the boat. I've got to repair that area anyway, so I'll just grind the glass away from the sleeve. BKH
|
|
|
Livin' the Dream
|
|
|
|
|
8122pbrainard
Grand Poobah
Joined: September-14-2006 Location: Three Lakes Wi. Status: Offline Points: 41045 |
Post Options
Thanks(0)
Quote Reply
Posted: March-17-2007 at 9:57am |
|
5200 is the way to go with the reinstall. I have used some filled epoxy with some wax paper between it and the rudder packing gland but that was just to get a smooth ever surface for later bedding with the 5200.
|
|
|
|
|
farmer
Senior Member

Joined: July-23-2006 Location: United States Status: Offline Points: 442 |
Post Options
Thanks(0)
Quote Reply
Posted: March-17-2007 at 2:34pm |
|
Pete
Mine was sealed with what looks like life caulk or something similar. Wasn't too bad to remove.How do you remove hardware bedded in 5200? I would like to use it if I know I can get it off again. Farmer |
|
|
|
|
SkiBum
Gold Member
Joined: November-17-2006 Location: United States Status: Offline Points: 587 |
Post Options
Thanks(0)
Quote Reply
Posted: March-17-2007 at 3:35pm |

Finished removing all of the gelcote from bottom of the boat. Ranks right up there with a root canal on the fun meter. Once I cleaned up the mess I cranked up the heat and applied a layer of resin. Working the fairing compound on the bottom of the hull will be great fun. Still have to sand the topside. But I have to catch a plane in the morning. Be back to work on her in a few weeks. |
|
|
|
|
SkiBum
Gold Member
Joined: November-17-2006 Location: United States Status: Offline Points: 587 |
Post Options
Thanks(0)
Quote Reply
Posted: March-17-2007 at 3:43pm |
Not sure if my underwater gear was bonded with 5200 but that is what it looks like. I managed to find a bite for a 4" putty knife. Then I struck the end of the knife with a hammer. Once I got a little give I forced it loose. |
|
|
|
|
8122pbrainard
Grand Poobah
Joined: September-14-2006 Location: Three Lakes Wi. Status: Offline Points: 41045 |
Post Options
Thanks(0)
Quote Reply
Posted: March-17-2007 at 4:39pm |
|
I'm pretty sure it was 5200. It can be a problem to get off but if it can't be pryed off then you can hot wire cut it. A car battery or a HD charger hooked up to about a 12" piece of ni-chrome wire with wood handles on each side works great. .030 stainless welding wire (MIG) will work too but isn't as strong.
|
|
|
|
|
farmer
Senior Member
Joined: July-23-2006 Location: United States Status: Offline Points: 442 |
Post Options
Thanks(0)
Quote Reply
Posted: March-18-2007 at 7:50am |
|
The hot wire doesn't sound too bad. I cut foam with a hot wire cutter made from piano wire and a car battery charger. A local piano tuner gave me some partial coils for free.They seemed to work well and they were plenty strong. Farmer |
|
|
|
|
8122pbrainard
Grand Poobah
Joined: September-14-2006 Location: Three Lakes Wi. Status: Offline Points: 41045 |
Post Options
Thanks(0)
Quote Reply
Posted: March-18-2007 at 12:13pm |
|
Getting the wire started under whatever is the only problem.
|
|
|
|
|
David F
Platinum Member
Joined: June-11-2004 Location: United States Status: Offline Points: 1770 |
Post Options
Thanks(0)
Quote Reply
Posted: March-19-2007 at 10:39am |
|
There is no need to glue the rudder port, strut or fins to the bottom of the boat with 5200. I bed the hardware in Life Boat Caulk then fill the void around the edges with same. Future removal is a snap and no worries that the gelcoat is coming off with the hardware.
|
|
|
|
|
Post Reply
|
Page <1 23456 7> |
 Tweet
Tweet
|
| Forum Jump | Forum Permissions You cannot post new topics in this forum You cannot reply to topics in this forum You cannot delete your posts in this forum You cannot edit your posts in this forum You cannot create polls in this forum You cannot vote in polls in this forum |


 Topic Options
 farmer wrote: