 Boats For Sale:


My "New" Project Boat |
Post Reply 
|
Page <1 3456> |
| Author | |
bkhallpass 
Grand Poobah 

Joined: March-29-2005 Location: United States Status: Offline Points: 4723 |
 Post Options Post Options
") Thanks(0) Thanks(0)
 Quote Reply Quote Reply
 Posted: January-18-2010 at 3:37pm Posted: January-18-2010 at 3:37pm |
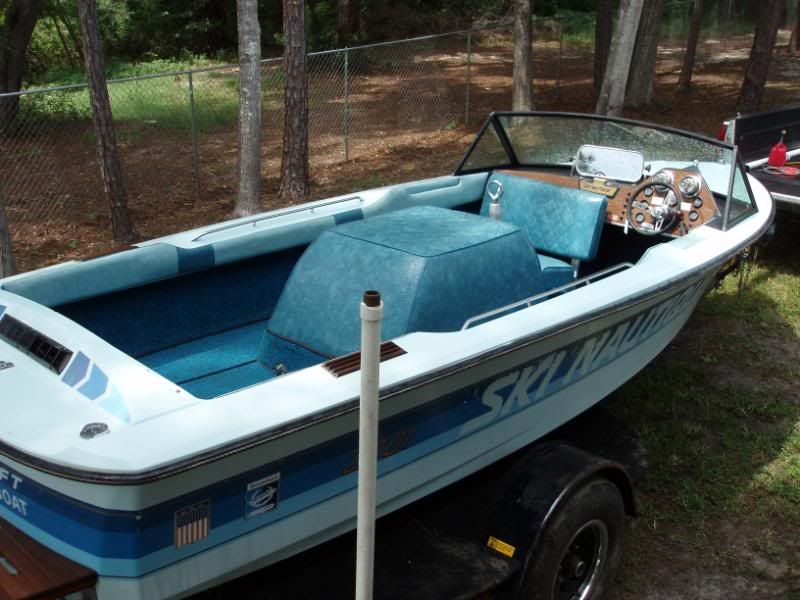
Thanks. I always liked the color combo, and was pleased when the project boat I found happened to be in that color combo. The wife is lobbying for shades of Red, and the daughter shades of pink. I had thought about changing the colors since this is a rebuild, not a restore, but so far I haven't come up with anything I like better than the original. At this pace it will probably be another 2 years before I paint anyway. BKH |
|
|
Livin' the Dream
|
|
 |
|
|
WakeSlayer
Grand Poobah

Joined: March-15-2006 Location: United States Status: Offline Points: 2138 |
Post Options
Thanks(0)
Quote Reply
Posted: January-18-2010 at 3:43pm |
It will be kinda funny if you lose this particular battle. |
|
|
Mike N
1968 Mustang |
|
|
|
|
hotboat
Gold Member 

Joined: March-28-2009 Location: Conn Lake Pa Status: Offline Points: 814 |
Post Options
Thanks(0)
Quote Reply
Posted: January-18-2010 at 4:04pm |
|
You have my vote for the original colors, always one of my faves

|
|
|
Brian
|
|
|
|
|
8122pbrainard
Grand Poobah

Joined: September-14-2006 Location: Three Lakes Wi. Status: Offline Points: 41045 |
Post Options
Thanks(0)
Quote Reply
Posted: January-18-2010 at 4:05pm |
Pat, Don't let him fool you - he still plays with them!! Probably the reason he never has time to work on the boat! 
|
|
|
|
|
hasbeenskier
Platinum Member

Joined: May-23-2005 Location: United States Status: Offline Points: 1116 |
Post Options
Thanks(0)
Quote Reply
Posted: January-18-2010 at 4:23pm |
|
Brian,
We haven't spoken in a while but I have been waiting for the opportunity to bring up your 2001 again. I am glad you are able to get back to it. I am still restoring the 81 BFN, I installed the new rub rail Saturday. It will probably take the rest of 2010 to finish it. I have also bought an 84 2001 (My favorite of all time Dresden Blue hull.) One day I may restore it... If I live long enough. bj |
|
|
hasbeenskier
|
|
|
|
|
hasbeenskier
Platinum Member
Joined: May-23-2005 Location: United States Status: Offline Points: 1116 |
Post Options
Thanks(0)
Quote Reply
Posted: January-18-2010 at 4:55pm |
|
|
|
hasbeenskier
|
|
|
|
|
bkhallpass
Grand Poobah
Joined: March-29-2005 Location: United States Status: Offline Points: 4723 |
Post Options
Thanks(0)
Quote Reply
Posted: January-18-2010 at 5:22pm |
|
Slayer, if my daughter was a little older I probably would go with the pink scheme and give the boat to her. At this rate, she may be old enough by the time I finish.
BJ, looks like your find is in a bit better shape than mine. Joe in NY is another fan of the light blue hulls. You'll live long enough. I've gotten more exercise in the last two weeks working on this boat than I had in the previous 18 months when I had a job. Working on the boat is therapeutic for the mind and body. Pete, I've grown out of the trucks. These days I prefer the Rock'm Sock'm Robots, KerPlunk, Battling Tops, Legos, Stratego, and Battleship games which I also couldn't bring myself to toss out. BKH |
|
|
Livin' the Dream
|
|
|
|
|
hasbeenskier
Platinum Member
Joined: May-23-2005 Location: United States Status: Offline Points: 1116 |
Post Options
Thanks(0)
Quote Reply
Posted: January-18-2010 at 5:32pm |
|
Uh-Oh! Does that been you're between jobs? Or, are you taking a sabbatical?.....Youuu Knowww... The river run is coming soon.....
bj |
|
|
hasbeenskier
|
|
|
|
|
bkhallpass
Grand Poobah
Joined: March-29-2005 Location: United States Status: Offline Points: 4723 |
Post Options
Thanks(0)
Quote Reply
Posted: January-18-2010 at 6:38pm |
|
Just between jobs. I took a year long Sabbatical back in 2004. That was before wife and kid, and before the economy took a dump. These days I need to get back to work. I've found it typically takes 3 to 4 months to find an appropriate position, and so I should have some time to make some real progress on the boat. There is always another job, but you can never get back wasted time. BKH
|
|
|
Livin' the Dream
|
|
|
|
|
LaurelLakeSkier
Senior Member 

Joined: February-12-2007 Location: Wisconsin Status: Offline Points: 485 |
Post Options
Thanks(0)
Quote Reply
Posted: January-18-2010 at 11:46pm |
|
When the time comes for color choice, I'd say stay with the gray. I've always really liked that color combo on a "twin" boat a friend of mine has owned for 20 years or so.
|
|
|
|
|
bkhallpass
Grand Poobah
Joined: March-29-2005 Location: United States Status: Offline Points: 4723 |
Post Options
Thanks(0)
Quote Reply
Posted: February-03-2010 at 4:02pm |
|
These photos don't seem too exciting these days given that we have about 15 stringer project going on at the same time, and most of those are progressing far faster than mine. Nevertheless, here's some progress.
The two main stringers are shaped. I'm going to start on the secondaries today. It was somewhat of a chore to get the stringers right as I had virtually nothing to use for a pattern. My old stringers were rotted to the point of dust and rubble. I picked them up with a dustpan. I am too much of a perfectionist - the stringers were never perfect fits to begin with. I also don't have the tools to get perfect carpentry. Nevertheless, I'm pretty happy with he fit so far. BKH 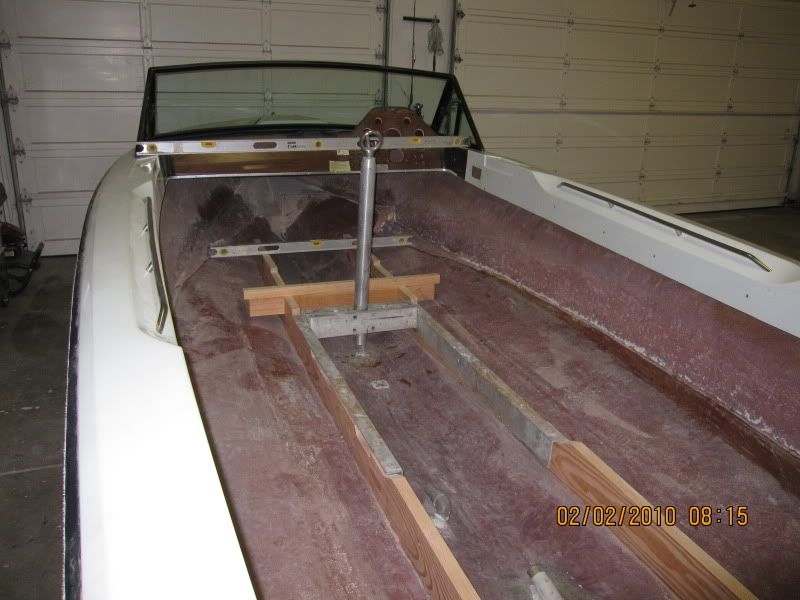
|
|
|
Livin' the Dream
|
|
|
|
|
WakeSlayer
Grand Poobah
Joined: March-15-2006 Location: United States Status: Offline Points: 2138 |
Post Options
Thanks(0)
Quote Reply
Posted: February-03-2010 at 4:12pm |
|
Wow Brian. That looks great. I was lucky and had my stringers pop out intact so copying them was easy. It is interesting to see how imperfect they were in the first place.
Nice work !! |
|
|
Mike N
1968 Mustang |
|
|
|
|
storm34
Grand Poobah

Joined: November-03-2008 Location: Dexter Iowa Status: Offline Points: 4492 |
Post Options
Thanks(0)
Quote Reply
Posted: February-03-2010 at 4:25pm |
|
Looking good Brian! I wouldn't have guessed you didn't have the "right tools"...keep up the good work!
|
|
|
|
|
Hollywood
Moderator Group

Joined: February-04-2004 Location: Twin Lakes, WI Status: Offline Points: 13513 |
Post Options
Thanks(0)
Quote Reply
Posted: February-03-2010 at 4:27pm |
|
Tkey look bedded to the hull already.
|
|
|
|
|
WakeSlayer
Grand Poobah
Joined: March-15-2006 Location: United States Status: Offline Points: 2138 |
Post Options
Thanks(0)
Quote Reply
Posted: February-03-2010 at 4:34pm |
|
I am guessing they are shaped so well they look bedded. Mine were shaped to the old stringers and by no means gap-free like that.
|
|
|
Mike N
1968 Mustang |
|
|
|
|
8122pbrainard
Grand Poobah
Joined: September-14-2006 Location: Three Lakes Wi. Status: Offline Points: 41045 |
Post Options
Thanks(0)
Quote Reply
Posted: February-03-2010 at 5:06pm |
|
Brian,
Lookin pretty good! Now I know even computer sales people have woodworking skills.
|
|
|
|
|
bkhallpass
Grand Poobah
Joined: March-29-2005 Location: United States Status: Offline Points: 4723 |
Post Options
Thanks(0)
Quote Reply
Posted: February-03-2010 at 6:15pm |
|
This will be long post, but I'll share some of what I learned in making
these stringers. There are a few small gaps (and they are small), but overall a pretty good fit. Sits very solid even before bedding. Most of the gaps are the result of an unsteady hand using a 4 inch grinder to shape the stringer, and of course I didn't grind the floor to an exact level. I will round the stringer surfaces before bedding, but right now, I need clean edges so I can mark of the height on the secondary stringer. Storm, ultimatley, I'd love to have a table saw and a band saw with a big wide work surface surrounding them. Haven't had those since 8th grade woodshop, and wouldn't have the room if I did own them. If you are patient, you can do a lot with good skill saw, good sabre saw, and a grinder. In reconstructing the stringers, I figured out a few things. The first 8 feet or so from the stern forward are essentially flat surfaces. While there is a slight taper to the center of the boat, it appears CC didn't worry about that, and just filled, or tried to fill the gap by sitting the frame in a bed of resin. I'm sure they used the straight edge of a board and only shaped the forward 5 feet or so of the stringer. Armed with a template for the forward 5 feet, you could crank these out quickly. I also think it likely that the main stringer assembly was bedded to the hull after fully assembled. That is, the cross bracing over the shaft log, and the cross bracing at the battery box, were likely preinstalled. It appears there was no glassing between these cross braces, and they were stapled into place. Again, with the main stringers already assembled, you could bed both stringers and the cross bracing at the same time. CC clearly used a 2 X 8 and screwed on a wedge for the gas can mount. To make the stringers in 1 piece, you need a 2 X 10. When I made my template, I got it very close. I then taped wax paper the hull of the boat. I sat the stringer in place on top of the wax paper and filled the gaps with some cheap Bondo I bought at the hardware store. This gave me a pretty accurate template when drawing the patterns on my final work product. Also I discovered that the 1 inch secondary stringer has the same surface contour as the main stringer, at least on my model of boat. I cut of about a foot of the stern section of the template I had made for the main stringer, and sat it in place where the secondary will bed, and voila, perfect fit. This will save me a lot of time when shaping the secondary stringers. I probably have the slowest project in the history of the site, and I doubt it will be the best. There are some good craftsman out there. But, it's fun. BKH |
|
|
Livin' the Dream
|
|
|
|
|
WakeSlayer
Grand Poobah
Joined: March-15-2006 Location: United States Status: Offline Points: 2138 |
Post Options
Thanks(0)
Quote Reply
Posted: February-03-2010 at 6:53pm |
|
Did you notice the hull sagging much after removing all the old mush and channels? My brother and I had to do a good amount of adjusting to get the hull to sit what we felt was properly. I have heard guys say the 2001 hulls were not as stout as the older ones. I would not consider my 67 to be stout really. At first we had it supported on stands at the transom and near the windshield as I have read before, but it bowed down way too much. We dropped mostly back on the trailer and lifted the keel under the pylon / skeg area. We adjusted the hull to level again both directions and made the new stringers sit like the old ones, based on the ground in line where I removed the glass. There are a couple places with pretty sizeable gaps that are / will be filled. All four stringers sat dry fit, level and at correct measurements down from a level across the gunnels.
You already have them shaped super nice so it doesn't matter, but as mentioned a couple times recently a power planar is an amazing tool for shaping the bottoms. |
|
|
Mike N
1968 Mustang |
|
|
|
|
DrCC
Grand Poobah

Joined: April-12-2004 Location: at home Status: Offline Points: 2867 |
Post Options
Thanks(0)
Quote Reply
Posted: February-03-2010 at 7:53pm |
|
BKH, Nice lumber picking skills.
|
|
|
|
|
lewy2001
Grand Poobah

Joined: March-19-2008 Location: NSW Australia Status: Offline Points: 2234 |
Post Options
Thanks(0)
Quote Reply
Posted: February-03-2010 at 8:28pm |
|
Brian you were obviously a very good 8th grade shop student.

Agree with DrCC nice pieces of straight grained Oregon(Douglas Fir). It maybe worth recording the dimensions of those nice fitting mains. There are a lot of 2001's out there that still need stringer jobs. Great work keep it up. Giving us IT people some status with Pete. 
Looking forward to next update. |
|
|
If you're going through hell, keep going
89 Ski <a href="http://www.correctcraftfan.com/diaries/details.asp?ID=5685" ta |
|
|
|
|
Chopper
Gold Member

Joined: June-15-2006 Location: Australia Status: Offline Points: 821 |
Post Options
Thanks(0)
Quote Reply
Posted: February-03-2010 at 11:43pm |
|
Maybe you could take the new stringers to a fabrication place who can scan them & make a 3D model of them.
Then the file could be used to manufacture using a cnc or similar machine new "drop in" stringers as per your suspicions of the CC factory process. You could make the new stringers out of whatever material you wished then.! That would be the ultimate file for the reference section. |
|
|
|
|
RainDog
Platinum Member

Joined: February-21-2007 Location: Mke/Grn Lake WI Status: Offline Points: 1387 |
Post Options
Thanks(0)
Quote Reply
Posted: February-04-2010 at 1:25am |
Present company included. You are being modest. It looks great. |
|
|
|
|
jbear
Grand Poobah

Joined: January-21-2005 Location: Lake Wales FL. Status: Offline Points: 8193 |
Post Options
Thanks(0)
Quote Reply
Posted: February-04-2010 at 2:28am |
|
Nice to see this thread fired up again and the progress being made. I too am impressed by the job so far. Hard to believe this thread started in December '06!
Am I to understand you are between jobs? Wow..must be way to long since we talked in person. Hope the job search will go quickly. Bet that it will. Keep up the good work and keep the pictures coming. Hope those two beautiful girls you live with are doing well. john |
|
|
"Loud pipes save lives"
AdamT sez "I'm Canadian and a beaver lover myself"... |
|
|
|
|
nautique frk
Platinum Member

Joined: February-16-2004 Location: United States Status: Offline Points: 1784 |
Post Options
Thanks(0)
Quote Reply
Posted: February-04-2010 at 2:28pm |
|
Very nice work !
|
|
|
|
|
nau7iqu9
Senior Member

Joined: September-07-2009 Location: Port Orange, FL Status: Offline Points: 135 |
Post Options
Thanks(0)
Quote Reply
Posted: February-04-2010 at 10:23pm |
|
BK,
Really like the new boat! Congrats, Especially on the color scheme. Stringers look great! I should get you a job poundin nails with me. Shaun
|
|
|
|
|
The Godfather
Platinum Member
Joined: August-13-2008 Location: Orlando Fla Status: Offline Points: 1766 |
Post Options
Thanks(0)
Quote Reply
Posted: February-04-2010 at 10:30pm |
|
You guy's amaze me, to take on a project and really have fun with it. Great work BK !! |
|
|
|
|
bkhallpass
Grand Poobah
Joined: March-29-2005 Location: United States Status: Offline Points: 4723 |
Post Options
Thanks(0)
Quote Reply
Posted: February-05-2010 at 12:27am |
|
Thanks all.
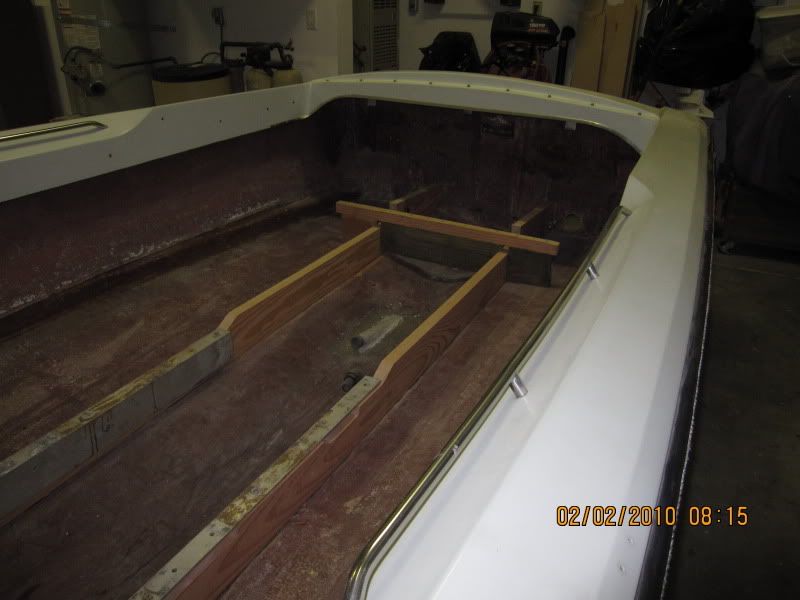
I shaped the secondaries today. 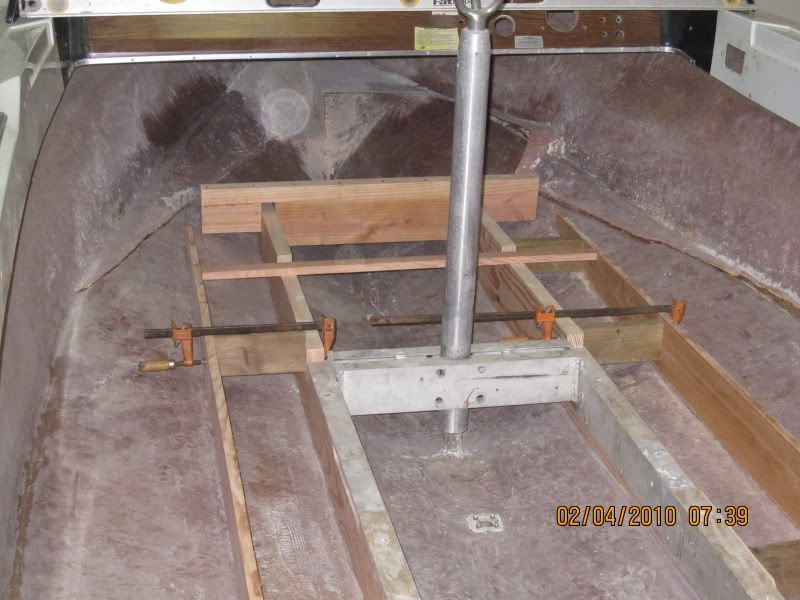
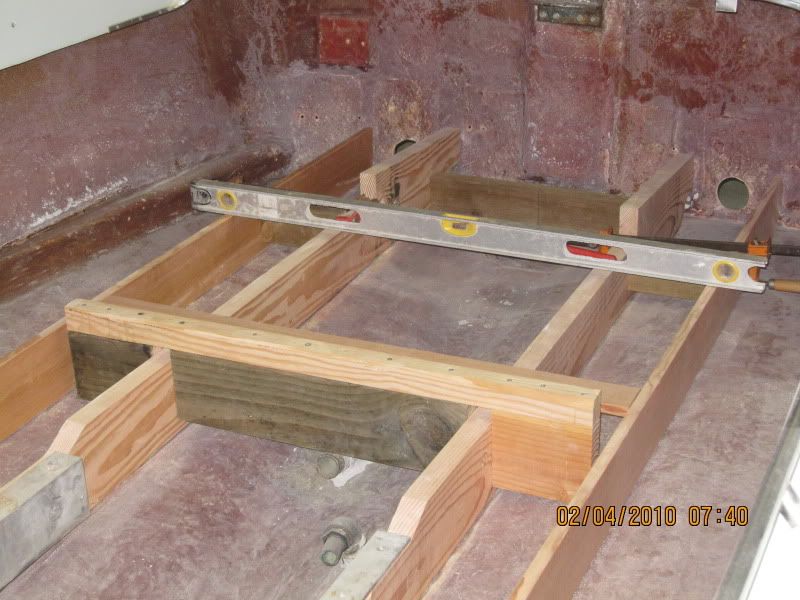
Not perfect, but as close as I can get it. I'll shave one of the secondary a hair after bedded. Red level is the mains, yellow level is the secondaries. 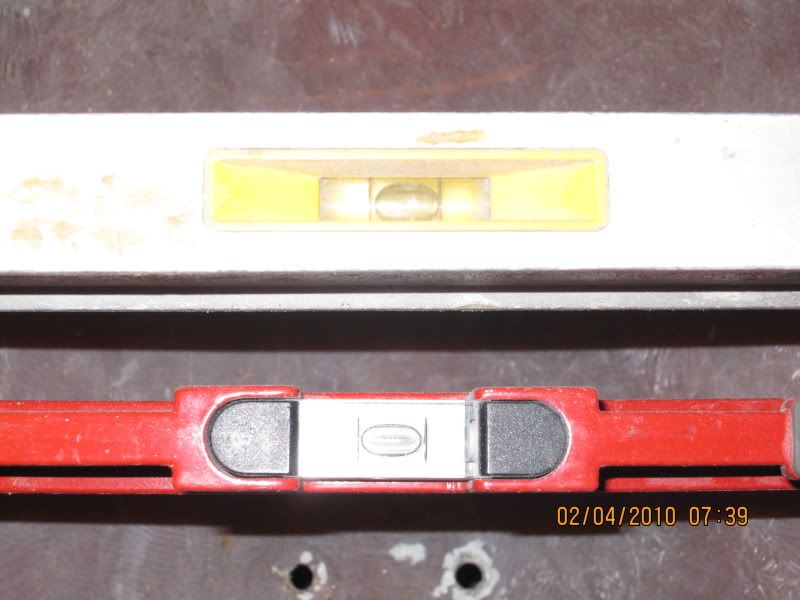
My "helper." 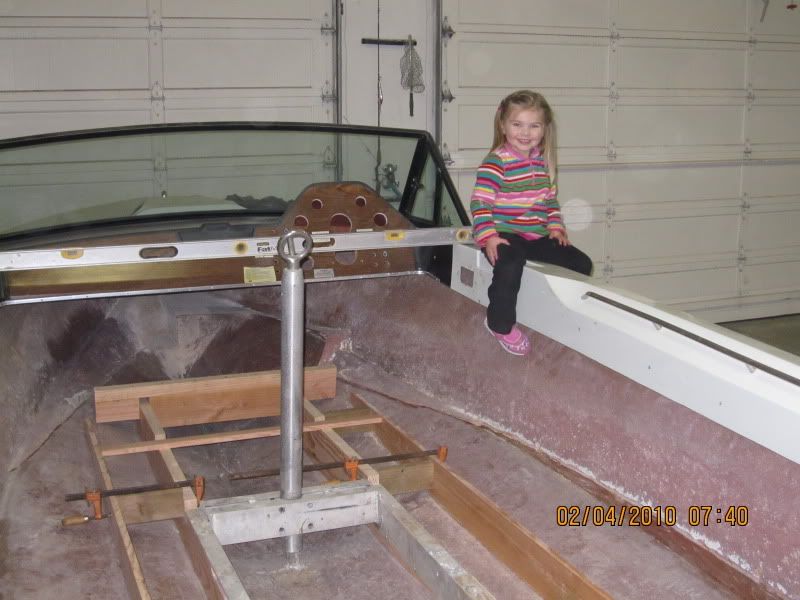
BKH |
|
|
Livin' the Dream
|
|
|
|
|
The Godfather
Platinum Member
Joined: August-13-2008 Location: Orlando Fla Status: Offline Points: 1766 |
Post Options
Thanks(0)
Quote Reply
Posted: February-05-2010 at 12:56am |

|
|
|
|
|
akabulla
Gold Member

Joined: November-15-2008 Location: United States Status: Offline Points: 649 |
Post Options
Thanks(0)
Quote Reply
Posted: February-05-2010 at 1:08am |
|
That is looking really good. Make sure you leave a gap between the end of the cradle where ski pole is and the step up. I can't tell from the picture but it looks pretty tight and once you glass the top you won't be able to move the cradle far enough forward for the ski pole to get in the base.
I like the way you setup the braces. That is pretty slick and looks like it will keep the stringers nice and vertical as they set. Are you going to just do one piece for the secondaries or are you going to make them wider towards the back like the newer 2001s? This is from my 82 when I re-did my secondaries. 
|
|
|
|
|
bkhallpass
Grand Poobah
Joined: March-29-2005 Location: United States Status: Offline Points: 4723 |
Post Options
Thanks(0)
Quote Reply
Posted: February-05-2010 at 1:26am |
|
There is 1/4 inch gap between the cradle and the stringer. The secondaries need to be built out just like yours. I'm still thinking about how I want to do it. I will proably make them solid instead of foam between the small cavities.
I still must cut a drain hole in each main and notch the mains for the cross brace over the shaft log. I still must notch the secondaries for the plyood floor and for the two cross braces. I have not decided whether I will run the floor all the way to the stern, or if I will cut it short a foot or so. If I do cut it short, I'll need to cut a drain hole in each secondary as well. BKH |
|
|
Livin' the Dream
|
|
|
|
|
Post Reply
|
Page <1 3456> |
 Tweet
Tweet
|
| Forum Jump | Forum Permissions You cannot post new topics in this forum You cannot reply to topics in this forum You cannot delete your posts in this forum You cannot edit your posts in this forum You cannot create polls in this forum You cannot vote in polls in this forum |


 Topic Options
 M3Fan wrote: