 Boats For Sale:


My new 2001 and my first! |
Post Reply 
|
Page <1 45678 23> |
| Author | |||
BuffaloBFN 
Grand Poobah 

Joined: June-24-2007 Location: Gainesville,GA Status: Offline Points: 6094 |
 Post Options Post Options
") Thanks(0) Thanks(0)
 Quote Reply Quote Reply
 Posted: February-08-2009 at 10:15am Posted: February-08-2009 at 10:15am |
||
|
3. You'll be at it for days with an orbital. I used a 16 and 36 grit disk on the grinder. To clean it up, I used a 36 grit flapper disk on the same grinder.
That may not be the best meathod because of the mess it makes. I tried to keep a shop vac on the output, but still! I also tried air tools and a trickle of water. My problem there was wimpy air tools. 4. Wipe down the old glass with acetone, and if your using epoxy it'll be soap and water on 24 hour new glass. 5. I did use fir ply...though mostly because they had it. I think most untreated ply is ok especially if you soak it down with CPES. |
|||
 |
|||
|
akabulla
Gold Member 

Joined: November-15-2008 Location: United States Status: Offline Points: 649 |
Post Options
Thanks(0)
Quote Reply
Posted: February-08-2009 at 1:56pm |
||
|
Great! Thanks Buffalo! I really appreciate it. I am going out now to buy a new cutting wheel. I tried to use the disposable ones but they are eaten up fast so I am going to spend the money and get a diamond blade so I will grab those disks you recommend.
In the area around the base for the ski pole and bilge it looks like it is some kind of concrete used to reinforced it. It is also around the log. Can I just sand and smooth that down and use glass on top of it or do I have to knock it down to the glass in the areas that my new glass will cover? |
|||
|
|||
|
BuffaloBFN
Grand Poobah
Joined: June-24-2007 Location: Gainesville,GA Status: Offline Points: 6094 |
Post Options
Thanks(0)
Quote Reply
Posted: February-08-2009 at 2:33pm |
||
We must see a pic on that! Concrete?!!? Maybe JB weld or some epoxy? Your money on the diamond blade will be well spent, but you may want to wait for some of the others to chime in before you buy everything. 
|
|||
|
|||
|
8122pbrainard
Grand Poobah

Joined: September-14-2006 Location: Three Lakes Wi. Status: Offline Points: 41045 |
Post Options
Thanks(0)
Quote Reply
Posted: February-08-2009 at 3:22pm |
||
Just as Greg said, pictures are always great but I feel what you're looking at is simply the reinforcement around the shaft log and the pylon mount to the hull. It's a thickened section of the hull and if real saturated with resin, it will look like a big blob in the bilge! Grinding down the hull to fresh resin/cloth, is really only needed in the areas you will be bonding in the new stringers. Other places you can get by with a light sanding and cleaning if you plan on a finish decorative bilge coating. Greg mentioned the soap and water wash if you use epoxy and leave it sit for more than 24 hours. This is to remove a chemical reaction called a amine blush. Some brands claim to be formulated to not cause this but I'd do the wash anyway on any additional work on top of any previous coats of epoxy. |
|||
|
|||
|
Riley
Grand Poobah
Joined: January-19-2004 Location: Portland, ME Status: Offline Points: 7953 |
Post Options
Thanks(0)
Quote Reply
Posted: February-08-2009 at 3:36pm |
||
"Grinding down the hull to fresh resin/cloth, is really only needed in the areas you will be bonding in the new stringers. Other places you can get by with a light sanding and cleaning if you plan on a finish decorative bilge coating." Why does this have to be done, and what if you don't do this? One thing I've noticed that I did differently then the other posts I've seen is after I bonded the stringers to the hull, I then ran 8" glass fabric along both sides of the stringers and glassed them to the hull with it. |
|||
|
|||
|
8122pbrainard
Grand Poobah
Joined: September-14-2006 Location: Three Lakes Wi. Status: Offline Points: 41045 |
Post Options
Thanks(0)
Quote Reply
Posted: February-08-2009 at 5:24pm |
||
|
Bruce,
It's just a added assurance that you aren't trying to bond to a old surface that may be contaminated with say engine oil. Lots of that in our bilges!! Don't worry, you'll be fine if you cleaned it up real good. Also, I don't believe your older hull had the decorative layer of pigmented resin on the inside. You definitely would want to grind that off. |
|||
|
|||
|
akabulla
Gold Member
Joined: November-15-2008 Location: United States Status: Offline Points: 649 |
Post Options
Thanks(0)
Quote Reply
Posted: February-08-2009 at 5:38pm |
||
|
Ok, Thanks! I plan on doing my stringers just like Bill. Bond it to the hull with 2 layers of 2" mat and then after laying the fillet I will lay 2",4", and 8" mat on the seems on both sides.
I guess I used the word concrete because it is thick and grey which is a different pigment then the rest of the bilge. There was also a lot of dust and rocks around that area but I think that was just crap from it sitting out for so long. Can I assume that there is a block of wood under all that stuff that holds the ski pole base and the bilge screws? |
|||
|
|||
|
TRBenj
Grand Poobah

Joined: June-29-2005 Location: NWCT Status: Online Points: 21169 |
Post Options
Thanks(0)
Quote Reply
Posted: February-08-2009 at 7:06pm |
||
Bruce, what exactly did you do differently? I would hope that most people are putting at least 3 layers of glass down to bond the stringers to the hull! |
|||
|
|||
|
akabulla
Gold Member
Joined: November-15-2008 Location: United States Status: Offline Points: 649 |
Post Options
Thanks(0)
Quote Reply
Posted: February-08-2009 at 7:17pm |
||
|
When I order my materials on Monday I want to get the foam as well. This is the list critter put together for me. I added one more gallon of resin to the list because I am going to build a battery box out of 1/4" ply and cover it in mat. Does this look about right? Since I won't have a ply sub floor I decided to use the heavier foam. Make sense? Is 24 cubic feet about the right amount for my 83?
(2) TWO - 5 gal���Epoxy resin 635 thin 3:1 ratio�� EPOX-635316� (2) TWO - Pumps������������������������ EPX-P31������� 1 roll��� 50 yds 2" E-glass tape���������� FG-C02R������ 1 roll��� 50 yds 4" E-glass tape���������� FG-C04R������ 1 roll��� 50 yds 8" E-glass tape���������� FG-C08R������ 20yds���� Epoxy mat����������������������� FG-EM10550���� 5qts����� 1/32 milled fiber filler�������� SM-MF050����� 4" 3/8"�� Fiberglass Rollers�������������� FR-1314A������ 5qts����� Phenolic Microballoons���������� FL-PH025����� 2 boxes�� 2" wood paintbrushes qty-24����� BR-TA20B����� 5 ea����� 1qt mixing containers����������� CON-MM032������ 5 lb����� tub of talc��������������������� SM-TAL01������ 15yds���� 6oz cloth����������������������� FG-C0638������ 13yds���� #1708 biaxial������������������� FG-170838����� 3 boxes�� 1" brushes���������������������� BR-TA10B����� 16 LB Kit 4 Cubic Feet - FOAM-0416 80 LB Kit 20 Cubic Feet - FOAM-0480 2 galkit CEPS Jamestown Distributers SMI-CPESWGL Everything look about right? |
|||
|
|||
|
Riley
Grand Poobah
Joined: January-19-2004 Location: Portland, ME Status: Offline Points: 7953 |
Post Options
Thanks(0)
Quote Reply
Posted: February-08-2009 at 7:45pm |
||
Tim, I put one layer of the 8" fiberglass material down after I had glued the outer stringers to the hull with "butter". Are you saying I should put a few more layers down? Looking at Wakeslayers thread, I didn't think he used any fiberglass fabric on the outer stringers. Same with Greg's BFN. The pics don't look like he's used fabric. Akabulla, that's a healthy list. That's got to be grand or more. |
|||
|
|||
|
TRBenj
Grand Poobah
Joined: June-29-2005 Location: NWCT Status: Online Points: 21169 |
Post Options
Thanks(0)
Quote Reply
Posted: February-08-2009 at 7:59pm |
||
Bruce, I sure would think so. My understanding is that most of the strength of the stringers comes from the glass that runs down them and into the hull. The factory didnt really bed the stringers with any adhesives- I only found thin pieces of foam under the ones in my Tique. The glass on both sides of them was pretty darn thick, though! Ive put at least 3 layers (mat/cloth/mat) on all the stringers Ive done in both my '90 and Tique per the original recommendation (from DavidF?) on my first stringer job. The thickness of that buildup seems pretty consistent with the factory job. I cant speak for how many layers Greg or Mike used on their projects, but I suspect they did something similar. |
|||
|
|||
|
8122pbrainard
Grand Poobah
Joined: September-14-2006 Location: Three Lakes Wi. Status: Offline Points: 41045 |
Post Options
Thanks(0)
Quote Reply
Posted: February-08-2009 at 8:03pm |
||
|
Bruce,
It probably wouldn't hurt to go with another layer over the stringers to the hull but then if you look at the original, there were spots that only had narrow fiberglass "straps" holding the stringers to the hull!!! AKA, Wait for some input from Greg on the foam. I see your list is calling out the 4lb foam like you mentioned. I don't feel that's needed. |
|||
|
|||
|
BuffaloBFN
Grand Poobah
Joined: June-24-2007 Location: Gainesville,GA Status: Offline Points: 6094 |
Post Options
Thanks(0)
Quote Reply
Posted: February-08-2009 at 8:40pm |
||
|
I used several 'layers' depending on how they are counted. I used 1 stip of mat underneath, set it in place with a few clamps and a jig, made the fillet on each side, put down a strip of ~1.5" mat on top of the butter to hold it all where I wanted it, and then finished the joint with 2,4 and 8" cloth. After that the stringer got a layer of mat, cloth, and then the heavy biaxial. Some areas got more than that but none got less. The fillet and 1st piece of mat is only 2-4 feet at a time....eat something and run to the can before you start!
FWIW-fiberglass almost disappears when it's wetted in right. On the 4lb foam...I have no experience with it. I do think the 2lb did a nice job and will serve its purpose. I sanded it even with my runners, soaked it with epoxy, and followed up with mat-cloth-biaxial. |
|||
|
|||
|
Riley
Grand Poobah
Joined: January-19-2004 Location: Portland, ME Status: Offline Points: 7953 |
Post Options
Thanks(0)
Quote Reply
Posted: February-08-2009 at 8:54pm |
||
[QUOTE=BuffaloBFN] I used several 'layers' depending on how they are counted. I used 1 stip of mat underneath, set it in place with a few clamps and a jig, made the fillet on each side, put down a strip of ~1.5" mat on top of the butter to hold it all where I wanted it, and then finished the joint with 2,4 and 8" cloth. After that the stringer got a layer of mat, cloth, and then the heavy biaxial. Some areas got more than that but none got less. The fillet and 1st piece of mat is only 2-4 feet at a time....eat something and run to the can before you start! HFS! I'd should have known. I've screwed the floor down, but fortunately I didn't glue it down. I guess I'm not done. I could tell the factory didn;t glue the framing to the hull because we were able to break the fiberglass off the sides of the stringers and remove a nice template. |
|||
|
|||
|
critter
Platinum Member

Joined: January-11-2008 Location: New Hill, NC Status: Offline Points: 1227 |
Post Options
Thanks(0)
Quote Reply
Posted: February-08-2009 at 11:04pm |
||
|
I did the same that Greg did in the Barracuda and I think that it came out really strong and water tight.
As I have been waiting for the temps to get up enough for me to pour the foam, it has rained a time or two and my cover keeps blowing in or off. I have not seen any water pass by the blocking or stringers. I feel that when I foam, set the floor, and glass the floor to the inside of the stringers and outter hull that it should be water tight. |
|||
|
1980 Ski Nautique
1966 Barracuda |
|||
|
|||
|
akabulla
Gold Member
Joined: November-15-2008 Location: United States Status: Offline Points: 649 |
Post Options
Thanks(0)
Quote Reply
Posted: February-08-2009 at 11:52pm |
||
|
Greg did you use one layer of mat under the stringer or two? Also Joe sent me an email with the spec of his blue top and he has deep cycle batteries. Greg is that what you use for your BFN or do you have a started battery and not a deep cycle?
I am going to start with one but make my box big enough for two so I need to buy one blue top now to build the battery box. I am going to use a battery combiner so I can have two different ones but I need to make sure the first one I buy will be enough for my engine. |
|||
|
|||
|
BuffaloBFN
Grand Poobah
Joined: June-24-2007 Location: Gainesville,GA Status: Offline Points: 6094 |
Post Options
Thanks(0)
Quote Reply
Posted: February-09-2009 at 4:26pm |
||
|
I have 1 starting battery; 750 or 850 cca's. There's been a lot of debate on battery type and I'm not the person to ask(try the search). I'm not running a rocket launching stereo either. I can't wait to play some AM for '79! LOL
You may also want to ask 1 of the pros about battery venting and box construction. I used 1 layer of mat under the stringers. You may want 2 or even some thickened resin depending on your prep. What you do want is good even contact(no air pockets). |
|||
|
|||
|
akabulla
Gold Member
Joined: November-15-2008 Location: United States Status: Offline Points: 649 |
Post Options
Thanks(0)
Quote Reply
Posted: February-09-2009 at 4:26pm |
||
|
Greg, I ordered all my materials but held off on ordering the foam until I got your input.
I have one question for the experts. Does anyone see an issue if I use the triangular braces like Greg used in his BFN? I know Joe used them in his 2001. I understand if I do that I should just run glass down the seem and not bond it to the hull? I like the idea of having the braces so I can run the boards length wise like Greg has instead of just having wood sitting on top o the foam like Bill did. Greg's setup: 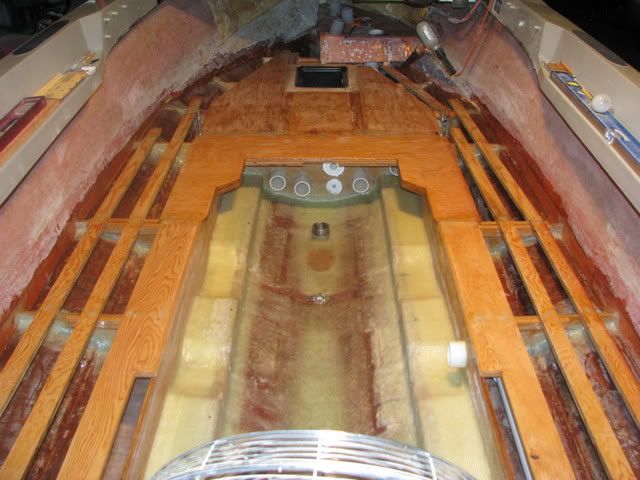
Bill's Setup with no braces under the cross supports: 
I am not saying one seems better than the other I just like the idea of the braces under the supports because they will hold the supports in place as I pour the foam. |
|||
|
|||
|
BuffaloBFN
Grand Poobah
Joined: June-24-2007 Location: Gainesville,GA Status: Offline Points: 6094 |
Post Options
Thanks(0)
Quote Reply
Posted: February-09-2009 at 4:36pm |
||
|
What's your name anyway? I must have missed it in an earlier post.
FWIW-I put the structure back almost exactly as I found it. Some improvements yes, but CC has been at it longer than I. I think the biggest difference between mine now is that I didn't have the demands of an assembly line...and we'll leave my OCD out of it.
|
|||
|
|||
|
BuffaloBFN
Grand Poobah
Joined: June-24-2007 Location: Gainesville,GA Status: Offline Points: 6094 |
Post Options
Thanks(0)
Quote Reply
Posted: February-09-2009 at 4:45pm |
||
Please don't burn shipping on my account. I thought I had posted some comments on foam here, but that may be in the Grinch's post on his 79 BFN. Anyway, I used 2 lb, and I ended up needing an additional order and a trip to west after that. I think I used 4 16lb kits plus just a bit from west, but I'm running crazy just now and don't have time to go through the receipts. Remember, I was filling a V-hull. |
|||
|
|||
|
akabulla
Gold Member
Joined: November-15-2008 Location: United States Status: Offline Points: 649 |
Post Options
Thanks(0)
Quote Reply
Posted: February-09-2009 at 5:14pm |
||
|
Ok, I will call and get the 2 pound. So you think I should replace as the factory did?
Thanks! |
|||
|
|||
|
BuffaloBFN
Grand Poobah
Joined: June-24-2007 Location: Gainesville,GA Status: Offline Points: 6094 |
Post Options
Thanks(0)
Quote Reply
Posted: February-09-2009 at 6:06pm |
||
I didn't say that and no fair putting words in my mouth.
The patch was the first boat building I've ever done outside of fixing up a row boat that drifted in when I was a kid. I took the advice given on my stringer thread and made my own decisions. Think it through and don't get in a rush! And hey Joe! |
|||
|
|||
|
BuffaloBFN
Grand Poobah
Joined: June-24-2007 Location: Gainesville,GA Status: Offline Points: 6094 |
Post Options
Thanks(0)
Quote Reply
Posted: February-09-2009 at 6:10pm |
||
|
1 last thought-if you give your questions a few days, you'll get tons of help. Some check in more often than others, and I bet most of us are working to finance our boating 'affliction' or getting ready for the river trip.

|
|||
|
|||
|
akabulla
Gold Member
Joined: November-15-2008 Location: United States Status: Offline Points: 649 |
Post Options
Thanks(0)
Quote Reply
Posted: February-09-2009 at 7:14pm |
||
|
That's cool man and Sorry, I wasn't trying to put words in your mouth, I want to make sure I don't misunderstand anything so I can make the best informed decision and make sure this is done right!
I have a few days until my stuff gets here so I will wait for everyone else to chime in! I am curious what Joe will say about the cross supports since I know he included them in his boat! It is tuff not to make quick decisions! The more I think about getting this done the more excited I get. I understand about the trip. I was slow on getting a cabin or I would be joining critter and everyone else this weekend. Guess I will be spending the time rocking my stringer install and spending the rest of the time itching!!
Later! |
|||
|
|||
|
BuffaloBFN
Grand Poobah
Joined: June-24-2007 Location: Gainesville,GA Status: Offline Points: 6094 |
Post Options
Thanks(0)
Quote Reply
Posted: February-09-2009 at 9:02pm |
||
|
No sweat. Best of luck on your project, and I look forward to seeing your progress.
Too bad you aren't going to the river...I'm sure we could find you a place for a tent! 
|
|||
|
|||
|
akabulla
Gold Member
Joined: November-15-2008 Location: United States Status: Offline Points: 649 |
Post Options
Thanks(0)
Quote Reply
Posted: February-10-2009 at 10:29pm |
||
|
Yea I want to go but I think my weekend will be better spent working on the boat. I am getting all the materials by the end of the week so I have a goal to get the secondaries done by the end of the weekend.
I built a nice large table to have a good working space. It also got the engine out of the way. I also put a tarp over the engine to protect it while I create all that beautiful white dust. 
I also built 4 boat stands and raised it off the trailer. It is nice and level and very stable now. 

I also got a book on fiberglass repair called "The Fiberglass Boat Repair Manual" which should be some good reading over the next few days while I wait on the wood and supplies. Greg where did you get your vent hose? It looks a little stronger than the factory white dryer vent hose looking stuff. I was going to use PVC for the vents but I started thinking that the strain on the joints from the flex in the boat might be too much so the flexible hose makes more sense. Have fun this weekend and I'll see you at the next one! |
|||
|
|||
|
JoeinNY
Grand Poobah

Joined: October-19-2005 Location: United States Status: Offline Points: 5698 |
Post Options
Thanks(0)
Quote Reply
Posted: February-11-2009 at 12:19am |
||
|
Lot of topics here, hard to keep up... Joe I really think you aught to roam down south for the weekend we can answer a whole lot of questions over a campfire and some Jim Beam, save you lots of time in the long run.
For the record I put my stringers down with a minimum six layers of cloth (not mat) tape, two each of the 2, 4, 8, staggered in the most OCD method so that the thicker end of the tape never causes air bubbles in the next layer above. Then every part of the stingers get another layer of the mat all the way to the top. In the exposed engine area of the stringers two more layers of the mat go over the top and 4-5 inches to the floor on both sides, and over that and about 7 inches to the floor on either side. This is similar in thickness to the factory job, no thicker, although the factory can be a little lax on a few areas up front not getting the roving/mat all the way up. The six layers of cloth tape might be a little excessive but the cloth adds almost no thickness. The stringers were first bedded with expoy thickened with 1/4 inch chopped glass the mat should work better if you get a real tight fit. Those side supports are a lot of work, as I mentioned elsewhere I did not bed them just used the 2, 4,8 tape one layer each to make them have a bit more give so they wouldnt have any chance of causing gel coat cracks. If your spending the money on foam I would go ahead and use it as structure and fiberglass over it. The plywood floor is just more wood and in places where you are not screwing things down I dont get it. I ended up making my floor about a quarter inch higher than the stock floor, and with that and my batteries sitting right on the hull they are still a line to line fit under the floor hatch. Keep that in mind when building up a box, even with a quarter inch plywood it is going to be tight. You can move a little more forward than I could (I had to worry about the nitrous bottle) and that should help with depth. I looked at my engine a bit closer this weekend before I yanked it, and my pulley ends up no more than an inch and a half back from the pylon. A lot closer than you had mocked up. I am not familiar with the newer box, its possible the pylon is farther forward in relation to the engine mounts in the later boats. I don't know that a couple inches back on the engine and transmission is going to have any actual effect on the handling of the boat, I doubt it was that precise.. any it looks like you will end up with the weight farther back than stock if you use that cover. |
|||
|
|||
|
akabulla
Gold Member
Joined: November-15-2008 Location: United States Status: Offline Points: 649 |
Post Options
Thanks(0)
Quote Reply
Posted: February-11-2009 at 1:38am |
||
|
Ok thanks! I am going to try to make it down for the weekend but I just took a week off to go to Mexico so if I come it wouldn't be till after work on Friday and it is a 9 hour drive for me so it might be hard to make that drive late Friday and then again on Sunday. I will let you know! It sounds like a lot of fun!
cya |
|||
|
|||
|
akabulla
Gold Member
Joined: November-15-2008 Location: United States Status: Offline Points: 649 |
Post Options
Thanks(0)
Quote Reply
Posted: February-11-2009 at 12:42pm |
||
|
US Composites just called and said they were out of the 1-1/2oz Epoxy Mat. They said the 1-1/2oz Chopped Strand Mat would work just as well. Is that correct or should I get it from somewhere else and if so where?
Thanks! |
|||
|
|||
|
critter
Platinum Member
Joined: January-11-2008 Location: New Hill, NC Status: Offline Points: 1227 |
Post Options
Thanks(0)
Quote Reply
Posted: February-11-2009 at 1:43pm |
||
|
When do they say that they will have it in stock?
I may have enough for you to set the stingers. |
|||
|
1980 Ski Nautique
1966 Barracuda |
|||
|
|||
|
Post Reply
|
Page <1 45678 23> |
 Tweet
Tweet
|
| Forum Jump | Forum Permissions You cannot post new topics in this forum You cannot reply to topics in this forum You cannot delete your posts in this forum You cannot edit your posts in this forum You cannot create polls in this forum You cannot vote in polls in this forum |


 Topic Options
 akabulla wrote: