 Boats For Sale:


Strut & Shaft Alignment |
Post Reply 
|
Page <1234> |
| Author | |
Robb 
Senior Member 

Joined: July-06-2010 Location: Indiana Status: Offline Points: 185 |
 Post Options Post Options
") Thanks(0) Thanks(0)
 Quote Reply Quote Reply
 Posted: May-20-2011 at 11:06am Posted: May-20-2011 at 11:06am |
|
Yeah, you turned it around in 3 days for me last July right before my lake vacation. You did me right. Much appreciated! Any suggestions? Considering the shape everything was in prior to this, I would hope I am only helping things.
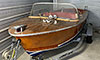
In the picture, you'll notice both lag bolts missing. These are the only ones that I have removed fearing that aren't as tight as they should be. Any temporary fix for this also? |
|
 |
|
|
8122pbrainard
Grand Poobah 

Joined: September-14-2006 Location: Three Lakes Wi. Status: Offline Points: 41040 |
Post Options
Thanks(0)
Quote Reply
Posted: May-20-2011 at 11:28am |
|
Rob,
Pour CPES down the loose lag holes and then epoxy. Eric, I did notice your new decals!! Getting professional?  BTW, I can't get a close up to see what they say. Anything about the trans being shipped without oil? BTW, I can't get a close up to see what they say. Anything about the trans being shipped without oil? 
|
|
|
|
|
Robb
Senior Member
Joined: July-06-2010 Location: Indiana Status: Offline Points: 185 |
Post Options
Thanks(0)
Quote Reply
Posted: May-20-2011 at 11:40am |
|
You mean you've got add oil to it when it comes back?
|
|
|
|
|
DrCC
Grand Poobah

Joined: April-12-2004 Location: at home Status: Offline Points: 2867 |
Post Options
Thanks(0)
Quote Reply
Posted: May-20-2011 at 2:22pm |
|
I would have to disagree on the CPES - epoxy for the motor mount lag.
A much better solution would be Polyurethane Glue. Because it requires a 10-25 percent Moisture Content to activate. And, It expands, So it would fill any rotten voids you might have around the lag. |
|
|
Keep it....from sinkin'
|
|
|
|
|
Robb
Senior Member
Joined: July-06-2010 Location: Indiana Status: Offline Points: 185 |
Post Options
Thanks(0)
Quote Reply
Posted: May-20-2011 at 3:13pm |
|
Al:
Do you have the name of a product you'd recommend and where to get it? Do I simply fill the entire hole with it and then screw the lag in the new material? |
|
|
|
|
8122pbrainard
Grand Poobah
Joined: September-14-2006 Location: Three Lakes Wi. Status: Offline Points: 41040 |
Post Options
Thanks(0)
Quote Reply
Posted: May-20-2011 at 3:31pm |
|
Robb,
I've got to disagree with Al on this one. We don't very often but I must in this case. I've used plenty of polyurethane glue and always have it in my shop for wood projects. Elmers "Ultimate" and "Gorilla" are two popular brands. It's the same chemical make up as "Great Stuff" foam and does foam up/expand but, in it's open foamed state very weak. It's only when it's compressed into a thin layer say on well jointed wood that it's strong. I feel Al is worried about you having a big hole down there that will be difficult to fill by using CPES and epoxy. Yes, this may be the case and you may need to get a funnel in the lag hole and keep pouring in the CPES!!! If you do find this to be the case, I suggest thickening the epoxy and injecting it with a cartridge type caulking gun. Empty tubes are available. They are a mess to fill but do work. |
|
|
|
|
DrCC
Grand Poobah
Joined: April-12-2004 Location: at home Status: Offline Points: 2867 |
Post Options
Thanks(0)
Quote Reply
Posted: May-20-2011 at 3:36pm |
|
Who's Billy?
I'd be concerned about epoxy not curing in a wet stringer. |
|
|
Keep it....from sinkin'
|
|
|
|
|
8122pbrainard
Grand Poobah
Joined: September-14-2006 Location: Three Lakes Wi. Status: Offline Points: 41040 |
Post Options
Thanks(0)
Quote Reply
Posted: May-20-2011 at 3:44pm |
Sorry Al!! I caught my mistake and you'll see did some editing. 
As long as the water isn't liquid down there, I don't feel there will be a problem with the exothermic. |
|
|
|
|
Robb
Senior Member
Joined: July-06-2010 Location: Indiana Status: Offline Points: 185 |
Post Options
Thanks(0)
Quote Reply
Posted: May-20-2011 at 3:54pm |
|
Pete:
Dumb question - do you just fill the entire hole with resin and self-tap with the lag once it has hardened? |
|
|
|
|
8122pbrainard
Grand Poobah
Joined: September-14-2006 Location: Three Lakes Wi. Status: Offline Points: 41040 |
Post Options
Thanks(0)
Quote Reply
Posted: May-20-2011 at 4:11pm |
|
Robb,
There's no such thing as a dumb question! If you do get the hole pretty full, you'll need to be real careful with drilling the pilot hole for the threaded section and the clearance hole for the lag's shank. If it starts to bind up real bad, open up the pilot hole to the next size. |
|
|
|
|
Robb
Senior Member
Joined: July-06-2010 Location: Indiana Status: Offline Points: 185 |
Post Options
Thanks(0)
Quote Reply
Posted: May-20-2011 at 5:34pm |
|
Pete:
That's what I thought - thanks for confirming. I'll give it a go tonight. |
|
|
|
|
eric lavine
Grand Poobah
Joined: August-13-2006 Location: United States Status: Offline Points: 13413 |
Post Options
Thanks(0)
Quote Reply
Posted: May-21-2011 at 9:41am |
|
always had the stickers Pete, rarely do we ever get transmission pictures on the site.....always get pictures of shiney boats, hopped up engines, chrome, boobs,
|
|
|
"the things you own will start to own you"
|
|
|
|
|
Robb
Senior Member
Joined: July-06-2010 Location: Indiana Status: Offline Points: 185 |
Post Options
Thanks(0)
Quote Reply
Posted: May-23-2011 at 9:37am |
|
I am ready to mount the strut to its new base. Can someone provide the proper steps for bedding it with 5200? Also, is a polyurethane paint recommended for painting the inside hull/bilge?
Thanks! |
|
|
|
|
SNobsessed
Grand Poobah
Joined: October-21-2007 Location: IA Status: Offline Points: 7102 |
Post Options
Thanks(0)
Quote Reply
Posted: May-24-2011 at 12:03am |
|
Robb - I just troweled on the 5200 around the perimeter evenly, about 1/8 inch thick. I also put a few stripes in the middle for good luck. Wear gloves & have rags ready to wipe off the excess. Make sure you have dry fitted it & have your exact position marked. Put some 5200 in the holes & tighten the mounting screws right away. It would even be a good idea to put the shaft in, coupler on, & check alignment before that stuff sets up (takes a day or so). You won't be adjusting it after it sets up!
|
|
|
“Beer is proof that God loves us and wants us to be happy.”
Ben Franklin |
|
|
|
|
Robb
Senior Member
Joined: July-06-2010 Location: Indiana Status: Offline Points: 185 |
Post Options
Thanks(0)
Quote Reply
Posted: May-24-2011 at 2:12am |
|
Chris:
Thanks. This will be a project for tomorrow night. I didn't figure it'd be difficult - just didn't want to make a mess by putting on way too much. I also wasn't sure if the screws get snugged first and then tightened later after the 5200 starts to harden. |
|
|
|
|
DrCC
Grand Poobah
Joined: April-12-2004 Location: at home Status: Offline Points: 2867 |
Post Options
Thanks(0)
Quote Reply
Posted: May-24-2011 at 3:00am |
|
Robb, I wouldn't put any 5200 in the 4 holes. The bolts will just push it up and out. Grab the bolt at the top and smear some on the threads.
The messier it is means "longer term leak free enjoyment." Don't get any in your hair, if you do, comes out with mineral spirits. Why paint bilge now? Isn't this a "one more season" fix? Just drive it till you start breaking motor mounts. |
|
|
Keep it....from sinkin'
|
|
|
|
|
8122pbrainard
Grand Poobah
Joined: September-14-2006 Location: Three Lakes Wi. Status: Offline Points: 41040 |
Post Options
Thanks(0)
Quote Reply
Posted: May-24-2011 at 9:09am |
EXACTLY!!!! This is a season fix. We do not want people to get the wrong idea. |
|
|
|
|
Robb
Senior Member
Joined: July-06-2010 Location: Indiana Status: Offline Points: 185 |
Post Options
Thanks(0)
Quote Reply
Posted: May-25-2011 at 5:19pm |
|
Just want to finish things off right and make it look nice; it won't take me but a few minutes to paint the areas I replaced. I know most of it will be covered, but I'm a perfectionist - one of my many downfalls.
I am going to put the flange back on tonight, and I was wondering how long to heat it up in the oven and what temp? I was thinking 350 - 400 deg F for about an hour. Any other advice on this process would be appreciated. |
|
|
|
|
8122pbrainard
Grand Poobah
Joined: September-14-2006 Location: Three Lakes Wi. Status: Offline Points: 41040 |
Post Options
Thanks(0)
Quote Reply
Posted: May-25-2011 at 8:39pm |
|
Robb,
Crank up the oven as high as it will go. 500? Of course don't put it in self clean mode!! The hour will do it. Then, work fast and have everything ready.
|
|
|
|
|
Robb
Senior Member
Joined: July-06-2010 Location: Indiana Status: Offline Points: 185 |
Post Options
Thanks(0)
Quote Reply
Posted: May-26-2011 at 2:56am |
|
Thanks Pete. I didn't get a chance to this, or much else, on the boat this evening. After installing the shaft coupler and new packing, I slid under the boat to recheck the alignment, and it is now sitting low in the log. I give up!!
I removed the rudder gland to replace the rope packing and found this: 
-Should that bushing be in there? -What size rope packing should I use? I can't tell as the piece is massively distorted. -Should there be more than just a single piece in there? Time to hit the hay............ |
|
|
|
|
8122pbrainard
Grand Poobah
Joined: September-14-2006 Location: Three Lakes Wi. Status: Offline Points: 41040 |
Post Options
Thanks(0)
Quote Reply
Posted: May-26-2011 at 8:59am |
|
Robb,
With the shaft now sitting low in the log, you need to move on to aligning the engine. I have never seen a spacer inside a packing gland!!! Looks like a PO only had enough packing to make up one ring! Yes, you should have at least 3 rings of packing. As far as the size goes, it really varies. It's almost lie CC installed what ever they had from what ever manufacturer they could buy from at the time. I suggest getting both the 1/4 and 3/16 and se what fits. It;s not expensive. I'd go with the Teflon "Gortex".
How did the coupling install go? |
|
|
|
|
eric lavine
Grand Poobah
Joined: August-13-2006 Location: United States Status: Offline Points: 13413 |
Post Options
Thanks(0)
Quote Reply
Posted: May-26-2011 at 9:41am |
|
never seen a bushing either, u need minimum of 2 pieces of rope staggered tighten it up and then loosen and add a third. dont crank it down or you will burn the shaft and packing
|
|
|
"the things you own will start to own you"
|
|
|
|
|
Robb
Senior Member
Joined: July-06-2010 Location: Indiana Status: Offline Points: 185 |
Post Options
Thanks(0)
Quote Reply
Posted: May-26-2011 at 11:17am |
|
I believe you're right. I'm finding several "shortcuts" that the POs have taken on things. You'll be seeing them sometime in the future when I start to address some of them.
I did not get the flange coupler installed last night; I was only able to put the hose and gland (not sure what this assembly is called) on. I apologize for confusing you by using the wrong terminology - it was late, and I was depressed about the shaft sitting low after installing this. Could the hose and gland cause the shaft to sit a little lower due to its weight or position? I was just thinking that it could slightly bias the shaft in any direction. If not, then I think the shaft log is off. Looking at it, I'm wondering if it wasn't damaged at some point and had to be reglassed. It certainly looks like it could have been. This might explain the bent strut, hull gouges (from prop), etc. |
|
|
|
|
TRBenj
Grand Poobah

Joined: June-29-2005 Location: NWCT Status: Offline Points: 21133 |
Post Options
Thanks(0)
Quote Reply
Posted: May-26-2011 at 11:50am |
|
Ive seen that bushing before on CC rudders- but its supposed to go on top of the packing nut, not inside it!
Lots of things can influence the position of the shaft- the log hose, packing gland, the unsupported weight of the shaft itself. You need to find the position where it spins most freely in the strut- this is when its aligned, and when (hopefully) it should be centered in the shaft log. |
|
|
|
|
8122pbrainard
Grand Poobah
Joined: September-14-2006 Location: Three Lakes Wi. Status: Offline Points: 41040 |
Post Options
Thanks(0)
Quote Reply
Posted: May-26-2011 at 12:12pm |
Robb, Tim explained it very well. I suggest cutting a V block of wood to set the forward end of the prop shaft in. This will overcome the weight and side forces from the hose to the packing gland. Move it till you find that "happy" spot again and hopefully the shaft is still pretty centered in the log from your strut project. Clamp of the V block and then go after the engine alignment. |
|
|
|
|
Robb
Senior Member
Joined: July-06-2010 Location: Indiana Status: Offline Points: 185 |
Post Options
Thanks(0)
Quote Reply
Posted: May-26-2011 at 1:49pm |
|
I'm sure glad we all think alike!! This is exactly what I did last night, although I just used a scrap piece of wood and shimmed up the gland/hose assy. Once I did this, the shaft wanted to slide right out of the strut! Luckily, I planned ahead and had a block to stop it from coming out.
I guess I was getting hung up on the fact that the shaft's position when aligned in the log is where it should remain - not necessarily the case as I'm finding out. I feel better already. I think I'm going to leave the bushing out altogether and go with the rope packing. Thanks guys. |
|
|
|
|
TRBenj
Grand Poobah
Joined: June-29-2005 Location: NWCT Status: Offline Points: 21133 |
Post Options
Thanks(0)
Quote Reply
Posted: May-26-2011 at 1:56pm |
|
I would recommend the virtually dripless goretex packing instead of the wax impregnated rope... its only a few bucks more.
The bushing should be used on top of the packing nut- dont leave it out. Its meant to bring the installed height of the rudder up. |
|
|
|
|
Robb
Senior Member
Joined: July-06-2010 Location: Indiana Status: Offline Points: 185 |
Post Options
Thanks(0)
Quote Reply
Posted: May-26-2011 at 2:28pm |
|
Tim:
Roger that! Consider it done. Thanks again for your insight. |
|
|
|
|
Robb
Senior Member
Joined: July-06-2010 Location: Indiana Status: Offline Points: 185 |
Post Options
Thanks(0)
Quote Reply
Posted: May-27-2011 at 2:04am |
|
Well, mounting the flange coupling did not go so good. The first time was my fault; I got in such a hurry that I started to put it on backwards, and once I noticed my mistake, it was too late. After it cooled down from piping hot to just hot, I proceeded to remove it AGAIN. Once off, I threw it back in the oven at 500 for another hour. The second time, I got to within a half an inch and that was it! Afterwards, I was able to slide the key out very easily. Suggestions?? Guess the weekend is out now................maybe Memorial Day, but I'm not holding my breath. Got a lot to put back together yet after I get this problem solved.
|
|
|
|
|
eric lavine
Grand Poobah
Joined: August-13-2006 Location: United States Status: Offline Points: 13413 |
Post Options
Thanks(0)
Quote Reply
Posted: May-27-2011 at 9:36am |
|
so Pete, since its ok to slide hammer the shaft out, Cant we just beat the shaft in?
|
|
|
"the things you own will start to own you"
|
|
|
|
|
Post Reply
|
Page <1234> |
 Tweet
Tweet
|
| Forum Jump | Forum Permissions You cannot post new topics in this forum You cannot reply to topics in this forum You cannot delete your posts in this forum You cannot edit your posts in this forum You cannot create polls in this forum You cannot vote in polls in this forum |


 Topic Options
 DrCC wrote: