 Boats For Sale:


My First Ski Nautique |
Post Reply 
|
Page 12> |
| Author | ||
1980SN2001 
Senior Member 
Joined: August-01-2022 Location: Rocklin, CA Status: Offline Points: 109 |
 Post Options Post Options
") Thanks(0) Thanks(0)
 Quote Reply Quote Reply
 Topic: My First Ski Nautique Topic: My First Ski NautiquePosted: August-23-2023 at 3:47pm |
|
|
This topic has been something I've wanted to do since I have
substantially completed my project but I have been waiting to create it until I
could organize all the photos and consider the best layout. After much
consideration, deliberation, and delay I figured I just better get on with it
lol. Thank you to all those who post on this site and help the
newbies. I am on this site regularly lurking in the background, soaking up
information and I learn something new all the time. I can honestly say this
site and those on it gave me the knowledge and confidence to complete this
project. I know there is still a lot to learn about these boats but with this
site I know about 1000% more than what I did when I started. Cheers to all of
you! This topic is about my introduction to Ski Nautiques and my journey to restore the boat I ended up buying that I wanted to share. I have always loved boats/boating/tubing/fishing etc. I
previously had a 1984 Bayliner Capri Cuddy Cabin which was in very poor shape.
Mechanically it was pretty good, but the floor was rotting, the interior was in
poor shape etc. The wife was always worried about taking it out with irrational
fears (or maybe not so irrational) of it catching fire or sinking, that’s the
kind of shape it was in lol.
|
||
|
1980 SN Project
|
||
 |
||
|
1980SN2001
Senior Member
Joined: August-01-2022 Location: Rocklin, CA Status: Offline Points: 109 |
Post Options
Thanks(0)
Quote Reply
Posted: August-23-2023 at 3:50pm |
|
|
The hull was in great shape, the gel coat/exterior looked good
for the year and the interior was almost flawless. The carpet had been removed
and the PO had sprayed this so-called black bilge epoxy everywhere inside the
boat which I realized later was NOT a good thing. The motor was a big question
mark too, the PO knew nothing about engines. The marine shop he took it to had
pulled one of the heads, not sure why but the PO ultimately decided it was too
much money to warrant the repairs and decided to sell it. Lots of rust on
anything metal as well.
|
||
|
1980 SN Project
|
||
|
||
|
1980SN2001
Senior Member
Joined: August-01-2022 Location: Rocklin, CA Status: Offline Points: 109 |
Post Options
Thanks(0)
Quote Reply
Posted: August-23-2023 at 3:51pm |
|
|
I pulled the motor out to check the condition of the main
bearings and all were in pretty good shape except the rear. It had significant
scoring as well as the crankshaft for that bearing so off it went to the
machine shop. The carburetor was not rebuildable either. Intake manifold was
full of rust on the inside and not usable. I also found a broken tooth on the
distributor.
|
||
|
1980 SN Project
|
||
|
||
|
1980SN2001
Senior Member
Joined: August-01-2022 Location: Rocklin, CA Status: Offline Points: 109 |
Post Options
Thanks(0)
Quote Reply
Posted: August-23-2023 at 3:54pm |
|
|
Machine shop bored and honed the block, installed new cam
bearings, resurfaced the rods and the crankshaft, and sold me new pistons,
rings, main bearings, and rod bearings. I ordered all the marine gaskets, new oil pump, ARP oil pump shaft, rear main seal, a blue one piece rubber oil pan
gasket, new RR Pertronix distributor, new water pump, new impeller pump pulley(because
I damaged the old one), new impeller, all new hoses, new elbow hose fittings
for the exhaust manifolds, new 160 degree thermostat, new coil, new plug wires,
new plugs, new Edelbrock Perform RPM intake manifold, ARP bolts for everything
I could get them for, Holley Sniper EFI system, new starting relay, and a new
alternator. Was rustier than I was expecting but I spent some time after this picture with a dremel and a sanding disc to clean it up.
|
||
|
1980 SN Project
|
||
|
||
|
1980SN2001
Senior Member
Joined: August-01-2022 Location: Rocklin, CA Status: Offline Points: 109 |
Post Options
Thanks(0)
Quote Reply
Posted: August-23-2023 at 3:56pm |
|
|
I also picked up a used set of GT40 heads out of a 1997
Explorer. One of the heads had a broken intake manifold bolt so I used the mill
at my work to get it out and installed a helicoil.
|
||
|
1980 SN Project
|
||
|
||
|
1980SN2001
Senior Member
Joined: August-01-2022 Location: Rocklin, CA Status: Offline Points: 109 |
Post Options
Thanks(0)
Quote Reply
Posted: August-23-2023 at 3:59pm |
|
|
I did a home valve job on the heads, stripped, cleaned,
painted, installed new brass freeze plugs, drilled out for larger head bolts,
and replaced all the valve seals.
|
||
|
1980 SN Project
|
||
|
||
|
1980SN2001
Senior Member
Joined: August-01-2022 Location: Rocklin, CA Status: Offline Points: 109 |
Post Options
Thanks(0)
Quote Reply
Posted: August-23-2023 at 4:18pm |
|
|
I sand blasted and powder coated or painted anything and
everything I could including the engine mounts, transmission, transmission
mounts, new Edelbrock intake manifold, steering cable arm and bracket, timing cover, all water pump/thermostat pieces etc.
Nothing was left with the original paint. I even went as far as taking the
alternator apart so I could paint the housing black lol.
|
||
|
1980 SN Project
|
||
|
||
|
1980SN2001
Senior Member
Joined: August-01-2022 Location: Rocklin, CA Status: Offline Points: 109 |
Post Options
Thanks(0)
Quote Reply
Posted: August-23-2023 at 4:20pm |
|
|
For the exhaust manifolds I spent hours sand blasting these
things. They were so rusty! I also resurfaced the mounting surfaces. I powder
coated them and then stripped the powder coat on the spots that attached to the
head and receive the most heat and coated them with KBS extreme temperature
primer and paint inside and out to hopefully deter some of the rust for a while.
|
||
|
1980 SN Project
|
||
|
||
|
1980SN2001
Senior Member
Joined: August-01-2022 Location: Rocklin, CA Status: Offline Points: 109 |
Post Options
Thanks(0)
Quote Reply
Posted: August-23-2023 at 4:31pm |
|
|
I also stripped all the black so-called epoxy from the
entire bilge area. In the process I realized that some of the fiberglass was
delaminating from the wood substrate at the corners where the floor meets the
exhaust channels. I decided to cut the fiberglass out and just address these areas. I know there is some wood rot going on the exterior stringers, but I was not ready to do a full stringer job yet. The main stringers seemed to be in good shape, so I proceeded just fixing these areas. I cut out the old delaminating fiberglass and covered with 3 layers of biaxial 1708 fiberglass cloth and Isophthalic Polyester Resin which after reading on this forum doesn't seem like the best choice...but it was already done so maybe next time lol. After I was satisfied with the
fiberglass repairs, I finished stripping the bilge and I applied 2 coats of
Total Boat Bilge Epoxy.
It went from this:
To this: To this:
|
||
|
1980 SN Project
|
||
|
||
|
1980SN2001
Senior Member
Joined: August-01-2022 Location: Rocklin, CA Status: Offline Points: 109 |
Post Options
Thanks(0)
Quote Reply
Posted: August-23-2023 at 4:35pm |
|
|
Then I cleaned the engine cradle and coated it with 2K SprayMax high gloss epoxy. I also drilled and countersunk 1/4-20 stainless flat head bolts through the cradle so I could attach fuel lines, wires, steering and throttle cables etc. While the engine cradle was out, I poured Restore-Rite StongBond Epoxy Wood Sealer into all of bolt mounting holes in the stringers. Then when I reinstalled the engine cradle and used 3M 5200 in all the holes. I also sanded the gas tank boards and applied the same wood sealer to them before I resinstalled them with new stainless hardware. I installed a new blower, blower hose, new gas tank filler hose and filler port and wired everything up. Also I bonded the gas tank filler port to ground.
|
||
|
1980 SN Project
|
||
|
||
|
1980SN2001
Senior Member
Joined: August-01-2022 Location: Rocklin, CA Status: Offline Points: 109 |
Post Options
Thanks(0)
Quote Reply
Posted: August-23-2023 at 4:45pm |
|
|
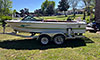
I couldn't fit the boat in the garage without removing the
swim platform, so I had to buy or make some removable mounts. I made several attempts
to contact Alloy Marine to get a custom set of brackets made but I never got a
call back. So, I decided to make my own using some stainless flux cored MIG
welding wire. Also I had to make a swing away tongue for the trailer to fit as well.
|
||
|
1980 SN Project
|
||
|
||
|
1980SN2001
Senior Member
Joined: August-01-2022 Location: Rocklin, CA Status: Offline Points: 109 |
Post Options
Thanks(0)
Quote Reply
Posted: August-23-2023 at 4:47pm |
|
|
I installed new carpeting and remade the removable floor
piece because the old one was falling apart. I cut it out of plywood, coated it
a layer of fiberglass and polyester resin, then painted it with the Total Boat
Bilge epoxy. One of my helpers for the project.
|
||
|
1980 SN Project
|
||
|
||
|
1980SN2001
Senior Member
Joined: August-01-2022 Location: Rocklin, CA Status: Offline Points: 109 |
Post Options
Thanks(0)
Quote Reply
Posted: August-23-2023 at 4:53pm |
|
|
Assembled the motor and reinstalled everything with
stainless hardware anywhere I could and used some anti-seize on all the bolts
to try and prevent future rust issues.
|
||
|
1980 SN Project
|
||
|
||
|
1980SN2001
Senior Member
Joined: August-01-2022 Location: Rocklin, CA Status: Offline Points: 109 |
Post Options
Thanks(0)
Quote Reply
Posted: August-23-2023 at 4:57pm |
|
|
Here it is going in and installed in the boat, working on
wiring, hoses etc. Big thank you to my helpers!
|
||
|
1980 SN Project
|
||
|
||
|
1980SN2001
Senior Member
Joined: August-01-2022 Location: Rocklin, CA Status: Offline Points: 109 |
Post Options
Thanks(0)
Quote Reply
Posted: August-23-2023 at 5:04pm |
|
|
I installed a new stereo, mono channel amp, 4 channel amp,
2 5.25" marine speakers, and a custom subwoofer box for 2 6.5"
subwoofers that I mounted under the bow above the drivers footrest. New yellow
top optima battery and all new DLO battery cables with crimped on lugs.
|
||
|
1980 SN Project
|
||
|
||
|
1980SN2001
Senior Member
Joined: August-01-2022 Location: Rocklin, CA Status: Offline Points: 109 |
Post Options
Thanks(0)
Quote Reply
Posted: August-23-2023 at 5:05pm |
|
|
Replaced the popout window latches as well. Applied teak
oil to the swim deck, steps on the gunnel, and the howl wood pieces. New bilge
pump and fuel/water filter.
|
||
|
1980 SN Project
|
||
|
||
|
1980SN2001
Senior Member
Joined: August-01-2022 Location: Rocklin, CA Status: Offline Points: 109 |
Post Options
Thanks(0)
Quote Reply
Posted: August-23-2023 at 5:09pm |
|
|
First time in the water and running the engine. Didn't even disconnect it from the trailer because I wasn't sure if it would float or not lol.
|
||
|
1980 SN Project
|
||
|
||
|
1980SN2001
Senior Member
Joined: August-01-2022 Location: Rocklin, CA Status: Offline Points: 109 |
Post Options
Thanks(0)
Quote Reply
Posted: August-23-2023 at 5:13pm |
|
|
Here it is getting some proper use. I have so far learned
how to double ski and wakeboard behind it, next on the list: slalom ski!
Still need to finish the carpet on the motor cover, replace
all the fuel lines with USCG approved fuel lines, replace the throttle and
steering cable, replace the prop shaft packing, install a warning light/buzzer
for temperature and oil pressure, and
I'm sure some other small things I can't think of right now.
My next project on it is building a custom replica of the
FCT2 tower. I'll save that for another topic. :)
That’s my story, I hope it wasn't too wordy or unnecessarily
detailed but I know you guys are all about the details...and pictures, lots of
pictures! |
||
|
1980 SN Project
|
||
|
||
|
Gary S
Grand Poobah 

Joined: November-30-2006 Location: Illinois Status: Offline Points: 14096 |
Post Options
Thanks(0)
Quote Reply
Posted: August-23-2023 at 5:28pm |
|
|
You did an amazing job,something to be proud of for sure. Thanks for sharing
|
||
|
||
|
MrMcD
Grand Poobah

Joined: January-28-2014 Location: Folsom, CA Status: Offline Points: 3764 |
Post Options
Thanks(0)
Quote Reply
Posted: August-23-2023 at 5:33pm |
|
|
Nice work, those are great boats that can serve you for many years if taken care of. I see you are in Rocklin, what lake is that you are launching at?
|
||
|
||
|
1980SN2001
Senior Member
Joined: August-01-2022 Location: Rocklin, CA Status: Offline Points: 109 |
Post Options
Thanks(0)
Quote Reply
Posted: August-23-2023 at 6:08pm |
|
Thank you Gary S.
 |
||
|
1980 SN Project
|
||
|
||
|
KENO
Grand Poobah
Joined: June-06-2004 Location: United States Status: Offline Points: 11155 |
Post Options
Thanks(0)
Quote Reply
Posted: August-23-2023 at 6:09pm |
|
Last I knew Pertronix only has a normal rotation 351w marine distributor, so was there some magic involved like a new gear that had to be drilled or bushed down to fit the Pertronix shaft? Good job with the Sniper
 |
||
|
||
|
1980SN2001
Senior Member
Joined: August-01-2022 Location: Rocklin, CA Status: Offline Points: 109 |
Post Options
Thanks(0)
Quote Reply
Posted: August-23-2023 at 6:11pm |
|
Thanks MrMcD. Yes, I'm in Rocklin and I've been following the "PARK JOB" thread you have going very closely lol. Folsom Lake is my home lake, got an annual pass this year for the first time. The picture of it in the water the first time is at the granite bay launch, way down low because it was in the winter time(I think January). The other pics are all in Folsom as well but over by Rattlesnake Bar.
|
||
|
1980 SN Project
|
||
|
||
|
1980SN2001
Senior Member
Joined: August-01-2022 Location: Rocklin, CA Status: Offline Points: 109 |
Post Options
Thanks(0)
Quote Reply
Posted: August-23-2023 at 6:15pm |
|
Thank you KENO. I believe you're right because if you peruse the Pertronix online catalog there is no RR distributor. I got this distributor from Ron at skiboatpartsonline.com and I think he has a RR gear made for it and markets it as such. I considered buying an additional gear for it from AAAmarine.com in the event that this gear fails. AAAmarine.com seemed to be having a close out on them about 7 months ago but I hesitated and then it seemed like they closed up shop and the gears are no longer available.
|
||
|
1980 SN Project
|
||
|
||
|
1980SN2001
Senior Member
Joined: August-01-2022 Location: Rocklin, CA Status: Offline Points: 109 |
Post Options
Thanks(0)
Quote Reply
Posted: August-23-2023 at 6:25pm |
|
|
Looking at this picture I realize my efforts to install a temperatue warning light/buzzer have been thwarted by the sniper system...
  |
||
|
1980 SN Project
|
||
|
||
|
AZ86SKI
Senior Member
Joined: July-05-2022 Location: Phoenix, AZ Status: Offline Points: 115 |
Post Options
Thanks(0)
Quote Reply
Posted: August-23-2023 at 6:39pm |
|
|
Well done! You put in a ton of work and it really came out great. Thanks for documenting and posting. It's educational and provides motivation for others to complete projects of their own, including me.
|
||
|
||
|
KENO
Grand Poobah
Joined: June-06-2004 Location: United States Status: Offline Points: 11155 |
Post Options
Thanks(0)
Quote Reply
Posted: August-23-2023 at 7:38pm |
|
Consider your thwarted efforts to be "unthwarted" if that's a word See the yellow arrow pointing at a pipe plug in your water pump, that's a good spot to screw a temp switch into. The gt40 engines used that spot for the temperature sender for the gauge on the dash. It'll work just fine for your switch.  |
||
|
||
|
1980SN2001
Senior Member
Joined: August-01-2022 Location: Rocklin, CA Status: Offline Points: 109 |
Post Options
Thanks(0)
Quote Reply
Posted: August-23-2023 at 9:35pm |
|
Thank you AX86SKI. I hope it helps someone, or at the very least people get some amusement out all the blood sweat and tears I put into this project lol. |
||
|
1980 SN Project
|
||
|
||
|
1980SN2001
Senior Member
Joined: August-01-2022 Location: Rocklin, CA Status: Offline Points: 109 |
Post Options
Thanks(0)
Quote Reply
Posted: August-23-2023 at 9:36pm |
|
Genius, it is unthwarted! Thank you once again KENO! |
||
|
1980 SN Project
|
||
|
||
|
Jonny Quest
Grand Poobah

Joined: August-20-2013 Location: Utah--via Texas Status: Offline Points: 2995 |
Post Options
Thanks(0)
Quote Reply
Posted: August-23-2023 at 11:30pm |
|
|
Damn fine job!! You can be proud of your efforts and how the project came together. Well done, lad.
Give us some feedback on the Holley Sniper EFI system. I'm very curious...
JQ |
||
|
Current
2003 Ski Nautique 206 Limited Previous 2001 Ski Nautique Open Bow 1994 Ski Nautique Open Bow Aqua skiing, ergo sum |
||
|
||
|
Post Reply
|
Page 12> |
 Tweet
Tweet
|
| Forum Jump | Forum Permissions You cannot post new topics in this forum You cannot reply to topics in this forum You cannot delete your posts in this forum You cannot edit your posts in this forum You cannot create polls in this forum You cannot vote in polls in this forum |


 Topic Options


 Gary S wrote: