neverending floor project |
Post Reply 
|
| Author | |
kevin719 
Senior Member 
Joined: June-18-2008 Location: United States Status: Offline Points: 231 |
 Post Options Post Options
 Thanks(0) Thanks(0)
 Quote Quote  Reply Reply
 Topic: neverending floor project Topic: neverending floor projectPosted: August-03-2008 at 10:25am |
|
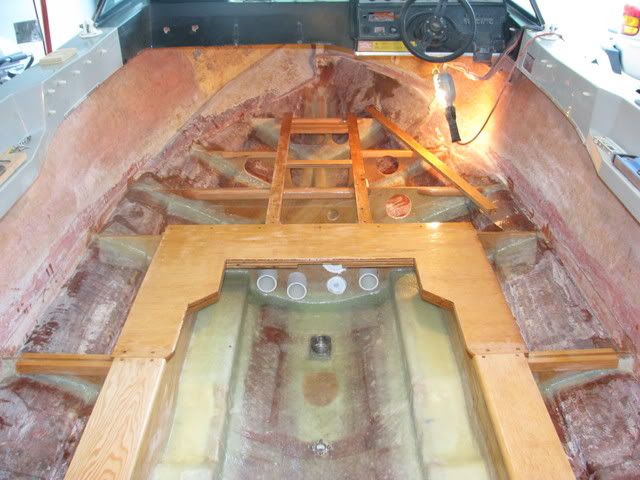
I have finished my floor to the front of the motor and have removed the glass and soaking wet foam in the front! This stuff has not seen water in 3 months and is still soggy! My question is does any one have pics of the wood (framing) that goes around the pylon? Mine is too rotten to see what to do?Thanks again.
|
|
|
kevinindy
|
|
 |
|
BuffaloBFN 
Grand Poobah 

Joined: June-24-2007 Location: Gainesville,GA Status: Offline Points: 6094 |
 Post Options Post Options
 Thanks(0) Thanks(0)
 Quote Quote  Reply Reply
 Posted: August-03-2008 at 11:00am Posted: August-03-2008 at 11:00am |
|
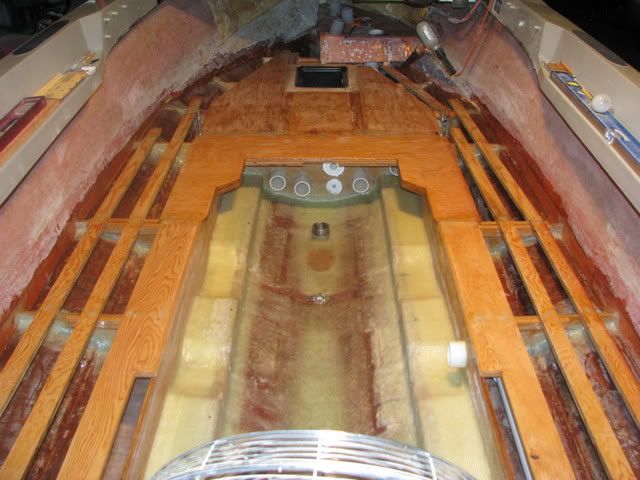
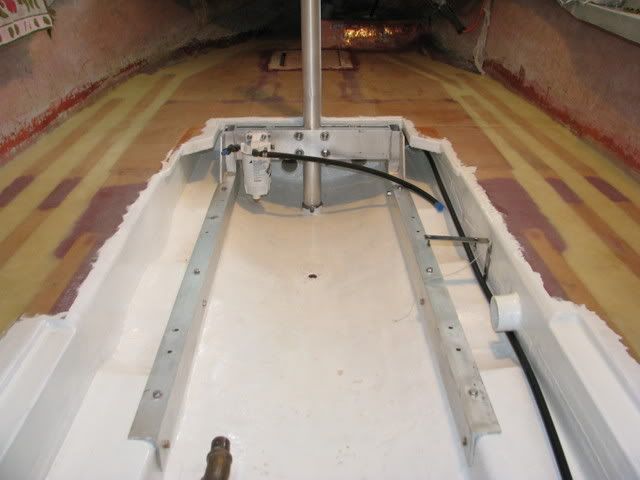
You have a 74 southwind? That hull is similar to my bfn...it's a V hull anyway. I hope these help.


|
|
 |
|
kevin719 
Senior Member 
Joined: June-18-2008 Location: United States Status: Offline Points: 231 |
 Post Options Post Options
 Thanks(0) Thanks(0)
 Quote Quote  Reply Reply
 Posted: August-03-2008 at 1:47pm Posted: August-03-2008 at 1:47pm |
|
I dont have those stainless brackets for the pole and stringers? My glass/ply just had a hole cut in it for the pylon??
|
|
|
kevinindy
|
|
 |
|
BuffaloBFN 
Grand Poobah 

Joined: June-24-2007 Location: Gainesville,GA Status: Offline Points: 6094 |
 Post Options Post Options
 Thanks(0) Thanks(0)
 Quote Quote  Reply Reply
 Posted: August-03-2008 at 2:24pm Posted: August-03-2008 at 2:24pm |
|
Your boat wouldn't have come from the factory with the cradle, but I think they're put together about the same way. If you look closely in the 2nd pic, you'll see that there are 2 layers of ply and you may be able to see a small square cutout in the bottom piece right where the pylon will go. Mine is notched back to take the 'shoulders' of the cradle; I think your's would have been straight accross with that smaller notch cut out for the pylon. The next layer probably would have had the round cut out for the pylon.
|
|
 |
|
kevin719 
Senior Member 
Joined: June-18-2008 Location: United States Status: Offline Points: 231 |
 Post Options Post Options
 Thanks(0) Thanks(0)
 Quote Quote  Reply Reply
 Posted: August-03-2008 at 4:26pm Posted: August-03-2008 at 4:26pm |
|
Man where was you a month ago when I started? Your boat the same as mine! Yours looks perfect! I have done the same as you(in the back of the boat except I did not foam. The solid pieces (next to the motor) I did not put in because I did not remove anything that looked like that.lol. I have coated everything 3x with west epoxy glass. I am still thinking about taking a hole saw to the ply and fill with foam.How much foam did you use and do you remember where you bought and approx how much it cost?? Thanks for your pics! They are perfect! I would love to see more so I know what I am supposed to be doing!Kevin
|
|
|
kevinindy
|
|
 |
|
BuffaloBFN 
Grand Poobah 

Joined: June-24-2007 Location: Gainesville,GA Status: Offline Points: 6094 |
 Post Options Post Options
 Thanks(0) Thanks(0)
 Quote Quote  Reply Reply
 Posted: August-03-2008 at 5:46pm Posted: August-03-2008 at 5:46pm |
|
Thanks Kevin!
Indeed, more pics are available...The Pumpkin Patch This is a long read...maybe a whole pot of coffee. It was my 1st stringer job; I'd only done 1 other glass job before, so the info is there! You may trip over a few inside jokes, but this site really helped me and I listened and read things over again...my boat rides like 'lasses in summertime now! I used 3 16lb kits plus a little bit from west marine. Some of that went into my stringer void(poured cold to make denser), so you might get by with 2. They came from US Composites. Your hole saw idea has been discussed here before. It was done intentionally and there's good info in the thread...it's linked somewhere in the pumpkin patch(I'd guess in the first 8 pgs). |
|
 |
|
kevin719 
Senior Member 
Joined: June-18-2008 Location: United States Status: Offline Points: 231 |
 Post Options Post Options
 Thanks(0) Thanks(0)
 Quote Quote  Reply Reply
 Posted: August-03-2008 at 10:59pm Posted: August-03-2008 at 10:59pm |
|
Thanks for all of your time I do not want to do this again for a while! Do you think that it will be ok that I did not use the solid wood boards on the sides of the motor box? I did replace the verticle 1x supports and the strips that supports the floors as you? I just put the ply over that and glassed it in.It is very solid but I saw those solid boards on yours and now I am worried.Also with the two layers of ply around the pylon then that area will be higher than the rest of the floor??Or is the bottom layer not actually on the floor supports? Thanks again! I read the post on drilling the holes and pouring in the foam and will do this if I decide to foam. I finished removing the crap from the bow today and do not know if I want to go through that again!So many guys here do not put it back in. Do you remember the price of it?Kevin
|
|
|
kevinindy
|
|
 |
|
8122pbrainard 
Grand Poobah 

Joined: September-14-2006 Location: Three Lakes Wi. Status: Offline Points: 41045 |
 Post Options Post Options
 Thanks(0) Thanks(0)
 Quote Quote  Reply Reply
 Posted: August-04-2008 at 8:22am Posted: August-04-2008 at 8:22am |
Kevin, Some pictures would really help. The wood on the "sides of the motor box", are you talking about the main stringers? The doubled up floor around the pylon is below the floor so it isn't higher. |
|
 |
|
kevin719 
Senior Member 
Joined: June-18-2008 Location: United States Status: Offline Points: 231 |
 Post Options Post Options
 Thanks(0) Thanks(0)
 Quote Quote  Reply Reply
 Posted: August-04-2008 at 6:19pm Posted: August-04-2008 at 6:19pm |
|
I have tried to put some pics here and it says the files are too big? I can email to you or if someone can tell me how to put pics here??
|
|
|
kevinindy
|
|
 |
|
kevin719 
Senior Member 
Joined: June-18-2008 Location: United States Status: Offline Points: 231 |
 Post Options Post Options
 Thanks(0) Thanks(0)
 Quote Quote  Reply Reply
 Posted: August-04-2008 at 6:23pm Posted: August-04-2008 at 6:23pm |
|
No not the stringers the boards that you have around the motor box.The front is doubled up and the sides. I could put them in but I will have to cut some of the tops out along the sides of the box.
|
|
|
kevinindy
|
|
 |
|
BuffaloBFN 
Grand Poobah 

Joined: June-24-2007 Location: Gainesville,GA Status: Offline Points: 6094 |
 Post Options Post Options
 Thanks(0) Thanks(0)
 Quote Quote  Reply Reply
 Posted: August-04-2008 at 8:26pm Posted: August-04-2008 at 8:26pm |
|
Upload your pics to photobucket.com and then copy and paste the link here.
The boards around the bilge...the stringers are at the same height, the front surround piece is ply and the aft is solid fir. The lower piece in front is cut to fit inside the secondary stringers and is glued and screwed to the piece that sits on top. The lower piece originally sat on supports glued to the bilge side of the stringers, but I did that differently. I also soaked all of the wood down with CPES...good stuff! |
|
 |
|
kevin719 
Senior Member 
Joined: June-18-2008 Location: United States Status: Offline Points: 231 |
 Post Options Post Options
 Thanks(0) Thanks(0)
 Quote Quote  Reply Reply
 Posted: August-04-2008 at 10:42pm Posted: August-04-2008 at 10:42pm |
|
Here is the first pics and I will put the more recent here shortly.Kevin
|
|
|
kevinindy
|
|
 |
|
kevin719 
Senior Member 
Joined: June-18-2008 Location: United States Status: Offline Points: 231 |
 Post Options Post Options
 Thanks(0) Thanks(0)
 Quote Quote  Reply Reply
 Posted: August-04-2008 at 10:44pm Posted: August-04-2008 at 10:44pm |
|
|
|
|
kevinindy
|
|
 |
|
kevin719 
Senior Member 
Joined: June-18-2008 Location: United States Status: Offline Points: 231 |
 Post Options Post Options
 Thanks(0) Thanks(0)
 Quote Quote  Reply Reply
 Posted: August-04-2008 at 10:51pm Posted: August-04-2008 at 10:51pm |
 [/IMG] [/IMG]
|
|
|
kevinindy
|
|
 |
|
kevin719 
Senior Member 
Joined: June-18-2008 Location: United States Status: Offline Points: 231 |
 Post Options Post Options
 Thanks(0) Thanks(0)
 Quote Quote  Reply Reply
 Posted: August-04-2008 at 10:52pm Posted: August-04-2008 at 10:52pm |
|
I am a idiot with this computer!!! lol I can build a motor but cany send a pic
|
|
|
kevinindy
|
|
 |
|
79nautique 
Grand Poobah 

Joined: January-27-2004 Location: United States Status: Offline Points: 7872 |
 Post Options Post Options
 Thanks(0) Thanks(0)
 Quote Quote  Reply Reply
 Posted: August-05-2008 at 10:26am Posted: August-05-2008 at 10:26am |
|
what part of Indy do you live in?
|
|
 |
|
critter 
Platinum Member 

Joined: January-11-2008 Location: New Hill, NC Status: Offline Points: 1227 |
 Post Options Post Options
 Thanks(0) Thanks(0)
 Quote Quote  Reply Reply
 Posted: August-05-2008 at 12:57pm Posted: August-05-2008 at 12:57pm |
|
Computers have more parts and closer tolerances
  .. Just keep trying.. it will happen. .. Just keep trying.. it will happen.
|
|
|
1980 Ski Nautique
1966 Barracuda |
|
 |
|
kevin719 
Senior Member 
Joined: June-18-2008 Location: United States Status: Offline Points: 231 |
 Post Options Post Options
 Thanks(0) Thanks(0)
 Quote Quote  Reply Reply
 Posted: August-05-2008 at 2:28pm Posted: August-05-2008 at 2:28pm |
|
I live in the ben davis area but I keep the boat at my shop in the 86th &michigan rd area.
|
|
|
kevinindy
|
|
 |
|
kevin719 
Senior Member 
Joined: June-18-2008 Location: United States Status: Offline Points: 231 |
 Post Options Post Options
 Thanks(0) Thanks(0)
 Quote Quote  Reply Reply
 Posted: August-09-2008 at 10:18am Posted: August-09-2008 at 10:18am |
|
Are the fir boards that you ran from alongside the motor box to the transom 1x4 0r 1x6?Thanks
|
|
|
kevinindy
|
|
 |
|
8122pbrainard 
Grand Poobah 

Joined: September-14-2006 Location: Three Lakes Wi. Status: Offline Points: 41045 |
 Post Options Post Options
 Thanks(0) Thanks(0)
 Quote Quote  Reply Reply
 Posted: August-09-2008 at 10:46am Posted: August-09-2008 at 10:46am |
|
Kevin, I think Greg is busy trying to get a cam installed so I think I can answer for him. If you look at the second picture, you will see that it is 3/4 ply and not dimensional stock. The width (or height in this case) is determined by the finish floor height - bottom edge scribed to the floor.
You haven't said if yo have looked through the pictures in Greg's thread "weeding the pumpkin patch" ?? Plenty of great info there!! |
|
 |
|
kevin719 
Senior Member 
Joined: June-18-2008 Location: United States Status: Offline Points: 231 |
 Post Options Post Options
 Thanks(0) Thanks(0)
 Quote Quote  Reply Reply
 Posted: August-09-2008 at 11:20am Posted: August-09-2008 at 11:20am |
|
Yeah I have been checking out the pumkin patch quite a bit! I was refering to the wood that runs to the transom and has the notches for the removable floor.It looks like 1x6.I know that up front around the pylon is 2 layers of 3/4. I had my floor in plywood and when i saw the pumpkin patch I ripped it up and started over.lol. I even had it glassed in! He did such a great job it motivated me.Maybe you know?He ran the blower hose up to the side of the motor box.Do you think that is better than stock(in the back)Thanks! Kevin Maybe I can put in his cam and he can work on my floor

|
|
|
kevinindy
|
|
 |
|
BuffaloBFN 
Grand Poobah 

Joined: June-24-2007 Location: Gainesville,GA Status: Offline Points: 6094 |
 Post Options Post Options
 Thanks(0) Thanks(0)
 Quote Quote  Reply Reply
 Posted: August-09-2008 at 11:42am Posted: August-09-2008 at 11:42am |
|
Thanks Pete/Dude! (saw you referred to as 'Dude' on 2001.com LOL) Spot on as always.
And thank you Kevin! The material aft of the front 'surround' is solid stock and roughly 1x6. I bought rough sawn stock and planed it to match the thickness of the ply. Do try to think through the removable floor area; that takes a lot of stress and was the first or second source of water in my hull. The battery box may have been first. No worries on the cam install...I'm tickled to be doing it with full confidence this time! A repaint will probably keep me off the water this w/e, but it'll be back in the boat tomorrow. 
|
|
 |
|
jbear 
Grand Poobah 

Joined: January-21-2005 Location: Lake Wales FL. Status: Offline Points: 8193 |
 Post Options Post Options
 Thanks(0) Thanks(0)
 Quote Quote  Reply Reply
 Posted: August-10-2008 at 1:18am Posted: August-10-2008 at 1:18am |
|
Every time I see pictures of the inside of that boat Greg I get a woody...what a beautiful job.
Hard to imagine anyone missing the "pumpkin patch...one of our longest running, most posted, threads ever..if not the most. Deservedly so. Thread jack..sorry..Greg are you close to Morefoot? Patti and I stopped on our way to Tennessee to have lunch with him and his lovely wife, Kim. What a great couple. I believe they are just a little bit south of Atlanta, in McDonough (sp?). john |
|
|
"Loud pipes save lives"
AdamT sez "I'm Canadian and a beaver lover myself"... |
|
 |
|
BuffaloBFN 
Grand Poobah 

Joined: June-24-2007 Location: Gainesville,GA Status: Offline Points: 6094 |
 Post Options Post Options
 Thanks(0) Thanks(0)
 Quote Quote  Reply Reply
 Posted: August-10-2008 at 10:13am Posted: August-10-2008 at 10:13am |
|
Hey John, they're on the other end of that 2 hour delay we talked about. We haven't met, but there's a little moorfoot in the patch! He helped me with a few fiberglass pointers.
Good to see you back around! |
|
 |
|
jbear 
Grand Poobah 

Joined: January-21-2005 Location: Lake Wales FL. Status: Offline Points: 8193 |
 Post Options Post Options
 Thanks(0) Thanks(0)
 Quote Quote  Reply Reply
 Posted: August-11-2008 at 2:15am Posted: August-11-2008 at 2:15am |
|
Glad to be back in the fold...so to speak. Had a few weeks off to finnish work camps, run up to GL and then almost 3 weeks in Tennessee.
john |
|
|
"Loud pipes save lives"
AdamT sez "I'm Canadian and a beaver lover myself"... |
|
 |
|
kevin719 
Senior Member 
Joined: June-18-2008 Location: United States Status: Offline Points: 231 |
 Post Options Post Options
 Thanks(0) Thanks(0)
 Quote Quote  Reply Reply
 Posted: August-17-2008 at 12:35pm Posted: August-17-2008 at 12:35pm |
|
Ok I am taking a break this weekend on the floor
 I am waiting for the foam to come in. I will rebuild the carb this week.Is there any tricks or advice for these 4160's or are they pretty much straightforward? I have been working on fuel injection for so long that it will be nice to do a carb! But it has been at least 15 yrs since I did a 4 barrel! LOL.Hey also does anyone know if a 74 had a electric choke or a cable? I couldnt find a cable with threads long enough to go through the thick dash?? I would love to switch it to electric if anyone knows what I need.Thanks again!! Kevin I am waiting for the foam to come in. I will rebuild the carb this week.Is there any tricks or advice for these 4160's or are they pretty much straightforward? I have been working on fuel injection for so long that it will be nice to do a carb! But it has been at least 15 yrs since I did a 4 barrel! LOL.Hey also does anyone know if a 74 had a electric choke or a cable? I couldnt find a cable with threads long enough to go through the thick dash?? I would love to switch it to electric if anyone knows what I need.Thanks again!! Kevin
|
|
|
kevinindy
|
|
 |
|
Post Reply 
|
|
|
Tweet
|
| Forum Jump | Forum Permissions  You cannot post new topics in this forum You cannot reply to topics in this forum You cannot delete your posts in this forum You cannot edit your posts in this forum You cannot create polls in this forum You cannot vote in polls in this forum |