1983 ski Nautique 2001 blueprints |
Post Reply 
|
Page <12 |
| Author | |
boat rider 
Newbie 
Joined: December-30-2021 Location: new orleans Status: Offline Points: 31 |
 Post Options Post Options
 Thanks(0) Thanks(0)
 Quote Quote  Reply Reply
 Posted: January-21-2022 at 1:31am Posted: January-21-2022 at 1:31am |
I am trying for a half custom half factory if that makes sense. I want the seating and drivetrain factory(basically anything that affects the proformance) or as close as possible but I would like to add a tower, perfect pass,(I am a course skier) rear ballast bags and hand routed eva foam flooring. |
|
 |
|
67 ski nat 
Platinum Member 
Joined: July-19-2018 Location: Santa rosa Status: Offline Points: 1194 |
 Post Options Post Options
 Thanks(1) Thanks(1)
 Quote Quote  Reply Reply
 Posted: January-21-2022 at 8:30am Posted: January-21-2022 at 8:30am |
|
Hey boat rider. Have you looked at WOTs (wayouthere) project. Seems similar to your work ahead. WOTs is impressive
|
|
 |
|
ScottZ 
Platinum Member 

Joined: January-20-2004 Location: Clanton, AL Status: Offline Points: 1154 |
 Post Options Post Options
 Thanks(1) Thanks(1)
 Quote Quote  Reply Reply
 Posted: January-21-2022 at 4:46pm Posted: January-21-2022 at 4:46pm |
John Thacker 205-755-9035 Verbena, AL
|
|
|
Scott Zuelzke
Lake Mitchell , AL 1984 Ski Nautique 1972 Skier |
|
 |
|
ScottZ 
Platinum Member 

Joined: January-20-2004 Location: Clanton, AL Status: Offline Points: 1154 |
 Post Options Post Options
 Thanks(0) Thanks(0)
 Quote Quote  Reply Reply
 Posted: January-21-2022 at 5:07pm Posted: January-21-2022 at 5:07pm |
 
|
|
|
Scott Zuelzke
Lake Mitchell , AL 1984 Ski Nautique 1972 Skier |
|
 |
|
ScottZ 
Platinum Member 

Joined: January-20-2004 Location: Clanton, AL Status: Offline Points: 1154 |
 Post Options Post Options
 Thanks(0) Thanks(0)
 Quote Quote  Reply Reply
 Posted: January-21-2022 at 5:10pm Posted: January-21-2022 at 5:10pm |
|
This boat is actually a "barn find". It has been sitting for 10 years. The wind blew part of the roof off the barn a few years ago. All original, unmolested. Cats have been living in it. Field mice have probably chewed up the wires as well. The guy said $1500 is the least he will take. The floor seems firm.
|
|
|
Scott Zuelzke
Lake Mitchell , AL 1984 Ski Nautique 1972 Skier |
|
 |
|
wayoutthere 
Senior Member 
Joined: February-28-2020 Location: Florida Status: Offline Points: 477 |
 Post Options Post Options
 Thanks(0) Thanks(0)
 Quote Quote  Reply Reply
 Posted: January-21-2022 at 5:53pm Posted: January-21-2022 at 5:53pm |
|
67 ski nat, thanks for the kind words.
Boatrider, first pic is how i made an elevation drawing of the stringer so the parts could be re located after the new stringers were installed. Second pic is how i would mark and cut out a bad floor, with a 2 foot level as a straight edge along the gunnel and mark both sides on the floor. Lots of options for rebuild depending on which direction you take plus more can always be trimmed off. Lets wait until you decide how you want the floor and if there will be foam. Another post coming with a ballast idea since you mentioned it.
|
|
 |
|
wayoutthere 
Senior Member 
Joined: February-28-2020 Location: Florida Status: Offline Points: 477 |
 Post Options Post Options
 Thanks(0) Thanks(0)
 Quote Quote  Reply Reply
 Posted: January-21-2022 at 6:29pm Posted: January-21-2022 at 6:29pm |
|
I'll try to explain a ballast tank idea thought up after your post today, not to scale and funny looking but think it work. Get some melamine board, frp or masonite, the masonite has been successful for me, so has pvc board. Remember to store your frp on a flat surface like the bed in the spare room, but keep the melamine and masonite out in the shed unless or untill you have to put it in the dining room so the balsa core can be cut to fit the transom template for a patio table project which oddly enough is in progress right now. Actually for some ballast tanks to make the mold in this case i'd use masonite because it's light and easy to work with, and with some planning can be used over and over. It ends up being a funny looking half a box with the hullside and bottom closing it up. Fit masonite to the hullside by scribing to fit, once you have 2 pieces cut a top and face. It will go from the hull bottom up to the gunnel but not up under it because you need room to fiberglass it into place. A fiberglass box could be fitted along the hullside next to the engine, another behind it that goes almost all the way back to the transom. A big one under the deck would make 5 ballast tanks that dont take up floor space beyond the gunnels. Lay your masonite box down and install some dowel rods, say 1/2 inch dowel for a 1 inch hose. (fill, vent, drain tube locations in the box would have to be determined and some pump research is in order to see how many and what size tubes you need) ( think i'd fill them thru clamshells and forward motion, pump to drain) Glass up the box and wrap the dowel rod until you have the diameter you want, after the glass dries, pop it off the masonite, drill out your dowels and bingo ya got some molded in hose barbs. Glass the 1/2 boxes right onto the hull sides and hull bottom 3-5 coats of meguires #8 maximim mold release on every and anthing you want to pull fiberglass off of 5 x18 x 48 inch tank is 18 gallons, say you got 2 tanks with 30 gallons a side and another 40 under the deck, 100 gallons 700 pounds spread out from front to back, it might go red october better ask how much extra weight that hull is good for. |
|
 |
|
boat rider 
Newbie 
Joined: December-30-2021 Location: new orleans Status: Offline Points: 31 |
 Post Options Post Options
 Thanks(0) Thanks(0)
 Quote Quote  Reply Reply
 Posted: January-21-2022 at 8:59pm Posted: January-21-2022 at 8:59pm |
|
Great that’s awesome info on the ballast. As far as it sinking i have heard of people adding 1750 pounds in ( not the brightest idea but nevertheless it works.) I really appreciate how above and beyond y’all go to help me out.
|
|
 |
|
Wilhelm Hertzog 
Senior Member 
Joined: June-14-2014 Location: Cape Town Status: Offline Points: 334 |
 Post Options Post Options
 Thanks(0) Thanks(0)
 Quote Quote  Reply Reply
 Posted: January-22-2022 at 3:27pm Posted: January-22-2022 at 3:27pm |
|
I have four ballast tanks built into my 2001. Shout if you'd like more info on my setup.
|
|
|
1982 Ski Nautique PCM351W RR II Velvet Drive 10-17-003 1:1 II PerfectPass Stargazer
Do not go gentle into that good night. Rage, rage against the dying of the light. |
|
 |
|
boat rider 
Newbie 
Joined: December-30-2021 Location: new orleans Status: Offline Points: 31 |
 Post Options Post Options
 Thanks(0) Thanks(0)
 Quote Quote  Reply Reply
 Posted: January-22-2022 at 7:27pm Posted: January-22-2022 at 7:27pm |
|
Absolutely I would like to hear of the settup there is never too much good info.
|
|
 |
|
Wilhelm Hertzog 
Senior Member 
Joined: June-14-2014 Location: Cape Town Status: Offline Points: 334 |
 Post Options Post Options
 Thanks(0) Thanks(0)
 Quote Quote  Reply Reply
 Posted: February-05-2022 at 3:40pm Posted: February-05-2022 at 3:40pm |
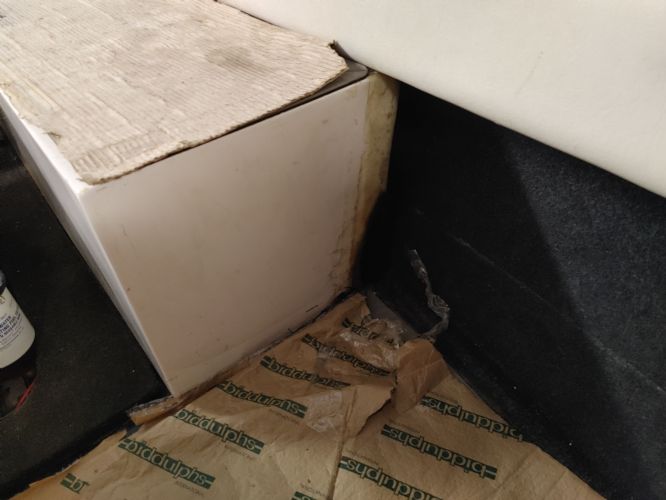
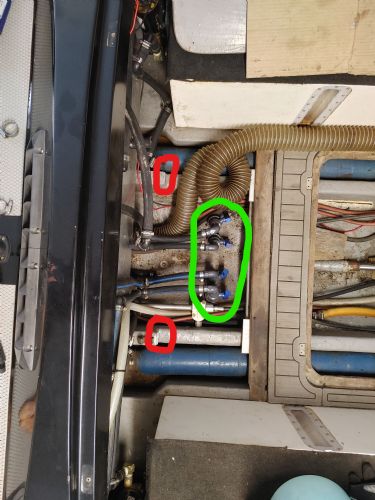
Apologies for taking so long, but here are some pictures of my setup. And apologies for the untidy state of things in the pictures, but I have a few things I'm working on, hence the cardboard/paper covering etc. I had stringers and floor replaced when I bought the boat (all wood replaced with Nidacore), and the shop that did the stringers and floor for me also built and installed the tanks for me. For regulatory reasons I had to have a lot of foam added under the floor for buoyancy, so the factory battery box etc. all had to go. The tanks work really well as seating in the boat. Only drawback is that the side tanks cut down quite a bit on working space around the engine when one has to work on the engine. The port and starboard tanks cover most of the space from the stern to the front of the boat, to a point in line with the front of the engine cover.They fit in snug below the coaming pads. They're bonded to the floor with 4200, and have a piece of fibreglass attaching them to the hull at the front. The tanks (except for the front) have sight windows with float level indicators.   The aft tank fits in between the two side tanks. It has two 'wings', which slide in behind the side tanks and keeps it from moving forward. It rests on the stringers, which have a small step in them (marked in red in the picture below) which the tanks snugs up against, preventing it from sliding back.    The green thru-hulls supply the pumps which fill and drain the tanks. The front tank is fitted under the bow, held in place with a bit of fibreglass. It is shaped to accomodate the battery. It does make it impossible to access the navigation light without pulling the tank (likely a big job), but so far I haven't had to do that.  The pieces of wood glassed onto the front tank is for screwing a kick panel onto, which holds speakers, amplifier and fire extinguisher (regulatory requirement in South Africa). Each tank is drained and filled with its own pump. The pumps are mounted at the back of the two side tanks, and against the sides of the hull next to the fuel tank. Each pump is mounted on a piece of PVC foam core material that is bonded to the tank/hull with 4200. Mounting and plumbing those pumps was a major PITA, because there is very little space to work with.   The side and aft tanks fill/drain fittings as well as the overflow/vent fittings are at the rear. In hindsight the overflow/vent should have been at the front, as I do lose some water through the overflow while underway, with the bow of the boat higher than the stern. I intend to plumb in a long loop under the gunwales for each tank to address this issue. The hard tanks does add weight to the boat, so if you're concerned about keeping the smallest slalom wake possible, ballast bags may be better. But filling and draining the hard tanks are much less of a hassle than bags, and as I said, the tanks serve as really convenient seating as well, so overall I'm very happy with the setup.
|
|
|
1982 Ski Nautique PCM351W RR II Velvet Drive 10-17-003 1:1 II PerfectPass Stargazer
Do not go gentle into that good night. Rage, rage against the dying of the light. |
|
 |
|
Skigeaux 
Newbie 
Joined: March-06-2022 Location: Kiln, MS Status: Offline Points: 3 |
 Post Options Post Options
 Thanks(0) Thanks(0)
 Quote Quote  Reply Reply
 Posted: March-07-2022 at 12:48pm Posted: March-07-2022 at 12:48pm |
|
Hello,
I see you are in New Orleans. I am just East of you in Kiln, MS and beginning a total redo on my 1982 2001. Also from New Orleans originally. Could be good to get together and compare notes, ideas, etc.. Phone is 504-931-7999 and name is Charles.
 |
|
|
Chas.kearney@gmail.com
|
|
 |
|
Post Reply 
|
Page <12 |
|
Tweet
|
| Forum Jump | Forum Permissions  You cannot post new topics in this forum You cannot reply to topics in this forum You cannot delete your posts in this forum You cannot edit your posts in this forum You cannot create polls in this forum You cannot vote in polls in this forum |