79 Nautique rebuild?
Printed From: CorrectCraftFan.com
Category: Repairs and Maintenance
Forum Name: Boat Maintenance
Forum Discription: Discuss maintenance of your Correct Craft
URL: http://www.CorrectCraftFan.com/forum/forum_posts.asp?TID=12719
Printed Date: November-20-2024 at 12:44am
Topic: 79 Nautique rebuild?
Posted By: 79TiqueRebuild
Subject: 79 Nautique rebuild?
Date Posted: January-21-2009 at 2:24am
|
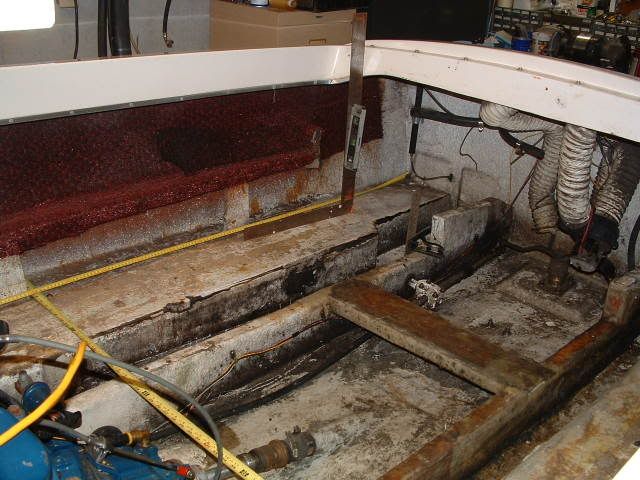
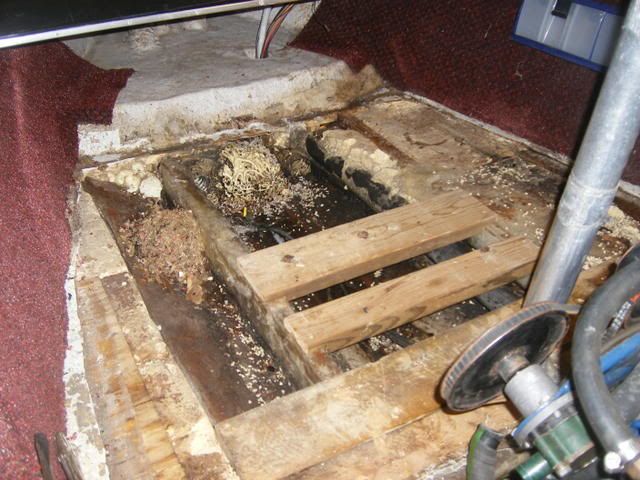
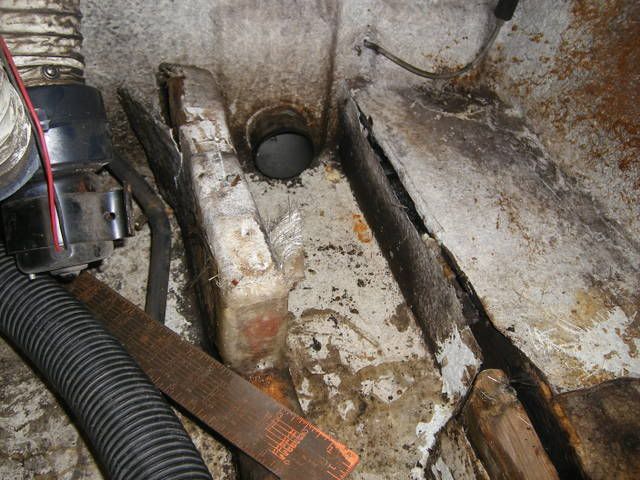
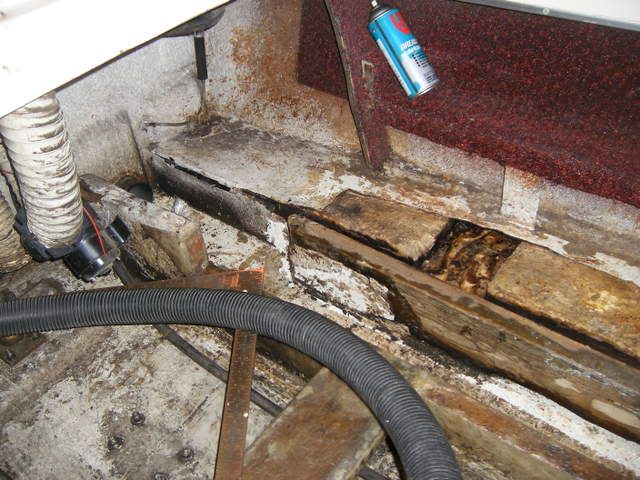
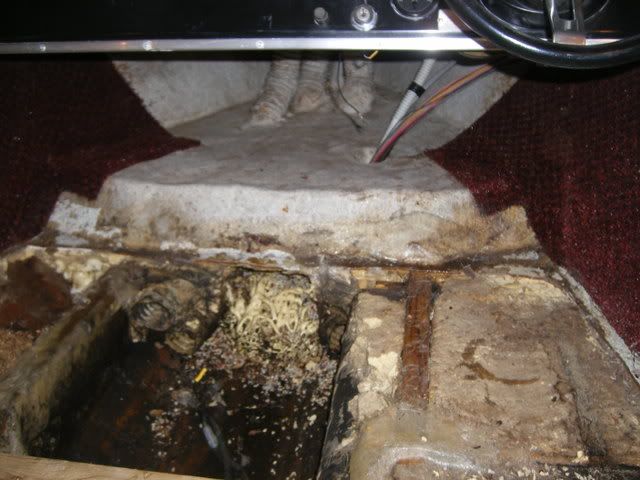
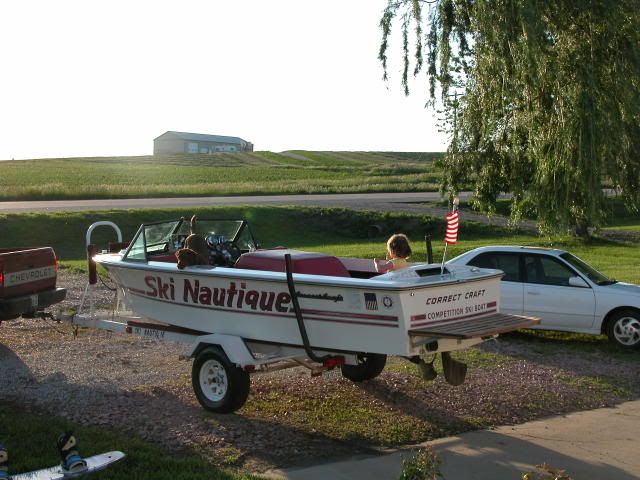
I recently purchased my first inboard ski boat, a 1979 ski nautique with a 351 ford commander. When I was purchasing it I noticed cracking under the carpet near the back end of the boat and so I knew I had a project boat on my hands. However, it was only after I got home and started ripping up the carpeting that I saw what I was getting myself into. Most of the original fiberglass floor has been replaced, but instead of being replaced level with the old floor, the previous owner had just put a thick piece of plywood over the previous floor and put a thin layer of fiberglass over that. The 2 (I think) original stringers that he did not replace are just about all rotted through at this point, so they most likely will need to be replaced.
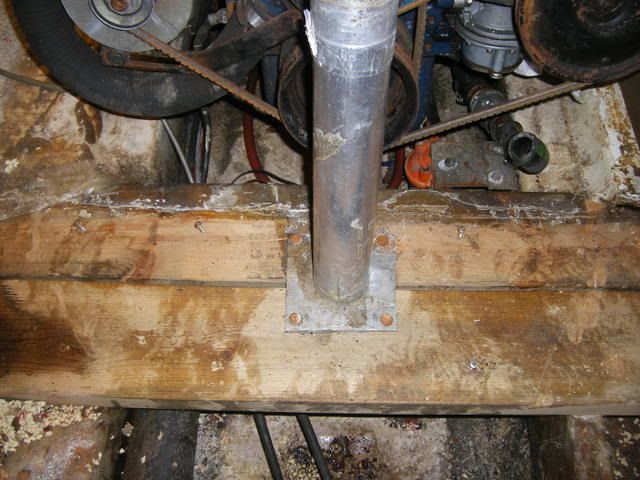
Once I got past the fiberglass and the plywood I saw just what poor shape this boat is in. Most of the stringers had been replaced, but instead of being replaced in whole, the previous owner just cut out the stringers not directly around the engine and poorly spliced in other pieces of wood. Needless to say, the boat is in sore shape, but I'm hoping to restore it. I finished up tonight working on removing the pylon, but was unable to do so. I'm not sure where it is supposed to detach from the hull of the boat. When I shake it, the whole pylon moves, including the part attached to the floor, which can't be a good sign. Any advice? Here is a picture of the pylon, the red arrow points to the part that moves with the pylon. 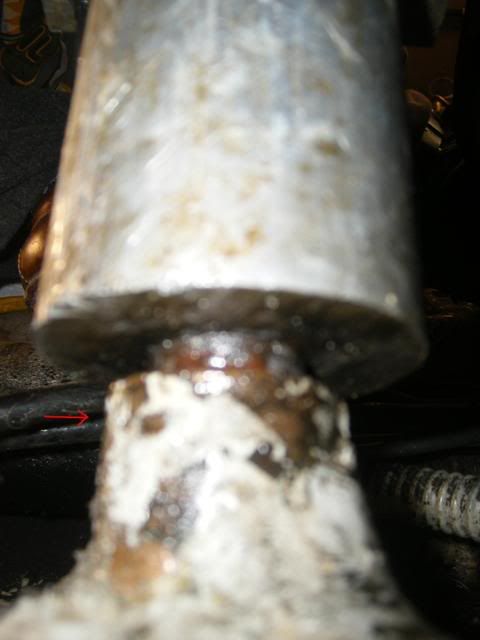
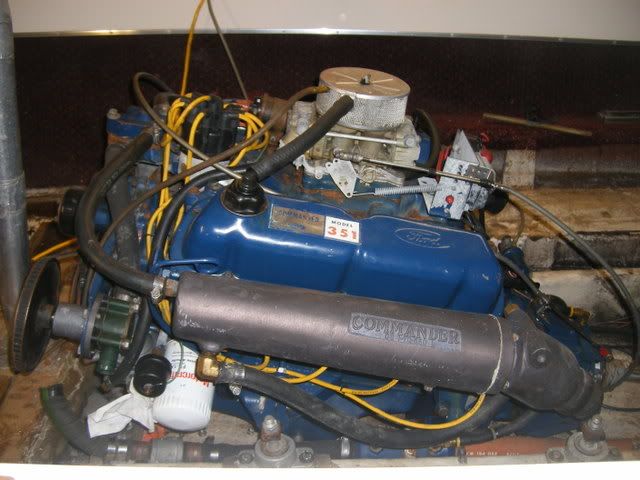
The hull and rub-rail are in very good shape, and the motor starts and runs. The worst part of the boat is the flooring. Anyway, I'll include some pictures. I'm also looking for any diagrams of the original stringers for a 79 ski nautique as these are completely torn up and spliced in at random intervals which makes me worried that I'll be able to put it all together like it's supposed to look like. I was only able to get the engine started thanks to this website as the previous owner had put the distributor shaft on 180 degrees out which causes it to s hoot fire! But I was able to correct the mistake and get it started with your help. Thanks. 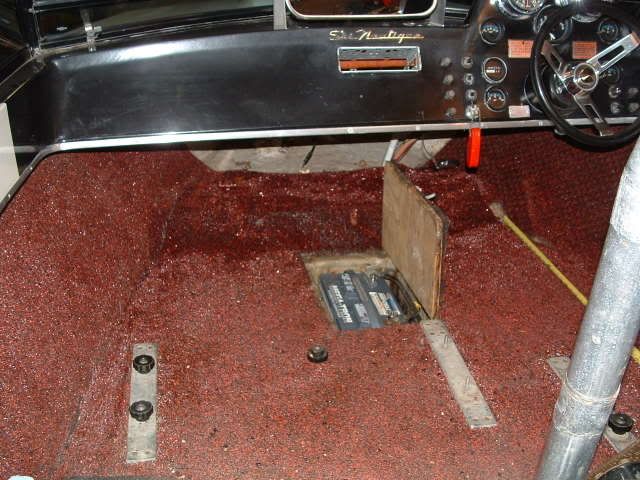
|
Replies:
Posted By: jbear
Date Posted: January-21-2009 at 2:59am
|
Welcome to the site Monty. Looks like you have yourself a job there. But you have found the site that will help you get it under control. Many good threads here. Lots o luck.
john ------------- "Loud pipes save lives" AdamT sez "I'm Canadian and a beaver lover myself"... |
Posted By: storm34
Date Posted: January-21-2009 at 4:09am
|
Welcome! Great looking boat! ------------- |
Posted By: uk1979
Date Posted: January-21-2009 at 9:18am
|
This is off my 1977/78 which has no engine cradle I think 1979 is when they started to fit them but yours looks like its before this so should be the same others will confirm this
the hull should be the same ,good luck and welcome to the site. 


sub stringer add on 

 ------------- Lets have a go 56 Starflite 77 SN 78 SN 80 BFN |
Posted By: BuffaloBFN
Date Posted: January-21-2009 at 9:48am
|
Welcome aboard...heck of a project you have there!
Take lots of pics from any and every angle you can think of. It will be a good reference down the road. http://correctcraftfan.com/forum/forum_posts.asp?TID=9543&KW=pumpkin - This was my first stringer job and so it has a lot of first timer questions answered. ------------- http://correctcraftfan.com/diaries/details.asp?ID=2331&sort=&pagenum=12&yrstart=1986&yrend=1990" rel="nofollow - 1988 BFN-sold "It's a Livin' Thing...What a Terrible Thing to Lose" ELO |
Posted By: 8122pbrainard
Date Posted: January-21-2009 at 10:10am
|
Monty,
Your pylon is only bolted at the floor level. The bottom is just a pin into a socket that's glassed into the bilge/keel. I'm sure it's rusted in. Try some penetrating oil and soak it for a couple days. If still stuck, you'll need to cut the socket out of the glass. Not the worst because it sure looks like you'll be doing quite alot of glass work elsewhere! We''l certainly help you through it and it looks like the guys have already given you a good start. Welcome ------------- /diaries/details.asp?ID=1622" rel="nofollow - 54 Atom /diaries/details.asp?ID=2179" rel="nofollow - 77 Tique 64 X55 Dunphy Keep it original, Pete < |
Posted By: 79nautique
Date Posted: January-21-2009 at 10:54am
|
80 was when they went to the engine cradle not 79 ------------- http://www.correctcraftfan.com/diaries/details.asp?ID=756&sort=&pagenum=1&yrstart=1979&yrend=1979 - 79 nautique |
Posted By: WakeSlayer
Date Posted: January-21-2009 at 1:37pm
|
Welcome to the site!
It looks like you have quite the project ahead of you there. You will get through it with the help from everyone here. Mike ------------- Mike N 1968 Mustang |
Posted By: 79TiqueRebuild
Date Posted: January-24-2009 at 12:12am
|
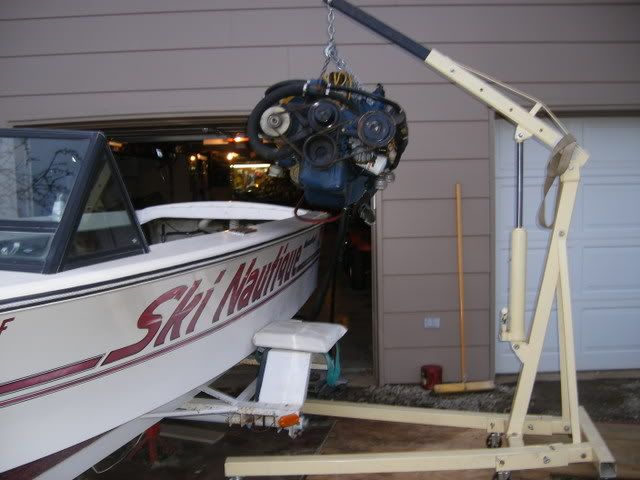
Thanks for the pictures UK1979, those should come in handy when I actually get to building the new stringers. Last night I got the engine pulled out and tonight I've been working on cutting all of the old stringers and fiberglass out. I've been using a DeWalt saws-all which has been working fairly well.
I still can't get the pylon out, which is troubling. I've been soaking it with oil for the last few days or so and have tried using a ball joint separator with no luck. Is there any special trick to getting it out? Does anyone have a material list compiled? I know basically what it is going to take, but specifics are always better than just the basics. Thanks again for everyone's help, I've got some pictures of the engine pull for your enjoyment. Will keep you posted.. 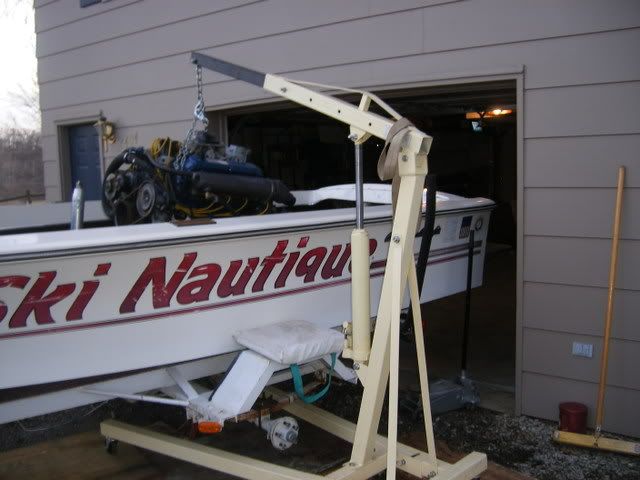
|
Posted By: critter
Date Posted: January-24-2009 at 12:51am
|
Monty, I really like the throw cushion protecting the trailer fender in case the motor falls. Yeah.. that should do it.
Here is a close to accurate list of what I used for my stringer job in a 66 Barracuda.. List of materials to replace the stringers: Quanty Item Cat# Price 5 gal Epoxy resin 635 thin 3:1 ratio EPOX-635316 $243.00 2 gal Epoxy resin 635 thin 3:1 ratio EPOX-635315 $109.00 1 (2)Pumps EPX-P31 $6.25 1 roll 50 yds 2" E-glass tape FG-C02R $15.85 1 roll 50 yds 4" E-glass tape FG-C04R $26.05 1 roll 50 yds 8" E-glass tape FG-C08R $52.00 20yds Epoxy mat FG-EM10550 $5.35/yd x 20 = $107.00 5qts 1/32 milled fiber filler SM-MF050 $16.25 - (used in filets) 4" 3/8" Fiberglass Rollers FR-1314A $5.35 x 3 = $16.05 5qts Phenolic Microballoons FL-PH025 $12.50 2 boxes 2" wood paintbrushes qty-24 BR-TA20B $12.25 x 2 = $24.50 5 ea 1qt mixing containers CON-MM032 $.55/ea x 5 = $2.75 5 lb tub of talc SM-TAL01 $5.25 15yds 6oz cloth FG-C0638 $4.30/yd x 15 = $64.50 13yds #1708 biaxial FG-170838 $6.40/yd x 13 = $83.20 3 boxes 1" brushes BR-TA10B $14.45 x 3 = $43.35 ------- $916.64 2 gal Epoxy resin 635 thin 3:1 ratio EPOX-635315 $109.00 (Additional needed for floor) 2 galkit CEPS Jamestown Distributers SMI-CPESWGL $198.00 (Clear Penetrating Epoxy Sealer) Stringers- 2ea 2"x8"x16' 2ea 1"x6"x12' === All 4 were $220.80 Each stringer consumes about one gallon of epoxy resin from start to finish. Use the epoxy to laminate both sides of the stringers. Seat the stringers with a layer of epoxy mat and use weights to set. Fill gaps with filler and epoxy. Make a bead on each side of the stringer where it meets the hull at least 1' up on the stringer and on the hull. Then use 2", 4", 8" strips along the joint to mate the stringer to the hull. Then cover with 6oz and then biaxial. I got my materials from US Composites. At least this is what I did for my stringers. Not saying that it is the best way but it is working for me. I have yet to install the floor as I am waiting for warm temps to pour the foam. Good luck. ------------- 1980 Ski Nautique 1966 Barracuda |
Posted By: WakeSlayer
Date Posted: January-24-2009 at 3:12pm
|
At some point I am going to need to add up my total cost. I am a little apprehensive to do so. These are close estimates
West epoxy 4x 1.2 gal kit$140ea $560 fir and plywood $250 glass cloth and fillers $300 carpet and adhesive $300 noodles / 2 cases $176 misc stainless stuff $50-75 brushes, pails and stuff $100 I have done a ton of other things that I decided to while in there, which is what really bangs the total up there. That is the stuff I don't want to add up yet... ------------- Mike N 1968 Mustang |
Posted By: eric lavine
Date Posted: January-24-2009 at 3:17pm
|
you forgot one little thing, Beer cost ------------- "the things you own will start to own you" |
Posted By: WakeSlayer
Date Posted: January-24-2009 at 4:06pm
|
Again, hesitant to add it up, Eric.
I am getting closer to done, and a lot closer to your previously stated estimate. Incredible, I say. ------------- Mike N 1968 Mustang |
Posted By: uk1979
Date Posted: January-24-2009 at 11:03pm
|
Monty
Good work keep the pictures coming,here are some shots of my pylon apart. 
I found a Dremel a good tool to use on the cutting out with a diamond wheels on it,there cheap as chips and one big wheel in a pack of 6 cut a main stringer out,also low dust so thin and small. ------------- Lets have a go 56 Starflite 77 SN 78 SN 80 BFN |
Posted By: 79TiqueRebuild
Date Posted: February-04-2009 at 1:04am
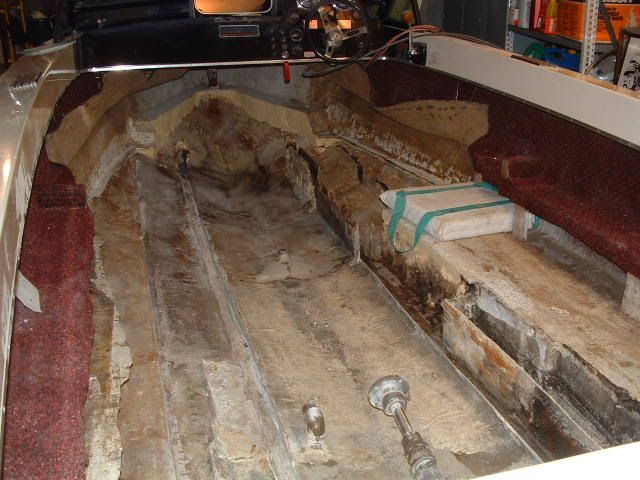
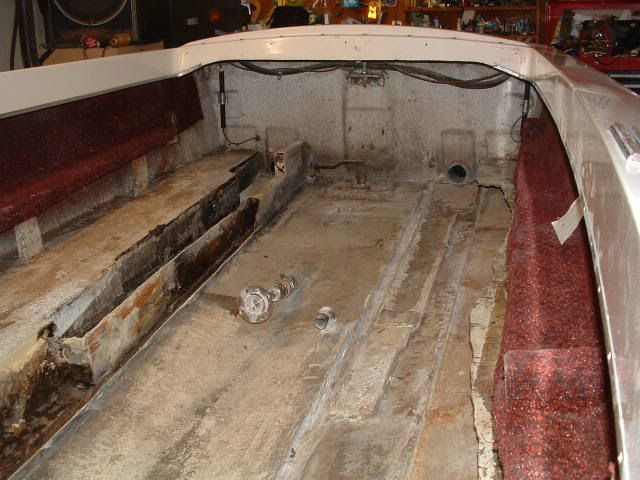
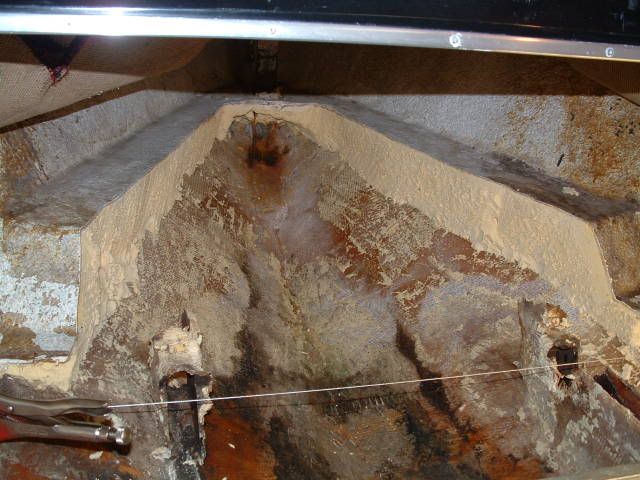
I finally got the stubborn pylon out. I used a 3 foot cheater bar and a pipe wrench and worked it loose. The pictures above show my progress so far. A PO had replaced engine stringers at some point, and did a bad job of it. sure would be nice if there were templates or stringer dimensions available. |
Posted By: 8122pbrainard
Date Posted: February-04-2009 at 10:54am
|
Monty,
Don't forget to check the condition of the wood blocking that's glassed into the transom. Drill some holes into the blocks close to the bottom and see what comes out. So, what did the PO do to screw up his stringer "repair". Some details will help others here on what NOT to do!!! ------------- /diaries/details.asp?ID=1622" rel="nofollow - 54 Atom /diaries/details.asp?ID=2179" rel="nofollow - 77 Tique 64 X55 Dunphy Keep it original, Pete < |
Posted By: 79TiqueRebuild
Date Posted: February-13-2009 at 6:27pm
|
Thanks for the advice on the wood-backing blocks on transom. I've drilled a couple holes and have gotten good wood, I still need to check on the sides. While I was back looking around I noticed a crack on the rudder block. Maybe somebody hit something? I'm not sure but I decided to check it out. You can see that it was damaged and that the board was wet but it was nice to get a complete piece of wood out of the boat for a template. (it's probably the first whole piece of wood that I've taken out of the boat so far!!) I'm curious about a build-up under the main stringers that almost looks like bondo? was this from the factory or could it have been something a previous owner put in? Should I grind it all out and try to get to level glass or should I leave it and build up around it? The picture didn't turn out as well as I would have liked. CPES is on order and stringers came in once but it was splintered so they reordered it. I have been reading many threads on this site and refers to "scribing" the stringers to the hull. Is there a link to a site that might describe that process in specific detail? Most of my woodworking has been done with a chainsaw and a log splitter..
Build-up under stringers and along bilge: 
Rudder plate (w/o fiberglass top): 
Oh, and to answer the question about some of the things the previous owner did that were messed up: the main stringers were pieced out in 5 different pieces. the fiberglass that was put in didn't seem to adhere to the old fiberglass, not sure if it was because it wasn't cleaned properly or what. Nothing was fit properly, for instance, a large piece of plywood fit over the top of the flooring at the front of the boat, but instead of being cut in correctly, it was just screwed on top of everything so that the floor was uneven. You can see from the original pictures that the way the pylon was attached and mounted there were two crossboards cut to support it, but neither were held down with anything other than fiberglass. It did allow for a mouse to build a large nest however. |
Posted By: uk1979
Date Posted: February-14-2009 at 12:16pm
|
Hi Monty
Looks like its moving on well,as for the lump of bondo you show could well have been done by PO I found that the stringers had been fitted in the hull with foam dabs along it in the factory before they were glassed in, so a small gap around 2mm would be there, so a repaired job at some point would fill it, but if its glass/poly then just filled when the factory glassed in, just check it out with the old original glass/poly. Now let see if we can work out the new stringers, I have some Dwgs of the Stringers off my boat 1977/78 I think there the same as yours, have put them in DXF file full size, so if you have a friend with a plotter type printer you should be able to print off actual size and use as a template to lay on your new wood (remember Dwg's is of the deepest side or facing to the middle of the hull and are handed) If you know someone with a CNC router you should be able to put the tool paths to each Dwg and put a small off set on the Hull Side ( bigger ) to scribe in. Scribing in I have know doubt there will be many schools of thought on how too, all with there own merit. Give this a go, Cut to length the new wood, cut out the Dwg along the hull side only lay on new and mark along the new wood, keeping the rest of the paper on the other side will help to keep it straight, then you can cut to the shape of template, Keep more wood than you need along the top of the stringer. Scribing now lay the stringer in the boat where it needs to go and just mark cut/plane until your happy with the fit so its in and out allot on the boat,or put some wood each end right across the top of the sides and clamp say 2x4, then an upright down next to the stringer position, screw or clamp must be plum (upright) now stringer is the ruff shape lay in and clamp the front only, now cut a small piece of 1/8 ply or hardboard 1/16 longer than the biggest gap you have at the front (would think it should be just over 1 inch in height and can be 3/4 wide) now with it go to the back of the boat lift the stringer up and clamp when you have the same gap as the front. Now with your scribe piece run along the hull down each side of the stringer with a pencil on the top of the scribe which gives you the shape of you hull.Now depending on how you prep the hull before fitting this can be tricky, if you grind off all old flush in the hull no problem but harder to set back in the right place,or the leave base channels in gives you the place to re fit in which case would need to off set stringer to scribe by it thickness so it can run in the channel then repeat to do the other side easy to do by unclamping and moving the cross bars. Now you have a line on each side you can saw/plane/sand up to it, I would leave a touch more say 2mm off the line from the front to nothing where it flattens out as its a steep curve and will fit better, should there be a cock up you can just redo until your happy, when your happy with the fit then cut the other side of paper template lay on your hull shaped stringer mark and cut to right size,this way you have a few chances on the scribing, some on here can do it first time its what you are happy doing. When you have finished one then repeat for the other side (remember its a mirror of it ) and then lay the first one on to it and mark the top and you should have a pair. I have tried to post the DXF files but will not load so if you post a E mail I will ping over unless someone can help me with this. Have fun and keep us posted on how it going and you might think its a bit slow on here but many are at a reunion the weekend and beer is involved too but will be back soon. As for me I'm off to take my youngest daughter out for the first time teaching her to drive and she thinks the rear view mirror is to check her makeup so could be gone a while. ------------- Lets have a go 56 Starflite 77 SN 78 SN 80 BFN |
Posted By: 8122pbrainard
Date Posted: February-14-2009 at 12:38pm
|
Monty,
I see in Rogers that he mentioned a "scribe" but didn't go farther. Just in case you are wondering about it, I find the easiest scribing tool to use is a child's grade school compass. Set the distance between the pencil and the point to the width of material you want to cut off. Drag the point end on the hulls profile leaving the pencil mark on the stringer. ------------- /diaries/details.asp?ID=1622" rel="nofollow - 54 Atom /diaries/details.asp?ID=2179" rel="nofollow - 77 Tique 64 X55 Dunphy Keep it original, Pete < |
Posted By: JDiggs
Date Posted: February-14-2009 at 12:56pm
|
Hey Uk, you mention dxf file which is a file format usually produced from an autocad drawing. If you are using autocad, depending on the version (06 or better?) you can plot it to a jpg or a pdf.
If you cant do it, send it to me and I'll put it into both formats. Also, I might be able to print it full size on several 24x36 sheets and send it to you. Then you just cut it out and have a paper template to use |
Posted By: uk1979
Date Posted: February-14-2009 at 1:21pm
|
Pete
Yes that is a way too, just trying to do it as a one size fits all,if your working with channels you may need put a bend at 90 over the depth of channel on the compass. JDiggs post a mail adress and I ping over cheers. ------------- Lets have a go 56 Starflite 77 SN 78 SN 80 BFN |
Posted By: 79TiqueRebuild
Date Posted: February-14-2009 at 5:31pm
|
Thanks for the help. I would of never even attempted this project without this great site and the knowledgeable people on it. I don't know anyone with that type of printer or cnc equipment but will do some checking around. Now I get to put a set of struts on my son's honda he is going for his drivers license on Wed. Thanks Monty |
Posted By: JDiggs
Date Posted: February-14-2009 at 8:23pm
|
I can print it off for you & send you 4 sheets. Then you just cut it out, tape them together, tape them to your 2x8, draw around it and cut it. I think that would work.
danieljdeal@gmail.com, fire it over to me uk, I'll see what I can do with it |
Posted By: uk1979
Date Posted: February-15-2009 at 2:01pm
|
Hi Guys
Monty/Daniel just pinged them over let me know if its not come through. ------------- Lets have a go 56 Starflite 77 SN 78 SN 80 BFN |
Posted By: 79TiqueRebuild
Date Posted: February-17-2009 at 10:45pm
|
I had some progress this weekend. Got boat supported on stands as suggested. I got your cad files Roger,hopefully Daniel or somebody can convert them and possibly print them for me.
Did some grinding wow that area in the bilge is tough.Where's Mike Rowe when you need him? I kept thinking how somebody said he felt like a powdered doughnut. lol somehow they wont taste the same. Looks from the pics some of you had a great time in Fl.... Hopefully someday 


|
Posted By: BuffaloBFN
Date Posted: February-18-2009 at 9:26am
|
Looks good Monty! You may want to cut the glass top off of the wood in the stern like you did on the steering port. They took a while to dry in my case and I replaced 2 of 5 pieces in mine. Of course soak them in CPES after they dry...and the dryer they are, the more they'll soak up almost plasticizing the wood. Cool stuff!
Edit-That glass around the edges of the steering port could be holding water. ------------- http://correctcraftfan.com/diaries/details.asp?ID=2331&sort=&pagenum=12&yrstart=1986&yrend=1990" rel="nofollow - 1988 BFN-sold "It's a Livin' Thing...What a Terrible Thing to Lose" ELO |
Posted By: 79TiqueRebuild
Date Posted: February-20-2009 at 12:45am
|
Got a couple hours on boat tonight. I bought a pack of 16 grit pads for grinder @ Harbor freight not bad 6 for 3.98. Was cutting out floor closer to hull using a diamond wheel on the grinder got in pretty close.
While I was scraping the still soggy foam in back I hit the corner transom block. I could tell it was wet from the sound. I drilled a hole half expecting water to run out but got wet wood. 


I thought you guys would get a good laugh at my hull supports. It seems like I spend as much time cleaning my shop vac filter as I do working on the boat. Also - what is the purpose of the black tubes attached to the speedo lines? |
Posted By: critter
Date Posted: February-20-2009 at 1:21am
|
Monty,
Try this posting.. http://www.correctcraftfan.com/forum/forum_posts.asp?TID=12833&PN=2 - dampners ------------- 1980 Ski Nautique 1966 Barracuda |
Posted By: 79TiqueRebuild
Date Posted: February-21-2009 at 12:20am
Thanks for the link on dampners. I worked on drivers side floor a little tonight.

This worked well for me I used a fillet glove because I removed guard.and running shop vac helped keep dust down a little. 
|
Posted By: the grinch
Date Posted: February-25-2009 at 2:19am
|
I notice that Monty's boat has the ski shelfs btwn the gunnels and floor. Was this a CC interior option? I've seen them on other boats, but not most. Doesn't look like they'd be to hard to add on my BF, but what's the general opinion on them? Do they get in the way or are they beneficial? ------------- It takes a big hole to bury an elephant. Kirk Miller [URL=http://www.correctcraftfan.com/forum/register.asp?FID=7]KIRKS79/URL] |
Posted By: 81nautique
Date Posted: February-25-2009 at 9:42am
Some boats had one, two or none. Must have been an option. I have 2 in my boat and although they narrow up the floor space I am able to store a pair of double skis, my barefoot boom, paddle, fire extinguisher, sun block,etc... in them and keep all that stuff off the floor. Some rip them out some keep them, adding them would be easy and I can post a few pictures of mine if you like. ------------- You can’t change the wind but you can adjust your sails |
Posted By: Waterdog
Date Posted: February-25-2009 at 9:58am
|
My brothers 84 2001 has them my 86 2001 dosen't. He keeps a lot of stuff off the floor with them. ------------- - waterdog - http://www.correctcraftfan.com/diaries/details.asp?ID=3896&sort=&pagenum=2&yrstart=1978&yrend=1978" rel="nofollow - 78 Ski Tique |
Posted By: uk1979
Date Posted: February-25-2009 at 6:18pm
Also if you have them leave in when you do a stringer job good for tools and odd bits, and great to keep the beer on as you work + hide the empty from the skirt  ------------- Lets have a go 56 Starflite 77 SN 78 SN 80 BFN |
Posted By: 79TiqueRebuild
Date Posted: February-25-2009 at 8:18pm
| Mine are going stay in. I can't wait to get beyond this grinding. It sure is hard to drink beer with this mask on. |
Posted By: the grinch
Date Posted: February-25-2009 at 9:58pm
|
I think I'm going to wait till I get a little farther along with the floor before I decide whether to add some or not. I can see the benefit, however, I only have the skis in the boat when the kids are with me and I'm really never that far from the dock if I have a bunch of crap in the boat. What I really need to do is come up an ideal means of holding a cooler and a hydrofoil out of the way but easy to get to. The grinding does wear hard on you on one of these projects. My forearms resemble POPEYE's I've done so much of it, but I'm almost ready to put that baby back in the tool box! ------------- It takes a big hole to bury an elephant. Kirk Miller [URL=http://www.correctcraftfan.com/forum/register.asp?FID=7]KIRKS79/URL] |
Posted By: 79TiqueRebuild
Date Posted: March-06-2009 at 1:32am
|
Finally had some time to work on the boat tonight.Jeremy converted the cad file for the main stringer that roger sent. Thanks both of you. I purchased a test piece of 2x6 so I could figure out that scribe thing. I feel pretty good about how it came out. Hopefully I'll get to work on the real one this weekend.
I'm planning on a plywood floor was thinking about 1/2" for main floor and 3/4" for removable behind engine cover. any recommendations? 
|
Posted By: WakeSlayer
Date Posted: March-06-2009 at 2:45am
|
I used 3/4 all the way around. not sure if I would want to go less. Maybe 5/8's. ------------- Mike N 1968 Mustang |
Posted By: uk1979
Date Posted: March-06-2009 at 9:15am
|
Good Work Monty glad it works,on the floor Mike is right 3/4 or at a pinch 5/8 as the ski pylon is bolted through the floor on your year SN and is the main support so a good multi ply (WBP grade) would be good coated all over with CPES & epoxy ( when you coat it up do all over at the same time on a thick plastic sheet, will help to keep it flat and not pull one side,they say epoxy has a low shrink rate/ to dry! ) as for the sides that was fiberglass which was over the ply/wood then over foam, lots of schools of thought and all good Mike's post shows the ply way well, the back middle section was 3/4 ply that you could remove with screws for ease to work on.
Lots to read up on here for floors Foam or no Foam, if no then there are Mike's pool noodles right up to empty soft drink bottles (caps on) to ping pong balls. At the end of the day its your boat and do it as you feel happy with which could be a combo of all the above or a new twist. Keep it up and keep the new wood work skills under your hat and on here, if the skirts find out you will soon have lots of new jobs which = less boat time. ------------- Lets have a go 56 Starflite 77 SN 78 SN 80 BFN |
Posted By: uk1979
Date Posted: March-06-2009 at 10:06am
|
Thinking about it Monty I would add a extra piece of 3/4 ply under the floor around the pylon epoxy & screwed on.
------------- Lets have a go 56 Starflite 77 SN 78 SN 80 BFN |
Posted By: the grinch
Date Posted: March-06-2009 at 8:38pm
|
My 79bfn is alot like the 79sn in and around the pylon. This was a huge failure point in the floor system on mine. I wish I had taken pictures of this part of the floor before tearing it apart. If like mine, the only attachment point for the pylon is the socket in the bilge (which has no pin), and of course the floor. With the exception of my daughter, everyone pulled behind my 81sn was 200#s plussss. With the simple laws of physics, the attachment down at the floor and its close proximity to that socket in the bilge, there is alot of force or leverage created at the attachment points. I would tie that floor around the pylon in with more than screws. If the floor attachment starts to fail, then that socket in the bilge is going to get wallowed out. I would use more than screws to hold that part of the floor in. ------------- It takes a big hole to bury an elephant. Kirk Miller [URL=http://www.correctcraftfan.com/forum/register.asp?FID=7]KIRKS79/URL] |
Posted By: 79TiqueRebuild
Date Posted: March-07-2009 at 3:18am
|
I got the real observer side main stringer fit to the hull.I started laying out the top side of it and I think I will go with the 3/4' floor and under the pylon sink in a 2x8 across the main stringers. One of those engine cradle would be nice.
While I was Measuring out the top I remembered that when pulling the motor there were 1/2 oak shims under the front motor mounts.Has anybody seen that or is that part of a p.o. stringer replacement? I was going to add a 1/2 inch to front mm height to do away with them. Kirk what do you mean use more than screws to hold floor around pylon? |
Posted By: uk1979
Date Posted: March-07-2009 at 8:10am
|
Monty yes a good solid bit of 2x8 under the floor sealed and epoxy on with a good snug fit around the pylon along with the 4 bolts through the welded top plate down to the under plate to give a 3/4 ply and 2 inch depth should be fine, not sure what Kirk's mean's as I am thinking you are putting the front floor in as a big slab not unlike he shows in his post, you could put some off cuts of ply under the floor where you fix the seats too all epoxy on,then I would coat the tops of the stringers with wet epoxy and screw down or if its a removable job just more screws no wet epoxy.
As for the shims I too had them 11/4 at the front and 1/4 at the back I may be wrong my guess is the stringers were set as a one size fits all on the engine package you had, and its easy to just shim up, you have 351 and I have 350 and the early 70's boat may have had something different. ------------- Lets have a go 56 Starflite 77 SN 78 SN 80 BFN |
Posted By: the grinch
Date Posted: March-09-2009 at 5:07am
|
I was referring to some layered plywood underneath the center floor slab. The layers would be placed to butt against the front bulkheads to create more dispersed load against the bulkheads when force or load is on the pylon and floor. I haven't quite made it that far in my rebuild, but I'll post pics when I get there. Should be towards the end of the week. I also built a cradle to help with this force as well. It may be overbuild but my original floor had failed here for whatever reason. Don't want it to happen again so adding a little xtra. ------------- It takes a big hole to bury an elephant. Kirk Miller [URL=http://www.correctcraftfan.com/forum/register.asp?FID=7]KIRKS79/URL] |
Posted By: WakeSlayer
Date Posted: March-09-2009 at 8:05pm
Dammit !! For the pylon mount, and I do realize this is a different boat: Mine was two pieces of 3/4" ply peanut buttered and screwed together. One went between the stingers and one went on top in a notch. Then my floor. so it is 2" plus total of surrounding cross support. ------------- Mike N 1968 Mustang |
Posted By: 79TiqueRebuild
Date Posted: March-09-2009 at 8:39pm
|
Thanks I will go back and check that out again.
I always liked that episode of mythbusters. I just haven't checked in to quanity and prices. Do you think a ping pong paddle would pass water patrol requirements for a paddle?? |
Posted By: uk1979
Date Posted: March-10-2009 at 7:04pm
|
Monty as Kirk and Mike said the pylon fixing is a weak part on our year boats, and the engine cradle type is the way to go with all the extra things/ways now around to pull. I would think the later cradle may fit with a small amount of work and setting the stringers for one, may be worth a post on the parts wanted list or mail Paul
he has lots of parts he helped me out and sent over to the UK if not a cradle you may need some other CC parts. nautiquefanatic pcarpenter2@carolina.rr.com or call (980)581-0006 Mike you could go ping pong on your next boat  ------------- Lets have a go 56 Starflite 77 SN 78 SN 80 BFN |
Posted By: WakeSlayer
Date Posted: March-10-2009 at 7:22pm
|
Just the thought of dumping 8000 ping pong balls in the boat makes me laugh. Hit a big roller and have like a dozen of them pop out of nowhere and bounce around. ------------- Mike N 1968 Mustang |
Posted By: 79TiqueRebuild
Date Posted: March-11-2009 at 10:19pm
|
Thanks. I sent a E-mail to Paul about a engine cradle. Does anybody know what years would work on my boat? I want to beef up the pylon area as much as possible as the boys want to Wakeboard with that stripper pole.
I got the files for the other stringers from Jeremy. Thanks so much!!! to you and Roger. Have to make a trip to lake this weekend to check on things and thought of my lift right now is setup for my runabout do you what changes will I have to make for the CC? 
|
Posted By: the grinch
Date Posted: March-11-2009 at 11:43pm
|
Monty it looks like all you may have to do is raise the bunks straight up. Measure width of bunks and then take that measurement on the boat. From that point, measure down to the lowest hanging point on the boat, (the rudder) and that's how high you need to raise the bunks. Of course the rudder may overhang the lift and may not be a factor, so it may be the prop shaft, or so forth. I guess it really depends on how far forward the boat will sit on the bunks. I don't have a pic, however, I built a stop on the lift at my previous house to keep from pulling boat in to far and the prop or rudder hitting. ------------- It takes a big hole to bury an elephant. Kirk Miller [URL=http://www.correctcraftfan.com/forum/register.asp?FID=7]KIRKS79/URL] |
Posted By: 79TiqueRebuild
Date Posted: March-12-2009 at 12:16am
| Pardon me for being dumb. But do I need to buy new Taller brackets? or is there a way to make these work? I know I'm a long way from this issue but want to get this figured out while I'm there or at least know what to be looking for. Monty |
Posted By: the grinch
Date Posted: March-12-2009 at 1:06am
|
I don't know if you have a local shop that builds docks and has some type of brackets that would work. I rebuilt my own for my 81sn but it was a little different (overhead lift with chains down to a cradle) application. I had to cut the rear section of the cross member that is like yours and weld a dropped section in btwn the bunks. You can't do that with yours, so it would be easiest to just raise the bunks front and rear. You might be able to have some brackets made to raise the bunks that you could bolt onto the cradle. Really not to difficult to do with the right materials. Don't worry to much about the galvanized steel. You can use mild steel and then paint with galvanizing paint. It worked fine for the five years I had the house. ------------- It takes a big hole to bury an elephant. Kirk Miller [URL=http://www.correctcraftfan.com/forum/register.asp?FID=7]KIRKS79/URL] |
Posted By: 79TiqueRebuild
Date Posted: March-12-2009 at 1:17am
| Thanks I'm not too far from lake of the Ozarks lots of lift dealers there. I measured boat so will see if I can come up with taller brackets. |
Posted By: WakeSlayer
Date Posted: March-12-2009 at 1:12pm
|
I think you are stuck on the height of the brackets. I do think they need to be brought in quite a ways together. That may help part of that. Depending how they are attached under the bunks, perhaps you can put a spacer of some sort in there. I don't think you need to go much higher. Maybe 4" lift at most. Just my opinion, make sure. ------------- Mike N 1968 Mustang |
Posted By: uk1979
Date Posted: March-12-2009 at 10:22pm
|
Monty, just looked back through your post and the cradle came in 1980 so a 80/81 would make a good starting point as its the same hull,they may be the same in 2001 boats, need a 2001 guy to size one up for you.
Nice lift by the way. ------------- Lets have a go 56 Starflite 77 SN 78 SN 80 BFN |
Posted By: eric lavine
Date Posted: March-13-2009 at 10:22pm
|
Monty, It took a while and then i seen the airline, pretty cool, do you have to bring an air compresser with you? or is there one on site? ------------- "the things you own will start to own you" |
Posted By: 79TiqueRebuild
Date Posted: March-14-2009 at 12:39am
|
There is a electric blower that is mounted in a fiberglass box, flip the lever in the box to release air and switch on blower to raise it. The fancy ones are remote controlled so you can raise it back up for rough water. Then lower when returning. We are on a Corp lake and have to use a generator for electricity. The valve on the tank is a safety I installed. After looking today I think I can raise my bunks with some 2" square metal stock. more fun.....
http://lakeboatlifts.com/ - lake lifts |
Posted By: 79TiqueRebuild
Date Posted: March-17-2009 at 2:16am
I took the day off today, I was inspired by the lake and got some fitting and a partial mock-up of the observer side. Then I cut out old drivers side.I'm not as fast as the rest but I'll keep plugging along.


|
Posted By: the grinch
Date Posted: March-17-2009 at 11:29am
|
Monty, that's looking good. I bet you are thinking, "If I could take a month off of work, I'd have it finished in no time!" Good luck. ------------- It takes a big hole to bury an elephant. Kirk Miller [URL=http://www.correctcraftfan.com/forum/register.asp?FID=7]KIRKS79/URL] |
Posted By: BuffaloBFN
Date Posted: March-17-2009 at 11:42am
|
I like the 'extend-a-level'! ------------- http://correctcraftfan.com/diaries/details.asp?ID=2331&sort=&pagenum=12&yrstart=1986&yrend=1990" rel="nofollow - 1988 BFN-sold "It's a Livin' Thing...What a Terrible Thing to Lose" ELO |
Posted By: 79TiqueRebuild
Date Posted: March-23-2009 at 1:30am
Here's what came out on exhaust back plate.

This is the biggest piece of template I had. Woo ho. 
Did some more fitting for mock-up. How come the phone only rings after you get in the boat? I wonder if anybody kept track of times entered and out I'd probably set a record.. Kirk, Our contract is up Apr 4 @ midnight I may have the time to work on boat But I've been kind of holding off placing order for fiberglass materials$$$$$ 

|
Posted By: jbear
Date Posted: March-23-2009 at 2:26am
|
[QUOTE=79TiqueRebuild] Our contract is up Apr 4 @ midnight I may have the time to work on boat
Contract in what..if you don't mind me asking? Sounds like just about the same time that contract is up for my telco buddies up north. john ------------- "Loud pipes save lives" AdamT sez "I'm Canadian and a beaver lover myself"... |
Posted By: 79TiqueRebuild
Date Posted: March-23-2009 at 2:37am
| AT&T & CWA Sounds like were in the same boat. |
Posted By: uk1979
Date Posted: March-23-2009 at 10:40am
Good work Monty and you have wood work skills now, good to see you are now using the shelf, well earned 
Keep it coming good for others. ------------- Lets have a go 56 Starflite 77 SN 78 SN 80 BFN |
Posted By: 79TiqueRebuild
Date Posted: March-25-2009 at 9:25pm
Ok did more fitting and a little plumbing work. I'm going to mark everything and start with cpes treatment.

A fiberglass book I reserved at library finally made it to me. After looking at it I'm more confused than ever. It says to have rigid plastic foam pad under the bulkhead and other areas so you don't have hard spots. I was thinking that the wood parts should fit as close as possible and then be glued down with that mat and a thick mixture of epoxy or peanut butter.I know its back through the patch and WBTS and others. Did I miss something I remember several comments that CC set the stringers on foam pads. Was that the norm back then and things are done different now? 
|
Posted By: 8122pbrainard
Date Posted: March-25-2009 at 10:37pm
|
Monty,
Your ok! Notice they say "rigid" Plastic foam. I don't know exactly what they are referring to but it's something to take up the minor gaps between the wood and the hull. The key word rigid means the wood doesn't move in relationship to the hull and thats exactly what you have done with your project. You could even call the resin, mat and peanut butter a "rigid plastic". BTW, it's looking good!! ------------- /diaries/details.asp?ID=1622" rel="nofollow - 54 Atom /diaries/details.asp?ID=2179" rel="nofollow - 77 Tique 64 X55 Dunphy Keep it original, Pete < |
Posted By: SUNAPEE CROW
Date Posted: March-25-2009 at 11:37pm
|
Monty,
Were you able to find the original red and black outdoor carpet? If so, I'd like to know where you bought it. I have an '80 that looks very much like your boat. Mine is approaching a re do. |
Posted By: 79TiqueRebuild
Date Posted: March-26-2009 at 12:38am
|
Thanks Pete I've had sick feeling all day after looking through that book. I think I'll follow this sites lead.
Rick, I haven't found any carpet yet. The carpet I removed from the floor looked similar but was the indoor-outdoor type astro grass? I will let you know if I come up with something though. |
Posted By: BuffaloBFN
Date Posted: March-26-2009 at 9:26am
|
Cool, someone still using a library! What's the copyright on the book?
I have a couple of books on fiberglass and that rigid foam trick isn't in either. Super nice job on the dry fit!!! ------------- http://correctcraftfan.com/diaries/details.asp?ID=2331&sort=&pagenum=12&yrstart=1986&yrend=1990" rel="nofollow - 1988 BFN-sold "It's a Livin' Thing...What a Terrible Thing to Lose" ELO |
Posted By: 79TiqueRebuild
Date Posted: March-26-2009 at 10:59pm
|
Hey I waited 8 weeks to get that book 2nd edition 3rd printing 1988. Our library didn't have a lot to choose from on fiberglass repair. Not too bad of music selection though and sometimes some decent books on cd's for those trips to the lake.
I want to re staple some of the seats. does anybody what kind and size staples are best and where to get them? Thanks, Monty |
Posted By: SUNAPEE CROW
Date Posted: March-27-2009 at 12:09am
|
Monty,
I have done my seats twice in the twenty plus years that I have owned the boat. The drivers seat takes a beating with the beading that is stitched into the seat. Wet skiier sits down to drive and the thread rots.Water runs down through the foam , the plywood delaminates and the star nuts no longer have anything to bite into. Best results have been Westing the plywood base completely and securing the upholstery with 3/8" stainless staples. You might have to use 1/2" on the corners where the material piles up. At Home Depot the "Arrow"stainless or monel staples are wrapped with a bullet proof tape to prevent pilfery. To the best of my knowledge stainless is available only in 1/2" width staples. |
Posted By: 79TiqueRebuild
Date Posted: May-01-2009 at 10:11pm
|
I've been working on various items such as the seats I got them re-stapled and replaced some bolts with ss.
Followed the link on swim platform maintenance. It really helped mine I have a couple of steps left. 
I finally applied cpes to my stringers that seems like some very good stuff.However I can't remember where I read how many coats to apply. 
|
Posted By: 8122pbrainard
Date Posted: May-01-2009 at 10:56pm
|
Monty,
Keep putting the CPES sealer on first coat until it won't absorb anymore. Then the next day after it's "kicked" (solvent evaporated and the thermal has cured the epoxy) give it one more coat. Then your good to go with the next step - normal epoxy layup on the stringers. The CPES is great stuff!!! What's the picture of the platform? did you put CPES on it too? ------------- /diaries/details.asp?ID=1622" rel="nofollow - 54 Atom /diaries/details.asp?ID=2179" rel="nofollow - 77 Tique 64 X55 Dunphy Keep it original, Pete < |
Posted By: 79TiqueRebuild
Date Posted: May-02-2009 at 12:06am
|
No but I did wonder if that would work? I have just been following that wet sand and teak oil process. The more coats of teak oil the longer it takes to dry.
I've been holding off ordering my fiberglass materials till our contract gets settled we've been 3 weeks now on an expired contract. Just happy we are still working. But can't really justify spending money on the boat till we settle Thanks, Monty |
Posted By: 8122pbrainard
Date Posted: May-02-2009 at 12:45am
|
Monty,
It was just confusing with your posting a picture of your platform in the middle of your CPES/stringer project!! Keep going as it really looks like you've got the basic idea on the stringers down. Fantastic!! Keep the CPES to the stringers and off the Teak. The stuff (Teak) is so oily that no "finish" really performs. Some (like the Epifanes )will last for a season and then fail. Stick with a oil and look for a synthetic. I do not honestly know of any finish for Teak that works better than a oil type. ------------- /diaries/details.asp?ID=1622" rel="nofollow - 54 Atom /diaries/details.asp?ID=2179" rel="nofollow - 77 Tique 64 X55 Dunphy Keep it original, Pete < |
Posted By: 79TiqueRebuild
Date Posted: May-02-2009 at 1:17am
|
Thanks. Pete
Sorry for the confusion on the post I went back and tried to straighten out. |
Posted By: JoeinNY
Date Posted: May-02-2009 at 2:06am
|
Ah the don't fully bed the stringers school of boat repair rears its head..
That is not all nonsense they are talking in that book, however I wouldnt let it phase you. For the most part your hull is relatively thick and you dont run your boat on rocks and your trailer is full bunk and well constructed so the bunks are located correctly in relation to the stringes. Additionally your hull will have foam so an acute flexing by the stringers is not very likely. If you need to fix a sailboat or a racing boat give me a call and we will talk about foam bedding teckniques. Anyone who read my 83 floor thread closely might note some of the adjustments I made to eliminate the foam.... extra hull reinforcement on the stringers well tapered so as to not create a stress concentration, and the additional supports I used were not bedded and much less layering was used to attach them. All overkill but I like overkill... ------------- http://www.correctcraftfan.com/diaries/details.asp?ID=1477 - 1983 Ski Nautique 2001 1967 Mustang 302 "Decoy" http://www.youtube.com/watch?v=cO5MkcBXBBs - Holeshot Video |
Posted By: kapla
Date Posted: May-02-2009 at 3:02am
Joey I don�t know whats wrong here but the search sometimes gets fuzzy ....can you give a link to your post on the stringer job...I might go with no foam and need to see some pics of the set up...just to get and idea... ------------- <a href="">1992 ski nautique |
Posted By: 79TiqueRebuild
Date Posted: December-31-2009 at 12:17am
|
After waiting since April, We finally have a contract and received my order from US composites.They pack the mate3rials very good I might add.
But they only ship you what you order. I overlooked cabosil so whats another week. 
I Started by bedding the rudder port base. 
Then tried a main stringer one thing I found is that at first I didn't mix the epoxy thick enough. I was worried it would setup too quick. Ha Ha After mixing it thicker I still had some ooze out on steep angles but I found a sheet of wax paper helped hold it in. 
The holidays and a head cold got me of past my 24 hour window so I guess I will have to wash down with soap and water. Is there any particular kind of soap to use and do I just rinse with a wet rag and towel dry? |
Posted By: BuffaloBFN
Date Posted: December-31-2009 at 9:09am
|
I used a little dish soap in water. The blush isn't hard to remove, but it can be easy to miss a spot. It's easier to feel than to see!
Edit-Looks like you did a nice job on the rudder port. Bear in mind though, that glass doesn't like sharp corners. ------------- http://correctcraftfan.com/diaries/details.asp?ID=2331&sort=&pagenum=12&yrstart=1986&yrend=1990" rel="nofollow - 1988 BFN-sold "It's a Livin' Thing...What a Terrible Thing to Lose" ELO |
Posted By: uk1979
Date Posted: December-31-2009 at 9:54am
|
Monty, great to here your news and now back on the boat ,like the diving belt as a weight, not sure how cold it is round your way but Greg rigged up gutter from the drain plug under the boat to the yard drain so he could use a hose to rinse off.
Keep the pictures coming looks like there are a few 70s boats in rebuild. ------------- Lets have a go 56 Starflite 77 SN 78 SN 80 BFN |
Posted By: Gary S
Date Posted: January-02-2010 at 9:18pm
|
Good to hear you finally got a contract Monty,that was a long time. We got ours in a couple of months if I remember right,but it did make the summer uncertain. I can't imagine waiting 9,and basically putting your life on hold. Good luck on the boat,looking good so far. ------------- http://www.correctcraftfan.com/diaries/details.asp?ID=1711&sort=&pagenum=1&yrstart=1966&yrend=1970" rel="nofollow - 69 Mustang HM SS 95 Nautique Super Sport |
Posted By: 79TiqueRebuild
Date Posted: January-03-2010 at 2:13am
|
Thanks Gary I hope this is my last.We'll see what happens in the next 4 years.
Got to do some more work on the boat.I got drivers main bedded down. I used the dishsoap and water to wipe clean my expired work. I am starting to understand about the rounded edges.Live and learn. Thanks Greg Roger, How many gallons of epoxy before I get hooked? One thing that concerns me is how well the epoxy will bond to the pvc pipe I plan on using for my air ducts. I really like your glassed duct work. 
|
Posted By: uk1979
Date Posted: January-03-2010 at 10:19am
|
Hi Monty, I used 6 pack of 6 L west system (9.5 US gallons) to build and set my stringers only, but the cost of west was so high then took Pete’s advice and looked around over here for something else and found Sicomin Epoxy who sell trade drums of 43kg with hardener (around 11.5 US gallons) at half the cost of west.
If using pvc pipe for ducting would seal up with 3M 5200 looks to be the best. ------------- Lets have a go 56 Starflite 77 SN 78 SN 80 BFN |
Posted By: uk1979
Date Posted: January-03-2010 at 10:30am
|
Monty like the pictures of your new work and see you have added a notch for a pylon timber to fit into,that should hold it well,a good idea on pre cradle boats.
------------- Lets have a go 56 Starflite 77 SN 78 SN 80 BFN |
Posted By: 79TiqueRebuild
Date Posted: March-15-2010 at 12:56am
|
Well I have been making progress on the boat. Not near as fast as some of the others doing their stringer/floors. Finally got to a point to pull it off the stands and move it outside to grind the lip of the floor that I left for a guide. 3 more hours of grinding!!
I have some questions on the battery box. Should it be epoxied to the hull? Did the door for it have hinges? I have decide to use foam up in the air-box and around the battery box between the bulkheads. Should I brace the inside of the battery box until the foam sets? I don't want it bowing in the sides. What do you guys think about building a temporary form with plastic on the bottom to keep the foam level and in the area I want it? I would like to keep the skin on the top and not have to cut it. A couple pictures of my progress so far. Monty 

|
Posted By: uk1979
Date Posted: March-15-2010 at 9:13am
|
Monty I found with the foam I used as long as you have blow/fill holes around 3inch in size well spread over your cover board you should be OK, but the foam has some power when its going off so some supports in the battery box would be a good idea, as for setting the battery box you could pop some screws from the top of your cover board into the flange around the box if no flange epoxy some tabs to fix to then after you foam unscrew to remove the cover board.
Think its best you play with the foam first to see how much it expands, when I made my block of foam first time it lifted the lid with a 28lb on it, second time less foam and 56 lb on the lid it just held this was with no blow holes. Keep your shop nice a warm when you do foam to get the max out of the foam and for long time after it set or you will have sink back, also watch the vapors as its not good to breath in. Great work on what I can see Roger. ------------- Lets have a go 56 Starflite 77 SN 78 SN 80 BFN |
Posted By: 8122pbrainard
Date Posted: March-15-2010 at 10:27am
|
Monty,
Have you purchased pour in foam? Injection kits are available that come with nozzles that you can put a nozzle extension on the end. A 12" piece of 1/4" I.D. poly or nylon tubing works great. I've injected quite alot of foam this way. Even though I'm pretty much in favor of going no foam, I've always favored the injection rather than pour in method of foaming. Yes it does develope pressure like Roger stated so practice is needed. If you do inject, start filling the back side of the cavities first, move to the next cavity and then come back. http://www.fomo.com/handi-flow.aspx - Injection foam A 3" hole isn't needed with the injection. All to really need is a hole large enough to get the nozzle extention in and have the ability to move it to the back sides of the cavities. ------------- /diaries/details.asp?ID=1622" rel="nofollow - 54 Atom /diaries/details.asp?ID=2179" rel="nofollow - 77 Tique 64 X55 Dunphy Keep it original, Pete < |
Posted By: Keeganino
Date Posted: March-15-2010 at 12:47pm
|
Nice pics and work! Forgive me if I missed it, but what kind of lumber are you using around the pylon? I can't decide if I want to use solid wood or plywood there, but leaning towards ply. I believe 2 layers of 5/8ths were original to my boat so it was really thick. Since plywood has layers running in different directions, it would offer strength in different directions. I could see solid wood cracking from one week spot in the board. I also plan to foam the bow around the hoses. Let us know what you decide to do and how it goes. ------------- "working on these old boats may not be cost effective but as it shows its what it brings into your life that matters" -Roger http://www.correctcraftfan.com/diaries/details.asp?ID=4897" rel="nofollow - 1973 Skier |
Posted By: Okie Boarder
Date Posted: March-15-2010 at 3:24pm
| Looking good. My plan is to pour foam with the floor top open. I'm going to experiment with it to see how much I need to pour at a time. I'm lining my compartments that will get foam, with plastic sheeting. The foam will essentially be a free floating block shaped to the compartment, as I will remove the sheeting once I'm done. US Composites said I can pour the foam in multiple layers, also. With that being said, my plan is to pour less than I think I need and if I end up needing more, I'll add another layer. |
Posted By: 79TiqueRebuild
Date Posted: March-16-2010 at 1:26am
|
Thanks for the pointers guys.That injectable foam looks great. I was not going to foam but I feel in these areas it will help support the air and cable ducts and battery box.I feel it will be sealed good enough water won't get in. I had already ordered the pourable kind of foam should be here Thursday. I will probably tarp and put a heater in the boat to raise the temperature while I pour and while it cures. My pour will probably be a multi layer pour also I'll make a mess for sure.
Keegan, I used a 2x8 Douglas fir for my pylon support but tied it in to both primaries and secondaries. Then am going with 3/4 exterior plywood with mat on both sides Epoxied down and 3 layers of tape on all joints. Monty |
Posted By: Keeganino
Date Posted: March-16-2010 at 1:56am
Sounds solid to me!  ------------- "working on these old boats may not be cost effective but as it shows its what it brings into your life that matters" -Roger http://www.correctcraftfan.com/diaries/details.asp?ID=4897" rel="nofollow - 1973 Skier |
Posted By: 79TiqueRebuild
Date Posted: March-16-2010 at 11:15pm
| Does anybody have any suggestions or ideas for attaching gas line and wiring harness along the stringers? I believe it originally had cable ties with holes and screwed into the stringers. I found some ties that will work but I hate to put screws into my new stringers. My thoughts were some type of small screw with a plate on the back that I could epoxy to the stringer and possibly glass tape over with screw sticking through then attach clamp and put a nut on it.Does this make any sense? Or should I just use screws and inject cpes ? |
Posted By: 79TiqueRebuild
Date Posted: March-18-2010 at 11:35pm
|
My foam arrived today. Its in the Dreaded one gallon cans.
Does anyone have any tips on pouring from gallon cans? I really struggled with the cpes it seems I spilled more than went in the container till I got down a ways. Thanks, Monty |
Posted By: 8122pbrainard
Date Posted: March-19-2010 at 8:39am
Monty, We all hate putting holes through the nice epoxy/glass into new stringers but sometimes it's needed. It's a PITA but for holes, the recommended procedure is to drill the hole, inject CPES with a syringe and then when putting the screw in use 5200 in the hole. ------------- /diaries/details.asp?ID=1622" rel="nofollow - 54 Atom /diaries/details.asp?ID=2179" rel="nofollow - 77 Tique 64 X55 Dunphy Keep it original, Pete < |
Posted By: 79TiqueRebuild
Date Posted: March-22-2010 at 12:39am
|
I didn't get any physical work done on the boat but did some searching.
I found this on Rot Doctors site.I bouught my cpes from Jamestown and it didn't come with the spouts. I will try and make some out of plastic though. Has anybody used these? 
We provide two free disposable pour spouts with each 2 gallon unit of CPES and L&L Resin--one for Part A and one for Part B. Simply fold and attach to the can rim, leave on and dispose with empty containers. Also ran across this link on working with pour-able foam. I will feel more comfortable when I attempt it now. Monty http://www.bertram31.com/proj/tips/foam.htm - working with pourable foam |
Posted By: uk1979
Date Posted: March-22-2010 at 9:19am
|
Good info for the guys Monty,like the pour spouts no more hit or miss with a new cans. ------------- Lets have a go 56 Starflite 77 SN 78 SN 80 BFN |
Posted By: 79TiqueRebuild
Date Posted: March-25-2010 at 10:46am
|
Would this cutlass bearing fit my boat? http://cgi.ebay.com/ebaymotors/CUTLASS-BEARING-B-F-GOODRICH-1-X-1-1-4-X-4_W0QQcmdZViewItemQQhashZitem5636844647QQitemZ370281825863QQptZBoatQ5fPartsQ5fAccessoriesQ5fGear - cutlass bearing Or would it be best to buy from g2marine? Thanks, Monty
1979 Ski Nautique |
Posted By: 79TiqueRebuild
Date Posted: April-01-2010 at 1:59am
Got the foam poured in the two areas I had decided to foam. The rest of the areas have drain holes and I will not foam.

Test fit of plywood before cpes and coat of matt. 
Got my cutlass bearing and used all thread an some washers to get pull into place. used a small drill bit to dimple where the set screws go and blue locktite on set screws. (Thanks Eric). If anyone could has a picture of how the battery door is hinged/mounted I would sure appreciate it. Monty |
Posted By: uk1979
Date Posted: April-01-2010 at 7:16am
|
Monty the battery hatch I have is just a piece of ply with carpet on top then trimmed round with Ali T section so it drops in the ply floor snug, not sure if it had a screw too will check over the weekend.
She is looking good now soon be back on the water, like how you use the cups A & B good idea Roger. ------------- Lets have a go 56 Starflite 77 SN 78 SN 80 BFN |
Posted By: 79TiqueRebuild
Date Posted: April-01-2010 at 10:18am
|
Thanks for checking on that Roger. My next question would be on where to get the aluminum channel the lid sets in? I would like for it to be close to original.
I used the A & B to measure out the foam and then mixed them in empty epoxy jugs that I cut the tops off of. Lowes gives away paint stirring sticks. Monty |
 the grinch wrote: