83 SN restore in Idaho
Printed From: CorrectCraftFan.com
Category: Repairs and Maintenance
Forum Name: Boat Maintenance
Forum Discription: Discuss maintenance of your Correct Craft
URL: http://www.CorrectCraftFan.com/forum/forum_posts.asp?TID=13276
Printed Date: September-21-2024 at 2:08am
Topic: 83 SN restore in Idaho
Posted By: KFD14
Subject: 83 SN restore in Idaho
Date Posted: April-08-2009 at 4:41pm
|
It must be love.....for why else would one start such an undertaking???
Noticed a soft spot in between the drivers and observers seat. Pulled back carpet, wood is gone... So here it starts. Days one and two. Removed furniture, carpet, engine, fuel tank, and started into the floor. Secondaries are goners, primaries aren't too bad. Going to replace all. I need to resize my photos but will definately be indulging all that wish to track the progress. The snow is melting fast so I need to move right along. Cheers. ------------- %20http://www.correctcraftfan.com/diaries/details.asp?ID=4380" rel="nofollow - 83 2001 SN |
Replies:
Posted By: WakeSlayer
Date Posted: April-08-2009 at 4:47pm
|
It is a labor of love for certain.
Good luck Seth!! Post tons of pics. You better get crackin quick! Snow is going to gone out there pretty quick. Mike ------------- Mike N 1968 Mustang |
Posted By: KFD14
Date Posted: April-08-2009 at 5:08pm
Drivers primary and secondary

Up Up and away 
The helper 
Observers side 
Stupid bulkhead 

Too much HP for this application?? 
 ------------- %20http://www.correctcraftfan.com/diaries/details.asp?ID=4380" rel="nofollow - 83 2001 SN |
Posted By: KFD14
Date Posted: April-08-2009 at 5:09pm
|
Sorry, I'll make them even smaller.. ------------- %20http://www.correctcraftfan.com/diaries/details.asp?ID=4380" rel="nofollow - 83 2001 SN |
Posted By: KFD14
Date Posted: April-08-2009 at 5:28pm
|
More....
Primary at cradle 
Drivers secondary 
Not good for separating water from wood  ------------- %20http://www.correctcraftfan.com/diaries/details.asp?ID=4380" rel="nofollow - 83 2001 SN |
Posted By: kapla
Date Posted: April-08-2009 at 7:53pm
every time I see this pics I get nightmares
I do have some soft spots @ the same areas. didn�t tear it appart yet but I�m worried of finding this scenario.... ------------- <a href="">1992 ski nautique |
Posted By: KFD14
Date Posted: April-08-2009 at 8:44pm
|
Kapla, I didn't really want to do it this spring but I didn't want it to progress to spider cracks in the gel, as I don't have any yet. I thought that we live in such a dry climate that it would dry out after each use, but obviously not.
Oh well, it'll be funnn.....  ------------- %20http://www.correctcraftfan.com/diaries/details.asp?ID=4380" rel="nofollow - 83 2001 SN |
Posted By: KFD14
Date Posted: April-15-2009 at 9:54pm
|
Had a break in the weather, removed the right side floor and foam. About to start on first secondary. Need to get the rest out first though.
I've been reading the posts and can't find a good description of how to support the boat or if I even need to. The boat is currently sitting on its trailer and I will be doing one stringer at a time. What are everyones thoughts on that? ------------- %20http://www.correctcraftfan.com/diaries/details.asp?ID=4380" rel="nofollow - 83 2001 SN |
Posted By: BuffaloBFN
Date Posted: April-15-2009 at 10:41pm
|
Do get it on supports so that your hull doesn't change shape when you take it apart. I think it's also a good idea to take out one main stringer at a time, replace, and then do the other.
This is a long read but the info is there! http://correctcraftfan.com/forum/forum_posts.asp?TID=9543&KW=pumpkin - Pumpkin patch ------------- http://correctcraftfan.com/diaries/details.asp?ID=2331&sort=&pagenum=12&yrstart=1986&yrend=1990" rel="nofollow - 1988 BFN-sold "It's a Livin' Thing...What a Terrible Thing to Lose" ELO |
Posted By: KFD14
Date Posted: May-17-2009 at 2:05pm
|
Well it's been a wet spring and since I'm doing this outside I haven't been able to work on it a whole lot untill recently.
So here is the progress report. I got the boat supported. It's on the trailer and I supported both sides of the bow and the transom as well as a piller under the center of the hull. Removed drivers secondary and main and started ginding.....oh that's fun. How much do I need to grind? Does it need to be down to the hull, flat or just enough to get the stringers in place? I got the channel for the secondary flat but the main has about a 1/4 inch of material, especially on the bilge side. I am planning on repainting the bilge, so do I need to remove all the old bilge paint, will the new glass stick to the old paint, and is there any worry that the old layers of glass aren't bonded well enough to the hull to support the new stringers??? 


 ------------- %20http://www.correctcraftfan.com/diaries/details.asp?ID=4380" rel="nofollow - 83 2001 SN |
Posted By: uk1979
Date Posted: May-17-2009 at 2:25pm
|
I found as you grind off you will find bits that turn gray which meant it was loose/bond had given up so kept going until it was a honey colour, can have dips in it just no gray, I took off all the old bilge paint/gel back to bare hull its all down to how bad your OCD is some of us have it bad.
------------- Lets have a go 56 Starflite 77 SN 78 SN 80 BFN |
Posted By: KFD14
Date Posted: May-18-2009 at 1:36pm
|
Okay, so I did some grinding yesterday, love that - it's soooo much fun!!
What do you all think, is this looking like it's ready, or do I need to grind the channels out more? Just asking because I've never done glass work before and I want to make sure I'm going to get a strong bond. Cheers 


I am planning on smoothing things out more and grinding off more of the old bildge paint. ------------- %20http://www.correctcraftfan.com/diaries/details.asp?ID=4380" rel="nofollow - 83 2001 SN |
Posted By: 8122pbrainard
Date Posted: May-18-2009 at 2:11pm
|
Seth,
It's looking good infact you may be overdoing the grinding. The concern is to just get through the bilge coating so you'll have a good epoxy bond to the old hull. Don't worry about the small voids in the old hull. They will get filled up when you get to glassing in the new stringers. ------------- /diaries/details.asp?ID=1622" rel="nofollow - 54 Atom /diaries/details.asp?ID=2179" rel="nofollow - 77 Tique 64 X55 Dunphy Keep it original, Pete < |
Posted By: KFD14
Date Posted: May-18-2009 at 2:25pm
|
Thanks Pete, I still need to cut out the blocks on the transom. I won't grind the hull any more though. ------------- %20http://www.correctcraftfan.com/diaries/details.asp?ID=4380" rel="nofollow - 83 2001 SN |
Posted By: BuffaloBFN
Date Posted: May-18-2009 at 2:38pm
|
I basically agree with Pete, but I did cut mine back a little further.
I found a 36 grit flapper wheel on the grinder to be handy at this point. The better your prep is now(smoother), the easier the new glass will go down. ------------- http://correctcraftfan.com/diaries/details.asp?ID=2331&sort=&pagenum=12&yrstart=1986&yrend=1990" rel="nofollow - 1988 BFN-sold "It's a Livin' Thing...What a Terrible Thing to Lose" ELO |
Posted By: KFD14
Date Posted: May-18-2009 at 3:35pm
|
Just ordered some supplies.
US Composites 8.5 oz glass tape 50 yds each 2" 4" 8" 80 yds 4" mat 8 Gallons Epoxy resin 1 gallon Carbosil and some rollers and pumps. I am starting here because I haven't decided how to do the floor yet - wood or glass. US Composites suggested 8.5 oz tape, does that sound right? BFN - I was going to smooth things down with that flapper disk also, mainly on the bilge side. ------------- %20http://www.correctcraftfan.com/diaries/details.asp?ID=4380" rel="nofollow - 83 2001 SN |
Posted By: KFD14
Date Posted: May-18-2009 at 3:43pm
|
Also, Mark suggested that instead of spending big $ on CPES that I could mix my own with resin and acetone at no more than 10%. Has any one done this - good or bad idea? ------------- %20http://www.correctcraftfan.com/diaries/details.asp?ID=4380" rel="nofollow - 83 2001 SN |
Posted By: KFD14
Date Posted: May-18-2009 at 7:05pm
|
Should I cut out the blocks on the transom that hold the platform and exhaust? They are wet/partially rotten. There were no problems holding the platform before. And if I reinstall with 5200 they might be fine??? ------------- %20http://www.correctcraftfan.com/diaries/details.asp?ID=4380" rel="nofollow - 83 2001 SN |
Posted By: newoldboat
Date Posted: May-19-2009 at 12:54am
| Seth, I'm doing the same repair. I found a grinding disk was great for removing the stringers. A sanding disc was better for grinding the paint off of the bilge area. Your sanding looks good, I used the sanding disc to remove some of the bare mat that you can see in your pics. It seems around the stringers they didn't use enough resin so I sanded off the bare mat that wasn't saturated from the factory. Hang in there, this job sucks but it is necessary. I don't know what rollers you bought but I have tried a couple and the Bodi aluminum rollers seem to be the best. I used the crappy plastic ones from west and they didn't last very long. Good luck! |
Posted By: nautiless
Date Posted: May-19-2009 at 4:49am
|
Good luck Seth. It's well worth it. My project is a bit further down the road and i'm getting pretty damn thrilled for summer....keep the end in mind while your hands go numb holding a grinder. ------------- 1982 SN 2001 RIP (Resto in Progress) http://www.correctcraftfan.com/diaries/details.asp?ID=4400 - Don's Diary |
Posted By: BuffaloBFN
Date Posted: May-19-2009 at 9:51am
|
On the CPES, a fellow can't be blamed for pushing his own product; but I think it's much more efficient to have the proprietary stuff ready for the next coat. I used a lot of it!
On the transom, that's your call; but if you have troubles there later you'll have to cut out a lot of new work to get at it. I think I replaced 3 of 5 in mine, and I soaked the 2 with cpes. ------------- http://correctcraftfan.com/diaries/details.asp?ID=2331&sort=&pagenum=12&yrstart=1986&yrend=1990" rel="nofollow - 1988 BFN-sold "It's a Livin' Thing...What a Terrible Thing to Lose" ELO |
Posted By: 8122pbrainard
Date Posted: May-19-2009 at 10:06am
|
Seth,
I sure would not take the chance on the transom wood reinforcements. The wood is already wet and it will rot. You're down in there now with the grinder and will have the resin/glass out soon so it's just logical to do it now. Yes, thinning resin with a solvent has been around for years. When the Grougon (sp?)brothers of West heard about it years ago they came out with a hugh warning. They are very concerned with the compatability of certain solvents with the epoxy resin. Personally I won't take the chance and will continue using the CPES. ------------- /diaries/details.asp?ID=1622" rel="nofollow - 54 Atom /diaries/details.asp?ID=2179" rel="nofollow - 77 Tique 64 X55 Dunphy Keep it original, Pete < |
Posted By: uk1979
Date Posted: May-19-2009 at 10:39am
|
Seth yes as Greg said a touch more grinding as you show in the pictures the part that goes from gray to pink has lifted from the hull, try a knife first and see if it lifts before you grind I found mine did.
As Pete has educated us water come in through the hull and my thinking is over the years each winter it will freeze and pry apart the joints along with the swelling of the wood and finally the rot sets in, this is how it works for us in colder parts. Your new way should stop all this. ------------- Lets have a go 56 Starflite 77 SN 78 SN 80 BFN |
Posted By: KFD14
Date Posted: May-19-2009 at 1:14pm
|
Buffalo - do you remember how much CPES you used??
UK - I'll take another look but I think that everything that is left is strongly bonded. But I don't want to take any chances either. Has anyone had any problems with the epoxy resin setting up in direct sun light - UV rays. I am doing all this out side and someone mentioned to me that the UV might affect the set up. I know it will change the cure time, just as long as it doesn't have any negative affects on the bonding properties or such. ------------- %20http://www.correctcraftfan.com/diaries/details.asp?ID=4380" rel="nofollow - 83 2001 SN |
Posted By: BuffaloBFN
Date Posted: May-19-2009 at 1:23pm
|
I used most of a 2 gallon kit. I also used pumps...makes it so much easier.
What Roger and I are talking about with the grinding is the heavy weave is the original hull, the multi-directional on top is what was used to glass the stringers in. I glassed everything directly to the hull; not to the stuff on top. ------------- http://correctcraftfan.com/diaries/details.asp?ID=2331&sort=&pagenum=12&yrstart=1986&yrend=1990" rel="nofollow - 1988 BFN-sold "It's a Livin' Thing...What a Terrible Thing to Lose" ELO |
Posted By: 8122pbrainard
Date Posted: May-19-2009 at 1:42pm
|
Seth,
The UV won't speed the cure rate but heat will. If you are mixing large batches then pouring the mixed epoxy into a roller pan will spread it out so the heat isn't concentrated in a small cup. You may want to go to a slower cure hardener too. The UV comment you caught may have been it's effect on cured epoxy on clear coats. It turns white with age from the UV. It has to have multiple clear coats with UV inhibiting in it such as a marine spar varnish. ------------- /diaries/details.asp?ID=1622" rel="nofollow - 54 Atom /diaries/details.asp?ID=2179" rel="nofollow - 77 Tique 64 X55 Dunphy Keep it original, Pete < |
Posted By: KFD14
Date Posted: May-19-2009 at 6:10pm
|
Buffalo - that's what I though initially. I wasn't sure if that layer might be strong enough to bond to or if it should be removed. I decided to stop here after Pete's comment on not grinding any more, but now I'm not so sure of that decision.
I don't think you can tell in the photos but the once original channel is now about twice as wide as before. Would you take it out to the width of the new glass - 4" on each side plus width of stringer so that it bonds directly to the hull?? ------------- %20http://www.correctcraftfan.com/diaries/details.asp?ID=4380" rel="nofollow - 83 2001 SN |
Posted By: BuffaloBFN
Date Posted: May-19-2009 at 6:36pm
I'll respond to this more a bit later, but I have to ask if you read through the pumpkin patch?!!? 
Like I said before...I basically agree with pete on this. The kicker is the amount of 'first timer' info in the patch. Read through it and even jot down some notes....and make sure to have a pot of coffee on standby. 
Please don't get me in a scrap with Pete...much of the 'first time' info came from him! ------------- http://correctcraftfan.com/diaries/details.asp?ID=2331&sort=&pagenum=12&yrstart=1986&yrend=1990" rel="nofollow - 1988 BFN-sold "It's a Livin' Thing...What a Terrible Thing to Lose" ELO |
Posted By: KFD14
Date Posted: May-19-2009 at 8:52pm
|
I have, maybe I muddled up all the info and don't remember those specifics.
I certainly don't want to get anyone into a scrap especially after reading the post on xmass tree studs. I'll make sure I read through the patch again, and again, and again.....
This thing is my baby and I don't want to f*#* it up so thanks to everyone for all the help so far and in the future. 
Cheers ------------- %20http://www.correctcraftfan.com/diaries/details.asp?ID=4380" rel="nofollow - 83 2001 SN |
Posted By: BuffaloBFN
Date Posted: May-19-2009 at 9:08pm
|
Cheers always!
I was being overly careful not to step on toes...some of us have been aroud here and have become as good of friends as one can be over a forum and the coconut telegraph. Others who have driven all the way south(or flown) have actually met me and would probably tell you to run! (2 jokes in there GL folks...maybe 3 )
You'll find that there is some resin poured in that has no glass in it...very brittle. The white fibers on the edge of you cutouts is glass that was never saturated. I figured the best structure was to go back to the foundation(which is super solid) and build up from there. Pete, feel free to fill in! ------------- http://correctcraftfan.com/diaries/details.asp?ID=2331&sort=&pagenum=12&yrstart=1986&yrend=1990" rel="nofollow - 1988 BFN-sold "It's a Livin' Thing...What a Terrible Thing to Lose" ELO |
Posted By: KFD14
Date Posted: May-19-2009 at 10:00pm
|
Okay, I'm starting to understand. I thought those fibers were just the glass exposing itself as I ground off the resin, thinking that the glass would go slower than the resin would.
Darn - I was so happy about 15 posts ago when I was "1/2 done" . I tell my self - I love to grind, I love to grind, I love to ...... ------------- %20http://www.correctcraftfan.com/diaries/details.asp?ID=4380" rel="nofollow - 83 2001 SN |
Posted By: 8122pbrainard
Date Posted: May-20-2009 at 11:30am
|
Seth,
I happened to be talking to Greg by phone yesterday and the conclusion was I need to go visit my eye doctor for a new set of glasses! Yes, do some more grinding untill you get closer to the matting/cloth in your hull. I went back and looked closer at your pictures and you have spots with quite a lot of resin on top. The resin is simply a glue to hold the fiberglass together. It's the glass that gives the hull strength as the resin is really pretty brittle. ------------- /diaries/details.asp?ID=1622" rel="nofollow - 54 Atom /diaries/details.asp?ID=2179" rel="nofollow - 77 Tique 64 X55 Dunphy Keep it original, Pete < |
Posted By: KFD14
Date Posted: May-20-2009 at 5:56pm
Is this more what we are after???


EDIT: the first one any way. It's so much easier for me to see it here in a photo than on the boat. ME thinks it's a pretty picture here - but a lot of grinding back in reality...... ------------- %20http://www.correctcraftfan.com/diaries/details.asp?ID=4380" rel="nofollow - 83 2001 SN |
Posted By: 8122pbrainard
Date Posted: May-20-2009 at 6:21pm
|
Seth,
Yes on the first picture. Greg - OK?? ------------- /diaries/details.asp?ID=1622" rel="nofollow - 54 Atom /diaries/details.asp?ID=2179" rel="nofollow - 77 Tique 64 X55 Dunphy Keep it original, Pete < |
Posted By: BuffaloBFN
Date Posted: May-20-2009 at 6:40pm
|
My glasses are in the shop. ------------- http://correctcraftfan.com/diaries/details.asp?ID=2331&sort=&pagenum=12&yrstart=1986&yrend=1990" rel="nofollow - 1988 BFN-sold "It's a Livin' Thing...What a Terrible Thing to Lose" ELO |
Posted By: critter
Date Posted: May-20-2009 at 6:44pm
|
I agree with Pete.
I would think that Seth should be able to lay a nice mat and epoxy mix for the Stringer in that 1st picture. Will want to lay a well soaked mat under that stinger to eliminate any voids. ------------- 1980 Ski Nautique 1966 Barracuda |
Posted By: critter
Date Posted: May-20-2009 at 6:47pm
|
Greg, get those glasses everytime Insurance will pay for a pair.... That way you have a pair at work, in the house, in the garage, and in the shop.
And Eric will thank you for it... ------------- 1980 Ski Nautique 1966 Barracuda |
Posted By: BuffaloBFN
Date Posted: May-20-2009 at 7:11pm
|
You're so bad Roger! LOL
Seth, I think you would have had a good repair before...now you'll have a better one! There's also an OCD quotient to be factored in.
The dust will tend to hide what you're looking at; if you haven't already, give the area a good wipe down with a wet rag. I actually rigged some scrap gutter under mine so I could rinse it out. ------------- http://correctcraftfan.com/diaries/details.asp?ID=2331&sort=&pagenum=12&yrstart=1986&yrend=1990" rel="nofollow - 1988 BFN-sold "It's a Livin' Thing...What a Terrible Thing to Lose" ELO |
Posted By: BuffaloBFN
Date Posted: May-20-2009 at 7:27pm
|
I just went back through the thread...did the stringers have glass under the cradle?
And cool fitting on the front of that port exhaust manifold! ------------- http://correctcraftfan.com/diaries/details.asp?ID=2331&sort=&pagenum=12&yrstart=1986&yrend=1990" rel="nofollow - 1988 BFN-sold "It's a Livin' Thing...What a Terrible Thing to Lose" ELO |
Posted By: KFD14
Date Posted: May-20-2009 at 9:26pm
|
Buffalo - ya they did.
Okay so 5 hrs of grinding and 5 35 grit disks and I have one side of the main (bottom of picture)down to what I think is solid.  ------------- %20http://www.correctcraftfan.com/diaries/details.asp?ID=4380" rel="nofollow - 83 2001 SN |
Posted By: KFD14
Date Posted: May-20-2009 at 9:29pm
|
Oh and are you talking about the elbow in the water line? It came that way to me... ------------- %20http://www.correctcraftfan.com/diaries/details.asp?ID=4380" rel="nofollow - 83 2001 SN |
Posted By: Gary S
Date Posted: May-21-2009 at 1:47am
Greg,I'm surprised that with the shortage of rain you had when you were doing your boat,that you just didn't take one off the house Up here we just wait until the 2 foot ice dam removes them ------------- http://www.correctcraftfan.com/diaries/details.asp?ID=1711&sort=&pagenum=1&yrstart=1966&yrend=1970" rel="nofollow - 69 Mustang HM SS 95 Nautique Super Sport |
 BuffaloBFN wrote:
Posted By: KFD14
Date Posted: June-15-2009 at 1:14am
|
More progress. Haven't updated the post for a few weeks but I have made some headway.
Dry fitting 

Every thing with CPES  ------------- %20http://www.correctcraftfan.com/diaries/details.asp?ID=4380" rel="nofollow - 83 2001 SN |
Posted By: KFD14
Date Posted: June-15-2009 at 1:18am
|
I now have all the pieces glassed together and put in the primary today.
Have a question, I have glassed the primary to the hull. Should I wait until that is curred to start the fillet? Do I need to wait for a cure at every layer or can I put it all together in the same day. The layers will be bond to hull, fillet, three layers of glass. I've never worked with fiberglass so any help would be appreciated. Cheers ------------- %20http://www.correctcraftfan.com/diaries/details.asp?ID=4380" rel="nofollow - 83 2001 SN |
Posted By: nautiless
Date Posted: June-15-2009 at 4:51am
|
Nice work. Keep it up! ------------- 1982 SN 2001 RIP (Resto in Progress) http://www.correctcraftfan.com/diaries/details.asp?ID=4400 - Don's Diary |
Posted By: 8122pbrainard
Date Posted: June-15-2009 at 9:49am
|
Seth,
Very nice work! I see some of Greg's methods have rubbed off on you with radiusing the edges. It does make it easier to lay up the glass. No you do not need to wait for each coat of epoxy to cure. Just wait for it to "kick" (set up). Acually, it's better to keep going because with just waiting for the kick, you will get a better bond. The feeling is you get more "chemical" bonding rather than a mechanical bond after the complete cure. ------------- /diaries/details.asp?ID=1622" rel="nofollow - 54 Atom /diaries/details.asp?ID=2179" rel="nofollow - 77 Tique 64 X55 Dunphy Keep it original, Pete < |
Posted By: BuffaloBFN
Date Posted: June-15-2009 at 10:02am
|
Very nice! ------------- http://correctcraftfan.com/diaries/details.asp?ID=2331&sort=&pagenum=12&yrstart=1986&yrend=1990" rel="nofollow - 1988 BFN-sold "It's a Livin' Thing...What a Terrible Thing to Lose" ELO |
Posted By: kapla
Date Posted: June-16-2009 at 8:45pm
|
nice... keep the pics comming.. what wood did you use..fir? sure looks nice..are you planning to refoam?
------------- <a href="">1992 ski nautique |
Posted By: KFD14
Date Posted: June-17-2009 at 1:59pm
|
Kapla - thanks.
I used #1 doug fir. I found a local mill that dries their wood to 8% then mills it. That way when it's all layed up it wont shrink and pull away from the glass. It was a lot more expensive than the construction grade stuff but worth it, I feel. I am planning on refoaming. I know it's a bit controversial but I have a young son and I think that the safety of floatation foam out weights the down sides. We'll see. I'm going to use ply in the front and glass the floor in the back - original. Cheers ------------- %20http://www.correctcraftfan.com/diaries/details.asp?ID=4380" rel="nofollow - 83 2001 SN |
Posted By: BuffaloBFN
Date Posted: June-17-2009 at 5:35pm
^^^ ------------- http://correctcraftfan.com/diaries/details.asp?ID=2331&sort=&pagenum=12&yrstart=1986&yrend=1990" rel="nofollow - 1988 BFN-sold "It's a Livin' Thing...What a Terrible Thing to Lose" ELO |
Posted By: critter
Date Posted: June-18-2009 at 12:01am
|
Seth, Looking good..
A comment on the foaming. I poured foam and then tried to cut it down close to the stringers using differnet saws. Could not get a clean cut. Gouged it and had to do some over. The saws bowed. I found that if I cut it down with the saw to about 1/2 above the stringers and then used my Beltsander to sand down to the stringer tops. I ended up with a nice clean finish with no gaps for water if it ever did find its wasy under the Glass and Floor. ------------- 1980 Ski Nautique 1966 Barracuda |
Posted By: BuffaloBFN
Date Posted: June-18-2009 at 9:13am
|
Along with what Roger said, I found a jitterbug to be the tool to get it close. I also used a belt sander, but it doesn't have a full surface bottom and wants to clog. For the final touch-up, use a straight and square 2x4 or the like and glue 60 grit paper to it...makes an excellent screed! ------------- http://correctcraftfan.com/diaries/details.asp?ID=2331&sort=&pagenum=12&yrstart=1986&yrend=1990" rel="nofollow - 1988 BFN-sold "It's a Livin' Thing...What a Terrible Thing to Lose" ELO |
Posted By: eric lavine
Date Posted: June-18-2009 at 9:32am
|
if? when ------------- "the things you own will start to own you" |
Posted By: 8122pbrainard
Date Posted: June-18-2009 at 9:39am
|
For leveling longer surfaces, I made two aluminum angles than bolt to the sides of my belt sander flush with the belt surface. Starting with the high spots then you can get down to the level of the stringer tops. The only problem as Greg mentioned you can't get into tight spots. A couple lengths of angle would help.
The 2x4 with the 60 is probably just as fast! ------------- /diaries/details.asp?ID=1622" rel="nofollow - 54 Atom /diaries/details.asp?ID=2179" rel="nofollow - 77 Tique 64 X55 Dunphy Keep it original, Pete < |
Posted By: BuffaloBFN
Date Posted: June-18-2009 at 10:05am
|
Talk about me over-engineering things?
After I saw how the screed worked to finish up the first side, I used it for most of the other. If the foam is poured in borderline low temps, it would't work so well. ------------- http://correctcraftfan.com/diaries/details.asp?ID=2331&sort=&pagenum=12&yrstart=1986&yrend=1990" rel="nofollow - 1988 BFN-sold "It's a Livin' Thing...What a Terrible Thing to Lose" ELO |
Posted By: KFD14
Date Posted: June-18-2009 at 1:18pm
|
Thanks everyone for the tips and encouragement. I'll try to remember the sanding tips for when the time comes. Currently I am only half finished on the stringer part. Got 2" glass tape on both main and secondary on the drivers side yesturday. I have the next nine days off. I think that after I get the 4" glass on the drivers side there will be enough rigidty to the hull to cut out the other side. Hopefully I can accomplish this and get them back in by the end of the month. The weather is starting to turn nice and my wife and I are getting anxious to get on the lake.
Cheers ------------- %20http://www.correctcraftfan.com/diaries/details.asp?ID=4380" rel="nofollow - 83 2001 SN |
Posted By: Cslaten33
Date Posted: January-03-2010 at 2:02am
|
How did everything turn out??? ------------- Thanks Clark Slaten |
Posted By: KFD14
Date Posted: January-16-2010 at 10:25pm
Well, I ran out of time before the snow hit the ground. I have all the stringers in, but that is it. I should be moving it to a heated garage in Feb and will be able to resume the work. Right now I'm working 90 hr weeks - no time for the restore  ------------- %20http://www.correctcraftfan.com/diaries/details.asp?ID=4380" rel="nofollow - 83 2001 SN |
Posted By: KFD14
Date Posted: May-08-2010 at 5:27pm
Well I'm back at it.


All stringers in with CPES, couple of layers of matt, fillet, 2" then 6" then 8" e-glass tape. Still have to finish some of the 8". Question - Should I do more than one layer of each or do I need to double up on the 6" and 8". Plan on final one or two layers of Biaxial on mains. ------------- %20http://www.correctcraftfan.com/diaries/details.asp?ID=4380" rel="nofollow - 83 2001 SN |
Posted By: bkhallpass
Date Posted: May-08-2010 at 5:34pm
|
Looks nice. I bedded the first main on my 82 today. Does not look as nice as yours yet, but I think it will look much better when the fillets are in.
I plan to use single layer of 2,4, 8 tape. Couple of layers over the top. FWIW. BKH ------------- Livin' the Dream |
Posted By: KFD14
Date Posted: May-09-2010 at 4:40am
|
Thanks BKH - After a long winter it's nice to be making some progress on it again.
Just wondering if those layers are going to be sufficent. Defaulting to the experts here for their advice. ------------- %20http://www.correctcraftfan.com/diaries/details.asp?ID=4380" rel="nofollow - 83 2001 SN |
Posted By: 8122pbrainard
Date Posted: May-09-2010 at 9:12am
|
I don't feel you need to double up except around the engine on the mains a couple feet forward and aft. ------------- /diaries/details.asp?ID=1622" rel="nofollow - 54 Atom /diaries/details.asp?ID=2179" rel="nofollow - 77 Tique 64 X55 Dunphy Keep it original, Pete < |
Posted By: KFD14
Date Posted: May-09-2010 at 1:56pm
|
Ya Pete. That's what I was thinking also. I'm guessing that the biaxial adds a lot of strength also. Will probably lay it up along the sides then cap them off with another layer of biax, on the mains any way. I think that the secondaries will be fine with the current layup. Especially after I build the floor. I am planning on taking that layup all the way from the floor down the side of the secondary to the hull, should be plenty of strength there. ------------- %20http://www.correctcraftfan.com/diaries/details.asp?ID=4380" rel="nofollow - 83 2001 SN |
Posted By: KFD14
Date Posted: May-09-2010 at 5:53pm
|
So I am planning on ordering the rest of my glass tommorrow. I am planning on foaming and then rebuilding the floor with glass, playwood under the front seats - like original.
I was thinking that the way to go is biaxial sandwiching matt. Do I have the right idea or is it a layer of matt with two layers of biax on top? Is this enough or do I need to do more layers? Do I even need the matt or can I go with two or three layers of biax? Thoughts... ------------- %20http://www.correctcraftfan.com/diaries/details.asp?ID=4380" rel="nofollow - 83 2001 SN |
Posted By: bkhallpass
Date Posted: May-09-2010 at 7:08pm
|
Problem is, you can't find epoxy mat. No one is making it. I'm told that regular mat is difficult to work with in epoxy as it falls apart. The mat is easier to shape around the stringers on the first layer, make the turns, avoid air bubbles, etc.
After talking with Joe in NY, and TRBenj, I am planning to do the first layer of floor, over the stringers, with a layer of 10 oz cloth. Hopefully, I can get a nice fit. Than I plan to do a couple of layers of Biax to build up thickness. These guys seemed to think that would be enough. BKH ------------- Livin' the Dream |
Posted By: KFD14
Date Posted: May-09-2010 at 7:26pm
|
Got ya, I didn't catch that the matt at US composites was not compatable with epoxy resin, Thanks. ------------- %20http://www.correctcraftfan.com/diaries/details.asp?ID=4380" rel="nofollow - 83 2001 SN |
Posted By: bkhallpass
Date Posted: May-09-2010 at 8:09pm
|
Hey Seth, I don't know if the mat is compatible. I am a relative neophyte with fiberglass, and I have not personally tried the mat with epoxy. It may work. I don't know.
What I do know is the in the past one could get mat for epoxy resin. It was stitched together, I'm told the stitching made it better to work with in epoxy. When I talked to US composite, they confirmed they can't get epoxy mat from anyone. They also suggested that regular mat could be hard to work with in epoxy. They steered me toward biaxial. If I had some mat, I'd probably try it on some test pieces and see how it works. In the little fiberglass work I have done in the past, I liked mat on the first layer and the last layer. As I said, it forms up more easily on the first layer, and it leaves a smooter surface than does cloth on the last layer. BKH ------------- Livin' the Dream |
Posted By: 79TiqueRebuild
Date Posted: May-09-2010 at 10:21pm
|
I got my mat from http://www.fiberglasssite.com/servlet/StoreFront - fiberglasssite
It went down good horizontal for the floor but not much fun for bends. Everything else came from us composites. Monty |
Posted By: KFD14
Date Posted: August-27-2010 at 2:19am
I've finally made some progress...slow progress...but it is progress.


I haven't decided if I need to put two layers of biaxial on the mains. They currently have a layer running up the sides then a cap that runs down to the intersection of the hull. That gives them two layers on the sides but only one layer bonding to the hull. Any thoughts, I know Pete said earlier that I should do two especially in the area of the motor mount. Is that the prevailing opinion? Thanks, Seth ------------- %20http://www.correctcraftfan.com/diaries/details.asp?ID=4380" rel="nofollow - 83 2001 SN |
Posted By: WakeSlayer
Date Posted: August-27-2010 at 3:15pm
|
I put a second complete cap down and onto the hull from well before the motor to well behind it. Bulletproof. I assume you ran layers of tape under that, too?
------------- Mike N 1968 Mustang |
Posted By: KFD14
Date Posted: August-27-2010 at 5:00pm
|
Mike, Ya - it's layered 2", 4"x2, 8"x2, biaxial up the sides, biaxial cap over top. I layed a wide layer of biaxial as the first layer and I would have to go really wide for a second layer to have any contact with the hull. I might have layed that first layer to wide. This is why I question the second layer. Everthing feels super bomber now, but I also don't want to f#@& anything up and have it all blow apart under a hard acceleration. Oh and two layers of matt between hull and stringers. ------------- %20http://www.correctcraftfan.com/diaries/details.asp?ID=4380" rel="nofollow - 83 2001 SN |
Posted By: Keeganino
Date Posted: August-27-2010 at 5:30pm
|
I double capped my mains with biaxial from the pylon back to about 6 inches past the tranny mount. So far so good. Your getting to the fun part- looks great! ------------- "working on these old boats may not be cost effective but as it shows its what it brings into your life that matters" -Roger http://www.correctcraftfan.com/diaries/details.asp?ID=4897" rel="nofollow - 1973 Skier |
Posted By: bkhallpass
Date Posted: August-27-2010 at 10:01pm
|
I only use 2,4,8 and capped with two layers of cloth. Obviously the boat is not back together yet, but those stringers are darned solid. BKH ------------- Livin' the Dream |
Posted By: bkhallpass
Date Posted: August-27-2010 at 10:05pm
|
P.S. Interesting, your secondary assembly is different than mine. Wonder if they change the stringers slightly from 82 to 83. On mine, there was no inside stringer at the secondary in the section beside the motor box. Like you, I put a piece in anyway, but I made it even with the secondary by the muffler section. It appears you set yours in farther. Might be a good idea as mine has only about 1/2 inch clearance on each side for the motor box to sit. BKH ------------- Livin' the Dream |
Posted By: KFD14
Date Posted: August-27-2010 at 11:59pm
|
I think the original build up was the same. I found that to be an area of significant deteriation when I pulled it apart. Plus I wasn't sure I could or wanted to re-create the build the factory did. In my lay up that area is actually open to the bildge with a drain. I don't think much water will get there but at least noe there is a way out. I made it as close as I could to the mains so there would be plenty of support for the motor box.
I also couldn't believe how much more solid my stingers felt after the first layer or biax. Like I said before they seem bomb proof. ------------- %20http://www.correctcraftfan.com/diaries/details.asp?ID=4380" rel="nofollow - 83 2001 SN |
Posted By: KFD14
Date Posted: September-02-2010 at 3:05am
|
Well I started the second layer of Biax on the mains. While waiting for some resin to cure I started cleaning up the battery box and cooler box. I realized I'm going to need to put a layer of glass on these as well. There are at least two places where they have worn small holes in the glass - that won't be water tight :) I am planning on using the bilge cote to paint them when done. THant way they will match the new bilge.
Question- the battery box has a large "port" style opening that used to go through the bulkhead. At first look I thought it was a vent but its not. Is this necessary? What was it intended for? If I don't need it I'm going to glass over the opening and do away with it. It's the largest round hole in the upper part of the box in the following photos. 
Guess I meant the middle part of the box 
 ------------- %20http://www.correctcraftfan.com/diaries/details.asp?ID=4380" rel="nofollow - 83 2001 SN |
Posted By: TRBenj
Date Posted: September-02-2010 at 11:17am
|
Very interesting. Joe's '83 battery box (which I am using in our BFN) had the same exact port in it. It looked a little hokey, so I figured it had been added later. I have no idea what its purpose would have been- the cavity the box sat in should have been filled with foam, so there wouldnt have been anything to access. Maybe it was utilized when the boat was being assembled?
I removed the port and glassed the hole shut... then cut a new one at the opposite end of the box and reinstalled it. Im using it as a drain access point, since that will be the lowest point of the hull (we are not refoaming). While youre reworking the box, give some thought to the other openings. We chose to go bigger on the battery cable conduit (3") to make it easier to get the cables and terminals through. We also couldnt come up with a battery box drain concept that I liked, so we ended up plugging that hole as well. ------------- |
Posted By: C-Bass
Date Posted: September-02-2010 at 11:40am
|
+1 on making the cable hole bigger. I'm not doing a rebuild, but I just installed some 2/0 cable a month ago and it was a major PIA to get both cables thru that hole. It eventually happened, but it wasn't easy.
As a side note...on our stock battery box...where does that drain lead to??? I've noticed it having about an inch of water in the bottom before and didn't know why this wouldn't have drained back to the bilge, as it was mostly dry. I'm sure I'm due for a rebuild of the floor stringers, etc... but won't start on that till winter of 2011. Is there something that would help this in the meantime? ------------- Craig 67 SN 73 SN http://www.correctcraftfan.com/diaries/details.asp?ID=6103" rel="nofollow - 99 Sport 85SN |
Posted By: gun-driver
Date Posted: September-02-2010 at 11:52am
|
Did your boat have an access port behind the battery box in the floor? My '85 had a port behind the box in the floor. The bulk head was right behind the battery box so there was no foam aft of there.
I assume it was to allow access to the vent hose's and/or the bottom pylon bolt. Maybe that's what it is for?? After looking at your demo pictures on the first page, it's definitely to allow access to the bottom of the pylon area. 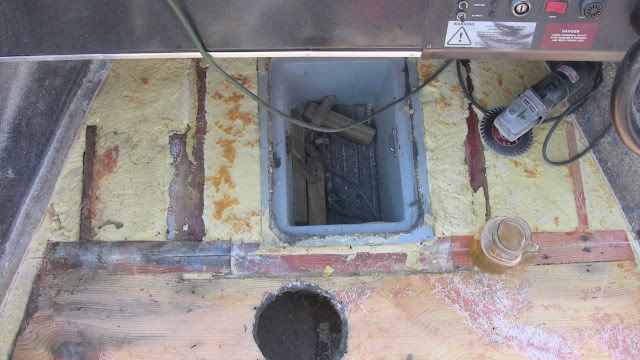
|
Posted By: KFD14
Date Posted: September-02-2010 at 1:25pm
My 2001 had the cooler option. As you can see in these photos the battery box, closest to the bulkhead, has that port built right into the bulkhead.


I'm not sure that it's for access as you could access everything from in front of the engine. Would have been much more difficult to access from the battery box than to just open the engine cover. ???? ------------- %20http://www.correctcraftfan.com/diaries/details.asp?ID=4380" rel="nofollow - 83 2001 SN |
Posted By: KFD14
Date Posted: July-28-2011 at 4:26am
Well it's been a while since I have updated this, really just started to make some progress again. So for any one that might have been interested here is an update. As you can see in the following photos I have finished pouring the foam and shaping it. I have dry fitted the front floor sections, I decided to use wood all the way forward. I don't really have a reason but it seems like it's going to work well. I have a little touch up to do and I need to CPES the wood for the floor but I should be laying the glass on the floor in a day or two. Time to pick out the carpet color !


 ------------- %20http://www.correctcraftfan.com/diaries/details.asp?ID=4380" rel="nofollow - 83 2001 SN |
Posted By: bkhallpass
Date Posted: July-28-2011 at 6:19am
|
Hey, it's the only guy on the site with a rebuild as slow as mine. However, you've taken a decided lead over me at this point. Looking good. BKH ------------- Livin' the Dream |
Posted By: 8122pbrainard
Date Posted: July-28-2011 at 9:56pm
|
Seth,
I hope you're CPES's that ply! Look'n fantastic!!!! ------------- /diaries/details.asp?ID=1622" rel="nofollow - 54 Atom /diaries/details.asp?ID=2179" rel="nofollow - 77 Tique 64 X55 Dunphy Keep it original, Pete < |
Posted By: KFD14
Date Posted: July-29-2011 at 12:50am
|
You know it Pete.
Brian, I told my wife it'd be done by her birthday. That's in June I just haven't specified what year :) I hope to have it on the water in September, any projections on yours?? ------------- %20http://www.correctcraftfan.com/diaries/details.asp?ID=4380" rel="nofollow - 83 2001 SN |
Posted By: dwcar
Date Posted: July-29-2011 at 1:28am
|
Looks great Seth. Cant wait to see her back on the water!! ------------- 83Ski |
Posted By: bkhallpass
Date Posted: July-29-2011 at 2:37am
Definitely before my daughter's 16th Birthday (she's 4 now). BKH ------------- Livin' the Dream |
Posted By: KFD14
Date Posted: July-29-2011 at 2:54am
 Nice, my son is 3......and she'll be shocked when you finished it early.. Nice, my son is 3......and she'll be shocked when you finished it early..  ------------- %20http://www.correctcraftfan.com/diaries/details.asp?ID=4380" rel="nofollow - 83 2001 SN |
Posted By: jlagrow
Date Posted: July-29-2011 at 2:35pm
|
Hey Seth, your foam looks great!! What aproach did you use to get it so level? I am getting close to foaming my Southwind. Did you get your foam from US Composite?
John ------------- 1976 Southwind 20 open |
Posted By: KFD14
Date Posted: July-29-2011 at 6:24pm
|
Hey John, Thanks. I actually bought the foam from two different members of this site. They had bought it and decided latter to go the no foam route - lots of pros and cons to both methods that have been discussed in great detail in other posts. It is the same foam that US Composites sells. I have two small kids and felt that the benefits out weighed the negatives.
I used a similar approach to leveling the foam that most others do. I first poured it then I cut it down with a hand saw. That brought it down to about the level I needed it but the saw being very flexible was a little hard to control, especially at the tip. I then attacked the high areas with an orbital sander. A belt sander would have worked better but I don't own one and my budget for the resto is about shot. So I took a section of 1x6 and stappled a piece of 50grit sandpaper to it. That worked really well. I did most of the rough work by sight then used a straight edge to work out the minute differences. I tried to leave the foam a little higher at the gunnel and slope it towards the bilge. It ended up not being much of a slope, maybe an 1/8" at most. I started the pour at the stern and worked forward. I did the rough cut there before I filled the bow. I used some of the cut offs to supplement the pour in the bow since that area holds the most foam. It took roughly two gallons per side and 1 1/2 gallons in the bow. US Compostes sells it by the pound. I don't remember what the conversion is but it came out to one gallon of each part A and part B per side and 3/4 of each for the front. I'll probably use most of the rest in the air box area and a couple of touch ups I need to do. I found that the trick with the foam was to use small amounts in warm temps, 80 degrees plus. Stir very rapidly for 25 seconds and pour. Make sure that you are ready because there is precious little time to do the pour once mixed. I used a stack of plastic party cups that I bought at the grocery store. They have a little line about an inch up from the bottom and I found I could use them multiple times before the sprung a leak or got to goupy to work with. The foam was kind of fun to work with as long as I had the area totally preped. It felt like the most rapid progression of the resto so far. Just remember that any thing it touches it sticks relentlessly to, skin, hair, clothes, side of the boat...you get the picture. Hope this helps. Oh ya I used the 2lb foam, I can't believe how solid it feels. Good luck. ------------- %20http://www.correctcraftfan.com/diaries/details.asp?ID=4380" rel="nofollow - 83 2001 SN |
Posted By: KRoundy
Date Posted: July-29-2011 at 9:12pm
|
Wow. You do great work. ------------- Previous: 1993 Electric Blue/Charcoal Ski Nautique Current: 2016 Ski Nautique 200 Open Bow |
Posted By: jlagrow
Date Posted: July-30-2011 at 7:49pm
|
Thanks alot Seth for the info on soing the foam. Have to say I'm alittle uptight about how much to mix, the quick pace of it, and trying not to leave any voids. Then getting it all leveled out like yours. I sure hope the Southwind turns out like yours. Realy NICE Seth! I'd post some pics but not sure how to on this site? ------------- 1976 Southwind 20 open |
Posted By: KFD14
Date Posted: July-30-2011 at 9:51pm
|
Thanks for the kind words. Don't loose to much sleep over it that stuff expands to fill pretty much any void.
There is a thread somewhere on this site about how to post pictures. If they are on your computer it's really pretty easy. Go into the full editor when you are going to post a reply. It's the button with the two white boxes with an arrow pointing up and to the right. Then hit the button with the tree and the upward pointing arrow. That will open a window that will let you browse to the location they are stored on your computer. Select and upload, just make sure that they aren't huge photos or it will take forever to up load and they will be hard to view in the forums. If you need more help do a seach for the post that I mentioned earlier. Everyone on this site loves photos and they love to help folks out so it might be worth your time. I have received invaluable advise throught this site, in large part due to the photos that I and others have posted. Good luck. ------------- %20http://www.correctcraftfan.com/diaries/details.asp?ID=4380" rel="nofollow - 83 2001 SN |
Posted By: KFD14
Date Posted: July-31-2011 at 12:50am
|
Any one have advice on a coating for my bilge. I have seen some folks have trouble with the interlux after using epoxy resin to do the glass work. I haven't seen any results from pigmented resin, how does that turn out? ------------- %20http://www.correctcraftfan.com/diaries/details.asp?ID=4380" rel="nofollow - 83 2001 SN |
Posted By: politicallycorrect
Date Posted: July-31-2011 at 12:24pm
Sorry this is a little bit of a hijack... Hey John, you need to get some pics of the southwind up, I'd love to compare with my 72. I've finally got most of the floor up and have been digging into the foam and finding tons of water. I'm planning on no foam(tims just another bfn rebuild thread is a great template!!!) To post pics click on post reply(not quick reply).Choose the picture button with the arrow. I've found I need to make them smaller to fit on here. http://www.shrinkpictures.com - photo resizing I've used that website to resize pictures to fit on here. Scott ------------- Skin grows back...fiberglass doesn't!! |
Posted By: jlagrow
Date Posted: July-31-2011 at 1:14pm
Here a few pics. This is my test run at uploading pics. If all goes well I"ll post some more. These Southwinds are great boats!!!
        ------------- 1976 Southwind 20 open |
Posted By: dwcar
Date Posted: July-31-2011 at 1:51pm
|
Nice work John. What part of Houston do you live in? What body of water do you boat on? ------------- 83Ski |
Posted By: bkhallpass
Date Posted: July-31-2011 at 3:00pm
|
A sandbagger. Almost done with the project and he posts his first pics. Looks good. BKH ------------- Livin' the Dream |
Posted By: jlagrow
Date Posted: July-31-2011 at 6:13pm
|
Still got quite a ways to go. I split the hull from the deck. That is going to take a little doing to mate them correctly again. Yoo know that the last 10% of the work is 90% of the time!
I live up in Magnolia. Move here 4 years ago from St. Louis MO where I used the Southwind on the mighty Miss. Never got the boat wet in TX. Planning on a spring launch in Lake Conroe. ------------- 1976 Southwind 20 open |
Posted By: 8122pbrainard
Date Posted: July-31-2011 at 6:28pm
|
John,
I have to ask why you split the deck from the hull? Yes, i agree that your work looks to be top shelf. Keep it up!! ------------- /diaries/details.asp?ID=1622" rel="nofollow - 54 Atom /diaries/details.asp?ID=2179" rel="nofollow - 77 Tique 64 X55 Dunphy Keep it original, Pete < |
Posted By: bkhallpass
Date Posted: July-31-2011 at 9:08pm
|
Looks like he has an open bow Pete. Would be b---- to get in there without splitting the hull. BKH ------------- Livin' the Dream |