Soggy rudder mount
Printed From: CorrectCraftFan.com
Category: Repairs and Maintenance
Forum Name: Boat Maintenance
Forum Discription: Discuss maintenance of your Correct Craft
URL: http://www.CorrectCraftFan.com/forum/forum_posts.asp?TID=13659
Printed Date: January-15-2025 at 9:50am
Topic: Soggy rudder mount
Posted By: 1000dollabill
Subject: Soggy rudder mount
Date Posted: May-13-2009 at 5:53am
|
removed my loose rudder port that was sealed with clear silicon. when i cleaned off all of the silicon and re-mounted the port (with 5200) I was actually pressing water out of the hull. I'm assuming it has already started rotting, so how do I fix this? The rudder is sturdy but I know this will be a problem. If I grind it down to see the core, how does one repair this area? Is it possible from the topside? the holes are filled with silicon from the PO. I'm sure I could manage the glass work, but exactly how do you replace the core?
Thanks Guys. |
Replies:
Posted By: 8122pbrainard
Date Posted: May-13-2009 at 9:36am
|
William,
Around the hole in the hull for the port there's plywood reinforcement that's been glassed into the hull. This is a extra piece that's glassed in after the hull is pulled from the mold. It's on the inside (bilge) so that's where you start. You'll need to pull the fuel tank and then grind/cut out the old glass over this plywood and put in new. This really is a pretty easy job so don't worry if you've never done it before. Plus, you know we're always around. I'd get to it as soon as possible before you do any hull damage - with the wet soggy wood, it's the hull doing most of the work. If you remounted less that about 3 days ago, pull the port now before the 5200 fully cures. Have you done any checking on the condition of other wood in the hull? Stringers? This would be a ideal time to bore some small holes through the glass covering the stringers and see what's going on. You'll have the epoxy resin and glass cloth out for covering them back up! ------------- /diaries/details.asp?ID=1622" rel="nofollow - 54 Atom /diaries/details.asp?ID=2179" rel="nofollow - 77 Tique 64 X55 Dunphy Keep it original, Pete < |
Posted By: BuffaloBFN
Date Posted: May-13-2009 at 10:31am
This will give you an idea of what's back there.
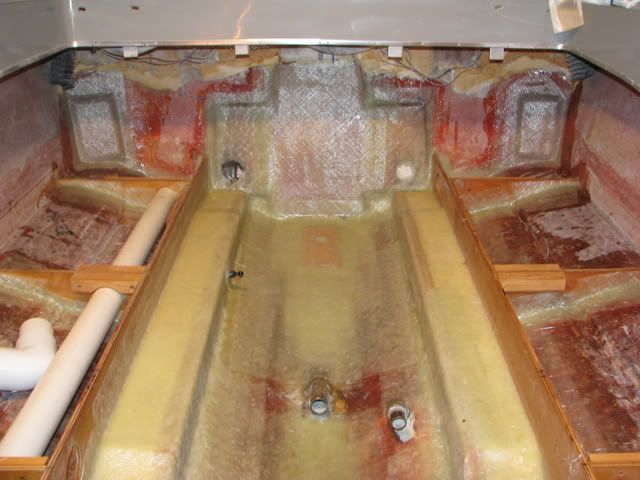 ------------- http://correctcraftfan.com/diaries/details.asp?ID=2331&sort=&pagenum=12&yrstart=1986&yrend=1990" rel="nofollow - 1988 BFN-sold "It's a Livin' Thing...What a Terrible Thing to Lose" ELO |
Posted By: 1000dollabill
Date Posted: May-13-2009 at 5:24pm
|
Stringers are rock solid. The 5200 is only on the bottom of the hull and it is pretty much already cured. what if the soggyness is all the way in the hull? how is that repaired? How is the plywood patch attached? Sorry for so many questions.
Thanks guys. |
Posted By: 8122pbrainard
Date Posted: May-13-2009 at 6:27pm
|
William,
The "soggyness is all the way in the hull" is because the plywood reinforcement (rotted and full of water) is between the hull and then glass layed up on the inside (bilge) to hold it in place and distribute the loading. See the picture Greg (BuffaloBFN) posted and you'll see the ply back next to the transom. The fix is not a patch but rather a repair. The old is cut/ground out back to the hull. New plywood is layed in and then glassed over. It will come out like new again! About a month ago, I was asked to help out with a wakeboader.com members problem. His prop shaft log had broke loose from his hull. He had never touched resin or glass so didn't know the first thing about how to go about repairing it. I walked him through it over the course of a couple of weeks. He would post pictures and I would feed him the steps from grinding out the old and then glassing it in again. He found the process pretty simple and now considers himself a fibergass repair pro!! We (all of us here on CCfan) can walk you through this if you decide to take on the repair. ------------- /diaries/details.asp?ID=1622" rel="nofollow - 54 Atom /diaries/details.asp?ID=2179" rel="nofollow - 77 Tique 64 X55 Dunphy Keep it original, Pete < |
Posted By: 1000dollabill
Date Posted: May-13-2009 at 10:34pm
|
I'm sure I can tackle it, but I'm super busy until sometime next week. I had the tank out yesterday, which gives me a clear shot to work on it. Thus far I have:
A 4" grinder 1 quart West System 105 Epoxy Resin 7 oz West System 206 Hardener 1 quart Acetone 1 quart white bottom paint. And a whole mess of tools. Will this work for the rudder re-enforcement? What else will I need? What size plywood? Mine looks like it currently has an 8"x8" piece there, but what thickness is normal? Which type of matting do I use? How do I prep the area the new glass attaches to? I might be getting ahead of myself but I'd like to knock this out as fast as possible, while having all of the information, materials, and tools in front of me. Thanks guys. P.S. If you have a link to a similar procedure I sure would appreciate it. I sure wouldn't like it if this took weeks. |
Posted By: BuffaloBFN
Date Posted: May-13-2009 at 10:53pm
|
The pic I posted is from this http://correctcraftfan.com/forum/forum_posts.asp?TID=9543&KW=pumpkin - thread . If you put 'stringers' in the seacrch engine above, you'll get a lot more good reading.
The rudder port in my boat was a 2x6 glassed into the hull like Pete was saying. The transom has ply glassed to the inside. It's a messy job, but it's as simple as cutting the old out with your grinder, prepping the area, and glassing in the new piece. Don't use pressure treated wood and enjoy the read!  ------------- http://correctcraftfan.com/diaries/details.asp?ID=2331&sort=&pagenum=12&yrstart=1986&yrend=1990" rel="nofollow - 1988 BFN-sold "It's a Livin' Thing...What a Terrible Thing to Lose" ELO |
Posted By: 8122pbrainard
Date Posted: May-14-2009 at 11:05am
|
William,
Most likely the ply that's in there now is 3/4" but you can confirm that when you grind it out. I highly recommend pretreating the ply with CPES before you start glassing it in. http://www.jamestowndistributors.com/userportal/search.do?freeText=cpes&page=GRID&history= - CPES I notice your list has white bottom paint on it. Do you mean bilge paint? All the work is in the bilge and not on the bottom. I'd use a couple layers of biaxial fabric (15oz) over the top of the ply and then a layer of regular 12oz. cloth. ------------- /diaries/details.asp?ID=1622" rel="nofollow - 54 Atom /diaries/details.asp?ID=2179" rel="nofollow - 77 Tique 64 X55 Dunphy Keep it original, Pete < |
Posted By: 79TiqueRebuild
Date Posted: May-15-2009 at 2:57am
Here is a picture of mine as I was removing it.

|