Stringer Templates
Printed From: CorrectCraftFan.com
Category: Repairs and Maintenance
Forum Name: Boat Maintenance
Forum Discription: Discuss maintenance of your Correct Craft
URL: http://www.CorrectCraftFan.com/forum/forum_posts.asp?TID=16015
Printed Date: September-24-2024 at 2:43pm
Topic: Stringer Templates
Posted By: 82 Nautique 1
Subject: Stringer Templates
Date Posted: December-09-2009 at 7:02pm
|
Does anyone know if someone that has done a stringer replacement project has created any templates for download or use ?
I am considering a stringer replacement project on a 1988 CC 2001 I recently purchased. OR ???? Does anybody do a complete job start to finish ?? COST ???? Thanks... Guy's & Gal's Dennis  ------------- Original Owner " Dennis" http://www.correctcraftfan.com/diaries/details.asp?ID=4855" rel="nofollow - 1982 Nautique |
Replies:
Posted By: TRBenj
Date Posted: December-09-2009 at 7:08pm
|
No one here has posted templates for a 2001. There are some drawings for Ski Tique stringers that would also work for the Skiers and Mustangs that used the same 16' hull, but even those arent perfect and will require some massaging to get perfect before installing.
The general consensus is that a quality stringer job will cost about $1500 or so in materials and about 200 hours of labor. Thats about a $5500 job- if you can find someone who does quality work for $20/hr.  Seriously, its very labor intensive- expect to pay close to $10k for a quality job. Seriously, its very labor intensive- expect to pay close to $10k for a quality job.
Your best bet is to read, read, read. Skibum, JoeinNY, gundriver, and a few others have done very nice writeups on their 2001 stringer replacement projects. ------------- |
Posted By: 8122pbrainard
Date Posted: December-10-2009 at 9:36am
|
Dennis,
Now that the cold is here (2 at O'hare now) and seeing you work involves managing a asphalt plant, you should have plenty of time to do this project. Tim is correvt that there is lots of info and many threads here on CCfan. Read up and ask questions if needed. The actual work isn't that complicated it just takes time. Many have done it without ever doing any glass work before and with just basic tools. Edit: Just went down to 1 at O'hare ------------- /diaries/details.asp?ID=1622" rel="nofollow - 54 Atom /diaries/details.asp?ID=2179" rel="nofollow - 77 Tique 64 X55 Dunphy Keep it original, Pete < |
Posted By: ryanowen
Date Posted: December-10-2009 at 11:47am
Dennis, I'd recommend just removing your stringers carefully and using them as templates. Having a template in advance of removing your stringers won't save you all that much time in the grand scheme of the project. I think you'll find that the cost will quickly exceed the value of the boat if you hire it done. Just plan on setting aside a lot of time if you do it yourself. Good luck! Ryan ------------- http://www.correctcraftfan.com/diaries/details.asp?ID=3284 - 1988 Ski Nautique |
 82 Nautique 1 wrote:
Posted By: Okie Boarder
Date Posted: December-10-2009 at 11:48am
|
Dennis,
You might take a look at my thread too. Eventhough it isn't a CC, it might give you some ideas. I'm doing a job like this for my first time and getting a lot of help along the way. Basic mechanical aptitude and tools is getting the job done. I spend a couple hours in the evening working on it and try to squeeze in a full day here and there on weekends. I seem to be making decent progress. Hope that helps. BTW, cutting the stringers carefully to use as templates helps. Also, I've been taking lots of measurements so I can duplicate without the template. Together it has been working well. Scribing helps too. |
Posted By: abolton
Date Posted: December-10-2009 at 3:50pm
|
I have just started a stringer job on my 78sn, I have all the foam dug out and one secondary stringer removed. Yesterday I bought the resin, 60' of 1-1/2oz mat and 30' of 18oz roving. That's enough to do all 4 stringers with a sched. lay up of mat/roving/mat completely encapsolating the stringers with 4" tabs on each side to laminate to the hull. The Stringers will be scribed and placed in a bed of thickened resen with a 3/4" filit radius for the tabbing. Nidacor composit for the secondary stringers, clear doug fir for the main stringers only because of the lagged in motor mounts. So far the fiberglass materials have cost me $200. I had a sheet of Nidacor left over from another project, but I need to buy a few sheets more for the flooring instead of plywood. I Hate Wood! too heavy and it rots anyway. My orig. wood stringers only had one layer of mat 3/4 the way up the sides and the tops where not capped. Pretty weak, stringers and bulk heads should be toataly encapsolated and roving should be used in addition to the mat. ------------- ABE |
Posted By: TRBenj
Date Posted: December-10-2009 at 4:06pm
That does not sound like the factory lay up to me- all the Correct Crafts Ive torn into have had glass all the way up the stringers. The mains have all been fully wrapped anywhere there wasnt a piece of wood floor installed directly over them (which would have been covered in glass again). Perhaps your boat has been restrung once before? Take a close look at the thickness of your layup- you'll want to at least match that of the factory, which ranged from 1/8" on up to 1/4" or 5/16". ------------- |
Posted By: abolton
Date Posted: December-10-2009 at 4:32pm
|
Yea, the Main Stringers are encapsolated, but the secondary ones where not. It is all orig. she is a virgin for sure...
I have a question - I would like to omitt the box down off the secondary stringer that forms the exhaust hose channel. It doesn't seem like it's a structual member. Your thoughts? ------------- ABE |
Posted By: TRBenj
Date Posted: December-10-2009 at 4:55pm
Are you talking about this buildup (circled in red)?
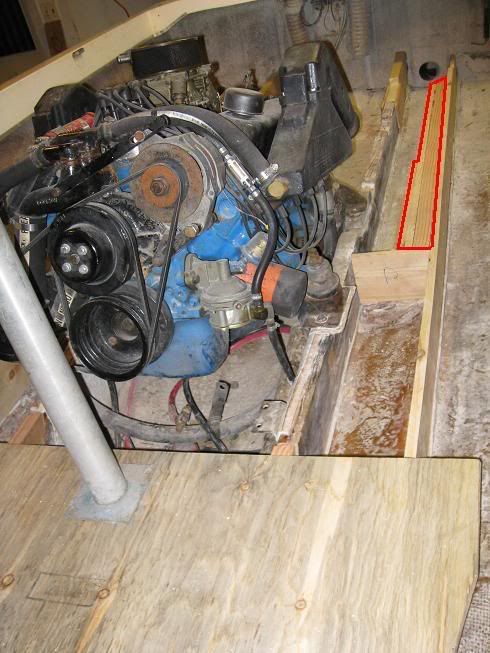
Im not sure I would say that the build up isnt structural. Notice that it happens to line up with one of the shorter/weaker sections of the primary stringer (under the rear mounts). Even if it isnt structural, its still pretty necessary, though. Notice that you need the full width of the pocket at the transom in order to give enough room to attach the exhaust hose to the thru-hulls. Also take a tape measure to your motorbox... notice that if the pockets are left full width, the box is too narrow to cover the channels completely. If you dont mind the front edges of the pockets showing through with the box closed, then you dont need them- otherwise, theyre necessary. ------------- |
Posted By: abolton
Date Posted: December-10-2009 at 5:07pm
|
Oh you are so right. I didnt think of the motor box since its not there...Da - well Nidacor will be a good choice for that one too. Sorry but I hate wood! I am reducing the hieght of the stringers by 3/4" (except motor mounts) for a full width floor also out of Nidacor. ------------- ABE |
Posted By: 8122pbrainard
Date Posted: December-10-2009 at 6:34pm
|
Abe,
I hope you got epoxy resin and not polyester. Also you didn't mention the CPES. Since you hate wood so much, you should be using them. BTW, I don't hate wood! Only one of my boats is glass! ------------- /diaries/details.asp?ID=1622" rel="nofollow - 54 Atom /diaries/details.asp?ID=2179" rel="nofollow - 77 Tique 64 X55 Dunphy Keep it original, Pete < |
Posted By: abolton
Date Posted: December-10-2009 at 7:52pm
|
I know - everyone is stuck on epoxy resin for a lot of good reasons, but its just needed if the job is done right. Why CPES? A good lay up sched. a fully encapsolated stringer and a dry bildge with bildge paint or colored resin will last a my lifetime. Most well done jobs fail because of a deck or through hull fitting that has let water infiltrate into the core material. Balsa core is especially prone to wicking and I have seen vast areas rot out from a few empty screw holes. ------------- ABE |
Posted By: Fl Inboards
Date Posted: December-10-2009 at 8:15pm
Why NidaCore? Take a look At Coosa. http://www.coosacomposites.com/nautical.html Also as far a Nautiques center or main stringers being fully encapsulated is not all together true as once the floor in front of the motor is removed you will find the tops of the stringers with no glass over them. ------------- Hobby Boats can be expensive when the hobbyist is limited on their own skill and expertise. 1993 Shamrock "fat" 20. 2008 Nautique 196 5.0 |
Posted By: inglesideshawn
Date Posted: December-10-2009 at 8:25pm
|
ive got all the measurements form my 89 stringer job if that will help..my 2cents are to plan on double what you think ill cost and and another hundred hours to it... dont forget the steering cable, prop,battery,new interior seat bases,bilge pump,fuel gage,hoses,exaust hoses....thats some of the why not stuff.... ohh and post pics.... ------------- 1989 nautique |
Posted By: TRBenj
Date Posted: December-10-2009 at 8:38pm
Isnt that what I said?
------------- |
Posted By: Fl Inboards
Date Posted: December-10-2009 at 9:00pm
|
Tim, Whats your point? Most of the floors that I have pulled up seem to find a large portion of the rot in front of the motor box. Currently we are doing a stringer job on a 84. At first look one would think their is nothing wrong with this boat as it was kept clean and dry for the most part, but wow how the foam traps water and causes problems. The stringer sustraite is absolute mud. SAY NO TO FOAM!!! ------------- Hobby Boats can be expensive when the hobbyist is limited on their own skill and expertise. 1993 Shamrock "fat" 20. 2008 Nautique 196 5.0 |
Posted By: 82 Nautique 1
Date Posted: December-10-2009 at 10:36pm
|
Yes, Being it is to cold to make asphalt, might as well start this 88 project. I have been reading lots of the information on several posts from previous projects.
One question I have and have seen it done both ways is. A. Do the secondary stringers 1 at a time B. Then do the Main stringers 1 at a time C. Replace the wood in front of the motor box D. Re glass over all areas. Another question I am unclear on is the importance of covering the replacement wood in front of the motor box with resin or sealer before placing down. I have the time, Just want to do what is best, yet easy as well. Thanks everyone for the information. It really helps. Dennis  ------------- Original Owner " Dennis" http://www.correctcraftfan.com/diaries/details.asp?ID=4855" rel="nofollow - 1982 Nautique |
Posted By: 82 Nautique 1
Date Posted: December-10-2009 at 10:39pm
|
Inglesidehawn.....
Could you send me the measurements you have for your 89 Stringer Job. I will try to remove and save at least the top section, however I would still need the height measurements as well. Thanks ------------- Original Owner " Dennis" http://www.correctcraftfan.com/diaries/details.asp?ID=4855" rel="nofollow - 1982 Nautique |
Posted By: 8122pbrainard
Date Posted: December-11-2009 at 9:13am
Polyester is hydroscopic and epozy isn't. CPES is such a low viscocity that it will soak into the wood. ------------- /diaries/details.asp?ID=1622" rel="nofollow - 54 Atom /diaries/details.asp?ID=2179" rel="nofollow - 77 Tique 64 X55 Dunphy Keep it original, Pete < |
Posted By: 8122pbrainard
Date Posted: December-11-2009 at 9:18am
|
Dennis,
I suggest CPES glass and resin on all wood. You can go lighter on the glass up front. ------------- /diaries/details.asp?ID=1622" rel="nofollow - 54 Atom /diaries/details.asp?ID=2179" rel="nofollow - 77 Tique 64 X55 Dunphy Keep it original, Pete < |
Posted By: 82 Nautique 1
Date Posted: December-11-2009 at 10:15am
|
How many layers of glass (and weight or type used)are people placing on the rebuilds ?
1.Over the Plywood floor in front of motor cover 2. From the plywood to the back (over stringers and foam) And guy's thanks for your help.... Your experience & opinions on this subject are a great help. I am also not clear on how you set the new stringers on edge against the hull. (do you brush down resin, place stringer and weight it down ? There has also been mention of colored resin ? How does one do that? Would a colored resin be better in the bilge than bilgecoat ? I know there is a lot of the above questions asked and answered in other forum posts, however it seems there are several people currently in the process of doing this type of work. Let's keep this alive. If it were not my love and pasion for my Correct Craft boat I would not even consider doing this work. Thanks everyone ------------- Original Owner " Dennis" http://www.correctcraftfan.com/diaries/details.asp?ID=4855" rel="nofollow - 1982 Nautique |
Posted By: abolton
Date Posted: December-11-2009 at 11:44am
|
1) On just the floor seal with Epoxy Resin, no glass cloth is needed.
2) You might deside not to re-foam... 2 layers of 1-1/2oz mat min. 3) Stringers are set in a bed of thickend resin or equal 4) Add a bit of gel coat (any color) to resin to get tinted resin 5) Epoxy colored resin would be great, most use bilgcoat for cost. ------------- ABE |
Posted By: ryanowen
Date Posted: December-11-2009 at 12:14pm
|
First off, keep in mind that I've only done this once. I hardly qualify as an expert, but I did just do it this summer so it's pretty fresh in my mind.
I used a biaxial for everything, so each of my layers were really one layer of mat and one of cloth. I think a lot of guys will use mat, then cloth, then mat and so on to build up thickness. I didn’t get overly hung up on how many layers, I just made sure it was as thick or thicker than the factory. I also made sure to really progressively build up the joints between the floor, stringers and hull. To set the stringers I left a little channel from the old stringers and filled it with a thickened resin compound. You can get it pre-mixed or just make it yourself with the resin you have and some type of thickening material. It had the consistency of drywall mud. Once the stringer was set, I just put some weights on it to hold it down. Gelcoat is the resin typically tinted. I think gelcoat is just a type of polyester resin. I had a batch of gelcoat tinted (for my bilge) to closely match the color of the outside of my boat (gray). Turned out pretty nice and it should stand the test of time. I don’t think you can gelcoat directly over epoxy, so keep that in mind. I used vinylester resin for my project. The main thing I tried to do was build it as good or better than the factory. For example, I capped the secondary stringers, completely covered the plywood floor section in cloth and fiberglassed the driver seat base to the floor rather than screwed it over carpet. The rusted out staples the factory used were replaced with stainless screws. As you pull it apart, it will quickly become apparent where they cut corners. ------------- http://www.correctcraftfan.com/diaries/details.asp?ID=3284 - 1988 Ski Nautique |
Posted By: abolton
Date Posted: December-11-2009 at 1:14pm
|
Well said:
I dug out all the foam last week and cut 1" above bottom for the channel like you did. I will pull one stringer at a time too, the secondary poped right out last night in one pc. so I have a nice template. I will post pictures soon. ------------- ABE |
Posted By: BuffaloBFN
Date Posted: December-11-2009 at 1:17pm
|
Here's my .02...and a lot of good info from the gang. It's a BFN, but the proceedures are the same.
http://correctcraftfan.com/forum/forum_posts.asp?TID=9543&KW=pumpkin&title=weeding-the-span-classhighlightpumpkin-span-patch - Weeding the Pumpkin Patch I used the biaxial as well(#1708? at US Comp) along with mat and cloth. The biaxial is a little tougher to work with but very strong when wetted in properly. I'm also a big advocate of CPES...good stuff! ------------- http://correctcraftfan.com/diaries/details.asp?ID=2331&sort=&pagenum=12&yrstart=1986&yrend=1990" rel="nofollow - 1988 BFN-sold "It's a Livin' Thing...What a Terrible Thing to Lose" ELO |
Posted By: 8122pbrainard
Date Posted: December-11-2009 at 1:36pm
|
If you opt for coating the bilge with resin instead of Bilgecoat, tinting agents are available for epoxy. White or gray. ------------- /diaries/details.asp?ID=1622" rel="nofollow - 54 Atom /diaries/details.asp?ID=2179" rel="nofollow - 77 Tique 64 X55 Dunphy Keep it original, Pete < |
Posted By: Okie Boarder
Date Posted: December-11-2009 at 2:06pm
|
I'm new to this as well, but you might be able to glean some information from my thread (eventhough it isn't a CC).
http://www.correctcraftfan.com/forum/forum_posts.asp?TID=15123&title=okie-boarders-floor-and-stringer-replacement - Okie Boarders Stringer Thread I am using CPES on all my wood. I am taking the stringers out one at a time and replacing them as I go. I also plan to have one whole side rebuilt with cross-supports and everything before I do the other side. To set my first stringer I used shims and 1x2 to lift the wood off the hull and also hold it in place. I then mixed up the thickened epoxy and "injected" it in the gap. For thickening the epoxy for bedding I used cabosil. For doing the fillets I used about 60% glass bubbles and 40% cabosil. That seems to be working fairly well. I plan to use biaxial for my stringers and mat on the plywood for the deck (floor) and I'm using all epoxy in mine. |
Posted By: BuffaloBFN
Date Posted: December-12-2009 at 12:05pm
|
For thickeners, mil fiber will add the most strength(cut up glass fibers). I also used talc(cheap) and cabosil, and micro bubbles in different combinations.
Don't use cabosil anywhere you think you want to sand! ------------- http://correctcraftfan.com/diaries/details.asp?ID=2331&sort=&pagenum=12&yrstart=1986&yrend=1990" rel="nofollow - 1988 BFN-sold "It's a Livin' Thing...What a Terrible Thing to Lose" ELO |
Posted By: 82 Nautique 1
Date Posted: December-12-2009 at 11:51pm
|
Started my project today... Wow..
Yes the most damage was in front of the motor box. The Main stringers were not glassed over the tops. ( I wonder why) It appears that the flex hoses for the clean air vents under the floor to the engine compartment failed. Any water entering the vents was captured in the foam. I have a couple questions. Oakie, Did you do the secondary stringer first, then the first main ? Also you stated you placed a wedge under the stringer and injected the filler ? Why did you nat place the stringers on the hull ? To hard to contour ? Will the filler be sufficient ? Someone stated they trimmed 1" above the hull, inserted the new stringer inside of the old fibreglass. Has anyone else did this. I think it would be best to remove all of the old?? Has anybody added additional alluminum supports under the wood seating area for support? I would think something could be made similar to the engine cradle. Thanks everyone for your help. Everyone's experience sure helps us newbees tackle this project. I have been taking pictures and will post as I go. ------------- Original Owner " Dennis" http://www.correctcraftfan.com/diaries/details.asp?ID=4855" rel="nofollow - 1982 Nautique |
Posted By: Wacko
Date Posted: December-13-2009 at 2:18pm
| Now answers to your questions but would love to see pics of your progress |
Posted By: 8122pbrainard
Date Posted: December-13-2009 at 2:37pm
I really don't feel this is needed nor a good idea. First, the wood for the seat support is plenty. The problem with the factory design is it got wet. With your epoxying the wood, this shouldn't happen. Second, if moisture did somehow get down there, I don't feel the aluminum would survive very long - white rust! Stainless wouldn't even like it. It needs to dry out occasionally to maintain the oxide barrier. The difference with the engine cradle is it's out in the open. Third, even though the bolt holes going through to the aluminum should be sealed with 5200, it's a potential leak. BTW, any fasteners going into the floor should be pilot drilled, CPES's, epoxied and then when driving the screw, 5200 sealed. If you want to beef up the floor at the fasteners, epoxy a extra layer of wood on the bottom like a 1x2. ------------- /diaries/details.asp?ID=1622" rel="nofollow - 54 Atom /diaries/details.asp?ID=2179" rel="nofollow - 77 Tique 64 X55 Dunphy Keep it original, Pete < |
Posted By: 82 Nautique 1
Date Posted: December-13-2009 at 2:43pm
|
OK, Thanks for the input on under floor strength.
Suplies purchased to work on removal aagain today. I am going to try to get 1 of the secondary stringers out today. Pictures to come later today...... ------------- Original Owner " Dennis" http://www.correctcraftfan.com/diaries/details.asp?ID=4855" rel="nofollow - 1982 Nautique |
Posted By: 82 Nautique 1
Date Posted: December-14-2009 at 2:34am
|
mailto:%20 - ------------- Original Owner " Dennis" http://www.correctcraftfan.com/diaries/details.asp?ID=4855" rel="nofollow - 1982 Nautique |
Posted By: 82 Nautique 1
Date Posted: December-14-2009 at 6:48am

Main stringers - Some rot started, Secondary stringers - more. Near the rear the secondaries that have the 3 sandwiched together appear to be the worst. Started cutting out secondary and had 1 heck of a time. Twords the front it was discolored, however the wood was very strong. Even cutting very close to the hull and prying up, it would not pull or pry out. Ended up getting a saws all and cutting entirely through to get it out. I am thinking my problems are not as bad as I originally thought. I will continue to remove the rest of the first secondary and prep for replacement. ------------- Original Owner " Dennis" http://www.correctcraftfan.com/diaries/details.asp?ID=4855" rel="nofollow - 1982 Nautique |
Posted By: 82 Nautique 1
Date Posted: December-14-2009 at 7:03am

Sorry, here is front of the engine ares where the tops of the stringers were not glassed and rotting has started ------------- Original Owner " Dennis" http://www.correctcraftfan.com/diaries/details.asp?ID=4855" rel="nofollow - 1982 Nautique |
Posted By: 82 Nautique 1
Date Posted: December-14-2009 at 7:36am
Port side----
I have since removed all the flooring and floatation forward of the engine, and from the drivers side to the rear. ------------- Original Owner " Dennis" http://www.correctcraftfan.com/diaries/details.asp?ID=4855" rel="nofollow - 1982 Nautique |
Posted By: 82 Nautique 1
Date Posted: December-14-2009 at 1:11pm
|
Ok, Need opinions here:
As I posted the secondary stringers were really bad near the doubled up area at the rear of the engine compartment. Probably 90 % of the stringer was in good shape and hard to get out (like new wood) Due to the fact of the failure mentioned, I am going to do the secondaries. How do people feel about cleaning up the main stringers where they were not encased, drill some holes perpindicular and inject CPES then brush the CEPS on the outside.... Then wrap in fibreglass lide the rebuild on the secondaries. Has anyone seen the secondaries be real bad and the mains be OK ?? Thanks for your opinions and ideas. Dennis  ------------- Original Owner " Dennis" http://www.correctcraftfan.com/diaries/details.asp?ID=4855" rel="nofollow - 1982 Nautique |
Posted By: 8122pbrainard
Date Posted: December-14-2009 at 2:06pm
Dennis, No!! No!! First the moisture is in the wood along with the fungus spores that cause rot. Without removing it, it will never dry out plus without a epoxy at the bottom of the stringers (remember it's not hydroscopic) moisture will continue to migrate through the hull into the wood. You need to get the wood out of there and start with new. The injection is a short term "band aid". Here's what will happen with epoxy injection. You will never get the wood completely saturated with the CPES and epoxy. The wood now that isn't epoxy saturated is sealed off next to the epoxy and will rot even faster! ------------- /diaries/details.asp?ID=1622" rel="nofollow - 54 Atom /diaries/details.asp?ID=2179" rel="nofollow - 77 Tique 64 X55 Dunphy Keep it original, Pete < |
Posted By: Okie Boarder
Date Posted: December-14-2009 at 3:11pm
|
Dennis,
I'm doing my stringers one at a time. I started with the secondary on the port side. That was removed and the hull was ground clean. The new stringer is in place and has been filleted. As I mentioned, I used shims to hold it up off the hull. The reason for this is you don't want the wood to rest on the hull...you want a gap. I filled that gap with the thickened epoxy and that "glued" it to the hull. I've now removed the port side primary and I'm almost done grinding the hull for that one. I'm really only a couple steps ahead of you. I agree with Pete. Since you're already tearing up a lot of the boat, just clean it all out and put new in. Otherwise you're going to be doing this again soon. Keep up the good work, you're coming along. |
Posted By: 82 Nautique 1
Date Posted: December-14-2009 at 3:31pm
|
Andy and Pete, Thanks for the advice. I ordered my materials from US Composits today, should be placing first new one in Thursday.
Are you using Douglas Fir for the Main Stringer ?? How far did you shim up the secondary, How far apart with the shims ? Any pictures?, please post or send to me @ dhbwg@mchsi.com At least I will have something to do while I take 3 weeks vacation starting Friday. I will post some more pictures later tonight. Dennis ------------- Original Owner " Dennis" http://www.correctcraftfan.com/diaries/details.asp?ID=4855" rel="nofollow - 1982 Nautique |
Posted By: 8122pbrainard
Date Posted: December-14-2009 at 3:48pm
|
Dennis,
I do know Andy is using Doug fir. I believe the shimming of his stringers is to level off the top surface to a finished height but he's using quite alot of filled epoxy! With careful scribing to to the hull shape, the amount of epoxy can be reduced. The important thing is to have the wood sit in a bed of epoxy taking up any minor gaps and sealing off the bottom side. A 1/16th to a 1/8" bed would be ideal. ------------- /diaries/details.asp?ID=1622" rel="nofollow - 54 Atom /diaries/details.asp?ID=2179" rel="nofollow - 77 Tique 64 X55 Dunphy Keep it original, Pete < |
Posted By: 82 Nautique 1
Date Posted: December-14-2009 at 3:51pm
|
Andy,
Are you using the pump measuring for blending your epoxy ? You mentioned 60% glass boubles & 40% Cabosil.... What quantities as far as pumps( If you are using the pump system) and how much filler do you add per batch ? ------------- Original Owner " Dennis" http://www.correctcraftfan.com/diaries/details.asp?ID=4855" rel="nofollow - 1982 Nautique |
Posted By: 8122pbrainard
Date Posted: December-14-2009 at 4:26pm
|
Dennis,
I highly recommend the mini hand pumps. You will need to get them with the proper ratio for the resin/hardener you are using. Then, there is no guess work or inaccurate measuring. One full pump from each gives you the proper ratio. If you are mixing large batches say for coating large areas, spread the resin out in a roller pan. If concentrated in a cup, the resin will "kick" prematurely. You'll end up with a very hot cup to the point where it will start smoking!! Use a plastic roller pan so the resin isn't concentrated in a small area building up the heat. Any resin still in it will break off when the pan is flexed the next day. ------------- /diaries/details.asp?ID=1622" rel="nofollow - 54 Atom /diaries/details.asp?ID=2179" rel="nofollow - 77 Tique 64 X55 Dunphy Keep it original, Pete < |
Posted By: 82 Nautique 1
Date Posted: December-14-2009 at 4:40pm
|
Pete,
Yes I ordered the pumps for measuring. Thanks for the tips and help. Just wanting to get what I need beforehand. All the information here has been tremendous. Dennis ------------- Original Owner " Dennis" http://www.correctcraftfan.com/diaries/details.asp?ID=4855" rel="nofollow - 1982 Nautique |
Posted By: Okie Boarder
Date Posted: December-14-2009 at 4:47pm
|
Dennis,
Yes, I'm using Doug Fir for everything I possibly can. Anything I don't use Doug Fir for will be Marine Grade Plywood. I put about 3 sets of shims along the entire length, plus I used 1x2 across the top in a few spots to attach the stringer to the nearby stringer to hold it in place. Pete is right, I used them the level the top and leave the gap at the bottom. My gap was more than it should be. I'm still learning the methods for scribing and cutting properly. I got the pumps from US Composites. The thing I don't like about them compared to the MAS brand pumps is they are just a 1 ounce per pump set up, instead of being metered to the ratio you want. I'm using the medium hardener so it is 3 pumps of resin to 1 pump of hardener. I'm using cups right now because I'm mixing small batches. The cups I got from US Composites also, and they have the measuring marks on them, so it helps verify the mixture. As far as mixing in the filler, you just keep adding filler until the mixture is the thickness you want. Usually peanut butter or frosting consistency works well. Here's some pictures that might help... 


|
Posted By: BuffaloBFN
Date Posted: December-14-2009 at 5:12pm
You just need a cheap compass set to the gap on the low side and then transfer to the other side. That's with the stringer clamped in place. Let the point ride on the hull(keeping the same orientation of the compass) and the pencil will show the material that needs to go. Also on Pete's suggestion, I picked up a hand planer and this was a good move! You'll have less material to remove than I did so a belt sander may work better. Another tip is to cut your blank a little on the 'too big' side and work to where you need to be...and check the fit often!  ------------- http://correctcraftfan.com/diaries/details.asp?ID=2331&sort=&pagenum=12&yrstart=1986&yrend=1990" rel="nofollow - 1988 BFN-sold "It's a Livin' Thing...What a Terrible Thing to Lose" ELO |
Posted By: 82 Nautique 1
Date Posted: December-15-2009 at 9:37am
|
1988 2001 SN Stringer update:
Starboard secondary removed. Rear 
Front 
I should have used previous advice and removed the engine & Tranny. I will do that today. Tired of climbing over and around it. Question: Is it important to remove all of the resin/fillet buildup from the sides of where I removed the stringer? Or can I just clean it up and set the new stringer in the bed of resin filler and glass back in ? Also, Between the stringers the factory sprayed or placed grey gelcoat (same as what is in the bilge) Does that need to be removed to the glass or can I just clean it and glass over it? I will also want to clean up the bilge and repaint with bilgecoat. ------------- Original Owner " Dennis" http://www.correctcraftfan.com/diaries/details.asp?ID=4855" rel="nofollow - 1982 Nautique |
Posted By: 8122pbrainard
Date Posted: December-15-2009 at 9:48am
No as it gives you a good reference point for stringer placement but, see below.
The gray is decorative and should be ground down until you see some glass where ever you will be laying new glass. The gray isn't very strong. ------------- /diaries/details.asp?ID=1622" rel="nofollow - 54 Atom /diaries/details.asp?ID=2179" rel="nofollow - 77 Tique 64 X55 Dunphy Keep it original, Pete < |
Posted By: 82 Nautique 1
Date Posted: December-15-2009 at 11:00am
|
Sounds good.
Thanks. I will wire wheel or clean to fibreglass inbetween the old stringers and in the bilge area. ------------- Original Owner " Dennis" http://www.correctcraftfan.com/diaries/details.asp?ID=4855" rel="nofollow - 1982 Nautique |
Posted By: abolton
Date Posted: December-15-2009 at 3:15pm
|
I too have my starboard secondary stringer removed! To cut the stringer out I used a 3" cut off wheel w/suction taped to the air hose. I cut the glass near the hull all the way around then the stringer just popped right out.
With the stringer out and 60" wide rolls of cloth in hand I found I didnt have room for a 12' long layout table. I cut and fit some scrap plywood over the stringers on the other side and it makes a great lay out table to put the old stringer on to use as a template. I use it to lay out the cloth, cut and wet it out. I hope to clean and grind and start making the replacement stringer tonight. ------------- ABE |
Posted By: Okie Boarder
Date Posted: December-15-2009 at 3:54pm
|
Looks like you are coming along nicely. I've been grinding mine down completely until I'm to fresh glass and resin. Usually I can see the coremat material underneath. The only place I'm not doing that is in the bilge. In the bilge I'm making sure I grind away the bilgekote and the top layer of mat. Under that is woven roving so I am trying to leave as much of that behind as I can.
My grinding tools of choice are a 4" electric grinder along with a 24 grit resin sanding disk. I'd agree on getting the engine out of there. I'd also try removing or covering as much other stuff as you can. That fiberglass dust gets on everything and coats it. Some items it can be difficult to remove. I found that out earlier this year when I did the shaft log on mine. |
Posted By: 82 Nautique 1
Date Posted: December-15-2009 at 4:44pm
|
OK guys I am kind of getting excited to get my fibreglass materials and CPES tomorrow or Thursday.
My question is when you started mixing your batch's of resin? I ordered the 3-1 pump system what size batch do you suggest starting to mix first time ? How much, filler of beads per batch? Do you guy's have pictures ? Is the 24 grit a special resin disk or just 24 grit sand paper ? Thanks ------------- Original Owner " Dennis" http://www.correctcraftfan.com/diaries/details.asp?ID=4855" rel="nofollow - 1982 Nautique |
Posted By: 8122pbrainard
Date Posted: December-15-2009 at 5:09pm
|
Dennis,
Start with small batches say a cup until you get a feel for the usage. When the fillers are added, the batch has the tendency to really grow!! When empty, you can just make more and even use the same mixing cup. The 24 grit is a resin bonded disk. Same as what you would buy for metal. ------------- /diaries/details.asp?ID=1622" rel="nofollow - 54 Atom /diaries/details.asp?ID=2179" rel="nofollow - 77 Tique 64 X55 Dunphy Keep it original, Pete < |
Posted By: Hollywood
Date Posted: December-15-2009 at 5:15pm
Pete, you may be further confusing him. I think Dennis is asking if there is a sanding disk to use "for" resin. So, the answer to his question I think is "just 24 grit sand paper". The sand grains are stuck to the paper by resin. You guys are talking about different resins - in the boat vs. in the sand paper. ------------- |
Posted By: abolton
Date Posted: December-15-2009 at 5:15pm
|
What have you found to be good for grinding on the filit radius where the channel meets the hull? My 4-1/2" disc is not flexible enough to do it... ------------- ABE |
Posted By: TRBenj
Date Posted: December-15-2009 at 5:17pm
Pete, like this?
 ------------- |
Posted By: BuffaloBFN
Date Posted: December-15-2009 at 5:35pm
|
For finer/finish prep work the layered sandpaper flapper disks are nice. The big boxes have them.
I just looked at an old one; made by norton and called a flap disk. ------------- http://correctcraftfan.com/diaries/details.asp?ID=2331&sort=&pagenum=12&yrstart=1986&yrend=1990" rel="nofollow - 1988 BFN-sold "It's a Livin' Thing...What a Terrible Thing to Lose" ELO |
Posted By: Okie Boarder
Date Posted: December-15-2009 at 5:38pm
I got those pint sized mixing containers from US Composites. They also sell them at Lowe's and I think Home Depot. When I mixed up the "glue" for bedding the stringers, I did 8 ounce batches and used just cabosil. When I mixed up the batches for fillets I did 4 ounce batches with the 60/40 mix of glass bubbles and cabosil. The filler isn't really a set amount, just keep adding it a little at a time until your mixture is the right thickness. You'll figoure out about how much after the first couple batches. The cabosil is really powdery and light and likes to cause a big mess. The glass bubbles are a little heavier and a little easier to deal with. The disk is a sanding disc that is 24 grit, like Hollywood explained. The sand is adhered to a thick paper disc with resin. Home Depot carries them in singles and Lowe's carries them in packs. I've been burning through about 10 per stringer so far. Here's a picture of one... 
|
Posted By: 82 Nautique 1
Date Posted: December-15-2009 at 6:44pm
|
Great, I was cutting out the stringer with the disk you are and was using some new type of sanding disk, don't remember the name ? I will take a picture of it. Cost like $8.00
I think the sandpaper will be a little more aggressive and give more control covering more area. I will give it a try. Thanks for the mix blends of the resin... gives me somewhere to start ------------- Original Owner " Dennis" http://www.correctcraftfan.com/diaries/details.asp?ID=4855" rel="nofollow - 1982 Nautique |
Posted By: abolton
Date Posted: December-15-2009 at 6:52pm
My question got lost in the shuffle...any solutions for grinding a 3/4" Radius at the old stringer channel? ------------- ABE |
Posted By: SNobsessed
Date Posted: December-15-2009 at 10:02pm
|
How about a 1-1/2" mounted stone bit powered by a hand drill? ------------- “Beer is proof that God loves us and wants us to be happy.” Ben Franklin |
Posted By: 8122pbrainard
Date Posted: December-16-2009 at 10:39am
Abe, You really shouldn't have that much of the old radius left even with saving some for a reference point and a spot to put the filled epoxy for bedding in the new wood. The flap disks may get in there as they will comform to some shapes but they wear out fast. A stone will get loaded up real quick. A flap wheel will get in there but it too will wear fast. I'd say go after what's left with the resin bonded disk. At a tangent to the radius a 4" disk will do it. Tim, I see your question has been answered regarding the resin bonded abrasive disk. Yes, the one that Andy pictured. ------------- /diaries/details.asp?ID=1622" rel="nofollow - 54 Atom /diaries/details.asp?ID=2179" rel="nofollow - 77 Tique 64 X55 Dunphy Keep it original, Pete < |
Posted By: abolton
Date Posted: December-16-2009 at 11:37am
|
Thank you, we have a Harbor Frt. here in town I will pick up some things. I just ordered all new skins and carpet from Christine's, and I'm working on getting new gauges from Livorsi S/W style ofcourse. I need to repaint the dash, restore the steering wheel and speedo's and re-chrome the Ski Nautique dash emblem. I hope to complete it with a new long block with the GT40 heads, a bit more cam and new carb. I love being on the Nautique year round, thats hard to do in Buffalo. ------------- ABE |
Posted By: Hollywood
Date Posted: December-16-2009 at 12:34pm
------------- |

Posted By: JoeinNY
Date Posted: December-16-2009 at 4:17pm
To me the issue of the stringers being glassed over the top comes down to how do you do that and still end up with a flat floor. With the wood to wood joint you simply sand down the stringers till they are flat and level, but to glass over you need to leave a predetermined gap and then add glass and then resand. Not a deal breaker with wood, but a lot more work and definitely harder to get perfectly flat. Certainly not something the factory was going to do, if someone else has worked out how to do it well I would interested to see it. When I did my mustang with non structural foam stringers I had to fully wrap them with many laminations for strength and because I was unwilling to sand through the layers of glass that I was relying on for structure I ended up with a very not flat floor. Coosa was my solution in the second set of stringers to get around this problem. Basically I glassed fully up the sides of the stringers, cut and sanded everything flush (making the tops of all stringers and supports that were going to have floor attached to them bare coosa on top), and then I would soak strips of fiberglass mat with thickened resin and place them on tip of the exposed coosa before putting the floor on top. I just didn't see another way to get a flat floor? Okieboarder if you are using those sanding disks and going through 10 a stringer you should really consider getting some flap disks. One diamond cutting wheel and 3 flap disks was the sum total of equipment I used to remove and grind the entire job on my 83 SN. Those tools produced better finish, cheaper cost, and quicker progress than previous methods which included combinations of sawzalls, bodys saws,grinder cutoff wheels, sanding disks, and the regular grinding disks. For any radius or cutout work I used the zip saw with flex attachment and mostly cartridge rolls, but also some with a 1 inch diameter flap disk drum. Many ways to skin a cat of course but with things that wear relatively quickly like the cutoff wheels and the sanding disks I find you spend most of the project working at less than ideal cutting speed, or stopping frequently to change disks/wheels. ------------- http://www.correctcraftfan.com/diaries/details.asp?ID=1477 - 1983 Ski Nautique 2001 1967 Mustang 302 "Decoy" http://www.youtube.com/watch?v=cO5MkcBXBBs - Holeshot Video |
Posted By: TRBenj
Date Posted: December-16-2009 at 4:44pm
Joe, flap discs look like this? Are these a home depot item?  ------------- |
Posted By: JoeinNY
Date Posted: December-16-2009 at 4:50pm
|
ThAt would be them, I buy them at a manufacturing supply place. They are commonly used in metal body working. Less pressure yields excellent control and a flat surface, more pressure and the will remove a ton of material quick. ------------- http://www.correctcraftfan.com/diaries/details.asp?ID=1477 - 1983 Ski Nautique 2001 1967 Mustang 302 "Decoy" http://www.youtube.com/watch?v=cO5MkcBXBBs - Holeshot Video |
Posted By: abolton
Date Posted: December-16-2009 at 5:41pm
|
To get a Flat Floor...
I have a 27' Magnum that has fully glassed stringers, how they did it was on each side of the stringer they glassed on L-tabs set slightly higher than the top of the stringer to attach the floor to. When Idid it I through bolted two 5/4 x 4 P.T. pcs. of wood the entire lgth. of the stringer set slightly higher than the top. I then screwed my floor into those runners. It makes for a nice flat floor just be sure to seal the through holes in the stringers and use Stainless Steel nuts and bolts. ------------- ABE |
Posted By: TRBenj
Date Posted: December-16-2009 at 6:36pm
Nothing listed at Home Depot, but Lowes shows that they have them. I assume go with the most aggressive grit that I can, right? http://www.lowes.com/lowes/lkn?action=productDetail&productId=178821-70-DW8308&lpage=none - DEWALT 36 Grit 4-1/2" Flap Disc ------------- |
Posted By: skfitz
Date Posted: December-16-2009 at 6:37pm
|
regarding abolton's post ^^^
Is it necessary to bond the floor to the stringers and hull for structural reasons? I initially considered using a bolt-down floor mounted on tabs bonded to the stringers (very easy, better sub-floor maintenance, and easy to get a flat floor), but then I began having concerns whether the stringer-floor-hull bond was necessary for structural integrity. |
Posted By: JoeinNY
Date Posted: December-16-2009 at 6:46pm
|
Tim, those are good disks, a bit pricey and 24 grit would be nice but 36 will certainly tear right through. Is there a http://www.harborfreight.com/cpi/ctaf/displayitem.taf?Itemnumber=44972 - Harbor Freight around. These go a little quicker but the price is right and they get the job done.
As to attaching the floor to the stringers, It depends on how you design the system. I am usually trying to get additional strength out of the system by tying together. Additionally these boats bang pretty hard through the waves, a boat constructed with a floor screwed down to the stringers instead of as one bonded piece feels, sounds, and performs differently than a nautique. ------------- http://www.correctcraftfan.com/diaries/details.asp?ID=1477 - 1983 Ski Nautique 2001 1967 Mustang 302 "Decoy" http://www.youtube.com/watch?v=cO5MkcBXBBs - Holeshot Video |
Posted By: TRBenj
Date Posted: December-16-2009 at 6:55pm
Well, as luck may have it there is- and they have a bunch in stock. I didnt even know H-F had retail stores. Good looking out, Joe! ------------- |
Posted By: JoeinNY
Date Posted: December-16-2009 at 7:01pm
|
Dont get me wrong the harbor freight ones are not what I would go with if you could get some good industrial quailty ones in the 6 dollar each range, but buy two packs of the harbor freight ones and you will go a long way. ------------- http://www.correctcraftfan.com/diaries/details.asp?ID=1477 - 1983 Ski Nautique 2001 1967 Mustang 302 "Decoy" http://www.youtube.com/watch?v=cO5MkcBXBBs - Holeshot Video |
Posted By: 8122pbrainard
Date Posted: December-16-2009 at 7:05pm
Not necessarily. I have found that a real coarse grit like the 24 wears out faster than say a 36. There are less abrasive particles the coarser you go so they get dull faster. I'd go with the 36. I don't get anything coarser than that anymore. The only advantage a 24 may have is with real soft materials. It won't load up as fast. ------------- /diaries/details.asp?ID=1622" rel="nofollow - 54 Atom /diaries/details.asp?ID=2179" rel="nofollow - 77 Tique 64 X55 Dunphy Keep it original, Pete < |
Posted By: TRBenj
Date Posted: December-16-2009 at 7:12pm
|
All good advice here. Looks like H-F has a bunch to choose from in the 24-80 grit range, so I may try a few different ones and see what works best. Lord knows Ill use them all eventually. Thanks guys! ------------- |
Posted By: BuffaloBFN
Date Posted: December-17-2009 at 11:54am
|
I also liked the 36 grit. We don't have a H-F around here so I got mine at Lowe's. They lasted a good while for the purposes Joe mentioned and leave a great finished surface. I think their only weak spot is that green glass clogs them up quick, but a quick buzz on rough concrete will usually clean them up. ------------- http://correctcraftfan.com/diaries/details.asp?ID=2331&sort=&pagenum=12&yrstart=1986&yrend=1990" rel="nofollow - 1988 BFN-sold "It's a Livin' Thing...What a Terrible Thing to Lose" ELO |
Posted By: 8122pbrainard
Date Posted: December-17-2009 at 12:47pm
Greg, I'm surprised you don't have one of these: 
They work great too. Plus, it saves the concrete!! ------------- /diaries/details.asp?ID=1622" rel="nofollow - 54 Atom /diaries/details.asp?ID=2179" rel="nofollow - 77 Tique 64 X55 Dunphy Keep it original, Pete < |
Posted By: 82 Nautique 1
Date Posted: December-17-2009 at 2:40pm
|
I have used the plap disk, they work well
Just need to be carefull when you get close to the original mat because it chews up the mat faster that the resin !!!!! I have found the thin disk, or diamond wheel cutting to about 1/8" above the original glass then grinding works well. I am trying to figure out the best way to confine/collect the dust ??? I purchased a floor attachment for my shop vac to place near grinding work... hopefully it will suck in most of the dust What do you others to to contain the dust ???  ------------- Original Owner " Dennis" http://www.correctcraftfan.com/diaries/details.asp?ID=4855" rel="nofollow - 1982 Nautique |
Posted By: WakeSlayer
Date Posted: December-17-2009 at 3:13pm
|
I am waiting til it is about 30 or 35* out and windy. I refuse to do this inside my shop. ------------- Mike N 1968 Mustang |
Posted By: 82 Nautique 1
Date Posted: December-17-2009 at 4:08pm
|
Well, I would not mind doing it outside but sub freezing Illinois prevents that this time of year.
I am doing it in my garage. Devil of a time keeping things clean. Fire up my portable heater and "GIT ER DONE" My wife did ask how much longer her new car had to sit outside ??? ------------- Original Owner " Dennis" http://www.correctcraftfan.com/diaries/details.asp?ID=4855" rel="nofollow - 1982 Nautique |
Posted By: TRBenj
Date Posted: December-17-2009 at 4:14pm
|
I wont grind inside anymore- it makes too much of a mess. Cold or not, the BFN is getting pulled outside this weekend to get the final hull grinding complete. ------------- |
Posted By: Hollywood
Date Posted: December-17-2009 at 4:27pm
|
Tarp off the sides, open up the garage door and setup a fan to blow outside. ------------- |
Posted By: WakeSlayer
Date Posted: December-17-2009 at 4:33pm
We did not even break zero on Tuesday. Some warm clothes under the tyvek suit make it not entirely unpleasant to do it outside. ------------- Mike N 1968 Mustang |
Posted By: 8122pbrainard
Date Posted: December-17-2009 at 6:26pm
And Charlie (Brady) has been outside on a roof for 2 weeks in the twin cities. Carharts and go to work!! His biggest problem is getting the acetylene to gasify and not spit liquid. He's running a big "rosebud" hard brazing 4" copper refrigeration lines/valves/manifolds for something like 400 tons of cooling!!! ------------- /diaries/details.asp?ID=1622" rel="nofollow - 54 Atom /diaries/details.asp?ID=2179" rel="nofollow - 77 Tique 64 X55 Dunphy Keep it original, Pete < |
Posted By: WakeSlayer
Date Posted: December-17-2009 at 8:06pm
|
Ouch. We were windy too. We have been throwing on the Carhart's just to feed the horses.... I cannot imagine having to work all day in these conditions. Although, it has been a balmy upper 20's today. Barely requires a jacket. ------------- Mike N 1968 Mustang |
Posted By: BuffaloBFN
Date Posted: December-18-2009 at 9:49am
|
Pete, that's one of those things I always forget to order. I haven't seen them for sale around here and somehow they always get forgotten. I did remember once and they were out!
For belts I turn them around and they self clean pretty well, and the 36 grit doesn't hurt the driveway much. ------------- http://correctcraftfan.com/diaries/details.asp?ID=2331&sort=&pagenum=12&yrstart=1986&yrend=1990" rel="nofollow - 1988 BFN-sold "It's a Livin' Thing...What a Terrible Thing to Lose" ELO |
Posted By: 8122pbrainard
Date Posted: December-18-2009 at 11:34am
It's nice that the belts have been coming through with the unidirectional splice in them for quite a few years but have you noticed they still put the direction arrow on them??? woodworker.com for the rubber cleaning blocks. BTW, I get so much from Woodworker's Supply that they've classified me in the "PRO" category. Different web site and pricing. I also have a Woodworkers Supply Visa card for the points! ------------- /diaries/details.asp?ID=1622" rel="nofollow - 54 Atom /diaries/details.asp?ID=2179" rel="nofollow - 77 Tique 64 X55 Dunphy Keep it original, Pete < |
Posted By: 81nautique
Date Posted: December-18-2009 at 12:33pm
It's not really fair Pete that you live a stones throw from both Owl Hardwood and a Wooodworkers Supply Store. Man when I make a trek to those places I have to put aside 3-4 hours besides the time I spend staring at all the cool stuff. I did just realize last week that I have a Harbor Freight store on my home from work, that could be a problem. ------------- You can’t change the wind but you can adjust your sails |
Posted By: 8122pbrainard
Date Posted: December-18-2009 at 2:03pm
Owl yes as it's on my way home but no with Woodworkers Supply. That's online ordering! You must be thinking of another woodworker type store. ------------- /diaries/details.asp?ID=1622" rel="nofollow - 54 Atom /diaries/details.asp?ID=2179" rel="nofollow - 77 Tique 64 X55 Dunphy Keep it original, Pete < |
Posted By: 81nautique
Date Posted: December-18-2009 at 2:52pm
Right you are, I was thinking of woodcraft in palatine. Usually my round trip will include both stops. ------------- You can’t change the wind but you can adjust your sails |
Posted By: Okie Boarder
Date Posted: December-19-2009 at 9:19am
|
I'll check out those flap disks and give one a try the next go round on grinding. I have the main stringer all done and bought the wood the other day, so it's ready to get shaped to be put in.
I've been fighting with the temperatures and the outside versus inside thing. I just decided since I was going to store some things under the boat and block it up, to leave it put, in the garage. I've been opening the front two car door and the back 3rd car door and that helps. Everything is still getting covered in the dust. I just finish grinding the stage I'm on and clean up, open up the garage and pull out the leaf blower to blow everything off. |
Posted By: BuffaloBFN
Date Posted: December-19-2009 at 10:11am
|
Here's one redneck solution I came up with Okie; I ran some scrap gutter from the bilge drain out to the driveway. This way it can be rinsed out on the inside anyway. I would avoid this meathod after new parts start going back in. Later, you'll just need a soapy rag for amine blush. Cleaning the garage is in the mice-type.
I've also read about someone using a small trickle of water while they were cutting(air tools). No arrows Pete. ------------- http://correctcraftfan.com/diaries/details.asp?ID=2331&sort=&pagenum=12&yrstart=1986&yrend=1990" rel="nofollow - 1988 BFN-sold "It's a Livin' Thing...What a Terrible Thing to Lose" ELO |
Posted By: 82 Nautique 1
Date Posted: December-19-2009 at 10:42pm
|
CPES Question ??
I have my first secondary stringer cut, dry fit, sanded and coated with a liberal amount of the CPES. How long do I need to let the CPES dry or cure out before laminating the stringer back together and installing. The CPES can said 1-3 days ?? Would that be for injecting it into wood or just coating as a sealer. If I have to wait 3 day's this will really slow down my progress. Need more planning I guess. I feel like I am gaining on this project
------------- Original Owner " Dennis" http://www.correctcraftfan.com/diaries/details.asp?ID=4855" rel="nofollow - 1982 Nautique |
Posted By: 8122pbrainard
Date Posted: December-19-2009 at 10:52pm
|
Dennis,
All you need is to let the solvent flash off. This can be as short as a couple of hours if your working in a warm dry area. The solvent is used to reduce the viscosity of the CPES epoxy resin/hardener so it will penetrate. Once the solvent is gone, the normal exothermic reaction takes over curing the epoxy. That doesn't need air so even coated with more epoxy the CPES will continue to cure. ------------- /diaries/details.asp?ID=1622" rel="nofollow - 54 Atom /diaries/details.asp?ID=2179" rel="nofollow - 77 Tique 64 X55 Dunphy Keep it original, Pete < |
Posted By: 82 Nautique 1
Date Posted: December-19-2009 at 11:01pm
|
Great,
Thanks for the quick reply, Now I can keep moving forward 
------------- Original Owner " Dennis" http://www.correctcraftfan.com/diaries/details.asp?ID=4855" rel="nofollow - 1982 Nautique |
Posted By: BuffaloBFN
Date Posted: December-20-2009 at 3:35pm
|
Pete's always got all that fancy info! Put in terms meant for mortal men, you can re-coat when it's dry to the touch. I went with a minimum of 4 coats with more on end grain. Where it was practical, I even stood pieces on end so gravity would be my friend. ------------- http://correctcraftfan.com/diaries/details.asp?ID=2331&sort=&pagenum=12&yrstart=1986&yrend=1990" rel="nofollow - 1988 BFN-sold "It's a Livin' Thing...What a Terrible Thing to Lose" ELO |
Posted By: abolton
Date Posted: December-22-2009 at 12:02am
|
%20 - ------------- ABE |
Posted By: 82 Nautique 1
Date Posted: December-22-2009 at 12:08am
|
Stringer update on the 1988 nautique.....
Driver side stringer bedded in glass on Saturday night, Sunday I removed port side fibreglass flooring, foam, and cut out the stringer and ground the fillets on the edge. ( Dewalt grinder with the sandpaper worked best) I made a box chute for the shop vac to connect to. I placed this box in front of the grinder and it captured quite a bit of the grinding and sanding dust. Today I cut the stringer, dry fit it " I lost count how many times I climbed in and out of the boat" and placed 4" fibreglass strip, 2" strip on top of this, Epoxy on bottom of stringer and set it in place. I weighted the stringer down with bricks, then ended up putting kicker 1 by lumber against the garage rafter and top of the stringer. I placed a tarp over the boat and placed a small electric heater under the tarp to keep the temperature around 80. I ordered some 4/1 faster setting epoxy today, as the 3/1 takes so much time to set up. I am trying to speed up the stringer replacement and bedding some. I am starting to understand how the cost of stringer/floor replacement can be so high if hired done. Actually I am enjoying doing the work, and am looking forward to moving onto the main stringers
I will take some pictures of the in place secondaries tomorrow. Storm to hit the midwest (Illinois ) next 2-3 days. I guess I will continue to hunker down in my man cave with my Correct Craft. Dennis ------------- Original Owner " Dennis" http://www.correctcraftfan.com/diaries/details.asp?ID=4855" rel="nofollow - 1982 Nautique |
Posted By: abolton
Date Posted: December-22-2009 at 12:48am
  Look Mom - No Wood Look Mom - No Wood------------- ABE |
Posted By: abolton
Date Posted: December-22-2009 at 12:51am
Dry fit complete, looks like I will need some help from you guys to post pics - sorry I cant figure it out any better than this for 2nite, If you can help I could e-mail better pics. I do intend to use Doug Fir for the main stringers only because I don't want to fab up L-angles for engine mounts. ------------- ABE |