Float switch for my bilge pump
Printed From: CorrectCraftFan.com
Category: Repairs and Maintenance
Forum Name: Boat Maintenance
Forum Discription: Discuss maintenance of your Correct Craft
URL: http://www.CorrectCraftFan.com/forum/forum_posts.asp?TID=17671
Printed Date: September-28-2024 at 12:47pm
Topic: Float switch for my bilge pump
Posted By: srbranum
Subject: Float switch for my bilge pump
Date Posted: May-22-2010 at 4:49pm
|
I can't believe I cannot figure this out even after writing down how it was wired before I took the old ones out.
Can anyone tell me how to wire my Attwood 800 bilge pump and the pictured float switch? Each device has two wires but the wires on the float switch are the same color which is throwing me off. I just have a bilge on/off switch on the dash. Need help asap because it is getting in the way of everything else. Thanks, scott  ------------- I have to keep her running 'cause I can't afford a new one |
Replies:
Posted By: eric lavine
Date Posted: May-22-2010 at 5:17pm
|
the switch should be a three position switch with the middle being neutral, one position power all the time to the pump to turn on manually and then power thru the switch on one leg with power when unattended. the float is merely an on/off switch. some pumps have three wires and its been a while so there may be an inconsistancy in this post ------------- "the things you own will start to own you" |
Posted By: srbranum
Date Posted: May-22-2010 at 5:22pm
|
I will look in to it. But, I had it wired up before the rebuild with this same float switch but a different pump and it worked fine. That pump had two wires like my new one. The switch on the dash is original and it too was working last year.
I basically have two wires on the pump, two on the float and an on off on the dash. knowing this, what do you think? ------------- I have to keep her running 'cause I can't afford a new one |
Posted By: eric lavine
Date Posted: May-22-2010 at 5:32pm
|
good ground? i dont want to confuse you because im a little confused also. i would ohm the switch for continuity flowing thru it then put 12 volts to the pump and make sure that works. checking the switch in the up and down position. ------------- "the things you own will start to own you" |
Posted By: 8122pbrainard
Date Posted: May-22-2010 at 5:45pm
|
Scott,
Hot to the dash switch same as before. Then to the float switch same as before. Connect to ether wire on the float. Other wire on the float to the pump wire marked positive (hot). Other wire on the pump will be ground. ------------- /diaries/details.asp?ID=1622" rel="nofollow - 54 Atom /diaries/details.asp?ID=2179" rel="nofollow - 77 Tique 64 X55 Dunphy Keep it original, Pete < |
Posted By: srbranum
Date Posted: May-22-2010 at 5:56pm
|
Eric,
See my post to Pete. Going outside and try everything. Thanks again, will let you know tonight. scott ------------- I have to keep her running 'cause I can't afford a new one |
Posted By: srbranum
Date Posted: May-23-2010 at 1:09am
|
Here is a picture of the bilge pump switch from the backside. Its the far switch on the right. Btw, the fuse is not blown. It's the switch with the yellow wire pointing left and the yellow connector on the right. The three wires on the switch are:
The small yellow wire leads to the bilge pump area The large yellow connector also goes to the bilge pump area and The dark colored wire in the middle goes upward to the fuse link. Where is the source of power? Did I take something off and forgot to put it back? I pull the switch but nothing comes on. I straight wired it to the battery and it works fine. scott  ------------- I have to keep her running 'cause I can't afford a new one |
Posted By: srbranum
Date Posted: May-23-2010 at 2:19am
When you say "hot to the dash....do you mean the hot wire on the bilge pump or a separate hot wire? Do you mean for me to get a "hot" wire to the dash bilge pump switch somehow because I don't see one now. Also, when you say "other wire on the float to the pump wire marked positive(hot),....is this the Hot wire you mentioned in the first sentence above? I going to kill this beast yet.........just need a big enough weapon. ------------- I have to keep her running 'cause I can't afford a new one |
 8122pbrainard wrote:
Posted By: OverMyHead
Date Posted: May-23-2010 at 2:27am
|
Do you have a meter? I had similar problems. I started with the black meter lead on the negative battery post and followed power with the red lead from the swith then to the pump. If that checks out move negative prob to the pumps neutral wire and check again. Turns out I had a wire slip off the manual mode switch, and had the hot leads mixed up to the pump. Confused and frustrated me. go to the basics. ------------- For thousands of years men have felt the irresistible urge to go to sea, and many of them died. Things got better after they invented boats. 1987 Ski Nautique |
Posted By: OverMyHead
Date Posted: May-23-2010 at 2:39am
|
Is there only one switch? It looks to me like the float mode ( yellow) is wired to the hot leg of the switch and should always be on when the accessory switch is hot, the brown would be the manual mode and wired through the switch. The neutral would takes a seperate path to the negative bus. Warning, I am a fair amature electrition but no expert.. ------------- For thousands of years men have felt the irresistible urge to go to sea, and many of them died. Things got better after they invented boats. 1987 Ski Nautique |
Posted By: srbranum
Date Posted: May-23-2010 at 10:23am
|
The switch is an original two position switch and is either pulled out(on and running) or in(Off). The instructions call for a three position switch but I had it wired with my switch before so I know it can be done, just did not make good enough notes.
The small yellow wire you see and the wire with the large yellow connector are not connected to anything at this point. They both run to the bilge area and were cut before my rebuild started. They head left in the picture and run down the access hole beneath the dash. Their is a constant power source wire also in the bilge area that was cut and it runs to the base of the amp meter. It was also a part of the puzzle before all the cutting took place. I have learned to never remove anything until I have it videoed or written down in detail before the repairs start. ------------- I have to keep her running 'cause I can't afford a new one |
Posted By: 8122pbrainard
Date Posted: May-23-2010 at 10:39am
|
Scott,
Power comes off the hot feed under the dash, to the fuse and to the switch. Thats the purple wire. Since you have two wires going to the bilge, you have both a "automatic" and "manual" mode of running the pump. The yellow wire on the switch is hot all the time so it goes to the float switch and then from the float switch to the pump. This is the automatic mode. The brown wire with the oversize yellow sta-con connector on the dash switch goes directly to the pump by passing the float switch. This is for the manual mode. Scott, If you ever have any electrical problems in your home, call a electrician!!!!   ------------- /diaries/details.asp?ID=1622" rel="nofollow - 54 Atom /diaries/details.asp?ID=2179" rel="nofollow - 77 Tique 64 X55 Dunphy Keep it original, Pete < |
Posted By: srbranum
Date Posted: May-23-2010 at 10:49am
|
Scott, If you ever have any electrical problems in your home, call a electrician!!!! [/QUOTE]
How did you know??? I did in fact call to have additional outlets put in my house and of course a new A/C unit was off the charts out of my league. If I can't fix it today, I may just have to do what the three stooges did when water came in their boat.........take a big drill and make another hole for the water to go out ------------- I have to keep her running 'cause I can't afford a new one |
Posted By: srbranum
Date Posted: May-23-2010 at 12:02pm
|
Pete,
Heading to church now. Went out there and looked at the contact point behind the fuse link. See if I have this figured out or close: There is a wire that goes from the AMP meter to the side of the fuse contact. A brown wire then goes from the fuse to the side of the bilge switch. Are you saying my power is coming from the amp meter to the fuse then to the switch? I will at it again about noon. Bought a cheap meter to see if I have power. Will let you know what happens. scott ------------- I have to keep her running 'cause I can't afford a new one |
Posted By: 8122pbrainard
Date Posted: May-23-2010 at 12:11pm
Yes, the amp meter connection is the hot source. Then to the fuse and then to the switch is the correct wiring. ------------- /diaries/details.asp?ID=1622" rel="nofollow - 54 Atom /diaries/details.asp?ID=2179" rel="nofollow - 77 Tique 64 X55 Dunphy Keep it original, Pete < |
Posted By: srbranum
Date Posted: May-23-2010 at 4:56pm
------------- I have to keep her running 'cause I can't afford a new one |
Posted By: 8122pbrainard
Date Posted: May-23-2010 at 6:41pm
|
Scott,
Both. In auto mode, the float switch turns it on and off. In manual, you pull the dash switch to turn it on. ------------- /diaries/details.asp?ID=1622" rel="nofollow - 54 Atom /diaries/details.asp?ID=2179" rel="nofollow - 77 Tique 64 X55 Dunphy Keep it original, Pete < |
Posted By: srbranum
Date Posted: May-23-2010 at 8:02pm
|
Thanks Pete but I am beginning to think I will never get this thing fixed.
I wired everything up like you said, got my tester out to check for power at each connection. All connections showed a light but when you pull the switch out, nothing happens. If you lift the float switch up, nothing happens. I even changed the wires from the bilge switch to the "misc" switch right beside it thinking the bilge switch went bad..........same thing, nothing. If you straight wire it from the battery bypassing the switch, it works. Its over my head, I will have to call somebody to try and come over to my house. So, I then switched to putting the floor in. Easy right? Just put the exhaust in, connect all the hoses and screw the floor down. NOT!!! For the last two hours, I have been trying to get the exhaust hoses hooked up to the metal straight pipes and for some reason, nothing wants to bend like I need it to. One end of the straight pipe won't even go in to the exhaust hose..they are both 3" so I am stumped. Nothing lately has been anything close to easy and I am getting pretty sick of the whole thing 
Don't know which direction to go now. Callaway gardens is looking like an impossibility. I am hating this project in the worst way now. ------------- I have to keep her running 'cause I can't afford a new one |
Posted By: OverMyHead
Date Posted: May-23-2010 at 8:39pm
|
Scott, I hope its not this simple but the way you are wired you will only get power to both modes with the Ignition on or in the accesory position. If you want to have it run in auto all the time that lead would have to be hot wired to the battery ------------- For thousands of years men have felt the irresistible urge to go to sea, and many of them died. Things got better after they invented boats. 1987 Ski Nautique |
Posted By: 8122pbrainard
Date Posted: May-23-2010 at 8:56pm
Dave, Scott says the feed is off his amp meter so it should be hot all the time. Scott, Do you have a fax? I could draw you a picture and fax it to you. Sorry but I can't do it on the computer!! 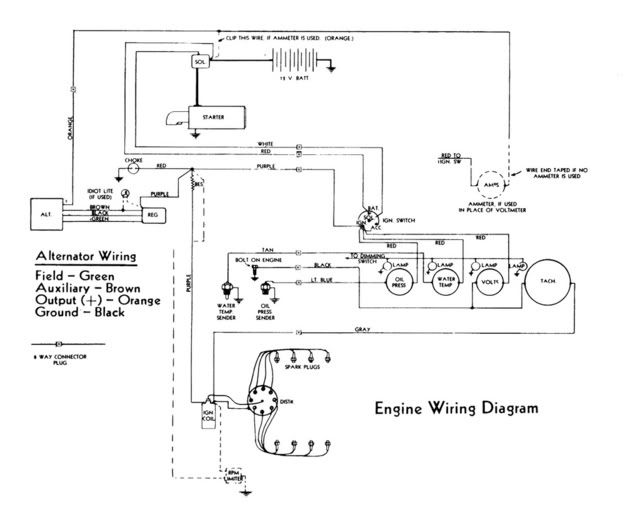
Scott, Lets' go back to the switch in the dash. Do you have power there?? ------------- /diaries/details.asp?ID=1622" rel="nofollow - 54 Atom /diaries/details.asp?ID=2179" rel="nofollow - 77 Tique 64 X55 Dunphy Keep it original, Pete < |
Posted By: srbranum
Date Posted: May-23-2010 at 9:34pm
|
I guess. I hooked everything up, grounded my testing device and touched the left connection on the bilge pump switch. The light came on. The feed from the amp meter is not doing anything right now except laying in the bottom of the boat. I started over with the wiring after your comments on how I should wire it and the amp feed wire was not included.
I touched 4 connections in the boat and the left terminal on the bilge switch and the light came on every time but if you pull the switch or lift the float switch, nothing. I am going to study your diagram and wait for your responses. Thanks dave as well. BTW, I just the whole gas tank assembly out for the third time due to my problems with the exhause hoses and straight pipe. ------------- I have to keep her running 'cause I can't afford a new one |
Posted By: srbranum
Date Posted: May-23-2010 at 9:36pm
|
no fax machine except at work tomorrow night but I don't know what the number is.........sorry.
scott ------------- I have to keep her running 'cause I can't afford a new one |
Posted By: srbranum
Date Posted: May-23-2010 at 9:39pm
|
There are two wires I have not connected yet but I doubt they have anything to do with my problem.
One goes to a terminal on the side of the distributor and the other is grounded to the block of the engine just below the distributor. Tell me they are not the culprit, please?  ------------- I have to keep her running 'cause I can't afford a new one |
Posted By: srbranum
Date Posted: May-23-2010 at 10:28pm
|
Pete,
Just found out that I cannot bring my boat anyway if I don't have a firm reservation and tickets. I think I read it correctly(see my post under the Master's topic). Guess I am not in a hurry anymore, huh? ------------- I have to keep her running 'cause I can't afford a new one |
Posted By: 79TiqueRebuild
Date Posted: May-24-2010 at 1:22am
Don't overlook the ground to complete the circuit. |
Posted By: OverMyHead
Date Posted: May-24-2010 at 1:47am
|
Dave,
Scott says the feed is off his amp meter so it should be hot all the time. Pete, I quess a little knowlege can be dangerous, I assumed since my gauges go dead when the ignition goes off that there would be no power there. I also have a volt meter and not an amp guage, I know the volt meter in laymans term reads the avalable voltage in the system,( battery or alternator). What is amps reading? total draw? ------------- For thousands of years men have felt the irresistible urge to go to sea, and many of them died. Things got better after they invented boats. 1987 Ski Nautique |
Posted By: 8122pbrainard
Date Posted: May-24-2010 at 8:28am
|
Scott,
Start over at the source and confirm power. Confirm power through the dash switch as well as the float switch. Yes, check your ground (use the same grounding point you have the pump hooked to for your test light) I don't know how to help you anymore other than getting you a sketch. ------------- /diaries/details.asp?ID=1622" rel="nofollow - 54 Atom /diaries/details.asp?ID=2179" rel="nofollow - 77 Tique 64 X55 Dunphy Keep it original, Pete < |
Posted By: srbranum
Date Posted: May-24-2010 at 10:49am
|
Pete,
Here's a dumb question: The only ground I have been assuming is taking place is on the right terminal of the switch where that big connector is located. Otherwise, I don't have it grounded to anything. One of the guys above said to make sure I am grounded and I assumed I was. Maybe this has been the problem. Will try it out today. Btw, if you know where I can buy a nylon half nut to go on the back side of my overflow valve on the stern of the boat, let me know. I cranked on mine too hard and broke it. It's like trying to buy low grade plutonium around here!! ------------- I have to keep her running 'cause I can't afford a new one |
Posted By: srbranum
Date Posted: May-24-2010 at 10:52am
|
Monty,
See my post to Pete below. I don't see where I have a ground wire other than assuming the non-hot side of the switch is grounded. Would this make everything not work? ------------- I have to keep her running 'cause I can't afford a new one |
Posted By: 8122pbrainard
Date Posted: May-24-2010 at 10:55am
|
Scott,
You are hopelessly electrically challenged!!! There isn't a ground on the switch - dash or float!!!!!! The ONLY ground you have is one of the wires on the pump. It needs to go to the engine block. The block is your ground. Remember your ground cable off the battery goes to the engine block. Do you see the little "earth" symbols in the wiring diagram above? Those are the ground connections.
What plactic nut on the transom? ------------- /diaries/details.asp?ID=1622" rel="nofollow - 54 Atom /diaries/details.asp?ID=2179" rel="nofollow - 77 Tique 64 X55 Dunphy Keep it original, Pete < |
Posted By: srbranum
Date Posted: May-24-2010 at 11:26am
|
10-4 buddy. The ground is on the engine block above the water pump. I will ground it and see what happens.
The nut I am talking about holds the overflow valve on to the back of the boat. The valve is located on the outside of the boat, on the stern, to the right of the ladder just below the rub rail. When you fill your tank, it will shoot out gas when the tank is full. I also believe it just vents fumes from the tank. There was a nylon nut on the back side of it between the wall of the boat and the vent hose. I cranked on it the other day and it being nylon, broke in to a bunch of pieces  . .------------- I have to keep her running 'cause I can't afford a new one |
Posted By: 8122pbrainard
Date Posted: May-24-2010 at 11:48am
|
Scott,
The vent through hull has straight pipe threads. Take it to a well stocked hardware store. What you want is a "locknut" matching the straight pipe. ------------- /diaries/details.asp?ID=1622" rel="nofollow - 54 Atom /diaries/details.asp?ID=2179" rel="nofollow - 77 Tique 64 X55 Dunphy Keep it original, Pete < |
Posted By: srbranum
Date Posted: May-24-2010 at 1:13pm
|
Understand, but the reason I say it has to be a half nut is because a regular lock nut is too thick and will overrun on to the area where the vent hose is attached thus the name "half nut". The nylon nut that came off of it is about the thickness of one of the black ends of an Oreo Cookie. ------------- I have to keep her running 'cause I can't afford a new one |
Posted By: 8122pbrainard
Date Posted: May-24-2010 at 1:24pm
Scott, Did I say regular nut? No, you assumed that. What nut's are you looking at??? I didn't even say "half nut". Here's a pipe thread "locknut": 
http://www.mcmaster.com/#stainless-steel-pipe-fittings-and-pipe/=788s2y - Pipe locknuts at McMaster Carr ------------- /diaries/details.asp?ID=1622" rel="nofollow - 54 Atom /diaries/details.asp?ID=2179" rel="nofollow - 77 Tique 64 X55 Dunphy Keep it original, Pete < |
Posted By: srbranum
Date Posted: May-24-2010 at 2:13pm
|
Pete,
I'm sorry. I was not trying to catch you off guard or question your CC knowledge. All I was saying was that it was a nylon, that's why it broke. I knew it was not the shape and thickness of a regular nut and a local mom and pop hardware store said what I needed was a "half nut" which they said it is called that because it is half the thickness of a normal nut but they did not have anything I could use. I don't recall if there was a lock washer behind it or not, probably not. I will try word my emails better in the future and not in insinuate a fact or theory I am dealing with... ------------- I have to keep her running 'cause I can't afford a new one |
Posted By: 8122pbrainard
Date Posted: May-24-2010 at 2:32pm
|
Scott,
Sorry but I was unaware you were mislead by mom and or pop!! Did they at least ID the thread size for you? If you can get the thread size, we can go from there. There may be a alternate.------------- /diaries/details.asp?ID=1622" rel="nofollow - 54 Atom /diaries/details.asp?ID=2179" rel="nofollow - 77 Tique 64 X55 Dunphy Keep it original, Pete < |
Posted By: srbranum
Date Posted: May-24-2010 at 3:30pm
|
I am heading to Guntersville, AL this afternoon to a large marina there to get a couple of things and I am bringing my PITA children with me pictured below to see if they have an idea. Pictured is the broken nut and I was wrong. It is made out of some sort of pot metal. I trust you guys more than them but maybe if they hold it in their hand, something will click. I saved about $300 by not going to Callaway this weekend so I can afford to buy what I need:
BTw, my last attempt this morning at the bilge pump: Grounded the switch like we discussed to a post marked "G" on the back of a gage. The float was not involved. As soon as I touched the ground point, the bilge pump came on. The problem with that is the switch was not pulled out and the float was sitting in a box out of the picture so I am back to square one: 

 ------------- I have to keep her running 'cause I can't afford a new one |
Posted By: 8122pbrainard
Date Posted: May-24-2010 at 4:38pm
|
Scott,
Lets give the pump wiring another try but it really sounds like you didn't ground the one pump wire. Under the dash: The purple wire is comming off the fuse. This is the hot feed. The yellow wire on the same terminal supplys power for the automatic mode. It gets connected to one of the float wires. It doesn't matter which one. The brown wire on the dash switch is for the manual mode. That, you will want to connect to the positive wire on the pump. It will bypass the float switch. Back to the bilge: You have the yellow wire connected to one of the float switch wires. The other wire on the float switch gets connected to the positive wire on the pump where you connected the brown wire. Then the negative wire on the pump goes to the engine block which is your ground. ------------- /diaries/details.asp?ID=1622" rel="nofollow - 54 Atom /diaries/details.asp?ID=2179" rel="nofollow - 77 Tique 64 X55 Dunphy Keep it original, Pete < |
Posted By: 79nautique
Date Posted: May-24-2010 at 5:13pm
|
regarding the nut the common name is jam nut or pannel nut, if you are trying to locate one at a hardware store or a large retail store like Home depot or lowes. ------------- http://www.correctcraftfan.com/diaries/details.asp?ID=756&sort=&pagenum=1&yrstart=1979&yrend=1979 - 79 nautique |
Posted By: DrCC
Date Posted: May-24-2010 at 5:49pm
|
And while your at the Depot, get a thin rubber washer. The one on your fuel vent looks like a garden hose washer. The thin washer will give you more threads on the inside.
AT |
Posted By: srbranum
Date Posted: May-25-2010 at 11:53am
|
Pete, been gone since lunch yesterday. Will try this out this afternoon and let you know.
scott ------------- I have to keep her running 'cause I can't afford a new one |
Posted By: srbranum
Date Posted: May-25-2010 at 11:56am
|
Could not find this yesterday anywhere. Will try Fastenal today. ------------- I have to keep her running 'cause I can't afford a new one |
Posted By: 8122pbrainard
Date Posted: May-25-2010 at 12:25pm
|
Scott,
Did you identify the thread size. As mentioned, there are alternates. Is it a pipe size? Go into the hardware again and see if a electrical locknut will screw onto the through hull. The big alternate is getting a complete new one. They still make the same vent! ------------- /diaries/details.asp?ID=1622" rel="nofollow - 54 Atom /diaries/details.asp?ID=2179" rel="nofollow - 77 Tique 64 X55 Dunphy Keep it original, Pete < |
Posted By: srbranum
Date Posted: May-25-2010 at 2:37pm
|
Pete,
I took the broken nut and the fitting in to a bunch of places. Basically, everyone said I would never find a replacement on the shelf and would have to buy a whole new fitting to get the nut. But, like you, I want it as original as possible and want to keep the old one. The original jam nut is 1/8" thick and about the best I could come up with is a nut the thickness of two quarters stacked together. The nut I bought at Fastenal fits the threads. I will probably just use the nut I bought and just not feed the fuel line all the way on to the fitting and making sure the hose clamp is secure. ------------- I have to keep her running 'cause I can't afford a new one |
Posted By: srbranum
Date Posted: May-25-2010 at 2:38pm
Good point. I will take you up on it.  ------------- I have to keep her running 'cause I can't afford a new one |
Posted By: 8122pbrainard
Date Posted: May-25-2010 at 2:45pm
|
Scott,
What is the nut size you got at Fastenal? ------------- /diaries/details.asp?ID=1622" rel="nofollow - 54 Atom /diaries/details.asp?ID=2179" rel="nofollow - 77 Tique 64 X55 Dunphy Keep it original, Pete < |
Posted By: 8122pbrainard
Date Posted: May-25-2010 at 3:01pm
Scott, The same Perko you have is now marketed as a "WEST" product. 
http://www.westmarine.com/webapp/wcs/stores/servlet/ProductDisplay?productId=99094&catalogId=10001&langId=-1&storeId=11151&storeNum=10106&subdeptNum=10443&classNum=10446 - $11.00 at West Marine You probably spent more on gas with all the running around you've been doing! ------------- /diaries/details.asp?ID=1622" rel="nofollow - 54 Atom /diaries/details.asp?ID=2179" rel="nofollow - 77 Tique 64 X55 Dunphy Keep it original, Pete < |
Posted By: srbranum
Date Posted: May-25-2010 at 3:09pm
 
WOW! I had no idea it would be that cheap. I will just order one of those and get a life and quit wasting gas and time!!!! I probably only stopped at 8 locations looking for that crazy nut. Can you find out if West sells that plastic nut with the rod attached that goes on the steering cable or worm underneath the dash? The guys said it is sold at Skidim but would they have the fuel vent you pictured as well? I could just buy both at the same place. Got to go to sleep now  , Will be corresponding after 3:30 today. , Will be corresponding after 3:30 today.
Thanks, scott ------------- I have to keep her running 'cause I can't afford a new one |
Posted By: 8122pbrainard
Date Posted: May-25-2010 at 4:35pm
|
Scott,
The new through hull vent I'm sure is a cheap zinc die cast imitation to your old Perko which may be brass. I'd get it just for the nut - or, if you know the size of the nut you got from Fastenal, as mentioned I may be able to help. BTW, you could also take the nut you do have and hack saw it in half!!! ------------- /diaries/details.asp?ID=1622" rel="nofollow - 54 Atom /diaries/details.asp?ID=2179" rel="nofollow - 77 Tique 64 X55 Dunphy Keep it original, Pete < |
Posted By: emccallum
Date Posted: May-25-2010 at 4:38pm
|
What a great thread. Pete, you deserve a medal for walking Scott thru this and not giving up. I have seen folks on other forums start blasting people that are just getting started and may not have grown up with mechanical families. Our treatment of Newbies (and we have had a lot this Spring) sets us apart from other forums.
Scott, you deserve the hardest worker medal. Knowledge isn't cheap and in time you will become well versed in CC boats. Stick with it! I just cant wait to read about a working bilge pump! ernest |
Posted By: srbranum
Date Posted: May-25-2010 at 8:06pm
Ask and ye shall receive!!  ------------- I have to keep her running 'cause I can't afford a new one |
Posted By: srbranum
Date Posted: May-25-2010 at 8:30pm
AND ON THE FIFTH DAY, GOD BLESSED THE BRANUM HOUSE WITH THE KNOWLEDGE OF PETE AND PROVIDED THE HOPELESSLY ELECTRONICALLY CHALLENGED MIND OF SCOTT WITH THE STRENGTH AND WISDOM TO NOT ONLY GET HIS BILGE PUMP WORKING BUT THE ADDITIONAL GIFT OF A WORKING FLOAT SWITCH. SO LET IT BE WRITTEN, SO LET IT BE FINISHED AND MOVE ON TO THE EXHAUST PROBLEM. HALLELUJAH!!!! SCOTT   ------------- I have to keep her running 'cause I can't afford a new one |
Posted By: 8122pbrainard
Date Posted: May-25-2010 at 9:22pm
|
Scott,
Fantastic news. I'm glad to hear you got it. I'm glad to have helped out but can't take all the credit. Ernest, Thanks, Yes this is a great site and one of a kind. Now, I must say there were a few frustrating moments with Scott's bilge pump!! I kept on trying to figure on how to explain the wiring. ------------- /diaries/details.asp?ID=1622" rel="nofollow - 54 Atom /diaries/details.asp?ID=2179" rel="nofollow - 77 Tique 64 X55 Dunphy Keep it original, Pete < |
Posted By: srbranum
Date Posted: May-25-2010 at 10:25pm
|
Could I have the honor of being your 11,000th post ??
Just kidding. I am not finished yet. If I can get the floor and exhaust in, I can't see much more difficulty. Did I mention in the middle of all this that I completely took apart the leaf springs, bearings and hub and stripped the paint, wire brushed to a new finish, added two coats or metal primer and two coats of white paint? What did you think about me sawing that nut in half? It looks perfect. ------------- I have to keep her running 'cause I can't afford a new one |
Posted By: 8122pbrainard
Date Posted: May-25-2010 at 11:20pm
On the boat?
Looks like it sure will work! I'm really curious on what size the nut is. I've asked several times. Did Fastenal tell you? ------------- /diaries/details.asp?ID=1622" rel="nofollow - 54 Atom /diaries/details.asp?ID=2179" rel="nofollow - 77 Tique 64 X55 Dunphy Keep it original, Pete < |
Posted By: emccallum
Date Posted: May-25-2010 at 11:20pm
| my day is complete |
Posted By: srbranum
Date Posted: May-25-2010 at 11:28pm
|
Pete,
To be honest with you, the guy at Fastenal took my fuel fitting and rummaged around a couple of bins and told me this is what I need. I did not even get a receipt (.71cents) so I took it and left. I will find out and let you know. ------------- I have to keep her running 'cause I can't afford a new one |
Posted By: srbranum
Date Posted: May-26-2010 at 3:08pm
|
Pete,
I went by Fastenal on the way home this morning and the salesman who helped me was not there and I did not have my parts with me. I had to go to Lowe's anyway and tried to find the matching thread and size in the hardware department and nothing goes up to that size. I am not putting you off, I will find out for sure in the morning. Scott ------------- I have to keep her running 'cause I can't afford a new one |
Posted By: srbranum
Date Posted: May-28-2010 at 11:40pm
Pete, Did you get my email. 3/4-16 Jam nut. Thanks, Scott ------------- I have to keep her running 'cause I can't afford a new one |