Reparing Exterior Damage
Printed From: CorrectCraftFan.com
Category: Repairs and Maintenance
Forum Name: Boat Maintenance
Forum Discription: Discuss maintenance of your Correct Craft
URL: http://www.CorrectCraftFan.com/forum/forum_posts.asp?TID=19649
Printed Date: November-20-2024 at 8:27am
Topic: Reparing Exterior Damage
Posted By: Okie Boarder
Subject: Reparing Exterior Damage
Date Posted: October-04-2010 at 12:26pm
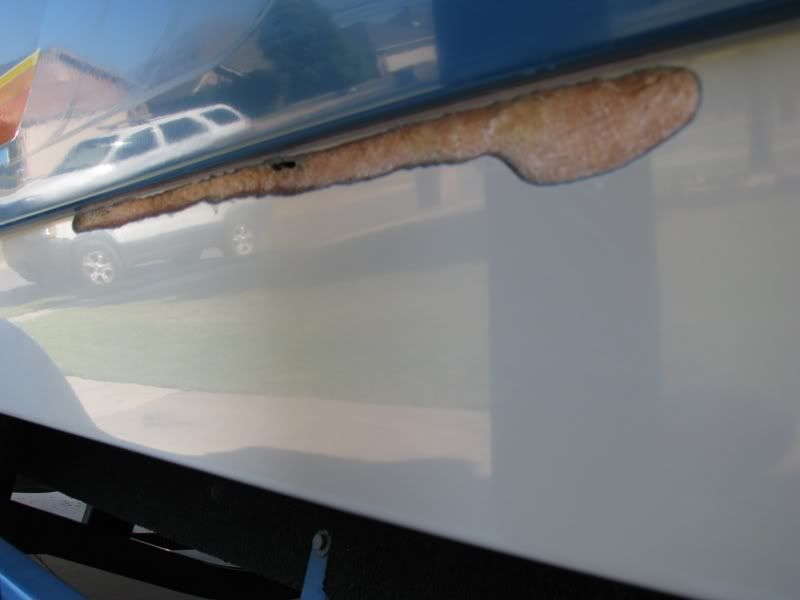
If you look at these pictures you can see there is some damage where large chunks of gelcoat are gone and been filled. There is also a crack that runs about 12".
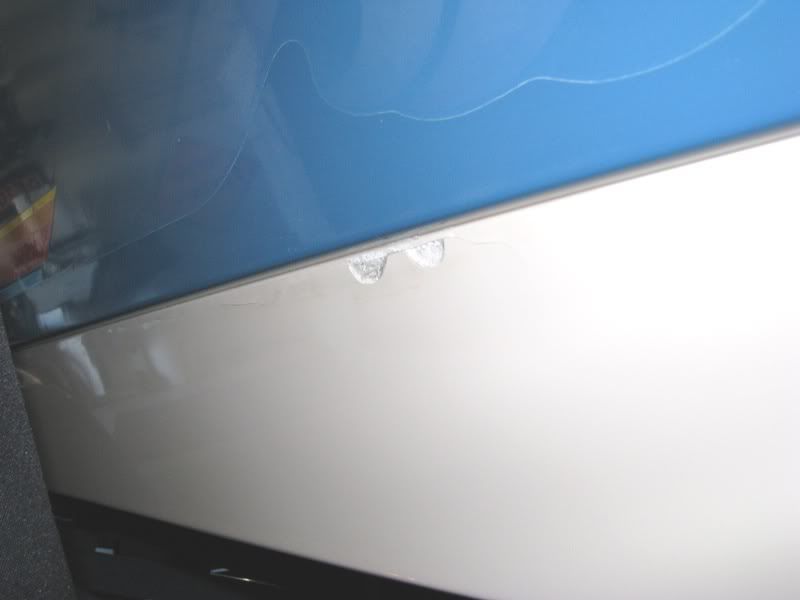
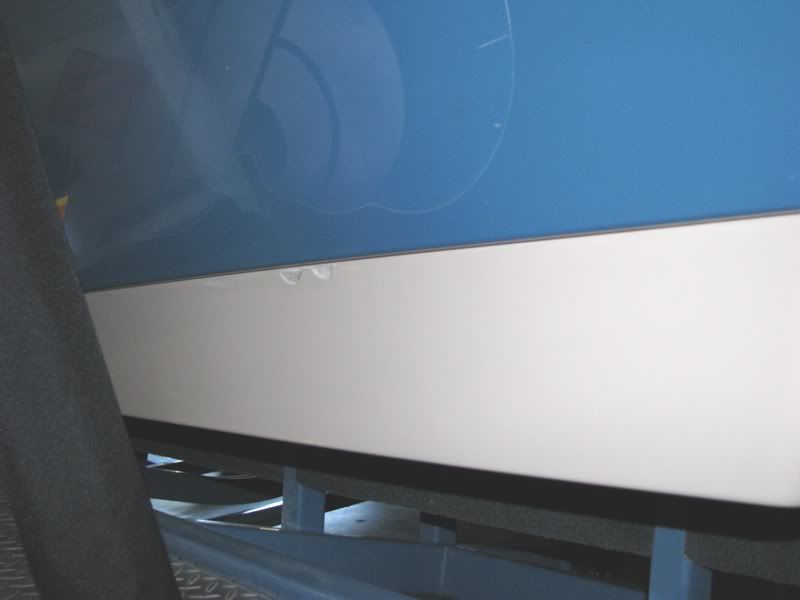
Yesterday, I was messing around with this and noticed it seemed hollow underneath. Also some water would ooze out of the crack when pressed on. I pressed kind of hard in one area in front of the area filled and it collapsed. I started messing with it and realized it was relatively hollow underneath, so I picked at it and chipped away gelcoat layers until it seemed solid again. It is almost as if there was a void under the gelcoat. I'll post some pictures of what it looks like now. I'm trying to decide what my options are at this point. I figured it wouldn't be good for it to continue getting wet under there. I'm not sure I can do a full gelcoat repair right now, but I want to at least "waterproof" it. Can I fill it with a thickened epoxy for now and tackle the gelcoat part of the repair later? Is so, is there a particular filler needed or can I use some of my leftover cabosil or glass bubbles? Will I need to grind away more? Any help would be appreciated. |
Replies:
Posted By: Riley
Date Posted: October-04-2010 at 12:53pm
|
I wonder what is causing it? Do you think your hull could be flexing? ------------- |
Posted By: Waterdog
Date Posted: October-04-2010 at 12:58pm
|
Andy,
Use vacuum or a heat lamp to dry it out overnite. Tap it out, the sound will change from solid to delaminated. Cab-o-sil thickened epoxy will work. Without pulling it all apart maybe you can "lift" the gell with a scribe or the tip of a knife and inject some epoxy in the delam. ------------- - waterdog - http://www.correctcraftfan.com/diaries/details.asp?ID=3896&sort=&pagenum=2&yrstart=1978&yrend=1978" rel="nofollow - 78 Ski Tique |
Posted By: Okie Boarder
Date Posted: October-04-2010 at 1:08pm
| I think it is possible it WAS flexing there. I used some needlenose pliers and a screwdriver yesterday and kind of chipped away at the delam. I'll post the pictures later today so you can see what I mean. There's only one section in the back that has a little delam left. I blew out most of the water, but could easily vaccuum it too. I was thinking maybe I could get this filled in next weekend. |
Posted By: Okie Boarder
Date Posted: October-04-2010 at 9:43pm
Here's what it looks like after I chipped away at it. Only the area in the right hand part of the picture has any hollow area left and only towards the bottom. All the rest has solid fiberglass at the edges. Can I just fill this entire void with thickened epoxy, then later sand / grind and then do a gelcoat repair?


|
Posted By: Waterdog
Date Posted: October-04-2010 at 10:12pm
|
Andy,
I was thinking bag it & apply vacuum (under vacuum water boils at 75*f) Can you get to the back side, if so you could apply 2in. then 4 in. glass tape to re-enforce it. Gel is hard thats what makes it durable but it doesen't like to flex. I'd fill it flush with filled epoxy, block sand it & paint it with a touch up gun and Algrip or Polyurathane Gel will stick to epoxy but not to well and the boat is flexing right there. ------------- - waterdog - http://www.correctcraftfan.com/diaries/details.asp?ID=3896&sort=&pagenum=2&yrstart=1978&yrend=1978" rel="nofollow - 78 Ski Tique |
Posted By: 8122pbrainard
Date Posted: October-04-2010 at 10:14pm
|
Andy,
Getting epoxy into that large void is a good idea however there are some cautions. Don't fill the void completely to the surface of the old gel. You need to leave some room for the gel. Now the problem! on such a large fill, the polyester gel will not stick to the epoxy. You need a "conversion" layer of polyvinyl. It sticks to epoxy and the gel will stick to it. Once filled, you'll need to grind out the fill at the edges so there's a "step" for the gel fill. ------------- /diaries/details.asp?ID=1622" rel="nofollow - 54 Atom /diaries/details.asp?ID=2179" rel="nofollow - 77 Tique 64 X55 Dunphy Keep it original, Pete < |
Posted By: Okie Boarder
Date Posted: October-05-2010 at 12:49am
|
OK. My objective short-term is to seal it off from water penetration...I want to make sure it is sea worthy for about another month. Long-term (winter or spring) is to finish it nicely. Can I fill with a thickened epoxy for now, either flush or just less than flush and then go back and finish it later?
There's no access to the back side without significant work, which isn't real feasible. So, thickened epoxy using cabosil? Really thick so it won't run on the vertical surface? |
Posted By: storm34
Date Posted: October-05-2010 at 1:14am
|
Andy, I would think you could tape everything around it to protect the gel from the stuff you put down. I like waterdog's idea of touching it up with some awlgrip to keep it looking decent from 10 ft ------------- |
Posted By: 8122pbrainard
Date Posted: October-05-2010 at 8:35am
|
Andy,
Yes, for now do the first step with the filled epoxy. Get in there and rough up the surface of the old glass with a burr on the Dremel before you lay in the epoxy. ------------- /diaries/details.asp?ID=1622" rel="nofollow - 54 Atom /diaries/details.asp?ID=2179" rel="nofollow - 77 Tique 64 X55 Dunphy Keep it original, Pete < |
Posted By: Morfoot
Date Posted: October-05-2010 at 9:09am
|
I'd also taper sand the edges of the gel so that you will have a smooth transition from the solid gel down to the fiberglass. Jagged edges aren't good as the potential for airpockets are there which will lead to imperfections in the finish coat. You don't want a "jigsaw puzzle" look or "moon craters" when you do the final wet sand. Also, if you taper sand, the new gel will have a nice smooth surface to bond to.
**EDIT** Also be VERY careful if you choose to use a heat lamp and dont get it too close to the good gel. You risk disbonding the good gel coat and your problem just got bigger. TRUST ME on this one. I learned the hard way.  ------------- "Morfoot; He can ski. He can wakeboard.He can cook chicken.He can create his own self-named beverage, & can also apparently fly. A man of many talents."72 Mustang "Kermit",88 SN Miss Scarlett, 99 SN "Sherman" |
Posted By: 8122pbrainard
Date Posted: October-05-2010 at 9:53am
|
Andy,
I was just looking at the problem area again and have a feeling I know what happened. I feel this was a factory defect when they laid up the hull. When they laid the glass on the inside and before cure, it wasn't rolled out carefully over the sharp step in the hull. This pulled the glass away from the gel/outer layer at the male side of the step creating a air pocket. ------------- /diaries/details.asp?ID=1622" rel="nofollow - 54 Atom /diaries/details.asp?ID=2179" rel="nofollow - 77 Tique 64 X55 Dunphy Keep it original, Pete < |
Posted By: Waterdog
Date Posted: October-05-2010 at 10:06am
|
Moorfoot,
Your right about the heat. Make sure you can lay your hand on the warm boat surface, it NEEDS to stay at 150*f or so overnite. Higher temps will dis-bond the ajoining areas. Another reason I like to draw water out with vacuum. ------------- - waterdog - http://www.correctcraftfan.com/diaries/details.asp?ID=3896&sort=&pagenum=2&yrstart=1978&yrend=1978" rel="nofollow - 78 Ski Tique |
Posted By: JoeinNY
Date Posted: October-05-2010 at 11:37am
|
Pete is right about the source, that sure looks the backside of a fiberglass bubble from the factory layup. You run into a few of them around the sharp transition points (the chine being most typical) of the older (mid seventies and back) CC's as well. ------------- http://www.correctcraftfan.com/diaries/details.asp?ID=1477 - 1983 Ski Nautique 2001 1967 Mustang 302 "Decoy" http://www.youtube.com/watch?v=cO5MkcBXBBs - Holeshot Video |
Posted By: Okie Boarder
Date Posted: October-05-2010 at 12:51pm
|
Sounds good guys. Thanks. I'll hit it with a dremel to rough it up, including feathering the edges and smoothing the surrounding gel. I'll fill with the thickened epoxy and smooth out for now, then I'll get back to it later to finish it and get the gel on there.
I think I would agree with the cause. It does look a lot like a void that was always there. Maybe hull flexing caused the gel to crack and chip away at some time, but I have a feeling there has always been a hollow area in that spot. |
Posted By: Okie Boarder
Date Posted: October-08-2010 at 2:23pm
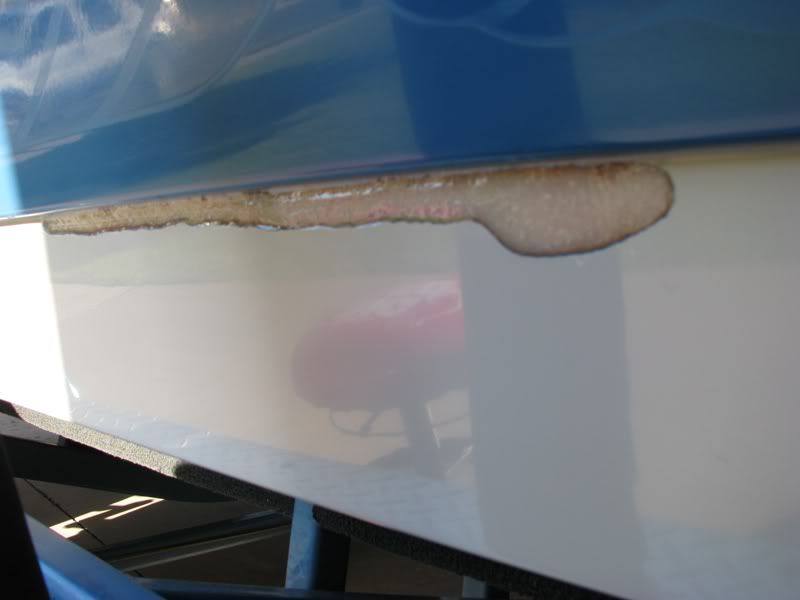
| What would be the recommended bit styles to use in the dremel? When you talk about smoothing, you mean to get rid of the scalloped look to the edge of the gelcoat in my latter pictures, right? |
Posted By: 8122pbrainard
Date Posted: October-08-2010 at 2:49pm
|
Andy,
For getting down into spots as well as routing out cracks, I like the 1/8" diameter ball shape because it cuts on the sides as well as the end. For evening off the gel edges, I'd use a straight spiral cut bit. The larger the diameter you use will give you more control over the cut. It may get tricky because it all a free hand cut. Take your time. ------------- /diaries/details.asp?ID=1622" rel="nofollow - 54 Atom /diaries/details.asp?ID=2179" rel="nofollow - 77 Tique 64 X55 Dunphy Keep it original, Pete < |
Posted By: Okie Boarder
Date Posted: October-10-2010 at 6:35pm
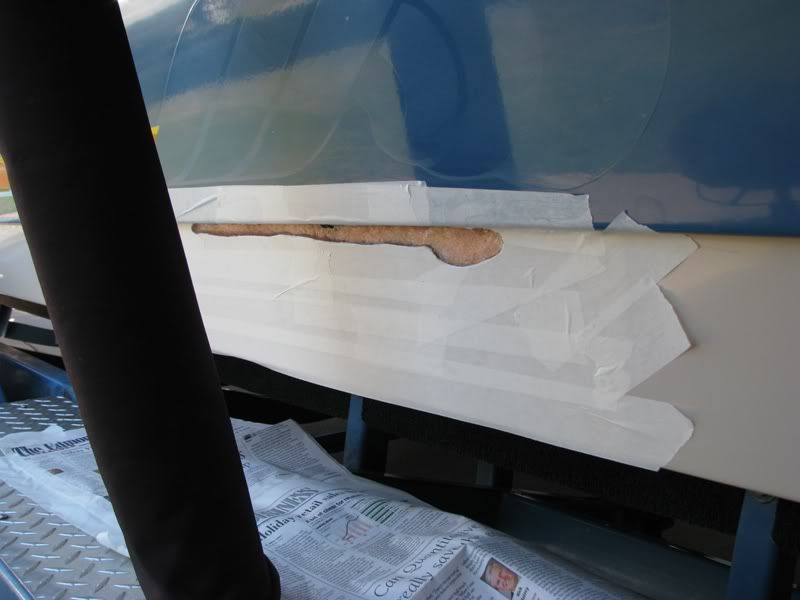
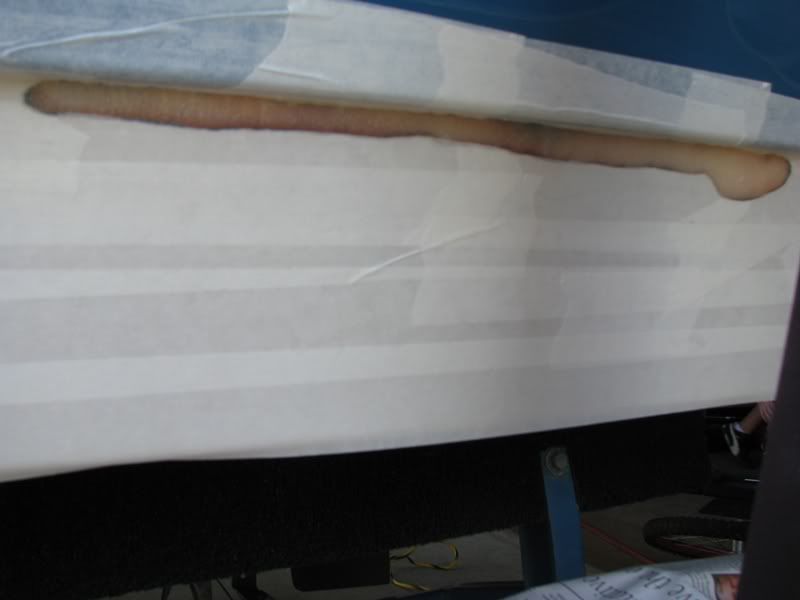
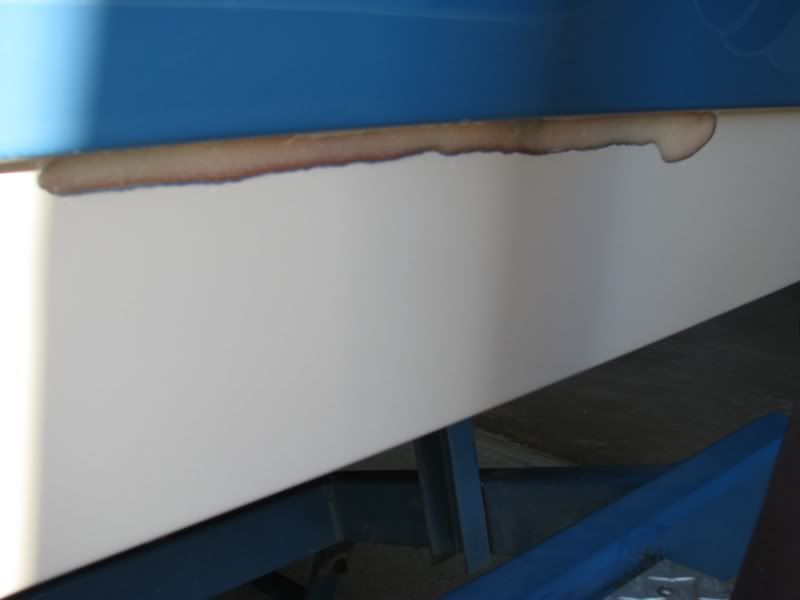
Here are some pictures of the work and results. I ground the edges as smooth as I could and also tried to put a good bevel on the gelcoat part of the edge. When I filled it with the thickened epoxy I used a "squeegee" to smooth and flatten it. It seems like it is a little lower than the gelcoat level, but I may need to do some sanding / grinding later when it is time to gelcoat. Thoughts?
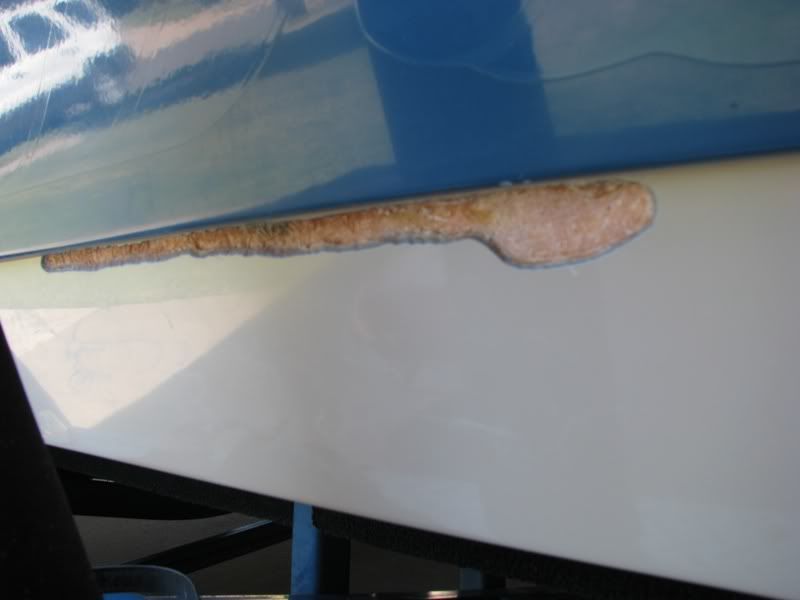
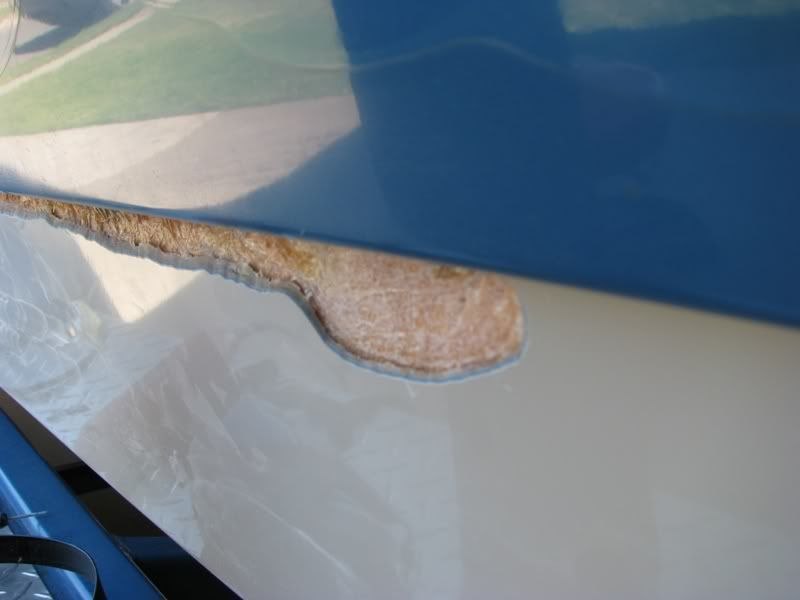
|
Posted By: 8122pbrainard
Date Posted: October-10-2010 at 6:43pm
|
Andy,
You do good work!! 
The next step with the gel is the tricky one!! When you get to it, the old edges will need some clean up as mentioned. How far down the hull side do you think the void go or where you able to grind down to where the void stopped? I'm just curious. Getting the epoxy down into it I'm sure will do the job. ------------- /diaries/details.asp?ID=1622" rel="nofollow - 54 Atom /diaries/details.asp?ID=2179" rel="nofollow - 77 Tique 64 X55 Dunphy Keep it original, Pete < |
Posted By: Okie Boarder
Date Posted: October-10-2010 at 6:58pm
| Thanks Pete. The worst area was towards the stern and it only went 1/4" further or so, at worst. I ground most of the way until I felt like it was close enough. I squirted some epoxy down in there the best I could and I'm sure it will do the trick. Yeah, I'll be sure to revive this thread when it's time for the next step. I'm either going to do it around winterizing time or pre de-winterizing time. |
Posted By: Okie Boarder
Date Posted: January-24-2011 at 9:00pm
| Found a few other cracks when I was working on a few things this weekend...arghhhh. I don't think the other cracks have voids underneath, no hollow sound or feel. One crack is on the port side about midship and it is vertical...about 1" long. I found a couple cracks running horizontal right in the same bend transition area as this one. They are hairline cracks with no delamination. Should I leave them along or do something about them? |
Posted By: dochockey
Date Posted: January-27-2011 at 10:22pm
|
That old saying Made on a Monday ? ------------- 1989 Teal Ski Nautique 1967 Mustang Harris Float Sunfish |
Posted By: Okie Boarder
Date Posted: January-28-2011 at 3:55pm
|
Either that or there may have been some stress on those areas due to the rotting issues that were found.
Could this repair suffice for the season or should I get gelcoat on it before this season? I found a place locally that has gelcoat with MEK in i who is saying it will work for my application? Any input on this? I'd love to support a local business if I can. |
Posted By: bbishop1974
Date Posted: January-30-2011 at 1:25pm
| I notice you are working on a older Supra.I had a 86' saltere with 89 hrs.I sold it because there was not a ounce of good wood in it.I think Supra went to composite lifetime warranty in 92'.I learned alot of what to look for from that boat.Mine had alot of stress cracks in the transom,which upon investigation revealed a hollow cavity and some brown mush.The gel on these boats seem thin compared to others as well.What year is yours? |
Posted By: Okie Boarder
Date Posted: February-01-2011 at 3:24pm
|
It's an 89 Sunsport.
Supra went to all composite during 92 so some 92's are still wood. Definitely all the 93's are all composite, though. |