1969 Mustang Stringer Rebuild
Printed From: CorrectCraftFan.com
Category: Repairs and Maintenance
Forum Name: Boat Maintenance
Forum Discription: Discuss maintenance of your Correct Craft
URL: http://www.CorrectCraftFan.com/forum/forum_posts.asp?TID=20615
Printed Date: November-23-2024 at 2:13am
Topic: 1969 Mustang Stringer Rebuild
Posted By: vondy
Subject: 1969 Mustang Stringer Rebuild
Date Posted: February-10-2011 at 8:19pm
|
(Edit 3-20-2012, since I somehow screwed up most of the photos linked to this post, I've made a set on my flickr account that should contain all of the ones used. Sorry.) http://www.flickr.com/photos/21103180@N02/sets/72157629629098099/" rel="nofollow - Photo Link Well it's time to get this done, been dreading it really, looks like a ton of work. I guess I have a small head start since I removed my foam a couple of years ago. My hope is to get this done no later than July 4th weekend. 3.5 months  I've been reading the major stringer post for 3 years now but will re-read and take notes before getting started. I do have a few questions for you experts first... Ideally I would remove the stringers and get all the grinding out of the way first. That gives me more time to save up money for supplies. I've heard It's OK to remove all the stringers in these small 16 footers without worrying about anything getting out of shape. Thoughts? Thinking ahead on other items to attend to when putting the engine back in... I want to add some adjustable engine mounts and do away with these  wedges. I assume that is doable? wedges. I assume that is doable?I think the rear starboard side clamp(?) that attaches to the engine mount is cracked along the top. Any chance that can be welded or something? It will be a few weeks before I get started so plenty of time to psych myself up  I know I'll get plenty of good advice here. I know I'll get plenty of good advice here.Thanks! ------------- http://correctcraftfan.com/diaries/details.asp?ID=4645&sort=&pagenum=1 - 69 Mustang HM |
Replies:
Posted By: connorssons
Date Posted: February-10-2011 at 11:12pm
| Hello Vondy! hows it been? glad to see ya going to restring the stang. keep us posted, and yes you can remove all the innerds just make sure you have it braced up correctly. good luck jeff |
Posted By: Keeganino
Date Posted: February-10-2011 at 11:27pm
|
Congrats on taking the plunge. Just saw some pcm mounts on ebay go for like $30. ------------- "working on these old boats may not be cost effective but as it shows its what it brings into your life that matters" -Roger http://www.correctcraftfan.com/diaries/details.asp?ID=4897" rel="nofollow - 1973 Skier |
Posted By: Keeganino
Date Posted: February-10-2011 at 11:27pm
|
Lets see some pics! ------------- "working on these old boats may not be cost effective but as it shows its what it brings into your life that matters" -Roger http://www.correctcraftfan.com/diaries/details.asp?ID=4897" rel="nofollow - 1973 Skier |
Posted By: vondy
Date Posted: February-11-2011 at 11:07am
Hey Jeff! Been good. Thanks again for saving us last summer with the manifolds. Would the trailer be sufficient for bracing it or would I need to build some extra bracing? ------------- http://correctcraftfan.com/diaries/details.asp?ID=4645&sort=&pagenum=1 - 69 Mustang HM |
 connorssons wrote:
Posted By: wingwrench
Date Posted: February-11-2011 at 11:30am
Depends on the trailer. On my 63 skier the aft end of my trailer bunks sit right at the corners of the transom, I made some wedges to fit between the trailer frame rails and the hull at about the windshield. With all the stringers out my hull is still pretty rigid but the wedges stabilize it when climbing in and out. Jack |
Posted By: 8122pbrainard
Date Posted: February-11-2011 at 11:59am
|
David,
I'd pull all the stringers and then see how it sits on the trailer. Yes, you have a hull that's considered real heavy and stiff. If you see and deflection, then you can always do some bracing. What's the matter with the wood wedges under the engine mounts? ------------- /diaries/details.asp?ID=1622" rel="nofollow - 54 Atom /diaries/details.asp?ID=2179" rel="nofollow - 77 Tique 64 X55 Dunphy Keep it original, Pete < |
Posted By: TRBenj
Date Posted: February-11-2011 at 12:10pm
|
Yes, you can remove all of the stringers in one shot to get all the grinding done first... but Im not sure I would recommend doing so for 2 reasons.
1. You will need to brace the boat as mentioned above. Without any structural members running the length of the hull, even the small hulls will deflect. The trailer is not sufficient- you will need additional braces front and rear at the chines at a minimum... and more is better. You could probably get away with just the trailer if you remove/replace one stringer at a time. 2. By removing/replacing one stringer at a time, it gives you a good reference point as you go along and shape and then install each stringer. It is very hard to take measurements once the boat is completely gutted. Even if you take 1000 measurements before disassembling, you will ALWAYS find something you failed to measure. Been there, done that. If your boat were anything but a Holman Moody, it would be pretty straightforward to replace your mounts with newer adjustable ones from PCM. The H-M uses different mounting provisions though (bellhousing and front cover), so it would not be easy to do away with yours. I would stick with the wedges. Of course, Id be willing to swap some PCM parts for those H-M nonadjustables if youre dead set on going that way. ------------- |
Posted By: Riley
Date Posted: February-11-2011 at 12:35pm
|
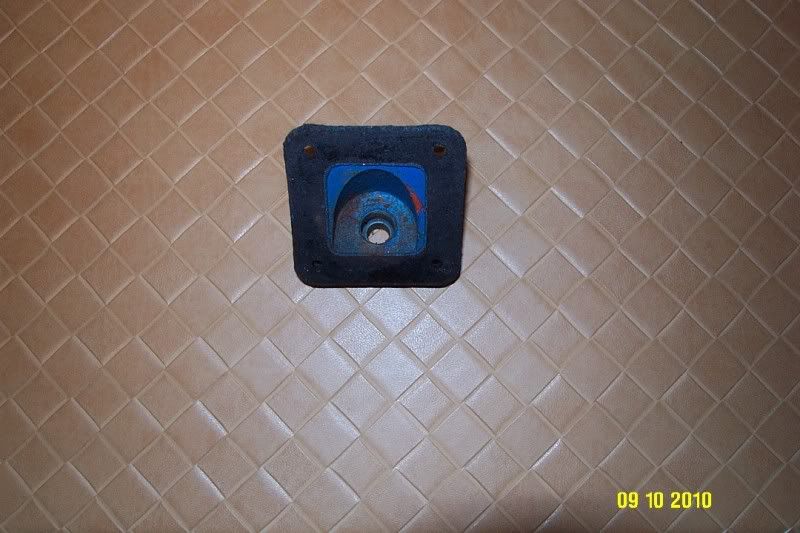
David, I've never aligned an engine with adjustable mounts, but found the wedges on our Mustang easy to work with. Adusting the wedges with a small sledge hammer and a block of wood was easy and it surprisingly came into alignment much easier than I thought it would. ------------- |
Posted By: vondy
Date Posted: February-11-2011 at 1:42pm
|
Seemed to me as accurate as the alignment needs to be that adjustable engine mounts would be easier and more accurate than banging on wedges. One problem I had was that the front needed to be adjusted so I ended up adding wedges to those as well.
Would there not be a concern for loosening and tightening the lags once a year. Seems like it would weaken the connection and be another point at which water could get in. I'm not against the wedges, I just want to make sure if there is a better way I do it. Any thoughts on the crack in the rear starboard bellhousing mount clamp? ------------- http://correctcraftfan.com/diaries/details.asp?ID=4645&sort=&pagenum=1 - 69 Mustang HM |
Posted By: Riley
Date Posted: February-11-2011 at 3:02pm
|
Vondy, I'm not familar with your mounts, but mine are fixed. No adjustment at all. They work much better than I thought they would. The only draw back I see to them is once your lag holes are drilled, there is no side to side adjustment, only up and down. You've got a Holman Moody set up, so I'd rather keep that and deal with it due to it being probably the most desirable power for you boat's age. ------------- |
Posted By: vondy
Date Posted: February-11-2011 at 4:47pm
|
Riley, I dug up some old pics of the mounts, before I added new wedges.
I do have side-to-side movement by-the-way. 

 ------------- http://correctcraftfan.com/diaries/details.asp?ID=4645&sort=&pagenum=1 - 69 Mustang HM |
Posted By: Keeganino
Date Posted: February-11-2011 at 6:01pm
|
Gotta love that engine! I would redo it just like that. Some Doug Fir wedges coated in CPES will contrast nicely with the new floor and bilge around it. If you are worried about wearing out the holes start with the shortest lags you can get away with. That way if you bore them out you can go deeper and get more bite. ------------- "working on these old boats may not be cost effective but as it shows its what it brings into your life that matters" -Roger http://www.correctcraftfan.com/diaries/details.asp?ID=4897" rel="nofollow - 1973 Skier |
Posted By: Riley
Date Posted: February-11-2011 at 9:30pm
Vondy, that's a much better set up than mine. You've got your side to side with the mounts and a little tap either way on the wedges for height. I'd stay with that set up. Keep your wedges to make new ones out of. I think mine are oak.
 ------------- |
Posted By: Keeganino
Date Posted: February-11-2011 at 10:21pm
|
Wow Bruce that sucker is clean! Does not look like there is much adjustment on that at all. I like the curves in the stringer. Very cool. ------------- "working on these old boats may not be cost effective but as it shows its what it brings into your life that matters" -Roger http://www.correctcraftfan.com/diaries/details.asp?ID=4897" rel="nofollow - 1973 Skier |
Posted By: Riley
Date Posted: February-12-2011 at 2:06pm
|
Keegan, the curved wood is an oak mount that sits on top of the stringers. There is just up and down movement with the wedges. I don't know what can be done if you need a side to side adjustment, other than move the engine forward or backward a bit and drill new lag holes. Fortunately , we did not have to do that. That white bilge will be the last one I do! I see you did yours the same color.
Vondy, your mounts are really good. I like how H/M put the rear mount forward of the tranny so you can remove it easily. ------------- |
Posted By: Keeganino
Date Posted: February-12-2011 at 2:14pm
|
My white bilge was getting dirty before I ever got the engine back in. Grey is probably more practical. ------------- "working on these old boats may not be cost effective but as it shows its what it brings into your life that matters" -Roger http://www.correctcraftfan.com/diaries/details.asp?ID=4897" rel="nofollow - 1973 Skier |
Posted By: Gary S
Date Posted: February-12-2011 at 4:06pm
David, you mean in that area right behind the bolts of the sideways clamp mount? This one was cracked on mine.I took it to a good welder and they fixxed me up fine. 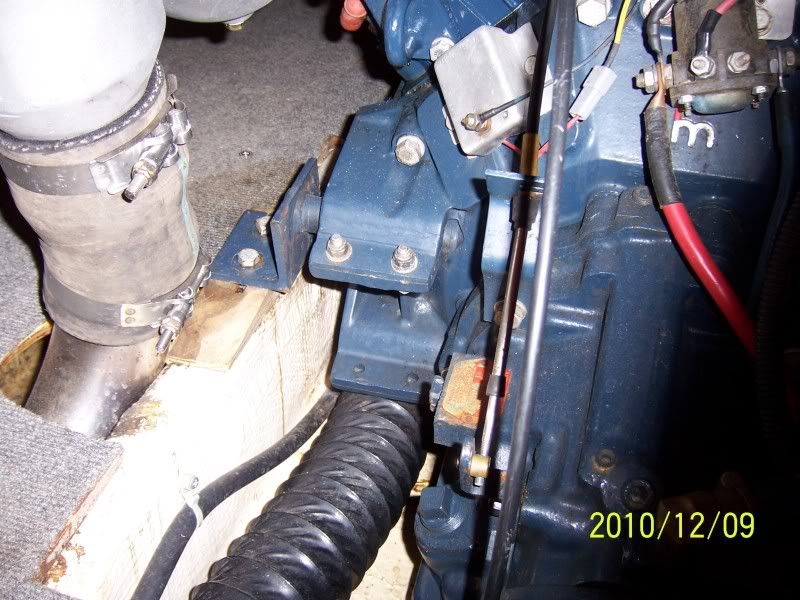 ------------- http://www.correctcraftfan.com/diaries/details.asp?ID=1711&sort=&pagenum=1&yrstart=1966&yrend=1970" rel="nofollow - 69 Mustang HM SS 95 Nautique Super Sport |
Posted By: vondy
Date Posted: February-14-2011 at 11:14am
|
That's it Gary.
I seem to recall the bell housing to be aluminum, is that right or am I imagining things? ------------- http://correctcraftfan.com/diaries/details.asp?ID=4645&sort=&pagenum=1 - 69 Mustang HM |
Posted By: connorssons
Date Posted: February-14-2011 at 11:24pm
| Hay Vondy! you are correct Alum. |
Posted By: Gary S
Date Posted: February-14-2011 at 11:28pm
|
Your right David,it's aluminum.Ask around and get yourself a good welder.We have alot of truck repair places around,since we live in a gravel mining area. Most gravel trailers are aluminum so they have alot of pratice.If you look close you can see the weld in that picture,I didn't even have to clean it up. Must be a common thing for these to crack I'll bet. ------------- http://www.correctcraftfan.com/diaries/details.asp?ID=1711&sort=&pagenum=1&yrstart=1966&yrend=1970" rel="nofollow - 69 Mustang HM SS 95 Nautique Super Sport |
Posted By: vondy
Date Posted: February-15-2011 at 12:45pm
|
Is it easy enough to separate the bell housing from the engine and transmission to take it to a welder? No major gaskets or seals to worry about? ------------- http://correctcraftfan.com/diaries/details.asp?ID=4645&sort=&pagenum=1 - 69 Mustang HM |
Posted By: Gary S
Date Posted: February-15-2011 at 9:27pm
|
Nothing there at all.Just a matter of unbolting it. ------------- http://www.correctcraftfan.com/diaries/details.asp?ID=1711&sort=&pagenum=1&yrstart=1966&yrend=1970" rel="nofollow - 69 Mustang HM SS 95 Nautique Super Sport |
Posted By: vondy
Date Posted: March-18-2011 at 8:39pm
|
Gave the lumber yard a call today looking for Douglas Fir. I told him I needed the good stuff and he said they have #1, C and better, vertical grain. I'm not that versed in wood grades. Does that sound right to y'all?
I'm also not sure on sizes yet but a 2x8x14 is $113. Pulling to engine tomorrow to officially get started. ------------- http://correctcraftfan.com/diaries/details.asp?ID=4645&sort=&pagenum=1 - 69 Mustang HM |
Posted By: 8122pbrainard
Date Posted: March-19-2011 at 9:38am
|
David,
Go take a look at it. If the #1 looks nice, is straight and doesn't have a large loose knots in it, it will be cheaper. Don't worry about bad edges as they will be trimmed off when you scrib to the hull. Make sure you ask them about the moisture content. If it's a good yard, they should have a meter. Out of the kiln, you'll see about 13%. 10% is getting there and usable. 8% is great. ------------- /diaries/details.asp?ID=1622" rel="nofollow - 54 Atom /diaries/details.asp?ID=2179" rel="nofollow - 77 Tique 64 X55 Dunphy Keep it original, Pete < |
Posted By: Riley
Date Posted: March-19-2011 at 10:59am
|
Pete, if it's 13% out of the kiln, how do you get it to 8%? Should it be bought ahead of time and be stored so that it air dries some more? ------------- |
Posted By: 8122pbrainard
Date Posted: March-19-2011 at 11:56am
Bruce, Yes, if at all possible, get it a couple months in advance. Sticker (1x2 spacers) it and put it in a cool spot with good air circulation. I suggested this to Tim along with a fan blowing on it. I believe he did do it. Rotating the wood top to bottom and end to end helps as well. I'm currently doing some green wood bowl turning on that 48 lathe I rebuilt. I've never done the green wood before and it's not fun! The selection of small blocks of unusual woods is fantastic plus real cheap but I don't feel the trouble you go through is worth it. First, you rough turn the blank figuring at least 10% shrinkage. Then you set the blocks to dry for 2 to 3 years!! If you don't have that time, you use the microwave method that I used. I almost started a couple of Beech blanks on fire!!  This green wood turning was really a experiment. I found a sample set of Beech, Sasafrass, Cherry and Walnut. This green wood turning was really a experiment. I found a sample set of Beech, Sasafrass, Cherry and Walnut. ------------- /diaries/details.asp?ID=1622" rel="nofollow - 54 Atom /diaries/details.asp?ID=2179" rel="nofollow - 77 Tique 64 X55 Dunphy Keep it original, Pete < |
Posted By: vondy
Date Posted: March-19-2011 at 12:00pm
Pete, he said his number 1 stuff was the c & better vertical grain. From the way I typed it, it might have looked like 3 options. He does have number 2 as well. ------------- http://correctcraftfan.com/diaries/details.asp?ID=4645&sort=&pagenum=1 - 69 Mustang HM |
Posted By: 8122pbrainard
Date Posted: March-19-2011 at 12:04pm
|
David,
Go look at it and if in doubt, report back. The "and better" is really a term open to interpretation!! ------------- /diaries/details.asp?ID=1622" rel="nofollow - 54 Atom /diaries/details.asp?ID=2179" rel="nofollow - 77 Tique 64 X55 Dunphy Keep it original, Pete < |
Posted By: vondy
Date Posted: March-20-2011 at 1:26pm
I'll do that. Looks like I'll need 2x8x12s for the mains and 1x2x9s for the secondaries. Does that sound right? What do others use for the cross bracing? Fir or something cheaper? I don't have a lot in this boat. http://www.flickr.com/photos/21103180@N02/5541515524/">  ------------- http://correctcraftfan.com/diaries/details.asp?ID=4645&sort=&pagenum=1 - 69 Mustang HM |
Posted By: vondy
Date Posted: March-20-2011 at 1:41pm
|
Engine is out. Along with pretty much everything else. Now I need to level, brace and get to cutting. Right after a trip to Harbor Freight.
Add this to the Redneck Engine Hoist. Actually it worked great. Not a single creek in the rafters.

Muddy oily mess in the bell housing. I'm sure from the flooding it took when the freeze plug popped out last year. 
Crack to be welded. 
Velvet drive. Needs to go to Eric. 
I know these are made to hold engines but it just seems weird having her cantilevered like that.  Planning on repainting, if I can find the right blue. Any hints on cleaning and getting the old stuff off? Planning on repainting, if I can find the right blue. Any hints on cleaning and getting the old stuff off?

Found my slow oil leak. Will have to fix this for sure, can't having my new bilge oily. I'll replace the oil pan gasket as well while it's all out. 
 ------------- http://correctcraftfan.com/diaries/details.asp?ID=4645&sort=&pagenum=1 - 69 Mustang HM |
Posted By: connorssons
Date Posted: March-20-2011 at 1:49pm
|
Vondy looking good, now the real fun begins. get a full suit when cutting glass, it will save alot of scratching
|
Posted By: WakeSlayer
Date Posted: March-20-2011 at 2:06pm
|
The fun begins. I used a citrus based engine cleaner and a couple different scrub brushes. I acetoned after that. Duplicolor should have the right paint.
Already going to start adding to the "while I am in here" list. As long as you have the oil pan off, you may as well do a rear seal. Since you are doing the rear, you may as well do the front one. As long as you are doing that, you may as well do a timing set, etc, etc, etc... For secondaries, you want 1x6. I think I got 12 footers. Just get an extra and rip down for your longitudinals. ------------- Mike N 1968 Mustang |
Posted By: vondy
Date Posted: March-20-2011 at 3:24pm
|
Yes, let the fun begin. And the questions....
First, leveling and bracing. Where is the best place to level off of front to back? My main stringers do not appear to have a very flat surface anywhere. The secondaries are pretty good. Will that work? 
My trailer was modified by the P.O. so the bunks go all the way to the back. I was going to add some supports where I have marked in the pic. Do I need to support the keel at all? 


Then there is the question of grinding. I'm grinding away the old glass that held the stringers in right? I'm worried about not knowing when to stop. Guess I'll get a better feel once I start doing it. 
Thanks guys. Obviously I can't do it without y'all! ------------- http://correctcraftfan.com/diaries/details.asp?ID=4645&sort=&pagenum=1 - 69 Mustang HM |
Posted By: Gary S
Date Posted: March-20-2011 at 6:32pm
My oil pan had the same leak.There is some kind of rubber diaphram rivited between that plate and the pan.There is a hole in it and the dipstick tube passes thru it. I ended up cleaning it well and using rtv sealant on it.If I ever have to pull the motor I'm going to install this one I took off a PCM pan,the dipstick tube threads on. And like Mike says,where do you stop with the motor? Since your in there might want to check the oil pump and change to a heavy duty oil pump drive shaft too.And check the teeth on the flywheel.
 ------------- http://www.correctcraftfan.com/diaries/details.asp?ID=1711&sort=&pagenum=1&yrstart=1966&yrend=1970" rel="nofollow - 69 Mustang HM SS 95 Nautique Super Sport |
Posted By: vondy
Date Posted: March-21-2011 at 3:44pm
|
Anyone have Eric's email? Eric you around? Need to contact about sending the transmission.
Thanks! ------------- http://correctcraftfan.com/diaries/details.asp?ID=4645&sort=&pagenum=1 - 69 Mustang HM |
Posted By: kapla
Date Posted: March-21-2011 at 4:01pm
|
877 369 6693
search for fantastic finish marine... ------------- <a href="">1992 ski nautique |
Posted By: vondy
Date Posted: March-21-2011 at 4:47pm
|
Thanks for the number Kapla. ------------- http://correctcraftfan.com/diaries/details.asp?ID=4645&sort=&pagenum=1 - 69 Mustang HM |
Posted By: vondy
Date Posted: March-21-2011 at 5:08pm
|
Went to look at the Fir today. The vertical grain looked beautiful. The #2 stuff had several knots, some checks and wanes. Believe I'll go with the vertical grain. About $100 for 2x8x12 and $27 for 1x6x10. Forgot to ask about the moister, i'll check that when I pickup. ------------- http://correctcraftfan.com/diaries/details.asp?ID=4645&sort=&pagenum=1 - 69 Mustang HM |
Posted By: vondy
Date Posted: March-22-2011 at 11:38am
|
Are 2x8s tall enough for the mains? Or should I go for 2x10? From my measurements, the highest point is about 7.5 inches, not including the bump up for the gas tank.
Thanks! ------------- http://correctcraftfan.com/diaries/details.asp?ID=4645&sort=&pagenum=1 - 69 Mustang HM |
Posted By: WakeSlayer
Date Posted: March-22-2011 at 11:56am
|
If you get it perfect, you could use 2x8's but they are only 7.5" in the first place. I went with the 2x10's as I had misplaced my board stretcher at the time. ------------- Mike N 1968 Mustang |
Posted By: vondy
Date Posted: March-22-2011 at 12:50pm
|
Your right Mike, 2x10's it is. What did you use for the cross bracing? Fir or something cheaper?
Did I miss your post for your SN re-stringing? Haven't seen it. ------------- http://correctcraftfan.com/diaries/details.asp?ID=4645&sort=&pagenum=1 - 69 Mustang HM |
Posted By: Gary S
Date Posted: March-22-2011 at 1:40pm
|
Board strecher Mike ? Not needed,If you refoam,the water it holds keeps the wood expanded.No foam, you need to rehydrate the fir like original ------------- http://www.correctcraftfan.com/diaries/details.asp?ID=1711&sort=&pagenum=1&yrstart=1966&yrend=1970" rel="nofollow - 69 Mustang HM SS 95 Nautique Super Sport |
Posted By: storm34
Date Posted: March-22-2011 at 1:57pm
|
Too funny.
Here is mikes thread.... http://www.correctcraftfan.com/forum/forum_posts.asp?TID=15296&KW=&title=the-long-road-ahead--67-nautique-resto-mod - the long road ahead ------------- |
Posted By: WakeSlayer
Date Posted: March-22-2011 at 2:00pm
|
I just got an extra 1x6 and will rip them and cut to fit. Ironic that I named my thread the long road ahead, as I have not touched the boat in a year....
Yeah Gary. I lost mine with my wire stretcher. They came as a set. Makes me mad because I actually had the fancy one that also does sheetrock. ------------- Mike N 1968 Mustang |
Posted By: Keeganino
Date Posted: March-22-2011 at 5:36pm
|
I have the same oil leak from the base of the dipstick Tried sealing it with rtv but it is still leaking. For cleaning the motor I used purple power mostly but also used 3m brake cleaner on some parts which worked really well. The brake cleaner is good for spot cleaning something you are about to paint because it evaporates away quickly. Make sure when you paint the bell housing you use a self etching primer. That aluminum does not hold paint otherwise
Looks like that trailer has a ton of support. The brace you drew looks fine. Probably not much else you could do with that set up. I think being level side to side is more important than front to back so you can tell if your stringers are all going back in level. ------------- "working on these old boats may not be cost effective but as it shows its what it brings into your life that matters" -Roger http://www.correctcraftfan.com/diaries/details.asp?ID=4897" rel="nofollow - 1973 Skier |
Posted By: vondy
Date Posted: March-24-2011 at 11:24am
I guess in my case I will need to use a primer for the bell housing, intake and exhaust manifolds. Keegan what did you use, Duplicolor's self etching primer? ------------- http://correctcraftfan.com/diaries/details.asp?ID=4645&sort=&pagenum=1 - 69 Mustang HM |
Posted By: 8122pbrainard
Date Posted: March-24-2011 at 12:16pm
David, I use the Duplicolor self etch and found it to be a good product. I also wipe down aluminum with a weak acid. In my case, I use liquid soldering flux just because I always have a pint on hand. Some will use vinegar but I do not feel it's strong enough. ------------- /diaries/details.asp?ID=1622" rel="nofollow - 54 Atom /diaries/details.asp?ID=2179" rel="nofollow - 77 Tique 64 X55 Dunphy Keep it original, Pete < |
Posted By: vondy
Date Posted: March-24-2011 at 1:13pm
|
Thanks Pete. Since I'm applying primer to the aluminum, should I go ahead and apply to the rest of the engine as well?
Picking up the Fir today. Hopefully this weekend I can get some cutting and grinding done. Need to finalize my US Composites list as well so I can get that ordered. How long has it been taking you guys to get your orders in from them? ------------- http://correctcraftfan.com/diaries/details.asp?ID=4645&sort=&pagenum=1 - 69 Mustang HM |
Posted By: Keeganino
Date Posted: March-24-2011 at 3:19pm
|
They consistently take a week to deliver. I also used the duplicolor primer. Not sure about using it on the non aluminum parts. I think anything that is bare metal should get primed. Pete will know better. ------------- "working on these old boats may not be cost effective but as it shows its what it brings into your life that matters" -Roger http://www.correctcraftfan.com/diaries/details.asp?ID=4897" rel="nofollow - 1973 Skier |
Posted By: 8122pbrainard
Date Posted: March-24-2011 at 3:35pm
|
David,
The self etch is fine for all metals so you can use it for the cast iron too. I do recommend priming the whole engine. On my last project (1927 universal) priming made a big difference. I first prepainted some items that would be hard to paint completely after assembly. These I did not prime and it took several coats (3 to 4) of the Duplicolor engine paint to cover the high spots in the rough castings. Then, I went and got a can of Duplicolor engine primer and used it on the complete engine. I found the finish with the engine paint with primer to be lots better plus it covered with one coat. ------------- /diaries/details.asp?ID=1622" rel="nofollow - 54 Atom /diaries/details.asp?ID=2179" rel="nofollow - 77 Tique 64 X55 Dunphy Keep it original, Pete < |
Posted By: vondy
Date Posted: March-25-2011 at 12:38am
|
Thanks for all the advice on the engine paint. I'm actually looking forward to messing with that. The stringers are scaring me
Talked to Eric about the trans today and hopefully will be mailing off tomorrow. What do you guys think about the structure? My plan is to go with 3/4 ply for the floor and vinyl on top of that, no carpet for me. Should I keep the structure just like it is? As small as the boat is I would imagine 3/4 ply would not need any extra bracing. I don't even think you would need the cross bracing that is in there now since the floor would tie the stringers together. Except maybe under the removable panel. I'm also thinking of relocating the battery to the center as far forward as I can like others have done. Curious if anyone has attempted to put a built in ice chest in this area. There's a lot of open space under there. ------------- http://correctcraftfan.com/diaries/details.asp?ID=4645&sort=&pagenum=1 - 69 Mustang HM |
Posted By: Keeganino
Date Posted: March-25-2011 at 2:14am
|
It looks like a lot of space till you start putting it back together. I think I asked the same question, but at putback time there is not really a big enough space to make a nice chest or locker once the battery box and conduit are in. Are you ordering the nautolex vinyl from Garys for the floor? I might spring for it after the carpet is worn out. ------------- "working on these old boats may not be cost effective but as it shows its what it brings into your life that matters" -Roger http://www.correctcraftfan.com/diaries/details.asp?ID=4897" rel="nofollow - 1973 Skier |
Posted By: vondy
Date Posted: March-25-2011 at 11:01am
Thinking about it. ------------- http://correctcraftfan.com/diaries/details.asp?ID=4645&sort=&pagenum=1 - 69 Mustang HM |
Posted By: Keeganino
Date Posted: March-25-2011 at 12:54pm
|
The samples I got were real nice. I was running out of money at that point in the game and the carpet was a lot cheaper. ------------- "working on these old boats may not be cost effective but as it shows its what it brings into your life that matters" -Roger http://www.correctcraftfan.com/diaries/details.asp?ID=4897" rel="nofollow - 1973 Skier |
Posted By: TRBenj
Date Posted: March-25-2011 at 1:06pm
|
Keegan, how hard did you look? Lots of places sell the Nautolex.
You can find a piece big enough to do the floor and panels on http://cgi.ebay.com/Nautolex-Marine-Vinyl-Flooring-6-x-Various-Lengths-/250764595650?pt=US_Contemporary_Rugs_Carpets&var=&hash=item800fe853f9 - ebay for ~$200. Vondy, refresh my memory- do you not have the fiberglass floor pan? ------------- |
Posted By: WakeSlayer
Date Posted: March-25-2011 at 1:12pm
|
I think you still want the longitudinal stringers. You need some support outward on the floor. ------------- Mike N 1968 Mustang |
Posted By: TRBenj
Date Posted: March-25-2011 at 1:24pm
|
On my http://correctcraftfan.com/diaries/details.asp?Id=3024 - Skier , we're not refoaming. Instead of those "straps" that sit in notches cut in the main and secondary stringers, we're going to put in a few ribs running between the secondary and side of the hull- at least at the seems of the plywood floor pieces. Cutting and cutting around those notches in the stringers is a pain. Those ribs, plus glassing the floor to the walls should provide plenty of support. I think we're going to use 5/8" ply. ------------- |
Posted By: WakeSlayer
Date Posted: March-25-2011 at 1:41pm
|
I wish I would have done ribs on the SN, but I already cut the notches. And, yes, what a pain in the ass to work around them.... ------------- Mike N 1968 Mustang |
Posted By: vondy
Date Posted: March-25-2011 at 5:47pm
Yes I do have the floor pan. It's in pretty bad shape though. Cracks everywhere, the pylon area was separated and glued to the floor when I got it and the removable section behind the engine was very flimsy. I put some ply in that area, painted white, to get me through the last two years. The ribs sound good. I would love to skip the notching. What species would you use for them? ------------- http://correctcraftfan.com/diaries/details.asp?ID=4645&sort=&pagenum=1 - 69 Mustang HM |
Posted By: TRBenj
Date Posted: March-25-2011 at 5:52pm
|
I think even a rough looking floorpan is better than ditching it altogether.
I think we bought some extra 2x doug fir for the ribs. ------------- |
Posted By: vondy
Date Posted: March-25-2011 at 6:13pm
It's beyond rough, two sections are already gone. Now that I am thinking about it, I'll still need to do some notching around the pylon area. ------------- http://correctcraftfan.com/diaries/details.asp?ID=4645&sort=&pagenum=1 - 69 Mustang HM |
Posted By: vondy
Date Posted: March-25-2011 at 7:26pm
|
Keeganino, do you have a shopping list from your US Composites order? Working on mine and would like to compare. Your boat is about the same as mine, although you have much more going on with your secondarys. ------------- http://correctcraftfan.com/diaries/details.asp?ID=4645&sort=&pagenum=1 - 69 Mustang HM |
Posted By: 8122pbrainard
Date Posted: March-25-2011 at 10:16pm
|
David,
I, like Tim am sorry to hear about the glass floor pan. They were very unique to the stangs. How much of it is actually left? Restoring it takes lots of work but it can be done by someone that is advanced in glass repair. DO NOT throw it out!!! Yes, I feel your choice of doing the Nautilux floor is a good choice - still original!!  Go for it! Go for it! ------------- /diaries/details.asp?ID=1622" rel="nofollow - 54 Atom /diaries/details.asp?ID=2179" rel="nofollow - 77 Tique 64 X55 Dunphy Keep it original, Pete < |
Posted By: Riley
Date Posted: March-25-2011 at 11:13pm
We used white dot flooring from Gary's which has a similar look as a floor plan. I like the looks of it, but it is hard to keep clean. I'd go with the sharkskin Nautolex next time.
 ------------- |
Posted By: 8122pbrainard
Date Posted: March-25-2011 at 11:38pm
|
Bruce,
That boat is nothing but I think you should get out of the appraiser business and let your sons (and yourself) do boats!!!------------- /diaries/details.asp?ID=1622" rel="nofollow - 54 Atom /diaries/details.asp?ID=2179" rel="nofollow - 77 Tique 64 X55 Dunphy Keep it original, Pete < |
Posted By: Riley
Date Posted: March-26-2011 at 12:19pm
|
Thanks, Pete. That would be my dream job, as long as I didn't have to make money at it as that takes the fun out of it. That boat is almost done. I got to get that steering wheel off and paint it and the helm.
The white dot flooring cost around $90 and they sent me enough to do 2 or 3 boats. ------------- |
Posted By: vondy
Date Posted: March-26-2011 at 9:11pm
The grinding has begun. Wow, let me tell you how much fun that is...  living the dream living the dream
The starboard secondary is out. I actually feel bad taking it out because it was in there so good. No rot either, other than where the screw holes were for the cross bracing. It wasn't bonded to the hull quite as well at the stern but the rest was stuck like new. 


Now that I have the feel for grinding I want to make sure I'm going deep enough, and not too deep. I've been stopping when I get down to the cloth area, removing the thickened mat. 
I'm assuming the thick gray area should go as well. 
I thought about bedding the stringers one at a time, using the adjoining one as a guide and clamping block. It will prolong my grinding time but make the installation easier I guess. Thoughts? No more grinding for the day, off to a wedding. ------------- http://correctcraftfan.com/diaries/details.asp?ID=4645&sort=&pagenum=1 - 69 Mustang HM |
Posted By: Keeganino
Date Posted: March-26-2011 at 9:39pm
|
Your grinding looks good. I would not go any further. I did one side at a time so I could make sure everything was level and lined up. Makes it a lot easier to mark your engine mount locations. Nice stringer out in one piece! Wish I had had one like that for a template.
Seems like the only receipt I dont have is from USC!? But here is what I found in my notes: Mains take 16 linear yards per layer for both stringers Secondaries take 14.3 linear yards per layer for both stringers FLoor to hull and bilge is 21 Linear yards per layer I used a gallon medium cure time epoxy kit and cabosil as a filler. Probably only need like 2 lbs of that. I got 10 lbs and barely made a dent in it. I got the 95 yard roll of biax and used a little more than half. Here is Tim's order for the BFN which was about the same as I ordered except for all the 50" cloth. Only got a fraction of that.  ------------- "working on these old boats may not be cost effective but as it shows its what it brings into your life that matters" -Roger http://www.correctcraftfan.com/diaries/details.asp?ID=4897" rel="nofollow - 1973 Skier |
Posted By: WakeSlayer
Date Posted: March-26-2011 at 10:01pm
|
Keegan, you mean a 5 gallon kit, I assume. Even so, I have a good dent in my second 5 gallon kit on the 18ft SN, and still have the floor and little stuff to do. ------------- Mike N 1968 Mustang |
Posted By: vondy
Date Posted: March-27-2011 at 3:15pm
|
Thanks guys! I'm going to be on a question role here for the next two days so please bear with me.
Back to the US Composites order later. As for stringer removal. It's in the 50's today and I would like to take advantage of the cooler weather to do some more grinding. Should I remove the port secondary. This way I'll have both secondaries removed and then bedded in before the primaries are removed. Then I'll do the primaries one at a time. This makes sense to me but being that I have not done this before I may be missing something that could mess me up down the line. ------------- http://correctcraftfan.com/diaries/details.asp?ID=4645&sort=&pagenum=1 - 69 Mustang HM |
Posted By: critter
Date Posted: March-27-2011 at 3:43pm
|
IMO, you can remove both Secondarys with no issues as long as you have
the boat supported well at the front chine area and stern. I think that I remember removing both secondarys at the same time. ------------- 1980 Ski Nautique 1966 Barracuda |
Posted By: Keeganino
Date Posted: March-27-2011 at 7:54pm
|
Edit on my post above I used 10 gallons of medium cure epoxy, and I used every last bit. Sorry about that and good eye Mike. You will be fine pulling both secondaries as Critter mentioned. I think I read Tim saying that he would probably not get the fast cure epoxy again. Cheaper to get the 10 gallons all at once. ------------- "working on these old boats may not be cost effective but as it shows its what it brings into your life that matters" -Roger http://www.correctcraftfan.com/diaries/details.asp?ID=4897" rel="nofollow - 1973 Skier |
Posted By: TRBenj
Date Posted: March-27-2011 at 9:16pm
No, I would do it again- we did a good amount of glassing in cooler temperatures (winter/spring in New England) so the Fast Cure sped up the process somewhat. If youre going to be working in more moderate temps, the Medium cure (3:1) works great. ------------- |
Posted By: Keeganino
Date Posted: March-27-2011 at 10:53pm
|
Sorry to misquote you there Tim. I did most of my glassing in the middle of the summer so I was using less hardener than called for and ended up with about a pint left over. ------------- "working on these old boats may not be cost effective but as it shows its what it brings into your life that matters" -Roger http://www.correctcraftfan.com/diaries/details.asp?ID=4897" rel="nofollow - 1973 Skier |
Posted By: vondy
Date Posted: March-28-2011 at 3:01pm
|
Hoping to get US Composites and my CPES ordered today. Not sure about several things. Looking for some advice.
1. How much Cabosil? Seems like those who have ordered the 10lb bags don’t use very much of it. Should I go for less? http://www.uscomposites.com/fillers.html 2. Do I need any other filler/thickener besides the Cabosil? I see others use milled fiber. 3. Here’s what I am understanding as far as the layup goes. a. CPES the stringers/wood. b. ???Do I wrap with fiberglass before embedding or embed straight CPES coated stringers to hull??? c. Bed stringers down in thickened epoxy. d. Filet with thickened epoxy. e. Down the length of the stringers from the stringer to the hull, glass 2 inch tape followed by 4 inch then 8 inch. Then 12 inch biax followed by capping with 12 inch biax. ???One layer each??? f. Same with ribs. Maybe no biax? g. CPES floor. Do I glass as well? h. Bed floor to stringers with thickened epoxy. i. Glass floor to sides of hull. In layers? j. Glue down vinyl floor. 4. On the plywood floor, if I am to glass it, do I use cloth and how much and what thickness? 5. Are most people getting their CPES from Jamestown? Smiths Warm CPES Epoxy 2 gal kit enough? Sorry for the bombardment of questions. This whole thing is mind boggling the first time around. I know I’ll also need brushes, etc. If you see anything I need to add, change, remove, please let me know. As always, many thanks! ------------- http://correctcraftfan.com/diaries/details.asp?ID=4645&sort=&pagenum=1 - 69 Mustang HM |
Posted By: vondy
Date Posted: March-28-2011 at 3:03pm

 ------------- http://correctcraftfan.com/diaries/details.asp?ID=4645&sort=&pagenum=1 - 69 Mustang HM |
Posted By: Keeganino
Date Posted: March-28-2011 at 4:25pm
|
1. I would say 2-3 lbs of cabosil is plenty. That is the only filler I used and it works great.
3. Bed the stringers first and glass them in place so you are getting adhesion to the hull. Double up the 2/4/8 layers. Probably going to have to get 2 rolls of each. I only doubled the biax on the tops of the stringers from the engine to the tranny mounts. I used the 8.9 0z cloth and 1.5 oz mat on the floor after taping it to the hull with the 2/4/8. Mat first and then cloth for a nice surface was plenty thick enough for me. I would get a small paint mixer for your drill for mixing epoxy and especially when you use the filler. Worth its weight in gold. You will use a ton of mixing cups and paint brushes. I found walmart has a box of plastic drop cloths for cheap. It is easiest to wet out the material on a dropcloth before putting it in place. Remember the rollers for rolling air out of the layup and you will probably go through a few gallons of acetone. ------------- "working on these old boats may not be cost effective but as it shows its what it brings into your life that matters" -Roger http://www.correctcraftfan.com/diaries/details.asp?ID=4897" rel="nofollow - 1973 Skier |
Posted By: vondy
Date Posted: March-28-2011 at 5:53pm
|
Thanks Keegan, you've been a big help on this project. I'm reading your stringer thread again as we speak.
Did you use the cabosil just for bedding the stringers, fileting, and bedding the floor? Or did you also use it while taping? Did you glass the underside of your floor or just the top? Was it one layer each, mat then cloth, on top? 

Which roller did you end up getting? http://www.shopmaninc.com/fgrollers.html - Roller Was 2 gallons of CPES enough for you? OK, thanks again. I can't wait to start glassing. Right now I don't feel like I'm getting anywhere. Too many unknowns. Spending more time planning than doing. ------------- http://correctcraftfan.com/diaries/details.asp?ID=4645&sort=&pagenum=1 - 69 Mustang HM |
Posted By: WakeSlayer
Date Posted: March-28-2011 at 6:32pm
|
Keep track of your hours! ------------- Mike N 1968 Mustang |
Posted By: vondy
Date Posted: March-28-2011 at 6:57pm
Do I get to bill someone? Besides myself  ------------- http://correctcraftfan.com/diaries/details.asp?ID=4645&sort=&pagenum=1 - 69 Mustang HM |
Posted By: charger496
Date Posted: March-28-2011 at 8:57pm
|
Don't keep track of your hours! It'll make you think too much about the value of your time, and being one who just finished a boat, it's worth it... but for the first one, it takes a lot more hours than it should. Worth it though!
Bed the cpes and epoxyed stringers in cabosil. A layer of glass between them is just another bond that could fail. And filet the edges with it too. |
Posted By: charger496
Date Posted: March-28-2011 at 8:59pm
| Did I mention it's worth it (twice)? |
Posted By: Keeganino
Date Posted: March-28-2011 at 11:37pm
|
No problem! I have to do something with all this useful knowledge in my head.
You got it. The cabosil thickens the epoxy to desired viscosity. You can get it to the point of peanut butter so it stays where you put it. It gets thinner as it starts to kick so on the bilge side of the stringers make sure you make it extra thick for the fillet so it does not run. Any gaps you have after bedding can be filled when you make your fillets. Use the radius on the top of a bondo spreader to make a nice smooth fillet and squeeze epoxy into any voids. You dont use any filler when wetting out the material. Definitely use it to bond the floor to the stringers. Think I made fillets from the floor to hull as well to get a good transition. On the floor I did one layer of cloth on the bottom, then 1 layer each of the mat and cloth on the top. I did beef up the pylon area with a layer of biaxial. I love that stuff. Super strong! For the rollers I would get one that is narrow like 3" for tight spots. The wider one for the majority of the work and definitely get a corner roller. I would say the bigger diameter barrel on the roller is probably better. Make sure you get them in acetone as soon as your finished or they are done. I know you are excited. Gonna be worth every bit of the labor. I am really glad I have not kept up with my hours! Like Charger was talking about I could do another on in half the time! Plus now I have all the tools. ------------- "working on these old boats may not be cost effective but as it shows its what it brings into your life that matters" -Roger http://www.correctcraftfan.com/diaries/details.asp?ID=4897" rel="nofollow - 1973 Skier |
Posted By: vondy
Date Posted: March-29-2011 at 3:38am
|
Keegan I'll take all the useful knowledge you can spare.
OK, here is my final shopping list for US Composites. Please let me know if I should change anything. 
This is based on... 1. Doubling up the tape layers. 2. One Biax layer at stringer joints and one Biax layer over stringer tops. 3. One layer of cloth on the bottom of the floor and one layer of mat on top followed by a layer of cloth. The next size down for the Cabosil is a 1.7lb bag. For the price it makes sense to get the 10lb bag. I have selected 2 sets of pumps, should I get more? Ordering CPES from Jamestown or Rotdoctor. Anybody have a preference between the two? Rotdoctor might be a few bucks cheaper. I'm assuming I don't need any special mixing buckets or scissors. I should be able to find mixing buckets cheaper elsewhere. Chip brushes from harbor freight as well as drill paddle mixer. Starting to rethink my itemized pricelist. It hurts to see how much we are actually spending. And I have not even entered the other stuff yet... transmission, tools, etc. 
Yes... it will be worth it... I keep telling myself  ------------- http://correctcraftfan.com/diaries/details.asp?ID=4645&sort=&pagenum=1 - 69 Mustang HM |
Posted By: vondy
Date Posted: March-29-2011 at 11:29am
|
Just realized that the epoxy mat sheets from USC has been discontinued. They say their 1.5 oz chopped strand mat could be considered a substitute. Any thoughts on that? ------------- http://correctcraftfan.com/diaries/details.asp?ID=4645&sort=&pagenum=1 - 69 Mustang HM |
Posted By: TRBenj
Date Posted: March-29-2011 at 3:15pm
|
Their recommended replacement on the mat is fine- I could hardly tell the difference. Get more pumps. Get more rollers too- theyre hard to clean, so some will be junk after one use. I would consider ordering the mixing buckets from USC as well- Harbor Freight didnt have them locally, and they were significantly more expensive at Home Depot. I probably wouldnt bother with the layer of cloth after the mat on the floor. Did you add up the tape that you will need on the floor to wall connection? I take it youre not foaming any part of the boat? If not, dont forget to add any extra length of support ribs, etc on your tape material.
For CPES, Ive had luck making my own by mixing epoxy resin with xylene. I posted a link a while back for some "home brew" CPES. Buying it premade is $$$, which seems a little silly to me, since its basically thinned resin. ------------- |
Posted By: Keeganino
Date Posted: March-29-2011 at 3:33pm
|
I found that the mat is more difficult to work with to get a smooth finish but I am sure it will work. I would just get the 8.9 and use that instead of getting the lighter stuff but would be interested to hear what others have to say. 2 layers of 8.9 will take a ton of resin. Its way thicker than the 8.9 cloth tape. If you use it and put 1 layer on the bottom and 2 on top you can probably get away using thinner plywood on the floor.
I got my CPES from rotdoctor and had no complaints. It came with these paper pour spouts that are crucial. I heard somebody else say they did not get them and wasted about as much as they used. As expensive as that stuff is I would be POed sloshing that stuff around. The containers it comes in are not pour friendly without the spouts. Chip brushes go on sale at HF all the time. They also have the small paintmixer I was talking about. The shaft was too long so I cut it down to the size that worked best. Their mixing cups are not the best. HD or LOwes had something better and the wide mouth 1.5 gallon plastic paint buckets are good for mixing in cabosil. Good trick for reusing the mixing cups is to leave the brush in the cup and let it harden. Then pull the brush out along with all the kicked resin and you have a clean cup. Pumps... Cant remember if I used 2 or 3 sets. They are great for small batches but when you bed your stringers and make fillets you will be mixing up a quart or more at a time so your better off using the graduations on the mixing bucket at that point. The other thing you are going to go through like air is gloves. At the end I was buying the blue nitrile gloves. way more durable and comfortable. HF has those too. Man I get excited talking about this stuff. Way more fun than polishing aluminum which is what I have been doing for the last couple of weeks. Gonna have awesome rub rails when I am done though! ------------- "working on these old boats may not be cost effective but as it shows its what it brings into your life that matters" -Roger http://www.correctcraftfan.com/diaries/details.asp?ID=4897" rel="nofollow - 1973 Skier |
Posted By: vondy
Date Posted: March-29-2011 at 5:00pm
|
So should I get some 2.5 quart plastic containers? Would that be sufficient? Would I ever need more than that? Should I get some smaller ones too?
Back to the floor. Since I'm putting vinyl on top, I would suspect I would want as smooth a finish underneath that I could get. Sounds like cloth would be better for that. Maybe, I don't know. And what about putting mat on the underside of the floor rather than cloth? The mat is cheaper. I did the math and believe 2 rolls each of tape is plenty for stingers and floor to hull. What about empty caulk tubes for applying epoxy? Do I need some of those? Got plenty of gloves. ------------- http://correctcraftfan.com/diaries/details.asp?ID=4645&sort=&pagenum=1 - 69 Mustang HM |
Posted By: storm34
Date Posted: March-29-2011 at 5:45pm
Tell the wife to make sure she picks up AT LEAST 4 cases of beer on her next Costco run! 
And be sure to buy a couple replacements in the event your case starts to get a little lighter!
Not sure if Tim is ever going to drink those or not...maybe if he ever finishes his boat ------------- |
Posted By: TRBenj
Date Posted: March-29-2011 at 5:48pm
|
Those beers are coming to the next reunion I make it to!
The lower cost of the mat is easily offset by the amount of resin it soaks up. Mat is great for building thickness quickly for impact resistance, etc. Dont worry about getting tubes for thickened resin. We used ziplock bags. Get a LOT of cups. Get some stirrers too. ------------- |
Posted By: WakeSlayer
Date Posted: March-29-2011 at 6:06pm
|
Those tubes suck. ------------- Mike N 1968 Mustang |
Posted By: vondy
Date Posted: March-29-2011 at 6:20pm
We are never short on beer
Noted. So what's the verdict on the floor? Cloth on bottom, mat on top followed by cloth? Cloth on bottom mat only on top? Cloth on bottom and two layers of cloth on top? Once I figure that out I'll add some buckets and cups and place my order. Can I just get some paper drinking cups for small amounts or do I need to order anything special from USC? ------------- http://correctcraftfan.com/diaries/details.asp?ID=4645&sort=&pagenum=1 - 69 Mustang HM |
Posted By: WakeSlayer
Date Posted: March-29-2011 at 7:00pm
|
Solo cups work fine, too. ------------- Mike N 1968 Mustang |
Posted By: 8122pbrainard
Date Posted: March-29-2011 at 7:21pm
|
David,
A layer of cloth on both sides of the ply floor is fine. Just make sure you wrap the edges as well. ------------- /diaries/details.asp?ID=1622" rel="nofollow - 54 Atom /diaries/details.asp?ID=2179" rel="nofollow - 77 Tique 64 X55 Dunphy Keep it original, Pete < |
Posted By: vondy
Date Posted: March-29-2011 at 7:40pm
So no mat for the floor. How about for the ribs and various other wood like the exhaust bracing, rudder mount, etc? Mat or cloth? I think that about covers it all. ------------- http://correctcraftfan.com/diaries/details.asp?ID=4645&sort=&pagenum=1 - 69 Mustang HM |
Posted By: charger496
Date Posted: March-29-2011 at 7:43pm
| Is wrapping the edges just for abrasion resistance? Didn't do that to mine. |
Posted By: storm34
Date Posted: March-29-2011 at 9:03pm
And I would assume it helps in keeping out water. ------------- |
Posted By: 8122pbrainard
Date Posted: March-29-2011 at 9:44pm
|
David,
Any wood that isn't real structural, a layer of cloth is fine as well. Chris, You're correct that wrapping the edges is to prevent water absorption. You should have zero abrasion since the floor ply is set in thickened epoxy bonding it completely to the tops of the stringers. At the edge that bumps the hull sides, it glassed there preventing any movement as well. ------------- /diaries/details.asp?ID=1622" rel="nofollow - 54 Atom /diaries/details.asp?ID=2179" rel="nofollow - 77 Tique 64 X55 Dunphy Keep it original, Pete < |
Posted By: Keeganino
Date Posted: March-30-2011 at 12:09am
|
The type of material you use on the floor does not matter much. I would not lose any sleep over it. By the time you get to that point you will be a glass master Just get one type and use that. The nice thing about glass is that you can always grind it to shape if you have to. Thats why I say it is a forgiving medium. Build it up grind it down. With a vinyl floor you will want it to be pretty smooth.
I did what Tim suggested and used gallon freezer bags cut like a frosting bag to apply a bead for the fillet(then shaped it with a bondo spreader). Get good bags. Cheap ones will split, but you can reinforce them with tape before you cut the corner. Gotta work fast when its in the bag too cause it kicks fast in large batches. I went through a lot of different mixing cups and my favorites ended up being the 1.5 gallon for large batches and the 1 quart for smaller ones(Lowes or Home Depot had these for the best price). Anything smaller and the mixer can make a mess in a hurry(make sure you use a variable speed drill). As you get the hang of using the resin your batches will keep getting bigger. I used stirrers for the first few days PITA and then got the drill mixer and never looked back. You know you have a good mix when little bubbles start floating out of it. Ahhhhh I can almost smell it... Bit the bullet today and went and bought a 3/4 hp buffer from HF $75. Basically finished the rub rails this afternoon. SHould have done that 2 weeks ago. Cannot believe the difference in a 1/4 hp. Just another project that I got good at once the job was done! ------------- "working on these old boats may not be cost effective but as it shows its what it brings into your life that matters" -Roger http://www.correctcraftfan.com/diaries/details.asp?ID=4897" rel="nofollow - 1973 Skier |