floor repair and exploration
Printed From: CorrectCraftFan.com
Category: General Correct Craft Discussion
Forum Name: General Discussion
Forum Discription: Anything Correct Craft
URL: http://www.CorrectCraftFan.com/forum/forum_posts.asp?TID=28325
Printed Date: April-28-2024 at 7:49am
Topic: floor repair and exploration
Posted By: teelta
Subject: floor repair and exploration
Date Posted: November-12-2012 at 6:26pm
| I have a 1989 SN 2001. It has a bad soft spot just forward the ski pylon. When I took out the screws for the pitots to replace them, water came out the transom. When I took off the stabilizer fins to straighten them, water poured out. When I replaced the drive shaft, I noticed that oil residue was all the way up to the gas tank. It seems like the boat has been filled up with water at least to the floor level if not above prior to my ownership. I just picked this boat up this past Spring/early summer. I want to at least fix the portion of flooring in front of the pylon. I know I need to explore other areas of my floor but not sure exactly how to proceed without ripping everything out. I'm afraid I'm in for possible stringer replacement - maybe transom too?? But if so, I don't have the work space to work on this type of repair. The boat doesn't seem heavy in the water - the platform is about 1-2 inches above the water. But pretty sure there is at least some water trapped in there and will eventually lead to stringer replacement if not taken care of. If I just did the small floor repair where it is rotted, how long will it take for the rest of the floor/stringers to go? If you have time to provide me some direction, I would appreciate it. |
Replies:
Posted By: SNobsessed
Date Posted: November-12-2012 at 9:08pm
|
The factor in your favor is that your boat was made with the AME resin, which doesn't absorb water - so the stringers may not be totally rotted yet. Others will suggest you do a full rebuild - I suggest you 1st just open up that floor section and then do some drilling into the stringers there to see how wet they are. Post some photos so we can follow your progress. ------------- “Beer is proof that God loves us and wants us to be happy.” Ben Franklin |
Posted By: teelta
Date Posted: November-17-2012 at 1:55am
Looks like the floor is 1/4" fiberglass on top of wood. The wood looks like 1X6 boards and are not attached to the stringers. Is that factory or a botched floor job? The boards are pretty rotted. Also the top of the starboard stringer is rotted about 2 inches from the top. Couldn't really tell on the port side.  Not sure how to proceed. Should I go ahead and get the engine out and start taking up the whole floor? or test some other sections? Can anyone tell me how far to go up under the dash? Looks like the floor and setup (i.e. single exhaust) in my 89 is a little different than other 2001s. I'm assuming there are secondary stringers in there somewhere? Can anyone give me a layout under the floor if it is different than other 2001 so I know what to expect? |
Posted By: gun-driver
Date Posted: November-17-2012 at 2:35am
This is the only wood in the floor the rest is glass over foam.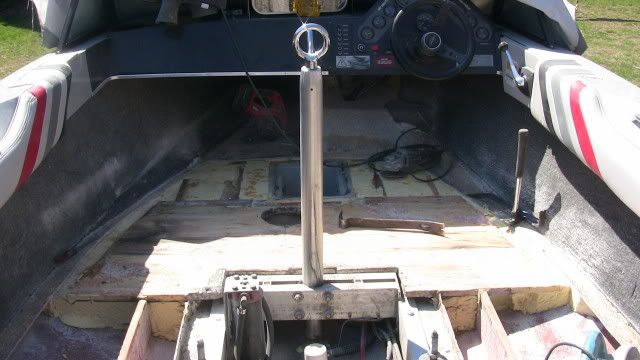
|
Posted By: lewy2001
Date Posted: November-17-2012 at 5:30am
|
The 89 is different more like TimB's 90 due to the single exhaust. I have some pictures some where of a 89 with the floor ripped up will try and find them for you. ------------- If you're going through hell, keep going http://www.correctcraftfan.com/diaries/details.asp?ID=2999" rel="nofollow - 89 Ski <a href="http://www.correctcraftfan.com/diaries/details.asp?ID=5685" ta |
Posted By: gun-driver
Date Posted: November-17-2012 at 9:12am
|
The stringer lay out may be different but it's still glass on foam. If you dig you will find rot so unless you want to do the stringers fix the wood and call it a day. |
Posted By: teelta
Date Posted: November-17-2012 at 11:56am
| Thanks for the pic and info - very helpful. What is the advantage of fiberglass over foam? I like the idea of the floor made out of marine grade plywood - it seems stronger in my mind. |
Posted By: teelta
Date Posted: November-17-2012 at 12:11pm
| gun-driver did you replace your stringers? |
Posted By: gun-driver
Date Posted: November-17-2012 at 1:24pm
Yes I did a complete rebuild of my '85. |
 teelta wrote:
Posted By: teelta
Date Posted: November-17-2012 at 1:38pm
| Do you have any more pics? How do you build up 1/4" of fiberglass? That's a lot of glass. Would it be better to use plywood and glass over that? |
Posted By: teelta
Date Posted: November-17-2012 at 1:38pm
| Do you have any more pics? How do you build up 1/4" of fiberglass? That's a lot of glass. Would it be better to use plywood over the whole floor and glass over that? |
Posted By: 8122pbrainard
Date Posted: November-17-2012 at 7:07pm
Marine isn't needed. Search the site. ------------- /diaries/details.asp?ID=1622" rel="nofollow - 54 Atom /diaries/details.asp?ID=2179" rel="nofollow - 77 Tique 64 X55 Dunphy Keep it original, Pete < |
Posted By: 8122pbrainard
Date Posted: November-17-2012 at 7:08pm
Yes he did. Search the site. ------------- /diaries/details.asp?ID=1622" rel="nofollow - 54 Atom /diaries/details.asp?ID=2179" rel="nofollow - 77 Tique 64 X55 Dunphy Keep it original, Pete < |
Posted By: 8122pbrainard
Date Posted: November-17-2012 at 7:10pm
Yes, there are details on glass over the foam. Search the site. ------------- /diaries/details.asp?ID=1622" rel="nofollow - 54 Atom /diaries/details.asp?ID=2179" rel="nofollow - 77 Tique 64 X55 Dunphy Keep it original, Pete < |
Posted By: peter1234
Date Posted: November-17-2012 at 8:33pm
|
Pete I do have to say when you try and search the site it is not easy to find what you want and even with keywords it is hard for me even after 5 yrs . maybe i am slow to learn but i have to blame the search for some of it . I have had a fairly simple question to ask that is probably somewhere on here but the search hasnt shown me . I have tried 5 or 6 times and am wary of asking here also so i will call a composites company for the answer ------------- former skylark owner now a formula but I cant let this place go |
Posted By: Frankenotter
Date Posted: November-17-2012 at 9:58pm
|
Try doing a google search. For example, if you want to find stringer threads type: Correct craft fan + stringer This helped me quite a bit. The search function on the forum is no good. ------------- 1999 Ski Nautique 196 |
Posted By: gun-driver
Date Posted: November-17-2012 at 10:44pm
|
I looked up my old rebuild thread but the photos aren't there because I rearranged my photo bucket. My build was a little different as I didn't put foam back in I used supports perpendicular to the stringers instead. I also wanted the boat light so I used 1x8 from the pylon forward and 1/4" luan (made for under tile) for the rest of the floor with 2 layers of mat and 1 layer of cloth and it's very solid. Here’s the link to my photo bucket. http://s256.photobucket.com/albums/hh176/gun-driver/85%20boat%20rebuild/" rel="nofollow - http://s256.photobucket.com/albums/hh176/gun-driver/85%20boat%20rebuild/ |
Posted By: teelta
Date Posted: November-18-2012 at 12:04am
 You can see that part of the stringer (surrounded by foam) is laminated with fiberglass but the section closer to the engine is not. No wonder it rotted. Could someone have tried to splice in a new stringer?  lovely rot, right?  How far up under the dash do you go? I can see wood under portions of it. I haven't explored any of the sides or back yet, but given the extent of rot on those stringers in front of the engine is it safe to say I need to go ahead and get the engine out and do a full stringer replacement? Gun-driver thanks for the link and thanks for your help! :) |
Posted By: teelta
Date Posted: November-19-2012 at 6:41pm
Got the gas tank out today. What is this bundle of wire at the transom? There are 2 on each side (one set is blue and gray and the other is red and gray). Are these vent tubes right? One comes from the blower but the other supposed to just hang there?  Anyone able to answer my previous post(s)? |
Posted By: turningpoint84
Date Posted: November-19-2012 at 7:11pm
|
teelta, Don't get frustrated, obviously you know you have a TON of work ahead of you. I suggest looking for another 89 that's been restrung. Do it right, REMOVE EVERYTHING that's on or near the floor. I know this sucks, but you'll be happy you did it later. That means yes everything under the dash/bow. As for those wires, I have no idea, i'm sure someone with a 2001 can help you. ------------- Proud 1968 mustang owner and now http://www.correctcraftfan.com/diaries/details.asp?ID=6454&sort=&pagenum1" rel="nofollow - 1970 Mustang |
Posted By: Jllogan
Date Posted: November-19-2012 at 7:20pm
|
This is a messy, expensive, time consuming and hard job. However, it needs done. There are some "splicing" products out there, but anyone on this site will recommend a full strip and rebuild. Anything else is subject to failure. There is no really good shortcut, do it all or patch the floor up and move on. ------------- http://correctcraftfan.com/diaries/details.asp?ID=5792&sort=&pagenum=1" rel="nofollow - 1986 Ski Nautique 2001 |
Posted By: Waternut
Date Posted: November-19-2012 at 7:27pm
|
That other hose should be connected to a vent on the outside of the boat. ------------- |
Posted By: Hollywood
Date Posted: November-19-2012 at 7:52pm
|
The factory radio had a 4x10 speaker in the seat corner bases. I'm betting those are the wires. For the most part a complete wiring harness was installed on all boats. ------------- |
Posted By: teelta
Date Posted: November-23-2012 at 11:10pm
| I haven't been able to work on my boat but have been doing a LOT of reading. I still haven't made up my mind between plywood floor and foam and fiberglass. I don't want a lighter boat because I mostly wakeboard behind it. I can't tell from my research if there is a significant difference in weight between the two. Also, I wonder if anyone has done plywood and foam? |
Posted By: 79TiqueRebuild
Date Posted: November-23-2012 at 11:40pm
| When I replaced my stringers I used foam around the front air box and battery box to the bulkhead separating the engine compartment. I reused the fiberglass air box and went with plywood for the floor. It was cpes'ed and fiberglassed heavily. I am very pleased with the way it turned out. Read lots of stringer threads and decide which way will be the best for you. Hope this helps, Monty |
Posted By: teelta
Date Posted: November-25-2012 at 12:21am
|
Anybody know weight differences between plywood and no foam, foam and fiberglass, and coosa with or without foam? |
Posted By: gun-driver
Date Posted: November-25-2012 at 3:14pm
My theory on this was...if I want to make a wake I'll put bags in it, but when just cruising around, bare-footing or skiing I don't want the extra weight. As for how much lighter it is I'm not sure until I get it over to the local supply yard and put it on the scale. Been meaning to do this just haven't got around to it. |
Posted By: teelta
Date Posted: December-03-2012 at 10:55pm
The engine's out...  The floor is out and the foam is out...  I found a sharpshooter shovel to work the best for foam removal. Almost done getting the air box out. After that, on to stringers! |
Posted By: 79TiqueRebuild
Date Posted: December-03-2012 at 11:09pm
|
Looks like it is coming along. Was the foam waterlogged? Nice engine hoist! I had to remove a wheel to barely get mine to clear. Keep the pictures coming. Monty |
Posted By: gun-driver
Date Posted: December-04-2012 at 1:44am
|
Well you can take the foam out like that or... you can take a hand saw cut along the edges down to the hull and pop them out with a pry bar in nice big squares. 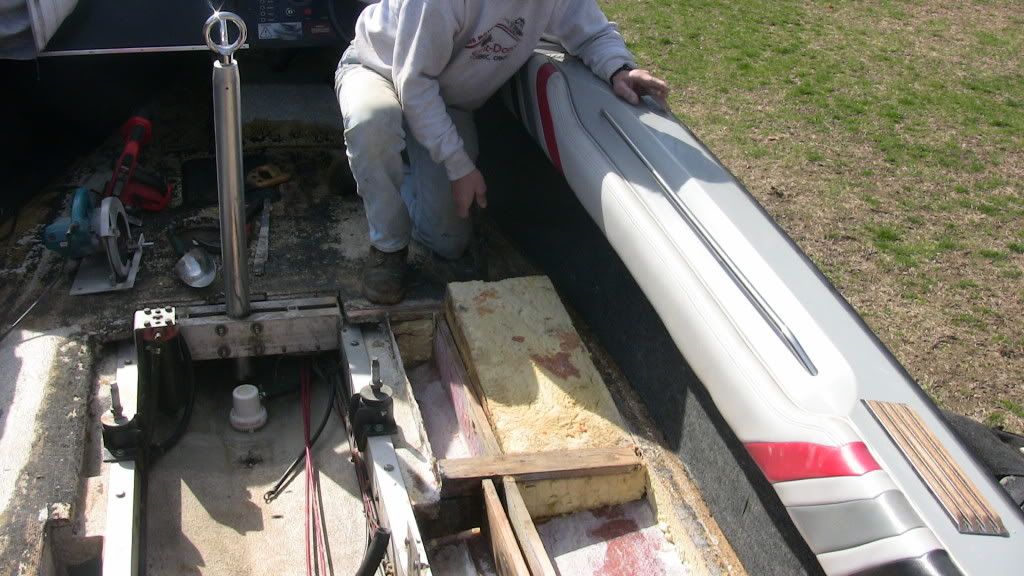 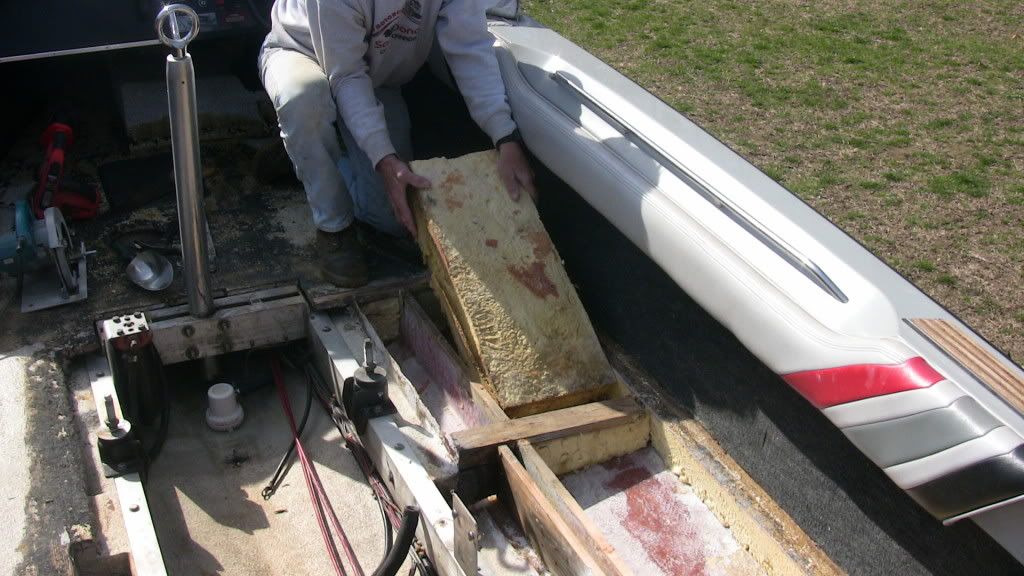  |
Posted By: teelta
Date Posted: December-04-2012 at 1:54am
|
79TiqueRebuild - the foam was really wet in some places. I don't know if this is true of all 2001s but they put the dryer vent stuff under the floor to vent the engine compartment as well as the air box. So once the vinyl got torn, water went straight to the foam under the floor. The worst part was around the battery compartment. I rented that engine hoist for $35 for the day. It worked out really well. Well worth the $!! Gun-driver - I tried it that way but did not work that well for me. The sharpshooter was faster plus I could stand up and do it! 
|
Posted By: inglesideshawn
Date Posted: December-04-2012 at 3:50am
Hers a pic of my 89 with the new pipes ran ... the old venting had alot to do with the failure of the foam and stringers.. ------------- 1989 nautique |
Posted By: BuffaloBFN
Date Posted: December-04-2012 at 8:04am
|
Here's my stringer thread. It's a BFN but answers many questions as I was almost a virgin to fiberglass. Great engine lift.  http://correctcraftfan.com/forum/forum_posts.asp?TID=9543&KW=pumpkin+patch&title=weeding-the-pumpkin-patch" rel="nofollow - Weeding the Pumpkin Patch ------------- http://correctcraftfan.com/diaries/details.asp?ID=2331&sort=&pagenum=12&yrstart=1986&yrend=1990" rel="nofollow - 1988 BFN-sold "It's a Livin' Thing...What a Terrible Thing to Lose" ELO |
Posted By: teelta
Date Posted: December-04-2012 at 12:33pm
That is exactly what I plan on doing there as well as the engine vent tube. Do you have a picture of what you did with the air box? The 89s are a little different in that the tubes are so close to the hull. Did you have to get rid of some of the foam on the side hull just above the air box in order to get a good bond with the new fiberglass and epoxy? |
Posted By: teelta
Date Posted: December-04-2012 at 12:35pm
Thanks. I am quite familiar with your thread. It is one of the many I have bookmarked. |
Posted By: inglesideshawn
Date Posted: December-04-2012 at 7:27pm
|
The four inch pipe was the most difficult,I dident use a elbo,the bend was to sharp for the steering cable. what worked for me was to make small cuts in the pipe and epoxy them one cut at a time till I had the correct bend. the smaller ones just use elbos and its not to bad, just leave them long on bouth ends and trim them up after the foam and glass work is done.as for the air box I used the old one to use as a mold for the new one,the old one got cut out with the floor..I should of made the batter box bigger to hold either dual batts or have a storage place. ------------- 1989 nautique |
Posted By: inglesideshawn
Date Posted: December-04-2012 at 7:40pm
new one just had to be trimed to fit..  ------------- 1989 nautique |
Posted By: teelta
Date Posted: December-05-2012 at 8:00pm
Man, I don't know how yo could have made your battery box any bigger. There isn't much room there especially once you put the vents in. |
Posted By: teelta
Date Posted: December-05-2012 at 8:03pm
| Has anyone tried using an oscillating tool to cut out stringers? I'm really nervous about cutting them out. Unfortunately, they are not so bad that they are delaminating everywhere. |
Posted By: BuffaloBFN
Date Posted: December-05-2012 at 8:39pm
I remember the feeling well. I used a cut-off wheel on a grinder, but since then guys are using a diamond wheel. Cut the seam/fillet to separate the two. I would start by looking for a place where you can see a little something underneath whether it's delaminated or just showing through thinner glass. Once you see the joint, you can follow it home. ------------- http://correctcraftfan.com/diaries/details.asp?ID=2331&sort=&pagenum=12&yrstart=1986&yrend=1990" rel="nofollow - 1988 BFN-sold "It's a Livin' Thing...What a Terrible Thing to Lose" ELO |
Posted By: BuffaloBFN
Date Posted: December-06-2012 at 7:09am
Did you find your answers here? ------------- http://correctcraftfan.com/diaries/details.asp?ID=2331&sort=&pagenum=12&yrstart=1986&yrend=1990" rel="nofollow - 1988 BFN-sold "It's a Livin' Thing...What a Terrible Thing to Lose" ELO |
Posted By: teelta
Date Posted: December-06-2012 at 11:27am
| Still haven't decided whether to use plywood over foam or just fiberglass over foam. |
Posted By: Wila74
Date Posted: December-06-2012 at 11:31am
| Nice work! |
Posted By: dochockey
Date Posted: December-06-2012 at 2:22pm
|
if there was no foam in these boats we would not have to do all these stringer jobs . until they design a foam product that doesn't soak up water don't put it back in the floor. my 2¢ ------------- 1989 Teal Ski Nautique 1967 Mustang Harris Float Sunfish |
Posted By: dochockey
Date Posted: December-06-2012 at 2:29pm
|
I know I have this job coming up cause I know the history of my boat. I'm a believer of floatation just not foam in the current process ------------- 1989 Teal Ski Nautique 1967 Mustang Harris Float Sunfish |
Posted By: teelta
Date Posted: December-06-2012 at 2:36pm
|
70% of my main stringers are good. Most of the damage is around the pylon area where there was no fiberglass on top of the stringers. I wish I could just replace that area and be done with it but it sounds like a lot of people regret doing that in the long run. My thought is however I decide to do it - foam, no foam, plywood over foam or fiberglass over foam...it will all be better than factory and if it has lasted almost 24 years from the factory then it will last even longer after I get done with it. As long as I can get over my fear of cutting those stringers!
|
Posted By: 79TiqueRebuild
Date Posted: December-06-2012 at 3:15pm
|
A can or 2 of liquid courage got me through my project. I think I spent almost as much time reading stringer threads as actually working on them. Monty |
Posted By: inglesideshawn
Date Posted: December-07-2012 at 1:27am
Mabe its just the 89s, but the hull kept oil canning and that was the reason for me going with the foam again..Its possible to make it better than new,you can see why the parts failed, and what should be done to keep that from happing again.. Oh and dont forget to do the platform brackets, their was just mush in their.. Make the new blocks double thick so the lags dont go through.... and mine all four were the same.. ------------- 1989 nautique |
Posted By: quinner
Date Posted: December-07-2012 at 1:36am
|
Shawn, We are tearing in to our 80' Martinique project, you should stop by and give us some pointers, just down the road!! ------------- http://www.correctcraftfan.com/diaries/details.asp?ID=1143" rel="nofollow - Mi Bowt |
Posted By: teelta
Date Posted: December-07-2012 at 1:37am
| What is oil canning? How did you cut off the blocks? Chisel them out? Did you use 1x6s or plywood? |
Posted By: inglesideshawn
Date Posted: December-07-2012 at 2:22am
|
The older boats must of had thicker glass, mine would flex with the lighest weight. That made it hard to fit the new stringers, even doing them one at a time. platform blocks were a sandwich of halfinch ply and glass,and rounded off the corners .I realy liked the diamond wheel. ------------- 1989 nautique |
Posted By: inglesideshawn
Date Posted: December-07-2012 at 2:40am
|
The 80 sounds like a great winter project... ------------- 1989 nautique |
Posted By: teelta
Date Posted: December-07-2012 at 2:49am
I was going to take out both main and secondary stringers on one side only tomorrow. Should I just do one of them at a time instead? |
Posted By: teelta
Date Posted: December-09-2012 at 7:38pm
|
Got a stringer out. Couple of questions...there is a channel in the fiberglass now that the stringer is removed. Even if I grind it down there will still be a channel there, which is fine I guess because the new stringer will go right back in unless I need to move it over an 1/8" or 1/4" to allow for thicker fiberglass (several layers to attach to hull and several layers to attach floor) than what was original. I'm not sure how thick the fiberglass will be on the inside (bilge side) of the stringer and want to plan so the engine cradle will fit. |
Posted By: BuffaloBFN
Date Posted: December-09-2012 at 7:54pm
|
If anything, you'll need to build with modern materials to make up thickness. And that channel wasn't part of the original pop from the mold/mould? I had resin piled up in those areas, and I wanted to get back to glass(or close to it) for the rebuild. ------------- http://correctcraftfan.com/diaries/details.asp?ID=2331&sort=&pagenum=12&yrstart=1986&yrend=1990" rel="nofollow - 1988 BFN-sold "It's a Livin' Thing...What a Terrible Thing to Lose" ELO |
Posted By: BuffaloBFN
Date Posted: December-09-2012 at 8:04pm
This pic is all resin piled up where the base of the stringer was. You can see where I thought I was ready... Had to go back and cut all of that out. The dark area under the old stringer is the hull.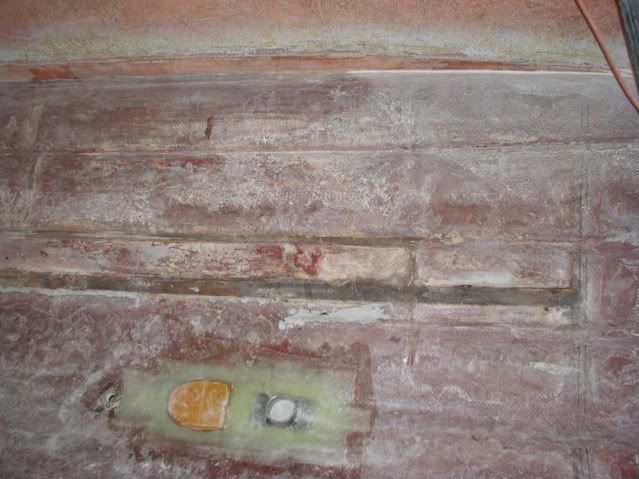 ------------- http://correctcraftfan.com/diaries/details.asp?ID=2331&sort=&pagenum=12&yrstart=1986&yrend=1990" rel="nofollow - 1988 BFN-sold "It's a Livin' Thing...What a Terrible Thing to Lose" ELO |
Posted By: teelta
Date Posted: December-16-2012 at 1:16am
| Got the main stringer formed and almost ready to go in. I have this grey spattered material (gel coat or resin?) in the bilge. How do you prep that to lay fiberglass on? Just rough it up with 60-80 grit paper? I wasn't planning on sanding the bilge smooth? Same with other side of stringer? |
Posted By: BuffaloBFN
Date Posted: December-16-2012 at 6:11am
|
If the gray splatter is in the bilge area, then it's probably gel. You'll want to cut that back for new glass to adhere. I'd use 36-50 grit on a flapper wheel. Did you figure out the canning yet? If not, think of a coke can without its inner structure(coke). The sides 'can' easily when unsupported. My guess, based on the age of your boat, is that you will have zero to minimal flex to worry about. ------------- http://correctcraftfan.com/diaries/details.asp?ID=2331&sort=&pagenum=12&yrstart=1986&yrend=1990" rel="nofollow - 1988 BFN-sold "It's a Livin' Thing...What a Terrible Thing to Lose" ELO |
Posted By: 8122pbrainard
Date Posted: December-16-2012 at 9:32am
|
Trey, Greg is correct that the gel has got to go. You need to get down to some good glass for the new to bond to and tie into the old structurally. If you have been reading some of the stringer threads, you should have noticed this step is important. Gel is simply decorative and not strong. How about some pictures so we can take a look. I'd hate for you to get too far and skip over some other steps. ------------- /diaries/details.asp?ID=1622" rel="nofollow - 54 Atom /diaries/details.asp?ID=2179" rel="nofollow - 77 Tique 64 X55 Dunphy Keep it original, Pete < |
Posted By: BuffaloBFN
Date Posted: December-16-2012 at 11:37am
|
FWIW My suggestion to go with heavier grit is to aid a possible mechanical grip to the chemical bond. When you get down to where you want to be with the 36 grit, don't be afraid to bounce it for deeper grooves. ------------- http://correctcraftfan.com/diaries/details.asp?ID=2331&sort=&pagenum=12&yrstart=1986&yrend=1990" rel="nofollow - 1988 BFN-sold "It's a Livin' Thing...What a Terrible Thing to Lose" ELO |
Posted By: teelta
Date Posted: December-17-2012 at 2:39am
Ok makes sense. Thanks. I have read in some threads that some put down some fiberglass between the hull and stringer bottom. What is the purpose of this? |
Posted By: 79TiqueRebuild
Date Posted: December-17-2012 at 2:55am
| When I was bedding my stringers I used some Matt and epoxy thickened with milled fiber and some cabosil to fill in the gaps where I didn't get the new stringers matched to the hull. When bedding them down the thicker the epoxy the better, almost a peanut butter consistency. You will find that it will try and find the lowest point. Hope this helps, Monty |
Posted By: 8122pbrainard
Date Posted: December-17-2012 at 8:56am
This is to reinforce the hull when going no foam. It's thought that CC on later models used the foam it add rigidity to the hull skin. ------------- /diaries/details.asp?ID=1622" rel="nofollow - 54 Atom /diaries/details.asp?ID=2179" rel="nofollow - 77 Tique 64 X55 Dunphy Keep it original, Pete < |
Posted By: BuffaloBFN
Date Posted: December-17-2012 at 12:26pm
Pete's not wearing a t-neck today. Specifically, the glass and resin put between the bottom of the stringer and the hull is to make up small differences in fittment. It's not to take up slop, so try to get the stringer close. ------------- http://correctcraftfan.com/diaries/details.asp?ID=2331&sort=&pagenum=12&yrstart=1986&yrend=1990" rel="nofollow - 1988 BFN-sold "It's a Livin' Thing...What a Terrible Thing to Lose" ELO |
Posted By: 8122pbrainard
Date Posted: December-17-2012 at 8:24pm
 Wow, I sure misread this one!! Wow, I sure misread this one!!  ------------- /diaries/details.asp?ID=1622" rel="nofollow - 54 Atom /diaries/details.asp?ID=2179" rel="nofollow - 77 Tique 64 X55 Dunphy Keep it original, Pete < |
Posted By: BuffaloBFN
Date Posted: December-17-2012 at 10:29pm
|
It all gets fixed around here. I bet you could type gobbldy gook and someone could decipher it. ------------- http://correctcraftfan.com/diaries/details.asp?ID=2331&sort=&pagenum=12&yrstart=1986&yrend=1990" rel="nofollow - 1988 BFN-sold "It's a Livin' Thing...What a Terrible Thing to Lose" ELO |
Posted By: jbear
Date Posted: December-18-2012 at 12:41am
|
my surprise was that Pete was not wearing a t-neck..gotta be cold up north. bet that he has a monogramed shirt on tho.... john ------------- "Loud pipes save lives" AdamT sez "I'm Canadian and a beaver lover myself"... |
Posted By: 8122pbrainard
Date Posted: December-18-2012 at 8:45am
John, Actually I did and have been wearing a T-neck plus some heavy shirts (sorry no monogram) since I've been spending so much time out in the new empty plant. It's been cold out there since there are only two heaters in all of the 200,000 sq. ft., open dock doors in the warehouse area and no equipment yet. The lack of heat was planned since when we get the blow molders running, we we actually have excess heat. In summer, we will have fan coils with chilled water trying to get the heat down. ------------- /diaries/details.asp?ID=1622" rel="nofollow - 54 Atom /diaries/details.asp?ID=2179" rel="nofollow - 77 Tique 64 X55 Dunphy Keep it original, Pete < |
Posted By: BuffaloBFN
Date Posted: December-18-2012 at 9:21am
|
I thought it was the t-neck that held in the 'CCFunk'. My bad. ------------- http://correctcraftfan.com/diaries/details.asp?ID=2331&sort=&pagenum=12&yrstart=1986&yrend=1990" rel="nofollow - 1988 BFN-sold "It's a Livin' Thing...What a Terrible Thing to Lose" ELO |
Posted By: teelta
Date Posted: December-21-2012 at 11:47pm
I got the first stringer in. As you can see I need to add more Cabosil on the next one. Was able to add a little bit of a fillet with the excess but will come back to add some more when it dries.  |
Posted By: dochockey
Date Posted: December-22-2012 at 12:13am
|
Did you find the boat tin canning? ------------- 1989 Teal Ski Nautique 1967 Mustang Harris Float Sunfish |
Posted By: teelta
Date Posted: December-22-2012 at 12:21am
not much but I have it supported on jacks and that is one reason why I decided to replace one at a time |
Posted By: yangqing
Date Posted: December-22-2012 at 6:37am
|
As far as I'm concerned,Diablo 3 is very intersting. Buying Diablo III Gold from vipdiablo3 is the most convenient and fastest way.I can always get a secure delivery within 15mins minutes ,they can always make sure my enjoying not being disrupted and having execute more exciting: http://www.rsgold2buy.com/" rel="nofollow - Runescape Gold http://www.d3face.com/" rel="nofollow - Diablo 3 Gold http://www.topgw2gold.com/" rel="nofollow - Guild Wars 2 Gold ------------- yangqing |
Posted By: yangqing
Date Posted: December-22-2012 at 6:38am
|
As far as I'm concerned,Diablo 3 is very intersting. Buying Diablo III Gold from vipdiablo3 is the most convenient and fastest way.I can always get a secure delivery within 15mins minutes ,they can always make sure my enjoying not being disrupted and having execute more exciting: http://www.rsgold2buy.com/" rel="nofollow - Runescape Gold http://www.d3face.com/" rel="nofollow - Diablo 3 Gold http://www.topgw2gold.com/" rel="nofollow - Guild Wars 2 Gold ------------- yangqing |
Posted By: BuffaloBFN
Date Posted: December-22-2012 at 6:59am
|
Trey, you may find that your mixture thins a bit when the epoxy kicks; so what looks good by the stir stick may end up too thin. Also, if you have an edge on the downhill side now, it'll save you grief if you fair it now. cabosil: great stuff for thickening and saving weight but super hard, a bear to remove microballons: easy to fair and not heavy, lower marks for thickening talc: cheap and a good thickener, heavier ------------- http://correctcraftfan.com/diaries/details.asp?ID=2331&sort=&pagenum=12&yrstart=1986&yrend=1990" rel="nofollow - 1988 BFN-sold "It's a Livin' Thing...What a Terrible Thing to Lose" ELO |
Posted By: BuffaloBFN
Date Posted: December-22-2012 at 7:02am
?!!? ------------- http://correctcraftfan.com/diaries/details.asp?ID=2331&sort=&pagenum=12&yrstart=1986&yrend=1990" rel="nofollow - 1988 BFN-sold "It's a Livin' Thing...What a Terrible Thing to Lose" ELO |
Posted By: Gary S
Date Posted: December-22-2012 at 12:10pm
As far as I'm concerned you are a bore,go away. ------------- http://www.correctcraftfan.com/diaries/details.asp?ID=1711&sort=&pagenum=1&yrstart=1966&yrend=1970" rel="nofollow - 69 Mustang HM SS 95 Nautique Super Sport |
Posted By: teelta
Date Posted: December-22-2012 at 12:17pm
Good idea...thanks. I was going to try sanding that edge off. |
Posted By: 8122pbrainard
Date Posted: December-22-2012 at 12:36pm
Reported to the administration as spam. ------------- /diaries/details.asp?ID=1622" rel="nofollow - 54 Atom /diaries/details.asp?ID=2179" rel="nofollow - 77 Tique 64 X55 Dunphy Keep it original, Pete < |
Posted By: teelta
Date Posted: December-27-2012 at 2:23pm
This cold weather has shut down the project...the trouble with not having a shop or a garage big enough 
|
Posted By: teelta
Date Posted: December-28-2012 at 3:53pm
|
The tech guy at US Composites recommended using 2 overlapping layers of Biax to glass the stringers to the hull. This is a bit different process than what I've read here on this site. But since the Biax is much thicker and several layers within it, it kind of makes sense to me and much simplier. I might add an extra just to make sure. The tech also said that if you add dry heat blowing on the epoxy while it is drying, it won't blush. I tried it and worked. |
Posted By: TRBenj
Date Posted: December-28-2012 at 4:18pm
|
Working with biax is a pain. Its good stuff, but thick- so it doesnt like to make bends, and it soaks up a lot of resin. Adding layers over biax is less than fun, as its thickness will cause an air pocket at the transition. Grinding the edge smooth would be recommended if youre putting the 2nd layer down after the first is dry. Theres a reason most people here recommend a higher number of thinner layers instead... not only can it be made stronger (and have a better strength to weight ratio), but thin layers of cloth are infinitely easier to work with. Plus, biax is $$$. ------------- |
Posted By: Waternut
Date Posted: December-28-2012 at 5:05pm
Well I don't want to start a battle but I disagree with some of this. I agree that more layers of fabric are stronger, have a higher strength to weight ratio, and are easier the work with. However, that's in a perfect world. In reality, thinner layers are still easier to work with but using a wet layup, your strength to weight ratio advantages go down depending on how much resin you think you need, and you could actually get lots of air bubbles between plies if you aren't careful. Weight gains and savings will be marginal though. Lastly, the cost of 2-3 layers of cloth weave will typically exceed the cost of biax. There are lots of considerations in strength, resin content, stiffness, waterproofing capability, workability, price, etc. Each user needs to rack and stack the pros and cons to best determine which is best for them. ------------- |
Posted By: TRBenj
Date Posted: December-28-2012 at 5:32pm
|
I just did the math and youre right... accounting for the extra layers of cloth more than negates the price savings by a small margin. I do think the slight extra cost is more than worth it in terms of strength and workability though. One needs to be careful about introducing air regardless of their layup method... and I would say that fewer, thicker layers will be more prone to introducing bubbles and pockets (especially at the overlapped edges) than a greater number of thin layers. Same goes for proper wet out- that needs to be controlled regardless of layup method. Definitely agree that weight savings wont be huge even with the thinner layup... but any opportunity to use less resin and get the same amount of strength (or greater) is a good one to take advantage of. Direction of strength is another thing to consider... biax (at least the one USC sells) has its weave oriented at 45 degrees. Cloth will give you strength along the length of the stringer, as well as in the vertical direction... which is primarily where you need it. Ive tried a few different layups and found that many layers of thin cloth, followed by biax up the sides and over the tops of the mains works pretty nicely. While there are many ways to skin this cat, our boats are similar enough in size, layout and purpose that reinventing the wheel on each successive re-string probably isnt necessary. Lots to be learned from others peoples lessons learned here! ------------- |
Posted By: teelta
Date Posted: December-29-2012 at 1:40am
| Maybe I have too much time on my hands to think and dream but I wonder if it possible to do away with the secondary stringer to put an integrated ballast under the floor kind of like how Roger (uk1979) did with his boat. I worry about the hull flexing so might need to put more fiberglass down to strengthen the hull??? Also how many ribs do you need to support the floor? Suggestions on pumping water in and out? Maybe this is all a bad idea, I don't know. |
Posted By: 8122pbrainard
Date Posted: December-29-2012 at 8:52am
|
Trey, If the tanks are designed properly with internal baffles, they will take the place of the ribs and secondary stringers supporting the floor and hull. ------------- /diaries/details.asp?ID=1622" rel="nofollow - 54 Atom /diaries/details.asp?ID=2179" rel="nofollow - 77 Tique 64 X55 Dunphy Keep it original, Pete < |
Posted By: uk1979
Date Posted: December-29-2012 at 11:55am
|
Trey.......a few tips that I and others have tried on their builds........ When flaring along the bottom of the stringers ready to take Cloth or Biax make some shaped tools out of plastic/pvc to run along the hull and give you a nice uniform shape.......the $ store is a good place to look for cooking spatulas wood one are good too as you can shape and use to work Biax into tight corners. Let the flaring beginning to firm up run some cloth over it and brush on epoxy this will smooth it right out and give you very little sanding if you stop at this point and let fully set. Working in and out of the boat is a pain try this........... sheet up one side of your boat and build a layup table on top along the side cover with news paper then clear plastic sheeting all taped on the underside of the table......pre wet out Biax don’t try to wet out on the stringers!!......I mix up the epoxy in the pot then with my Biax pre cut to size laying on the table and pore along the Biax then go over it with the roller to spread it out once that side is done turn over and do that side too and leave for a while you should be able to see the news print through the Biax then fold up like wall paper and hang on a rail and do the next piece if you have some, depending on length and size you can have 2 or 3 going at once as I found I had 30 to 45 min to work it, allot depends on the air temp you working in....a good place to try first is an exhaust port and swim deck mount to gauge the time you have as they are small I use a different epoxy here and there may be some different timings. If you’re putting the first layer of Biax down bush on some epoxy first and leave to get sticky then start coating up the Biax then when you spread out from corners it will stay put. On the Biax I use found the long ply side to be the flattest and went with that side down.........let it kick and is nice and sticky then apply your next layer remember to turn 180 still with the long ply down to get the 45 running the other way........ with your tools work the Biax out from corners to remove air and brush the excess epoxy back over.... have good rads on the top of your stringers and biax will fold over easy.....don’t try to fold over the secondary stringers just go each side and cap with cloth....if you have cut outs in the stringers just run over them and knife out when semi dry/green. If you can have help mixing up the epoxy while you spread and fix works well with many beer brakes waiting each layer to kick/sticky up as an all in one build is the best for a chemical bond throughout..........but how ever to do it will be as good or better than the old...... do what works for you. Try to work in a VERY WELL VENTALATED AREA a car port is good epoxy is not good to breath in all day spray mask is good to use some have had bad eye swelling skin reaction and for me made me feel low after a few days. As Pete said you could make tanks with ribs and add more fibre glass to the hull if using the hull as the tank it would need to be a good thick covering to seal up the old and not crack over time as the old is not water tight like epoxy that’s why your old stringers rotted out, a cool project but if you need to be back on the water this may stop you next year if free time is short.....there are many ballast pumps out there it will come down to how much $$ and the time to fill /empty you’re looking for. Good luck with the build and thanks for posting your progress.  ------------- Lets have a go 56 Starflite 77 SN 78 SN 80 BFN |
Posted By: Air206
Date Posted: December-29-2012 at 12:32pm
|
Roger: Awesome tips! The logistics of doing stringers always floored me (pun intended)..... your words of wisdom are really helpful to many newbies trying to wrap their heads around all this. Thanks for taking the time to add........ AWESOME! Steve ------------- https://tinyurl.com/y6t5e3bu" rel="nofollow - 04 Air206 http://tinyurl.com/9urzgls" rel="nofollow - 91 Barefoot 78 SkiTiq |
Posted By: Waternut
Date Posted: December-29-2012 at 1:10pm
|
Good post uk1979. One thing I want to add is before laying the pre-wetted biax down, make sure you apply a thin layer of epoxy to your stringers and hull. This will make everything stick better and you can just dab your fabric in place. I typically prefer to lay all the layers at once and when they become tacky, come back and press out any air bubbles, gaps, and lifted edges that may have formed...but that's just my preferred plan. There is nothing wrong with uk1979's plan. There is also nothing wrong with letting the first layer dry completely, scuff sanding it, and applying another layer. They just take a little more time is all. Probably doesn't need to be said but just in case. Remember that published cure times are typically taken in 75-80 degree weather. If you're working in 40-50 degree weather, your cure times and pot life times will probably double. ------------- |
Posted By: 8122pbrainard
Date Posted: December-29-2012 at 1:19pm
Pot and cure times are also dependent on the hardener used. Also, pour your mixed epoxy into a roller pan rather than a container. Spreading the mix out will increase the pot life. ------------- /diaries/details.asp?ID=1622" rel="nofollow - 54 Atom /diaries/details.asp?ID=2179" rel="nofollow - 77 Tique 64 X55 Dunphy Keep it original, Pete < |
Posted By: teelta
Date Posted: December-29-2012 at 1:38pm
| I got the 3:1 hardener system so it cannot be used below 55 degrees. Thanks for all the tips guys. |
Posted By: Waternut
Date Posted: December-29-2012 at 4:20pm
Yes epoxy is an exothermic reaction meaning that mixing it produces heat. The more surface area the resin can make with itself, the more heat it will generate which will speed up the curing process. I personally can't use enough resin fast enough to justify mixing that much but spreading it out is good practice anyway. Always mix the resin and hardener in epoxy resins per the instructions though. Mixing extra hardener with polyester resins will make them cure noticeably faster. Mixing extra hardener with epoxies doesn't make that much of a difference in cure times and actually degrades the strength of the resin. If you need to speed up the cure time, use heat. ------------- |
Posted By: uk1979
Date Posted: December-30-2012 at 9:50pm
Thanks Steve…you will find its not so much what you use but how you set your build up…biax is all about time pre cut all your layers, pour un mixed epoxy into mega cups and if using pumps pump out the right amount of hardener into smaller cups so if working alone its quick to mix a batch up…for me I found .5 liter plus hardener batches to start and adjust up or down to your biax … found my 6in wide biax would take 2 x .5 batches to soak a full stringer length biax pour straight from the mixing cup along the length of the biax around 1.5 in wide you will find it much quicker to then roller out into the biax than back and forth loading up a roller in a tray…remember that you won't use as much epoxy on the other side of the biax but if you have spare just push onto the next strip of biax on your lay up table. Have lots mixing sticks and longer sticks that can be cut easy so if you have a real tight corner or a bit that won't stay down just put a small bit of plastic over the end and wedge off the hull/Old stringers untill it grabs…yes have a roller tray with a small amount of epoxy in for dabbing in as you go and somewhere to put the roller. Take off some pictures from the site to check yourself as you go…if unsure stop and reset your self and have a fall back part you can use up wet biax…exhaust port,bracket mounts,lift mount. You find this will give you plenty of time to lay your biax and not rushed. Mark lines with a sharpie on one end of the roll of biax before you cut to size then its easy to see which way your laying. Don't use the same drink cup as the ones your using as mixing pots…you will mix them up… You will use more epoxy in a biax build than in a cloth build,and as you can see biax needs to be set up more. More will post there ways …just pick which works for you as that will give the best results Roger. ------------- Lets have a go 56 Starflite 77 SN 78 SN 80 BFN |
Posted By: teelta
Date Posted: January-04-2013 at 4:19pm
| Roger, I understand the pre-wet process. The only thing I am a little fuzzy on is whether or not to put epoxy on the stringer (vertical surface) and let it get tacky before applying the fiberglass? If so, mix with Cabosil to keep all of it from running off the vertical surface? Or just put on thin layer without cabosil? |
Posted By: uk1979
Date Posted: January-04-2013 at 4:50pm
|
Hi Trey If your laying Biax yes pre coat in epoxy only and let it sticky up on all faces before you wet up the Biax........you can lay straight after the pre coat if the shape is nice and uniform with slow bends ...but if its tight corners sticky helps grab the Biax as you spread out the air/folds.....I would recommend you do a small area first just to get a feel for it...don’t steam into an full stringer first.  ------------- Lets have a go 56 Starflite 77 SN 78 SN 80 BFN |
Posted By: teelta
Date Posted: January-04-2013 at 5:12pm
Mix the epoxy with a thickener or just coat thinly and don't worry about any runs? |
Posted By: TRBenj
Date Posted: January-04-2013 at 5:46pm
I agree... your line of questioning would imply that youve never worked with epoxy resin before. Am I right? ------------- |
Posted By: uk1979
Date Posted: January-04-2013 at 5:46pm
Just coat thinly....I find a short pile/varnish 4inch roller good and a brush for in the corners.....just use the cheap rollers in multi packs from a DIY shed no point in trying to clean after just bin it. ------------- Lets have a go 56 Starflite 77 SN 78 SN 80 BFN |
Posted By: teelta
Date Posted: January-04-2013 at 6:10pm
Just with that first stringer and I just repaired my muffler...so other than that, no. I read in Bill's build that he used some thickener so it wouldn't run straight down the stringer. Roger didn't mention using any so I was just clarifying. |
Posted By: teelta
Date Posted: January-20-2013 at 6:25pm
OK got my first stringer glassed in. There are 3 layers of Biax...3", 6" and 12". 
|