Quick fuel carb install questions
Printed From: CorrectCraftFan.com
Category: General Correct Craft Discussion
Forum Name: General Discussion
Forum Discription: Anything Correct Craft
URL: http://www.CorrectCraftFan.com/forum/forum_posts.asp?TID=38633
Printed Date: September-27-2024 at 9:49am
Topic: Quick fuel carb install questions
Posted By: jblunceford
Subject: Quick fuel carb install questions
Date Posted: May-14-2016 at 8:29pm
|
I just pulled the holley 4160 and put a m600 QF carb on my '86 Martinique 351...everything swapped over easily except the QF carb came with its own ground/neg wire (from carb body) connected to the neg tab on the elect choke module. The holley elect choke was connected to both a neg & pos wires from the engine wire harness. I know to attach the pos wire off the engine harness to the new QF carb elect choke pos tab, but what do I do with the neg wire off the engine harness? Can I leave it loose or should I try to slip it under the same neg tab that the carb's neg wire is ttached to? ------------- Jeff in Hoover (Birmingham), AL 1986 CC Martinique Bow Rider 351PCM |
Replies:
Posted By: 8122pbrainard
Date Posted: May-14-2016 at 8:59pm
I wouldn't leave it loose. Quickfuel evidently wants you to make sure the carb is grounded which isn't a bad idea. I suggest connecting it to the neg on the choke and the engine harness but don't backyard hack it by trying to slip it under the same quick connect tab. There are "sta-con" quick connects called "piggyback". that is a proper means of connecting them together. ------------- /diaries/details.asp?ID=1622" rel="nofollow - 54 Atom /diaries/details.asp?ID=2179" rel="nofollow - 77 Tique 64 X55 Dunphy Keep it original, Pete < |
 jblunceford wrote:
Posted By: TRBenj
Date Posted: May-14-2016 at 9:11pm
| Id just leave it loose... It's no more a danger than that big piece of grounded metal under your carb. |
Posted By: 8122pbrainard
Date Posted: May-14-2016 at 10:04pm
Tim, Please explain to me why Quickfuel included the pigtail if they intended you to leave it loose. ------------- /diaries/details.asp?ID=1622" rel="nofollow - 54 Atom /diaries/details.asp?ID=2179" rel="nofollow - 77 Tique 64 X55 Dunphy Keep it original, Pete < |
Posted By: Gary S
Date Posted: May-14-2016 at 11:21pm
|
I would guess they supplied it since not all engine harness has a ground wire for the choke. PCM does but I had to make one for my HM to ground the choke when I put the Holley. Not having seen it I wonder rather than not hooking it up,if it can be removed completely? ------------- http://www.correctcraftfan.com/diaries/details.asp?ID=1711&sort=&pagenum=1&yrstart=1966&yrend=1970" rel="nofollow - 69 Mustang HM SS 95 Nautique Super Sport |
Posted By: jblunceford
Date Posted: May-14-2016 at 11:54pm
|
Thanks all.....got er going... Running smooth now...great upgrade...appreciate all the assistance. Jeff in Alabama. ------------- Jeff in Hoover (Birmingham), AL 1986 CC Martinique Bow Rider 351PCM |
Posted By: gun-driver
Date Posted: May-15-2016 at 12:09am
|
What was the fix |
Posted By: TRBenj
Date Posted: May-15-2016 at 12:19am
| Re-read, Pete. Quick fuel grounds the choke to the carb body. The question is what to do with the ground in the harness that attached to the (formerly installed) Holley choke since it is not needed with the QF. No need to do anything at all with it. |
Posted By: jblunceford
Date Posted: May-15-2016 at 2:47am
|
I doubled up both the qf carb supplied ground with the harness ground on the choke neg connection tab in a temporary fashion untill i can get to the hardware store for the proper connection (soon to fix). Otherwise, the install was pretty straightforward. .....just had to adjust the throttle linkage & associsted support (which required unbolting the support and moving it forward to the next set of bolt holes). That 25" flex fuel hose connected up nicely. The QF carb primed itself pretty quickly and fired up nicely. Required a little adjust on the idle set screw the it ran like a charm. I noticed the QF instructions said to retighten associated bolts after running a while, so I'll check those again soon. Again, it appears so far to be a great upgrade...boat has never run better for me, but only my second season with the old girl...i hope to get severAl more years outa this 30 yr old beauty....I'm 53 so this boat reminds me of my heydays. I love the vintage... Many thanks again...this is a great forum. Cheers..,, Jeff in Alabama ------------- Jeff in Hoover (Birmingham), AL 1986 CC Martinique Bow Rider 351PCM |
Posted By: 8122pbrainard
Date Posted: May-15-2016 at 5:47am
Jeff,  Great that the fix was so simple and the carb is doing the job. Keep us informed on how the Quickfuel performs. Great that the fix was so simple and the carb is doing the job. Keep us informed on how the Quickfuel performs.I actually went looking at the Quickfuel site for instructions regarding the ground pigtail for the choke. I couldn't find anything so it seems logical that Tim's and Gary's thought's are correct it's used when there isn't a ground to the choke in the engine harness. So Jeff, I'd say you can ether toss the pigtail and use the original ground in the harness or piggyback it with the original like you have done. It never hurts to have plenty of ground points. Grounding problems are one of the electrical problems that do haunt us from time to time especially as our boats get older and corrosion starts to set in. ------------- /diaries/details.asp?ID=1622" rel="nofollow - 54 Atom /diaries/details.asp?ID=2179" rel="nofollow - 77 Tique 64 X55 Dunphy Keep it original, Pete < |
Posted By: phatsat67
Date Posted: May-16-2016 at 11:27am
| I always got rid of the pig tail. One time the pigtail was sparking at the carb base so I trashed that idea and stuck with the factory stuff. You won't find a better running bolt on carb for stock applications on the market. They seem nearly fuel injected. Congrats. |
Posted By: TRBenj
Date Posted: May-16-2016 at 11:44am
| Grounds won't spark... 12v ign feed absolutely will and I would not leave that one dangling. Ground connection is harmless though. |
Posted By: phatsat67
Date Posted: May-16-2016 at 12:49pm
| You calling me a liar ? It was sparking. I think I ended up putting a new choke puck on that one too. |
Posted By: TRBenj
Date Posted: May-16-2016 at 1:31pm
Grounds don't spark, man. The entire engine is a ground. Now, if it was carelessly flopping into a 12v source that's another story... But the ground connection itself is not a danger. Zip tie it out of the way or cut it off- but no need to safely terminate it or connect it to anything. |
Posted By: 8122pbrainard
Date Posted: May-16-2016 at 1:42pm
Tim, They will spark when there's isn't another ground wire connected to the block and there's a connected load somewhere!  ------------- /diaries/details.asp?ID=1622" rel="nofollow - 54 Atom /diaries/details.asp?ID=2179" rel="nofollow - 77 Tique 64 X55 Dunphy Keep it original, Pete < |
Posted By: phatsat67
Date Posted: May-16-2016 at 2:34pm
|
I assume the choke assembly had a dead short. That'll certainly make a ground wire spark on another ground. Also, the ground that comes on the carb just pulls off. Plug in the factory ground and throw the pig tail away. No need for zip ties. |
Posted By: jblunceford
Date Posted: May-16-2016 at 6:02pm
|
My only critique so far is that the QF carb doesn't come with its own (top hat) air filter unit, the Holley filter fits fine, but the center connector bolt is a different size that the Holley air filter connector bolt (the Holly bolt with the nice round black screw knob is too large in diameter for the QF carb). I tried a smaller, 3-in diameter metric machine screw, but the thread is wrong (the mach screw thread too fine I think). This center bolt screws down into what appears to be a plastic (black) threaded receiver hole on the QF carb. I can't tell if the QF receiver hole is a black plastic coating over a metal receiver hole, or really jsut plastic...either way, I don't want to strip it with the wrong size/thread bolt. I have a question in to the QF guys, but thought I'd ask here as well.....anyone figured out the specs on the correct center bolt for bolting down the top hot air filter element to the top of the QF M600? ------------- Jeff in Hoover (Birmingham), AL 1986 CC Martinique Bow Rider 351PCM |
Posted By: TRBenj
Date Posted: May-16-2016 at 7:15pm
| Same as the Holley, believe it is 1/4-20. The boss is not plastic. |
Posted By: jblunceford
Date Posted: May-16-2016 at 7:31pm
|
Not sure how it can be the same as the holley, when the the center bolt I took off my holley is too large for the QF M600....it/the holley center bolt, is noticeably larger than the boss (threaded receiving hole) on the M600...this size difference can be seen with the naked eye. The connecting bolt that came off my Holley had a nice black hard- plastic screw down knob at the top, a little less than an inch in diameter. Is this the one that should fit the QF M600? If so, the only thing I can think is.....if the "boss" isn't plastic, is it metal underneath some plastic-like protective coating, and would the original Holley bolt actually fit the M600 boss if I force it and grind through the black coating on the "boss"? Otherwise, it needs a smaller diameter bolt of some thread type that I can't find. I tried an M6 (or M8?) diameter machine screw, which will make about 1 & 1/2 turns before tightening up because the thread pattern is wrong (too fine). ------------- Jeff in Hoover (Birmingham), AL 1986 CC Martinique Bow Rider 351PCM |
Posted By: jblunceford
Date Posted: May-16-2016 at 7:43pm
|
TRBenj, You are correct as stated....just spoke with QF rep who stated that the black covering on the boss is a "Teflon-type" spray on coating on the underlying cast metal. He says the original 1/4, 20 Holley bolt will fit when the protect coating is removed, gently ground out with a die, or the bolt itself. QF rep also says I can use the main wiring harness ground wire, and pull the one that is attached to the carb off (or tape up and tie back out of the way). No need for double ground wires. Mystery solved.....thanks again. Jeff ------------- Jeff in Hoover (Birmingham), AL 1986 CC Martinique Bow Rider 351PCM |
Posted By: Jonny Quest
Date Posted: May-16-2016 at 8:18pm
|
When I get back to the house, I'll go look at my QF M-600 and see what I did with the flame arrestor bolt. If memory serves, I found a bolt in my bin that was the right diameter and thread count. Then I bought a new S/S bolt that was the correct length from the local big-box hardware store. One note...I had to change-out my original flame arrestor as the QF carb has adjustable floats. The adjusting hardware did not allow my original flame arrestor to sit flat on the carb. I needed a raised flange type of arrestor. I decided to go for a little chrome bling and bought a K&N marine flame arrestor/air filter unit. JQ ------------- Current 2003 Ski Nautique 206 Limited Previous 2001 Ski Nautique Open Bow 1994 Ski Nautique Open Bow Aqua skiing, ergo sum |
Posted By: TRBenj
Date Posted: May-17-2016 at 12:04am
| You shouldn't need a raised flange arrester to clear the adjustable floats. I have used a few different non-raised 8" diam arresters on my qf750. |
Posted By: phatsat67
Date Posted: May-17-2016 at 10:18am
|
Tim, the 600 has shorter bowls than your big dual feed. The stock flame arrestor swill generally run into the adjustable float screws and won't seat on the carb flange. You could make a spacer or seek a different arrestor. It could also be that the rear bowl doesn't have a metering block I can't remember exactly. |
Posted By: Seancc1988
Date Posted: May-29-2016 at 2:44am
| How's the boat run with the new carb? Is holeshot or top end any better? |
Posted By: Jonny Quest
Date Posted: May-30-2016 at 12:37am
Tim: I tried to use the standard flame arrestor, but it would not sit flush on the carb body -- due to the float adjust hardware. I probably could have used several gaskets in a stacked configuration to get over the obstruction. Instead, I went with a raised flange arrestor. JQ ------------- Current 2003 Ski Nautique 206 Limited Previous 2001 Ski Nautique Open Bow 1994 Ski Nautique Open Bow Aqua skiing, ergo sum |
Posted By: Xer86
Date Posted: September-14-2017 at 11:33pm
| I just got a QFT M-600 to replace the 4160 on my '88 Martinique w/PCM 351 that I have been fighting with for some time now. My 4160 currently has a 2.5 PV installed and has run fine in the past with it. Just recently it has developed an issue. The QFT carb i ordered came with a 6.5 preinstalled. Is this going to create an issue? Has anyone installed the QFT carb as it arrives on a PCM 351 and got it to run properly without changing the PV in a similar application? Should I plan on changing the 6.5 to a 2.5 before I even try it? I don't know a ton about carbs but I am trying to learn so that I can get this boat running properly again. Currently at idle vacuum reading at carb to intake manifold spacer is ~20 in Hg at idle. A quick blip of the throttle drops it to ~5in Hg and then up to ~23 in Hg before retruning to 20. It sits there pretty steady. Any advice would be appreciated. |
Posted By: gun-driver
Date Posted: September-14-2017 at 11:41pm
| https://www.youtube.com/watch?v=mE_xTUXQJQ8" rel="nofollow - https://www.youtube.com/watch?v=mE_xTUXQJQ8 |
Posted By: Gary S
Date Posted: September-15-2017 at 12:13am
|
In the past Holley used 6.5's PV in their 351 600cfm marine carbs. Later for some reason they changed to 2.5's. For some other reason the new 302 450cfm's use 8.5's ------------- http://www.correctcraftfan.com/diaries/details.asp?ID=1711&sort=&pagenum=1&yrstart=1966&yrend=1970" rel="nofollow - 69 Mustang HM SS 95 Nautique Super Sport |
Posted By: Duane in Indy
Date Posted: September-15-2017 at 7:27am
Informative video , worth watching if you have questions. You are going to like your QFT carb. BTW Holley owns them now. ------------- Keep it as original as YOU want it 1978 Mustang (modified) |
Posted By: KENO
Date Posted: September-15-2017 at 8:21am
|
Plenty of people have bolted the Quick Fuel on as it comes out of the box with no issues. Just install it as is and don't go to a 2.5 PV. Put it on, adjust the idle and go. If you look at the jet sizes (secondary) you'll notice quite a difference from your Holley also, but you don't want to change them either. Your vacuum readings and the way it acts sound norma lfor blipping the throttle with no load if that's what you're asking |
Posted By: GottaSki
Date Posted: September-15-2017 at 11:38am
|
what Ken sez +1 ------------- "There is nothing, absolutely nothing, half so much worthwhile as messing around with boats...simply messing." River Rat to Mole |
Posted By: Xer86
Date Posted: September-15-2017 at 1:30pm
|
Thanks everyone for the input. I took the time to read up on the power valves a bit more and what you are saying makes much more sense now. One more quick question about installing the QFT M-600. The fuel line inlet on the M-600 is on the port side of the carb. The 4160 is on the front next to the primary bowl. Obviously the rigid factory fuel line will not work in this case. If I have to replace the fuel line anyway I was thinking to add an in-line fuel pressure regulator and gauge as diagnostic features for the mechanical fuel pump. The question is, does anyone know if there is a good kit to do this or have any recommendations for good part to build a setup like this? I was thinking to go to a local truck shop and see if they could fab a custom rigid line to fit but then I thought that a flexible line may be better. Ideas? |
Posted By: KENO
Date Posted: September-15-2017 at 2:57pm
|
since you had other posts about your Holley having the drips, I see you gave up on the Holley, Did you do the things people suggested like making sure the tank and everything upstream of the pump is clean so your new carburetor doesn't come up with the same problem? You'll get opinions both ways on the fuel line, if you go flexible you should be using USCG approved stuff It'll have USCG A1-15 for a rating and it's stamped on the hose. It's more resistant to fire than the typical auto hose or even the Aeroquip type braided hose. You'll get opinions on regulator and gauge setups too. Myself I'd use a gauge as a temporary thing to troubleshoot and you shouldn't need a regulator with a pump that puts out around 5 to 7 psi, but some people seem to lower their pressure to 3 psi or so as their cure to things like the "drips". Some other people might call that a band aid fix.
|
Posted By: 8122pbrainard
Date Posted: September-15-2017 at 3:41pm
Ken, Didn't you link the USCG details on the fuel line regs? I went looking without any luck. I remember the flex line termination (fittings and clamps) was spec'd too. Matt, If you want to go hard line, pre flared brake tubing and a good tubing bender works. I don't feel having someone off site fabricate the tubing will work. You need the engine in front of you to make the bends. ------------- /diaries/details.asp?ID=1622" rel="nofollow - 54 Atom /diaries/details.asp?ID=2179" rel="nofollow - 77 Tique 64 X55 Dunphy Keep it original, Pete < |
Posted By: scootdogydog
Date Posted: September-15-2017 at 3:47pm
|
http://m.overtons.com/modperl/product/details.cgi?pdesc=Sierra-Fuel-Line-Sierra-Part-18-8115&i=692043" rel="nofollow - fuel line ------------- http://www.correctcraftfan.com/diaries/details.asp?ID=7183" rel="nofollow - 1999 Python 1980 Ski Tique 1968 Mustang WIP |
Posted By: KENO
Date Posted: September-15-2017 at 5:19pm
|
Here are a couple of links from an old thread http://www.uscgboating.org/assets/1/AssetManager/ABYC.1002.01.pdf" rel="nofollow - http://www.uscgboating.org/assets/1/AssetManager/ABYC.1002.01.pdf https://www.gpo.gov/fdsys/pkg/CFR-2011-title33-vol2/pdf/CFR-2011-title33-vol2-sec183-558.pdf" rel="nofollow - https://www.gpo.gov/fdsys/pkg/CFR-2011-title33-vol2/pdf/CFR-2011-title33-vol2-sec183-558.pdf And Scoot dogs linked line is perfectly acceptable and used by quite a few of the QF conversion people here on CCF. Has the right threads, right bends and it's simple to install
|
Posted By: Xer86
Date Posted: September-15-2017 at 5:27pm
|
Keno, I finall got the holley running late yesterday while I was waiting for my M-600 to arrive. I haven't given up. My brain won't let me no matter how much I want to. I ended up checking the fuel filter and the fuel pump. I measured discharge pressure of 7psi so I ruled it out. Disassembled the carb and cleaned it all again. Pulled the PV and tested it since I had the backfire. I removed the old needle/seat assembly and installed the new one that came in the kit. The new one was a little different dimensionally. I mic'd the needle and the new one was .014" shorter than the old one. The new seat was .019" shorter than the old one. I adjusted the float a few times to compensate for the difference in the needle/seat assembly and finally got it where it was operating much better (not dripping during idle). It still has a little drip once I shut the boat off but its pretty minimal. The boat ran well with noticeably better throttle response throughout the RPM range up to about 4k. It would restart with a single turn of the key which was very uncommon before. No pumping the throttle and multiple start attempts. Not anything like it was before. At this point, I have had so many issues I just don't really trust the boat. It'll run well for a few outings and then out of nowhere it'll have some issue. I figure the M-600 will at least make it much easier to adjust the floats if needed without taking the primary bowl all the way off. When I bought the M-600, I also bought a new Ignitor II EI module and the corresponding 0.6ohm/45kV coil to replace the current setup (Ignitor I / 0.8ohm/40kV coil) but I realized that I ordered an oil filled coil and not an epoxy one so I sent it back today. My plan is to run the boat as-is for the remainder of the season and rebuild the holley completely over the winter when I have some spare time. I will also install the M-600 and probably the new Ignitor II module and epoxy filled coil at that time. Then I will have a spare carb, EI module and coil standing by. Usually for me, if I'm prepared for everything, nothing happens. Fingers crossed! |
Posted By: 8122pbrainard
Date Posted: September-15-2017 at 5:29pm
|
Ken, Thanks for finding those links. ------------- /diaries/details.asp?ID=1622" rel="nofollow - 54 Atom /diaries/details.asp?ID=2179" rel="nofollow - 77 Tique 64 X55 Dunphy Keep it original, Pete < |
Posted By: Xer86
Date Posted: September-15-2017 at 5:29pm
| Thanks Scootdog! |
Posted By: cbr1000dude
Date Posted: September-17-2017 at 9:17pm
I guess I'm the "bandaid" guy that lowered his FP to 3 psi to make my Holley quit dripping after shut off, and it still works fine thank you. Just remember, the gasoline you are using today is not the gasoline that was available 30 years ago that these carbs were designed to handle. I'm sure nobody has the formulas as these are kept secret, but the floats don't float as well in it. 7 psi was too much for mine after numerous rebuilds and even trying a brand new carb. did not help. Lowering the FP with a Holley FP regulator worked, and it's nice and shiney. My fuel guzzling 454 never drains the bowls, even at WOT for long runs. Just my experience.
|
Posted By: KENO
Date Posted: September-17-2017 at 9:24pm
You did come to mind, but don't feel like the Lone Ranger
|
Posted By: 8122pbrainard
Date Posted: September-17-2017 at 9:30pm
Are you thinking the S.G. has changed that much to affect the floats? Did you ever attempt to adjust the float levels? ------------- /diaries/details.asp?ID=1622" rel="nofollow - 54 Atom /diaries/details.asp?ID=2179" rel="nofollow - 77 Tique 64 X55 Dunphy Keep it original, Pete < |
Posted By: KENO
Date Posted: September-17-2017 at 9:43pm
|
I seem to remember he tried float adjustments, it works for him with reduced pressure and like I mentioned, others do it too so why worry about it. Like he said, it works just fine for him
|
Posted By: Duane in Indy
Date Posted: September-17-2017 at 10:01pm
|
Agee with most of what has been said. I would start with getting the carb mounting surface level. Most manifolds are set up with approx 5 degrees taper for auto setups. Boats are more in the range of 15 degrees. Accurate float setting is difficult to achieve with that much angle. As shown in my. "Mustang 17 Rebuild" thread my carb wedge plate has a lot of angle in it to achieve the level mounting surface I wanted ------------- Keep it as original as YOU want it 1978 Mustang (modified) |
Posted By: Gary S
Date Posted: September-17-2017 at 10:24pm
|
When I put my 4 bbl on I got the same degree wedge that HM used on their 2 bbl. You can see here how it looks. When I transfered this carb to my PCM with no wedge I had to do more adjusting than I thought . http://imgbox.com/KKsLUOsA" rel="nofollow"> 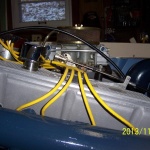 ------------- http://www.correctcraftfan.com/diaries/details.asp?ID=1711&sort=&pagenum=1&yrstart=1966&yrend=1970" rel="nofollow - 69 Mustang HM SS 95 Nautique Super Sport |