Transmission toast?
Printed From: CorrectCraftFan.com
Category: Repairs and Maintenance
Forum Name: Engine Repair
Forum Discription: Engine problems and solutions
URL: http://www.CorrectCraftFan.com/forum/forum_posts.asp?TID=49692
Printed Date: November-22-2024 at 11:23pm
Topic: Transmission toast?
Posted By: Wilhelm Hertzog
Subject: Transmission toast?
Date Posted: March-28-2021 at 4:52am
|
My transmission started slipping badly yesterday while wakeboarding with a heavy load. Fluid level was full, and the issue persisted after I added even more ATF. Had to idle back to the dock. Prop kept spinning while in neutral. When I pulled the dipstick there was a bit of smoke coming out of the hole. Clearly some major issues in there. I had the same thing happen a few years ago due to low fluid level (and I have at times noticed a very small leak from the front of the transmission). At that time filling up with ATF resolved the issue, but not this time. Engine was running at normal temps, so I don't think the oil cooler got clogged up or that the cooling system was malfunctioning in some way. Here is a photo of the transmission's ID tag: 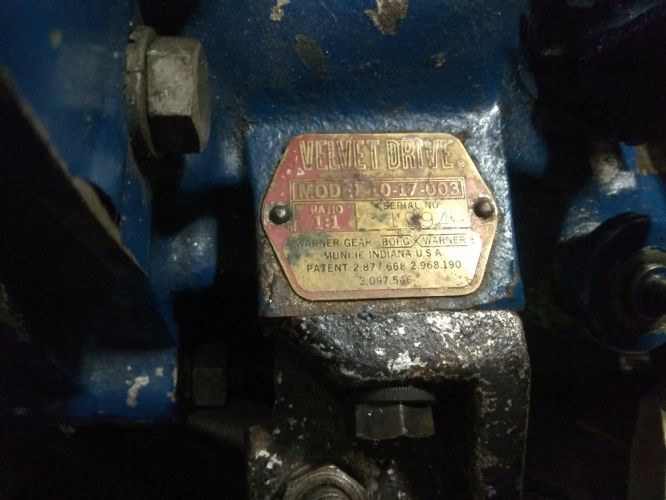 So:
As always, thanks for the help ------------- 1982 Ski Nautique PCM351W RR II Velvet Drive 10-17-003 1:1 II PerfectPass Stargazer Do not go gentle into that good night. Rage, rage against the dying of the light. |
Replies:
Posted By: KENO
Date Posted: March-28-2021 at 7:25am
|
1 Probably not, but you've got nothing to lose doing the flush and fill (except a few bucks) and it'll help convince you that a rebuild is needed 2 A rebuild of what you have should be sufficient, especially if you're propped right Does it have that nasty burnt fluid smell and maybe little particles in it when you pump the old stuff out ?
|
Posted By: Jonny Quest
Date Posted: March-28-2021 at 12:34pm
|
As the tranny is almost 40 years old, it doesn't owe you much. It might be time to rebuild the Velvet and look forward to another 40 years... JQ ------------- Current 2003 Ski Nautique 206 Limited Previous 2001 Ski Nautique Open Bow 1994 Ski Nautique Open Bow Aqua skiing, ergo sum |
Posted By: Wilhelm Hertzog
Date Posted: March-28-2021 at 4:27pm
|
Indeed. It was rebuilt shortly after I bought the boat, but I have no idea if the guy who did it knew what he was doing. This was well before I started spending time on CCF, so I was pretty clueless at that time. ------------- 1982 Ski Nautique PCM351W RR II Velvet Drive 10-17-003 1:1 II PerfectPass Stargazer Do not go gentle into that good night. Rage, rage against the dying of the light. |
Posted By: wetskier2000
Date Posted: March-29-2021 at 8:17am
|
I've always struggled with the idea of rebuilds on car and truck automatic transmissions. Some rebuilds or the rebuilders don't seem to be worth the effort... while I have mastered stick shift rebuilds in recent years, I have yet to handle autos. Are there trusted resources to handle our reverse gears?? ------------- Current: 1997 Nautique Previous: 1987 Nautique 1964 American Skier |
Posted By: 8122pbrainard
Date Posted: March-29-2021 at 8:25am
Rick, You really can't compare our marine "transmissions" to auto and trucks. Think more towards a wet clutch. ------------- /diaries/details.asp?ID=1622" rel="nofollow - 54 Atom /diaries/details.asp?ID=2179" rel="nofollow - 77 Tique 64 X55 Dunphy Keep it original, Pete < |
Posted By: KENO
Date Posted: March-29-2021 at 5:41pm
Umm............Explain this a little more Pete This is in the words of Yogi Berra "like deja' vu all over again"
|
Posted By: FFImarine
Date Posted: March-31-2021 at 3:50pm
|
We would be more then happy to rebuild your velvet drive. Give us a call 330-273-8291 ------------- You break it I’ll fix it |
Posted By: Wilhelm Hertzog
Date Posted: March-31-2021 at 5:23pm
Thanks a lot Joe, I would definitely have sent it to you, but I am in South Africa, which complicates logistics ever so slightly  . .------------- 1982 Ski Nautique PCM351W RR II Velvet Drive 10-17-003 1:1 II PerfectPass Stargazer Do not go gentle into that good night. Rage, rage against the dying of the light. |
Posted By: FFImarine
Date Posted: March-31-2021 at 5:48pm
|
Yeah I'd say that would be very expensive to ship🤣 ------------- You break it I’ll fix it |
Posted By: Wilhelm Hertzog
Date Posted: April-05-2021 at 2:53pm
So I've started disassembly. First problem is pretty obvious in the reverse clutch: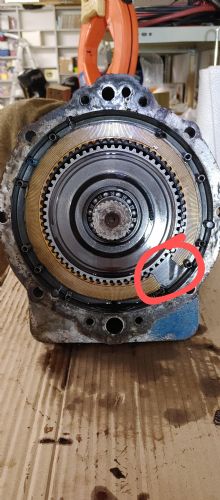 The plate seems to have chewed up the springs as well when it broke. Any suggestions as to why a clutch plate would break like that? I have yet to disassemble the forward clutch - seems I need to get hold of the right lock ring pliers first. Ken, you've commented in the past about the right pliers for the job, any chance of posting a link to a pair (or set) that will do the job for both the internal and external lock rings on the input shaft? ------------- 1982 Ski Nautique PCM351W RR II Velvet Drive 10-17-003 1:1 II PerfectPass Stargazer Do not go gentle into that good night. Rage, rage against the dying of the light. |
Posted By: Wilhelm Hertzog
Date Posted: April-05-2021 at 4:58pm
|
Forgot to mention before: I grazed a stony bottom of the river we were on a few hours before the transmission went. Prop suffered some damage (I'll post a picture later), but there was no noticeable vibration when running after the hit. The shaft measures as straight as it did on the dial indicator when I last checked alignment. And the shaft and transmission coupler faces separated easily and appeared parallel when I unbolted them to pull the transmission, though I didn't measure parallelism with a feeler gauge before pulling the transmission. Edit: picture of damaged prop below.  ------------- 1982 Ski Nautique PCM351W RR II Velvet Drive 10-17-003 1:1 II PerfectPass Stargazer Do not go gentle into that good night. Rage, rage against the dying of the light. |
Posted By: FFImarine
Date Posted: April-05-2021 at 6:50pm
|
It's very common for velvet drives reverse to snap reason being it's such a large plate and it's bronze and it just takes time for them to fatigue and Crack. Google flat snap ring pliers and you'll find what your looking for as for the rings holding the forward piston in a flat head screw driver will get them out easily ------------- You break it I’ll fix it |
Posted By: KENO
Date Posted: April-05-2021 at 8:07pm

Here's a picture of what the end of the lock ring or flat snap ring pliers look like and also another pair snuck into the picture with the Craftsman part number on them. A little tough to read but it's 47386 Kinda like a duckbill shape with serrations on the outer surfaces for that one small diameter but "beefy" lock ring that'll give you fits without a pair of these. You'll figure out which one  You can find Craftsman, Lisle and a variety others pretty easily under 20 US bucks with a Google search like Joe mentioned. Lisle part number is 44900
|
Posted By: FFImarine
Date Posted: April-05-2021 at 10:00pm
|
Keno, snap-on makes a pair which I use and in the serated area they put a small dimple that makes grabing lock ring so much easier ------------- You break it I’ll fix it |
Posted By: KENO
Date Posted: April-06-2021 at 6:06am
They must be kinda cute too with dimples 
|
Posted By: Wilhelm Hertzog
Date Posted: April-15-2021 at 9:11am
I've read all of the Velvet Drive service manuals I've been able to lay my hands on, and have two questions I'm hoping someone can help me with:
------------- 1982 Ski Nautique PCM351W RR II Velvet Drive 10-17-003 1:1 II PerfectPass Stargazer Do not go gentle into that good night. Rage, rage against the dying of the light. |
Posted By: FFImarine
Date Posted: April-15-2021 at 9:49am
|
I have only replaced coupler nuts when they are severely rusted or damaged, you can flush cooler lines and the cooler it's self with brake cleaner and compressed air but if you had water intrusion then it's safe to say you'll need to replace your cooler ------------- You break it I’ll fix it |
Posted By: Wilhelm Hertzog
Date Posted: April-16-2021 at 3:04am
Happily no signs of water intrusion as far as I can tell, judging by the drained ATF and the inside of the transmission case. The transmission oil cooler is very old and has been slightly pinched from over enthusiastic tightening of the mounting bracket at some point in the past, so I am considering replacing it in any case. I'm going to test for leaks under pressure and then make a call on replacing. ------------- 1982 Ski Nautique PCM351W RR II Velvet Drive 10-17-003 1:1 II PerfectPass Stargazer Do not go gentle into that good night. Rage, rage against the dying of the light. |
Posted By: Wilhelm Hertzog
Date Posted: April-22-2021 at 4:48pm
So more questions after disassembling the forward clutch:
As for the oil pump: other than if it is not putting out sufficient pressure (which I have unfortunately never measured), any other signs to look for as an indication that it should be replaced? It all looked fine when I disassembled, and the surface of the forward/reverse adapter on which the pump gears run appear smooth (I can't discern any noticeable ridges/burrs when running my fingernail over the surface). Below are some pictures. 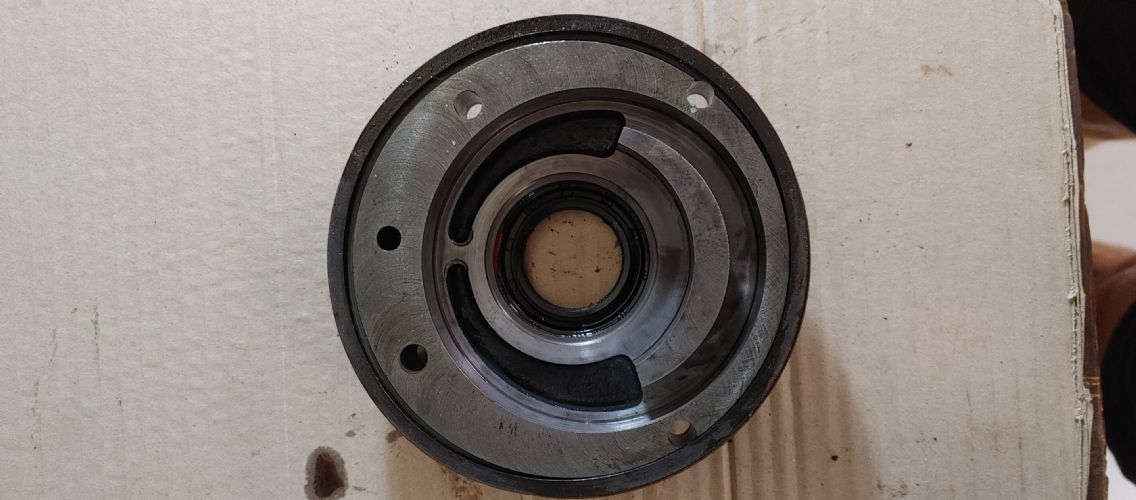 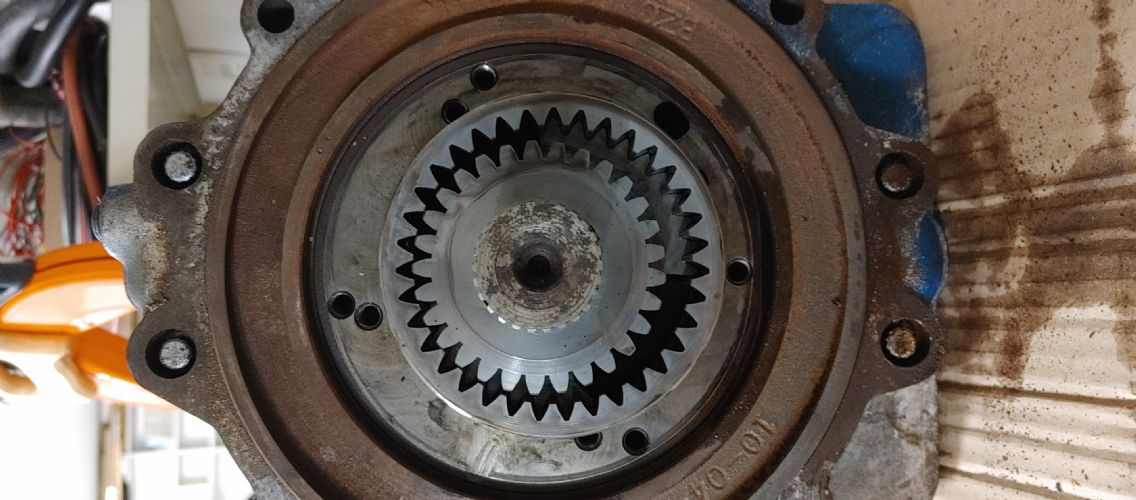 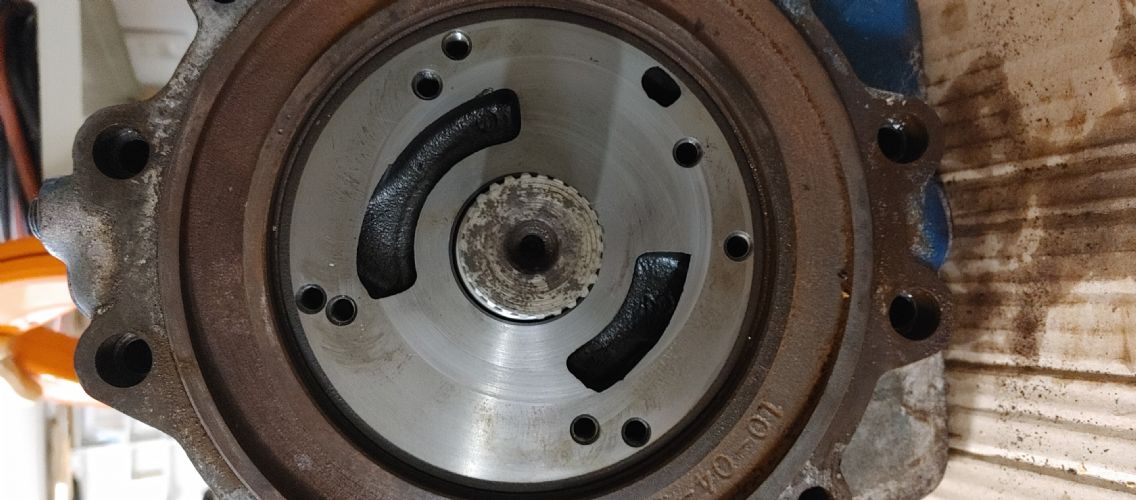 And lastly: removing the coupler nut is proving every bit as difficult as I anticipated. Any tips or tricks that I can try other than the usual penetrating fluid/heat? Thanks! ------------- 1982 Ski Nautique PCM351W RR II Velvet Drive 10-17-003 1:1 II PerfectPass Stargazer Do not go gentle into that good night. Rage, rage against the dying of the light. |
Posted By: KENO
Date Posted: April-22-2021 at 6:07pm
|
Question 1 The manual says to knock it out with a soft blunt tool. With your engagement and slipping issues it may have taken more effort to get it out. Question 2 Hard to tell from the video but it seems like it's spinning real easily like a ball bearing that's just been cleaned and has no lubrication.. It may be fine with some transmission fluid in there. Lube it up and then spin it. Only you know what it feels like. Question 3 An air or electric impact wrench that can grunt out around 250 ft lbs of torque should spin the coupler nut right off with no problem. Maybe FFI Joe will come along with some words of wisdom for you
 |
Posted By: FFImarine
Date Posted: April-22-2021 at 7:54pm
|
Forward piston is pressed into the ring gear that's why there so tight, remove the large snap ring holding the piston into the ring gear grab the splind side of the input shaft and hit it against a block of wood and it'll fall right off, Bearings are either good or bad so if it spins free and you don't feel any pitting in the race then your good Check for grooves in the oil pump housing and on the gears them selves and if you can grab and with your finger nail it's bad Take a flat head screw driver and stick it in one of the coupling hole so your able to hold it and use a air, electric or battery 1/2 impact and it will come off ------------- You break it I’ll fix it |
Posted By: Wilhelm Hertzog
Date Posted: May-05-2021 at 5:34pm
|
So I rented an impact wrench, which did the trick to get the nut off. I put some long bolts through the coupler bolt holes and used a tyre lever wedged against a trailer wheel to hold the coupler in position while I hit it with the impact wrench. So now I finally have the entire transmission disassembled and can start cleaning everything out while I wait for parts to arrive. Didn't want to place orders before I was sure of everything I need, so that I can only suffer shipping charges once. Luckily everything except the clutch plates, reverse springs and one snap ring (that bent when I took it off) looks to be in good shape. ------------- 1982 Ski Nautique PCM351W RR II Velvet Drive 10-17-003 1:1 II PerfectPass Stargazer Do not go gentle into that good night. Rage, rage against the dying of the light. |
Posted By: Wilhelm Hertzog
Date Posted: June-04-2021 at 2:52am
|
While everything is out of the boat and disassembled (and I'm waiting for parts), I'm doing some cleaning up and repainting/coating. Other than cost considerations, any recommendations/advice around painting vs. powder coating the transmission case? ------------- 1982 Ski Nautique PCM351W RR II Velvet Drive 10-17-003 1:1 II PerfectPass Stargazer Do not go gentle into that good night. Rage, rage against the dying of the light. |
Posted By: Wilhelm Hertzog
Date Posted: June-15-2021 at 5:49pm
|
The manuals (and Wouter in post #49 in the TeamTalk thread I posted a link to earlier) all say that one needs a press when it comes to compressing the forward clutch pack for installing the snap ring that holds the forward clutch cylinder in place. Any reason why a C-clamp of suitable size won't be up to this job? I'm sure a press will be easier to work with, but it seems to me a large C-clamp will also get the job done? ------------- 1982 Ski Nautique PCM351W RR II Velvet Drive 10-17-003 1:1 II PerfectPass Stargazer Do not go gentle into that good night. Rage, rage against the dying of the light. |
Posted By: KENO
Date Posted: June-15-2021 at 7:27pm
If ithat's what you have, you can make it work  It may take a little creativity.
Those C clamp threads can exert plenty of force
|
Posted By: 66_Cuda
Date Posted: June-21-2021 at 5:22pm
|
Some aviation manuals discourage powder coating because it can hide a crack, while paint will usually show a developing crack. Don't know if this is a concern for a transmission case. Jack ------------- 66 Barracuda 318 Poly |
Posted By: Wilhelm Hertzog
Date Posted: August-02-2021 at 2:58am
Finally got round to pulling the damper plate, and it probably makes more sense now why my transmission failed: the damper looks like the original, and is totally shot. Sounds like a shaker inside the spring housings when moving the thing around. I did order a new damper plate from Basic Power Industries with all of my rebuild parts. However, Basic Power only offers shipping with the USPS at checkout, which hands over to the South African Postal Service when the package gets to South Africa. The South African Postal Service then proceeded to send the package to Swaziland, from where it was sent back and is now apparently in transit. So I'm still waiting for my parts more than six weeks after ordering. The joys of a first world hobby in a third world continent... ------------- 1982 Ski Nautique PCM351W RR II Velvet Drive 10-17-003 1:1 II PerfectPass Stargazer Do not go gentle into that good night. Rage, rage against the dying of the light. |
Posted By: Wilhelm Hertzog
Date Posted: August-23-2021 at 6:32am
The section of my transmission's coupling on which the rear oil seal rides seems (and feels) pretty rough - see below. The seal rode (as best I could tell when I disassembled things) on the thicker of the two black lines that are visible on the 'snout' of the coupling. I did have a minor transmission fluid leak from the rear of the transmission in the past, so I'd like to clean that surface up properly to ensure a good seal. What is the best way to do this? Have it polished by an engineering shop? Fit a speedi sleeve? Thanks as always for the help! ------------- 1982 Ski Nautique PCM351W RR II Velvet Drive 10-17-003 1:1 II PerfectPass Stargazer Do not go gentle into that good night. Rage, rage against the dying of the light. |
Posted By: FFImarine
Date Posted: August-23-2021 at 8:51am
|
Weigh your options but if it was me I’d replace it ------------- You break it I’ll fix it |
Posted By: Wilhelm Hertzog
Date Posted: August-29-2021 at 5:12pm
|
I managed to track down a local SKF agent who can supply me with the right sleeve (CR 99193 or its Gold version CR 99833) that will cost me far less than a new coupler, so I'm going to sleeve it and see how it goes. After more than three months, the rebuild parts I ordered from Basic Power Industries eventually arrived last week. So I got back into the build process this weekend, and only paid a close look at the belleville spring for the first time today after cleaning it up - pictures below. It looks pretty worn to me - specifically there's a very noticeable groove worn into it where it contacts the clutch spring bearing ring . Due for replacement I guess? Or still re-usable?  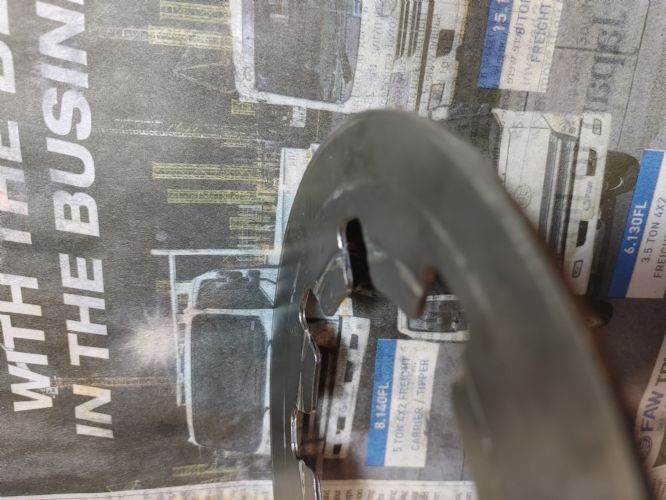  ------------- 1982 Ski Nautique PCM351W RR II Velvet Drive 10-17-003 1:1 II PerfectPass Stargazer Do not go gentle into that good night. Rage, rage against the dying of the light. |
Posted By: KENO
Date Posted: August-30-2021 at 9:34am
| I think I'd replace it |
Posted By: FFImarine
Date Posted: August-30-2021 at 11:04am
|
Replace it. I should have some in stock if you wanna get it from me ------------- You break it I’ll fix it |
Posted By: Wilhelm Hertzog
Date Posted: August-31-2021 at 1:50am
Thanks a lot Joe, I'll PM/email you. ------------- 1982 Ski Nautique PCM351W RR II Velvet Drive 10-17-003 1:1 II PerfectPass Stargazer Do not go gentle into that good night. Rage, rage against the dying of the light. |
Posted By: Wilhelm Hertzog
Date Posted: September-01-2021 at 4:18am
And here is a picture of my input shaft, which also looks like the surface on which the seal runs is not in great shape (apologies about the poor lighting, but this is the best resolution picture of the shaft I could get). Plan is to sleeve this as well. SKF CR 99138 (or 99819 for the Gold version) seems to be the right one. ------------- 1982 Ski Nautique PCM351W RR II Velvet Drive 10-17-003 1:1 II PerfectPass Stargazer Do not go gentle into that good night. Rage, rage against the dying of the light. |
Posted By: Gary S
Date Posted: September-01-2021 at 6:18am
|
I had the same problem years ago on my Mustang. One of those sleeves fixed it right up. Dont remember the size though. ------------- http://www.correctcraftfan.com/diaries/details.asp?ID=1711&sort=&pagenum=1&yrstart=1966&yrend=1970" rel="nofollow - 69 Mustang HM SS 95 Nautique Super Sport |
Posted By: Wilhelm Hertzog
Date Posted: September-01-2021 at 6:45am
|
Basic Power Industries very helpfully provides the dimensions of the sleeves on their https://bpi.ebasicpower.com/shop/marine-transmissions-and-parts-borg-warner-velvet-drive-zf-hurth-paragon/borg-warner-velvet-drive-parts/input-shaft-repair-sleeve-1.371-1.377-shaft-borg-warner-transmission" rel="nofollow - website . ------------- 1982 Ski Nautique PCM351W RR II Velvet Drive 10-17-003 1:1 II PerfectPass Stargazer Do not go gentle into that good night. Rage, rage against the dying of the light. |
Posted By: Wilhelm Hertzog
Date Posted: September-01-2021 at 8:37am
|
Can someone perhaps shed some light for me on the following? https://www.correctcraftfan.com/downloads/Velvet_Drive_70C-71C_Transmission_Service_Manual.pdf" rel="nofollow - This service manual says on page 37 to use twelve reverse clutch pressure plate springs, but https://www.correctcraftfan.com/downloads/Velvet_Drive_71C-72C_Transmission_Service_Manual.pdf" rel="nofollow - this service manual says on page 22 (page 30 of the PDF) to use only eleven. Which service manual is right? If eleven is the right number, why on earth would the pressure plate be machined with twelve spring holes, and not only eleven? My transmission had twelve springs installed, and the spring kit comes with 12 springs, which suggests twelve is the magic number, but I want to be sure to get it right. ------------- 1982 Ski Nautique PCM351W RR II Velvet Drive 10-17-003 1:1 II PerfectPass Stargazer Do not go gentle into that good night. Rage, rage against the dying of the light. |
Posted By: Grandpa Ripper
Date Posted: September-09-2021 at 9:08pm
|
Transmission coolers should be considered a wear item. When the tranny needs to be rebuilt, it is time to get a new cooler. They are not that expensive, yet are pretty critical. If they start leaking or are clogged up, you likely will not know about it until the newly rebuilt tranny is toasted again. Then you will wonder why you tried to save a few bucks in that area. Just my opinion of course. ------------- "If you are thinking like everyone else is thinking, you are not thinking." |
Posted By: Wilhelm Hertzog
Date Posted: September-10-2021 at 3:22am
New cooler is lying on the shelf waiting to be installed. I didn't order new cooler lines though - just flushed the old ones out. My thinking is they're easy enough to replace if they should spring a leak at some point in the future, so until that time, I'll run with the old ones. Things which can cause trouble/leaks and are difficult to replace without pulling the trans (seals, sealing surfaces) I'm not taking chances with. ------------- 1982 Ski Nautique PCM351W RR II Velvet Drive 10-17-003 1:1 II PerfectPass Stargazer Do not go gentle into that good night. Rage, rage against the dying of the light. |
Posted By: Wilhelm Hertzog
Date Posted: September-10-2021 at 3:28am
I still don't have clarity on this. Anyone with some insight here? Ken suggested that the springs have eleven coils, and hence the 11/12 confusion, but that is not the case: there is definitely a conflict between the two service manuals about the number of springs to use. ------------- 1982 Ski Nautique PCM351W RR II Velvet Drive 10-17-003 1:1 II PerfectPass Stargazer Do not go gentle into that good night. Rage, rage against the dying of the light. |
Posted By: 8122pbrainard
Date Posted: September-10-2021 at 5:56am
I've never heard this before. Anyone else? ------------- /diaries/details.asp?ID=1622" rel="nofollow - 54 Atom /diaries/details.asp?ID=2179" rel="nofollow - 77 Tique 64 X55 Dunphy Keep it original, Pete < |
Posted By: KENO
Date Posted: September-10-2021 at 6:59am
Ken deleted that comment about 5 minutes after it was posted,after he looked at a spring and you changed your reference page 12 springs came out, put 12 back in |
Posted By: KENO
Date Posted: September-10-2021 at 7:09am
Considering that if you buy a new transmission or in many cases with a rebuilt unit also, the warranty is void if you don't replace the cooler, you can call it whatever word you want to use I suppose. |
Posted By: 8122pbrainard
Date Posted: September-10-2021 at 7:31am
Good to know but I don't recall the warranty issue ever coming up before. ------------- /diaries/details.asp?ID=1622" rel="nofollow - 54 Atom /diaries/details.asp?ID=2179" rel="nofollow - 77 Tique 64 X55 Dunphy Keep it original, Pete < |
Posted By: Gary S
Date Posted: September-10-2021 at 8:01am
|
I think it was mentioned on skidims site. Dont know if its their policy or not. Edit- just checked,if you look at the description of a new velvet drive its in there. ------------- http://www.correctcraftfan.com/diaries/details.asp?ID=1711&sort=&pagenum=1&yrstart=1966&yrend=1970" rel="nofollow - 69 Mustang HM SS 95 Nautique Super Sport |
Posted By: GottaSki
Date Posted: September-10-2021 at 8:02am
|
After i rebuilt it, added a remote FL1-A filter, something to consider ------------- "There is nothing, absolutely nothing, half so much worthwhile as messing around with boats...simply messing." River Rat to Mole |
Posted By: FFImarine
Date Posted: September-10-2021 at 11:59am
|
11 reverse springs are used not 12 and your cooler is either good or bad but it doesn’t hurt to replace it during a rebuild along with your damper plate ------------- You break it I’ll fix it |
Posted By: KENO
Date Posted: September-10-2021 at 12:29pm
Why did he take 12 out?
|
Posted By: Grandpa Ripper
Date Posted: September-10-2021 at 1:38pm
|
You are now filtering the transmission fluid? (Love the Wind in the Willows reference! Ratty is my hero!) ------------- "If you are thinking like everyone else is thinking, you are not thinking." |
Posted By: FFImarine
Date Posted: September-10-2021 at 1:48pm
|
Early models had 12 holes newer models have 11 holes not sure of the reason but when I rebuild them they all get 11 springs ------------- You break it I’ll fix it |
Posted By: KENO
Date Posted: September-10-2021 at 1:55pm
|
And Wilhelm was comparing an early manual with a newer manual. There's your difference Wilhelm
 |
Posted By: FFImarine
Date Posted: September-10-2021 at 1:59pm
------------- You break it I’ll fix it |
Posted By: GottaSki
Date Posted: September-10-2021 at 2:00pm
|
Heh, Ratty rocks, an island of sensibility Yes, a local hose shop made a third hose for me, set me up with the hose connection to npt fittings to run a remote filter. it goes into the filter hot for best flow, then to the cooler. ------------- "There is nothing, absolutely nothing, half so much worthwhile as messing around with boats...simply messing." River Rat to Mole |
Posted By: Wilhelm Hertzog
Date Posted: September-10-2021 at 4:30pm
Great info, thanks Joe. But now I'll forever be wondering why Borg Warner changed from 12 to 11 springs. And why using 11 springs on an older transmission with 12 spring holes is better than using 12 springs. I never seem to get to the bottom of the rabbit hole with these things! ------------- 1982 Ski Nautique PCM351W RR II Velvet Drive 10-17-003 1:1 II PerfectPass Stargazer Do not go gentle into that good night. Rage, rage against the dying of the light. |
Posted By: KENO
Date Posted: September-10-2021 at 4:40pm
Just me, but just cause Joe uses 11 and yours was built with 12...........I 'd probably put in 12 and not worry about it.
|
Posted By: FFImarine
Date Posted: September-10-2021 at 5:55pm
Putting 12 in isn’t going to hurt anything so instead of wondering just put 12 in and don’t worry about it ------------- You break it I’ll fix it |
Posted By: Gary S
Date Posted: September-10-2021 at 6:44pm
|
I'd figure a way to add a 13th one just to mess with the next guy ------------- http://www.correctcraftfan.com/diaries/details.asp?ID=1711&sort=&pagenum=1&yrstart=1966&yrend=1970" rel="nofollow - 69 Mustang HM SS 95 Nautique Super Sport |
Posted By: Wilhelm Hertzog
Date Posted: September-29-2021 at 6:10am
|
Came across quite a nice disassembly video from Hale Marine here: https://www.youtube.com/watch?v=2GsXT37v8Aw&list=PLm_vNvlZHN2hoj6DUcA6kwydLyY-_VOSG&index=55&t=480s" rel="nofollow - video . Question: at around the 7:25 mark, the presenter mentions that the bushings inside the pinion carrier assembly/output shaft hadn't spun. How can one tell if they have spun or not? By confirming that the bushing holes line up with the shaft holes? Or is there something else? ------------- 1982 Ski Nautique PCM351W RR II Velvet Drive 10-17-003 1:1 II PerfectPass Stargazer Do not go gentle into that good night. Rage, rage against the dying of the light. |
Posted By: FFImarine
Date Posted: September-29-2021 at 8:45am
|
There is 2 bushings in the planetary and there are holes in the planetary the bushings line up with ------------- You break it I’ll fix it |
Posted By: Wilhelm Hertzog
Date Posted: October-01-2021 at 5:09am
So after getting the sleeves from a local SKF distributor, in my over-enthusiastic inexperience I proceeded to fit the sleeves to both the output coupler and the input shaft. Only to realise afterwards that the sleeve on the input shaft means the shaft won't fit through either the forward piston housing bearing or the forward and reverse adapter needle bearing. So I heated it up and carefully peeled it off (banging head against wall emoji goes here). I never noticed a leak from the front of the transmission in the past, so the sleeve was more preventative than corrective maintenance - to my untrained eye the shaft looked a bit rough where the seal rides. But now I need to decide:
Thanks as always for any opinions and suggestions, hugely appreciated! ------------- 1982 Ski Nautique PCM351W RR II Velvet Drive 10-17-003 1:1 II PerfectPass Stargazer Do not go gentle into that good night. Rage, rage against the dying of the light. |
Posted By: FFImarine
Date Posted: October-01-2021 at 8:54am
|
Install the sleeve at the end before you install the pump it’s the best way and it insures you’ll have no leaks in the future ------------- You break it I’ll fix it |
Posted By: Wilhelm Hertzog
Date Posted: October-01-2021 at 9:04am
Thanks a lot Joe. Looks like the local distributor still has one in stock, so I won't have to wait the customary two to three weeks again.
------------- 1982 Ski Nautique PCM351W RR II Velvet Drive 10-17-003 1:1 II PerfectPass Stargazer Do not go gentle into that good night. Rage, rage against the dying of the light. |
Posted By: Wilhelm Hertzog
Date Posted: October-17-2021 at 9:40am
Hit another snag: the outside diameter of the rivets on the new damper plate (ALTDA-106A from Basic Power Industries) is slightly larger than that of the old damper plate. And it is also slightly larger than the counter bore of the flywheel (measurements in millimeters below):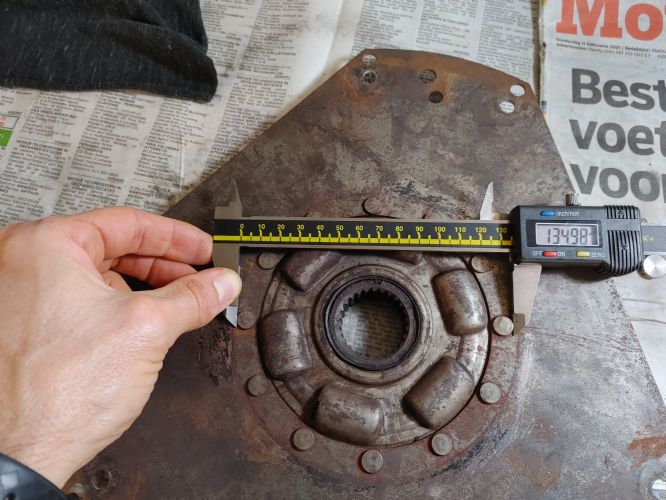  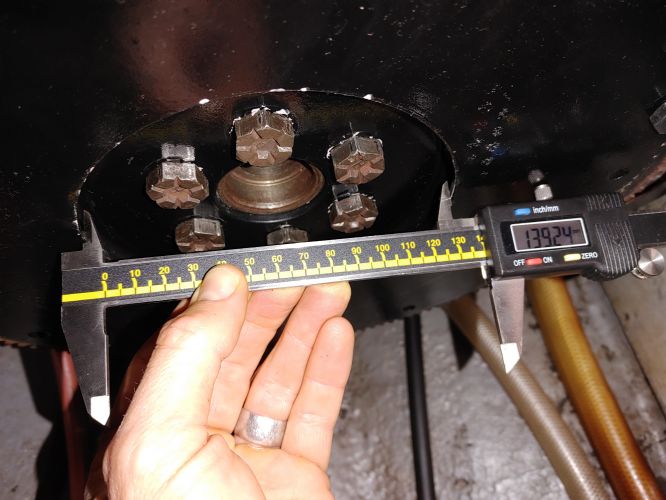 Which of course means the plate doesn't bolt down flush with the flywheel. Should I:
From reading on the forum, it seems this has been an issue with PCM transmissions as well (didn't come across a post where this was a problem with a Velvet Drive), and the solution was shimming. So I guess that will be the recommended option. Thanks as always!
------------- 1982 Ski Nautique PCM351W RR II Velvet Drive 10-17-003 1:1 II PerfectPass Stargazer Do not go gentle into that good night. Rage, rage against the dying of the light. |
Posted By: FFImarine
Date Posted: October-17-2021 at 7:54pm
|
It’s perfectly fine bolt that DA-106 on there I promise you’ll be just fine but use red lock tight on the threads of the bolts ------------- You break it I’ll fix it |
Posted By: Wilhelm Hertzog
Date Posted: October-18-2021 at 2:28am
|
Thanks Joe. I probably should have mentioned in my previous post, in case it makes a difference: I'm not using the OEM shouldered bolts (PCM part number https://skidim.com/bolt-flywheel-damper-ford-302-351.html" rel="nofollow - R009001 ). For some unknown to me reason, the damper plate mounting bolts that I removed were M8 metric bolts, not 5/16 SAE bolts. Someone must have tapped the original bolt holes to change them from SAE to metric threads at some point. Be that as it may, I'm wondering if the shoulder on the OEM bolts results in a bit of clearance between the plate and the flywheel even when fully tightened down, leaving space for the rivets and thus preventing incorrect loading of the damper plate? I was thinking that using washers for shims may serve the same purpose as the shoulder of the OEM bolts. If it is of particular importance to use a shouldered bolt, I imagine I should be able to find metric ones that match the OEM bolt closely enough. ------------- 1982 Ski Nautique PCM351W RR II Velvet Drive 10-17-003 1:1 II PerfectPass Stargazer Do not go gentle into that good night. Rage, rage against the dying of the light. |
Posted By: KENO
Date Posted: October-18-2021 at 6:38am
|
There isn't really a "shoulder" on the bolts. Click on the link below for some info in an old thread http://www.correctcraftfan.com/forum/forum_posts.asp?TID=49475&PID=592745" rel="nofollow - link There's a link in that thread to some ARP SAE bolts showing the dimensions and unthreaded portion. Since you need metric bolts, they won't do you any good, but you'll get the idea what your bolts should look like. The unthreaded portion of the shank above the threads is about 1/4 inch long with about 1/2 inch of threads. Some people are calling that unthreaded part a shoulder. It's the same diameter as the unthreaded portion of any 5/16 -18 bolt you'd get at a hardware store but it's only about 1/4 inch long Your metric bolts should resemble these dimensions. What's the part number cast into your flywheel? I think that if somebody threaded a 5/16-18 bolt hole for M8 threads, I'd be worried about the strength of those threads
|
Posted By: KENO
Date Posted: October-18-2021 at 6:54am
|
Here's a link to the bolts at SkiDim, just for a picture, since you need metric bolts. They call them shoulder bolts for what it's worth. I'd call them pricey just like they did  |
Posted By: Wilhelm Hertzog
Date Posted: October-18-2021 at 5:20pm
Looks to me like C6ZE-6380-A.  ------------- 1982 Ski Nautique PCM351W RR II Velvet Drive 10-17-003 1:1 II PerfectPass Stargazer Do not go gentle into that good night. Rage, rage against the dying of the light. |
Posted By: Wilhelm Hertzog
Date Posted: October-18-2021 at 5:32pm
Noted. However, as Pete states in the last post in the thread you linked to, are these bolts not more 'in shear, not in tension', and hence the strength of the threads in the flywheel are maybe not of such critical importance as it may be in other applications? When I test fitted the damper to the flywheel, the alignment between the holes in the damper plate ears and the flywheel bolt holes are so tight, it almost seems that the last bolt won't thread squarely into the flywheel. Definitely no prospect of aligning the damper plate with the transmission input shaft and then tightening to spec via the starter hole or through an access hole drilled in the bellhousing, as I've read of others doing - there is zero play between the damper plate holes and the bolts going through them. How critical is it to use the 'shouldered' bolts, given the tightness of fit between the damper plate holes and the bolts in my situation? Or should I drill the damper plate holes ever so slightly larger, so as to allow for a bit of free play and hence alignment of the plate using the input shaft? ------------- 1982 Ski Nautique PCM351W RR II Velvet Drive 10-17-003 1:1 II PerfectPass Stargazer Do not go gentle into that good night. Rage, rage against the dying of the light. |
Posted By: TRBenj
Date Posted: October-18-2021 at 6:50pm
| I’ve never actually encountered shouldered damper bolts that I can recall… and the bolts never seem to have enough slop to make the post trans mount tightening process worthwhile. |
Posted By: KENO
Date Posted: October-18-2021 at 8:10pm
|
Like I said before, and I think TRB seems to agree, what some people call a shoulder really isn't. It's just the smooth part of the shank above the threads. And if your 5/16 holes were turned into M 8-1.25 threads for example, by someone, they're gonna be weaker than some that were done properly due to the closeness in diameter when comparing dimensions and drill sizes needed. (hard to explain, easy to see the weak end result) . Done properly would be.....drill the right size starter hole and make new threads, but that hole is smaller than the OD of the SAE threads that are already there and makes for some new metric threads that are weak when you're all done because you're "rearranging some of the old threads that weren't drilled out, while you're tapping the new ones. Those new threads don't have the meat or strength that they would have and will strip at some unknown lower torque value. You're pretty much rolling the dice, picking what seems like a "tight enough" value without saying "oops, I just went too far", maybe loading the threads with loctite and saying a couple of quick prayers that it will hold and a bolt won't work it's way out while the engine is at 3000 rpm or so.. Lots of ifs Later Ford autos used metric bolts that were fully threaded, but they also had locating dowels to keep the clutch pressure plate aligned. I've never done the post transmission installation tightening either with the stock "smooth shank" bolts. 20 to 22 ft lbs was a good value for the 5/16-18 original bolts, although you'll find people saying they torqued them to 35 or so. I'd probably take one of your metric bolts and thread it in and torque it to whatever value you pick for it and see if it strips or if it's torques down good and then make some decisions from there. Maybe this makes sense to you and maybe not, if not, that's OK
 |
Posted By: Wilhelm Hertzog
Date Posted: October-20-2021 at 5:35pm
|
Well, I went ahead with the fully threaded metric bolts, and looks like I'm in luck: torqued down smoothly to about 20 ft-lb, and no stripping of threads. Let's hope the Loctite (and lock washer) holds. ------------- 1982 Ski Nautique PCM351W RR II Velvet Drive 10-17-003 1:1 II PerfectPass Stargazer Do not go gentle into that good night. Rage, rage against the dying of the light. |
Posted By: Wilhelm Hertzog
Date Posted: October-21-2021 at 4:55pm
|
Looks like my luck didn't last long. Finished assembling the transmission (except for the selector valve and oil strainer assemblies), but when I torque the oil pump housing bolts to spec, the input shaft locks up. Backing off the bolts ever so slightly (less than half a turn) frees up the shaft again. Clearly something is wrong somewhere. Any advice as to where to start looking? I was very careful to put the same number of clutch plates back in that came out. Thinking back, the forward clutch cylinder had to be pressed into the ring gear with some force to go in (it also came out with difficulty when I disassembled things), but the snap ring that holds it in place went in fine. There was a bit of fore-aft play on the input shaft before I tightened the oil pump housing bolts down - not sure if that is normal. ------------- 1982 Ski Nautique PCM351W RR II Velvet Drive 10-17-003 1:1 II PerfectPass Stargazer Do not go gentle into that good night. Rage, rage against the dying of the light. |
Posted By: Wilhelm Hertzog
Date Posted: October-21-2021 at 5:22pm
|
I know: it must be that 12th reverse clutch pressure plate spring. 😅 Seriously though, I guess it must be something in the oil pump getting stuck, because the oil pum housing bolts don't exert any pressure on any of the clutch plates, right? ------------- 1982 Ski Nautique PCM351W RR II Velvet Drive 10-17-003 1:1 II PerfectPass Stargazer Do not go gentle into that good night. Rage, rage against the dying of the light. |
Posted By: KENO
Date Posted: October-21-2021 at 7:06pm
If you take the pump off and you can rotate things freely, then your problem is in the pump and nothing internal is wrong. I might suspect that the key isn't seated right in the keyway and it's pushed back enough to contact the inner race of the needle bearing in the Forward-Reverse adapter when the bolts are torqued................or some other problem with the pump gears.
 |
Posted By: FFImarine
Date Posted: October-21-2021 at 8:42pm
|
Take a piece of 220grit sand paper and stick it to a flat surface, pour some trans fluid on the sand paper and rub both sides of your pump gears on the sand paper for roughly 30 seconds a side then clean the gears and re assemble it. You may have a slight imperfection on the gears and that’ll clean it right up and won’t take away any pressure it creates ------------- You break it I’ll fix it |
Posted By: Wilhelm Hertzog
Date Posted: October-23-2021 at 4:48pm
|
Looks like I'm in luck again. Before going the sanding route, I decided to flip the outer pump gear over. I couldn't flip the inner gear over, as I had installed the input shaft sleeve already - again! I neglected to mark the pump gears when I disassembled the pump, so I wasn't sure which way around they should be installed, hence I thought it worth a shot to see if flipping the gear over would make a difference. I then proceeded to tighten the bolts down evenly in very small increments, trying to get the pump housing to be pulled down onto the forward/reverse adapter as evenly as possible. And it worked! Managed to get the bolts torqued to spec with the shaft still spinning freely. Bit of touch up painting to do on the case, and then need to get the transmission back in the boat to test oil pressure. ------------- 1982 Ski Nautique PCM351W RR II Velvet Drive 10-17-003 1:1 II PerfectPass Stargazer Do not go gentle into that good night. Rage, rage against the dying of the light. |
Posted By: KENO
Date Posted: October-23-2021 at 6:03pm
|
I guess that falls into the "some other problem with the pump gear" category. Good job, hope it all works
 |
Posted By: Wilhelm Hertzog
Date Posted: December-31-2021 at 10:34am
|
So after painting and getting everything back into the boat, pressure test came out good, and the transmission has so far been working with no problems (or leaks) after a few hard days on the water so far this (southern hemisphere) summer. I am somewhat amazed that everything seems to have gone smoothly - thanks a lot to everyone who chimed in with help and guidance, especially Ken (as always) and Joe. It really is hugely appreciated. A complete novice like me would never have been able to get this done without all the input from you guys. I have did have quite a major drive train incident on the lake yesterday, but I'll create a new thread on that. ------------- 1982 Ski Nautique PCM351W RR II Velvet Drive 10-17-003 1:1 II PerfectPass Stargazer Do not go gentle into that good night. Rage, rage against the dying of the light. |
Posted By: KENO
Date Posted: December-31-2021 at 10:55am
|
Well here I was having read all your other updates today and getting ready to say something like "Good job on everything, here's hoping for a good, trouble free South African summer and then I see the quote below  Hope it's an easy fix and you have that good, trouble free summer 
|
 wetskier2000 wrote: