time for new Manifolds
Printed From: CorrectCraftFan.com
Category: Repairs and Maintenance
Forum Name: Engine Repair
Forum Discription: Engine problems and solutions
URL: http://www.CorrectCraftFan.com/forum/forum_posts.asp?TID=50265
Printed Date: November-22-2024 at 6:59pm
Topic: time for new Manifolds
Posted By: flyweed
Subject: time for new Manifolds
Date Posted: September-28-2021 at 7:17pm
|
Well our boating season is over for the most part, so today was the day I decided to tear into it and replace my leaky exhaust manifolds. I am so thankful for PB blaster. I soaked all 16 of the allen head bolts 3 days ago and just let them sit and soak. To loosen them I cracked them each just a tiny bit, then retightened them down, until each one had been cracked loose. Then I went through and backed all 16 out successfully with NO broken bolts or stripped heads. YES! . I am now just filing down the painted surfaces of the new manifolds to get rid of all the paint, and any burrs, etc that may be on the mating surfaces.  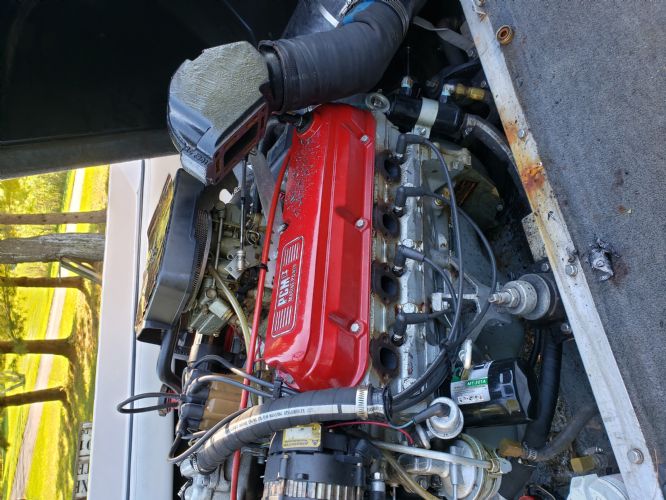 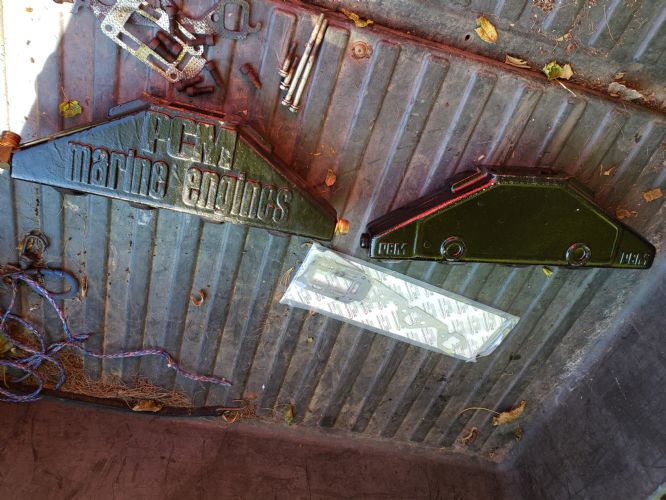 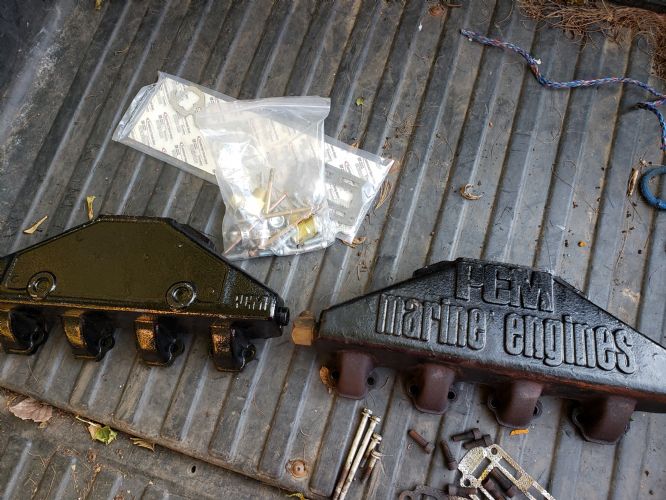  You can see on this last photo where this manifold was leaking from..alll along that rusty line on the bottom side. I sure wish the new manifolds said PCM Marine Engines like the old ones. ------------- '93 Ski Nautique NWZ, Air Boom Tower Drink Tonight..for tomorrow We Ride! |
Replies:
Posted By: KENO
Date Posted: September-28-2021 at 7:49pm
Here ya go
  |
Posted By: gun-driver
Date Posted: September-28-2021 at 7:51pm
| https://www.nautiqueparts.com/product/exhaust-manifold-decal-pcm-r143002a/" rel="nofollow - https://www.nautiqueparts.com/product/exhaust-manifold-decal-pcm-r143002a/ |
Posted By: gun-driver
Date Posted: September-28-2021 at 7:53pm
Keno’s is better 
|
Posted By: flyweed
Date Posted: September-28-2021 at 8:55pm
|
Nice. I'll have to order those decals. I ordered the new Manifolds from Nautique Parts as well, so we hoping they would still come with the PCM logo on them..guess not. Oh well. ------------- '93 Ski Nautique NWZ, Air Boom Tower Drink Tonight..for tomorrow We Ride! |
Posted By: Gary S
Date Posted: September-28-2021 at 9:51pm
|
They haven't had those raised letters in years-that's why they have those style decals. Your old manifolds had individually cut for each letter decals. On a side note- your new manifolds are even different from the ones I bought just a year ago and I know they were back ordered awhile ago,wonder if they changed who's casting them? ------------- http://www.correctcraftfan.com/diaries/details.asp?ID=1711&sort=&pagenum=1&yrstart=1966&yrend=1970" rel="nofollow - 69 Mustang HM SS 95 Nautique Super Sport |
Posted By: flyweed
Date Posted: September-29-2021 at 9:14am
|
yeah, I ordered my manifolds in June..got them first week of August! I knew they were backed up, which was fine. I knew I wouldn't be doing the job until Fall anyway. Quick question, should I sand those areas on the engine where the exhaust manifold gasket goes? or just wipe down good? Also, does anyone know if there are "torque specs" for the new manifold, or just tighten down, warm up engine and check for leaks and keep tightening? ------------- '93 Ski Nautique NWZ, Air Boom Tower Drink Tonight..for tomorrow We Ride! |
Posted By: uncle-buck
Date Posted: September-29-2021 at 11:09am
Torque spec for the exhaust manifold bolts is 20 ft. lbs.
|
Posted By: flyweed
Date Posted: September-29-2021 at 12:27pm
|
Uncle Buck..thanks for those specs......do you happen to know if it lists what the torque specs are on the 4 bolts that hold the exhaust riser on top of the manifold?? ------------- '93 Ski Nautique NWZ, Air Boom Tower Drink Tonight..for tomorrow We Ride! |
Posted By: KENO
Date Posted: September-29-2021 at 12:30pm
Just make sure the surfaces are clean and smooth with no chunks of the old gasket stuck to them. Depending on which PCM literature you refer to, the torque spec varies, you can find a range of 18-24 ft lbs in one manual, so Buck's 20 ft lbs is sorta midrange. It's a pretty generic chart If you want to make the installation easier, you need a couple of studs to help you out (no not me and Pete  ) )Here's a picture of the studs. These were 3/8-16 bolts 6 inches long with the head cut off. Screw 'em in and put the gasket on and slide the manifold on. Put in some bolts and then take the studs out Helps keep your spark plugs in one piece if you're doing it with them installed, and is a lot easier on your arms. 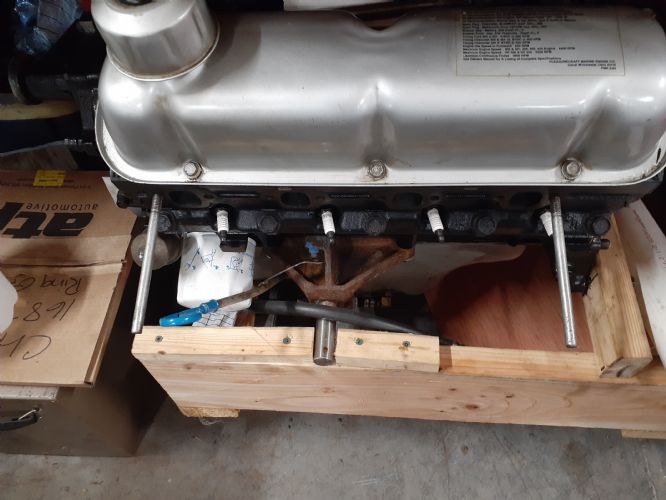 |
Posted By: KENO
Date Posted: September-29-2021 at 12:38pm
|
Here's one answer on the riser bolts in the link http://www.correctcraftfan.com/forum/forum_posts.asp?TID=42868&title=torque-specs" rel="nofollow - link
|
Posted By: pjsmoreno
Date Posted: October-01-2021 at 7:07pm
| Use to go to an old mechanic when I was in high school. Watch him install exhuast manifolds on a engine that way. Definitely old school. Great tip!! |
Posted By: Tomahawk
Date Posted: February-15-2022 at 12:17pm
| I am planning on ordering new manifolds for my 76 SN. One side is leaking the other not. I figured I might as well do both. PCM ford 351W. Anything extra outside of this thread that I should be looking for? |
Posted By: KENO
Date Posted: February-15-2022 at 1:10pm
|
A couple of manifold to engine gaskets if they don't come with your order and 16 new bolts. If you use Felpro MS90000 gaskets, Felpro will tell you to install them shiny side out in their directions http://www.felpro.com/technical/tecblogs/which-direction-to-install-a-gasket.html" rel="nofollow - Felpro link Ski Dim sells them cheap in the link below If you look close, you can read 90000 stamped into the gasket in their picture They say shiny side in. Who's a guy to believe? Probably doesn't really matter much which way they go, but I'd believe the people who make them http://skidim.com/gskt-exhaust-manifold-ford.html" rel="nofollow - link You can find stainless allen head bolts or regular carbon steel like the originals. One last thing you need is some good luck. Some people have all kinds of problems getting all the bolts out without breaking them or cutting the heads off, using torch heat etc and others find them kinda loose and have no problems. I'd check ahead of time using reasonable force, so you'll have an idea what you're in for Maybe you'll get lucky like flyweed did  His were probably about 17 years newer than yours His were probably about 17 years newer than yours |
Posted By: fanofccfan
Date Posted: February-15-2022 at 10:11pm
|
I just installed the felpro that Keno speaks of. I put the felt side to the inside and shiney side out. We shall see how they fare. ------------- 2004 196 LE Ski 1969 Marauder 19 1978 Ski |
Posted By: flyweed
Date Posted: February-19-2022 at 7:53am
|
I am the OP of this thread, and the replacement was pretty straight forward. I HIGHLY suggest you soak down your current manifold bolts with some PB blaster, or other lube and let it sit..then use a large/long socket and just "nudge" the bolt so it cracks loose a tiny bit...spray some more lube in and loosen just a tad more...then once you have the bolt backed out maybe a half a turn, tight it back up a half a turn, you just want to break ALL of the bolts loose before you remove them. This keeps the manifold flat against the engine surface, and takes away the chances of any "warping" of the manifold to lock the other bolts into place, at it keeps the manifold flat against the engine. Then once all bolts are cracked loose and sprayed down, you can now start to remove them. Once off, make sure you clean the engine mating surfaces of all old materials. I also used 2 bolt "studs" to line up my new gaskets and manifolds to slide on easier and keep everything aligned. It worked great. Dan ------------- '93 Ski Nautique NWZ, Air Boom Tower Drink Tonight..for tomorrow We Ride! |
Posted By: Tomahawk
Date Posted: February-21-2022 at 8:37am
| Thanks Keno and Flyweed. I ordered the parts and give the first shot of PB blaster to the bolts. I don't want to break off any bolts so I will be following all the advice. I will report on my adventure when the time comes. |
Posted By: fanofccfan
Date Posted: February-21-2022 at 8:52am
I fired my motor yesterday and found out I need too take my port side manifold to the machine shop to plane the face true. The rear port blew the gasket upon startup. I can see now with my trained eye ( ) that the face is not like its supposed to be. Live and learn. Sorry to hack the thread but thought I may as well update my situation since I chimed in earlier! ) that the face is not like its supposed to be. Live and learn. Sorry to hack the thread but thought I may as well update my situation since I chimed in earlier!------------- 2004 196 LE Ski 1969 Marauder 19 1978 Ski |
Posted By: flyweed
Date Posted: February-23-2022 at 7:31pm
|
Tomahawk, yes, you want to just crack all the bolts first, and work them a little each way, don't rush it. that way you'll remove all the bolts without breaking one. Your new bolts will be Stainless steel with your new manifold gasket set. Make sure you put your manifold gasket on the correct way, as there is a "engine" side and a "manifold" side to the gaskets. Torque them down to the correct specs and then put it in the water and start up the engine and check for any leaks. IF there are any drips, you can torque your bolts down a bit more until it stops. ------------- '93 Ski Nautique NWZ, Air Boom Tower Drink Tonight..for tomorrow We Ride! |
Posted By: NCH20SKIER
Date Posted: February-24-2022 at 6:30am
|
The use of the bolts can sometimes also be referred to as weekend marriage saving device............. Just make sure the surfaces are clean and smooth with no chunks of the old gasket stuck to them. Depending on which PCM literature you refer to, the torque spec varies, you can find a range of 18-24 ft lbs in one manual, so Buck's 20 ft lbs is sorta midrange. It's a pretty generic chart If you want to make the installation easier, you need a couple of studs to help you out (no not me and Pete  ) )Here's a picture of the studs. These were 3/8-16 bolts 6 inches long with the head cut off. Screw 'em in and put the gasket on and slide the manifold on. Put in some bolts and then take the studs out Helps keep your spark plugs in one piece if you're doing it with them installed, and is a lot easier on your arms.  ------------- '05 206 Limited '88 BFN |
Posted By: Tomahawk
Date Posted: February-28-2022 at 12:34pm
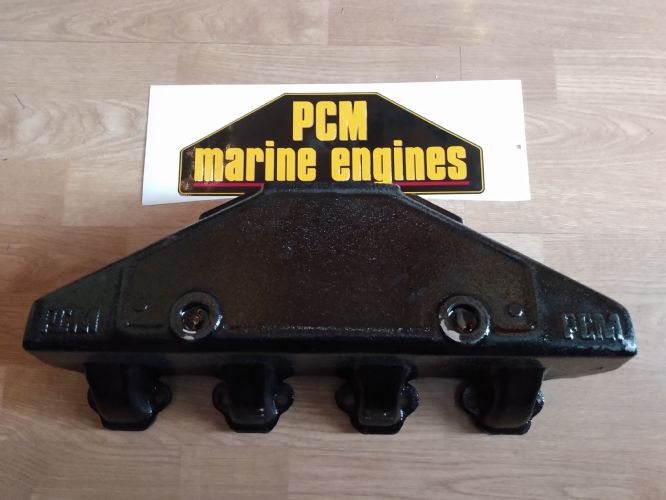 Now about something totally about looks and no functional use. I want to paint them to match the original green and I want to grind down the two raised circles where the PCM decal would go. Is there a functional reason why this is a bad idea?
|
Posted By: KENO
Date Posted: February-28-2022 at 5:55pm
|
I think that if you grind those flush, you may end up with a manifold with no functional use..........but it'll look good except for the holes you may end up with. I figure that they're core/casting/freeze plugs in those holes, depending on what you want to call them and if you grind the bosses flat there won't be much of anything for those plugs to seal against and they'll fall out or leak. If you look at the same spot on the backside of your old ones, you might find what look like a couple of holes that were filled in and somewhat smoothed over I could be all screwed up.............. or maybe not  |
Posted By: Tomahawk
Date Posted: February-28-2022 at 8:29pm
| Thank you KENO. I didn't think of a frost plug. I guess the appearance will have to take 2nd place. I will confirm by checking through the end plug. I am now curious why the original didn't have it and now they do. |
Posted By: KENO
Date Posted: March-01-2022 at 6:19am
Oh sure...............now we have to call them freeze/frost/casting/core plugs to cover all the bases.  I figure maybe they changed suppliers over the years and/or saw enough instances of manifolds cracked right along the bottom corner and had the plugs added to maybe help with a freeze situation. What are you using to match the original green paint?
|
Posted By: fanofccfan
Date Posted: March-01-2022 at 7:35am
|
You could trim the stickers to fit around the plugs. Wouldn’t be perfect but not many but yourself would know! ------------- 2004 196 LE Ski 1969 Marauder 19 1978 Ski |
Posted By: Tomahawk
Date Posted: March-01-2022 at 7:46am
|
Trimming the decal was suggested. It will work and you are right, only I will notice. Still doesn't mean I wouldn't rather spend a lot of time fixing something that no one will ever notice. Sorry to add another term KENO. I wasn't looking at the post and couldn't think of what they were called. Also as for paint I am going to first try a rattle can of Grabber Green engine paint. I bought it yesterday but didn't have a chance to check it to see how close the color matches.
|
Posted By: KENO
Date Posted: March-01-2022 at 8:11am
We can probably come up with a few more terms for those plugs. They've all been used at times over the years Try some Krylon 1932 if your Grabber Green doesn't match. It's one version of John Deere green and matched my 76 manifolds pretty closely. It's darker than the Grabber Green. Here's a link to an old thread with some discussion and pictures of the green manifolds and some bonus talk about the blue engine color too http://www.correctcraftfan.com/forum/forum_posts.asp?TID=46907&OB=DESC&PN=3&title=1977-302-pcm-engine" rel="nofollow - link There were some different shades over the years.
|
Posted By: Tomahawk
Date Posted: March-01-2022 at 8:24am
| OK, I will get some Krylon 1932 too. see what matches better. If it matched your 76 then I don't doubt it will work for my 76. I saw your picture from that post and it looks like I will be going that way. I am getting excited for spring. I figure I have a month until the ice out. |
Posted By: KENO
Date Posted: March-01-2022 at 8:32am
|
Hope it works out for ya' Lots of missing pictures in that thread that would have been good for comparison purposes.
|
Posted By: flyweed
Date Posted: March-01-2022 at 8:43am
|
I wish I could have purchased OEM manifolds that still had the PCM Marine Engines stamped into the manifolds. When I ordered my new ones this past summer they told me that indeed the replacement manifolds were a different manufacturer as well as a different manufacturing process. So whatever that's worth. If my new ones hold up as long as the old ones did, I should be good. (28 years before the old ones rusted and started to leak). ------------- '93 Ski Nautique NWZ, Air Boom Tower Drink Tonight..for tomorrow We Ride! |
Posted By: Tomahawk
Date Posted: March-04-2022 at 9:00pm
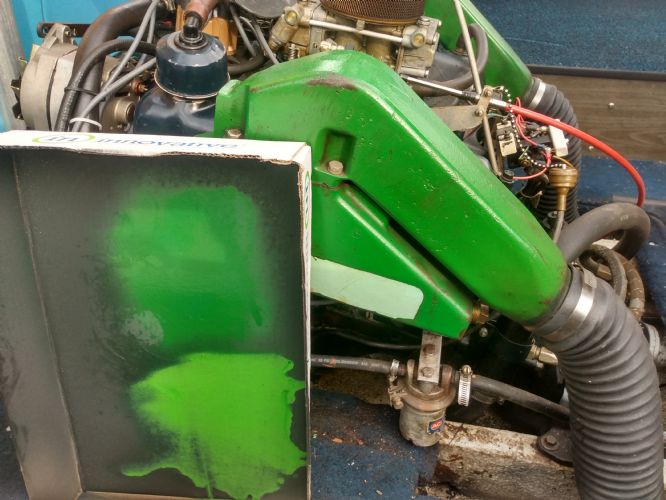 John Deere green on the top and Grabber green on the bottom. The John Deere green definitely wins in my book.
|
Posted By: KENO
Date Posted: March-05-2022 at 6:55am
My book too  Curious eyes wonder what the stuff circled in yellow is in the picture below Lower circle, either a fuel filter or electric fuel pump Upper circle, the bronze colored thing and the tubing or wires hooked to it. A couple of closer up pictures would be good if you're not sure
 |
Posted By: swilliams
Date Posted: March-05-2022 at 7:20am
|
The upper appears to be the suction tube for the oil pan. The lower is a fuel filter. My Omc has the drain tube thingy(which I don’t use). ------------- 1976 Martinique,350 Omc. 1975 Glastron/Carlson CV16,115 Merc. |
Posted By: KENO
Date Posted: March-05-2022 at 7:41am
|
I'm hoping it's a fuel filter, but I could think of better places to mount it I guess "I ain't never seen a thingy like that" , how about a picture of your thingy
 |
Posted By: Hollywood
Date Posted: March-05-2022 at 12:14pm
| How will you not sing some Joe Diffie every time you open the motorbox. |
Posted By: swilliams
Date Posted: March-05-2022 at 4:00pm
|
Keno, can’t post any pics. Still don’t have the tool bar available. Got a request to Keith for some assistance. Perhaps I’ll just send it to your email. ------------- 1976 Martinique,350 Omc. 1975 Glastron/Carlson CV16,115 Merc. |
Posted By: KENO
Date Posted: March-05-2022 at 4:50pm
|
Sure, you've probably seen the address in another post recently. If not let me know
|
Posted By: ultrarunner
Date Posted: March-06-2022 at 11:33am
| What about a set of stainless Edelbrock's? You can usually source a good set on eBay. The Commander stainless are really nice also, but very rare. |
Posted By: KENO
Date Posted: March-07-2022 at 6:22am
I think you're lost in the wrong thread here. Tomahawk was looking for paint to match his Green PCM manifolds and Flyweed replaced his PCM's with PCM's like he wanted to do.
|
Posted By: Tomahawk
Date Posted: March-07-2022 at 7:21am
| Swilliams is correct. Oil drain and Fuel filter. The wiring is also ballast resistor. I never took off the fried one so I have two there. It isn't pretty. |
Posted By: KENO
Date Posted: March-07-2022 at 7:56am
I think if you tried, you might be able to get that fuel filter a little closer to the hottest part of the exhaust manifold  When PCM started putting in a canister type fuel filter in later tears, it was mounted to the stringer, forward of the fuel pump and at least a little farther from the exhaust manifold Some later years after that had the filter farther back under the center floorboard, but still it was farther away from the manifold than yours is. How about a picture of the oil drain hose connection even if it's surroundings aren't pretty ?
|
Posted By: Tomahawk
Date Posted: March-16-2022 at 10:15pm
|
16 bolts. 13 let loose without problem. 2 snapped off at the head. One before I even turned it. Both were fatigued. One was missing and snapped off deep. That won't be fun. Pics of the other parts.  Oil drain. 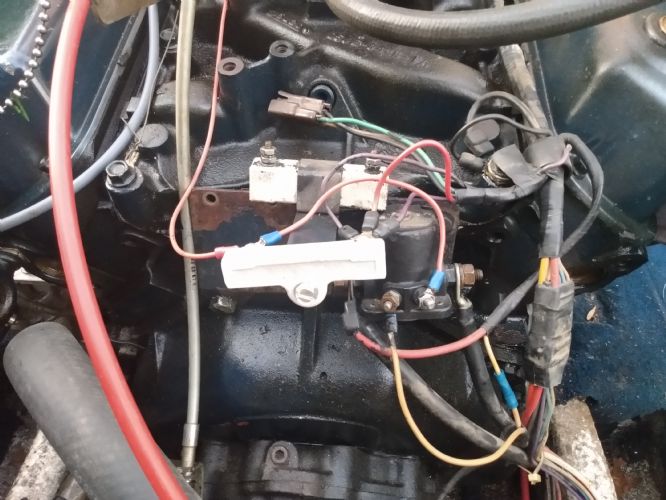 Old and New Ballast resistor 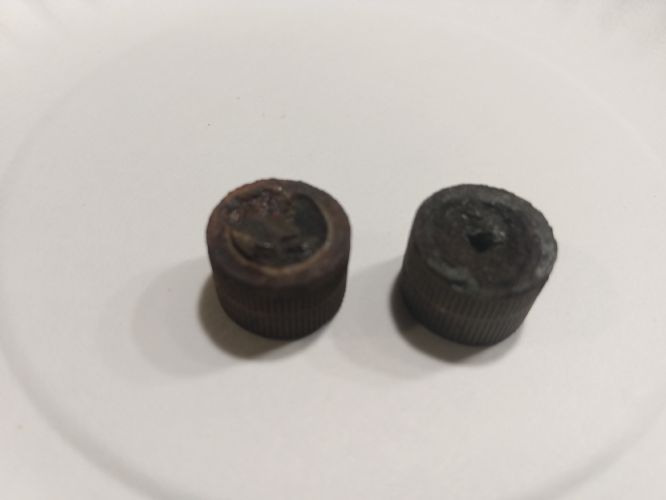 Heads snapped off. Fatigue was not new.
|
Posted By: KENO
Date Posted: March-17-2022 at 6:24pm
Assuming that you can get the 2 bolts out that have the broken off heads, I wouldn't be afraid to leave the one that' was missing and "snapped off deep" alone and use 7 bolts instead of 8 on that side. It should seal with no problem. You might make for more issues by trying to get it out and have a bigger project than you want. I also wouldn't be afraid of getting rid of the old ballast resistor and cleaning up that wiring some.  It looks like you have a Delco internally regulated alternator and don't need some of those wires that used to go to your old voltage regulator.
|
Posted By: Tomahawk
Date Posted: March-18-2022 at 8:17am
|
Assuming that you can get the 2 bolts out that have the broken off heads, I wouldn't be afraid to leave the one that' was missing and "snapped off deep" alone and use 7 bolts instead of 8 on that side. It should seal with no problem. Even if it is the last (or first) bolt? You might make for more issues by trying to get it out and have a bigger project than you want. I also wouldn't be afraid of getting rid of the old ballast resistor and cleaning up that wiring some.  Lazy not afraid It looks like you have a Delco internally regulated alternator and don't need some of those wires that used to go to your old voltage regulator. I was wondering where that circled wire used to be connected. So the answer is voltage regulator?  |
Posted By: flyweed
Date Posted: March-18-2022 at 8:44am
|
I don't know if just leaving it and only using 7 bolts is good advice. Will it work? probably, would it always worry me? YES. My dad always told me, if it's worth doing, it's worth doing right. Even if broken off, try and get it out, or redrill and retap it. If you don't feel confident doing that, take it to someone local who has experience doing that. Since you have the manifold off already, doing 1 bolt hole will be a pretty insignificant charge. My two cents Dan ------------- '93 Ski Nautique NWZ, Air Boom Tower Drink Tonight..for tomorrow We Ride! |
Posted By: KENO
Date Posted: March-18-2022 at 12:15pm
|
Well, I figured somebody would have a comment like that, but here are some things to think about since it's broken in deep. If you're gonna drill a hardened allen bolt, what kind of drill bit material do you need? Should it maybe be a left hand twist bit that might turn the remains out while you're drilling it? Am I real steady sitting/laying on the floor, drilling in that 3/8 hole so the bit goes in straight and doesn't snap off or damage the threads? If I get the hole drilled, will I break off an EZ out in the hole? Can I weld a nut to the remains instead of drilling? Not if it's broken in deep If I was gonna do it "right" the head would be off the engine or a portable EDM machine might be handy. You could look around at what some other 351w manifolds look like, say Indmar for example. They use 4 bolts per side and they don't leak. Here's a picture or 2 of the Indmar manifolds 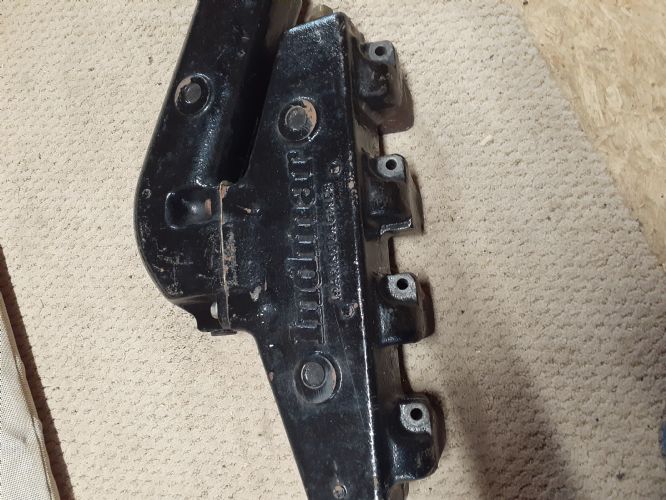 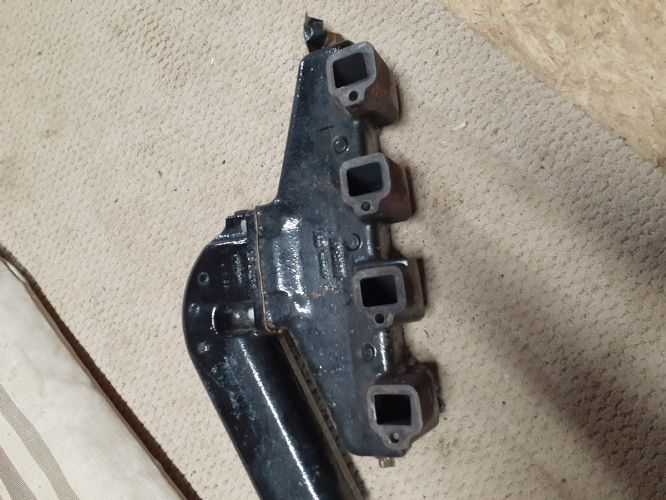 |
Posted By: KENO
Date Posted: March-18-2022 at 12:24pm
 It's a 3 wire connector that plugged into the voltage regulator harness. You can find it in the wiring diagram below that's pretty accurate for your 76 as it was built. (it doesn't show the neutra lsafety switch) 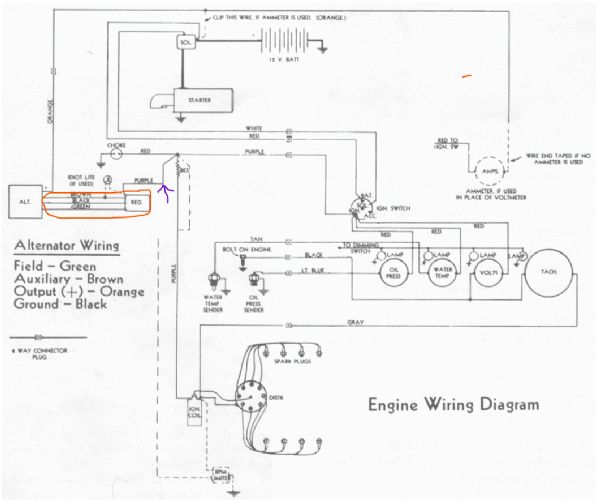 |
Posted By: Tomahawk
Date Posted: March-21-2022 at 3:00pm
| So the three broken bolts turned out to be no problem. The two that broke off at the head had almost a half inch exposed thread. I was able to get them out with my fingers. The bigger surprise was that the one that was "deeper" had 2 threads exposed and I was able to turn it out. No drilling required. I am a lucky guy. |
Posted By: flyweed
Date Posted: March-21-2022 at 4:46pm
|
you are indeed lucky, and glad you got them out. NOW you can start fresh and use stainless. :) ------------- '93 Ski Nautique NWZ, Air Boom Tower Drink Tonight..for tomorrow We Ride! |
Posted By: KENO
Date Posted: March-22-2022 at 6:48am
You should also go out and buy a lottery ticket, just one 
|
Posted By: Tomahawk
Date Posted: March-22-2022 at 7:44am
I think I need to let my luck recharge. I might have used it all up. I am putting on fresh bolts and gaskets and hoses too. Thought I could reuse the hose but I ripped one up bad during disassembly. Now on to painting. |
Posted By: KENO
Date Posted: March-22-2022 at 8:28am
|
Yeah skip the ticket, the best or maybe worst is yet to come Assuming you mean the exhaust hose, you'll have lots of fun wrestling around the 3 inch wire reinforced stuff and getting it installed on the copper tubes and the riser with a couple of sharp bends thrown in there. You might find it easier to take out the center section of the floor, which on my 76 involved carpet lifting and then you could access the screws holding the center section to the secondary stringers And you never know, that might lead to a carpet job Later years got easier with an easily removeable center section and in your pictures I might see some evidence that yours is easily removeable It gave more vertical room to move the copper tubes around to get the hose on. In the meantime, you could go find a friendly black bear to wrestle so you'll be in shape for the hose job  If the green arrow in the below picture is pointing at a rubber/vinyl strip in the floor (one on each side running back to the end of the floor), then it's easy to remove without having to rip carpet up.  |
Posted By: Tomahawk
Date Posted: May-10-2022 at 11:09pm
| Manifolds painted, Decals applied, Installed and tested. Took pictures. Phone fell into lake while checking the hole shot. Testing good. Lost phone bad. |
 flyweed wrote: