1986 BFN Rebuild
Printed From: CorrectCraftFan.com
Category: General Correct Craft Discussion
Forum Name: General Discussion
Forum Discription: Anything Correct Craft
URL: http://www.CorrectCraftFan.com/forum/forum_posts.asp?TID=51421
Printed Date: March-01-2025 at 1:52am
Topic: 1986 BFN Rebuild
Posted By: LennyBoat
Subject: 1986 BFN Rebuild
Date Posted: November-22-2023 at 1:40pm
|
Hi All, We are currently in the process of rebuilding our new to us 1986 Barefoot Nautique. For some of the members that have been around a while this boat might seem familiar, as the restoration has been started in 2009, but was never finished due to a lack of time. This is a http://https://www.correctcraftfan.com/forum/forum_posts.asp?TID=15757&PN=2&title=1986-barefoot-nautique" rel="nofollow - link to the original post. We bought the boat completely disassembled, so we are figuring things out as we go. First up was dissasembling the cracked block and sourcing a new one. After hours of searching european alternatives to Craiglist it seemed that there where no suitable 454 blocks for sale. All of them where either in a very bad state, or completely rebuilt. I found one in the states for a reasonable price which we imported from Chicago and is now at the workshop awaiting inspection and refurbishing. https://ibb.co/6vHGDRS" rel="nofollow">  Due to having very limited space for working on the boat we build a temporary workshop in an old army tent In my brothers garden, flipped the boat upside down and started on the exstensive boat hull repairs that needed to be done. https://ibb.co/zVFFNvY" rel="nofollow">  https://ibb.co/fCKB5wz" rel="nofollow"> https://ibb.co/fCKB5wz" rel="nofollow"> We would have loved to do a re-gell, but that is simply not in the budget. Spot repairs with gelcoat would have been practicaly impossible due to the many scratches en cracks. we decided to repair everything with epoxy and do a repaint with a 2-component Polyurethane coating system above the waterline (as used on sailing yachts), below the waterline we'll use anti fouling. (there is no polyurethane coating that's completely water-vapor proof as far as I know, so its not suited for underwater use) https://ibb.co/FmRsn5G" rel="nofollow">  Few weeks ago we finally flipped the boat back upright (had to get creative as the mini excavator stopped working) https://ibb.co/7nWD7Ym" rel="nofollow">  Once again there was a ton of small gouges and cracks, that we had to dremel out and repair. https://ibb.co/HnVDwXZ" rel="nofollow">  https://ibb.co/Kmxn0vN" rel="nofollow"> https://ibb.co/Kmxn0vN" rel="nofollow"> Removed the foam, as we had some water getting in the boat while we where building the shelter. Also want to check the stringers as they were not replaced by the previous owner. https://ibb.co/DDQ3Dg4" rel="nofollow">  Now we need to sand the deck, and move the boat to a dry location to start the painting process. I'll try to keep the updates and pictures coming as we progress. |
Replies:
Posted By: Kristof
Date Posted: November-23-2023 at 4:46am
|
So happy to see this boat is getting a resto after sitting so many years in Jo's basement!! Gonna follow up on this thread... Many memories about the beginnings of this one. Good luck guys! Oh, and on a side note: you are in the right place for pro tips on this project.
 ------------- https://www.correctcraftfan.com/forum/forum_posts.asp?TID=50377&title=what-have-i-been-up-to-on-my-89-2001" rel="nofollow - My '89 SN2001 |
Posted By: 67 ski nat
Date Posted: November-23-2023 at 10:04am
|
WOW. Labor of love for sure BFN awesome. Would love to own one too Good luck and try and enjoy |
Posted By: LennyBoat
Date Posted: December-02-2023 at 2:20am
| So what percentage of woodrot would be an acceptable amount for the stringers? (Please don't let it be zero...) |
Posted By: 67 ski nat
Date Posted: December-02-2023 at 9:55am
|
None |
Posted By: LennyBoat
Date Posted: December-02-2023 at 12:51pm
|
Damn. okay, painting postponed, first a stringer job... |
Posted By: KENO
Date Posted: December-02-2023 at 1:58pm
|
None is the lame, easy answer So, how much rot ya' got? There are quite a few people with mid 80's wooden stringers that are still driving around without the engine ripping itself out of the stringers. You can read about things like Rot Doctor, Git Rot, CPES, homebrewed CPES mixtures etc that more or less turn the rotted areas into petrified wood It all depends on how much work you want to put into the project and what the wood is like now and only you know those answers
|
Posted By: 67 ski nat
Date Posted: December-03-2023 at 9:10am
|
Keno is correct I just didn’t want to type zero A little bit in some locations is treatable I had a couple soft bolt holes repaired with penetrating epoxy Larger areas all the way through probably replace stringer. You might get lucky too |
Posted By: LennyBoat
Date Posted: December-04-2023 at 4:28am
|
Thank you for your advice! I've taken action and removed the fiberglass from the stringers where I suspected wood rot. While the surface of the stringers is damp, it hasn't permeated all the way through. There's a single soft spot, limited to around 1/2" deep, situated on the strongest part of the stringer (toward the stern, where the crossmember used to be). I'm optimistic that I can use the "wood conservation method" to address this. Keno, thanks for bringing this method to my attention—didn't know about it! Now, I'm exploring ways to dry the stringers without removing them from their original position. I came across a suggestion to speed up drying by soaking them in acetone. I might give this a try while the boat is still under the tent. Appreciate your insights! 😊 Picture of the soft spot: https://ibb.co/XtrfGhT" rel="nofollow"> |

Posted By: 67 ski nat
Date Posted: December-04-2023 at 9:13am
|
Ace hardware has ‘PC rot terminator’ Brand. Small bottles Drill small 1/8” holes into soft areas Amazing how epoxy flows and soaks into soft woods. It is very fluid, so keep watching and basting overflow until firms up |
Posted By: KENO
Date Posted: December-04-2023 at 2:12pm
| Well at least now you know you have choices on how to take care of your issue and after some reading about things here and elsewhere and knowing what your comfort level is with doing stringers, repairing stringers etc., you can decide your course of action. |
Posted By: LennyBoat
Date Posted: December-11-2023 at 6:02am
|
We are all done with removing the foam, removing the fiberglass from the stringers, and sanding the hull/deck. We'll move the boat to a heated garage to dry out the stringers tomorrow or the day after. I got into the large pile of parts that came with the boat to see what needs replacement and whatnot. I encountered some parts where I'm not sure of what they're for. First are these "mounting plates" with two holes in them. Not quite sure where they used to go. Same for the 'U' Bolts, (they don't fit the plates) https://ibb.co/yqzzFxJ" rel="nofollow">  And lastly these 2 parts. They have a hose on both sides, and looking at the length of the hose I would think these are for the Speedo's? If they are, what is their function? I assumed the hose went straight from the speedo to the pitot tube. https://ibb.co/HqPRNwG" rel="nofollow">  Thanks and have a nice week!
|
Posted By: TRBenj
Date Posted: December-11-2023 at 12:11pm
| Speedometer pulsation dampeners, motor mount blocks, and cradle u-bolts for the pylon. |
Posted By: LennyBoat
Date Posted: December-12-2023 at 3:56am
|
Hi TRBenj, Thanks for the info! I'll post some more pictures of the progress soon. |
Posted By: LennyBoat
Date Posted: February-12-2024 at 12:56pm
|
It's been a while since the last update, but we managed to get some work done over the past few weeks. The deck has been sanded, the glass from the stringers was removed and the boat was moved to a garage of one of the co-owners of the boat. After Inspection, we noticed that the state of the stringers wasn't all that bad. Most parts were still rock solid, and the places with rot where mostly on the surface. We used an electric heater pointed at the stringers for a few days to get as much of the moisture out as possible, afterwards we treated them with a penetrating epoxy as described by KENO and they were ready to be glassed over again. https://ibb.co/m6m73zc" rel="nofollow">  Next up was installing the floor panels. The previous owners started the rebuild proces with HPL plates (used for facade cladding) while this material doesn't rot and is quite sturdy I'm not sure I would go this way again. It doesn't take screws very well, and is a bit flexible. This became a problem when installing the panels and especially when foaming the cavities. The foam pushing up against the HPL panel made a bump in some places and pulled out the screws in other. we ended up removing the floor, pouring in extra foam where needed, and cutting off the excess. https://ibb.co/HN94fh0" rel="nofollow">  Due to the different colors in panels and a not so straight crossmember, it does seem that the front part of the floor is extremely uneven / not level. Its a bit of an optical illusion as in reality the floor is only slightly crooked  . .We also replaced the original HVAC tubing with hard PVC pipes and moved them a bit closer to each other to create more space. Afterwards it was time to glass in the stringers and floor. https://ibb.co/5s0ZmCc" rel="nofollow">  https://ibb.co/pLZSfZ8" rel="nofollow"> https://ibb.co/pLZSfZ8" rel="nofollow"> For us it was the first time working with fiberglass, and while its defenitley not as professional as a lot of repairs i saw on this website, we're still quite happy with the end result. Next up will be finishing of the foot support for the driver, glassing the last part between floor and stringer, making the floor panels for the middle parts and treating all the new glass with a waterproof primer (gelshield). We also started on making a custom glove box, as the original owner cut it out for some reason, and nothing will fit the dimensions of the hole that was left behind.
|
Posted By: Kristof
Date Posted: February-13-2024 at 3:06am
|
Very nice work guys! So good to see this boat getting the attention it needs. So many times I told Jo to sell this boat to someone that will get it back in shape, since he nor I would have the time to do it. It saddened me to see this boat 'decay', even though he kept it nice and dry in his basement. She is in good hands now obviously. PS: I was never in favor of the HPL plates myself, for exactly the same reasons you mentioned. But unfortunately my preferred Coosa board way was not possible in Europe (or VERY expensive). Don't know if it would be available over here these days? Edit: apparently these guys in Germany are Coosa dealers nowadays according to the Coosa website: http://https://www.vonderlinden.de/" rel="nofollow - http://https://www.vonderlinden.de/ ------------- https://www.correctcraftfan.com/forum/forum_posts.asp?TID=50377&title=what-have-i-been-up-to-on-my-89-2001" rel="nofollow - My '89 SN2001 |
Posted By: 67 ski nat
Date Posted: February-13-2024 at 10:25am
|
Nice. Looks tight and flat. |
Posted By: LennyBoat
Date Posted: February-14-2024 at 10:44am
|
Thanks! Indeed Coosa board seems to be a very nice material, but it's quite expensive for the moment.
HPL isn't cheap either, but you can find "scraps" or damaged panels from contractors which can't be used for construction but are perfect for the boat. I don't think you'll find leftover Coosa board. |
Posted By: Kristof
Date Posted: February-15-2024 at 2:20am
True... And certainly not in Europe as it is not very well known over here yet  And BTW, HPL or 'Trespa' plates are quite heavy and do add quite some weight to the boat.
------------- https://www.correctcraftfan.com/forum/forum_posts.asp?TID=50377&title=what-have-i-been-up-to-on-my-89-2001" rel="nofollow - My '89 SN2001 |
 LennyBoat wrote:
Posted By: LennyBoat
Date Posted: February-26-2024 at 6:14am
|
That's correct, Won't be a large problem as we are mainly going to use it for wakeboarding, and learning to barefoot. I'm curious to see what the wake will be like for slalom, probably not great, but I can't imagine its worse than our I/O we have right now. We are in the process of installing the rest of the floor now, and did a fitment check of the interior. Whole interior needs to be replaced, but we are thinking to have one season with the old interior, so we know what we want, and what needs to be modified to create some extra storage/speakers/cupholders/etc... I'll update with pictures soon. We are not quite sure about the location of the driver seat base. Anybody has any information on this? |
Posted By: andrewmarani
Date Posted: February-26-2024 at 10:42am
|
Hi, looks like an excellent rebuild. I'm maybe 75% through a stringer replacement on an 1986 Silver Nautique, thread is under "boat maintenance". I used Coosa for the floor and stringers, working well so far but that stuff is pricey. I've worked with Trespa through my construction company, it's both heavy and pricy unless, as noted, you can find remnants. I also needed the location of the seats and battery box since I forgot to get them before the tear out. Got the info below from va-river-tique. These are from the face of the pylon itself, not the nut in the hull. Be very careful screwing down the driver's seat, the front right corner is basically just the floor thickness over the hull, very easy to run the screw right through the hull if it's a touch to long. Found that out a couple of years ago running my hand on the underside of the hull trying to figure out where and why I had a slow leak into the bilge. Cut my finger on the screw point. va-river-tique I took these measurements from the bow side of the pylon. pylon to base of observer's seat is 12 1/4 inches. pylon to inside edge of battery box is 26 1/4 inches. pylon to base of driver's seat is 6 inches. ------------- Builder |
Posted By: TRBenj
Date Posted: February-27-2024 at 6:27am
| Interesting data points to compare but I wouldn’t expect any of them to be shared exactly between the SN and BFN. |
Posted By: 63 Skier
Date Posted: February-27-2024 at 7:14am
|
This is a fun project to watch, really appreciate the updates. You are making great progress! ------------- '63 American Skier - '98 Sport Nautique |
Posted By: LennyBoat
Date Posted: March-18-2024 at 6:56am
|
Hi All, Some more updates on the process of our rebuild: We foamed in the remaining part between the stringer and the floor, and glassed it over. The removeable floor panels have been made as well as the supports where they will be sitting on. The supports have been treated with epoxy, the screw holes filled with marine sealant, and we put sealant between the supports and the panel they are mounted on to keep these as dry as possible. Also did a test-fit of the interior to get a better overview of how everything should fit together. https://ibb.co/cczHStt" rel="nofollow">  https://ibb.co/QNcNgcd" rel="nofollow">  I have to say it felt good to be sitting in the boat after all these hours of work, even if it was just temporary. |
Posted By: LennyBoat
Date Posted: March-18-2024 at 7:06am
|
Did a carb overhaul and cleaning, parts for the engine rebuild should be arriving this week. https://ibb.co/93P7JSK" rel="nofollow">  Afterwards, cleaned and degreased the inside of the boat and painted the waterproof barrier and the Bilgepaint. For the barrier we used International Gelshield and the for the bilge we used International Danboline. https://ibb.co/mTc1qck" rel="nofollow">  https://ibb.co/fDnycBj" rel="nofollow">
 |
Posted By: LennyBoat
Date Posted: March-18-2024 at 7:12am
|
I also found this part: https://ibb.co/fNwnnrN" rel="nofollow">  Could anyone tell me what part this is, and what the 3 potentiometers are for? Thanks!
|
Posted By: LennyBoat
Date Posted: March-18-2024 at 7:22am
|
Hi Andrew, Thanks for the information! i'm not quite sure if the dimensions of the BFN are the same as the SN, but I'll update once I find out. I'll start a seperate topic about this in boat maintenance for this.
|
Posted By: andrewmarani
Date Posted: March-18-2024 at 8:11am
|
Reminds me of something I think I saw up under my dash... I will look later today. Andrew ------------- Builder |
Posted By: KENO
Date Posted: March-18-2024 at 11:54am
That would be the alarm module, it alarmed on low oil pressure, high water temperature and low volts. Here's a link to an 86 dash wiring diagram, look in the lower left corner, it doesn't show the module, but it shows all the wires on the dash plug that your plug goes into. The potentiometers were for setpoint adjustment.. http://www.planetnautique.com/CorrectCraftManuals/1986/1986_Dash.pdf" rel="nofollow - link to dash diagram If you click on this link, you'll have some reading, They weren't exactly well liked because they broke a lot http://www.google.com/search?q=correctcraftfan+alarm+module&oq=correctcraftfan+alarm+module&gs_lcrp=EgZjaHJvbWUyBggAEEUYOTIKCAEQABiiBBiJBTIKCAIQABiABBiiBDIKCAMQABiABBiiBDIGCAQQRRhA0gEJMjEyODhqMGo0qAIAsAIA&sourceid=chrome&ie=UTF-8" rel="nofollow - link to alarm module stuff
|
Posted By: LennyBoat
Date Posted: March-22-2024 at 6:58am
|
Thanks Keno, I'm curious to see if this one still works as it should  In the meantime, one of the co-owners of the boat drew up the dimensions of the blue band that goes around the boat so we can make stickers/paint it back after painting the hull's base colour: https://ibb.co/D5cKsHy" rel="nofollow">  (It's in metric )We are choosing the base colour, and it's been quite difficult. The choices are between a very light blue, another very light blue and another very light blue: https://ibb.co/5ThkVk5" rel="nofollow">  We are trying to get something as Mastercrafts "coastal blue" but it's quite difficult to see on an NCS colour chart. The new colour of the blue stripe is still under discussion. we will wait to see what the boat looks like after the new base coulour.
|
Posted By: LennyBoat
Date Posted: March-22-2024 at 7:02am
|
On different subject, does anyone have any expierience with installing an aftermarkt fuel tank? Can't find an original in the EU, so will probably go for a polyethylene tank because they relatively cheap.
|
Posted By: Kristof
Date Posted: March-22-2024 at 8:32am
My take on this: after having gone through the whole process of sanding (different grits), buffing and polishing mine, only to have the red go dull again after two summers, I decided to have the red stripe on mine stickered. Zeven years later, it is still shiny red as it should be. And, at five yards away, you can't see if it's gelcoat or a sticker.
Contact Jo. We have a tank from a later model SN laying around. Take measurements to see if it could fit... Maybe you can arrange a deal with Jo. I'll let him know later today. ------------- https://www.correctcraftfan.com/forum/forum_posts.asp?TID=50377&title=what-have-i-been-up-to-on-my-89-2001" rel="nofollow - My '89 SN2001 |
Posted By: LennyBoat
Date Posted: March-22-2024 at 9:21am
If that fits, that would be amazing. I'm sending him a message right now!
|
Posted By: LennyBoat
Date Posted: April-10-2024 at 12:26pm
|
Small Update: Progress has slowed down a bit over the past weeks as we're trying to figure out how to proceed. I've been reading up on a dash rewire, but as I've never seen the dash and wire loom as it was installed it gets a bit confusing. I'm a bit lost if I should up the wire size for all wires in the instrument cluster or only the ones leading from the battery to the daisy chain. reading a lot about adding extra power and negative wire to the wire loom, just not really sure where to? Anyways, I'm guessing that a lot of things will become clearer when we start working on it. Not sure what happend to the shaft strut, but the 2 bearing set screws were missing the heads. I drilled a small hole in one and tried removing it with a screw remover, which broke off inside of the screw so I had to drill them out completely to remove the shaft bearing. Bearing needed a lot of convincing to be removed so I used a hand saw to almost cut through the bearing from the inside. With some gentle force everything came out. https://ibb.co/rpwYznr" rel="nofollow">  https://imgbb.com/" rel="nofollow"> https://imgbb.com/" rel="nofollow"> https://ibb.co/RSjGV4R" rel="nofollow">  The paint on the throttle lever body was quite crusty, so I stripped the old paint, put some coats of primer on it and some coats of black paint. https://imgbb.com/" rel="nofollow">  https://ibb.co/2WSwCdy" rel="nofollow"> https://ibb.co/2WSwCdy" rel="nofollow"> Also, this morning i received some fresh parts for the engine  https://ibb.co/k9XPbSR" rel="nofollow">
 https://ibb.co/VHvP99Z" rel="nofollow">  |
Posted By: LennyBoat
Date Posted: April-10-2024 at 12:28pm
|
Kristof, Thanks for the insight on the sticker, we'll probably go that way as well.  The fuel tank turned out to be to large, so i'm looking for a suitable replacement.
|
Posted By: andrewmarani
Date Posted: April-10-2024 at 2:19pm
|
I'm assuming you pulled the instrument cluster out of the dash. Put up a picture of the back of your instrument cluster. I rebuilt my 86 nautique cluster wiring and i've got pictures. If it looks the same, I can send you what mine looked like finished and some info on how I went about it. Andrew ------------- Builder |
Posted By: LennyBoat
Date Posted: April-12-2024 at 3:04am
|
Hi Andrew, Many thanks in advance. As far as I know, the dash wiring should (mostly) be the same between the SN & the BFN. We bought the boat already disassembled , which is what makes some parts a bit more complicated. herewith the view of the dash/cluster (VDO gauges) as it is: https://ibb.co/fSZK2Bx">  https://ibb.co/4RrxxpV"> 
|
Posted By: samudj01
Date Posted: April-15-2024 at 10:52am
|
I just rewired my dash in my 93SN. If you haven't seen the thread, take a look. I tried to put some good pics in there. It is current;y on page two and is called, newtome93SkiNautique. Good luck. ------------- 78 Ski Tique, 72 Skier w/302's, 93 SN w/351 & 17 GS22 w/zr409 Previous - 99 Sport Nautique w/GT40 and 87 Martinique w/351 |
Posted By: andrewmarani
Date Posted: April-16-2024 at 4:38pm
|
Wow, that's in pieces. Front of your dash looks like mine, so they should be pretty close or the same. First picture is the back of the dash before I rewired it. Note there are some repaired wires on the before picture, done when I was replacing the RPM gauge, anything I repaired has marine grade heat shrink terminal connectors. Most of the old connectors are dark blue. Second picture is after it's rewired. The coiled up wires next to the two terminal blocks will connect to the old power wires under the bow. I added watertight terminals that I can disconnect to the ends so I can pull the dash without cutting anything if I need to pull it again. I have to stick my head up under the bow and check where I landed them but I think I ran an additional ground from the engine and a power wire from the solenoid to the dash because the wires supplying power and ground that are part of the old system are too small gauge wise. Good ratchet crimpers are a must for doing this neatly, just FYI. I can get some pictures of the back of the rewired dash installed if needed. Boat is currently under my back deck at the tail end of stringer replacement. Let me know. 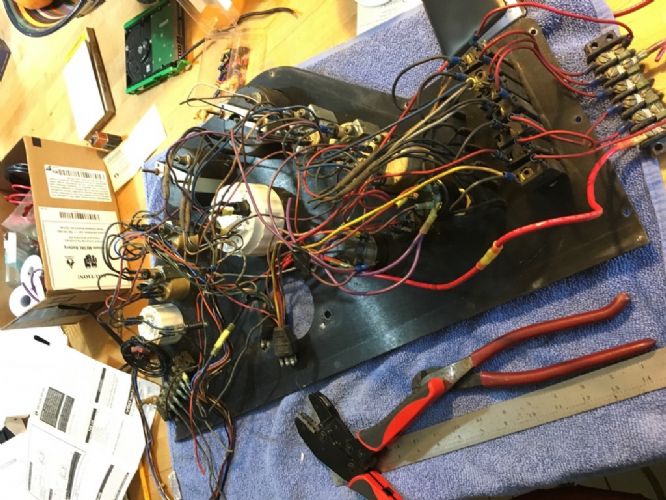 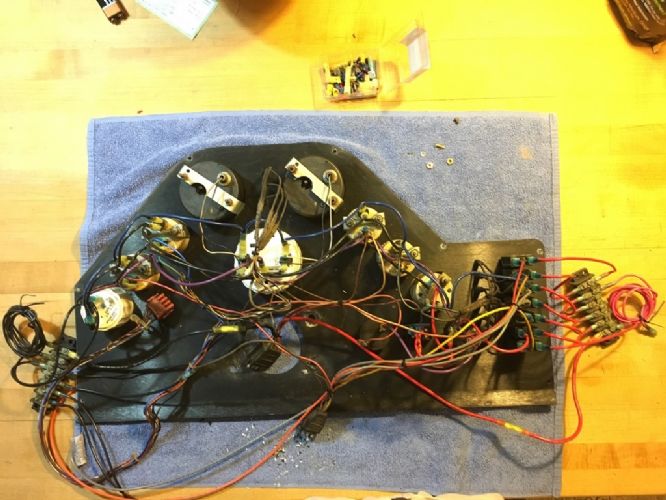 ------------- Builder |
Posted By: andrewmarani
Date Posted: April-16-2024 at 4:46pm
|
Resolution looks better on my computer than it is after I uploaded the pictures. PM me and I can email you the pictures, might be able to follow the wiring better. ------------- Builder |
Posted By: KENO
Date Posted: April-16-2024 at 7:05pm
|
Lenny Since I don't see any mention of dash wiring diagrams, I thought I'd mention that there's a wiring diagram listed as an 86 in the CCF Reference section under manuals. It was drawn in August 84 so it would be for an 85 you'd think, and carry over to 86. There are 2 versions shown one for VDO gauges like yours and another for Teleflex gauges It'll help you keep it "color correct" with the wiring
|
Posted By: Kristof
Date Posted: April-17-2024 at 3:03am
|
Lenny, What KENO said. The wiring diagrams in the Reference Section helped me solve some problems on my dash. For good measure here's the link: https://www.correctcraftfan.com/downloads/1986_Dash_Schematic.pdf" rel="nofollow - '86 Wiring diagram ------------- https://www.correctcraftfan.com/forum/forum_posts.asp?TID=50377&title=what-have-i-been-up-to-on-my-89-2001" rel="nofollow - My '89 SN2001 |
Posted By: andrewmarani
Date Posted: April-17-2024 at 8:58am
|
Didn't know there were different wiring for the VDO vs Teleflex. My gauges are VDO. ------------- Builder |
Posted By: KENO
Date Posted: April-17-2024 at 12:43pm
|
The only real difference is the terminal connection locations on the back of the gauges and wiring hookup to the gauges. VDO had spade type connectors Teleflex had studs with nuts
|
Posted By: LennyBoat
Date Posted: April-25-2024 at 8:29am
|
Thank you all for your input. We started the rewire and in the end it isn't as intimidating as it seemed. We just needed a little nudge to start and i'm guessing we'll be done by the end of this week. I'll double check our work with Andrews picture to make sure we dind't make any mistakes. |
Posted By: LennyBoat
Date Posted: June-12-2024 at 9:03am
|
Small update: Progress has slowed down a bit over the past few weeks due to work trips and other commitments. I also had to prepare my father's boat for the summer (an I/O bowrider, Maxum 1750sr). We sanded and cleaned the hull, applied the primer, and then put on four coats of Double Coat, sanding with a finer grit between each coat. Most of the time was spent on sanding, while the painting process was relatively quick and straightforward. I'm quite happy with the results. It may not be as durable as gelcoat, but it's much less labor-intensive and very beginner-friendly. https://ibb.co/F8TgRFF" rel="nofollow">  https://ibb.co/D1RMKvp" rel="nofollow">  https://ibb.co/m8tWp3b" rel="nofollow"> https://ibb.co/m8tWp3b" rel="nofollow">  |
Posted By: Kristof
Date Posted: June-19-2024 at 5:46am
|
Lookin' good there Lenny!
------------- https://www.correctcraftfan.com/forum/forum_posts.asp?TID=50377&title=what-have-i-been-up-to-on-my-89-2001" rel="nofollow - My '89 SN2001 |
Posted By: LennyBoat
Date Posted: June-20-2024 at 6:03am
|
Everything is slowly coming together https://ibb.co/qg2Kv5J" rel="nofollow">  https://ibb.co/KyQtGdP" rel="nofollow"> https://ibb.co/KyQtGdP" rel="nofollow"> Next up is the drivers seat base & electrical (pump, lights, blower, dash) afterwards the window I suppose. Throttle and steering control has been cleaned and re-greased and ready for instalation. Still waiting on the strut bearing, exhaust hose, flax packing and gas tank. Engine block should be ready soon. In the meantime I found some more parts that I do not recognise. Anyone knows if these are original parts and if so, what are they used for? https://ibb.co/6Wkvv6d" rel="nofollow">  It's not clear from the picture but the 2 washers (on the bolts, left) have a step. the inner part is thicker than the outer part.
|
Posted By: andrewmarani
Date Posted: June-20-2024 at 7:25am
|
it's the bolt that holds the rudder cable clamp to the stringer. on my 86 sliver nautique it was installed 24" from the stern. Drill a hole about half way up the primary stringer through to the space where the muffler sits and bolt in place. the ball sticks into the bilge side and the rudder cable clamp attaches to the ball. there is some play in the ball allowing the clamp to move around while still holding the cable in place. In the picture the clamp is that grease covered things around the cable, cleaned up pretty good to a nice white. This is a before picture, things are much better looking now but the boats at the marine shop waiting to have the engine dropped in. 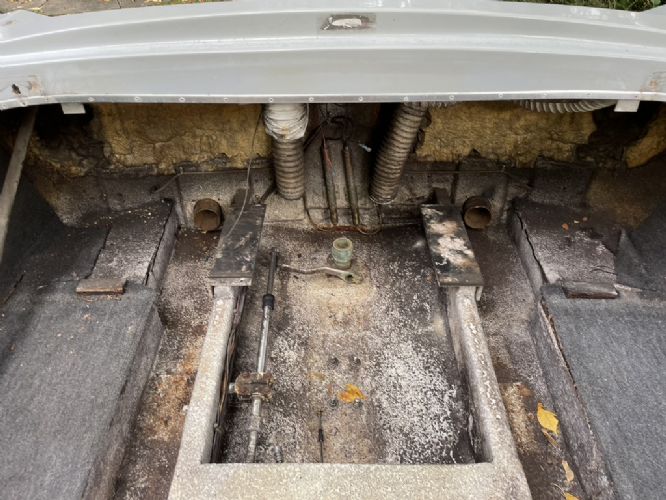 ------------- Builder |
Posted By: LennyBoat
Date Posted: June-20-2024 at 8:36am
|
Thank you for the information! I'm guessing that means it should have been installed before we foamed and glassed over the empty space between the stringer and the floor... |
Posted By: 63 Skier
Date Posted: June-20-2024 at 11:02am
Kind of like do-it-yourself furniture instructions .... "foam and glass over the empty space", then you turn the page and it says "but first install the steering cable support". The boat is looking fantastic! ------------- '63 American Skier - '98 Sport Nautique |
Posted By: andrewmarani
Date Posted: June-20-2024 at 1:59pm
|
Looking over your pictures, I think you're ok. What I'm calling the primary stringer, where the bracket gets fastened, is that lower stringer in your pictures. the one closest to the center of the boat. The outboard taller one is the secondary stringer. You don't fasten to the secondary. You have to get slightly creative. Instead of bolting into the side of your low primary stringer, you would make a small stainless bracket with a hole in the vertical leg for that bolt with the ball on the end and two holes in the horizontal leg. Lag the new stainless bracket down to the top of your primary stringer through the horizontal leg and hook the "ball bolt" to the vertical leg with a nut on each side of the bracket. Should get the job done. I suppose you could fiberglass the stainless bracket down to the stringer so you don't put holes in your stringer for the lags. Or you could fiberglass in a hump into your low stringer and drill hole in it and put the bolt through as originally installed. Lots of ways to slice this melon! ------------- Builder |
Posted By: LennyBoat
Date Posted: June-21-2024 at 4:06am
|
Hi all, I was thinking something alike, fabricate a stainless plate and weld a shortened bolt to it. and attach it to the stringer. I'm just curious how much force is on the rudder cable when turning under high load/speed. The original bolt size seems to suggest its quite a lot, however, i'm thinking it's a bit overkill? |
Posted By: KENO
Date Posted: June-21-2024 at 8:18am
|
Lenny Here's a picture from TRB's BFN rebuild thread A hunk of angle aluminum or stainless steel bolted to the strut mounting bolts with the clamp block bolted it. Lots of boats were built with that setup. Fairly close to indestructible mounting and easy too 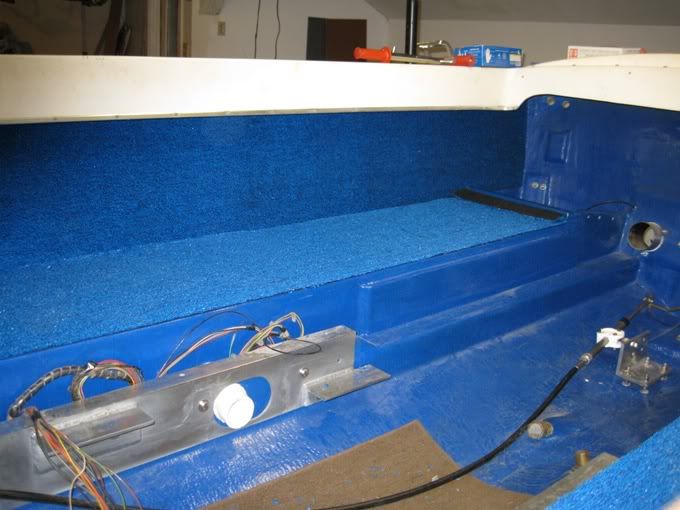 |
Posted By: LennyBoat
Date Posted: June-21-2024 at 9:12am
|
Are you kidding me, I have been looking on this forum for over a year now, and I never encountered (or always looked over) that thread. 30 pages of quality work, pictures and explanation about a BFN rebuild... damn Anyways, better late than never! Looks like I got some reading to do over the weekend! Thanks for the sugestion and pointing me towards this thread. I think the mount on the strut will be the solution.
|
Posted By: LennyBoat
Date Posted: July-12-2024 at 4:00am
|
I think I'm due a small update: Everything coming together nicely. hoping to source carpet somewhere next week. Engine should be finished soon as well. Quite excited about the progress https://ibb.co/1dFqJGQ" rel="nofollow">  https://ibb.co/HxgMFqh" rel="nofollow">
 |
Posted By: fanofccfan
Date Posted: July-12-2024 at 8:28am
The boat looks great! You must stay busy enough to need 3 wall hanging calendars to keep track of things huh?!?! ------------- 2004 196 LE Ski 1969 Marauder 19 1978 Ski |
Posted By: 63 Skier
Date Posted: July-12-2024 at 9:29am
Lenny never noticed they had calendar dates on them before. That is looking fantastic! When you get on the water, be sure to post some pictures of the local areas. I love seeing the scenery from different parts of the world. ------------- '63 American Skier - '98 Sport Nautique |
Posted By: KENO
Date Posted: July-12-2024 at 9:36am
|
Pylon looks good, seat has some stains on it though 
|
Posted By: LennyBoat
Date Posted: July-12-2024 at 11:47am
|
Well, well, well, Look at that, 3 replies in under 10 minutes... Looks like we're not the only ones beeing motivated by the calendar girls
|
Posted By: LennyBoat
Date Posted: July-12-2024 at 11:49am
Will do!
|
Posted By: LennyBoat
Date Posted: July-15-2024 at 11:16am
|
Had a slight setback this weekend when installing the new blower. https://ibb.co/1drtY18" rel="nofollow">  Oops...
|
Posted By: LennyBoat
Date Posted: February-25-2025 at 10:57am
|
Hello all, Time for an update. With the summer coming up last year it was difficult to find the time and motivation to continue working on the boat. After the two blower screws went through the hull, we went and enjoyed the good weather, and spent some time on the water with our I/O. Also had the chance to see a certain red boat in action, which some of you might recognize https://ibb.co/LdnNp4rF" rel="nofollow">  Due to work trips and vacation, we didn't really manage to start back up. Now, a few months before summer begins we realized once again that we need to finish this boat ASAP. So over the last week we painted the engine block and put it back together, installed the steering, horn and throttle control, also finished up the floor boards. We're waiting on some parts for the engine (fuel pump and some gaskets), for the fuel tank, etc etc. I'll update soon with pictures and , probably, a ton of questions. https://ibb.co/RptfpGt1" rel="nofollow">  Cheers, Lenny |
Posted By: Timr71
Date Posted: February-25-2025 at 5:02pm
| Looking good! Can't wait to see it on the water this year! |
Posted By: MrMcD
Date Posted: February-25-2025 at 9:30pm
|
Big Project, keep up the good work. |
Posted By: Kristof
Date Posted: February-26-2025 at 7:37am
Just curious about that red boat...  ------------- https://www.correctcraftfan.com/forum/forum_posts.asp?TID=50377&title=what-have-i-been-up-to-on-my-89-2001" rel="nofollow - My '89 SN2001 |
Posted By: 63 Skier
Date Posted: February-26-2025 at 9:09am
If someone can find the owner of that red boat they need to tell them to add more power to it, looks like it only is pulling a dozen people ... Nice looking work space! ------------- '63 American Skier - '98 Sport Nautique |
Posted By: Kristof
Date Posted: February-28-2025 at 5:18am
Next up: new camshaft... A few horses right there. ------------- https://www.correctcraftfan.com/forum/forum_posts.asp?TID=50377&title=what-have-i-been-up-to-on-my-89-2001" rel="nofollow - My '89 SN2001 |