1988 SN2001 Throttle Cable Troubles
Printed From: CorrectCraftFan.com
Category: Repairs and Maintenance
Forum Name: Boat Maintenance
Forum Discription: Discuss maintenance of your Correct Craft
URL: http://www.CorrectCraftFan.com/forum/forum_posts.asp?TID=51638
Printed Date: January-15-2025 at 4:48am
Topic: 1988 SN2001 Throttle Cable Troubles
Posted By: ccfan_nc
Subject: 1988 SN2001 Throttle Cable Troubles
Date Posted: June-24-2024 at 11:29pm
|
11 years with this boat now! Just graduated my youngest teen from HS and had he and his buddies out to try some foiling when the throttle stopped working (last week). Similar symptoms to this post: https://www.correctcraftfan.com/forum/forum_posts.asp?TID=40193" rel="nofollow - https://www.correctcraftfan.com/forum/forum_posts.asp?TID=40193 I have a newer boat than this but same symptom as above thread -- goes in and out of gear no problem but throttle will not advance from idle. My diagnosis: I can feel and see that the cable is solidly connected at the control and on top of the engine. Image below (pic1) of the transmission and throttle cables connected behind driver control arm. When I move the lever forward or back I can feel the cable move. But no corresponding movement at the engine. Solidly attached at both ends. Diagnosis -- broken cable. Puzzle is action was never rough/strained before failure. Anything else to check before I replace? Troubles: I went to pull the control assembly so I could detach the cables and replace but encountered one very tight nylon nut so the screw is starting to strip (pic2). And a second nut on the back side of the control mount that was installed poorly to one side in the metal bracket so there is no way to get a wrench on the nut (pic 3). I'm thinking I'll have to drill out both screws from the driver side? If anyone has any brighter ideas or similar experience please share before I tear up my nice control center. Can I replace the cables without pulling the arm assembly? I saw the recommendations to table new cables to old and pull thru and to replace both cables at the same time. Thanks in advance for any insights. Pic1 -- good connections for both cables at control arm back side. 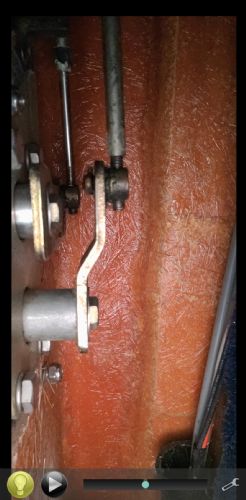 Pic2 -- Upper right -- nearly stripped screw from too-tight nylon lock nut. Lower right -- successfully removed. 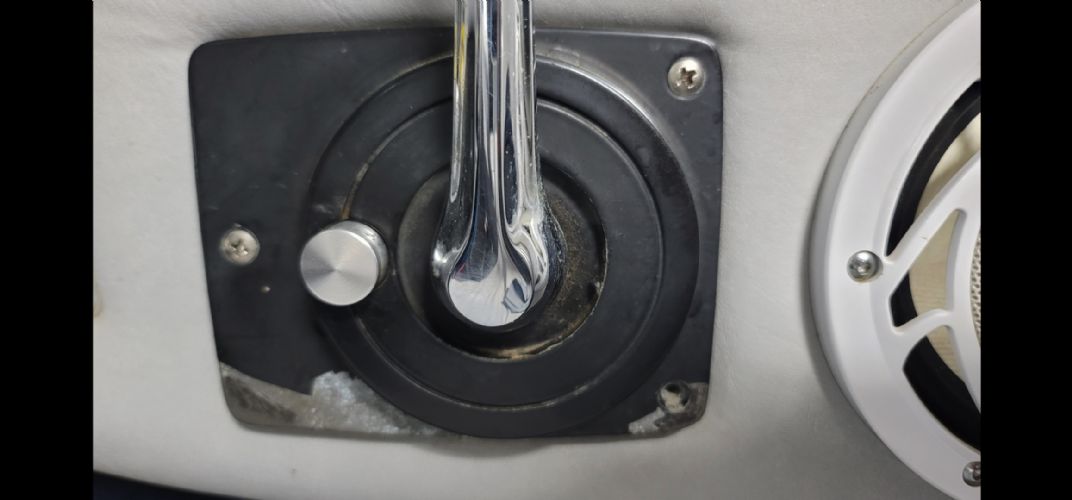 Pic3 -- back side of left most screw in pic2 -- nut inside metal bracket but not centered so no way to get a wrench on it! 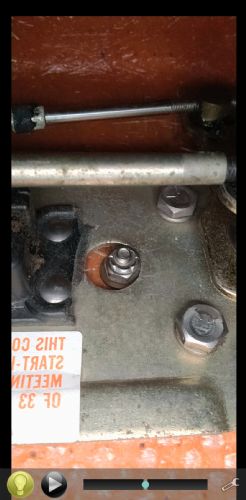 ------------- http://www.correctcraftfan.com/diaries/details.asp?ID=7670&sort=&pagenum=1" rel="nofollow - 88 Ski Nautique |
Replies:
Posted By: KENO
Date Posted: June-25-2024 at 6:53pm
|
Here are a couple pictures of the backside of your Morse controller. First picture shows 6 bolts, 2 holding the shift and throttle arms in place and the other 4 holding the bracket to the rest of the controller. Take all 6 out and you'll be able to lower the bracket and swap your cables while leaving the rest of the unit mounted to the gunnel. Or you can take that last nut off and take the shifter off the gunnel but it's not really necessary. You need to make note of which way those shifter and throttle arms are oriented and how far the brass barrels are threaded on the cable ends so you can thread them onto the new cable the same amount. If there's any wear on the brass barrels, now is a good time to replace them. Adjusting the cables so everything works right can be tough too It's definitely not the easiest job to do, so if you get stuck or confused, ask questions here.
https://ibb.co/3frN3DG" rel="nofollow">  https://ibb.co/sR8RVRH" rel="nofollow">  |
Posted By: ccfan_nc
Date Posted: June-26-2024 at 12:04am
|
Thanks Keno! Great and helpful pictures. I'm very glad I don't need to drill out the last two screws. I'll purchase two cables from NautiqueParts. Do you know the length I need? Apparently they come in a few different ones. ------------- http://www.correctcraftfan.com/diaries/details.asp?ID=7670&sort=&pagenum=1" rel="nofollow - 88 Ski Nautique |
Posted By: KENO
Date Posted: June-26-2024 at 6:59am
|
If you were to search here on CCF, the length most commonly used was 17 ft for both cables on your mid 80's SN. Depending on cable routing that could vary It's easy to look at the numbers on your cables to verify the length though. Here's a picture from an old thread showing the number. The 0204 at the end says it 204 inches (17 ft ) long https://ibb.co/zNzv5Kh" rel="nofollow">  The picture shows the transmission cable routing being from the front of the engine, past the carburetor and going back to the shift lever on the transmission. It also shows the throttle cable (with the numbers) coming from the rear, looping over the transmission to get to the carburetor That's probably how your cables are run. meaning you'd need 17 foot cables for both, but check the numbers to be sure.  |
Posted By: ccfan_nc
Date Posted: June-27-2024 at 12:20am
|
Thanks again Keno. My transmission
cable reads just like the picture above, 204 inches. NautiqueParts says
both throttle and transmission cables are the same length. Cables are
now black instead of red. ------------- http://www.correctcraftfan.com/diaries/details.asp?ID=7670&sort=&pagenum=1" rel="nofollow - 88 Ski Nautique |
Posted By: TRBenj
Date Posted: June-27-2024 at 6:00am
| Short is going to be preferred on the control end- the long will cause interference between the shift and throttle levers. I don’t think the lever on the trans requires the long, that would be the only possible reason to not go short all around. |
Posted By: KENO
Date Posted: June-27-2024 at 7:13am
|
Just to backup what TRB said, here's the first picture you posted in this thread. It shows 2 short ones and they don't have much clearance as the levers move around when you're moving the shifter  So you need 2 short ones for the controller The transmission end can use either but the long one is easier to use on that end. The short one can be real tight getting the cotter pin through on the transmission end So.......you should spend the big bucks for 2 of the short ones And then 1 long cheap one.The ball and socket connector at the carburetor end most likely won't be worn. Why the short ones cost so much more .................who knows? |
Posted By: KENO
Date Posted: June-27-2024 at 7:45am
|
Just to make life easier and save some aggravation later, the quote below from 81nautique tells you how to do the cable adjustment. I added a little extra color to the most important step
|
 81nautique wrote:
Posted By: ccfan_nc
Date Posted: July-20-2024 at 4:21pm
|
Hello Keno and TRBenj, Thanks for these
additional insights. I've been out of town / working like a dog since
my last post but finally ready to order these cables and connectors so
we can get back on the water before my last teen flies the coop! I'll
let you know if I encounter any more problems. But would advise anyone
else trying this job against trying to remove the outside panel on the drive side of the gunnel. ------------- http://www.correctcraftfan.com/diaries/details.asp?ID=7670&sort=&pagenum=1" rel="nofollow - 88 Ski Nautique |
Posted By: ccfan_nc
Date Posted: August-24-2024 at 5:46pm
|
Reapir underway! ------------- http://www.correctcraftfan.com/diaries/details.asp?ID=7670&sort=&pagenum=1" rel="nofollow - 88 Ski Nautique |
Posted By: ccfan_nc
Date Posted: September-09-2024 at 12:53pm
Reporting back that the boat is back and fully functional after the repair!  On Saturday we enjoyed a beautiful early Fall run with my soon to be college student. More planned in the coming weeks before he departs for good. On Saturday we enjoyed a beautiful early Fall run with my soon to be college student. More planned in the coming weeks before he departs for good.We learned a couple of things about how this works and will post soon to finish this off. Sorry it took us some time to get back here. We had the cable repair done and also an intermittent short in the dash associated with the ignition circuit/switch. I had to work on that before we could drive the boat again. Thanks again for all the excellent advice and support. ------------- http://www.correctcraftfan.com/diaries/details.asp?ID=7670&sort=&pagenum=1" rel="nofollow - 88 Ski Nautique |