 Boats For Sale:


Chucky’s 1966 Mustang rebuild |
Post Reply 
|
Page <1 45678 11> |
| Author | ||
Chucky 
Senior Member 
Joined: September-24-2019 Location: Minnesota Status: Offline Points: 153 |
 Post Options Post Options
") Thanks(0) Thanks(0)
 Quote Reply Quote Reply
 Posted: February-21-2020 at 5:31pm Posted: February-21-2020 at 5:31pm |
|
|
I had today off, so I installed the prop strut and the rudder support housing. The bolts on the strut are currently upside down. I needed to do it that way, because I’m working alone. Once the sealer sets up, I will flip and seal the bolts. I now notice the mark on the stringer that locates the clamping block mounting ball stud.
 
|
||
 |
||
|
Riley
Grand Poobah 
Joined: January-19-2004 Location: Portland, ME Status: Offline Points: 7952 |
Post Options
Thanks(1)
Quote Reply
Posted: February-17-2020 at 11:13am |
|
|
This is the same set up as you have.

|
||
|
||
|
67 ski nat
Platinum Member 
Joined: July-19-2018 Location: Santa rosa Status: Offline Points: 1184 |
Post Options
Thanks(1)
Quote Reply
Posted: February-17-2020 at 10:34am |
|
|
The ball is hiding (sandwiched ) under the four bolt and plate. And the shaft is in that mounting block extension
|
||
|
||
|
8122pbrainard
Grand Poobah

Joined: September-14-2006 Location: Three Lakes Wi. Status: Offline Points: 41040 |
Post Options
Thanks(1)
Quote Reply
Posted: February-16-2020 at 6:59pm |
|
|
Not the same era hull but the ball is the attachment for the steering cable torque tube at the aft end.

|
||
|
||
|
KENO
Grand Poobah
Joined: June-06-2004 Location: United States Status: Offline Points: 10726 |
Post Options
Thanks(1)
Quote Reply
Posted: February-16-2020 at 6:54pm |
|
Go to the linked thread, 4th picture down and you'll see it bolted to the drivers side stringer with the clamp block bolted to it And further on down page 1 , you'll see another picture of it. link |
||
|
||
|
Chucky
Senior Member
Joined: September-24-2019 Location: Minnesota Status: Offline Points: 153 |
Post Options
Thanks(0)
Quote Reply
Posted: February-16-2020 at 6:10pm |
|
|
!!!YES!!! You will NOT get that one lock ring off (without destroying it) without pliers similar to what KENO shows above. I should have been more clear on that. On a different note...Could someone please post a picture, or describe really well about where and or how this part is mounted? I know it’s part of the steering system. I know it goes with the clamping block. But, I don’t know what it bolts to??? Remember, I didn’t take this boat apart. Thanks!

|
||
|
||
|
KENO
Grand Poobah
Joined: June-06-2004 Location: United States Status: Offline Points: 10726 |
Post Options
Thanks(0)
Quote Reply
Posted: February-16-2020 at 3:44pm |
|
|
Chucky mentioned a nice set of snap ring pliers and to go along with them a good pair of lock ring pliers come in handy on one particular lock ring.
They make life easier without having to invent any new swear words along the way So.........snap ring pliers for snap rings and lock ring pliers for a lock ring Here's a link to one example, you can spend more or you can spend less link Here's a picture of what the ends look like on a typical pair 
|
||
|
||
|
67 ski nat
Platinum Member
Joined: July-19-2018 Location: Santa rosa Status: Offline Points: 1184 |
Post Options
Thanks(0)
Quote Reply
Posted: February-16-2020 at 1:37pm |
|
|
Thanks for your updates. Feeling better bout tackling mine
|
||
|
||
|
Chucky
Senior Member
Joined: September-24-2019 Location: Minnesota Status: Offline Points: 153 |
Post Options
Thanks(0)
Quote Reply
Posted: February-16-2020 at 12:49pm |
|
|
Rustoleum “Royal Blue”. Looks good to me. Edit to add “before” picture.
 
|
||
|
||
|
Chucky
Senior Member
Joined: September-24-2019 Location: Minnesota Status: Offline Points: 153 |
Post Options
Thanks(0)
Quote Reply
Posted: February-15-2020 at 10:23pm |
|
|
Instead of soaking my clutches in ATF, I just used a small paint brush and brushed on a nice coating of trans fluid to all sides of the bronze clutches. I cleaned the steels with brake parts cleaner / paper towels before brushing them with trans fluid too. They will be just fine and they will get soaked later when I fill and further prep the transmission.
|
||
|
||
|
Chucky
Senior Member
Joined: September-24-2019 Location: Minnesota Status: Offline Points: 153 |
Post Options
Thanks(0)
Quote Reply
Posted: February-15-2020 at 10:15pm |
|
|
I’d say 3-4 sessions of 4 or so hours each. So 12-16 hours max. Of course I could do it quicker, now that I’ve already done it. I think it would be possible to do it in 1 weekend, but I spaced it over 3 weekends. Internally, mine was very clean. I suspect it still worked, but I had no way of knowing. The front seal was worn looking, compared to the new one. I’m glad I decided to rebuild it. The trickiest part for me was rebuilding the forward hydraulic actuator. There’s an internal o-ring and a external flat cut o-ring. After replacing those o-rings, it was difficult to put the 2 pieces of that component back together. They fit very tightly together and the flat cut o-ring nearly got “pinched” every time I tried to put the parts back together. Slow, even pressure and patience was required on that part. The reverse hydraulic actuator assembly (similar o-rings) went back together easily. I’ll admit, I was a bit nervous, but it was actually not bad at all. A nice table, 2 rolls of paper towels, 2 cans of brake parts cleaner, a 1.5” socket, a nice pair of snap ring pliers and some basic hand tools and you should be good to go.
|
||
|
||
|
Faceplant
Senior Member

Joined: July-27-2013 Location: Otter Lake , Mi Status: Offline Points: 406 |
Post Options
Thanks(1)
Quote Reply
Posted: February-15-2020 at 9:08pm |
|
|
Curious to amount of time involved for trans rebuild ?
|
||
|
Feels like I am hanging 10 but in reality - probably hanging 6.
|
||
|
||
|
Chucky
Senior Member
Joined: September-24-2019 Location: Minnesota Status: Offline Points: 153 |
Post Options
Thanks(0)
Quote Reply
Posted: February-15-2020 at 3:57pm |
|
|
My project came with the bellhousing to connect to a 302. If anyone needs a 289 bellhousing, let me know. Primer is drying now...Thanks to KENO for being a good resource. Soon, I’ll be mounting the engine / trans in the boat!

|
||
|
||
|
Chucky
Senior Member
Joined: September-24-2019 Location: Minnesota Status: Offline Points: 153 |
Post Options
Thanks(0)
Quote Reply
Posted: February-15-2020 at 3:50pm |
|
|
I have the 70C trans, so your results may vary. I replaced the fiber reverse clutch with 2 bronze’s (separated by 1 steel). The forward clutch pack and all gaskets and seals are now new. It really wasn’t very difficult to “rebuild”. I never needed a press (maybe you do with a 71C?). But, I can’t stress enough the importance of a proper snap ring pliers.

|
||
|
||
|
KENO
Grand Poobah
Joined: June-06-2004 Location: United States Status: Offline Points: 10726 |
Post Options
Thanks(0)
Quote Reply
Posted: February-09-2020 at 9:00pm |
|
A little addition to this thread is the B/W manual in the link below. It's a later version of what's in the CCF reference section with a few extra pages in the back. One of those pages talks about reverse clutch plate combinations and another has info on the infamous "velvet dipstick" Most people on CCF would be interested in the RED velvet Dipstick link |
||
|
||
|
Chucky
Senior Member
Joined: September-24-2019 Location: Minnesota Status: Offline Points: 153 |
Post Options
Thanks(0)
Quote Reply
Posted: February-09-2020 at 3:31am |
|
|
Too clean, that’s funny. I recently completely “finished” the garage (tape, mud, prime, paint). Last winter, I was knee-deep in the Belair transmission. I had a slight problem with 3rd gear.
 Currently, I’m waiting for a couple of parts to arrive so I can button up the Velvet drive. Currently, I’m waiting for a couple of parts to arrive so I can button up the Velvet drive.
|
||
|
||
|
Kristof
Grand Poobah

Joined: October-08-2007 Location: Bree, Belgium Status: Offline Points: 3391 |
Post Options
Thanks(0)
Quote Reply
Posted: February-04-2020 at 2:49pm |
|

|
||
|
- Gun control means: using BOTH hands!
- Money doesn't make one happy, but when it rains cats and dogs, it's still better to cry in a Porsche than on a bicycle... |
||
|
||
|
KENO
Grand Poobah
Joined: June-06-2004 Location: United States Status: Offline Points: 10726 |
Post Options
Thanks(0)
Quote Reply
Posted: February-02-2020 at 5:47pm |
|
Check out the manual in the link link It's from a little known secret internet spot called the CCF reference section It'll tell you that your 71C has 5 inner clutch plates and 4 outer clutch plates for Forward and it has 1 reverse pressure plate and 1 reverse clutch plate. The reverse clutch plate on some is fiber and on some it's metallic. The fiber break easier and reverse no longer works when that happens The ALTO kit Chucky bought has a metallic plate (that's a good thing) |
||
|
||
|
67 ski nat
Platinum Member
Joined: July-19-2018 Location: Santa rosa Status: Offline Points: 1184 |
Post Options
Thanks(0)
Quote Reply
Posted: February-02-2020 at 4:54pm |
|
|
Yep 10-17 is in the manual I was looking at online, 71c on tag.
|
||
|
||
|
67 ski nat
Platinum Member
Joined: July-19-2018 Location: Santa rosa Status: Offline Points: 1184 |
Post Options
Thanks(0)
Quote Reply
Posted: February-02-2020 at 11:55am |
|
|
Yes good idea,
|
||
|
||
|
KENO
Grand Poobah
Joined: June-06-2004 Location: United States Status: Offline Points: 10726 |
Post Options
Thanks(0)
Quote Reply
Posted: February-02-2020 at 11:36am |
|
I believe that what you believe needs to get looked at again In 1967 the terminology As 10-17 hadn't come about yet. It'll probably say AS1-71C unless a much newer transmission was put in at some time |
||
|
||
|
67 ski nat
Platinum Member
Joined: July-19-2018 Location: Santa rosa Status: Offline Points: 1184 |
Post Options
Thanks(0)
Quote Reply
Posted: February-02-2020 at 10:45am |
|
|
My tag is hard to read but I believe it says 10-17. 71c
I remember talk about extra plates so curious what chunky finds |
||
|
||
|
KENO
Grand Poobah
Joined: June-06-2004 Location: United States Status: Offline Points: 10726 |
Post Options
Thanks(0)
Quote Reply
Posted: February-02-2020 at 9:27am |
|
The kit has enough parts like clutch plates to do a 72C/10-18 transmission so you (and Chucky) will have parts left over. You can try to cram them all in, but you won't succeed even with a big hammer If you post a picture of your ID tag on the transmission, that'll be a good start to figuring out what's inside it before you start tearing into it |
||
|
||
|
67 ski nat
Platinum Member
Joined: July-19-2018 Location: Santa rosa Status: Offline Points: 1184 |
Post Options
Thanks(0)
Quote Reply
Posted: February-01-2020 at 11:55pm |
|
|
Please let me know if all parts are used in kit , number plates and stuff
Looks like a tv sit com garage All props |
||
|
||
|
63 Skier
Grand Poobah

Joined: October-06-2006 Location: Concord, NH Status: Offline Points: 4239 |
Post Options
Thanks(1)
Quote Reply
Posted: February-01-2020 at 4:34pm |
|
|
Your shop is way too clean. I don't trust you ......

|
||
|
'63 American Skier - '98 Sport Nautique
|
||
|
||
|
Chucky
Senior Member
Joined: September-24-2019 Location: Minnesota Status: Offline Points: 153 |
Post Options
Thanks(0)
Quote Reply
Posted: February-01-2020 at 2:48pm |
|
|
Preparing for kit to arrive...

|
||
|
||
|
67 ski nat
Platinum Member
Joined: July-19-2018 Location: Santa rosa Status: Offline Points: 1184 |
Post Options
Thanks(1)
Quote Reply
Posted: January-31-2020 at 10:30am |
|
|
Yep. That is same kit I was going to get, thanks for confirming
|
||
|
||
|
Chucky
Senior Member
Joined: September-24-2019 Location: Minnesota Status: Offline Points: 153 |
Post Options
Thanks(0)
Quote Reply
Posted: January-30-2020 at 10:45pm |
|
|
Although the fluid was clean, I simply don’t know the history. Might as well start at zero.

|
||
|
||
|
81nautique
Grand Poobah

Joined: September-03-2005 Location: Big Rock, Il Status: Offline Points: 5772 |
Post Options
Thanks(1)
Quote Reply
Posted: January-08-2020 at 9:52am |
|
|
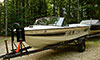
Not factory but it does have a good look. As long as the boat sits down between the fenders it works for me. Great job.
|
||
|
||
|
Kristof
Grand Poobah
Joined: October-08-2007 Location: Bree, Belgium Status: Offline Points: 3391 |
Post Options
Thanks(0)
Quote Reply
Posted: January-08-2020 at 6:27am |
|

|
||
|
- Gun control means: using BOTH hands!
- Money doesn't make one happy, but when it rains cats and dogs, it's still better to cry in a Porsche than on a bicycle... |
||
|
||
|
Post Reply
|
Page <1 45678 11> |
 Tweet
Tweet
|
| Forum Jump | Forum Permissions You cannot post new topics in this forum You cannot reply to topics in this forum You cannot delete your posts in this forum You cannot edit your posts in this forum You cannot create polls in this forum You cannot vote in polls in this forum |


 Topic Options
 Chucky wrote: